Skip to content
DisclaimerTerms Of UseGDPR PolicyCookie Policy

Foodish Talk

  • Home
  • Drinks
  • Appetizers
  • Dinner
  • Dessert
  • About
  • Contact
  • Privacy Policy
DisclaimerTerms Of UseGDPR PolicyCookie Policy

NO-ING-IMG

- 1 lb boneless, skinless chicken breast - 1/4 cup honey - 1/4 cup soy sauce (low sodium preferred) - 2 tablespoons minced garlic - 1 tablespoon grated ginger - 1 tablespoon cornstarch - 1 tablespoon olive oil - Salt and pepper to taste - Sesame seeds for garnish - Chopped green onions for garnish The main ingredients for Air Fryer Honey Garlic Chicken Bites create a sweet and savory dish. I use boneless chicken breast. It cooks quickly and stays juicy. The honey gives a sticky glaze, while the soy sauce adds depth. For the extra flavor, I add minced garlic and grated ginger. Garlic brings a sharp bite, while ginger adds warmth. These two work together to make the chicken pop! Cornstarch is key for a crispy coating. It helps the chicken get that golden crunch in the air fryer. A light brush of olive oil keeps everything from sticking and adds flavor. Finally, I love to garnish with sesame seeds and chopped green onions. They add a fresh touch and a nice crunch. Seasoning with salt and pepper rounds out the taste. These simple but flavorful ingredients turn chicken into a delightful treat that everyone loves. - Mixing the marinade ingredients: Start by grabbing a medium bowl. Combine 1/4 cup honey, 1/4 cup soy sauce, 2 tablespoons minced garlic, and 1 tablespoon grated ginger. Stir until well mixed. The sweet and savory mix will give your chicken great flavor. - Coating the chicken pieces: Cut 1 pound of boneless, skinless chicken breast into bite-sized pieces. Add the chicken to the marinade. Make sure each piece is well coated. This step is key for juicy bites. - Allowing marination time: Let the chicken marinate for 30 minutes. This gives time for the flavors to soak in. If you can, cover the bowl and place it in the fridge. - Preheating the air fryer: Set your air fryer to 360°F (180°C). Preheat it for about 5 minutes. This helps the chicken cook evenly and get crispy. - Preparing the chicken coating with cornstarch: After marinating, take out the chicken from the bowl. Reserve the marinade for later. Toss the chicken pieces with 1 tablespoon of cornstarch. This coating is what makes the chicken crispy when it cooks. - Cooking chicken in the air fryer: Lightly brush or spray the air fryer basket with olive oil. Place the chicken in a single layer. Air fry for 10 to 12 minutes. Shake the basket halfway through. The chicken should be golden brown and reach an internal temperature of 165°F (75°C). - Making the honey garlic sauce: While the chicken cooks, take the reserved marinade and pour it into a small saucepan. Bring it to a boil over medium heat. Once it boils, lower the heat to a simmer for about 5 minutes. This thickens the sauce nicely. - Tossing chicken with sauce and garnishing: After the chicken is done, transfer it to a bowl. Pour the thickened honey garlic sauce over the chicken. Toss it well to coat all the pieces. For a touch of color and crunch, garnish with sesame seeds and chopped green onions. Enjoy your flavorful treat! To get that perfect crispy texture, use cornstarch. Cornstarch creates a light, crunchy crust when cooked. Just toss your marinated chicken pieces in cornstarch before air frying. This simple step makes a big difference. Avoid overcrowding in the air fryer. If you stack chicken pieces too close, they won’t cook evenly. Cook in batches if needed. This way, every piece gets the hot air it needs to become crispy and golden brown. You can boost the flavor of the marinade by adding spices. Try a pinch of red pepper flakes for heat or some smoked paprika for a deep, rich taste. These small changes can transform your dish. For dipping sauces, consider serving with sweet chili sauce or a tangy soy sauce mix. These sauces will add extra flavor and make your chicken bites even more enjoyable. Pair your honey garlic chicken bites with sides like steamed rice or a fresh salad. The rice soaks up the sauce, while the salad adds a nice crunch. This balance makes for a well-rounded meal. Presentation matters! Serve the chicken bites in an elegant bowl or on a large platter. Garnish with sesame seeds and chopped green onions for color and style. This makes your dish look as good as it tastes! {{image_2}} You can switch up the chicken for other proteins. Shrimp works great in this dish. Just use fresh shrimp and follow the same steps. Tofu is another tasty choice. Use firm tofu for the best texture. Cut it into bite-sized cubes, and marinate just like the chicken. If you need a gluten-free option, choose a gluten-free soy sauce. There are many brands available that taste great. You can also check other ingredients for gluten. Make sure your honey and cornstarch are free from gluten too. Use these swaps, and you can enjoy the dish worry-free. Want more flavor? Try adding citrus. A splash of lime or lemon juice can brighten the dish. Just mix it into the marinade. If you like heat, add chili flakes or fresh chopped chili. This will give your chicken a spicy kick. Adjust the amount to match your taste. To keep your honey garlic chicken bites fresh, place them in an airtight container. Make sure to let them cool down first. Storing them in the fridge is best. They should stay good for about 3 to 4 days. Always label your container with the date. This way, you won’t forget when you made them! To reheat your chicken bites, use the air fryer for best results. Preheat the air fryer to 350°F (175°C). Place the chicken in a single layer. Heat for about 5 to 7 minutes. This method keeps them crispy. If you don’t have an air fryer, use the oven instead. Bake them at 350°F (175°C) for about 10 minutes. You can freeze your chicken bites for later! To do this, let them cool completely. Place them in a freezer-safe bag or container. Squeeze out as much air as possible before sealing. They can last for about 2 to 3 months in the freezer. When you're ready to eat, thaw them in the fridge overnight. Reheat them in the air fryer for that crispy goodness! The ideal time for marinating chicken is 30 minutes. This short time works well to soak in the flavors of honey, soy sauce, garlic, and ginger. You can leave it longer for a deeper taste, but 30 minutes gives great results. Yes, you can use frozen chicken, but it’s best to thaw it first. Thawing ensures even cooking and helps the marinade stick better. If you use frozen chicken, marinate after thawing for that tasty honey garlic flavor to soak in. Set your air fryer to 360°F (180°C). This temperature cooks the chicken bites evenly. It helps them get golden brown and crispy while keeping them juicy inside. Always check the chicken's internal temperature. It should reach 165°F (75°C) for safe eating. In this blog post, we explored a tasty honey garlic chicken recipe. We covered key ingredients, marinating steps, and air frying tips. You learned how to achieve crispy chicken, enhance flavors, and store leftovers effectively. Final thoughts: Enjoy customizing this dish with your favorite proteins or flavors. Keep this simple recipe handy for a quick and delicious meal any time!

Air Fryer Honey Garlic Chicken Bites Flavorful Treat

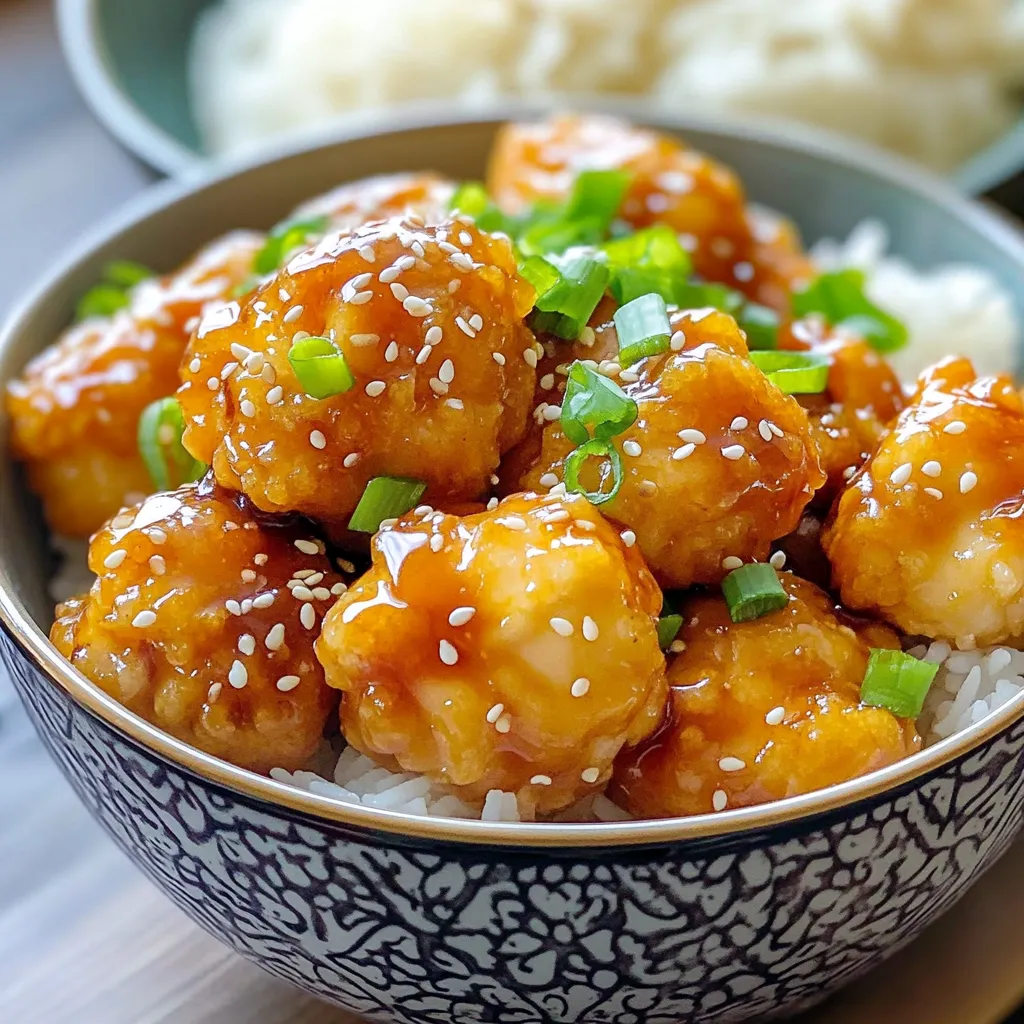
If you crave a quick and tasty dish, try my Air Fryer Honey Garlic Chicken Bites. This simple recipe combines

- 2 cups all-purpose flour - 1/4 cup granulated sugar - 1 packet (2 1/4 teaspoons) instant yeast - 1/2 teaspoon salt - 1/2 cup warm milk (about 110°F) - 1/4 cup unsalted butter, melted - 1 large egg - 1 tablespoon ground cinnamon - 1/4 cup brown sugar - Extra butter for brushing - Optional: powdered sugar for dusting When making this cinnamon sugar pull-apart bread, you need simple ingredients. The main players are flour, sugar, yeast, and salt. These form the base of your dough. The wet ingredients include warm milk, melted butter, and an egg. The warmth helps the yeast work its magic. For the cinnamon sugar mixture, combine cinnamon and brown sugar. This blend gives the bread its sweet, spicy flavor. You can brush the dough with extra melted butter for added richness. If you like, sprinkle powdered sugar on top for a lovely finish. This recipe is easy and fun. The ingredients are common and often found in your kitchen. Each part plays a key role in creating a soft, tasty bread. Enjoy the process of mixing and baking! 1. Combine dry ingredients: In a big bowl, mix 2 cups of all-purpose flour, 1/4 cup of granulated sugar, 2 1/4 teaspoons of instant yeast, and 1/2 teaspoon of salt. Whisk them together until blended. 2. Mix wet ingredients until smooth: In another bowl, stir together 1/2 cup of warm milk, 1/4 cup of melted butter, and 1 large egg. Keep mixing until the mixture is smooth. 3. Combine wet and dry ingredients to form dough: Slowly add the wet mix to the dry mix. Stir with a spoon until a dough starts to form. 1. Knead the dough: Place the dough on a floured surface. Knead it for 5-7 minutes until it feels smooth and elastic. 2. Let dough rise in a warm place: Put the kneaded dough in a greased bowl. Cover it with a clean towel. Let it rise in a warm spot for about 1 hour, or until it doubles in size. 1. Prepare the cinnamon sugar mixture: In a small bowl, mix 1 tablespoon of ground cinnamon with 1/4 cup of brown sugar. Set it aside for later. 2. Roll out and brush dough: Once the dough has risen, punch it down. Roll it into a rectangle about 1/2 inch thick. Brush the top with some melted butter. 3. Stack, cut, and place in the loaf pan: Evenly sprinkle the cinnamon sugar over the dough. Cut it into strips that are about 2 inches wide. Stack the strips on top of each other, then slice them down the middle. Place the two stacks vertically in a greased loaf pan. 1. Let the dough rise again: Cover the loaf pan and let the dough rise for another 30 minutes. 2. Preheat oven: While the dough rises, preheat your oven to 350°F (175°C). 3. Baking time and doneness check: Bake the bread for 25-30 minutes. The top should be golden brown. You can check if it's done by inserting a toothpick; it should come out clean. How to check dough elasticity? To check your dough's elasticity, stretch it gently. If it forms a thin sheet without tearing, it’s ready. This means the gluten developed well during kneading. Tips for a successful rise: 1. Use warm milk around 110°F for the yeast to activate well. 2. Place the dough in a warm spot, like an oven turned off but light on. 3. Cover the bowl with a clean towel to keep moisture in. Alternative spices to add: For a twist, try adding nutmeg or cardamom. These spices blend well with cinnamon and add nice depth. Suggestions for fillings or toppings: You can fill your dough with chocolate chips or nuts. For toppings, consider a drizzle of icing or a sprinkle of chopped pecans. Serving suggestions: Serve slices warm with a side of fruit or a scoop of ice cream. This makes your treat even more special. How to dust with powdered sugar: Use a fine sieve to sprinkle powdered sugar evenly over the top. This adds a lovely touch without clumping. {{image_2}} You can make this bread even more fun! Try adding nuts or chocolate chips. Chopped walnuts or pecans give a nice crunch. Dark chocolate chips add a sweet touch that pairs well with cinnamon. You can also try fruit fillings. Sliced apples or berries work great. Spread a layer of fruit before adding the cinnamon sugar. This will give your bread a fruity twist that everyone will love. If you need gluten-free options, use gluten-free flour. It works well in this recipe. Just ensure your other ingredients are also gluten-free. For a vegan version, swap the egg for flaxseed meal. Use melted coconut oil instead of butter. Plant-based milk can replace regular milk easily. You can still enjoy this bread without eggs or dairy. You can change the flavors for different seasons. During the holidays, add nutmeg or cloves for a warm spice. These spices bring out a festive taste. In fall, try using pumpkin spice instead of cinnamon. It gives the bread a cozy autumn feel. You can even top it with a maple glaze for that sweet finish. To keep your cinnamon sugar pull-apart bread fresh, wrap it well. Use plastic wrap or aluminum foil. Store it at room temperature. This keeps moisture in and helps maintain softness. If you have an airtight container, use that too. It helps keep the bread from drying out. For long-term storage, you can freeze the bread. Wait until it cools completely. Wrap it tightly in plastic wrap. Then, place it in a freezer bag. This way, it stays fresh for up to three months. When you want to enjoy it again, remove it from the freezer. Thaw it overnight in the fridge. Reheat in the oven at 350°F for about 10 minutes. Homemade cinnamon sugar pull-apart bread lasts about three to four days at room temperature. After that, it starts to lose its great taste. Look for signs of spoilage, like mold or a dry texture. If the bread feels hard or crumbly, it’s time to toss it. Enjoy your bread while it’s fresh for the best taste! You can use active dry yeast instead of instant yeast. To do this, use a 1:1 ratio. However, you must activate it before mixing it into your dough. To activate, combine the yeast with warm water and a bit of sugar. Let it sit for about 5 to 10 minutes until it bubbles. This shows that the yeast is alive and ready to use. To check if your bread is done, use a toothpick. Insert it into the center of the bread. If it comes out clean, your bread is ready. You can also look for a golden-brown crust. The bread should sound hollow when tapped on the bottom. Yes, you can prepare this bread in advance. You can make the dough and let it rise. After the first rise, cover it and place it in the fridge. It can stay there for up to 24 hours. When ready to bake, take it out, let it warm up, and shape it before the second rise. This makes it easy to enjoy fresh bread whenever you want. You now know the key steps to make delicious pull-apart bread. You’ve learned about the important ingredients, how to prepare the dough, and ways to store it. We covered tips for flavor and variations to suit your taste. Remember, practice makes perfect. Your baking skills will improve over time. Enjoy sharing your tasty bread with family and friends. Get started today, and make this treat your own!

Cinnamon Sugar Pull-Apart Bread Irresistibly Soft Treat

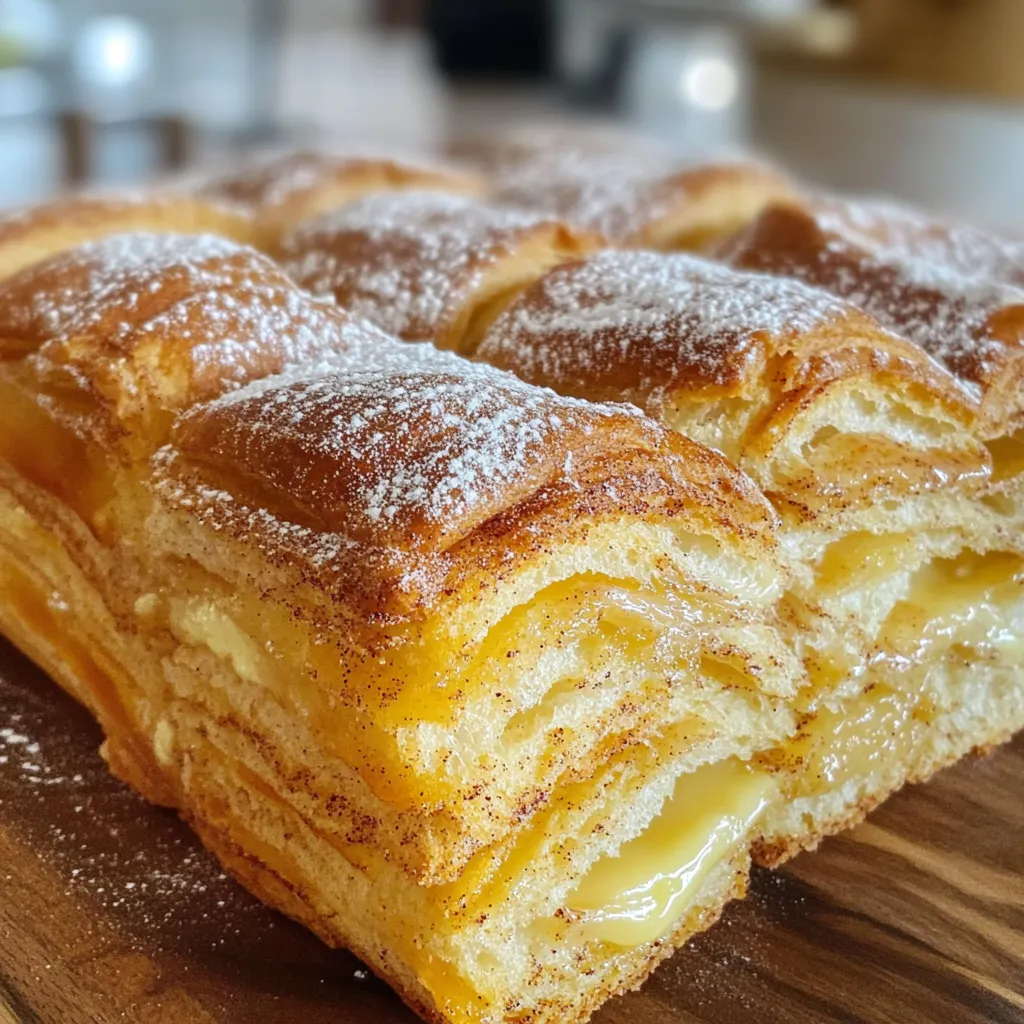
Craving something warm, soft, and sweet? You’ll love this Cinnamon Sugar Pull-Apart Bread! It features layers of fluffy dough wrapped

To make No-Bake Peanut Butter Pumpkin Bites, you need some key ingredients. Here’s a simple list: - 1 cup pumpkin puree - 1/2 cup natural peanut butter - 1/3 cup honey or maple syrup - 1 cup rolled oats - 1/2 cup ground flaxseed - 1 tsp vanilla extract - 1/2 tsp pumpkin pie spice - A pinch of salt - 1/2 cup dark chocolate chips (optional for drizzling) These ingredients blend together to create a tasty snack. The pumpkin adds moisture and flavor. The peanut butter gives the bites creaminess. The oats and flaxseed provide nice texture and nutrients. You can customize your bites with a few optional add-ins. Try adding: - Chopped nuts for crunch - Dried fruit for sweetness - Coconut flakes for flavor - Protein powder for an extra boost If you need substitutes, here are some ideas: - Use almond butter instead of peanut butter for a nut-free option. - Swap honey for agave syrup if you prefer. - Use quick oats if you don’t have rolled oats. These changes can help match your taste and dietary needs. Let’s dive into the nutritional benefits of each main ingredient: - Pumpkin puree: High in fiber and vitamins A and C. It supports eye health and boosts your immune system. - Natural peanut butter: Packed with protein and healthy fats. It helps keep you full and satisfied. - Honey or maple syrup: Adds natural sweetness. Both have antioxidants that can help your body. - Rolled oats: Great source of fiber. They aid in digestion and provide lasting energy. - Ground flaxseed: Rich in omega-3 fatty acids. It helps reduce inflammation and supports heart health. - Vanilla extract: Adds flavor and may have antioxidant properties. - Pumpkin pie spice: Contains cinnamon and nutmeg, both of which can help with digestion. - Dark chocolate chips (optional): Provide antioxidants and can improve heart health. These ingredients are not only tasty but also good for you. Enjoy making your No-Bake Peanut Butter Pumpkin Bites! To make no-bake peanut butter pumpkin bites, gather your ingredients first. You need pumpkin puree, peanut butter, honey or maple syrup, rolled oats, ground flaxseed, vanilla extract, pumpkin pie spice, salt, and dark chocolate chips. This recipe is simple and quick. You will have tasty snacks in just 15 minutes of prep time. Start by mixing the pumpkin puree, peanut butter, and honey (or maple syrup) in a large bowl. Use a spoon or spatula to stir until the mixture is smooth. Next, add the rolled oats, ground flaxseed, vanilla extract, pumpkin pie spice, and salt. Mix all the ingredients well until they are fully combined. The mixture will be thick and sticky, which is perfect for rolling into bites. Now it's time to form the bites. Take about one tablespoon of the mixture and roll it into a ball using your hands. Place each ball on a parchment-lined baking sheet. If you want to add a chocolate drizzle, melt the dark chocolate chips in a microwave-safe bowl. Heat them in 30-second intervals, stirring until smooth. Drizzle the melted chocolate over the bites. Finally, put the baking sheet in the refrigerator for at least 30 minutes. This helps the bites firm up and makes them easier to eat. To make your peanut butter pumpkin bites extra tasty, focus on your mixing. Start with room temperature peanut butter. This helps it blend smoothly with the pumpkin puree and honey. Use fresh pumpkin puree for the best flavor. If you want a richer taste, add more pumpkin pie spice. Adjust the amount to suit your liking! Don't skip the salt; it enhances the sweet flavors. Lastly, use a cookie scoop to get even-sized bites. This makes them look uniform and more appealing. Keep your bites fresh by storing them in an airtight container. Place parchment paper between layers to prevent sticking. They can last up to a week in the fridge. For longer storage, freeze them in a single layer, then transfer to a freezer-safe bag. They stay good for up to three months. Just remember to thaw them in the fridge before enjoying! Serve your no-bake peanut butter pumpkin bites on a fun platter. You can also layer them in a mason jar for a cute presentation. For an extra touch, sprinkle some pumpkin pie spice on top. Pair these bites with a glass of milk or a warm drink for a cozy snack. They also make a great treat for parties or as a lunchbox surprise! {{image_2}} You can change these bites to fit your taste. Try adding chopped nuts, like almonds or walnuts. Dried fruit, like cranberries or raisins, also works well. You could even add a scoop of protein powder for an extra boost. Get creative! If you want to switch up the sweetener, there are great options. Try agave syrup if you want a lighter taste. Coconut sugar offers a rich flavor. You can even use stevia or monk fruit for a low-calorie choice. This recipe is easy to adapt for special diets. For a gluten-free version, use certified gluten-free oats. To make it vegan, swap honey for maple syrup. These simple changes keep the bites delicious for everyone! Store your no-bake peanut butter pumpkin bites in an airtight container. This keeps them fresh and tasty. I recommend placing parchment paper between layers. This prevents them from sticking together. Always put them in the fridge right after they firm up. They taste best when chilled. If you want to save some bites for later, freezing is easy. Place the bites in a single layer on a baking sheet. Freeze them for about 30 minutes. Once firm, transfer them to an airtight container. You can also use freezer bags. Just remember to remove extra air from the bags. In the fridge, these bites last for about one week. If you freeze them, they can last for up to three months. Just thaw them in the fridge before eating. This way, they stay soft and delicious. Yes, you can use any nut butter you like. Almond butter, cashew butter, or sunflower seed butter work well too. Just remember, each nut butter has its own taste. This can change the flavor of your bites. Try different ones to see what you enjoy most! To make these bites vegan, swap honey for maple syrup. This keeps the recipe plant-based. All other ingredients are already vegan. You can enjoy these tasty treats without any animal products. These bites are great on their own or with fruit. Try serving them with apple slices or banana. They also pair well with a glass of almond milk or coconut milk. This makes for a fun snack time! Yes, these bites are healthy! They have good fats from peanut butter and flaxseed. Pumpkin adds fiber and vitamins. Oats provide energy and keep you full. They make a balanced snack for both kids and adults. Absolutely! If you want a simpler snack, skip the chocolate. The bites taste great without it. You can also roll them in coconut or nuts for a fun twist. In this blog post, we explored how to make no-bake peanut butter pumpkin bites. We covered key ingredients, their benefits, and step-by-step instructions to create them. Tips and tricks helped you perfect the bites, while storage advice ensures freshness. Finally, variations let you customize them to fit your needs. These bites are easy, fun, and healthy. Enjoy making and sharing them with friends and family!

No-Bake Peanut Butter Pumpkin Bites Tasty and Easy Snack

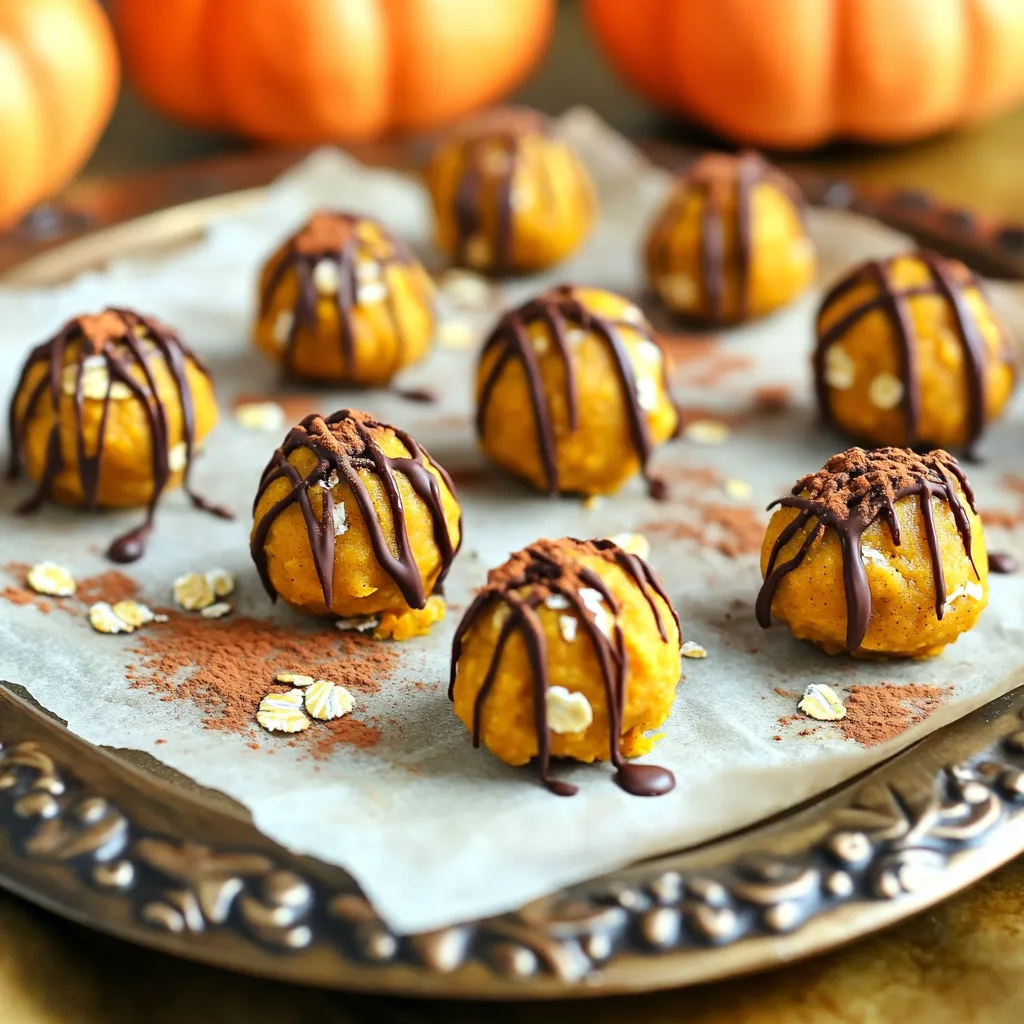
Looking for a quick and tasty snack? No-Bake Peanut Butter Pumpkin Bites are your answer! These easy treats combine creamy

- 1 lb (450g) large shrimp, peeled and deveined - 1 cup long-grain or jasmine rice - 2 tablespoons Cajun seasoning - 1 medium onion, finely chopped - 1 bell pepper (red or green), diced - 2 cloves garlic, minced - 1 can (14.5 oz) diced tomatoes, undrained - 2 cups chicken broth - 1 cup frozen peas - 2 tablespoons olive oil - 1 teaspoon dried thyme - Salt and pepper, to taste - Fresh parsley, chopped (for garnish) You can boost the flavor of your One-Pot Cajun Shrimp and Rice Skillet with a few extras. Consider adding: - A squeeze of fresh lemon juice for brightness. - Hot sauce for extra heat and zing. - Sliced green onions for a fresh crunch. - Smoked sausage for a heartier dish. If you don’t have some ingredients on hand, don’t worry! Here are some easy swaps: - Use brown rice instead of white rice; it may take longer to cook. - Swap shrimp for chicken or tofu for a different protein. - Use vegetable broth instead of chicken broth for a vegetarian option. - If you can’t find Cajun seasoning, mix paprika, garlic powder, and black pepper instead. These simple changes can help you create a dish that fits your needs and taste. To start, gather your ingredients. You need: - 1 lb large shrimp, peeled and deveined - 1 cup long-grain or jasmine rice - 2 tablespoons Cajun seasoning - 1 medium onion, finely chopped - 1 bell pepper, diced - 2 cloves garlic, minced - 1 can diced tomatoes, undrained - 2 cups chicken broth - 1 cup frozen peas - 2 tablespoons olive oil - 1 teaspoon dried thyme - Salt and pepper to taste - Fresh parsley for garnish Next, chop the onion and bell pepper. Mince the garlic. Having these ready makes cooking easier. Heat olive oil in a large skillet over medium heat. Add the onion and bell pepper. Cook until they soften, about 5 minutes. Stir in minced garlic and Cajun seasoning. Cook for one more minute. This step builds your flavor base. Now, add the rice to the skillet. Stir it well to coat with oil and spices. Toast the rice for about 2 minutes. This method adds depth to the rice's flavor. Next, pour in the diced tomatoes and chicken broth. Mix well, then bring to a boil. Once boiling, reduce the heat to low. Cover the skillet and let it simmer for 15 minutes. The rice should absorb most of the liquid and become tender. After the rice cooks, gently fold in the shrimp and frozen peas. Cover and cook for another 5-7 minutes. The shrimp will turn pink when done. Once cooked, season with salt and pepper to taste. Remove from heat and let it rest for 5 minutes. This resting time helps the flavors meld together. Before serving, garnish with fresh parsley. This adds color and a fresh taste. Enjoy your flavorful one-pot Cajun shrimp and rice! To make the best One-Pot Cajun Shrimp and Rice, follow these steps. First, use fresh shrimp for great flavor. If you can't find fresh, frozen shrimp works too. Just ensure they are fully thawed. Next, toast the rice well. This step adds a nice nutty flavor. Stir it often to prevent burning. The timing is key. Cook the rice until it absorbs most of the broth. This keeps it from being soggy. Finally, let it sit for a few minutes after cooking. This helps the flavors blend. Avoid overcooking the shrimp. They only need about five to seven minutes. Overcooked shrimp become rubbery. Also, don’t skip the seasoning. Cajun seasoning gives this dish its signature kick. Measure it out carefully. Another mistake is not tasting before serving. Always taste and adjust salt and pepper. This ensures the dish is flavorful. Lastly, don’t rush the simmering time. This step is vital for perfect rice. You can enhance flavors with simple tweaks. Adding a splash of lemon juice brightens the dish. Fresh herbs, like cilantro or basil, can also add depth. If you like heat, toss in some diced jalapeños. For a smoky flavor, try adding smoked paprika. A tablespoon or two can make a big difference. You could also add a dash of hot sauce for extra spice. Experiment with your favorite ingredients. Cooking is about fun and creativity. Enjoy the process and make it your own! {{image_2}} You can swap shrimp for other proteins. Chicken works well in this dish. Use about 1 pound of diced chicken breast. Cook it until brown before adding the rice. For a seafood twist, try scallops or fish fillets. Just ensure they cook through in the same time as shrimp. If you want a meat-free meal, leave out the shrimp. Add more vegetables instead. Zucchini, mushrooms, or spinach add great taste and texture. You can also use firm tofu for protein. Make sure to press and cube it before adding to the skillet. Feel free to adjust the Cajun seasoning. If you like more heat, add cayenne pepper. For a milder flavor, cut back on the seasoning. Adding a splash of lemon juice can brighten the dish, too. Fresh herbs like thyme or oregano enhance the taste, so don't be shy to mix them in! To store your leftover Cajun shrimp and rice, let it cool first. Place it in an airtight container. You can keep it in the fridge for up to three days. This keeps the dish fresh and tasty. When you are ready to eat the leftovers, you can reheat them on the stove. Add a splash of chicken broth or water to keep it moist. Heat it over medium heat, stirring often. You can also use the microwave. Place it in a microwave-safe dish, cover it, and heat in short bursts. Stir between each burst to ensure even heating. If you want to freeze Cajun shrimp and rice, let it cool completely. Use freezer-safe bags or containers. Label them with the date. You can freeze it for up to three months. When you are ready to eat it, thaw it in the fridge overnight. Then, reheat as mentioned above. This makes for a quick and easy meal later! Cooking Cajun shrimp and rice takes about 35 minutes total. This time includes 10 minutes for prep and 25 minutes for cooking. Once you start, the shrimp and rice come together quickly. You sauté the veggies first, then add the rice and broth. After simmering, the shrimp cooks in just a few minutes. Yes, you can make this dish ahead of time! You can cook it completely and store it in the fridge. Just let it cool down before you put it away. When you’re ready to eat, reheat it on the stove. Add a splash of broth to keep it moist. This dish holds its flavor well, making it perfect for meal prep. Cajun shrimp and rice pairs well with many sides. Here are some great options: - Garlic bread: It soaks up the flavors. - Green salad: A fresh salad adds crunch. - Coleslaw: The creaminess balances the spice. - Corn on the cob: Sweet corn complements the dish. Feel free to mix and match sides to suit your taste! This blog post covered the key ingredients and steps for making Cajun shrimp and rice. I shared tips to avoid common mistakes and shared flavor variations. You can store leftovers easily and even freeze them for later. In conclusion, you have the tools to cook a tasty dish. Enjoy exploring different flavors and making it your own. Happy cooking!

One-Pot Cajun Shrimp and Rice Skillet Flavor Boost

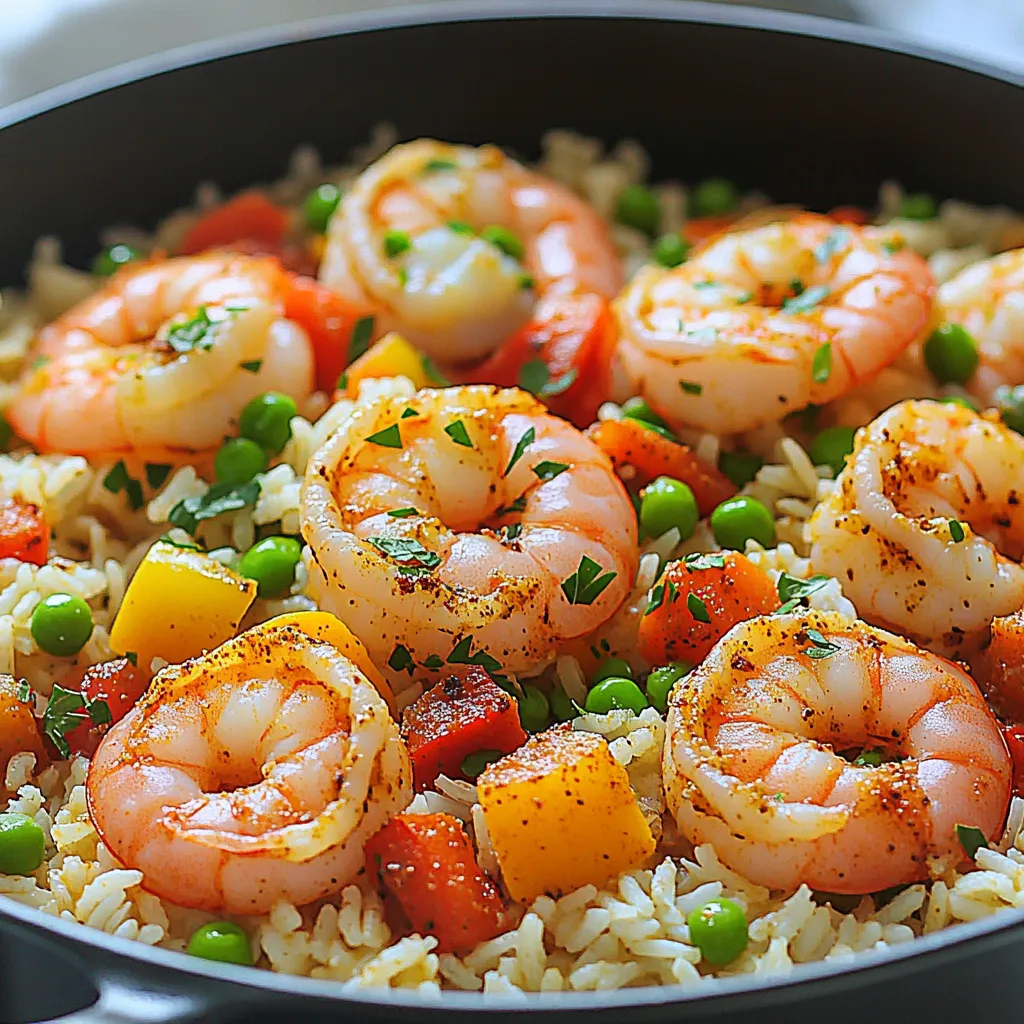
Are you ready to spice up your dinner routine? My One-Pot Cajun Shrimp and Rice Skillet is packed with bold

- 1 pound baby carrots (or regular carrots cut into sticks) - 3 tablespoons pure maple syrup - 2 tablespoons unsalted butter - 1 teaspoon cinnamon - Salt and pepper to taste - 1/2 cup walnuts, chopped - Fresh parsley for garnish (optional) The ingredients for maple glazed carrots are simple yet delightful. First, you need one pound of baby carrots. If you can’t find baby carrots, you can use regular ones. Just cut them into even sticks. Next, grab three tablespoons of pure maple syrup. This syrup adds a sweet touch to the dish. You will also need two tablespoons of unsalted butter. The butter helps in sautéing the carrots and gives them a rich flavor. Then, we have one teaspoon of cinnamon. This spice adds warmth and depth to the glaze. Don't forget to season with salt and pepper to taste. A little seasoning goes a long way in bringing out the flavors. For crunch, you will need half a cup of chopped walnuts. Toasting them adds a nutty flavor that pairs well with the sweet glaze. Lastly, consider using fresh parsley for garnish. It adds a pop of color and freshness to your dish. Gather these ingredients, and you are ready to create a tasty side that everyone will love! To prepare the carrots, you can use baby carrots or regular ones. For baby carrots, just rinse them under cold water. If you choose regular carrots, peel them first. Then, cut them into sticks. Aim for pieces that are about the same size. This helps them cook evenly. A sharp knife makes cutting easier and safer. To toast the walnuts, grab a dry skillet. Place it over medium heat. Add the chopped walnuts to the skillet. Stir them often for about 3 to 5 minutes. Watch for them to turn golden brown and smell nutty. Toasting enhances their flavor. Once they look ready, take them off the heat and set them aside. Now it’s time to cook the carrots. In a large skillet, melt the butter over medium heat. Add the carrots and sauté them for about 5 to 7 minutes. They should start to soften. When they are tender, it's time to glaze them. Drizzle the maple syrup over the carrots. Sprinkle in the cinnamon, salt, and pepper. Stir gently to coat all the carrots in the glaze. Let the carrots simmer in the maple glaze for another 5 minutes. This helps them absorb all that sweet flavor. Once they are fully tender, remove them from the heat. Add the toasted walnuts and stir gently to combine. For a nice touch, transfer the glazed carrots to a serving dish. If you want, garnish with fresh parsley for extra color and taste. To perfect the maple glaze, adjust the sweetness to your taste. If you want it sweeter, add more maple syrup, one tablespoon at a time. If it's too sweet, add a pinch of salt to balance it. Timing is key for tender carrots. Cook them until they are just soft, about 5 to 7 minutes. Then, simmer them in the glaze for another 5 minutes to absorb the flavors fully. You can enhance the flavor with spices. Try adding a pinch of nutmeg or some ginger for a warm kick. If you want a savory note, add garlic powder or thyme. These spices can make your dish stand out. For pairing, maple glazed carrots go well with roasted chicken or grilled fish. They add a nice sweet touch to your meal. If you need an alternative sweetener, try honey or agave syrup. These options work well and can fit different diets. For those with nut allergies, you can skip the walnuts or replace them with seeds like pumpkin or sunflower seeds. They add a nice crunch without the risk of allergens. {{image_2}} You can swap baby carrots for other root veggies. Think parsnips, sweet potatoes, or turnips. These add their own great taste while keeping the dish healthy. In winter, use hearty root veggies. In summer, try zucchini and corn for a fresh twist. Seasonal veggies make your dish vibrant and fun. Want to add a new flavor? Try adding fresh herbs like thyme or rosemary. These herbs can make the dish smell amazing. You can also play with nuts. Pecans or almonds give a different crunch and taste. Just toast them like you do with walnuts for the best flavor. How you serve the dish can change the whole vibe. Serve warm for a cozy meal, or chill it for a cool salad. For extra flair, sprinkle fresh parsley on top. You can also use a colorful plate to make the dish pop. A little creativity goes a long way in making food look great! To keep your maple glazed carrots fresh, store them in an airtight container. Place the container in the fridge. This method helps preserve the flavor and texture. The dish stays fresh for about 3 to 5 days. If you notice any change in smell or color, it’s time to toss them. To reheat your carrots, use a skillet over low heat. This method helps maintain their texture. Stir gently to heat them evenly. If you stored walnuts with the carrots, heat them separately in a dry skillet. This way, they stay crunchy and flavorful. Yes, you can freeze maple glazed carrots! To freeze, place the cooled carrots in a freezer-safe bag. Remove as much air as possible before sealing. When ready to eat, thaw them in the fridge overnight. Reheat in a skillet for the best taste and texture. Make sure to avoid freezing the walnuts, as they can lose their crunch. I prefer using baby carrots for their sweet taste and tender texture. They cook quickly and need little prep. Regular carrots are a good choice too. If you use them, just peel and cut them into sticks. Both types offer a lovely flavor but differ in size and texture. Baby carrots are sweeter, while regular ones have a more robust taste. Yes, you can prepare these carrots ahead of time. Cook the carrots and glaze them, then cool and store in the fridge. When ready to serve, simply reheat them on low heat. This allows the flavors to meld, enhancing the dish. For the best taste, eat them within three days. This dish is not vegan due to the butter. You can make it vegan by swapping the butter with coconut oil or olive oil. These oils add flavor and maintain the dish's texture. Also, ensure your maple syrup is pure and vegan-friendly. To add some heat, consider adding a pinch of cayenne pepper or red pepper flakes. Stir these in when glazing the carrots. You could also try adding fresh ginger for a warm spice. Adjust the amount to your taste for the perfect kick! Maple glazed carrots offer a sweet, savory dish perfect for any meal. From prepping the ingredients to crafting the glaze, each step enhances flavor. Exploring variations lets you customize to your taste. Whether you switch veggies or try spices, there is a twist for everyone. Lastly, storing and reheating properly keeps your dish tasty. Dive into this recipe, and enjoy your cooking adventure!

Maple Glazed Carrots with Toasted Walnuts Delight

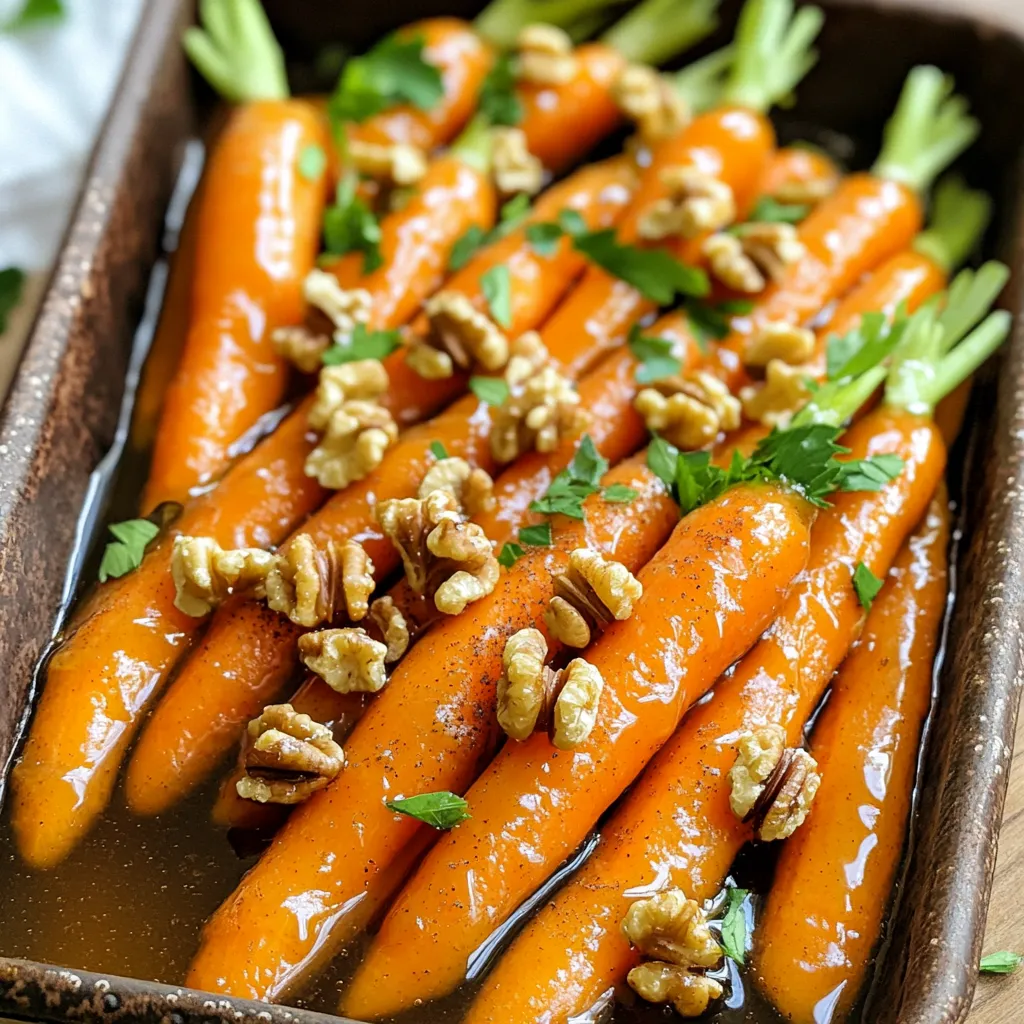
If you want a side dish that shines, try my Maple Glazed Carrots with Toasted Walnuts. This easy recipe combines

- 1 cup freshly brewed coffee, cooled - 1/2 cup milk (or non-dairy alternative) - 1/4 cup pumpkin puree - 2 tablespoons maple syrup - 1 teaspoon vanilla extract - 1/2 teaspoon pumpkin pie spice - Additional sweeteners and flavorings - Dairy-free options - Blender - Glass for serving - Coffee maker To make the Pumpkin Cream Cold Foam Iced Coffee, you'll need simple ingredients. Start with one cup of freshly brewed coffee. Make sure it’s cooled down to room temperature. If you want, brew it the night before and chill it in the fridge. Next, grab half a cup of milk. You can choose regular milk or a non-dairy alternative like almond or oat milk. This choice changes the flavor, so try both! You will also need a quarter cup of pumpkin puree. This gives that rich pumpkin taste. Then, add two tablespoons of maple syrup for sweetness. You may adjust this to your taste. Don't forget one teaspoon of vanilla extract. This adds a nice base flavor. Lastly, use half a teaspoon of pumpkin pie spice. This spice mix brings all the flavors together. For some fun, you can add more sweeteners if you like. Also, feel free to use dairy-free options to suit your needs. Gather your tools! You need a blender to mix everything smoothly. A glass for serving is important too. Finally, make sure you have a coffee maker to brew that perfect cup of coffee. Brew your coffee and let it cool. I like to brew it fresh and then let it sit for about 10 minutes. You can also brew it the night before. Just place it in the fridge. This way, it’s ready to go in the morning. If you want a different method, try using a French press. It gives a rich flavor that pairs well with pumpkin. In a blender, mix these ingredients: - 1/2 cup milk (or non-dairy alternative) - 1/4 cup pumpkin puree - 2 tablespoons maple syrup - 1 teaspoon vanilla extract - 1/2 teaspoon pumpkin pie spice Blend on high until smooth and creamy. This step is key for the right texture. For extra creaminess, use whole milk or cream. If you want it vegan, almond or oat milk works great. Grab a glass and fill it with ice cubes. Pour your cooled coffee over the ice, filling it about three-quarters full. Then, carefully pour the pumpkin cream on top. This creates a lovely layered look. If you stir it, the colors mix, but I love the look of the layers. Finally, sprinkle a pinch of pumpkin pie spice on top for extra flair. Now, you have a stunning Pumpkin Cream Cold Foam Iced Coffee! You can easily change the sweetness of your drink. Start with the maple syrup. Add more if you like it sweeter. You can also try honey or agave syrup for a different flavor. For flavor variations, you can mix in spices. Try adding cinnamon or nutmeg to your pumpkin cream. A dash of cocoa powder can also add a nice twist. If you want to use a milk alternative, consider almond milk or oat milk. Each type of milk gives a unique taste. Almond milk will be nutty, while oat milk adds creaminess. Enjoy your iced coffee on a warm afternoon. It’s perfect for brunch or a quick morning pick-me-up. Pair your drink with a slice of pumpkin bread or a muffin. The flavors complement each other well. You can also serve it with a light salad for a refreshing meal. Be careful not to over-blend the pumpkin cream. If you blend it too long, it can become too thin. You want it to be smooth and thick. Always cool your coffee before adding the pumpkin cream. If the coffee is too hot, it will melt the foam. Let it sit for a bit or chill it in the fridge. {{image_2}} You can add fun spices to your pumpkin cream. Try using cinnamon or nutmeg for a cozy twist. These spices blend well with pumpkin and coffee. You can also experiment with seasonal fruits like apples or pears. Their sweetness adds a fresh touch to your drink. Each variation brings a new flavor, making your iced coffee unique every time. If you want a smoother taste, consider using cold brew instead of regular coffee. Cold brew is less bitter and offers a gentle flavor. You can also switch up the coffee beans you use. Try a light roast for fruity notes or a dark roast for rich flavors. Each bean type will change your drink's character. For a dairy-free version, explore non-dairy milk like almond, oat, or coconut. Each option adds its own flavor and texture. If you want to make it vegan, use maple syrup or agave nectar as sweeteners. These natural options keep your drink sweet without any animal products. Adjust the sweetness to fit your taste. Enjoy your pumpkin cream cold foam without any worries! To keep your pumpkin cream fresh, store it in an airtight container. This helps protect it from air and odors. Use it within three days for the best taste. If you see any change in color or smell, it's best to toss it. You can refrigerate pumpkin puree mixtures for about five to seven days. Keep it in a sealed jar or container. Label it with the date so you know when to use it. For brewed coffee, let it cool down first. Then, pour it into a clean container. A glass jar works well. Store it in the fridge for up to a week. When reheating coffee, use a microwave or a stovetop. Heat it gently so it doesn’t taste burnt. If you need to add more flavor, a splash of milk can help. Yes, you can freeze the pumpkin cream. Pour it into an ice cube tray for easy use later. Once frozen, transfer the cubes to a freezer bag. Use within three months for best flavor. To freeze coffee and cream mixtures, blend them well first. Pour into a freezer-safe container and seal it tightly. When ready to use, thaw overnight in the fridge. Pumpkin Cream Cold Foam is a tasty iced coffee drink. It has layers of cold coffee and creamy pumpkin foam. This drink comes from the rise of pumpkin flavors in fall. People love it for its rich taste and festive feel. To make your drink sweeter, you can add more maple syrup. Start with the two tablespoons from the recipe. If you want it sweeter, add one more tablespoon at a time. You can also try other sweeteners like: - Honey - Agave syrup - Brown sugar Mix well to see how sweet it gets. Yes, you can easily make a larger batch! Just multiply each ingredient by the number of servings you want. For example, if you want to serve four people, use: - 4 cups coffee - 2 cups milk - 1 cup pumpkin puree - 8 tablespoons maple syrup - 4 teaspoons vanilla extract - 2 teaspoons pumpkin pie spice Blend everything together as before. This way, you can share your delicious drink with friends! This blog post shared how to create the perfect Pumpkin Cream Cold Foam Iced Coffee. From selecting fresh ingredients to blending them into a creamy treat, you now have the steps to make it delicious. Remember to customize flavors and avoid common mistakes, like over-blending. Whether you enjoy it on a warm day or as a seasonal treat, this drink brings joy. Enjoy sharing this recipe with friends and family for a delightful experience!

Pumpkin Cream Cold Foam Iced Coffee Refreshing Delight

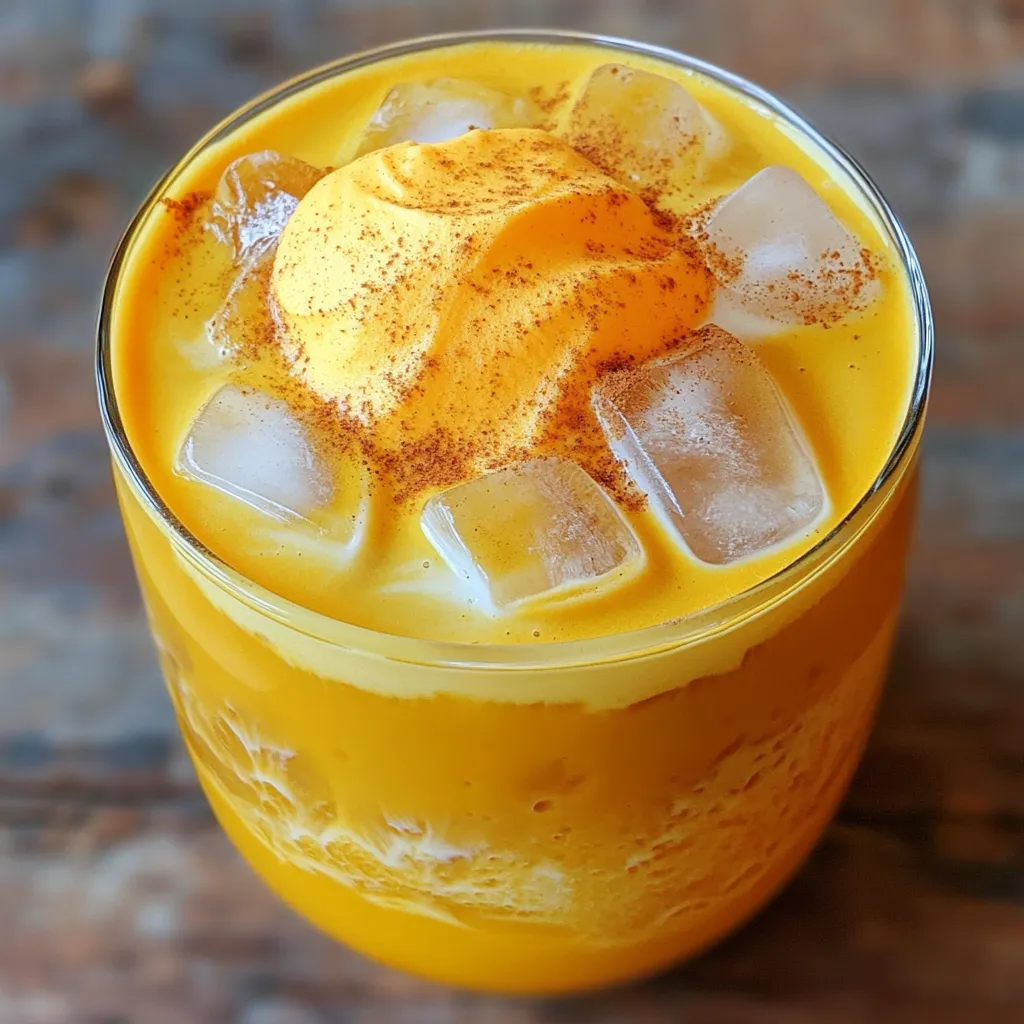
Are you ready to sip on a delicious fall treat? The Pumpkin Cream Cold Foam Iced Coffee is a fun

To make bakery-style apple cider donuts, gather these key ingredients: - 2 cups apple cider - 2 cups all-purpose flour - 1 cup granulated sugar - 2 teaspoons baking powder - 1 teaspoon baking soda - 1 teaspoon ground cinnamon - ½ teaspoon ground nutmeg - ½ teaspoon salt - ¼ cup unsalted butter, melted - 2 large eggs - ½ cup milk - 1 teaspoon vanilla extract - ¼ cup cinnamon sugar (for coating) Each ingredient plays a vital role in giving the donuts their rich flavor and soft texture. The apple cider provides a sweet and tangy base. The flour and sugar create that classic donut structure. Baking powder and soda help them rise. Spices like cinnamon and nutmeg add warmth, while salt enhances overall taste. The butter keeps the donuts moist, and eggs give them a nice lift. Milk and vanilla extract add creaminess and depth. Finally, the cinnamon sugar coating makes them irresistible. Now that you have the ingredients, you're one step closer to making these delicious treats! Start by pouring 2 cups of apple cider into a saucepan. Heat it on medium until it boils. Once it boils, reduce the heat to low. Let it simmer for 15 to 20 minutes. You want the cider to reduce to about 1 cup. This step makes the flavor stronger. After that, set it aside to cool. Grab a large bowl and whisk together the dry ingredients. You will need 2 cups of all-purpose flour, 1 cup of granulated sugar, 2 teaspoons of baking powder, and 1 teaspoon of baking soda. Add in 1 teaspoon of ground cinnamon, ½ teaspoon of ground nutmeg, and ½ teaspoon of salt. Mix well so everything is combined. In another bowl, mix the wet ingredients. Combine the cooled apple cider, ¼ cup of melted unsalted butter, and 2 large eggs. Add in ½ cup of milk and 1 teaspoon of vanilla extract. Whisk these together until they are smooth and blended. Now, pour the wet mix into the dry mix. Gently fold them together until just combined. Avoid overmixing; this helps keep the donuts light and fluffy. Use a piping bag or a spoon to fill the donut pan. Fill each cavity about ¾ full. Preheat your oven to 350°F (175°C) while you fill the pan. Bake the donuts for 12 to 15 minutes. Check them with a toothpick; it should come out clean when they are done. Let the donuts cool in the pan for 5 minutes. Then, transfer them to a wire rack. While the donuts are still warm, it’s time to coat them. You need ¼ cup of cinnamon sugar for this. You can roll each donut in the sugar or sprinkle it on top using a sifter. This adds a sweet, spicy finish that makes them irresistible. To make your donuts soft, avoid overmixing. When you mix wet and dry, stir just until they blend. This keeps your donuts light and fluffy. Use fresh ingredients for the best rise. Make sure your baking powder and baking soda are active. Test them by adding them to water. They should bubble up right away. For a deeper flavor, try adding a pinch of cloves or allspice. These spices can give your donuts an extra kick. You can also experiment with different sugars. Using brown sugar adds a richer taste. If you want a fruity twist, add some finely chopped apples to the batter. This makes each bite even more delicious. One common mistake is not reducing the apple cider enough. You want it thick and sweet. If you skip this step, your donuts may be too wet. Another mistake is checking for doneness too early. Use a toothpick to check. If it comes out clean, your donuts are ready. Lastly, don’t skip the cinnamon sugar coating. It adds a sweet and cozy finish. {{image_2}} To make glazed apple cider donuts, mix powdered sugar with a bit of milk. Dip each warm donut in this glaze. Shake off the excess. The glaze gives the donuts a sweet shine. You can add a pinch of cinnamon to the glaze for extra flavor. Try adding different spices to change up the flavor. You can use pumpkin spice instead of cinnamon and nutmeg. This gives a warm, autumn taste. For a kick, add a bit of ginger. Adjust the amounts to fit your taste. Each spice adds a new twist to the classic recipe. You can get creative with toppings. Drizzle chocolate or caramel sauce on top. Chopped nuts or sprinkles can give a nice crunch. For fillings, try apple pie filling or cream. Just pipe it into the donut after baking. These changes make each bite fun and different. To keep your bakery-style apple cider donuts fresh, store them in an airtight container. This helps maintain their soft texture. If you plan to eat them within a few days, keep them at room temperature. For longer storage, place them in the fridge. This can help them last up to a week. If you want to enjoy warm donuts, reheating is easy. Preheat your oven to 350°F (175°C). Place the donuts on a baking sheet. Heat them for about 5 to 8 minutes. You can also microwave them for about 15 seconds. Just be careful not to overdo it, as they can become tough. To freeze your apple cider donuts, first, let them cool completely. Then, wrap each donut in plastic wrap. Place them in a freezer-safe bag or container. They can stay fresh in the freezer for up to three months. To enjoy, just thaw them in the fridge overnight. Reheat when ready to eat. To make apple cider donuts vegan, swap eggs with flax eggs. Mix 1 tablespoon of ground flaxseed with 3 tablespoons of water. Let it sit for 5 minutes. Use plant-based milk instead of regular milk. Replace butter with coconut oil or vegan butter. Yes, you can use whole wheat flour. It makes the donuts denser and adds fiber. You may need to add a bit more liquid to the batter. Start with an extra tablespoon of milk to keep the right texture. Apple cider donuts stay fresh for about 2 to 3 days at room temperature. Store them in an airtight container to keep them moist. For longer storage, you can freeze them for up to 2 months. The best toppings include cinnamon sugar, maple glaze, or caramel drizzle. You can also add chopped nuts or sprinkles for extra crunch and color. Feel free to get creative with your favorite flavors! Yes, bottled apple cider works well for this recipe. Just make sure it’s pure cider with no added sugars or flavors. This keeps the taste authentic and delicious. You learned how to make tasty apple cider donuts, from ingredients to storage tips. I shared ways to mix and bake, plus tricks for great flavor. You can even make them vegan or try fun toppings. Keep this guide handy for perfect donuts each time. Enjoy your baking and share your love for these treats!

Bakery-Style Apple Cider Donuts Easy Sweet Treat

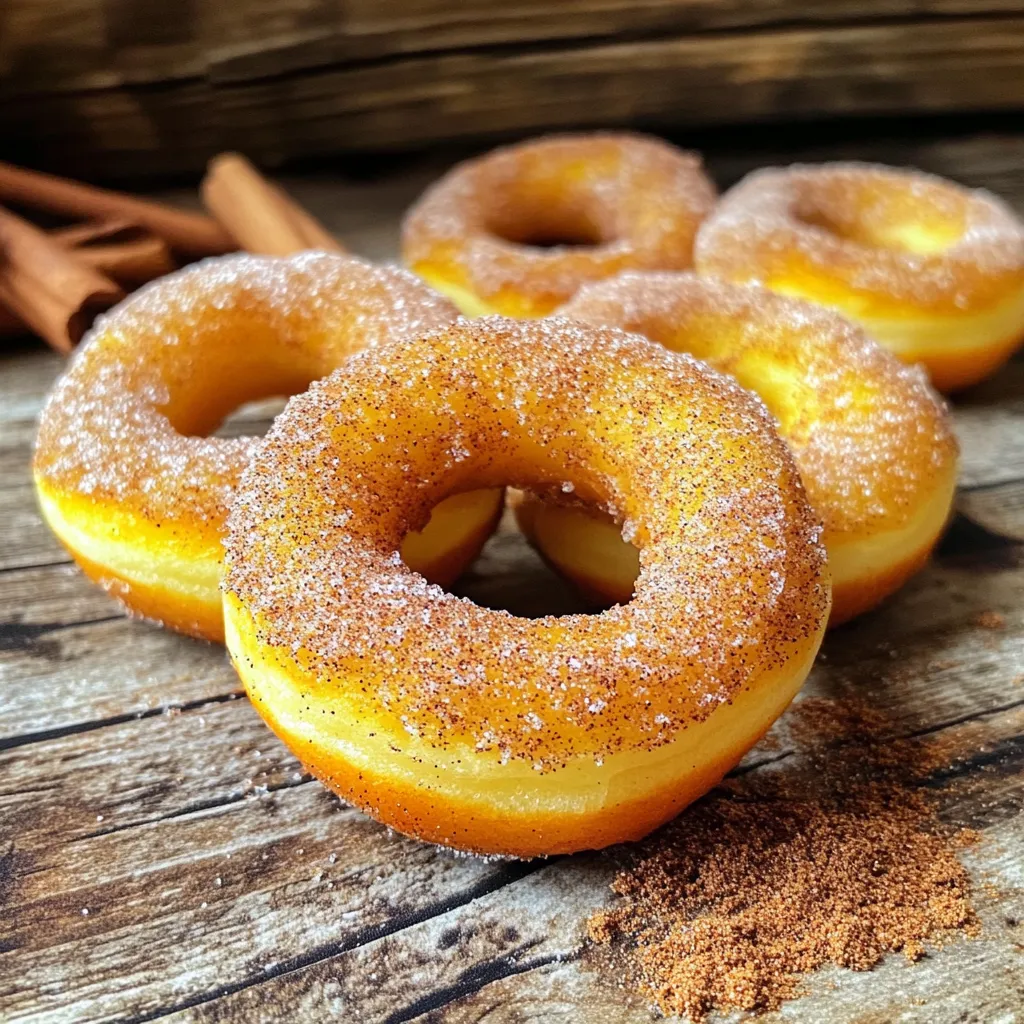
Imagine biting into a warm, soft donut that bursts with apple flavor. These Bakery-Style Apple Cider Donuts are your new

To make Minute Garlic Parmesan Orzo, gather these simple ingredients: - 1 cup orzo pasta - 2 tablespoons olive oil - 4 cloves garlic, minced - 3 cups vegetable broth - 1/2 teaspoon red pepper flakes (optional) - 1/2 cup grated Parmesan cheese - 1/4 cup fresh parsley, chopped - Salt and pepper to taste These ingredients work together to create a dish full of flavor. If you need to make changes, here are some good swaps: - Use chicken broth instead of vegetable broth for a richer taste. - Swap orzo for any small pasta, like ditalini or mini shells. - Try nutritional yeast instead of Parmesan for a dairy-free option. - Use garlic powder if fresh garlic isn’t available. These alternatives can help you customize the dish to your needs. To prepare this dish, you will need: - A medium saucepan for boiling the broth and orzo. - A large skillet for sautéing garlic and mixing ingredients. - A wooden spoon or spatula for stirring the orzo and garlic. - A measuring cup and spoons for accurate ingredient amounts. Having the right tools makes cooking easier and more fun! First, grab a medium saucepan. Pour in 3 cups of vegetable broth. Heat it until it boils. Once it bubbles, add 1 cup of orzo pasta. Stir the pasta gently. Cook it according to the package instructions, usually about 8-10 minutes. You want the orzo to be al dente, which means it should still have a little bite. Stir occasionally to keep it from sticking. When it’s done, drain any extra broth. While the orzo cooks, take a large skillet. Pour in 2 tablespoons of olive oil and heat it over medium heat. As the oil warms, add 4 minced garlic cloves. Sauté the garlic for about 1 minute. You want it fragrant but not burnt. If you like a little heat, sprinkle in 1/2 teaspoon of red pepper flakes. This adds a nice kick to the dish. Now it’s time to mix everything together. Once the orzo is ready, carefully drain it and add it to the skillet with the garlic. Stir gently to combine the orzo and garlic. Then, mix in 1/2 cup of grated Parmesan cheese while the orzo is still warm. This helps the cheese melt and create a creamy texture. Lastly, add chopped parsley, and season with salt and pepper to taste. Stir everything well to make sure the flavors blend. Now, your Minute Garlic Parmesan Orzo is ready to serve! To get the best garlic taste, use fresh garlic. Fresh garlic gives a stronger flavor than dried. Mince the garlic finely. This helps release its oils and aroma. Sauté it gently in olive oil. Cook it for just one minute. You want it fragrant, not burnt. If you like heat, add red pepper flakes. They give a nice kick that pairs well with garlic. For a creamy texture, add the Parmesan cheese while the orzo is warm. This helps the cheese melt perfectly. Use freshly grated Parmesan. It melts better than pre-grated cheese. Stir it in well, so every bite has that cheesy goodness. Adjust the amount of cheese to your taste. More cheese means more creaminess! Presentation makes food more appealing. Use a nice serving dish or individual bowls for the orzo. Garnish with extra Parmesan on top. Add a sprinkle of fresh parsley for color. You could even add a few chili flakes on top. This not only adds color but also shows guests a hint of spice. Serve it warm for the best taste! {{image_2}} You can easily boost the nutrition of Minute Garlic Parmesan Orzo by adding protein. Cooked chicken or shrimp works great here. For chicken, use grilled or rotisserie chicken. Cut it into bite-sized pieces before adding it to the orzo. For shrimp, sauté them in the skillet after the garlic until they turn pink. This adds flavor and makes the dish heartier. Adding veggies can enhance the taste and nutrition of your orzo. Spinach is a perfect choice. You can toss fresh spinach into the skillet right after sautéing the garlic. Cook until it wilts down. Peas also add a nice pop of color. You can stir in frozen peas when you combine the orzo. They will heat through quickly. Feel free to get creative with your favorite vegetables! You can easily make this dish vegan. Simply skip the Parmesan cheese or use a dairy-free version. Nutritional yeast is a great substitute. It adds a cheesy flavor without dairy. Use vegetable broth to keep it vegan. Olive oil is perfect for cooking and adds richness. You can still enjoy this tasty dish while sticking to a vegan lifestyle! To store your garlic Parmesan orzo, let it cool first. Place it in an airtight container. Keep it in the fridge. It will stay fresh for about three days. This way, you can enjoy it again soon. When you’re ready to eat, you can reheat the orzo on the stove or in the microwave. On the stove, add a splash of vegetable broth to keep it moist. Heat it over low heat and stir often. In the microwave, cover the dish and heat it for 1-2 minutes. Check and stir halfway to heat evenly. If you want to save it for later, you can freeze the orzo. Use a freezer-safe bag or container. Make sure to remove as much air as possible. It can last up to three months in the freezer. When you're ready to eat, thaw it overnight in the fridge before reheating. It takes about 15 minutes to make Minute Garlic Parmesan Orzo. The prep time is just 5 minutes. Cooking the orzo in vegetable broth takes about 8 to 10 minutes. This quick recipe is perfect for busy nights! Yes, you can use regular pasta instead of orzo. However, cooking times may change. Make sure to check the package for timing. Also, keep in mind that orzo has a unique shape, which adds to the dish's texture. You can serve Minute Garlic Parmesan Orzo with many dishes. It pairs well with grilled chicken, shrimp, or vegetables. A fresh salad or garlic bread also makes a great side. Feel free to get creative and mix flavors! In this blog post, I shared how to make Minute Garlic Parmesan Orzo. You learned about key ingredients and tasty substitutes. I also covered handy tools you will need. Then, I walked you through step-by-step cooking instructions. I provided tips to enhance flavor and achieve creamy textures. You saw different ways to customize the dish with proteins and veggies. Finally, we discussed how to store and reheat leftovers. Now you are ready to cook and enjoy this dish.

Minute Garlic Parmesan Orzo Tasty and Simple Recipe

Looking for a quick and tasty dish? This Minute Garlic Parmesan Orzo recipe is a winner! You can whip it

- 1 cup unsalted butter - 1 cup packed brown sugar - 1/2 cup granulated sugar - 2 large eggs - 1 tablespoon pure maple syrup - 1 teaspoon vanilla extract - 2 cups all-purpose flour - 1/2 teaspoon baking powder - 1/4 teaspoon baking soda - 1/2 teaspoon salt - 1 cup pecans, chopped - 1/2 cup white chocolate chips (optional) These ingredients come together to create a rich and sweet treat. The unsalted butter is key. It provides the base for that nutty brown butter flavor. The brown sugar gives the blondies a deep sweetness. Granulated sugar adds a nice balance. The eggs help bind everything together. Pure maple syrup and vanilla extract add warmth. They give your blondies that cozy flavor we all love. The all-purpose flour acts as the backbone. Baking powder and baking soda help the blondies rise and stay fluffy. Salt balances the sweetness. Chopped pecans add crunch and a nutty taste. If you want a creamy touch, add white chocolate chips. They melt beautifully in the blondies. Each ingredient plays a role, making these blondies hard to resist. - Butter alternatives: You can use coconut oil or vegan butter if you want a dairy-free option. - Sweetener options: Try using coconut sugar instead of brown sugar for a lower glycemic index. - Nut-free variations: If you have nut allergies, replace pecans with sunflower seeds. - Preheat your oven to 350°F (175°C). - Grease a 9x13 inch baking pan or line it with parchment paper. - In a medium saucepan, melt 1 cup of unsalted butter over medium heat. - Stir the butter frequently until it foams and turns golden brown, about 5-7 minutes. - Remove the saucepan from heat and let the butter cool slightly. - In a large mixing bowl, combine the brown butter with 1 cup of brown sugar and 1/2 cup of granulated sugar. - Stir until the mixture is well combined and smooth. - Crack in 2 large eggs and add 1 tablespoon of pure maple syrup and 1 teaspoon of vanilla extract. - Mix until everything is fully incorporated. - In a separate bowl, whisk together 2 cups of all-purpose flour, 1/2 teaspoon of baking powder, 1/4 teaspoon of baking soda, and 1/2 teaspoon of salt. - Gradually add the dry mix to the wet ingredients. Stir gently until just combined. - Fold in 1 cup of chopped pecans and 1/2 cup of white chocolate chips, if desired. - Pour the batter into the prepared baking pan and spread it evenly. - Bake for 20-25 minutes. A toothpick should come out with a few moist crumbs. - Let the blondies cool in the pan for at least 15 minutes before cutting into squares. To get the best texture, pay attention to your butter. You want it brown, but not burnt. Cooking it until it turns a rich golden color gives a nutty flavor. When mixing the batter, do not overmix. This keeps the blondies soft and chewy. You know your blondies are done when a toothpick comes out with a few moist crumbs. If it’s wet, they need more time. Check them after 20 minutes. For serving, these blondies shine with a dusting of powdered sugar. A drizzle of maple syrup adds extra sweetness. For a fun twist, serve them warm with a scoop of vanilla ice cream. This makes a great dessert. You can also top them with melted chocolate or caramel sauce. Chopped nuts or sprinkles can add texture and color. One key mistake is overmixing the batter. This can make your blondies tough instead of soft. Mix just until the flour disappears. Another common mistake is overbaking. Keep a close eye on them. If you bake too long, they turn dry. Always test for doneness early to avoid this. {{image_2}} You can change the taste of your blondies easily. Adding spices can bring warmth and depth. Try cinnamon for a cozy vibe or nutmeg for a hint of nutty flavor. Both spices mix well with the sweetness of maple syrup. You can also swap nuts for extra crunch. While pecans shine here, walnuts or almonds work great too. Each nut brings its own taste. This lets you create your own twist on the original recipe. Making these blondies gluten-free is simple. Just replace all-purpose flour with a gluten-free blend. Make sure the blend has a good texture. This keeps your blondies soft and chewy. If you want a vegan version, use flax eggs instead of regular eggs. Combine one tablespoon of ground flaxseed with three tablespoons of water. Let it sit for a few minutes to thicken. Use coconut oil or vegan butter in place of regular butter. You will still get that rich, nutty flavor. Blondies can fit any season with a few tweaks. During the holidays, try adding dried cranberries for a festive touch. Their tartness balances the sweet maple flavor. You can also use seasonal ingredients. In fall, add chopped apples for a fruity bite. In spring, consider using fresh strawberries for a light taste. These additions keep your blondies fresh and exciting throughout the year. To keep your brown butter maple pecan blondies fresh, store them at room temperature. Use an airtight container to keep them moist. Avoid direct sunlight and heat sources to maintain their texture. These blondies will last about 3 to 5 days at room temperature. They can also freeze well. Wrap them tightly in plastic wrap or foil, then place them in a freezer bag. They stay fresh for up to 3 months in the freezer. To enjoy your blondies warm, use the oven. Preheat it to 350°F (175°C). Place the blondies on a baking sheet and heat for about 5–10 minutes. You can also use the microwave. Heat them for about 15–20 seconds. Enjoy them warm with a drizzle of maple syrup or a scoop of ice cream! You can use oil instead of butter, but the taste will change. Butter adds a rich flavor that oil cannot match. If you want to try, use the same amount of oil. Your blondies may be softer but still tasty. To check if your blondies are done, insert a toothpick into the center. If it comes out with a few moist crumbs, they are ready. Be careful not to overbake them, or they will be dry. If you want a substitute for white chocolate chips, consider milk chocolate or dark chocolate chips. You can also skip them altogether for a nutty flavor. Try adding dried fruit for a fun twist. Yes, you can make these blondies ahead of time. They stay fresh for a few days in an airtight container. You can also freeze them for up to three months. Just thaw before serving for the best taste. This article guides you through making delicious blondies. You learned about the key ingredients and possible substitutions for your baking needs. We covered step-by-step instructions, tips for perfecting your blondies, and delicious variations. Remember to store them properly for the best taste and freshness. As you bake these treats, let your creativity shine. Explore different flavors and share your results. Enjoy the sweet journey of baking!

Brown Butter Maple Pecan Blondies Irresistible Treat

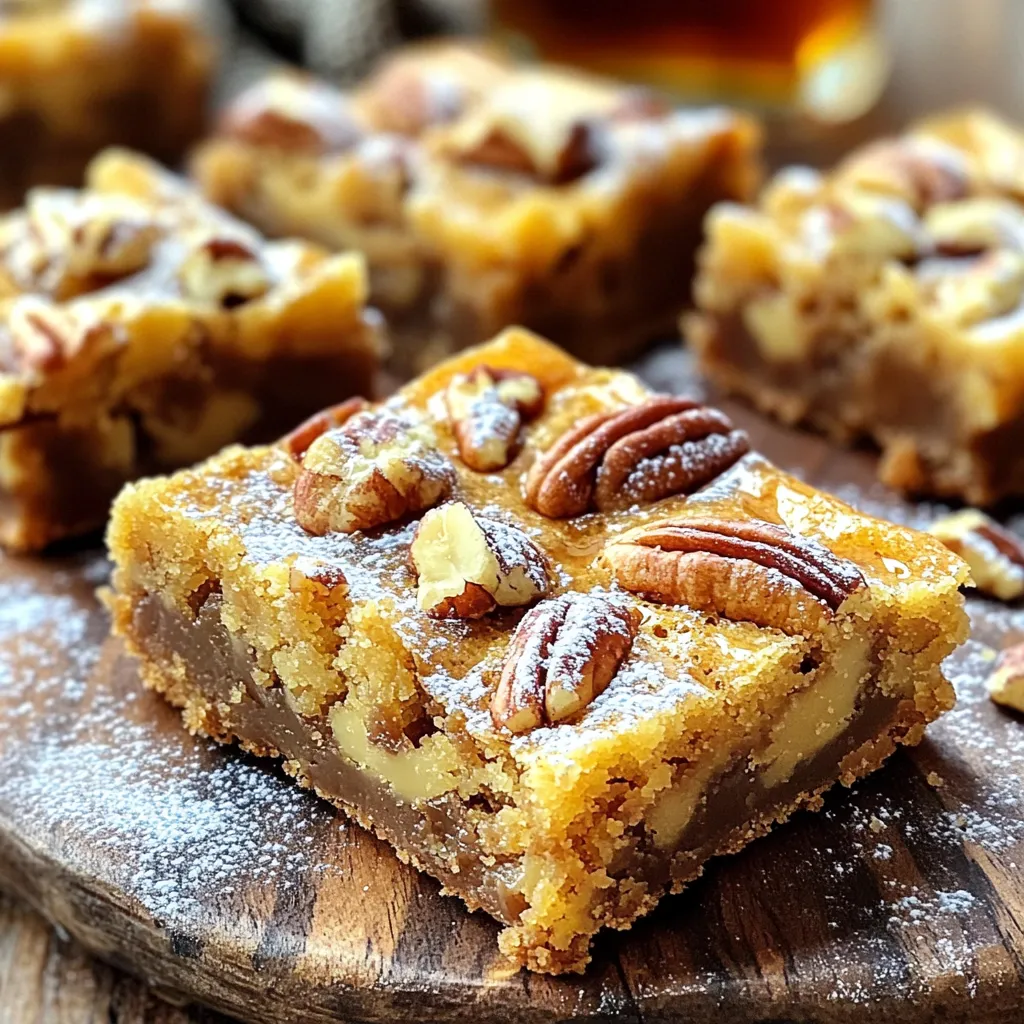
Craving something sweet and nutty? Brown Butter Maple Pecan Blondies are the treat you need. With rich brown butter and

- 2 boneless, skinless chicken breasts - 1 can (15 oz) white beans (cannellini or great northern) - 1 can (4 oz) diced green chilies - 1 cup corn (frozen or canned) - 1 medium onion, diced - 3 cloves garlic, minced - 2 cups chicken broth - 1 cup heavy cream or coconut milk - Ground spices and seasoning (cumin, chili powder, salt, pepper) - Fresh toppings (cilantro, lime wedges) The choice of your main ingredients is key to great chili. Chicken breasts give a nice, tender texture. White beans add creaminess and taste. Green chilies give a mild spice that lifts the flavor. For the extra ingredients, corn adds sweetness. Diced onion and minced garlic give a strong base. The chicken broth ties it all together, adding depth. For creaminess, use heavy cream or coconut milk. Don’t forget the spices! Cumin and chili powder enhance the dish. Salt and pepper can help balance flavors. Fresh cilantro and lime are perfect to top your chili. They add brightness and freshness to each bowl. Gather these ingredients, and you are ready to create a bowl of comfort! - Prep the Chicken and Seasoning: Start by placing the two chicken breasts at the bottom of your slow cooker. Sprinkle them with salt, pepper, ground cumin, and chili powder. This step adds great flavor right from the start. - Add the Vegetables and Beans: Now, layer the diced onion, minced garlic, diced green chilies, corn, and white beans over the seasoned chicken. This mix of veggies gives the chili its heartiness and color. - Pour in the Chicken Broth: Gently pour the chicken broth over the ingredients. Make sure everything is mostly submerged. This broth builds the base for a rich and creamy chili. - Cooking Time Guidelines: Cover your slow cooker. Cook on low for about six hours or on high for three hours. The chicken should be very tender and easy to shred. - Shred the Chicken Post-Cooking: Once cooked, take the chicken breasts out. Use two forks to shred the chicken into bite-sized pieces. Then, return the shredded chicken to the slow cooker. This step makes the chili easy to eat. - Incorporate the Creaminess: Now it’s time to stir in the heavy cream or coconut milk. Mix it well to make the chili creamy. Taste it and adjust with more salt or pepper if needed. - Serve and Garnish: Ladle the chili into bowls. Garnish each bowl with fresh cilantro. Serve with lime wedges on the side. The lime adds a nice zesty kick! Balancing Spices To get the right taste, you need to balance the spices. I like to start with one teaspoon of cumin and chili powder. You can adjust to your taste as you cook. If you want more heat, add a pinch of cayenne pepper. Always taste before serving! Achieving the Right Creaminess For a creamy texture, heavy cream works well. If you prefer a lighter option, try coconut milk. Stir it in slowly after shredding the chicken. This helps the cream mix in evenly, giving you that rich, smooth feel. Choosing the Right Setting Using a slow cooker is great for this chili. You can choose low or high heat. Cooking on low for six hours gives a deep flavor. If you're short on time, high for three hours works, too. Just ensure the chicken is tender before shredding. Cooking Time Variability Cooking times can vary based on your slow cooker. Always check the chicken. It should shred easily with a fork. If it’s still tough, cook it longer. Adjust the time based on your model’s heat level. Garnishing Ideas Garnish makes a big difference! Fresh cilantro adds color and flavor. You can also add diced avocado or sour cream for a creamy touch. A sprinkle of cheese can add richness, too. Serving Suggestions Ladle the chili into bowls while hot. Serve with lime wedges on the side. Squeezing lime over the chili adds a fresh zing. You can pair it with tortilla chips for a fun crunch. {{image_2}} You can easily change the main protein in this dish. Instead of chicken, try turkey or beef. If you want a plant-based option, use tofu. Each choice adds its own taste. You can also switch the heavy cream. Use coconut milk for a dairy-free twist. This keeps the chili creamy without dairy. Want to boost the flavor? Add more veggies! Bell peppers, zucchini, or carrots work well. They add color and nutrients. For a spicy kick, toss in jalapeños or a few drops of hot sauce. This will make the chili pop with heat and flavor. This chili is more than just a bowl meal. Use it as a taco filling. Just scoop some chili into a taco shell and add toppings. You can also serve it over rice for a burrito bowl. Top with cheese, sour cream, or salsa for extra taste. These ideas make the dish fun and versatile! To store your leftover chili, let it cool first. Use an airtight container. This keeps it fresh and tasty. You can store it in the fridge for up to three days. When you want to reheat, scoop the chili into a pot. Heat it on low. Stir often to avoid burning. You can also use a microwave. Put it in a microwave-safe bowl. Heat in short bursts, stirring in between. This keeps the chili creamy. If you want to freeze the chili, let it cool down first. Use a freezer-safe container. Leave some space at the top. The chili will expand as it freezes. You can freeze it for up to three months. To thaw, move it to the fridge a day before. This gives it time to soften. You can also use cold water. Seal it in a bag and submerge it in water. This method is faster. How long does it last? In the fridge, it lasts for about three days. In the freezer, it can last for three months. For best taste, eat it within these time frames. If the chili looks or smells off, it’s best to toss it. Always trust your senses when it comes to food safety. You can add heat to your chili in a few ways. Spices like cayenne pepper or crushed red pepper flakes work great. Adding fresh peppers can also give it more kick. Try jalapeños or serranos for a nice, spicy touch. Just be careful! Start with a little, then taste as you go. You can always add more spice, but it's hard to take it out once it's in. Yes, you can use frozen chicken for this recipe. It will cook well in the slow cooker. Just make sure to add a bit of extra cooking time. If you use thawed chicken, the chili will cook faster. Both options will yield tender and juicy chicken. Just remember to check that the chicken reaches a safe temperature of 165°F when done. Absolutely! This chili is great for meal prep. You can make it a day or two ahead of time. Just store it in the fridge after it cools. When ready to eat, reheat it on the stove or in the microwave. You can also freeze it for later. Just make sure to cool it down first before freezing. This way, you have a tasty meal ready when you need it! To wrap up, we explored a tasty chili using chicken, beans, and spices. You learned the best steps for prep and cooking. I shared tips for flavor and presentation. You can also swap ingredients for fun variations. Proper storage helps keep leftovers fresh. This recipe is easy and perfect for meal prep. Try it out, and enjoy a delicious dish any day.

Slow Cooker Creamy White Chicken Chili Delight

Are you ready to make a cozy meal that warms your heart? This Slow Cooker Creamy White Chicken Chili is

Older posts
Newer posts
← Previous Page1 … Page14 Page15 Page16 … Page84 Next →

dsad

© 2026 Foodish Talk • Built with GeneratePress

Our Policies

  • Copyright Policy
  • Cookie Policy
  • GDPR Policy
  • Privacy Policy
  • Disclaimer
  • Terms Of Use

More Information

  • Home
  • About
  • Contact
  • Appetizers
  • Dessert
  • Dinner
  • Drinks
©2026, Foodish Talk About Back To Top