Skip to content
DisclaimerTerms Of UseGDPR PolicyCookie Policy

Foodish Talk

  • Home
  • Drinks
  • Appetizers
  • Dinner
  • Dessert
  • About
  • Contact
  • Privacy Policy
DisclaimerTerms Of UseGDPR PolicyCookie Policy

NO-ING-IMG

- 4 lbs beef short ribs - 1 large onion, chopped - 4 cloves garlic, minced - 2 cups beef broth - 1 cup cherry balsamic vinegar - 2 tablespoons brown sugar - 2 tablespoons soy sauce (or tamari for gluten-free) - 1 teaspoon smoked paprika - 1 teaspoon dried thyme - Salt and pepper to taste - Fresh parsley, chopped (for garnish) The main ingredients create a rich and savory dish. Beef short ribs are the star here. They provide deep flavor and tenderness. The onion and garlic add sweetness and aroma. Cherry balsamic vinegar gives a nice tang. - Carrots, chopped - Celery, chopped - Bay leaves - Fresh herbs like rosemary or thyme Adding carrots and celery can give extra texture. Bay leaves add depth to the sauce. Fresh herbs can make the dish even fresher. - Calories: 450 - Protein: 35g - Fat: 30g - Carbohydrates: 10g - Fiber: 1g - Sugar: 5g This dish is hearty and filling. It provides a good amount of protein. Enjoy it with a side salad or some veggies for balance. {{ingredient_image_1}} First, pat the beef short ribs dry with paper towels. This helps the meat sear better. Next, season the ribs on all sides with salt and pepper. Make sure to coat them well. This step adds flavor to the meat. In a large skillet, heat one tablespoon of olive oil over medium-high heat. Once the oil is hot, add the short ribs in batches. Sear them for about 3-4 minutes on each side. You want a nice brown crust. This step builds flavor, making your dish even better. After browning, transfer the ribs to the crockpot. In the same skillet, add the chopped onion and sauté for 3-4 minutes. Wait until they soften. Then, add the minced garlic and cook for one more minute. This gives a great aroma. In a bowl, mix the beef broth, cherry balsamic vinegar, brown sugar, soy sauce, smoked paprika, and dried thyme. Whisk until the sugar dissolves. Pour the onion and garlic mix over the short ribs in the crockpot. Finally, pour the sauce mixture on top. Your beef short ribs are now ready for slow cooking! Searing adds great flavor. First, pat the ribs dry. This helps them brown better. Use a hot skillet with oil. Brown the ribs on all sides for about 3-4 minutes each. Don't overcrowd the pan. Do it in batches if needed. This step makes your ribs taste richer. Taste is personal. Start with the basic seasoning of salt and pepper. You can add more spices later. For a sweeter taste, increase the brown sugar. If you like heat, add a pinch of cayenne pepper. Always taste before serving. This way, you can adjust to everyone’s liking. Cook low and slow for the best results. Set your crockpot to low for 8 hours. This breaks down tough fibers in the meat. Always check for doneness; the meat should fall off the bone. If it’s not tender, cook a little longer. Letting the ribs rest before serving helps keep them juicy. Pro Tips Resting the Ribs: After cooking, let the ribs rest for about 10 minutes before serving. This allows the juices to redistribute for a more flavorful bite. Thicker Sauce: For a thicker sauce, remove the ribs once cooked and simmer the sauce on the stovetop for 10-15 minutes until it reduces and thickens. Flavor Infusion: For an extra depth of flavor, marinate the ribs in the sauce mixture overnight before cooking. This enhances the taste significantly. Serving Suggestions: Serve the short ribs with creamy polenta or roasted vegetables for a well-rounded meal that complements the rich flavors. {{image_2}} You can cook beef short ribs in many ways. If you want to use the oven, preheat it to 300°F. Place the seared ribs in a Dutch oven. Add the onion and garlic mix, then pour the sauce over. Cover and bake for 3-4 hours. The low heat will make the meat tender. For the Instant Pot, use the sauté function to brown the ribs. After that, add the onion, garlic, and sauce. Seal the lid and cook on high pressure for 45 minutes. Let it release naturally for 10 minutes. Both methods give you tender, flavorful ribs. You can change the flavor of your beef short ribs easily. Try using different sauces. For a sweet twist, add barbecue sauce instead of cherry balsamic vinegar. If you like spicy, mix in some hot sauce or chili powder. You can also swap out spices. Use cumin for a warm, earthy taste. Or add rosemary for a fresh herb flavor. These changes can make your dish unique each time. If you have dietary needs, you can adjust the recipe. For a gluten-free option, use tamari instead of soy sauce. If you're cutting sugar, try using a sugar substitute. You can also swap out beef for other meats. Pork short ribs or chicken thighs can work well too. Each choice will give you a different flavor profile but still keep it delicious. Enjoy experimenting! To store your beef short ribs, let them cool down first. Once cooled, place them in an airtight container. Make sure to cover the ribs well with sauce. This helps keep them moist. Store in the fridge for up to three days. Always label the container with the date to keep track. You can freeze cooked beef short ribs for long-term storage. Wrap them tightly in plastic wrap, then place them in a freezer bag. Use them within three months for the best taste. To reheat, thaw in the fridge overnight. Then, heat them in a pot over low heat. You can also use the microwave, but be careful not to dry them out. Cooked beef short ribs stay fresh in the fridge for about three days. If frozen, they last up to three months. Always check for any off smells or changes in color before eating. If they look or smell strange, it’s best to throw them away. Keeping track of storage times helps you enjoy your meals safely. You should cook beef short ribs on low for eight hours. If you're short on time, you can cook them on high for four hours. Low and slow makes the meat super tender. It will fall right off the bone! Use a meat thermometer to check for doneness if needed. Yes, you can use frozen beef short ribs. However, make sure to thaw them first. Thawing helps them cook evenly. If you cook them from frozen, increase the cooking time. It may take an extra hour or so on low. Crockpot short ribs taste great with many sides. Try creamy mashed potatoes or crusty bread to soak up the sauce. Roasted vegetables also pair well. A fresh salad can add some crunch to your meal. The options are endless! Absolutely! You can make these short ribs ahead of time. Cook them and let them cool. Store them in the fridge for up to three days. Reheat them gently on the stove or in the microwave. Their rich flavor will still be there when you serve them again. You learned how to make tasty crockpot beef short ribs. We covered ingredients, cooking steps, and storage tips. You can customize your dish with sauces and spices. Remember to sear your ribs for extra taste and adjust seasoning as needed. With these tips, you can enjoy a delicious meal that fits your needs. Cooking short ribs is easy and rewarding. Now, gather your ingredients and start cooking!

Crockpot Beef Short Ribs Rich and Flavorful Recipe

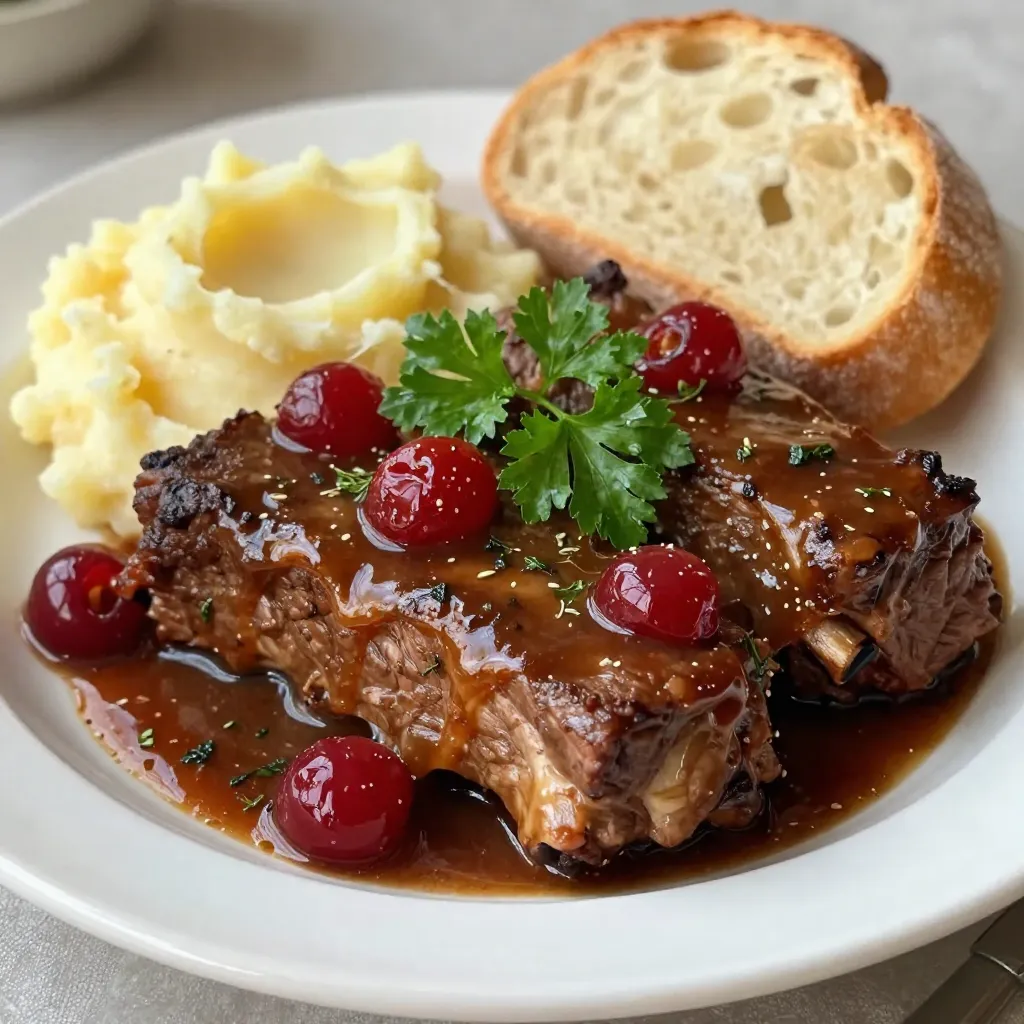
Are you ready to make the best Crockpot Beef Short Ribs? I’ll guide you step-by-step to rich, flavorful ribs that

- 1 cup rolled oats - 1/2 cup almond butter - 1/4 cup honey or maple syrup - 1 scoop vanilla protein powder - 2 tablespoons matcha green tea powder - 1/4 cup mini white chocolate chips - 1/4 teaspoon sea salt - 1-2 tablespoons of water (as needed) Each ingredient in these protein balls brings unique health benefits. - Rolled oats provide fiber, which helps digestion. They also give you lasting energy. - Almond butter offers healthy fats and protein. It can help keep you full. - Honey or maple syrup adds natural sweetness. They also have some vitamins and minerals. - Vanilla protein powder boosts your protein intake. This aids muscle recovery after workouts. - Matcha green tea powder is rich in antioxidants. It can enhance focus and boost metabolism. - Mini white chocolate chips add a sweet touch while giving a small amount of calcium. - Sea salt adds flavor and contains some essential minerals. - Water helps bring the mixture together, ensuring the right texture. You can easily adjust this recipe for different diets. - For a gluten-free option, use certified gluten-free rolled oats. - If you are nut-free, try sunflower seed butter instead of almond butter. - For a vegan version, swap honey for maple syrup and use plant-based protein powder. - To cut sugar, use a sugar-free sweetener that works for baking. - If you want a dairy-free treat, skip the white chocolate chips or use dairy-free versions. These simple swaps keep the flavors great while meeting your dietary needs. Enjoy creating your Matcha White Chocolate Protein Balls! First, gather all your ingredients. You will need oats, almond butter, honey, and more. In a large mixing bowl, add the rolled oats, vanilla protein powder, and matcha green tea powder. Mix these dry ingredients well so they are evenly combined. Next, add the almond butter, honey, and sea salt to the bowl. Stir everything until a thick dough forms. You can use a spatula or your hands for this part. If the mixture feels too dry, add 1-2 tablespoons of water. Stir until the dough holds together nicely. Finally, fold in the mini white chocolate chips gently. To get the right consistency, the dough should be thick but not crumbly. If it falls apart when you try to roll it, it needs more moisture. Add water one tablespoon at a time. Remember, the dough should stick together but not be too wet. If it feels sticky, let it sit for a few minutes. This helps it firm up. After mixing, it should easily roll into balls without falling apart. To roll the protein balls, grab about a tablespoon of the mixture. Use your hands to roll it into a smooth ball. Make sure to apply even pressure. If the dough sticks to your hands, dampen them slightly with water. Place each ball on a parchment-lined tray, leaving some space between them. Once you've rolled all the balls, refrigerate them for at least 30 minutes. This helps them firm up and makes them easier to eat. Enjoy your delicious snack! To keep your Matcha White Chocolate Protein Balls fresh, store them in an airtight container. This will help retain their moisture and flavor. You can keep them in the fridge for up to a week. If you want to store them longer, freeze them. Just put them in a freezer-safe bag or container. They can last for up to three months in the freezer. You can mix in different flavors to make these protein balls even better. For a nutty twist, add a bit of peanut butter or hazelnut spread. If you like a fruity taste, try adding dried cranberries or cherries. You can also switch the white chocolate chips for dark chocolate for a richer flavor. Making a big batch is a smart idea. It saves time and gives you a healthy snack ready to go. To prepare in bulk, just double or triple the recipe. Once you make them, divide the balls into portions. This way, you can grab them easily during the week. You can also mix the ingredients in advance and store them in the fridge. Just roll them into balls when you're ready to eat. {{image_2}} You can add many flavors to matcha white chocolate protein balls. Try adding a scoop of cocoa powder for a chocolate twist. You could also mix in dried fruits like cranberries or raisins. They add sweetness and chewiness. If you want a nutty taste, try adding chopped nuts like almonds or walnuts. These flavors can make your snack even more fun! Almond butter gives a nice taste, but you can switch it up! Peanut butter works great if you love its strong flavor. Sunflower seed butter is a fantastic choice for nut-free diets. Each nut butter adds a unique flavor and texture to the protein balls. Experiment to find your favorite! You can change how sweet your protein balls are. If you like them sweeter, add more honey or maple syrup. For a less sweet treat, use less of these. You can also use a sugar substitute, like stevia or agave, to control sweetness. This way, you can make a snack that fits your taste buds perfectly! To keep your Matcha White Chocolate Protein Balls fresh, use an airtight container. Line the container with parchment paper to avoid sticking. Make sure each ball sits in its own space. This method prevents them from squishing together. You can also separate layers with parchment paper for extra protection. These delicious protein balls stay fresh for up to one week in the fridge. After a week, their taste and texture may change. If you want to enjoy them longer, consider freezing. To freeze the protein balls, place them in a single layer on a tray. Freeze them for about one hour. Once they are firm, transfer them to a freezer-safe bag. Remove as much air as possible before sealing. This way, they can last for up to three months. When you want a snack, take out a few balls and let them thaw in the fridge. Enjoy your tasty treat anytime! These protein balls can last up to one week in the fridge. Store them in an airtight container. If you want to keep them longer, freeze them. They can last up to three months in the freezer. Yes, you can use different sweeteners. Maple syrup works well. You can also try agave nectar or coconut sugar. Just make sure to adjust the amount based on how sweet you want it. Matcha has many health benefits. It is high in antioxidants. These help fight free radicals in your body. Matcha may also boost your metabolism and increase your energy. It can improve focus and calm your mind. Refrigeration helps keep the protein balls fresh. It is not strictly necessary, but it is best. If you leave them at room temperature, they may spoil faster. So, for the best taste and texture, refrigerate them. Yes, you can make these protein balls vegan. Just swap honey for maple syrup. Use a plant-based protein powder. You can also use nut butters that do not contain animal products. Enjoy your tasty vegan snack! This article covered all you need to know about making protein balls. We explored the right ingredients and their health benefits. I shared step-by-step instructions for preparation and tips for storage. You can enjoy different variations based on your taste. In conclusion, these protein balls are simple to make and healthy to eat. With easy substitutions and fun flavors, they can fit your needs. Now, you can make delicious snacks that boost your energy and wellness. Enjoy your cooking!

Matcha White Chocolate Protein Balls Healthy Snack Delight

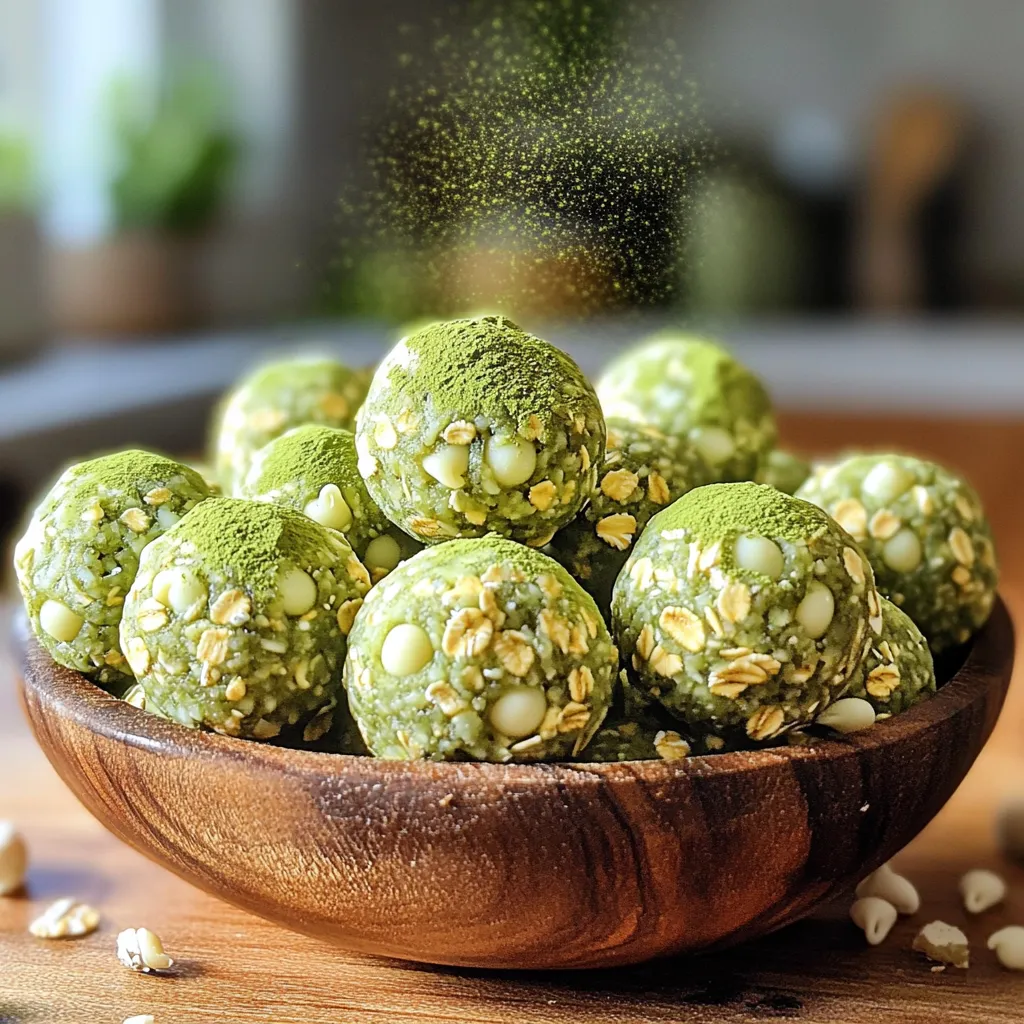
Are you looking for a tasty and healthy snack? These Matcha White Chocolate Protein Balls are perfect! Packed with nutrients,

- 2 lbs boneless, skinless chicken breasts - 1 cup BBQ sauce - 1/2 cup apple cider vinegar - 2 tablespoons brown sugar - 1 tablespoon Dijon mustard - 1 teaspoon smoked paprika - 1 teaspoon garlic powder - 1 teaspoon onion powder - Salt and pepper to taste - Hamburger buns - Coleslaw (optional) For the best Slow Cooker BBQ Pulled Chicken, I start with the chicken. I choose 2 lbs of boneless, skinless chicken breasts. This meat cooks well and pulls apart easily. Next, I grab 1 cup of my favorite BBQ sauce. This adds that sweet and tangy flavor we all love. To balance the richness, I add 1/2 cup of apple cider vinegar. It gives a nice zing. Next, I focus on flavor. I mix in 2 tablespoons of brown sugar for sweetness. I also add 1 tablespoon of Dijon mustard for depth. A teaspoon of smoked paprika gives a lovely smoky taste. I finish with 1 teaspoon each of garlic and onion powder. Salt and pepper round out the flavors. Finally, I think about toppings. I use fresh hamburger buns for a sturdy base. Coleslaw is optional but adds a delightful crunch. This combination of ingredients makes for a delicious sandwich that satisfies every time. In a large bowl, start by mixing your BBQ sauce, apple cider vinegar, brown sugar, and seasonings. Add 1 tablespoon of Dijon mustard. Sprinkle in 1 teaspoon each of smoked paprika, garlic powder, and onion powder. Don’t forget to add salt and pepper to taste. Whisk everything until it is well combined. This mixture will give your chicken a sweet and spicy flavor. Now, take your 2 lbs of boneless, skinless chicken breasts and place them in the slow cooker. Pour the BBQ sauce mixture over the chicken. Make sure the chicken is well coated. Cover the slow cooker with its lid. Cook on low for 6-7 hours or on high for 3-4 hours. The chicken should be tender and easy to pull apart with a fork when it’s done. Once the chicken is cooked, remove it from the slow cooker. Use two forks to shred the chicken into bite-sized pieces. Return the shredded chicken to the slow cooker and stir it into the BBQ sauce. Next, lightly toast 4 hamburger buns. You can do this under a broiler or in a toaster until they turn golden brown. To assemble your sandwiches, place a generous scoop of the pulled chicken on the bottom half of each bun. If you like, add coleslaw on top before placing the bun's top half on. Your delicious BBQ pulled chicken sandwiches are now ready to enjoy! To make the best pulled chicken, start with fresh, high-quality chicken. I like to use boneless, skinless chicken breasts for this recipe. They cook evenly and shred easily. For tenderness, make sure to cook the chicken low and slow. This method lets the flavors soak in. When it comes to BBQ sauce, you have many options. I recommend using a sweet and tangy sauce. A classic barbecue sauce works well. For a kick, try a spicy variant. You can even mix two types for a unique flavor. For the best results, use the low setting on your slow cooker. This usually takes about 6 to 7 hours. If you are short on time, the high setting works too, which takes about 3 to 4 hours. Adjust the cooking time based on the thickness of the chicken. Thicker breasts may need a bit longer. Presentation matters when serving your pulled chicken sandwiches. First, toast your hamburger buns until they are golden brown. This adds a nice crunch. Place a generous amount of pulled chicken on the bottom half of each bun. If you like, top with coleslaw for extra crunch. For a colorful touch, serve the sandwiches on a wooden platter. You can add dill pickles and fresh parsley as garnishes. Enjoy with a side of potato chips or a refreshing salad for a complete meal! {{image_2}} When making Slow Cooker BBQ Pulled Chicken, the sauce is key. You have many choices. You can pick a sweet BBQ sauce or a spicy one. Sweet sauces like honey BBQ give a rich taste. They balance the tang of the vinegar well. Spicy sauces can add a nice kick. They work well if you enjoy heat in your food. You can mix sauces to find your perfect flavor. Try different brands and styles for more fun! If you want to switch things up, you can use other meats. Pork is a popular choice. It has a different flavor but pairs well with BBQ sauce. You can also use tofu for a vegan option. Tofu absorbs flavors well and gives a nice texture. Just make sure to press it to remove extra water. This way, it will soak up all the delicious sauce! If you have dietary needs, there are easy swaps. For gluten-free diets, use gluten-free buns. Many brands offer great options that taste good. You can also find low-sugar BBQ sauces if you want to cut down on sugar. These sauces still pack a lot of flavor. Always check the labels to find what works best for you. Enjoy your sandwiches without worry! To keep your leftover pulled chicken fresh, store it right. Place the chicken in an airtight container. Make sure to cool it first before sealing. This helps keep flavors and moisture. You can store it in the fridge for up to four days. Always label the container with the date. This way, you know when to use it. Freezing pulled chicken is simple and smart. First, let the chicken cool completely. Next, place it in a freezer-safe bag. Squeeze out as much air as you can before sealing. This prevents freezer burn. You can keep it in the freezer for up to three months. When you're ready to use it, just thaw it in the fridge overnight. Reheating pulled chicken needs care to keep it juicy. The best way is to use the stove. Place the chicken in a pan over low heat. Add a splash of BBQ sauce or water to help with moisture. Stir often until it’s warm. You can also use a microwave. Just cover it with a damp paper towel. Heat it in short bursts, stirring in between. This helps avoid dryness. You should cook the chicken for about 6-7 hours on low or 3-4 hours on high. The chicken will be tender and fall apart easily when done. Be sure to check that it reaches 165°F for safety. This cooking method lets all the flavors meld well together. Yes, you can use frozen chicken breasts. Cook them on high for about 4-5 hours. Make sure they are fully cooked and reach 165°F. The BBQ sauce will still work well, keeping the chicken moist and flavorful. There are many great sides to pair with these sandwiches. Here are a few ideas: - Potato chips for crunch - A fresh garden salad for a light touch - Coleslaw adds great texture and flavor - Pickles on the side for a tangy contrast - Sweet tea or lemonade for a refreshing drink These sides will make your meal even better! This blog post covered how to make simple and tasty pulled chicken sandwiches. You learned about key ingredients like chicken, BBQ sauce, and seasonings. I provided step-by-step instructions for preparing the sauce, cooking, and assembling your sandwiches. Tips for the best flavor, storage, and variations helped enhance your dish. Try these ideas for a delicious meal. Enjoy the cooking process, and share your creations with friends!

Slow Cooker BBQ Pulled Chicken Sandwiches Delight

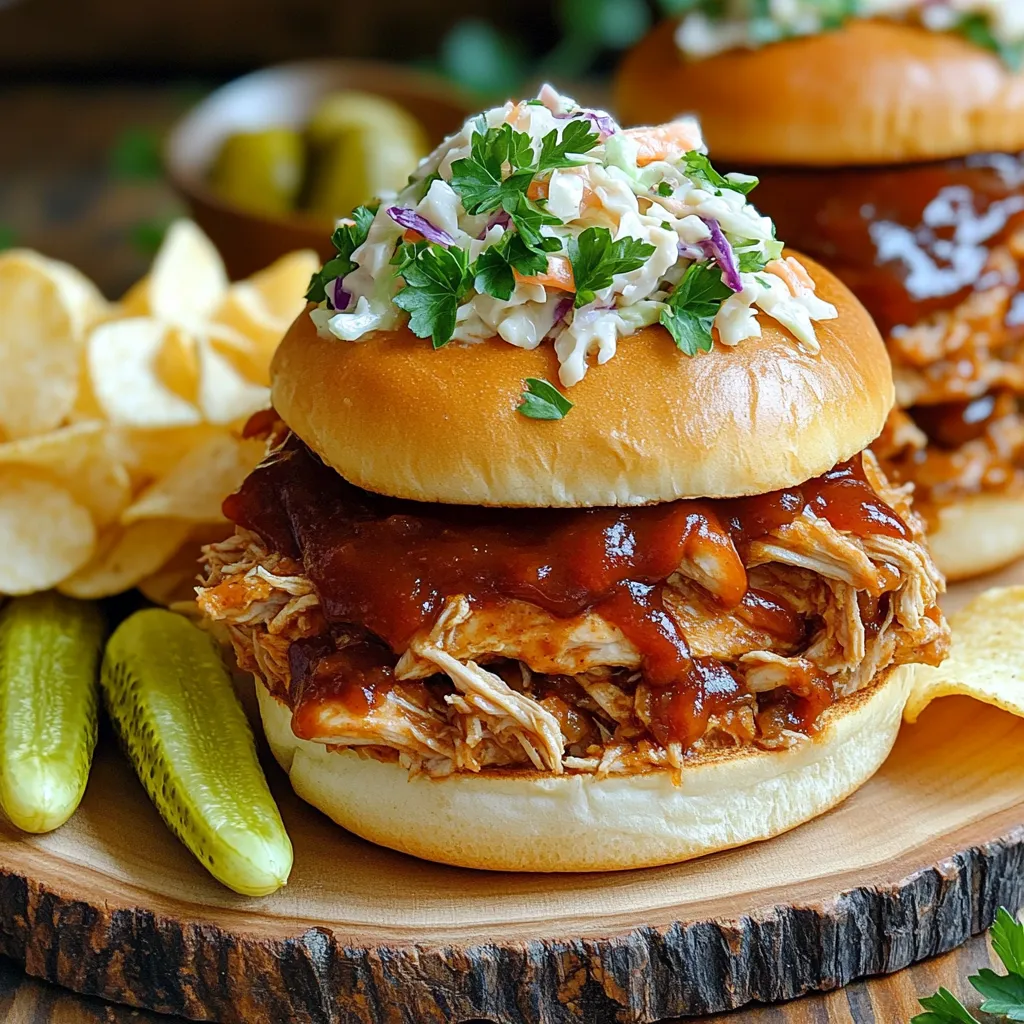
Looking for a quick, tasty meal? Try my Slow Cooker BBQ Pulled Chicken Sandwiches! This dish is easy to make,

For this delicious Caramel Apple Monkey Bread Pull-Apart, you will need: - 2 cans (16 oz each) refrigerated biscuit dough - 3 medium apples, peeled, cored, and diced - 1 cup brown sugar - 1/2 cup unsalted butter, melted - 2 teaspoons ground cinnamon - 1/2 teaspoon nutmeg - 1 cup caramel sauce (store-bought or homemade) - 1/2 cup chopped nuts (walnuts or pecans) To make this treat even better, consider these optional ingredients: - Powdered sugar for dusting - Extra nuts for crunch, like almonds or pecans - Vanilla ice cream for serving When choosing apples, select varieties that blend well with sweetness. Here are my favorites: - Granny Smith: They are tart and balance the sweetness of the caramel. Their firm texture holds up well during baking. - Honeycrisp: These apples are sweet and juicy. They add a nice flavor and keep a great crunch. - Fuji: Sweet and crisp, Fuji apples offer a delightful bite and work well in this recipe. Choosing the right apple can elevate your monkey bread and make it truly special! Start by prepping the apples. Peel, core, and dice three medium apples. This will give your monkey bread a nice fruity flavor. In a medium bowl, mix the diced apples with 1/4 cup of brown sugar, 1 teaspoon of cinnamon, and a pinch of nutmeg. Set this mixture aside. Next, melt 1/2 cup of unsalted butter in a separate bowl. Combine the melted butter with the remaining 3/4 cup of brown sugar and 1 teaspoon of cinnamon. Stir this until it is well blended. This will serve as the sweet coating for the biscuit pieces. Open the two cans of refrigerated biscuit dough. Cut each biscuit into quarters. This makes them easier to stack. Dip each piece into your brown sugar mixture, coating each piece well. Now, layer the biscuit pieces into your greased bundt pan. As you layer, sprinkle some of your apple mixture and a drizzle of caramel sauce between the layers. This adds flavor and keeps the bread moist. Continue until all biscuit pieces are in the pan. Pour the remaining brown sugar mixture over the top. Drizzle some extra caramel sauce on top for that sweet finish. If you like nuts, sprinkle 1/2 cup of chopped walnuts or pecans on top for extra crunch. Preheat your oven to 350°F (175°C). Place your bundt pan in the oven and bake for 30 to 35 minutes. You want the top to be golden brown. To check if it’s done, insert a toothpick into the bread. If it comes out clean, your monkey bread is ready. Once baked, let it cool for 10 to 15 minutes. Then, carefully invert it onto a serving plate. Drizzle more caramel sauce on top and dust with powdered sugar if you like. Enjoy your warm, gooey treat! To make the best Caramel Apple Monkey Bread, focus on even cooking. Here are my tips: - Use a Bundt Pan: This shape helps heat circulate well. - Grease Generously: A well-greased pan makes it easy to release the bread. - Layer Evenly: When adding biscuit pieces, layer them without gaps. This helps them cook through. - Check Doneness: Look for a golden brown top. Insert a toothpick in the center. If it comes out clean, it’s ready. Store your leftover monkey bread properly to keep it fresh: - Airtight Container: Place the bread in an airtight container to avoid drying out. - Fridge Storage: Keep it in the fridge for up to four days. - Reheat Gently: Use a microwave in short bursts. Heat for 15-20 seconds. Avoid overcooking, as it can dry out. Caramel Apple Monkey Bread is great on its own. But, you can make it even better with these ideas: - Serve Warm: This bread is best enjoyed warm for maximum gooeyness. - Add Ice Cream: A scoop of vanilla ice cream pairs well with the warm bread. - Whipped Cream: Drizzle whipped cream on top for a sweet touch. - Extra Caramel Sauce: Drizzle more caramel sauce for those who love sweetness. Enjoy your delicious creation! {{image_2}} You can change the taste of caramel apple monkey bread easily. For a fall twist, try pumpkin spice. Just add a teaspoon of pumpkin pie spice to your brown sugar mix. If you love chocolate, mix in some chocolate chips with the apples. This will make each bite rich and sweet. You can even swap out the caramel for chocolate sauce for a fun change. If you need a gluten-free version, use gluten-free biscuit dough. Many brands offer this option. For a dairy-free monkey bread, opt for dairy-free butter and a dairy-free caramel sauce. These changes keep the flavor while making it friendly for different diets. It’s always good to check the labels to ensure all ingredients fit your needs. Seasonal fruits can add a fresh taste. In the fall, try adding pears or cranberries along with apples. During spring, fresh berries like strawberries or blueberries can brighten your dish. You can also use festive spices like ginger or allspice for a holiday twist. These additions keep your monkey bread exciting all year round! To keep your Caramel Apple Monkey Bread fresh, use an airtight container. Wrap it tightly in plastic wrap or aluminum foil. This will help prevent it from drying out. If you have leftovers, store them at room temperature for up to two days. For longer storage, move it to the refrigerator. If you want to save some for later, freezing is easy. First, let the monkey bread cool completely. Then, wrap it in plastic wrap and then in foil. This double wrapping helps reduce freezer burn. Place it in a freezer-safe bag or container. It will stay good for about three months. To thaw, take it out of the freezer and leave it in the fridge overnight. If you're in a hurry, you can thaw it on the counter for a few hours. Once thawed, you can reheat it in the oven at 350°F (175°C) for about 10-15 minutes. In the refrigerator, your Caramel Apple Monkey Bread will last for about 5 days. It stays moist and tasty during this time. If you freeze it, it can last for up to three months without losing much flavor. Always check for signs of spoilage, like an off smell or mold, before enjoying. Yes, you can make this treat ahead. Prepare the monkey bread up to the baking step. Cover it tightly with plastic wrap and refrigerate. When you're ready, bake it straight from the fridge. You may need to add a few extra minutes to the baking time. This way, you can enjoy it fresh without extra stress. Using homemade caramel sauce is a great choice! Just make sure it’s thick enough to drizzle. If it’s too thin, it might not coat the bread well. Store-bought caramel is convenient, but homemade can add a special touch. Just follow your recipe, and let it cool before using. If you want something different, try croissant dough. It gives a flaky texture and a buttery flavor. You can also use puff pastry for a light and airy bread. Just remember, the baking time may change. Keep an eye on it to ensure it bakes perfectly. In this article, we explored how to make delicious Caramel Apple Monkey Bread. We discussed the main and optional ingredients, including the best apple types to use. I shared step-by-step instructions on preparation, assembly, and baking. To perfect your monkey bread, I offered helpful tips and ways to store your treats. We also examined flavor variations, dietary adjustments, and seasonal ideas to keep things fun. Enjoy making this tasty dish that will impress family and friends!

Caramel Apple Monkey Bread Pull-Apart Irresistible Treat

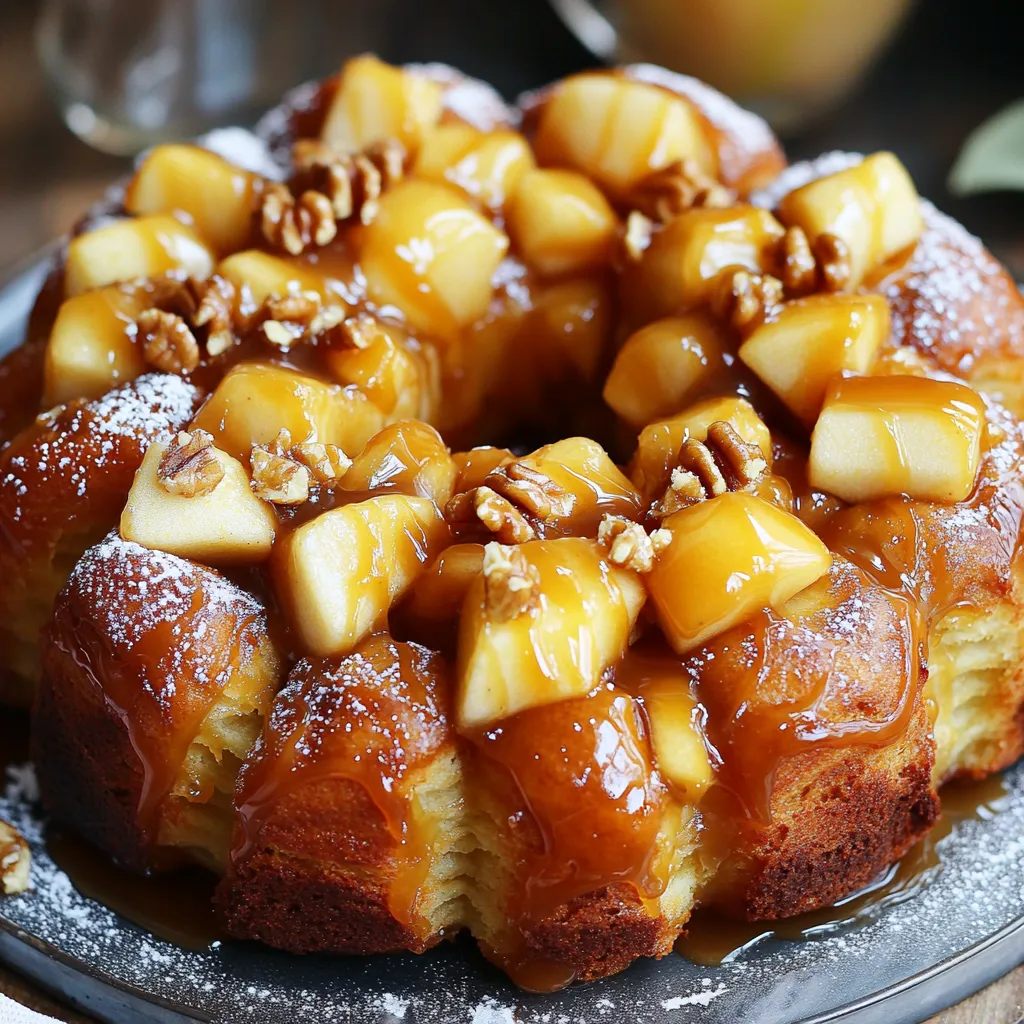
If you crave a dessert that magically combines gooey caramel, crisp apples, and warm biscuit dough, you’re in the right

- 3 large russet potatoes, peeled and diced - 1 medium onion, chopped - 3 cloves garlic, minced - 4 cups vegetable broth These key ingredients form the base of your soup. The russet potatoes add creaminess. The onion and garlic give a lovely depth of flavor. Vegetable broth makes the soup rich and savory. - 1 cup milk or heavy cream - 2 cups shredded sharp cheddar cheese - 1/2 cup sour cream - Salt and pepper to taste Dairy makes the soup creamy. Sharp cheddar cheese brings a tangy flavor. Sour cream adds a nice finish. Don’t forget to season with salt and pepper. Adjust these to your taste! - 4 slices crispy turkey bacon, crumbled - 1/4 cup chopped green onions - Olive oil, dried thyme, and smoked paprika These optional ingredients can elevate your soup. Crumbled turkey bacon adds a nice crunch. Green onions give a fresh bite. Olive oil, thyme, and smoked paprika enhance the overall flavor profile. Mix and match these to make your soup unique! - First, heat olive oil in a large pot over medium heat. - Next, add the chopped onion and minced garlic. Cook these for about 3 to 4 minutes. The onion should become soft and fragrant. - Now, stir in the diced potatoes along with salt, pepper, dried thyme, and smoked paprika. - Pour in 4 cups of vegetable broth and bring the mixture to a boil. - Once it boils, reduce the heat to low and let it simmer for 15 to 20 minutes. The potatoes should be tender by this time. - For the next step, use an immersion blender to puree the soup. If you don't have one, carefully transfer the soup to a regular blender in batches. - Return the pot to low heat after blending. Stir in 1 cup of milk and half of the shredded cheddar cheese. Mix until the cheese melts and the soup is creamy. - Finally, add in 1/2 cup of sour cream. Adjust the seasoning with more salt and pepper if needed. - Serve the soup hot, topped with the remaining cheddar cheese, crumbled turkey bacon, and chopped green onions. When making loaded baked potato cheddar soup, texture matters. Some like it smooth, while others prefer a chunky soup. To reach your desired texture, use an immersion blender. Blend until it’s as creamy or chunky as you want. If you want a thicker soup, add less broth. For a thinner consistency, simply increase the broth. You can boost the flavor of your soup by substituting some ingredients. For example, try using chicken broth instead of vegetable broth for a richer taste. Also, consider using fresh herbs like chives or parsley instead of dried thyme. Fresh herbs can elevate the soup's flavor and aroma. Presentation makes your soup even more appealing. Serve it in warm bowls for a cozy touch. Garnish with a drizzle of sour cream and a sprinkle of green onions. This adds color and makes it look gourmet. You can also top it with crispy turkey bacon for extra crunch and flavor. {{image_2}} To make this soup gluten-free, skip any flour in the recipe. Use vegetable broth that’s gluten-free. The other ingredients, like potatoes and cheese, are naturally gluten-free. You can enjoy this creamy soup without worry. For a vegan twist, swap dairy and meat products. Use cashew cream instead of milk and sour cream. Nutritional yeast gives a cheesy flavor. Replace turkey bacon with crispy tofu or mushrooms for texture. This way, you keep the rich taste while staying plant-based. You can change the cheese for different flavors. Try pepper jack for spice or gouda for smokiness. Adding veggies like spinach or broccoli boosts nutrition. You can also mix in proteins like shredded chicken or beans for a heartier soup. Get creative and make it your own! To keep your Loaded Baked Potato Cheddar Soup fresh, store it in an airtight container. Let it cool to room temperature before sealing. This helps prevent condensation. You can keep it in the fridge for up to three days. If you want to enjoy it later, freezing is a great option. To freeze the soup, let it cool completely. Then, pour it into freezer-safe bags or containers. Leave some space at the top, as the soup will expand when frozen. Label the containers with the date. It can last for up to three months. When you’re ready to eat, thaw it overnight in the fridge. You can reheat the soup on the stovetop or in the microwave. For stovetop reheating, pour the soup into a pot. Heat over medium until warm, stirring often. If using a microwave, place the soup in a microwave-safe bowl. Heat for two minutes, stirring halfway through. Check the temperature to ensure it’s hot before serving. Yes, you can make this soup ahead of time. Here are some tips for prepping in advance: - Cook and cool: Make the soup, then let it cool down before storing. - Storage: Place the cooled soup in an airtight container. You can keep it in the fridge for up to 3 days. - Reheat: When ready to eat, heat it gently on the stove. Add a splash of milk if it seems too thick. If you need a substitute for vegetable broth, try these options: - Chicken broth: This adds a meaty flavor, great for non-vegetarians. - Water and seasoning: Use water with herbs like thyme or bay leaf for a lighter choice. - Bouillon cubes: Dissolve them in hot water for a quick broth solution. To add some heat to your Loaded Baked Potato Cheddar Soup, consider these tips: - Hot sauce: Stir in your favorite hot sauce to taste. - Red pepper flakes: Sprinkle in red pepper flakes while cooking for a mild kick. - Spicy cheese: Use a pepper jack cheese instead of cheddar for extra spice. In this blog post, we explored how to make Loaded Baked Potato Cheddar Soup. We covered essential ingredients, step-by-step instructions, and tips for perfect texture and flavor. You can customize this soup with variations or store leftovers easily. Keep it cozy and delicious! With these clear steps and handy tips, you'll whip up a warm bowl that everyone will love. Enjoy making this comforting dish whenever you crave it. It’s simple, tasty, and satisfying.

Loaded Baked Potato Cheddar Soup Creamy and Comforting

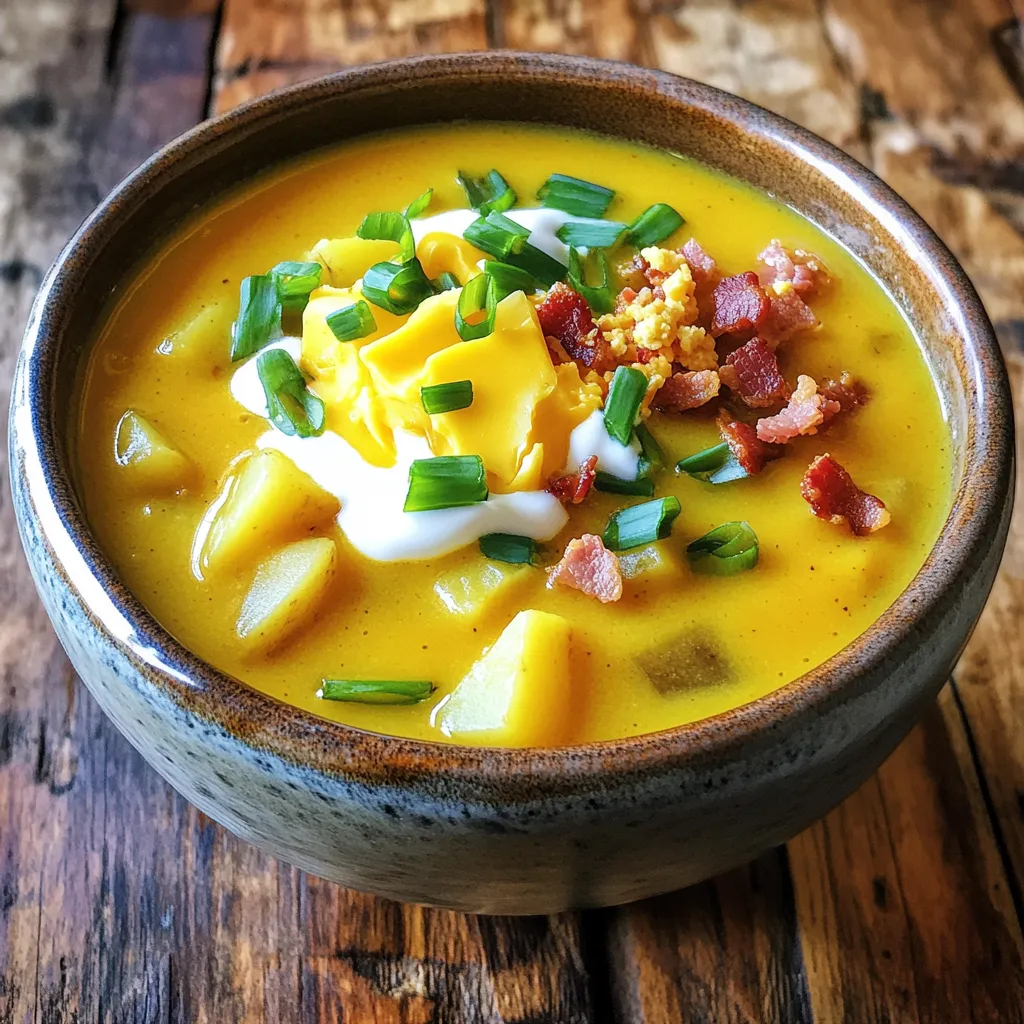
Craving something warm and hearty? Our Loaded Baked Potato Cheddar Soup is the answer! With creamy cheddar, tender potatoes, and

- 1 cup all-purpose flour - 1/4 cup granulated sugar - 1 tablespoon baking powder - 1/2 teaspoon salt - 1 teaspoon pumpkin spice mix - 1/2 cup water - 2 tablespoons unsalted butter, melted - 1/2 teaspoon vanilla extract - Oil for frying - 1/4 cup unsalted butter, melted (for coating) - 1/4 cup granulated sugar (for coating) - 1 teaspoon pumpkin spice mix (for coating) To make delicious pumpkin spice churro bites, gather all your ingredients first. You will need a mix of dry and wet items to create the dough. Start with 1 cup of all-purpose flour. This will be the base for your churros. Add 1/4 cup of granulated sugar for sweetness. Next, include 1 tablespoon of baking powder. This helps them puff up nicely. Don’t forget 1/2 teaspoon of salt to balance the flavor. Finally, add 1 teaspoon of pumpkin spice mix to give that warm fall flavor. For the wet ingredients, measure 1/2 cup of water. Add 2 tablespoons of unsalted butter, melted. This will add richness. Also, include 1/2 teaspoon of vanilla extract for extra flavor. You will need oil for frying. Make sure to select a neutral oil with a high smoke point. For coating, have 1/4 cup of unsalted butter, melted and 1/4 cup of granulated sugar ready. Lastly, repeat the 1 teaspoon of pumpkin spice mix for the coating mixture. With these ingredients in hand, you are all set to make these festive treats! - Whisking Dry Ingredients Start by gathering your dry ingredients. In a medium bowl, mix together 1 cup of all-purpose flour, 1/4 cup of granulated sugar, 1 tablespoon of baking powder, 1/2 teaspoon of salt, and 1 teaspoon of pumpkin spice mix. Whisk these until they blend well. This step is key for even flavor. - Boiling Wet Ingredients Next, grab a small pot. Add 1/2 cup of water, 2 tablespoons of melted unsalted butter, and 1/2 teaspoon of vanilla extract. Heat this mixture over medium heat until it gently boils. Keep an eye on it. You want it to simmer, not spill. - Mixing to Form Dough Once boiling, take the pot off the heat. Quickly add the dry flour mixture. Stir vigorously until a dough forms. It should come together and pull away from the sides. Let this dough cool for a few minutes. This helps you pipe it without burning your hands. - Heating the Oil In a large pot or deep frying pan, pour in enough oil to reach about 2 inches high. Heat the oil to 350°F (175°C). Use a thermometer for accuracy. Hot oil makes the churros crispy. - Piping the Dough Transfer your dough to a pastry bag with a star tip. If you don’t have a star tip, just cut the tip off the bag. Pipe small pieces of dough into the hot oil. Use scissors or a knife to cut the dough as you go. Be sure not to overcrowd the pot. - Frying Until Golden Brown Fry the churro bites for about 2-3 minutes. Turn them as needed to cook all sides evenly. Once they are golden brown, remove them with a slotted spoon. Drain them on paper towels. This helps get rid of excess oil. - Preparing the Cinnamon-Sugar Mixture In a shallow bowl, mix together 1/4 cup of melted butter, 1/4 cup of granulated sugar, and 1 teaspoon of pumpkin spice mix. Stir until well mixed. This will give your churro bites a sweet, spiced coat. - Tossing the Churro Bites While the churro bites are still warm, toss them in the cinnamon-sugar mixture. Make sure they are evenly coated. This step adds flavor and sweetness that you will love. - Serving Suggestions For a fun presentation, arrange the churro bites on a platter. You can dust them with extra pumpkin spice. Consider serving with warm caramel or chocolate sauce for dipping. It makes each bite even more delightful! Ensuring Proper Oil Temperature The right oil temperature is key for crispy churro bites. Heat your oil to 350°F (175°C). Use a thermometer for accuracy. If the oil is too cool, the churros will soak up oil. If too hot, they will burn. Tips for Piping Dough Use a pastry bag with a star tip for fun shapes. If you don’t have one, cut a small tip from a zip-top bag. Pipe small pieces into the oil; cut them with scissors. This keeps them bite-sized and even. Adding Extra Spices You can boost flavor by adding more spices. Try a pinch of nutmeg or cinnamon to the dough. A touch of vanilla adds warmth too. These small changes make a big difference. Experimenting with Dipping Sauces Try different sauces for dipping. Warm caramel or chocolate sauce pairs well. You can also use a spiced cream cheese dip for a fun twist. Don’t be afraid to get creative! Arranging on a Serving Platter For a beautiful display, arrange churro bites on a festive plate. Stack them in a cone shape or in a circle. This eye-catching look will impress your guests. Festive Garnishes Add a sprinkle of pumpkin spice on top for a seasonal touch. You can also use edible flowers or fresh herbs. These garnishes make your treats pop and look even more inviting. {{image_2}} You can switch up the pumpkin spice churro bites for fun. Try chocolate pumpkin spice churros. Just add chocolate chips to the dough. The rich chocolate pairs well with the pumpkin spice. You can also make maple cinnamon churro bites. For this, add a splash of maple extract to the dough. The sweet maple flavor gives a new twist. If you need gluten-free options, use gluten-free flour instead of all-purpose flour. This change keeps the taste while being friendly for gluten-free diets. For vegan pumpkin spice churros, swap the butter for coconut oil. Use a plant-based milk instead of water if you want. These small changes make the recipe fit for everyone. Serve your churro bites with a scoop of ice cream. Vanilla or caramel ice cream works best. The cold creaminess balances the warm churros. You can also create churro bonbons. Just dip the churro bites in chocolate and let them cool. This adds a fun and tasty layer to the dessert. - Best Practices for Storing Leftovers Let the churro bites cool completely. Place them in a single layer to avoid sticking. You can wrap them in plastic wrap or put them in a bag. This keeps them fresh. - Suitable Containers for Storage Use an airtight container or a resealable plastic bag. These options help keep moisture out and the churros fresh. If you have many, stack them carefully to save space. - Oven Method Preheat your oven to 350°F (175°C). Spread the churro bites on a baking sheet. Bake for about 5-7 minutes until warm and crispy. - Microwave Method Place a few churro bites on a microwave-safe plate. Heat for about 10-15 seconds. Be careful not to overheat, as they can become chewy. - Best Duration for Storing Store churro bites for about 2-3 days at room temperature. If you want to keep them longer, freeze them for up to a month. - Tips to Maintain Crispness To keep churros crispy, avoid covering them too tightly. A paper towel in the container can help absorb moisture. Enjoying them fresh is best, but these tips help them last longer. Churros are long, thin strips of fried dough. Churro bites are small, bite-sized pieces. Churro bites are easier to eat and perfect for sharing. Both have the same tasty flavor and texture. Yes, you can make the dough ahead. Store it in the fridge for up to one day. When ready, fry the churro bites fresh for the best taste. You can also prepare the cinnamon-sugar mix in advance. If you don’t have pumpkin spice, combine cinnamon, nutmeg, and ginger. Use equal parts for a similar flavor. You can also try just cinnamon for a simpler taste. Experiment to find what you like best. Use a thermometer to check the oil temperature. It should be around 350°F (175°C). If you don’t have a thermometer, drop a small piece of dough in the oil. If it bubbles and rises, the oil is ready. Yes! Preheat the oven to 400°F (200°C). Shape the dough into small bites and place them on a baking sheet. Bake for 12-15 minutes or until golden. They will not be as crispy but will still taste great. You now have a clear path to making delicious pumpkin spice churro bites. We covered the key ingredients and detailed steps that lead to a tasty treat. With helpful tips and various options for flavors, these churros can fit any occasion. Remember to store them properly for the best taste. Experiment with dips and presentation for fun. Enjoy creating these delightful bites today!

Pumpkin Spice Churro Bites Tasty Fall Treat

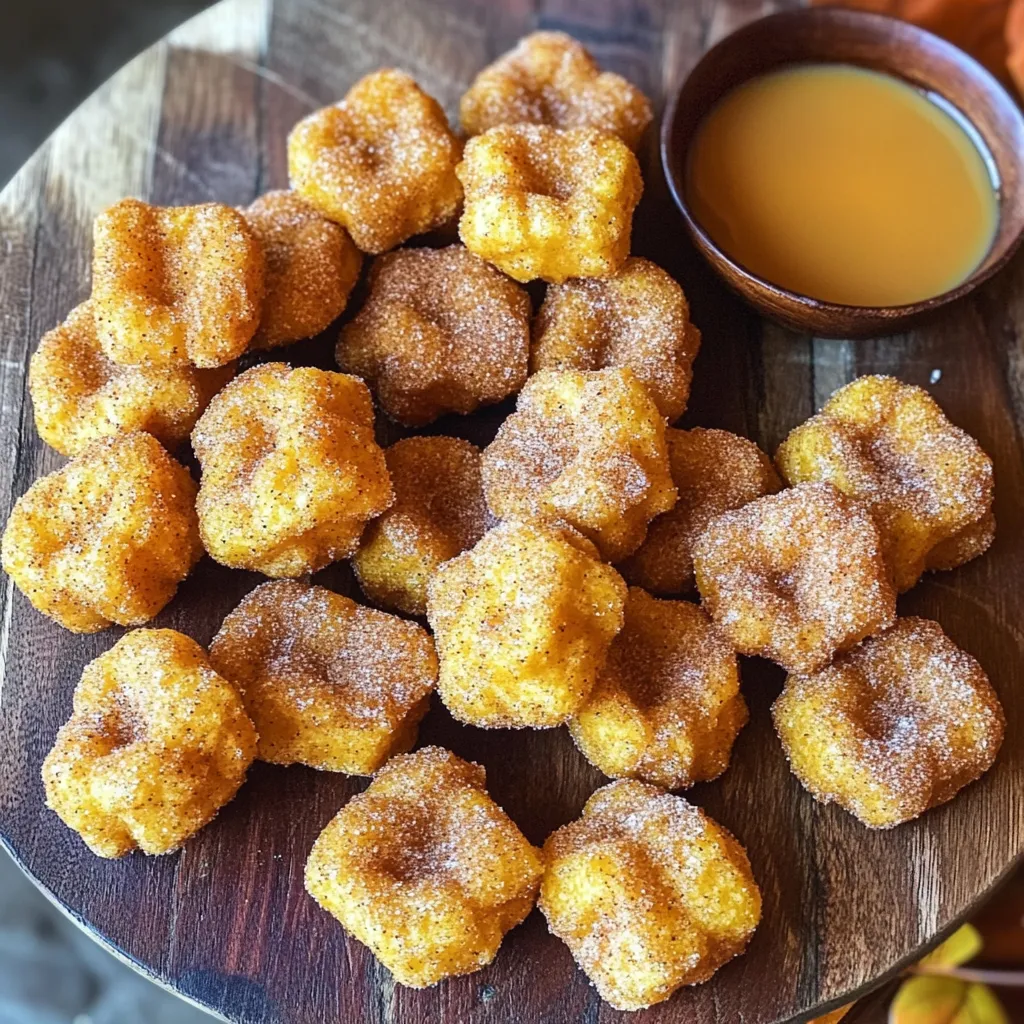
Fall is here, and you deserve a treat that captures all the cozy flavors of the season. Pumpkin Spice Churro

To create this Maple Dijon Chicken & Carrots delight, gather these simple ingredients: - 4 boneless, skinless chicken thighs - 2 tablespoons Dijon mustard - 3 tablespoons pure maple syrup - 1 tablespoon olive oil - 1 teaspoon garlic powder - 1 teaspoon onion powder - Salt and pepper to taste - 6 medium carrots, sliced into sticks - 1 red onion, cut into wedges - Fresh thyme sprigs for garnish These ingredients work together to give you a sweet and savory dish. The chicken thighs keep the meat juicy. The Dijon mustard adds a zesty kick. Maple syrup brings a touch of sweetness. Garlic and onion powder round out the flavors. I love using fresh thyme as a garnish. It adds a nice touch and a lovely aroma. The carrots and red onion not only taste great but also add color to your meal. Enjoy cooking with these vibrant ingredients! Start by preheating your oven to 400°F (200°C). This step helps cook the chicken and carrots evenly. A hot oven ensures a nice roast, giving your meal better flavor and texture. In a small bowl, mix together 2 tablespoons of Dijon mustard, 3 tablespoons of pure maple syrup, and 1 tablespoon of olive oil. Add 1 teaspoon of garlic powder, 1 teaspoon of onion powder, and a pinch of salt and pepper. This marinade makes the chicken tasty and juicy. Take 4 boneless, skinless chicken thighs and place them in a large bowl. Pour half of the marinade over the chicken. Make sure each piece is well coated. Let it marinate for about 15 minutes at room temperature. This short time helps the flavors soak in. While the chicken is soaking in flavor, prepare your sheet pan. Line it with parchment paper. This makes cleanup easy. Next, slice 6 medium carrots into sticks and cut 1 red onion into wedges. Add these veggies to the lined sheet pan. Drizzle the remaining marinade over the carrots and onions, then toss them to make sure they are all coated. This adds flavor to the vegetables, making them a perfect side. Now, arrange the marinated chicken thighs on the sheet pan among the veggies. This step sets you up for a delicious one-pan meal. Your oven is hot, the chicken is marinated, and the pan is ready. It's time to roast! To make the best marinade, use fresh ingredients. I love using pure maple syrup; it adds a sweet touch. Mix the Dijon mustard and maple syrup well. Add olive oil for richness. Garlic and onion powder boost the flavor. Don’t forget to season with salt and pepper. Marinate the chicken for at least 15 minutes. This step helps the flavors soak in. For a stronger taste, marinate longer in the fridge. Just remember to bring it back to room temp before cooking. Roasting is key for this dish. Preheat your oven to 400°F (200°C) for even cooking. Line your sheet pan with parchment paper. This makes for easy cleanup and helps prevent sticking. Spread the vegetables out in a single layer. This allows them to roast evenly. If you want crispy edges, broil for a few minutes at the end. Keep a close eye during broiling. It can go from perfect to burnt in seconds! This dish offers a colorful plate that looks great. Serve it straight from the pan for a rustic feel. Garnish with fresh thyme sprigs for a pop of green. Pair it with rice or crusty bread for a complete meal. You could also add a simple salad on the side. It balances the sweetness of the chicken and carrots. For a fun twist, drizzle a little extra maple syrup on top before serving. It adds a lovely shine and flavor! {{image_2}} You can mix up the veggies in this dish. Try using Brussels sprouts, sweet potatoes, or bell peppers. These vegetables add different flavors and textures. For a fun twist, use zucchini or asparagus when they are in season. Each veggie will soak up the tasty marinade. It keeps the dish fresh and exciting every time you make it. The marinade is key to this recipe. You can adjust the taste based on your mood. If you want it spicier, add some cayenne pepper or red pepper flakes. For a tangy twist, squeeze in some lemon juice. You can also swap maple syrup for honey for a different sweetness. Experiment with herbs like rosemary or oregano to change the flavor profile. Each variation can give you a new experience. If you want to switch up the protein, you have options. You can use chicken breasts instead of thighs. They will cook faster, so check them sooner. Turkey thighs are another great choice. They have a similar taste and texture. For a meat-free option, try tofu or chickpeas. Both will soak up the marinade well. Just make sure to adjust the cooking time as needed. Enjoy the freedom to create your own version! You can store leftovers in an airtight container. Place the chicken and carrots in the fridge. They stay fresh for about three days. Make sure to cool them first. This helps keep the flavors intact. To freeze, let the dish cool completely. Then, use freezer-safe bags. Remove all air before sealing. You can freeze it for up to three months. When you're ready, thaw it in the fridge overnight. This keeps the taste and texture nice. Reheat the chicken and carrots in the oven. Preheat it to 350°F (175°C). Place the dish in an oven-safe container. Cover it with foil to keep moisture in. Heat for about 15-20 minutes or until warmed through. You can also use a microwave. Just heat in short bursts to avoid overcooking. Enjoy your tasty meal again! You should marinate the chicken for about 15 minutes. This short time gives the chicken flavor. If you have more time, you can marinate it longer, even up to 2 hours. But don’t overdo it. Too long can change the texture. Yes, you can use bone-in chicken thighs. They will add more flavor to the dish. Just adjust the cooking time. Bone-in thighs will take a bit longer to cook. Make sure they reach 165°F (74°C) for safety. Maple Dijon Chicken & Carrots goes well with many sides. You can serve it with rice, quinoa, or a fresh salad. Mashed potatoes or roasted potatoes also work great. Choose what you enjoy! To check if the chicken is done, use a meat thermometer. The internal temperature should reach 165°F (74°C). You can also cut into the chicken. The juices should run clear, not pink. This shows it is safe to eat. This blog post went through the key ingredients, steps, and tips for Maple Dijon Chicken with carrots. You learned how to marinate, roast perfectly, and even store leftovers. Remember, you can mix in your favorite veggies or change the protein too. Cooking should be fun and creative! Enjoy this dish and share it with others. You'll impress them with your new skills and tasty meals.

Maple Dijon Chicken & Carrots Sheet Pan Delight

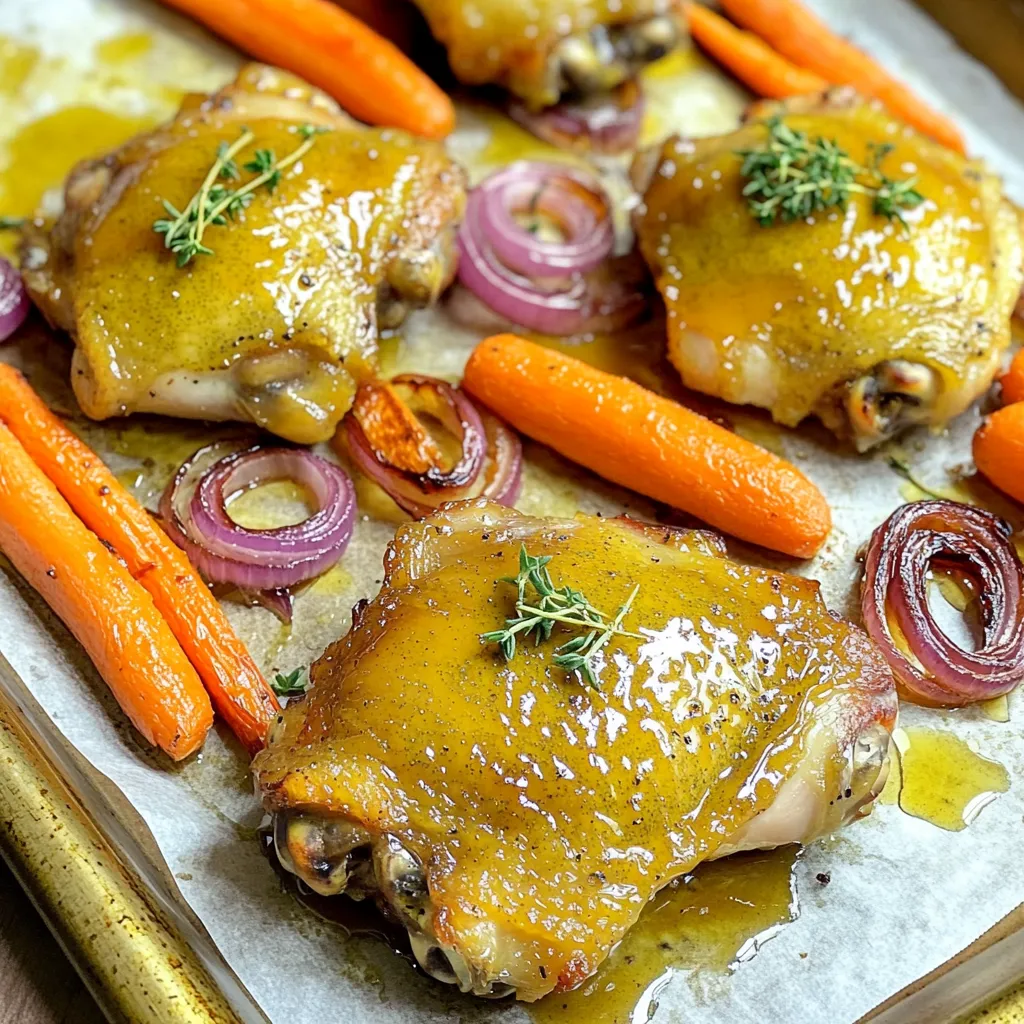
Get ready to enjoy a delicious meal with my Maple Dijon Chicken & Carrots Sheet Pan Delight! This simple recipe

To make delicious Caramel Pecan Pie Bars, gather these simple ingredients: - 1 cup all-purpose flour - 1/2 cup unsalted butter, softened - 1/4 cup granulated sugar - 1/4 teaspoon salt - 1/2 cup brown sugar, packed - 1/4 cup corn syrup - 1 teaspoon vanilla extract - 2 large eggs - 1 cup pecans, roughly chopped - 1/2 cup caramel sauce (store-bought or homemade) - Sea salt, for garnish These ingredients create a rich and sweet flavor. The crust uses flour, butter, and sugar for a soft base. The filling combines eggs, sugars, and corn syrup for that classic pecan pie taste. The pecans add crunch and richness, while the caramel sauce makes it extra special. Don't forget the sea salt; it adds a perfect touch! First, set your oven to 350°F (175°C). This heat will help your bars bake evenly. Grease a 9x9-inch baking pan or line it with parchment paper. This step makes removal easy later. In a mixing bowl, cream together 1/2 cup of softened butter and 1/4 cup of granulated sugar. Mix until it feels light and fluffy. Then, add 1 cup of all-purpose flour and 1/4 teaspoon of salt. Stir until a dough forms. Press this dough evenly into the bottom of your prepared pan. Place the pan in the oven and bake for about 15 minutes. You want the crust to turn lightly golden. Once baked, take it out and let it cool for a few minutes. In a medium bowl, whisk together 1/2 cup of packed brown sugar, 1/4 cup of corn syrup, and 1 teaspoon of vanilla extract. Add the eggs, one at a time. Whisk well after each addition until smooth and combined. Now, stir in 1 cup of roughly chopped pecans and half of 1/2 cup of caramel sauce. Mix well until everything is evenly distributed. Pour the pecan mixture over the baked crust. Spread it evenly to cover the crust. Place it back in the oven and bake for another 25 to 30 minutes. The filling should be set and slightly bubbly. It will firm up as it cools. After baking, take the pan out and let it cool on a wire rack for at least 30 minutes. Once cool, drizzle the remaining caramel sauce over the top and sprinkle a little sea salt for flavor. When the bars are completely cool, lift them out of the pan using the parchment paper edges if you used them. Cut into squares or rectangles. Enjoy these sweet treats on their own or with a scoop of vanilla ice cream! To get a great crust, use cold butter. This helps the crust stay flaky. Mix the butter with the sugar well before adding flour. It should look light and fluffy. Press the dough into your pan firmly. This keeps the crust from puffing up while baking. Bake until it's just golden. Don’t overbake it. For a creamy filling, mix the sugars well with the corn syrup. Make sure to whisk in the eggs slowly. This helps avoid lumps. Stir in the pecans gently. You want them well mixed but not crushed. Pour the filling over the warm crust. This helps the layers stick well together. Slice the bars into squares once they cool completely. Drizzle the remaining caramel sauce on top for extra flavor. A sprinkle of sea salt enhances the sweetness. For a special touch, serve with vanilla ice cream. The cold ice cream pairs perfectly with the warm bars. Enjoy with friends and family for a sweet treat! {{image_2}} You don’t have to stick with pecans. Try walnuts or almonds for a new twist. They add a different crunch and flavor. If you want a softer bite, use hazelnuts. Just chop them up and mix them in with the filling. Each nut brings its own taste and texture. It's fun to experiment! Want to make this dessert gluten-free? Swap the all-purpose flour for almond flour or a gluten-free blend. This change keeps the bars tasty and rich. Check the labels to ensure your ingredients are gluten-free. You might need to adjust the baking time slightly. Keep an eye on them as they bake. Add a kick of flavor with spices. A dash of cinnamon or nutmeg can make a big difference. You could also mix in some orange zest for a fresh twist. If you love chocolate, try adding mini chocolate chips to the filling. These enhancements will make your bars even more special. The options are endless! To keep your caramel pecan pie bars fresh, place them in an airtight container. Make sure the bars are completely cool before storing. This step helps prevent sogginess. You can also layer parchment paper between bars to avoid sticking. If you want to save some bars for later, freezing is a great option. Wrap each bar tightly in plastic wrap. Then, place the wrapped bars in a freezer-safe bag. Be sure to label the bag with the date. These bars can last up to three months in the freezer. When stored properly, caramel pecan pie bars last about a week in the fridge. They may stay fresh for a bit longer, but the taste might change. If you notice any change in texture or smell, it’s best to toss them. To make these bars, first, you need to preheat your oven to 350°F (175°C). Grease a 9x9-inch pan or use parchment paper. Next, cream together 1/2 cup of softened butter and 1/4 cup of granulated sugar until fluffy. Add 1 cup of all-purpose flour and 1/4 teaspoon of salt, mixing until a dough forms. Press this dough into the bottom of your pan. Bake it for about 15 minutes until golden. For the filling, whisk together 1/2 cup of packed brown sugar, 1/4 cup of corn syrup, and 1 teaspoon of vanilla. Add 2 large eggs one at a time, mixing well. Stir in 1 cup of chopped pecans and 1/2 cup of caramel sauce. Pour this mixture over the crust and bake for an extra 25-30 minutes. Let it cool, drizzle with more caramel, and sprinkle sea salt before slicing. Yes, you can! While pecans are classic, walnuts and almonds work well too. Just chop them up like you would the pecans. Each nut brings its own flavor and crunch. Feel free to experiment with your favorites. You might discover a new twist on this dessert. I love serving these bars warm with a scoop of vanilla ice cream. The ice cream melts slightly and mixes with the caramel, creating a dreamy dessert. You can also serve them with whipped cream or a sprinkle of sea salt on top. They make a great treat for gatherings or family dinners. If you want to avoid corn syrup, you have options. You can use honey or maple syrup instead. Both add sweetness and a hint of flavor. Just keep in mind that they might change the taste a bit. Use the same amount as you would corn syrup. Absolutely! You can make these bars a day or two in advance. Just store them in an airtight container at room temperature. If you want, you can reheat them slightly before serving. This helps the caramel become gooey again. The bars are done when the filling is set and slightly bubbly. A toothpick should come out clean or with just a few moist crumbs. Keep in mind that the filling will firm up as it cools. If the center still looks too jiggly, give it a few more minutes in the oven. In this blog post, we explored how to make delicious Caramel Pecan Pie Bars. I detailed key ingredients and provided step-by-step instructions for success. Tips for a perfect crust and creamy filling were shared, along with fun variations and storage info. Embrace your baking skills and enjoy these bars with family and friends. You’ll impress everyone with your treat while creating sweet memories. Happy baking!

Caramel Pecan Pie Bars Irresistible Dessert Recipe

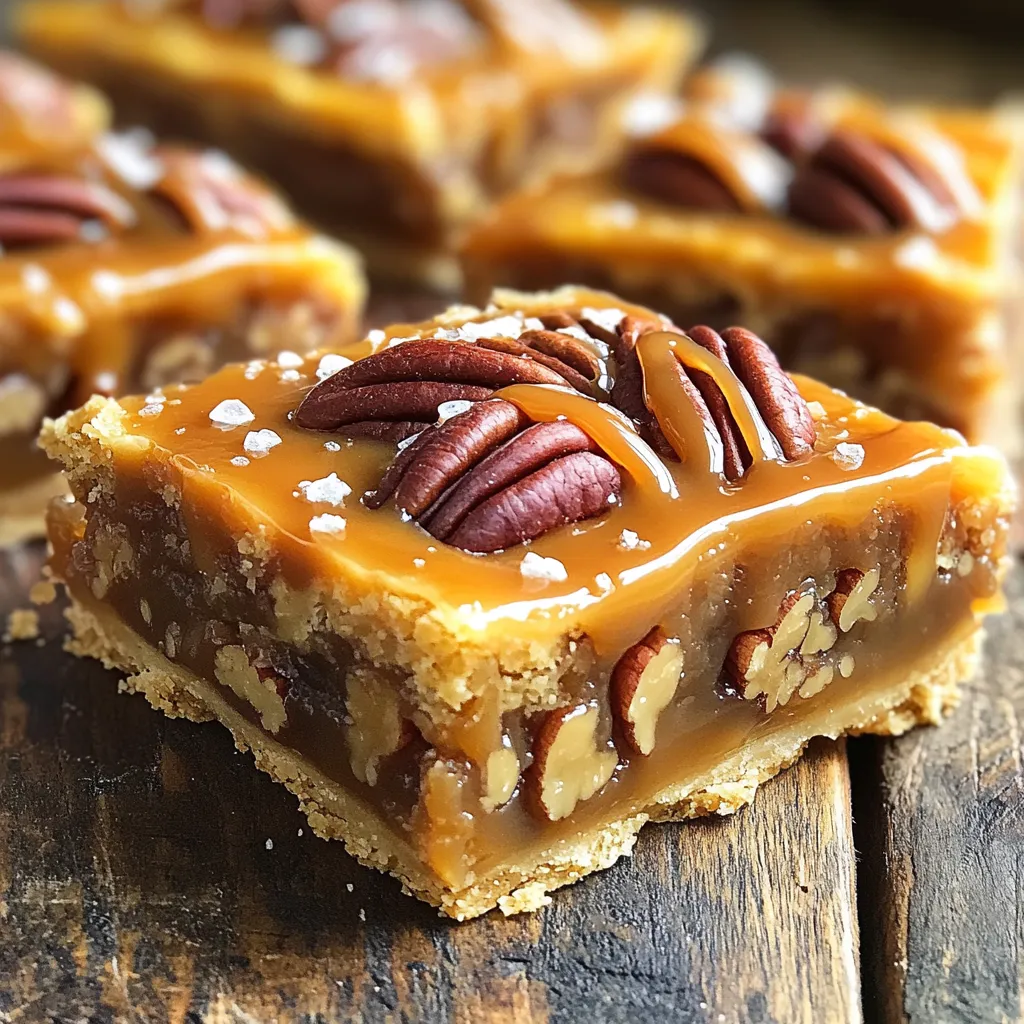
Are you craving a sweet treat that will impress everyone? Look no further! This Caramel Pecan Pie Bars recipe combines

- 1 lb boneless, skinless chicken breasts - 1 cup BBQ sauce - 1 bag tortilla chips (10-12 oz) - 2 cups shredded cheddar cheese - 1 cup black beans, rinsed and drained - 1 cup corn (fresh, frozen, or canned) - 1 jalapeño, thinly sliced - 1/2 red onion, diced - 1 avocado, diced - Fresh cilantro, for garnish - Sour cream, for serving - Lime wedges, for serving Gathering these ingredients makes the nachos come together fast. You will love how easy it is! Start with the chicken. I use boneless, skinless chicken breasts for quick prep. Then, grab your favorite BBQ sauce. This sauce adds flavor and moisture. Next, you need tortilla chips. Choose a bag that feels sturdy. Thin chips may break under all the toppings. For added flavor and texture, I include shredded cheddar cheese. It melts nicely and holds everything together. Now for the toppings! Black beans add protein and fiber. I like using canned beans for ease. Just rinse them well. Corn brings sweetness, and you can use fresh or frozen. For some heat, slice a jalapeño. Remove seeds if you want less spice. Diced red onion gives a crunch and a hint of sharpness. Don't forget the avocado for creaminess! Finally, fresh cilantro adds brightness. Serve with sour cream and lime wedges. These toppings make the dish pop! Mixing these ingredients creates a fun meal that everyone will enjoy. - Preheat oven to 400°F (200°C). - Toss chicken breasts with BBQ sauce until they are covered well. - Bake chicken for 25-30 minutes until it reaches 165°F (75°C). - Shred the chicken with two forks and mix in the rest of the BBQ sauce. - Spread tortilla chips evenly on a baking sheet. - Layer the chips with shredded chicken, black beans, corn, jalapeños, diced onions, and cheese. - Bake until the cheese is melted and bubbly, about 10-15 minutes. To make your Sheet-Pan BBQ Chicken Nachos great, start with the chicken. Make sure to coat the chicken well with BBQ sauce. This step adds flavor and moisture. Toss the chicken in a bowl with half of the sauce. Spread it on the baking sheet. Bake until the chicken reaches 165°F. For melted cheese, use shredded cheese and layer it evenly. This helps it melt well. Add cheese right before the nachos finish baking. If you like your cheese extra gooey, leave it in a bit longer. If you want to change the protein, try using tofu or jackfruit. Both options soak up flavors well. They make a tasty base for your nachos. For cheese, you can swap cheddar for pepper jack or mozzarella. Each brings a unique flavor. You can also add toppings like diced tomatoes or olives for extra taste. To give your nachos a kick, add spicy elements. You can mix in diced jalapeños or a hot sauce drizzle. For a tangy twist, try squeezing lime juice over the top. Garnish your nachos with fresh cilantro or green onions. These add color and freshness. You can also serve with sour cream for creaminess. Lime wedges on the side make it even better! {{image_2}} You can change the flavors of your nachos. Try southwest-style nachos. Use black beans, pinto beans, and spices like cumin and paprika. These changes add a nice kick. You can also mix BBQ chicken nachos with different sauces. Try using a spicy sauce or a tangy mustard sauce. Each sauce brings its own fun twist to the dish. If you need gluten-free options, use corn tortilla chips. They fit right in and taste great. For vegan or vegetarian adaptations, swap chicken with jackfruit or lentils. You can use vegan cheese too. These swaps keep the flavor while meeting dietary needs. Nachos pair well with side dishes. Try guacamole or a fresh salad for a crunchy touch. For drinks, serve with iced tea or a light beer. These beverages balance the rich flavors of the nachos. Enjoy your meal with friends for a fun time! To keep nachos fresh, place them in an airtight container. You can store them in the fridge for up to three days. Use parchment paper between layers to avoid sogginess. If you want to keep the chips crunchy, store them separately from the toppings. This way, the chips stay crispy longer. To reheat nachos, use an oven or toaster oven. Set the oven to 350°F (175°C). Place the nachos on a baking sheet for about 10 minutes. This method helps the cheese melt nicely. Avoid using a microwave, as it can make the chips soggy. If you must use the microwave, heat in short bursts and watch closely. You can freeze BBQ chicken nachos, but it's best to freeze the toppings separately. Store the chicken, beans, and other toppings in a freezer-safe bag. When ready to eat, let them thaw in the fridge overnight. Reheat using the oven for the best results. This way, you can enjoy these tasty nachos anytime. BBQ chicken nachos can last for about 3 to 4 days in the fridge. It is best to store them in an airtight container. This helps keep the chips from getting too soggy. When you want to eat them again, just reheat in the oven or microwave. Yes, you can use other types of chips! Some good alternatives include: - Tortilla strips - Pita chips - Potato chips - Corn chips These options add different flavors and textures to your nachos. Pick your favorite for a fun twist! The best BBQ sauce can vary by taste. Here are some popular brands to try: - Sweet Baby Ray's - KC Masterpiece - Stubb's You can also make your own sauce at home. Just mix ketchup, brown sugar, vinegar, and spices to create a tasty blend. Homemade sauce lets you customize the flavor to your liking! In this blog post, we explored making BBQ chicken nachos. You learned about the key ingredients, easy steps, and helpful tips. I shared ways to customize the dish and store leftovers. Enjoy experimenting with flavors and toppings to suit your taste. Nachos are fun to make and even more fun to share. Try these ideas for your next gathering or game day. With simple steps, you can create a crowd-pleaser everyone will love. Dive into your nacho adventure and savor every bite!

Sheet-Pan BBQ Chicken Nachos Delicious and Easy Meal

Looking for a quick and tasty meal? Try my Sheet-Pan BBQ Chicken Nachos! This dish is a crowd-pleaser and perfect

- 2 cans (28 oz each) crushed tomatoes - 1 large onion, diced - 3 cloves garlic, minced - 4 cups vegetable broth - 1 cup heavy cream (or coconut cream for a dairy-free option) The heart of this soup lies in its main ingredients. Crushed tomatoes bring a rich, sweet flavor. Diced onion adds depth, while minced garlic enhances the aroma. Vegetable broth gives a solid base. For creaminess, use heavy cream or coconut cream to suit your diet. - 1 tablespoon sugar (to balance acidity) - 1 teaspoon dried basil - 1 teaspoon dried oregano - Salt and pepper to taste - Fresh basil leaves for garnish - A drizzle of extra virgin olive oil Seasoning is crucial for flavor. A little sugar balances the acidity of the tomatoes. Dried basil and oregano add herbal notes. Adjust salt and pepper to your taste. Finally, fresh basil leaves and olive oil not only look great but also add fresh flavor when you serve the soup. - Dice the onion: Start by peeling the onion. Cut it into small pieces. This helps release the onion's sweet flavor into the soup. - Mince the garlic: Take the garlic cloves and chop them finely. This will add a strong flavor to the soup and make it more fragrant. - Layering ingredients in the slow cooker: Grab your slow cooker. Add the crushed tomatoes, diced onion, minced garlic, vegetable broth, sugar, dried basil, dried oregano, and a sprinkle of salt and pepper. Mix everything well. Layering allows all the flavors to blend nicely. - Cooking time on low vs. high: Cover the slow cooker. You can choose to cook it on low for 6 hours or high for 3 hours. Cooking on low is best for a deeper flavor, while high is quicker. - Blending the cooked soup: Once the cooking time is up, take an immersion blender. Blend the soup until it is smooth and creamy. If you don’t have one, pour the soup into a regular blender in small batches. Blend each batch and then return it to the slow cooker. - Adding cream and reheating: Stir in the heavy cream or coconut cream. Mix well and let it cook on low for another 30 minutes. This makes the soup rich and creamy. Adjust the salt and pepper to your taste before serving. To make your soup taste even better, balance acidity with sugar. This means if your tomatoes seem too tart, just add the tablespoon of sugar. It works wonders! Adjusting seasoning is also key. Taste your soup at the end and add salt and pepper as needed. Using an immersion blender is great for blending soup. It’s easy and saves time! You can blend right in the slow cooker. If you don’t have one, no worries. Use a regular blender instead. Just be careful and blend the soup in batches. For a beautiful look, garnish each bowl with fresh basil leaves. A drizzle of extra virgin olive oil adds a nice touch too. Serve your soup with crusty bread for a warm and filling meal. It’s perfect for dipping! {{image_2}} You can easily make this soup dairy-free. Just swap heavy cream for coconut cream. Coconut cream gives a rich and creamy texture. It also adds a hint of sweetness. This change makes the soup still feel indulgent while being plant-based. Want to add more to your soup? You can mix in some extra vegetables. Carrots and bell peppers work great here. They add color and nutrition. You can also add proteins like chickpeas. Chickpeas bring fiber and protein, making the soup more filling. If you like heat, you can spice things up. Try adding red pepper flakes or cayenne pepper. Start with a small amount and taste as you go. This way, you control the heat level. A little spice can make the soup exciting and new. After you enjoy your creamy tomato basil soup, store leftovers in airtight containers. This keeps the soup fresh and tasty. Make sure to cool the soup to room temperature first. In the fridge, the soup lasts for about 4 to 5 days. Always check for any signs of spoilage before eating. To freeze creamy tomato basil soup, first let it cool completely. Then, pour the soup into freezer-safe bags or containers. Leave some space at the top, as the soup will expand when frozen. It can last in the freezer for up to 3 months. When you are ready to eat it, thaw the soup in the fridge overnight. For reheating, use a pot on the stove over low heat. Stir it often to avoid sticking. You can also microwave it in a bowl. Make sure it is heated all through before serving. Enjoy your warm, creamy soup again! Yes, you can! If you don't have a slow cooker, use a pot on the stove. Simply combine all the ingredients in a large pot. Cook over medium heat until it simmers. Then, lower the heat and let it cook for about 30 minutes. Stir often to prevent sticking. After cooking, use an immersion blender to puree the soup. This method is quicker but still gives you a tasty creamy tomato basil soup. This soup can last about 3 to 5 days in the fridge. Store it in an airtight container to keep it fresh. Make sure to let it cool down before you store it. If you want to enjoy it later, you can freeze it for up to 3 months. Just thaw it in the fridge before reheating. Yes, you can use fresh herbs instead of dried ones. Fresh basil can add great flavor! Use about three times more fresh herbs than dried. For this recipe, if you want to use fresh basil, chop about 3 teaspoons and add it in near the end of cooking. This helps keep the fresh taste vibrant. Just remember, dried herbs are more potent, so adjust according to your taste! This blog post covered how to make a creamy tomato basil soup. We explored the main ingredients, preparation steps, and slow cooking process. You learned tips to enhance flavors and creative serving ideas. The post also shared variations for dietary needs and storage tips. Soup-making can be fun and rewarding. Enjoy experimenting with ingredients that fit your taste. You can impress anyone with this simple recipe!

Slow Cooker Creamy Tomato Basil Soup Recipe Delight

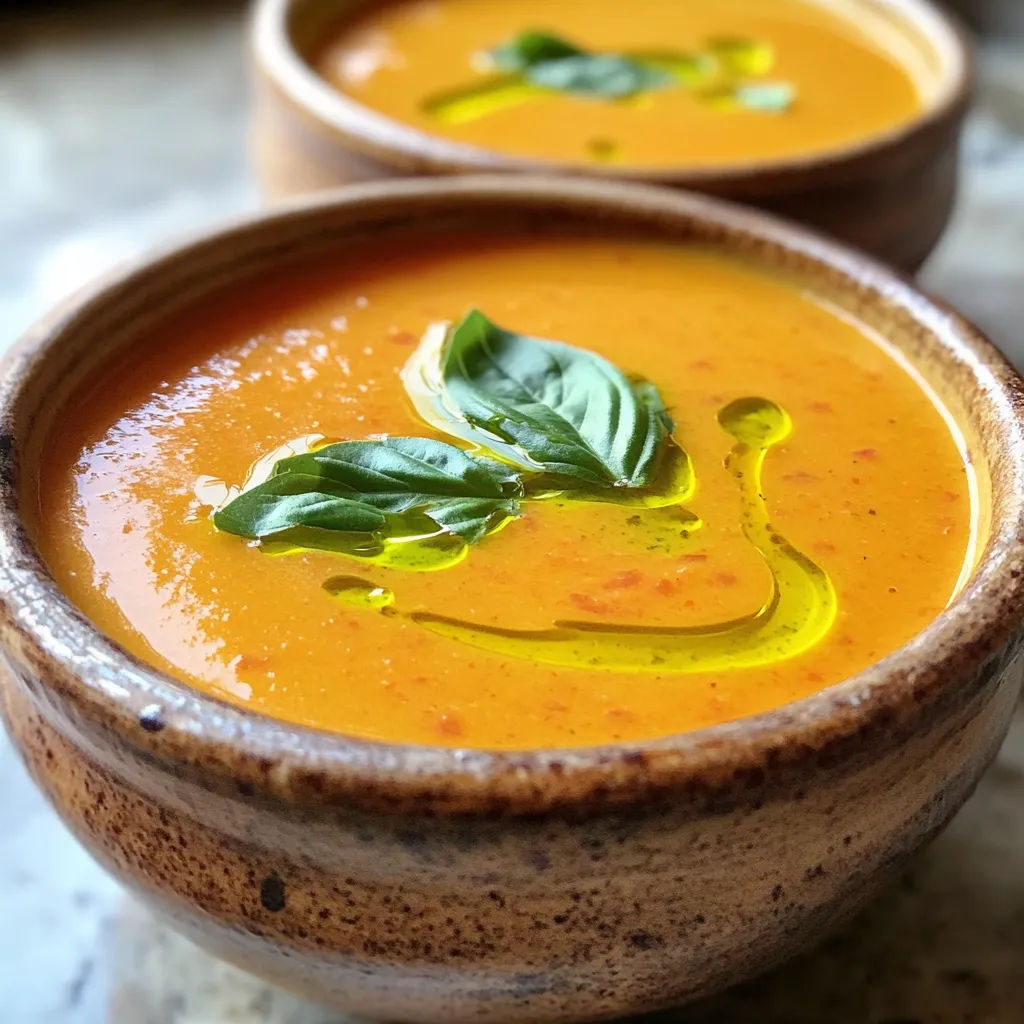
If you’re craving a comforting bowl of soup, you’re in the right place! My Slow Cooker Creamy Tomato Basil Soup

Older posts
Newer posts
← Previous Page1 … Page13 Page14 Page15 … Page84 Next →

dsad

© 2026 Foodish Talk • Built with GeneratePress

Our Policies

  • Copyright Policy
  • Cookie Policy
  • GDPR Policy
  • Privacy Policy
  • Disclaimer
  • Terms Of Use

More Information

  • Home
  • About
  • Contact
  • Appetizers
  • Dessert
  • Dinner
  • Drinks
©2026, Foodish Talk About Back To Top