Skip to content
DisclaimerTerms Of UseGDPR PolicyCookie Policy

Foodish Talk

  • Home
  • Drinks
  • Appetizers
  • Dinner
  • Dessert
  • About
  • Contact
  • Privacy Policy
DisclaimerTerms Of UseGDPR PolicyCookie Policy

NO-ING-IMG

For this dish, you need 2 salmon fillets. Choose fillets that weigh between 4 to 6 ounces each. Fresh salmon gives the best taste, but you can use frozen if needed. Season your salmon with salt, pepper, and fresh ginger for flavor. This step makes the fish tasty and bright. The veggies add color and crunch. You’ll need 1 cup of steamed broccoli florets. Broccoli is rich in nutrients and pairs well with salmon. Also, add 1 julienned carrot for sweetness and a nice crunch. Together, these veggies make your rice bowl healthy and fun. The sauce brings everything together. You’ll need 1/4 cup of teriyaki sauce. You can buy it or make your own at home. For cooking, use 1 tablespoon of sesame oil. This oil adds a nutty flavor. Don’t forget 1 clove of minced garlic and more grated ginger. These ingredients boost the taste. Finally, sprinkle sliced green onions and sesame seeds as garnish. They not only look good but also add extra flavor. To start, I season the salmon fillets. I use salt, pepper, and grated ginger. This mix adds flavor and aroma. I make sure to coat both sides evenly. It’s simple but makes a big difference in taste. This step sets the stage for a great meal. Next, I heat some sesame oil in a skillet over medium-high heat. I place the salmon fillets skin-side down in the hot oil. They sizzle right away! I cook them for about 3-4 minutes. After that, I flip the salmon gently. Then, I pour teriyaki sauce over the top. This makes the fish sweet and savory. I cook for another 3-4 minutes until it’s just right. Once done, I remove the salmon from heat and let it rest for a minute. This helps keep it moist. Then, I flake it into bite-sized pieces. Now, I’m ready to assemble the bowls. First, I divide the cooked jasmine rice into serving bowls. I like to use equal portions for a nice look. After that, I add the flaked teriyaki salmon on top. Next, I layer steamed broccoli florets and julienned carrots. These veggies add color and crunch. Finally, I sprinkle sliced green onions and sesame seeds on top. This step adds flavor and makes the dish pop. If there’s any teriyaki sauce left in the pan, I drizzle that over the bowls. Now, it’s ready to serve! You can change the teriyaki sauce to suit your taste. If you like it sweeter, add a bit of honey or brown sugar. For a spicy kick, mix in some sriracha or red pepper flakes. You can also use low-sodium soy sauce for a healthier option. Experiment with different ingredients like pineapple juice or rice vinegar. These small changes can make a big difference in flavor. Toppings can really boost your rice bowl. Try adding sliced avocado for creaminess. Toasted sesame seeds add a nice crunch. You can also sprinkle some furikake for extra umami. Chopped cilantro or fresh basil can give your dish a fresh twist. Don't forget about pickled ginger for a tangy bite. Each topping adds a unique flavor and texture to your meal. Cooking salmon correctly is key. Start with fresh, high-quality salmon for the best taste. Season it well, using salt, pepper, and ginger. Heat your skillet to medium-high. When the oil is hot, add the salmon skin-side down. Cook for 3-4 minutes. Then, flip it and pour over the teriyaki sauce. Cook for another 3-4 minutes or until it flakes easily with a fork. Let it rest for a minute before serving. This ensures your salmon stays juicy and flavorful. {{image_2}} You can switch out salmon for other proteins. Chicken breast works well. Just cook it the same way. Tofu is a great choice for a plant-based meal. Marinate it in teriyaki sauce before cooking. Shrimp is another tasty option. Cook shrimp for just a few minutes until pink. These swaps keep your meal fun and fresh. Feel free to change the vegetables in your bowl. Snap peas add a nice crunch. Bell peppers bring sweet flavor and color. You can also use spinach or kale for greens. Just sauté them briefly before serving. The more veggies, the better! This makes your meal healthy and vibrant. If you want to try a different grain, go for quinoa. It cooks quickly and has a nutty taste. Cauliflower rice is a smart low-carb option, too. It cooks fast and absorbs flavors well. You can even use brown rice for more fiber. Each option offers a unique twist to your dish. Storing your leftover teriyaki salmon rice bowls is simple. First, let the food cool down. Place it in an airtight container. This keeps the flavors fresh. You can store it in the fridge for 2-3 days. If you know you won’t eat it in that time, consider freezing it instead. Reheating is easy too. You can use a microwave for quick meals. Place the bowl in the microwave and cover it loosely. Heat for about 1-2 minutes or until hot. If you prefer the stovetop, use a skillet. Add a splash of water to keep it moist. Heat on low until warmed through. To freeze, separate the components. Keep the salmon, rice, and veggies in different containers. This helps prevent sogginess when thawed. Use freezer-safe bags or containers. Label them with the date. You can freeze them for up to 3 months. When ready to eat, thaw overnight in the fridge. Then reheat as mentioned above. Enjoy your meal anytime! You can make easy teriyaki sauce at home. Mix soy sauce, honey, and rice vinegar. Add garlic and ginger for flavor. Heat the mixture on low until it thickens. This sauce tastes fresh and rich. Several sides complement teriyaki salmon rice bowls. Steamed vegetables like bok choy or snap peas work well. You can also serve a simple salad with sesame dressing. Edamame or pickled cucumbers can add crunch and flavor. Yes, you can use frozen salmon. Just thaw it in the fridge overnight. Pat it dry before cooking. This keeps the salmon from steaming and helps it sear nicely. Follow the same cooking steps for a delicious meal. In this post, I covered how to make tasty teriyaki salmon rice bowls. We went over the ingredients like salmon, veggies, and sauce. I gave you easy steps to prepare, cook, and assemble your bowls. You learned tips for customizing flavor and cooking salmon just right. We explored fun variations, storage tips, and answered common questions. With this guide, you can enjoy delicious, healthy meals. Now, it’s your turn to try new recipes and share your creations!

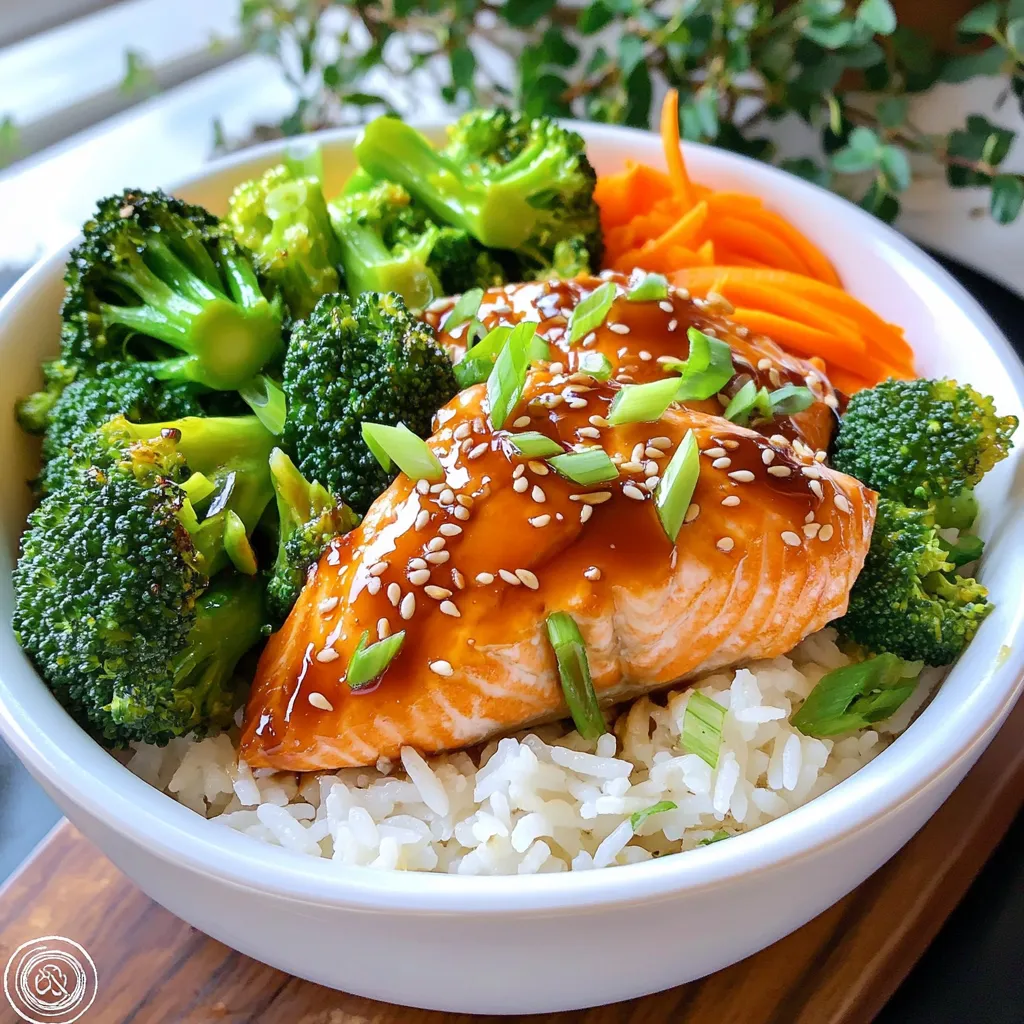
Minute Teriyaki Salmon Rice Bowls Quick and Easy Meal

Looking for a quick and tasty meal? These Minute Teriyaki Salmon Rice Bowls are perfect for you! In just a

- 2 medium apples, peeled and diced - 1 cup granulated sugar - 1/2 cup unsalted butter, softened - 2 large eggs - 1 teaspoon vanilla extract - 1 1/2 cups all-purpose flour - 1 teaspoon baking powder - 1/2 teaspoon baking soda - 1 teaspoon ground cinnamon - 1/2 teaspoon salt - 1/2 cup buttermilk - 1/2 cup brown sugar, packed - 1/4 cup rolled oats - 1/4 cup chopped walnuts or pecans (optional) To make this Apple Cinnamon Streusel Snack Cake, you need simple, fresh ingredients. Apples bring sweetness and moisture to the cake. Choose medium apples that are firm. I like Granny Smith or Honeycrisp for their nice balance of tart and sweet. You will need sugar for sweetness. Granulated sugar works best for the cake base. You’ll also need unsalted butter for richness. Softening it helps it mix well. Eggs add structure and moisture. The vanilla extract gives a warm, sweet flavor. For the dry mix, you’ll use all-purpose flour, baking powder, baking soda, ground cinnamon, and salt. Baking powder and soda help the cake rise. The ground cinnamon adds that comforting spice aroma. Buttermilk adds tanginess and moistness. It helps balance the sweetness. We also make a streusel topping. You’ll need brown sugar for rich flavor, rolled oats for texture, and optional nuts for crunch. Gather all these ingredients, and you’re ready to create a delightful snack cake! 1. Preheat the oven and prepare the baking pan: Start by preheating your oven to 350°F (175°C). While it heats, grease and flour a 9-inch square baking pan. This step helps prevent the cake from sticking. 2. Cream butter and sugar until fluffy: In a large bowl, add 1/2 cup of softened unsalted butter and 1 cup of granulated sugar. Use an electric mixer or a whisk to blend them together until the mixture is light and fluffy. This process adds air and makes the cake soft. 1. Add eggs and vanilla to the mixture: Next, crack in 2 large eggs. Mix well after adding each egg. Then, stir in 1 teaspoon of vanilla extract for flavor. 2. Combine dry ingredients separately and mix with wet ingredients: In another bowl, mix 1 1/2 cups of all-purpose flour, 1 teaspoon of baking powder, 1/2 teaspoon of baking soda, 1 teaspoon of ground cinnamon, and 1/2 teaspoon of salt. Gradually add this dry mix to your wet mixture, alternating with 1/2 cup of buttermilk. Start and end with the dry mix. Combine until just mixed, but don’t overdo it. 1. Fold in diced apples: Take 2 medium apples, peel, and dice them. Gently fold these into the batter. This step adds moisture and a lovely apple flavor. 2. Prepare streusel topping and sprinkle over the batter: In a small bowl, mix 1/2 cup of packed brown sugar, 1/4 cup of rolled oats, and 1/4 cup of chopped nuts (optional). Sprinkle this mixture evenly over the batter in the pan. This adds a crunchy topping. 1. Bake and check for doneness: Place the pan in the oven and bake for 30-35 minutes. Check doneness by inserting a toothpick into the center. If it comes out clean, the cake is ready. 2. Cooling process before serving: Once baked, let the cake cool in the pan for about 10 minutes. Then, transfer it to a wire rack to cool completely. This helps the cake set well and makes it easier to slice. How to choose the right apples Choose firm apples for your cake. Varieties like Granny Smith or Honeycrisp work well. They add a nice balance of sweet and tart flavors. Make sure the apples are fresh and free of bruises for the best taste. Ensuring proper mixing techniques Mixing is key to a great cake. Start by creaming the butter and sugar until it's light. This adds air and makes the cake fluffy. When adding eggs, mix one at a time. This ensures they blend well. Finally, be gentle when folding in the apples. You want them evenly spread without breaking them apart. Presentation ideas for the snack cake Serve your cake warm for the best flavor. Dust it lightly with powdered sugar for a nice touch. You can also cut it into squares and place it on a colorful plate. Add a sprig of mint for a fresh look. Pairing options Pair your cake with a scoop of vanilla ice cream. The cold ice cream contrasts nicely with the warm cake. Whipped cream is another tasty option. It adds creaminess and sweetness to each bite. Overmixing the batter Mixing too much can make the cake dense. Stop mixing as soon as the ingredients are combined. This keeps the cake light and airy. Not measuring ingredients accurately Measuring is crucial in baking. Use measuring cups and spoons for accuracy. Too much flour or sugar can change the cake’s texture. Always level off dry ingredients for the best results. {{image_2}} You can switch up the flavors in your Apple Cinnamon Streusel Snack Cake easily. Adding spices can enhance the taste. Try a pinch of nutmeg or ginger. Both spices add warmth and depth. You can also use nuts for crunch. Chopped walnuts or pecans bring flavor and texture. Feel free to mix and match to find your favorite combo! If you need gluten-free options, you can use gluten-free flour. It works well in this cake. You can also replace eggs and butter for a vegan version. Use flax eggs or applesauce for the eggs. Coconut oil or vegan butter can replace regular butter. This way, everyone can enjoy the cake without worry. The streusel topping is delicious, but there are other ideas too. You can add a simple glaze made from powdered sugar and milk. It adds sweetness and looks nice. For a fancy touch, try icing made from cream cheese. It pairs well with the apple flavor. You can also sprinkle some additional nuts or oats on top for a unique twist. To keep your Apple Cinnamon Streusel Snack Cake fresh, use an airtight container. Glass or plastic containers work well. You can also wrap the cake in plastic wrap for extra protection. Store it at room temperature for up to three days. If you want to keep it longer, the fridge is a good option. Just remember, the cake can last up to a week in the fridge. Freezing the snack cake is easy. First, let it cool completely. Then, slice the cake into pieces. Wrap each slice in plastic wrap. Place the wrapped slices in a freezer bag. Make sure to remove as much air as possible. This will help prevent freezer burn. You can freeze the snack cake for up to three months. When you’re ready to enjoy it, thaw it in the fridge overnight. If you need it faster, leave it out at room temperature for a few hours. Reheat slices in the microwave for a warm treat. Enjoy your delicious cake anytime! To check if your cake is done, use a toothpick. Insert it into the center of the cake. If it comes out clean or with a few crumbs, your cake is done. If it has wet batter, bake it for a few more minutes. This simple test gives you a clear answer. Remember, overbaking can make your cake dry. Yes, you can make this cake ahead of time. Bake it and let it cool completely. Then, wrap it tightly with plastic wrap. Store it in the fridge for up to three days. For longer storage, freeze it for up to three months. Just remember to thaw it in the fridge overnight before serving. This helps keep the cake moist and fresh. If you don’t have buttermilk, don’t worry! You can use regular milk mixed with vinegar or lemon juice. Use one tablespoon of vinegar or lemon juice in a measuring cup. Fill the cup with milk until you reach the one-half cup mark. Let it sit for five minutes before using. You can also use plain yogurt or sour cream mixed with water. Each option works well in baking. This blog post offered a complete guide on making Apple Cinnamon Streusel Snack Cake. You learned the right ingredients, step-by-step instructions, and tips to ensure your success. Remember to pick the best apples and avoid overmixing. Feel free to explore variations and adaptations to suit your taste. Store any leftovers properly, and don’t hesitate to prep ahead. Baking should be fun and rewarding, so enjoy your delicious creation!

Apple Cinnamon Streusel Snack Cake Simple Delight

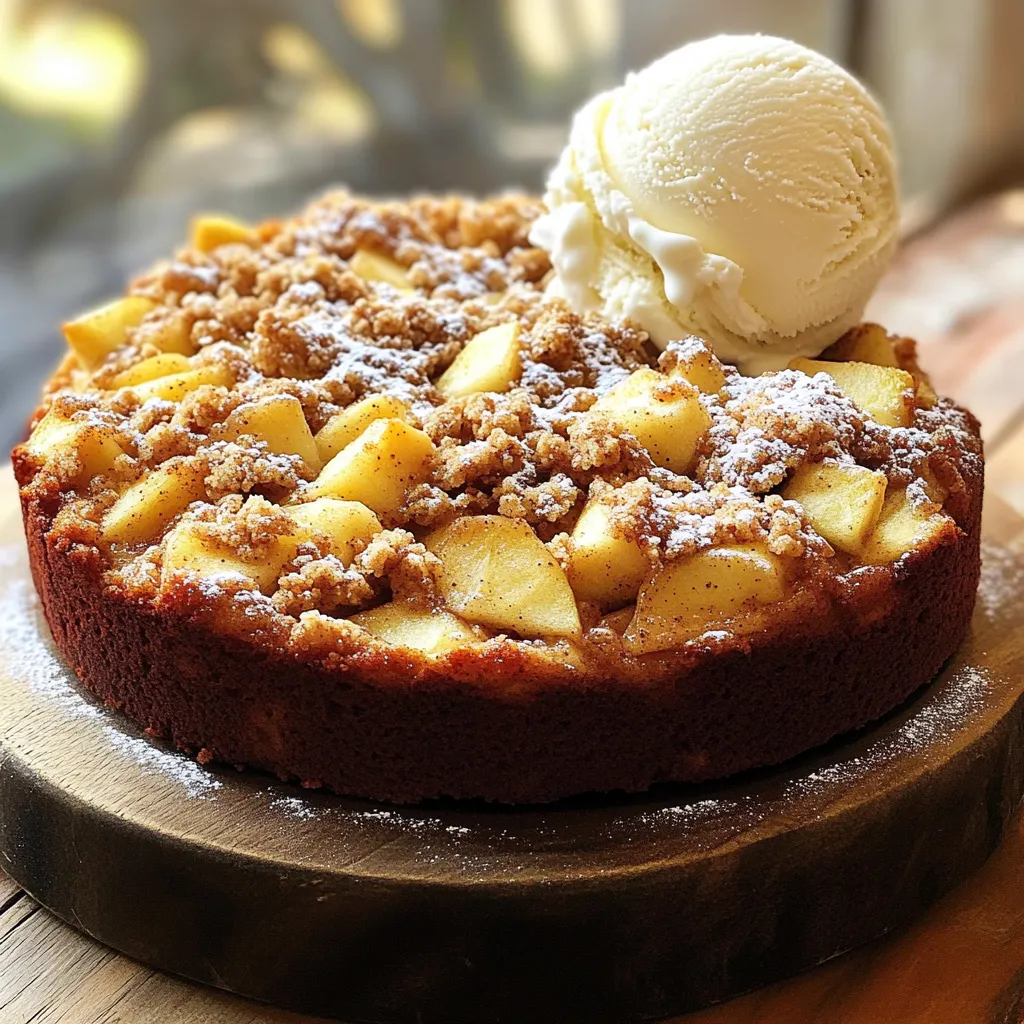
Get ready to indulge in a warm slice of nostalgia with my Apple Cinnamon Streusel Snack Cake! This easy recipe

- 1 cup crushed graham crackers - 2 tablespoons melted butter - 8 oz cream cheese, softened - 1 cup powdered sugar - 1 teaspoon vanilla extract - 1 cup heavy whipping cream - ½ cup caramel sauce (plus extra for drizzling) - ½ cup chopped pecans (toasted if preferred) - Pinch of salt The main ingredients create the rich and creamy base of the cheesecake. First, the graham crackers and butter form the crust. The cream cheese provides a smooth texture. Powdered sugar adds the right sweetness. Vanilla extract enhances the flavor. Heavy whipping cream makes the filling light and fluffy. Caramel sauce gives a sweet twist, while chopped pecans add a crunchy bite. A pinch of salt balances the flavors perfectly. - Medium and large mixing bowls - Whisk or electric mixer - Serving cups or jars - Measuring cups and spoons To make these cups, you'll need a few tools. Medium and large mixing bowls help keep your work organized. A whisk or electric mixer combines ingredients smoothly. Serving cups or jars hold the delicious treats. Measuring cups and spoons ensure accurate amounts for each ingredient. With these tools, you'll create a delightful dessert that impresses everyone. - Mix 1 cup of crushed graham crackers with 2 tablespoons of melted butter. - Spoon about 2 tablespoons of this mixture into small cups. Press down firmly to form a base. - In a large bowl, beat 8 oz of softened cream cheese with 1 cup of powdered sugar until smooth. - Stir in 1 teaspoon of vanilla extract and a pinch of salt. Mix well. - In another bowl, whip 1 cup of heavy cream until stiff peaks form. - Gently fold this whipped cream into the cream cheese mixture until fully mixed. - Drizzle in ½ cup of caramel sauce and swirl it into the cheesecake mix. - Spoon the cheesecake filling on top of the crust in each cup. Fill them all the way to the top. - Sprinkle ½ cup of chopped pecans on top. Add a bit more caramel for garnish. - Place the cups in the fridge for at least 4 hours. This helps them set perfectly. To get a smooth and creamy filling, whipped cream is key. It adds fluffiness and lightness to your cheesecake cups. When you whip it, make sure it forms stiff peaks. This helps create the right texture. Also, ensure your cream cheese is at room temperature. Cold cream cheese can form lumps, making it hard to blend smoothly. Garnishing makes a big difference. Use pecan halves on top of each cup. This adds a nice touch and looks appealing. Drizzle extra caramel sauce over the tops just before serving. It enhances the look and adds extra sweetness. You can also use clear cups or jars to show off the layers. Watch out for overmixing the filling. This can make it too soft and runny. On the flip side, undermixing can leave lumps, which you don’t want. Be gentle when folding in the whipped cream. Also, don’t skip chilling the cups long enough. They need at least four hours to set properly. If you rush this step, they won’t hold their shape when served. {{image_2}} You can make your caramel pecan no-bake cheesecake cups even more fun. Try adding chocolate or coffee flavors. For a chocolate twist, mix in cocoa powder or melted chocolate with the cream cheese. If you love coffee, add brewed coffee or espresso powder for a richer taste. Different nut toppings can also change the vibe. Swap pecans for walnuts or almonds for a new crunch. Toast them for extra flavor! If you need gluten-free options, just use gluten-free graham crackers for the crust. They work just as well. For those avoiding dairy, look for dairy-free cream cheese. Many brands now offer great alternatives. You can still get that creamy texture without the dairy! Want to serve more guests? Simply double the recipe. You can make a big batch for gatherings or potlucks. If you prefer smaller treats, just use mini cups. They make great party favors and look adorable on any table. Everyone will love these little delights! How long do the cheesecake cups last in the fridge? They stay fresh for up to five days. This makes them a great make-ahead treat. What are the best practices for covering and storing? Use plastic wrap or a tight lid. This keeps them safe and prevents drying out. Place the cups at the back of the fridge. This area remains coldest. Can you freeze the cheesecake cups? Yes, you can freeze them for up to two months. This is perfect for saving some for later. What are the tips for thawing and serving after freezing? Transfer them from the freezer to the fridge a night before serving. This allows them to thaw slowly. Once thawed, add a drizzle of caramel and top with pecans. This re-creates that fresh taste. Yes, you can make these cheesecake cups ahead of time. I suggest chilling them for at least 4 hours. This gives them time to set properly. You can store them in the fridge for up to 3 days. Just cover them to keep them fresh. If you want a change, try chocolate sauce or fruit puree. You can also use honey or maple syrup for a lighter option. These alternatives add a nice twist to the flavor. The cups are set when the filling feels firm to the touch. You can also check if they hold shape when you remove them from the fridge. If they jiggle too much, they need more chilling time. Sure! You can swap pecans for walnuts or almonds. Both options give a nice crunch. You can even try hazelnuts for a unique flavor. You now have a simple recipe for delicious cheesecake cups. We covered important ingredients, tools, and step-by-step instructions. You learned tips for great texture and presentation. I shared variations and storage tips to keep your treats fresh. Remember, the right chilling makes all the difference. Testing flavors and adjustments helps you make it your own. Enjoy this tasty dessert at any gathering or just for fun. You’re now ready to impress friends and family with your baking skills!

Caramel Pecan No-Bake Cheesecake Cups Delightful Treat

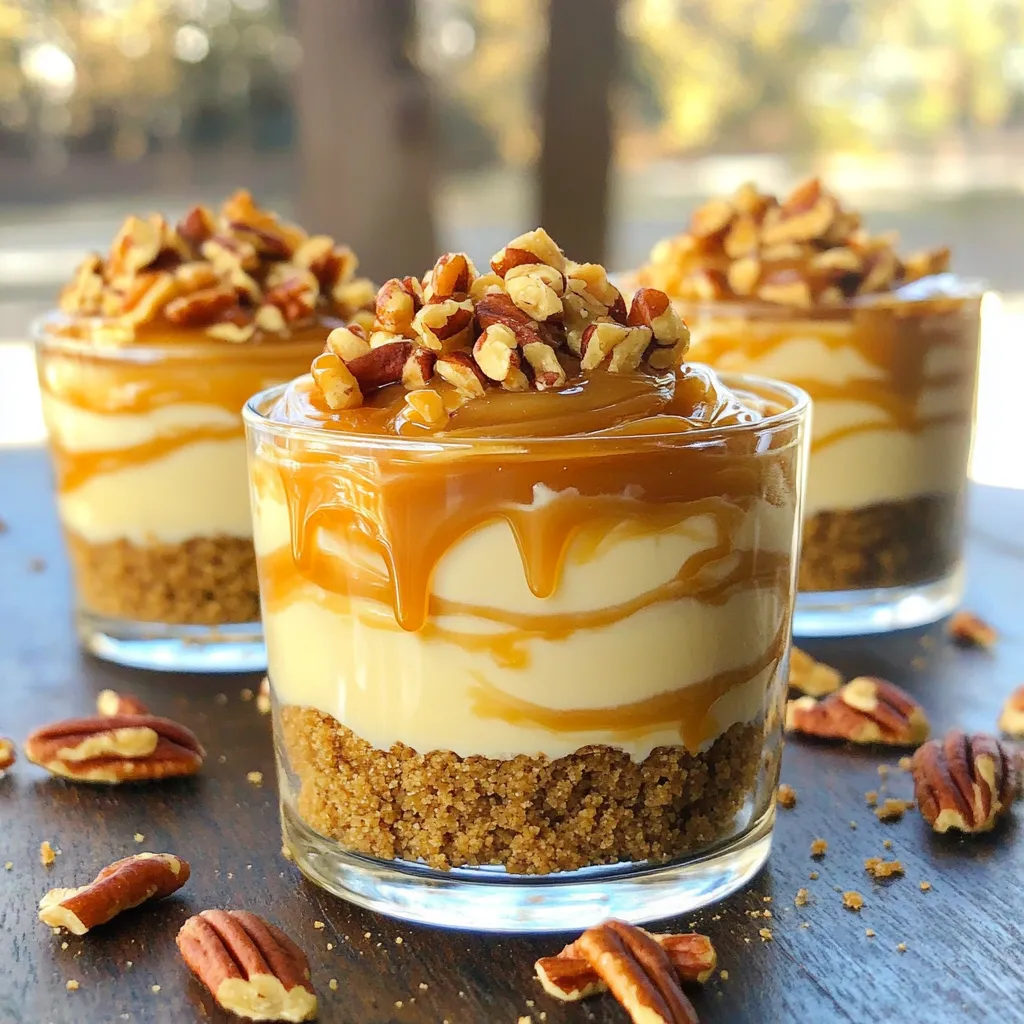
Are you ready to treat yourself? These Caramel Pecan No-Bake Cheesecake Cups are a delicious way to satisfy your sweet

To make Air Fryer Parmesan Herb Garlic Bread, gather these key ingredients: - 1 large loaf of French or Italian bread - 4 tablespoons unsalted butter, softened - 3 cloves garlic, minced - 1 teaspoon dried oregano - 1 teaspoon dried basil - 1 teaspoon garlic powder - ¼ cup grated Parmesan cheese - Salt and pepper to taste These ingredients work together to create a rich, savory flavor that makes each bite special. For a little extra flair, consider adding these optional ingredients: - Fresh parsley for garnish Fresh parsley brightens up the dish while adding a pop of color. You can make a few easy swaps if you don’t have an ingredient. Here are some ideas: - Use a whole grain or sourdough loaf instead of French or Italian bread. - Swap olive oil for unsalted butter if you prefer. - Try different cheeses, like mozzarella or cheddar, in place of Parmesan. These substitutions let you personalize the recipe to your taste. Enjoy mixing and matching! First, grab a large loaf of French or Italian bread. Slice it in half lengthwise. This will give you two flat halves. Next, take a knife and make a crisscross pattern on the cut sides. This step helps the bread soak up all that yummy butter. In a mixing bowl, put 4 tablespoons of softened butter. Add 3 cloves of minced garlic for that rich flavor. Toss in 1 teaspoon each of dried oregano and basil. Don’t forget 1 teaspoon of garlic powder for an extra kick! Next, add ¼ cup of grated Parmesan cheese. Season with salt and pepper to taste. Mix everything together until it’s nice and smooth. Preheat your air fryer to 350°F (175°C) for about 3 minutes. While it heats up, spread the garlic butter mix evenly over the cut sides of the bread. Make sure to fill in those crisscross scores. Place the bread halves in the air fryer basket, cut-side up. Air fry for about 5-7 minutes. Look for golden brown edges and melted butter. For extra crispiness, flip the bread and air fry for an extra 2 minutes. Once done, let it cool a bit before slicing. If you want, sprinkle some fresh parsley on top for color. Enjoy your crispy delight! To boost the flavor of your Air Fryer Parmesan Herb Garlic Bread, choose fresh herbs. Fresh basil and parsley add a bright taste. If you want a kick, try adding red pepper flakes to the garlic butter mix. You can also add a squeeze of lemon juice for a zesty twist. For the crispiest bread, make sure you spread the garlic butter evenly. Score the bread lightly to help the flavors soak in. Preheating your air fryer is key, too. It helps the bread cook evenly and get that golden crust. If you want extra crunch, flip the bread halfway through cooking, then air fry for a few more minutes. Avoid using cold butter; it won't blend well. Always use softened butter for a smooth mix. Don’t skip scoring the bread; it helps with flavor absorption. Make sure the bread fits properly in your air fryer. If it’s too tight, it won't crisp up well. Lastly, keep an eye on the cooking time to prevent burning. {{image_2}} You can switch up the cheese for your garlic bread. Try mozzarella for a stretchy, gooey texture. Cheddar adds a sharp bite. Goat cheese brings a creamy tang that pairs well with herbs. Use any cheese you love. Mix and match to find your favorite! Feel free to play with herbs in this recipe. Instead of oregano, use thyme for a warm flavor. Fresh rosemary adds a fragrant twist. You can even try dill for a unique taste. Just remember to adjust the amounts based on your choice. Want to kick up the taste? Add red pepper flakes for heat. A sprinkle of lemon zest gives a fresh zing. You can also mix in some chopped sun-dried tomatoes for a sweet, savory touch. These small tweaks can make your garlic bread even more special! To store leftover garlic bread, wrap it tightly in plastic wrap or foil. This helps keep it fresh. You can also place it in an airtight container. Store it at room temperature for one day. If you want it to last longer, put it in the fridge for up to three days. To reheat the bread, I recommend using the air fryer. Set it to 350°F (175°C). Place the bread in the basket for about 3-5 minutes. This will help it regain its crispy edges. You can also use a toaster oven. If you use a microwave, it may get chewy. If you want to freeze garlic bread, slice it first. Wrap each slice in plastic wrap, then place them in a freezer bag. Make sure to remove as much air as possible. You can freeze it for up to three months. When you're ready to eat, thaw it in the fridge overnight before reheating. Yes, you can use pre-made garlic butter. It saves time and adds flavor. Just spread it on the bread like the recipe shows. Make sure to check the taste, as some brands are saltier than others. If you don’t have an air fryer, don’t worry! You can bake the bread in the oven. Set your oven to 400°F (200°C). Place the buttered bread on a baking sheet. Bake for 10-12 minutes, or until golden brown. Keep an eye on it to avoid burning. To make gluten-free garlic bread, use gluten-free bread. Many stores offer great options. Just follow the same steps for mixing and cooking. The taste will still be delicious, and you won’t miss the gluten! This blog covered everything you need for making delicious garlic bread. We discussed key ingredients and optional garnishes to elevate its taste. You learned step-by-step how to prepare, mix, and air fry your bread. We highlighted tips to boost flavor and achieve perfect crispiness. Plus, I shared ways to store leftovers and common FAQs answered. I hope you feel ready to make this tasty garlic bread on your own. Enjoy every bite!

Air Fryer Parmesan Herb Garlic Bread Crispy Delight

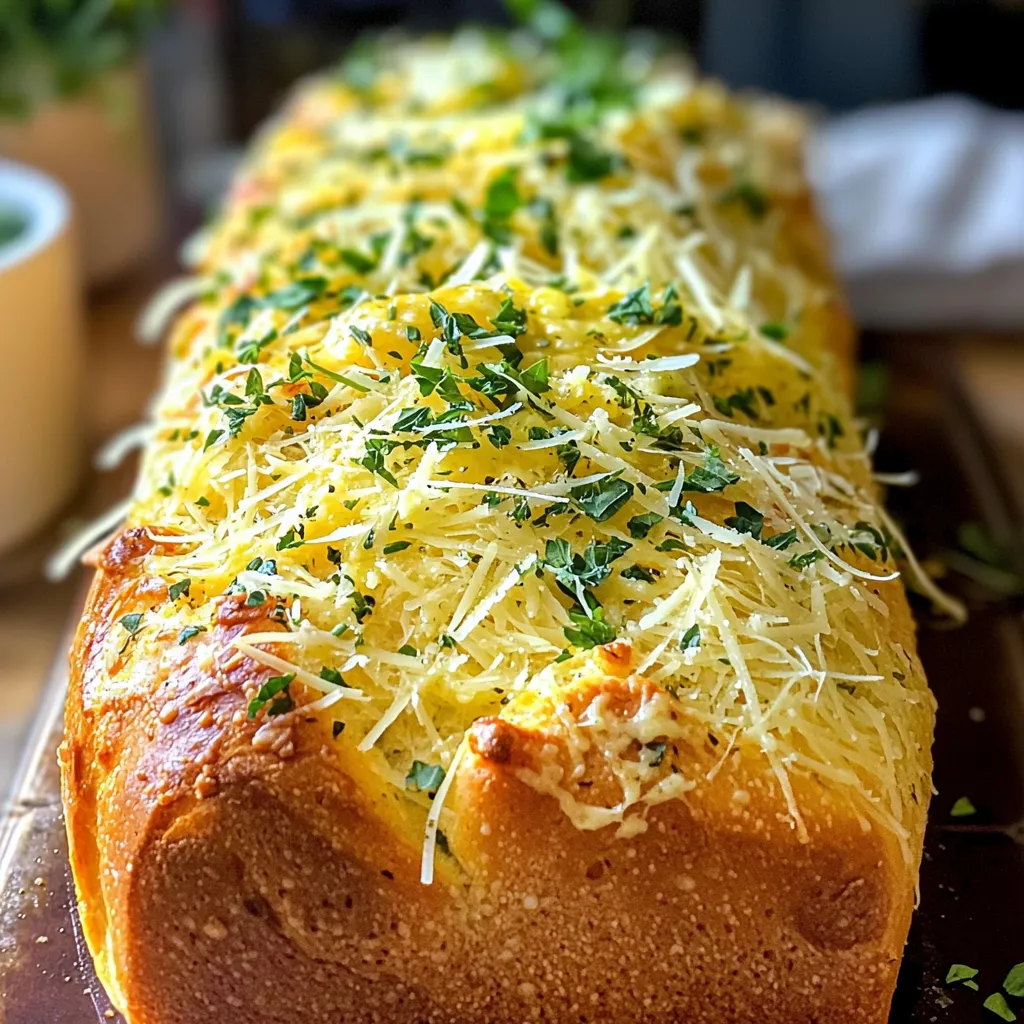
Looking for a quick and tasty snack? You’ll love my Air Fryer Parmesan Herb Garlic Bread! This crispy delight is

- 1 pound boneless, skinless chicken breasts - 1 can (15 oz) black beans, rinsed and drained - 1 can (15 oz) corn, drained - 1 can (10 oz) red enchilada sauce - 1 can (14.5 oz) diced tomatoes with green chilies - 2 cups chicken broth - 1 medium onion, diced - 2 cloves garlic, minced - 1 teaspoon cumin - 1 teaspoon chili powder - 1 teaspoon smoked paprika - Salt and pepper to taste I love using boneless, skinless chicken breasts for this soup. They cook up tender and juicy. The black beans and corn add great texture and flavor. Enchilada sauce gives it a nice kick, while diced tomatoes with green chilies add extra zest. Chicken broth brings it all together with warmth. Onions and garlic create a fragrant base that makes your kitchen smell divine. The spices—cumin, chili powder, and smoked paprika—add depth to every spoonful. - 1 cup shredded cheese (cheddar or Mexican blend) - 1 avocado, diced (for garnish) - Fresh cilantro, chopped (for garnish) - Sour cream (for serving) - Optional tortilla strips I always finish my soup with toppings. Shredded cheese melts beautifully on top. Avocado adds creaminess and freshness. Cilantro gives a bright pop of flavor. A dollop of sour cream makes it rich and smooth. If you want crunch, add tortilla strips. They make each bite exciting! 1. Prepare chicken and vegetables: Start with one pound of boneless, skinless chicken breasts. Place them at the bottom of your slow cooker. Next, dice one medium onion and mince two cloves of garlic. Spread the onion and garlic over the chicken. 2. Combine ingredients in the slow cooker: Now, add the following ingredients: - 1 can (15 oz) black beans, rinsed and drained - 1 can (15 oz) corn, drained - 1 can (10 oz) red enchilada sauce - 1 can (14.5 oz) diced tomatoes with green chilies - 2 cups chicken broth Season the mix with one teaspoon each of cumin, chili powder, and smoked paprika. Don’t forget to add salt and pepper to taste. Stir gently to combine everything. Ensure that the chicken is covered with the broth. 1. Cooking times for low and high settings: Cover the slow cooker. If you set it on low, cook for 6-7 hours. For high, cook for 3-4 hours. The chicken should be cooked through and tender. 2. Shredding chicken and adding cheese: After cooking, take two forks and shred the chicken right in the soup. Stir it back into the mix. If you want, add one cup of shredded cheese, like cheddar or a Mexican blend. Stir until the cheese melts. 1. How to ladle and present soup: Use a ladle to serve the soup into bowls. Top each bowl with diced avocado, fresh cilantro, and a dollop of sour cream for a nice touch. 2. Ideal side dishes and accompaniments: You might want to serve this soup with tortilla strips for some crunch. It pairs well with a simple salad or cornbread for a complete meal. To keep your chicken moist, place it at the bottom of the slow cooker. This allows the juices from the soup to flow over the chicken as it cooks. For the best results, cook on low for 6-7 hours. If you are short on time, the high setting works in 3-4 hours. Always check that the chicken is cooked through before shredding. You can boost the flavor by adding extra spices. Try some cayenne pepper or paprika for extra heat. Vegetables like bell peppers or corn add depth and texture. Adjust the spice level to suit your taste. If you want it milder, reduce the chili powder or skip the green chilies. For this recipe, a 6-quart slow cooker is ideal. It fits all the ingredients and allows for even cooking. A good pair of kitchen tongs makes shredding the chicken easier. A ladle is perfect for serving, and a large spoon helps mix the soup well. {{image_2}} Making it gluten-free To make this soup gluten-free, choose a gluten-free enchilada sauce. Most brands offer this option. You can also check the labels of your spices, like chili powder, to ensure they are gluten-free. Vegetarian alternatives For a vegetarian twist, swap the chicken for diced tofu or more beans. You can use extra black beans or add pinto beans. This keeps the protein high while making the soup meat-free. Southwest-style additions To amp up the flavor, consider adding cornmeal or diced green peppers. Chopped jalapeños can add heat if you like a spicy kick. Another great option is adding a splash of lime juice for brightness. Different cheese or bean options You can switch up the cheese for Monterey Jack or Pepper Jack. For beans, try kidney beans or chickpeas for a different taste. Each choice alters the flavor profile, giving you a new experience. Unique garnish ideas Garnish your soup with crushed tortilla chips or lime wedges. You can sprinkle some pickled onions for tang and crunch. Fresh diced tomatoes or radishes add color and freshness too. Serving as a dip or appetizer This soup can also work as a dip! Just serve it with tortilla chips or pita bread. It makes a fun appetizer for parties or game nights, bringing everyone together. To store leftovers properly, let the soup cool down first. Place it in an airtight container. This will keep the soup fresh. I recommend using glass or BPA-free plastic containers. They help prevent spills and keep flavors intact. For longer shelf-life, you can freeze the soup. Use freezer-safe containers or freezer bags. Make sure to leave some space for expansion. To thaw, move the soup to the fridge overnight. Reheat it on the stove or in the microwave until hot. Stir well before serving. For best practices with leftovers, consume them within three to four days. This keeps the soup tasting great. Look for signs of spoilage, like off smells or mold. If you see any, it's best to toss it. Enjoy your delicious slow cooker chicken enchilada soup while it's fresh! Can I use frozen chicken breasts? Yes, you can use frozen chicken breasts. Just add about an hour to the cooking time. This will help ensure that the chicken cooks all the way through. How do I adjust cooking time for more servings? To make more servings, you don't need to change the cooking time. Just increase the amount of chicken and other ingredients. The slow cooker will still work well. What can I substitute for black beans? If you don’t have black beans, you can use pinto beans or kidney beans. Both options will still give you great flavor and texture. Alternatives for chicken broth? You can use vegetable broth or even water if you have no broth. This will still add moisture, but may lose some flavor. Is this recipe healthy or low-calorie? This recipe is quite healthy. It has lean protein from chicken and fiber from beans. The soup is low in calories if you control the cheese and sour cream. Nutritional breakdown and serving suggestions Each serving has protein, fiber, and good fats. Pair it with a side salad for more veggies. You can also add whole-grain tortilla chips for crunch. This blog post explored a tasty slow cooker chicken soup. We discussed key ingredients, like chicken, beans, and spices. I shared simple steps for preparation and cooking, plus tips for the best flavor. You learned about variations for dietary needs and how to properly store leftovers. With these insights, you can enjoy a warm, satisfying meal. Remember, you can always customize this soup to fit your taste. Use this recipe as a base and let your creativity shine in the kitchen!

Slow Cooker Chicken Enchilada Soup Hearty and Easy Meal

Looking for a warm and satisfying meal? This Slow Cooker Chicken Enchilada Soup is just what you need! With tender

To make tasty teriyaki shrimp rice bowls, you will need: - 1 lb (450g) shrimp, peeled and deveined - 2 cups cooked jasmine rice - 1/4 cup teriyaki sauce - 1 tablespoon sesame oil - 1 tablespoon fresh ginger, minced - 2 cloves garlic, minced - 1 cup broccoli florets - 1 bell pepper, thinly sliced (any color) - 1/4 cup green onions, chopped - Salt and pepper to taste These ingredients work well together. The shrimp adds protein, while the veggies bring color and crunch. Jasmine rice provides a nice base for the dish. You can add some fun touches to your bowls: - 1 tablespoon sesame seeds (for garnish) - Extra green onions, chopped These garnishes not only look great, but they also add flavor and texture. Sesame seeds give a nutty crunch, while green onions add freshness. You'll need a few simple tools to make this meal: - Large skillet - Spatula or wooden spoon - Measuring cups and spoons - Knife and cutting board Using the right tools makes cooking easier and more fun. A large skillet helps you cook everything evenly. A spatula lets you stir well without breaking the shrimp. First, gather all your ingredients. You need shrimp, rice, teriyaki sauce, and veggies. Start with the shrimp. Make sure they are peeled and deveined. This saves time and makes cooking easier. Next, wash your broccoli and cut it into small florets. Slice your bell pepper into thin strips. This helps them cook faster and blend well in the dish. Mince the garlic and ginger. This adds great flavor to your meal. Now, heat the sesame oil in a large skillet. Use medium-high heat for the best results. Once the oil is hot, add the minced garlic and ginger. Sauté them for about one minute. You want them to smell nice but not burn. Next, toss in the broccoli and bell pepper. Stir them around for about three to four minutes. They should be tender but still a bit crisp. After the veggies are ready, push them to the side of the skillet. Add the shrimp to the empty space. Season them with salt and pepper. Cook the shrimp for two to three minutes on each side. They will turn pink and opaque when done. Pour the teriyaki sauce over the shrimp and veggies. Stir everything well to coat it evenly. Let it simmer for about two minutes. While that simmers, warm your cooked jasmine rice. You can use a microwave or a pan. Just make sure it’s nice and hot. To serve, scoop the warm jasmine rice into bowls. Top it with the teriyaki shrimp and vegetables. For a pop of color, sprinkle chopped green onions on top. Add sesame seeds for extra crunch. This meal looks great and tastes even better. Enjoy your quick and easy teriyaki shrimp rice bowls! To get the best shrimp, start with fresh or thawed shrimp. Rinse them under cold water. Pat them dry with a paper towel. This helps them sear well. When you cook shrimp, don’t overcrowd the pan. Cook them in batches if needed. This lets each shrimp get a nice golden color. Cook them just until they turn pink and opaque. Overcooking makes them tough. You can boost flavor easily. Try adding a splash of lime juice for zest. You can also mix in some pineapple chunks for sweetness. If you like heat, add red pepper flakes or sliced jalapeños. For a rich taste, a bit of soy sauce is great too. Fresh herbs like cilantro can add a nice touch as well. To save time, use pre-cooked shrimp. They only need to be heated through. You can also use frozen vegetables. Just toss them in the skillet straight from the freezer. For faster rice, use microwaveable jasmine rice packets. This cuts down cooking time. Preparing the sauce in advance helps too. Store it in the fridge for quick meals. {{image_2}} You can change the shrimp to fit your taste. Chicken or beef works well. For chicken, use bite-sized pieces. Cook them until no longer pink. For beef, choose thin strips and sear them quickly. Tofu is another great option. It soaks up flavors nicely. Use firm tofu and cut it into cubes. Sauté until golden brown for a nice texture. If you want a vegetarian or vegan meal, skip the shrimp and meat. Use tofu or tempeh instead. Both options give protein and texture. You can also add more veggies. Try mushrooms, snap peas, or carrots. They will add color and crunch. Use soy sauce or a vegan teriyaki sauce for flavor. This keeps the dish tasty and healthy. Want to boost the flavor? Add spices or sauces. Sriracha adds heat if you like it spicy. A splash of lime juice brightens the dish. For a sweet touch, try honey or maple syrup. You can also add fresh herbs like cilantro or basil. These herbs add freshness and depth. Serve with pickled ginger or wasabi for extra zing. To keep your teriyaki shrimp rice bowls fresh, store leftovers in an airtight container. Make sure to let the dish cool down before sealing it. This helps prevent moisture buildup. You can keep it in the fridge for up to three days. If you want to maintain the taste and texture, try to separate the shrimp and rice before storing. When you're ready to enjoy your leftovers, reheat them gently. You can use the microwave or a skillet. If using the microwave, heat for 1-2 minutes at medium power. Stir halfway through to avoid hot spots. If using a skillet, add a splash of water or teriyaki sauce to keep it moist. Heat on low until warmed through. This way, your meal stays tasty and juicy. If you want to freeze your teriyaki shrimp rice bowls, it's best to do this right after cooking. Place the shrimp and veggies in one container and the rice in another. Make sure to use freezer-safe containers. They can last for up to three months in the freezer. When you're ready to eat, thaw overnight in the fridge and reheat as mentioned above. This method preserves flavor and texture well. Teriyaki shrimp rice bowls can last in the fridge for about 3 to 4 days. Make sure to store them in an airtight container. This keeps the shrimp and veggies fresh. You can enjoy this tasty meal later in the week. Just reheat it before serving. Yes, you can use frozen shrimp for this recipe. Just remember to thaw them first. You can place them in the fridge overnight or run them under cold water. Once thawed, peel and devein them if needed. This makes cooking easy and fast. You can add many different vegetables to your rice bowls. Some great options are: - Snap peas - Carrots, thinly sliced - Zucchini, diced - Mushrooms, sliced - Baby corn These veggies add color and extra nutrients. Feel free to mix and match! This blog post covered all you need for teriyaki shrimp rice bowls. We discussed key ingredients, helpful tips, and cooking steps. You learned to enhance flavors and adjust protein options. Remember to store your leftovers well, so they taste great later. Now, get creative with your rice bowls! Explore new flavors and share your favorite combinations with friends. Enjoy making this dish at home, and impress everyone with your cooking skills.

Minute Teriyaki Shrimp Rice Bowls Quick and Easy Meal

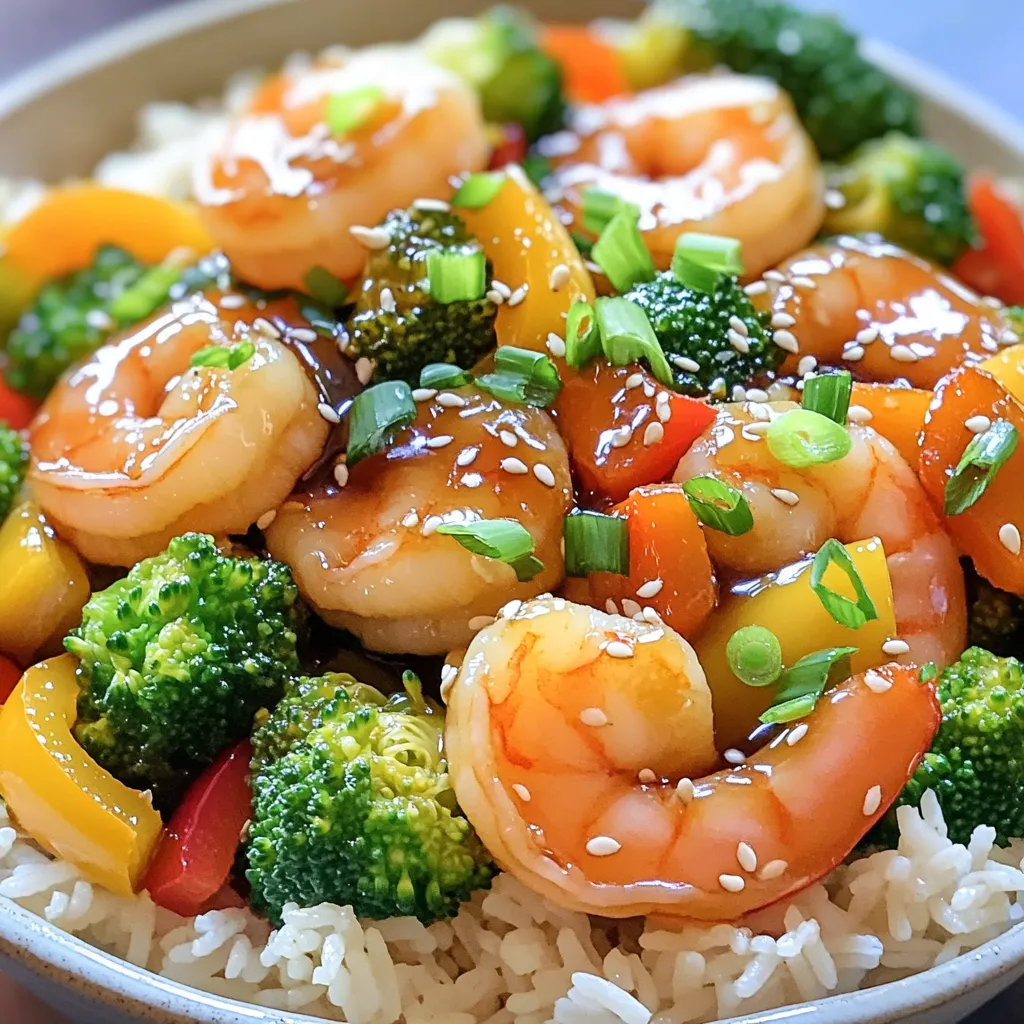
Do you crave a quick, tasty meal? Look no further than Minute Teriyaki Shrimp Rice Bowls! With just a few

- 1 cup rolled oats - 1 cup finely grated carrots (about 2 medium carrots) - 1/2 cup almond butter These main ingredients form the base of our energy bites. Rolled oats add fiber and texture. Finely grated carrots provide moisture and sweetness. Almond butter brings healthy fats and a delicious nutty flavor. - 1/4 cup honey or maple syrup - 1/2 cup shredded unsweetened coconut - 1 teaspoon vanilla extract For sweetness, you can use honey or maple syrup. Both options melt into the mixture well. Shredded coconut adds a tropical twist and a chewy texture. Vanilla extract enhances the overall flavor and aroma. - 1 teaspoon ground cinnamon - 1/4 teaspoon nutmeg - 1/4 cup chopped walnuts or pecans (optional) Spices like ground cinnamon and nutmeg give warmth and depth. They make each bite taste like carrot cake. If you want an extra crunch, add chopped walnuts or pecans. These nuts bring healthy fats and protein. Start by gathering all your main ingredients. You will need rolled oats, finely grated carrots, almond butter, honey or maple syrup, shredded coconut, vanilla extract, ground cinnamon, nutmeg, and salt. If you like, add chopped walnuts or pecans. In a large mixing bowl, combine these ingredients. Mix them well. Make sure the grated carrots and almond butter are evenly spread throughout the mixture. This step is key for great taste in each bite. Once your mixture is ready, cover the bowl with plastic wrap or a lid. Place it in the refrigerator for about 30 minutes. Chilling helps the mixture firm up. This will make it easier to roll into balls later. After chilling, take the mixture out of the fridge. Scoop out a tablespoon of the mix with your hands. Roll it into a ball. Keep repeating this until you use all the mixture. For fun, roll each energy bite in extra shredded coconut. This adds a nice touch and flavor. Finally, place your energy bites in an airtight container. Store them in the fridge for a quick snack or a post-workout treat! You can make these bites your own! Try different nut butters like peanut or cashew. Each nut butter brings a unique flavor. If you want extra crunch, consider adding seeds like chia or flax. You can also mix in dried fruits like raisins or cranberries for a sweet twist. These changes keep your snacks exciting and tasty. Chilling the mixture is key to the right texture. Refrigerate for 30 minutes to help it firm up. If the mixture feels too wet, add more oats. If it's too dry, a little more almond butter helps. Adjust until it feels just right. This way, you’ll easily roll them into bites. Enjoy these energy bites in many ways! They make a great snack on their own or as a post-workout treat. You can pair them with yogurt or a smoothie for added flavor. They also go well with a cup of tea or coffee. Get creative and try them in lunch boxes for a fun surprise! {{image_2}} You can change the taste of your carrot cake coconut energy bites in fun ways. - Adding chocolate chips: Mix in half a cup of dark chocolate chips. This adds a rich flavor. The chocolate goes well with the sweetness of the carrots. It makes each bite feel like a treat. - Incorporating dried fruits: Try adding a half cup of dried fruits. You can use raisins, cranberries, or apricots. These fruits bring extra sweetness and chewiness. They also add more nutrients to your bites. You can adapt these bites to fit different diets. - Vegan adaptations: To make them vegan, use maple syrup instead of honey. All other ingredients are already plant-based. - Gluten-free options: If you need gluten-free bites, check your oats. Make sure they are labeled gluten-free. This way, you can enjoy the bites without worry. You can change these bites for special times of the year. - Ideas for holiday-themed energy bites: For a festive touch, add pumpkin spice in the fall. In winter, mix in peppermint extract for a fresh taste. - Using seasonal fruits and spices: In summer, you could add fresh berries. They give a bright flavor. In spring, try zesting lemon for a light, fresh twist. Each season brings new tastes to explore. To keep your Carrot Cake Coconut Energy Bites fresh, store them in an airtight container. This helps lock in moisture and flavor. You can use any container with a good seal. Place a piece of parchment paper between layers if stacking them. This keeps them from sticking together. In the fridge, these energy bites last about one week. For longer storage, you can freeze them. Place the bites in a single layer on a baking sheet. Freeze for an hour, then transfer them to a freezer bag. This method prevents them from sticking. They can last up to three months in the freezer. To enjoy your frozen bites, take them out and let them thaw in the fridge. This keeps them cool and tasty. Thawing usually takes about an hour. Once thawed, you can serve them right away. They taste great as a quick snack or post-workout treat. Feel free to roll them in more shredded coconut for added texture! Carrot Cake Coconut Energy Bites can last about one week in the fridge. Store them in an airtight container. This keeps them fresh and tasty. If you want them to last longer, you can freeze them. They will stay good for up to three months in the freezer. Just remember to thaw them before you enjoy! Yes, you can make these energy bites ahead of time. In fact, they taste even better after sitting in the fridge for a bit. Just prepare the mixture, roll it into balls, and store them in an airtight container. You can make a batch on the weekend for quick snacks during the week. This saves time and keeps you on track with healthy eating. These energy bites have many health benefits. They are full of fiber from the rolled oats and carrots. Fiber helps with digestion and keeps you full. Almond butter adds healthy fats and protein. This gives you lasting energy. The honey or maple syrup adds natural sweetness without refined sugar. Plus, the nuts give you extra crunch and nutrients. Overall, these bites are a tasty and healthy snack choice! You learned how to make tasty Carrot Cake Coconut Energy Bites. We covered the main ingredients, sweeteners, and spices to enhance flavor. You saw easy steps to prepare and chill the mixture, and we discussed tips to customize your bites. Finally, I shared storage methods and answered common questions about freshness and nutritional benefits. These energy bites are fun to make and offer great flavor and health. Enjoy them as a quick snack or a treat anytime.

Carrot Cake Coconut Energy Bites Tasty and Healthy Snack

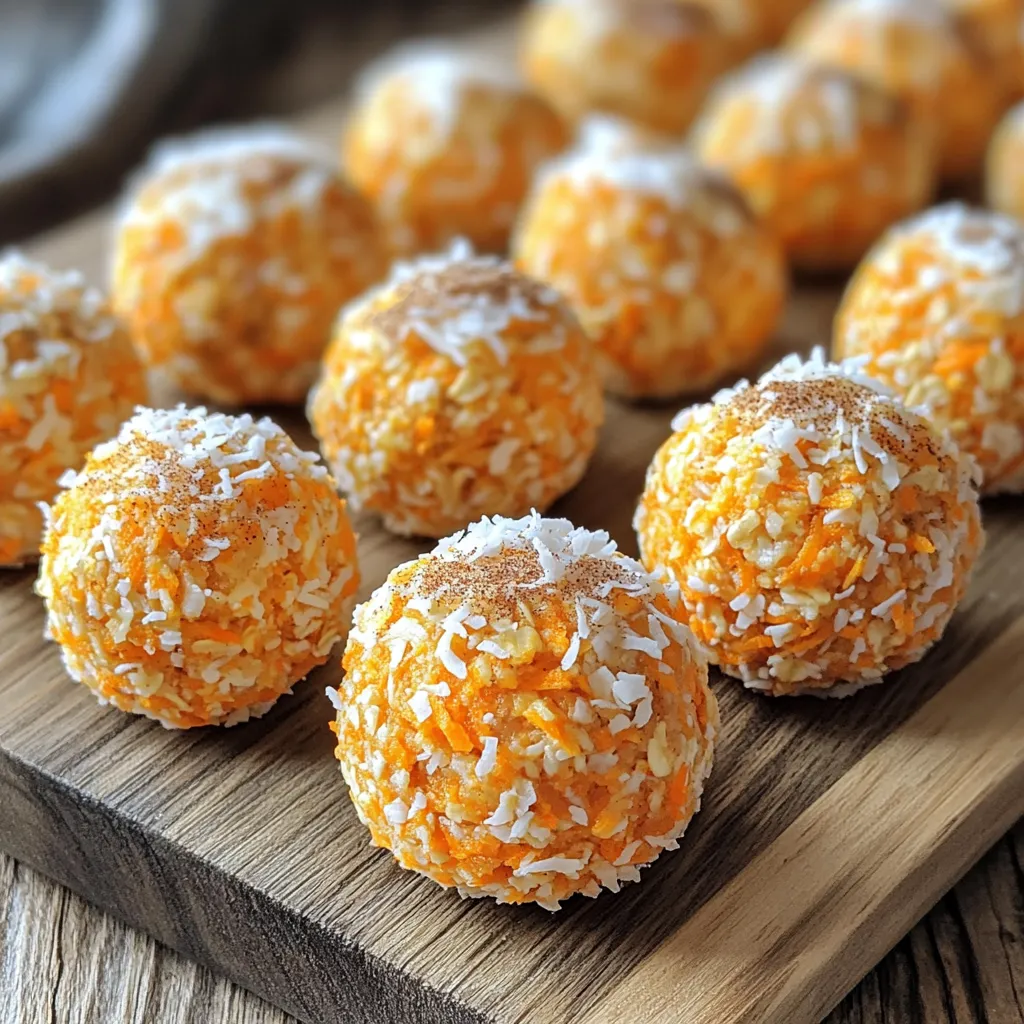
Looking for a quick, tasty, and healthy snack? I’ve got just the recipe for you! Carrot Cake Coconut Energy Bites

- 1 cup rolled oats - 2 cups almond milk (or any milk of choice) - 2 tablespoons almond butter - 1 tablespoon chia seeds - 1 tablespoon maple syrup (or honey) - 1 teaspoon vanilla extract - A pinch of salt - Fresh fruits for topping (such as banana, berries, or sliced apple) - Crushed nuts or granola for topping (optional) These ingredients create a tasty breakfast. The rolled oats are the base. Almond milk adds creaminess. Almond butter gives a nutty flavor and healthy fats. Chia seeds add fiber and a nice texture. Maple syrup or honey sweetens the dish. Vanilla extract brings warmth. A pinch of salt enhances all the flavors. Fresh fruits add color and nutrition. You can top it with crushed nuts or granola for crunch. I love how these simple ingredients come together. It feels like a treat, yet it's healthy. You can mix and match toppings to suit your taste. This recipe makes breakfast easy and fun! 1. First, take a mixing bowl. Add 1 cup rolled oats and 2 cups almond milk. Pour in 2 tablespoons almond butter, 1 tablespoon chia seeds, 1 tablespoon maple syrup, 1 teaspoon vanilla extract, and a pinch of salt. 2. Use a whisk to mix everything well. Make sure the almond butter blends smoothly into the liquid. 3. Next, divide this mixture evenly into two jars. Choose jars with lids to keep them sealed. 1. Now, seal the jars tightly. Place them in the refrigerator overnight. If you don’t have that long, let them soak for at least 4 hours. 2. Soaking helps the oats absorb the liquid. This makes them soft and creamy. You will love the texture in the morning. 1. In the morning, take the jars out of the fridge. Give the oats a good stir to mix them again. If they are too thick, add a splash of almond milk. 2. Top your oats with fresh fruits. You can use bananas, berries, or sliced apples. For some crunch, add crushed nuts or granola on top. 3. Enjoy your tasty Almond Butter Overnight Oats right from the jar. You can also transfer them to a bowl if you like! To make great almond butter overnight oats, mix well. Use a whisk to combine all ingredients. This helps the almond butter blend smoothly into the mix. If you find your oats too thick, add a splash of almond milk. This will help reach your desired consistency. Spices can take your oats to the next level. Adding a pinch of cinnamon gives warmth and depth. You can also adjust the sweetness. If you like it sweeter, add more maple syrup or honey. Taste as you go to find what you love. Batch preparation is a game-changer. Make a few jars at once for the week. This way, you have breakfast ready to go. If you need a quick option, use the microwave. Cook rolled oats with almond milk for about two minutes. This gives you a warm, comforting bowl in no time. {{image_2}} You can change the flavor of your almond butter overnight oats to make them unique. - Chocolate almond butter version: Add 2 tablespoons of cocoa powder to the oats. This gives a rich, chocolatey taste. You can also add mini chocolate chips for extra sweetness. - Nutty fruit blend option: Mix in chopped nuts like walnuts or pecans with your oats. You can also add dried fruits like raisins or cranberries for a chewy bite. This recipe is easy to modify for different diets. - Vegan and gluten-free options: Use almond milk and certified gluten-free oats to keep it vegan and gluten-free. This way, everyone can enjoy it without worry. - Low-carb variations: Replace oats with chia seeds or flaxseed meal. This keeps the dish low in carbs but still filling. Toppings make your overnight oats even better. - Different fruits and their benefits: Fresh fruits like bananas, berries, or apples add flavor and nutrients. For example, bananas are high in potassium, while berries are full of antioxidants. - Incorporating superfoods like hemp seeds: Sprinkle hemp seeds on top for extra protein and omega-3 fatty acids. They add a nice crunch and boost the health benefits of your meal. When storing your Almond Butter Overnight Oats, I recommend using glass jars. Glass keeps your oats fresh and free from unwanted smells. Plastic containers can absorb odors. Make sure to choose jars with tight-fitting lids. This helps seal in freshness and keeps your oats safe from spills. To ensure they stay fresh, always seal the jars tightly. If you do not have glass jars, use plastic containers that can close securely. This step is key to keeping your oats tasty and safe. Your Almond Butter Overnight Oats can last up to five days in the fridge. This gives you plenty of time to enjoy them. However, always check for signs of spoilage. If the oats look watery or have an off smell, it's best to throw them away. Freshness is important for taste and safety. If you prefer warm oats, you can easily reheat them. Just transfer the oats to a microwave-safe bowl. Heat them in short bursts of 30 seconds. Stir in between to ensure even heating. To avoid texture loss, add a splash of almond milk before reheating. This keeps the oats creamy and smooth. Enjoy your warm oats just like you would fresh! Yes, you can use many kinds of milk. Almond milk makes this dish creamy and nutty. You can also try oat milk, coconut milk, or soy milk. Each type has its own taste. For instance, coconut milk adds a tropical flavor. Using regular cow's milk works well too. Just remember, each milk choice changes the final taste a bit. You should soak the oats for at least 4 hours. This helps them soften. Overnight soaking is best for a creamy texture. Longer soaking means better absorption of flavors too. Soaking also makes the oats easier to digest. If you are short on time, a minimum of 30 minutes works. Yes, this recipe is great for meal prep. You can make multiple servings at once. Just double or triple the ingredients. Divide the mixture into jars. Seal them tightly and store in the fridge. They will last for about 3 days. This way, you have a quick breakfast ready for busy mornings. Absolutely! You can adjust the sweetness to your taste. Use maple syrup for a rich flavor. Honey is another good option. If you want less sugar, try mashed banana or unsweetened applesauce. You can also skip sweeteners altogether. Taste the oats before serving and add more if needed. In this post, we explored a simple overnight oats recipe. You learned the key ingredients, the easy steps to prepare them, and how to store them well. We also shared tips for making them taste great and highlighted fun variations. Overnight oats are simple, tasty, and great for your health. You can mix flavors and toppings to suit your taste. Enjoy experimenting and finding your perfect bowl!

Almond Butter Overnight Oats Easy and Nutritious Recipe

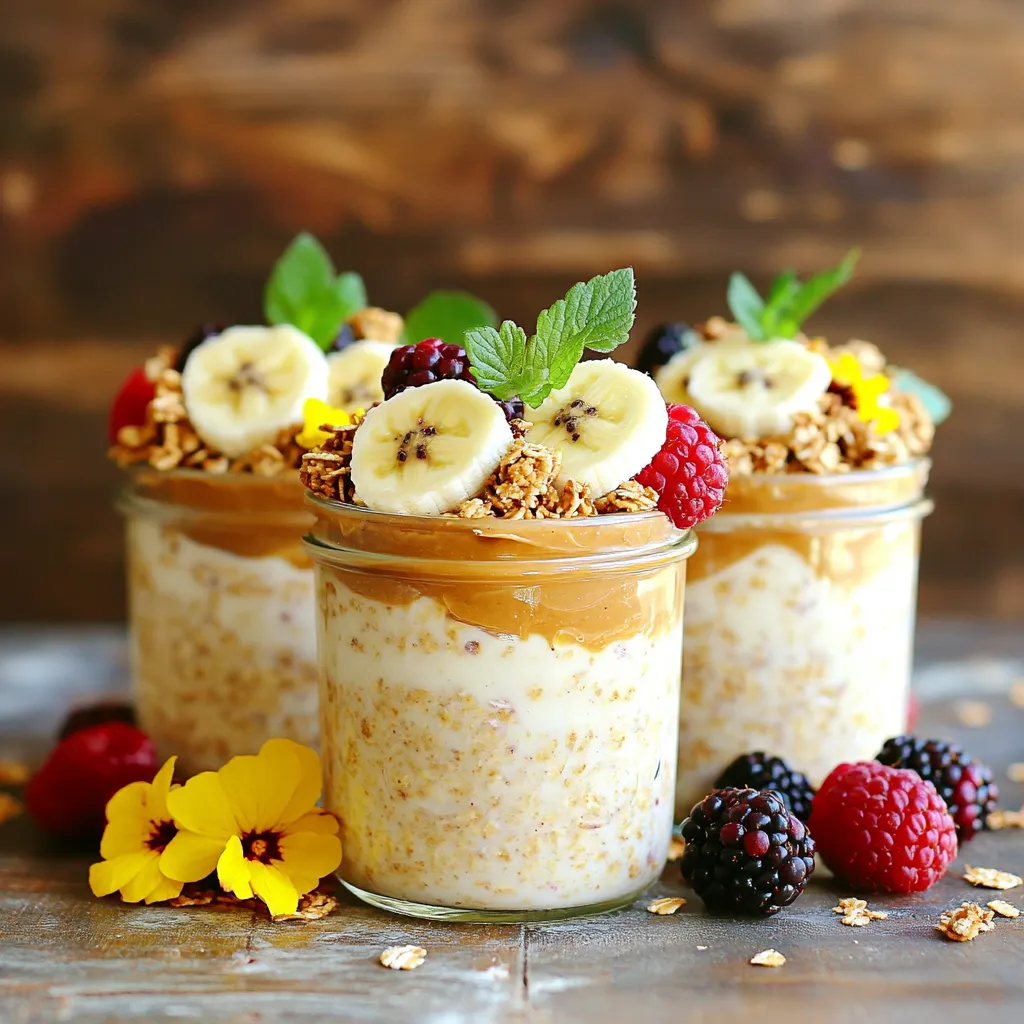
Looking for a quick, tasty breakfast that packs a nutritious punch? Let me introduce you to Almond Butter Overnight Oats.

For the perfect Apple Cinnamon Bakery Bread, gather these key ingredients: - Dried ingredients: - 2 cups all-purpose flour - 1 teaspoon baking powder - 1/2 teaspoon baking soda - 1 teaspoon ground cinnamon - 1/4 teaspoon nutmeg - 1/2 teaspoon salt - Wet ingredients: - 1/2 cup unsalted butter, softened - 3/4 cup brown sugar, packed - 2 large eggs - 1 teaspoon vanilla extract - 1/2 cup buttermilk - Fresh ingredients: - 2 medium apples, peeled, cored, and diced (I recommend Granny Smith or Honeycrisp) - 1/2 cup chopped walnuts (this is optional, but they add great texture) These ingredients blend to create a moist and flavorful bread. The apples add natural sweetness, while the spices give it warmth. The walnuts provide a nice crunch. Each component plays a role in making this bread a delightful treat. 1. Preheat the Oven: Start by preheating your oven to 350°F (175°C). This ensures even baking. Grease a 9x5-inch loaf pan with butter or cooking spray. This will stop the bread from sticking. 2. Mix Dry Ingredients: In a medium bowl, whisk together the following dry items: - 2 cups all-purpose flour - 1 teaspoon baking powder - 1/2 teaspoon baking soda - 1 teaspoon ground cinnamon - 1/4 teaspoon nutmeg - 1/2 teaspoon salt Set this bowl aside. 3. Prepare the Wet Mixture: In a large bowl, cream together: - 1/2 cup unsalted butter, softened - 3/4 cup brown sugar, packed Use a hand mixer or stand mixer for about 3-4 minutes. It should be light and fluffy. Next, add in 2 large eggs, one at a time. Then mix in 1 teaspoon vanilla extract until well combined. 4. Combine the Mixtures: Gradually add the dry mixture to the wet mixture. Alternate with 1/2 cup buttermilk. Start and end with the flour mixture. Mix until just combined. 5. Fold in Apples and Nuts: Gently fold in: - 2 medium apples, peeled, cored, and diced (Granny Smith or Honeycrisp) - 1/2 cup chopped walnuts (optional) Ensure they are evenly distributed in the batter. 1. Transfer to Pan: Pour the batter into the prepared loaf pan. Smooth the top with a spatula. 2. Add the Topping: In a small bowl, mix: - 1/4 cup granulated sugar - 1 teaspoon ground cinnamon Sprinkle this mixture evenly over the top of the loaf. 3. Bake: Place the pan in the oven and bake for 55-65 minutes. Check doneness by inserting a toothpick into the center. If it comes out clean, the bread is ready. 1. Cooling Techniques: Allow the bread to cool in the pan for 10 minutes. This helps it firm up. Next, transfer it to a wire rack to cool completely. 2. Slicing Recommendations: Wait until the bread is cool before slicing. This helps keep the slices neat. Serve warm with a pat of butter or a drizzle of honey for extra flavor. You can also sprinkle some extra cinnamon on top for a lovely touch. What are the best apples to choose? The best apples are Granny Smith or Honeycrisp. They add a nice tartness. This balances the sweetness of the bread. Choose firm apples for the best texture in your bread. How can I keep the bread moist? To keep the bread moist, do not overmix the batter. Mix just until combined. Adding buttermilk also helps, as it adds moisture. You can also cover the bread with foil during baking to prevent it from drying out. What happens if I overmix the batter? Overmixing makes the bread tough and dry. Mix until you see no dry flour. This keeps the bread light and fluffy. Why is baking at the right temperature important? Baking at the wrong temperature can lead to uneven results. Always preheat your oven to 350°F (175°C). An oven thermometer can help ensure your oven is accurate. How should I serve the bread? Serve the bread warm with a pat of butter. You can also drizzle honey over it. A sprinkle of cinnamon sugar on top enhances the flavor. What drinks pair well with this bread? This bread pairs nicely with coffee or tea. The warm spices complement the drinks well. Enjoy a slice with your morning brew or as an afternoon snack. {{image_2}} You can change the flavor of your apple cinnamon bread in fun ways. Adding spices like ginger or cloves gives it a warm, cozy taste. You can also try different mix-ins. For example, cranberries add a tart kick, while chocolate chips bring a sweet twist. Both options make the bread unique and tasty. If you need to make the bread gluten-free, substitute all-purpose flour with a gluten-free blend. This change keeps the texture nice. For vegan options, you can replace eggs with flaxseed meal or applesauce. You can also use coconut oil instead of butter. These swaps make the bread suitable for many diets. Serving apple cinnamon bread can be fun and creative. You can slice it and arrange it on a pretty platter. A pat of butter or a drizzle of honey on top makes it even better. For special occasions, sprinkle some extra cinnamon on the bread or add festive decorations. This way, your bread looks as good as it tastes! To keep Apple Cinnamon Bakery Bread fresh for a few days, wrap it well. Use plastic wrap or foil. Place it in an airtight container. This helps keep out air and moisture. Store it at room temperature, away from direct sunlight. It stays good for about three days. For long-term storage, freezing is the best option. First, let the bread cool completely. Then, slice the bread for easy use. Wrap each slice in plastic wrap. Put the wrapped slices in a freezer bag. Squeeze out the air before sealing. This keeps the bread fresh for up to three months. To reheat the bread, use the oven for the best texture. Preheat your oven to 350°F (175°C). Place the slices on a baking sheet. Heat for about 10 minutes. You can also use a microwave, but it may get soft. Heat it for 15-20 seconds in the microwave. Enjoy your warm, tasty bread! For this recipe, I recommend using Granny Smith or Honeycrisp apples. These apples offer a nice balance of tartness and sweetness. Granny Smith brings a sharp bite, while Honeycrisp adds a juicy sweetness. Both types hold their shape well during baking, giving you nice chunks of apple in every slice. Yes, you can prepare this bread ahead of time. Mix the dry and wet ingredients separately and store them in the fridge overnight. On baking day, combine them as directed. You can also bake the bread a day in advance. Just let it cool completely before wrapping it in plastic wrap. This keeps it fresh. You can make this bread in a bread machine, but some adjustments are needed. Use the machine's dough setting to mix the ingredients. After that, transfer the dough to a loaf pan to bake in the oven. This method gives you a better texture and crust than a bread machine alone. Homemade apple cinnamon bread is fresher and more flavorful than store-bought options. You control the ingredients, so you can avoid preservatives and additives. Plus, you can customize flavors and textures. The joy of baking at home also adds a special touch that you won’t find in store-bought bread. This article covered the main steps to make delicious apple cinnamon bread. We discussed essential ingredients, from flour to fresh apples, and shared clear, step-by-step instructions. I shared tips to avoid common mistakes and suggested tasty variations. Remember, using the right apples and mixing properly leads to great taste. Store your bread for freshness and enjoy it with coffee or tea. Homemade is always better than store-bought. Now, gather your ingredients and start baking! You’ll love the results.

Apple Cinnamon Bakery Bread Hearty and Flavorful Delight

Are you craving a warm, hearty treat that fills your kitchen with the sweet scent of autumn? Look no further

- 2 cups cooked shredded chicken - 1 cup BBQ sauce (homemade or store-bought) - 12 mini hamburger buns - 1 cup dill pickles, sliced - ½ cup coleslaw mix - ¼ cup mayonnaise - 1 tablespoon apple cider vinegar - 1 teaspoon garlic powder - Salt and pepper to taste - Fresh parsley, chopped (for garnish) When it comes to BBQ chicken sliders, the key is using great ingredients. Start with cooked shredded chicken. You can use leftover chicken or rotisserie for ease. The BBQ sauce is crucial. You can make your own or grab a good store-bought one. Don't skip the mini hamburger buns. They hold everything together perfectly. For crunch and tang, add sliced dill pickles. The coleslaw mix adds a nice texture. Mix it with mayonnaise, apple cider vinegar, garlic powder, salt, and pepper. This creamy topping brightens the sliders. Finally, fresh parsley adds a pop of color and flavor. It makes your sliders look great on the plate. Each ingredient plays a role in making these sliders a tasty treat. Enjoy the mix of flavors and textures in every bite! - In a large bowl, combine the cooked shredded chicken with 1 cup of BBQ sauce. - Mix well until the chicken is fully coated in the sauce. This step adds a rich flavor to the meat. - In another bowl, mix ¼ cup of mayonnaise with 1 tablespoon of apple cider vinegar. - Add 1 teaspoon of garlic powder, and sprinkle in some salt and pepper to taste. - Stir in ½ cup of coleslaw mix until it is evenly coated. The coleslaw adds a crunchy texture. - Preheat your oven to 350°F (175°C). - Take 12 mini hamburger buns and place them on a baking sheet. - Spoon a generous portion of the BBQ chicken mixture onto the bottom half of each slider bun. - Add a couple of pickle slices on top of the chicken for a tangy kick. - Finish with a small spoonful of coleslaw on each slider. - If you want a warm, crispy bun, place the assembled sliders in the oven. - Toast for 5-7 minutes until the buns turn golden brown. This step enhances the overall flavor and texture. To create a homemade BBQ sauce, combine ketchup, brown sugar, apple cider vinegar, and smoked paprika. This mix gives a sweet and tangy taste. You can add spices like cayenne for heat or honey for more sweetness. For pickles, dill pickles work great, but you can try bread and butter pickles for a sweet twist. Each type of pickle brings a unique flavor that can change the whole slider experience. Pair your sliders with crispy fries or a fresh garden salad. Fries add crunch, while salads provide a light balance. For a stunning presentation, stack the sliders on a rustic wooden board. Place extra pickles and a bowl of coleslaw on the side. Guests can customize their sliders just the way they like. To get the right chicken texture, use cooked, shredded chicken. The sauce should coat the chicken well. Avoid overcooking the mixture to keep the chicken tender. For leftover BBQ chicken, store it in an airtight container in the fridge. It lasts for about 3-4 days. You can also freeze the mixture for up to three months. Just thaw it in the fridge before using. {{image_2}} You can switch up the proteins in your sliders. Pulled pork makes a great choice. Turkey is also tasty and lighter. For toppings, try jalapeños for some heat. Cheese can add a creamy touch that many enjoy. BBQ sauces come in many flavors. You can choose spicy sauces for a kick or sweet ones if you prefer. Mixing coleslaw with apples adds sweetness. Adding nuts gives a nice crunch and taste. If you need gluten-free options, look for gluten-free buns. Many brands make tasty gluten-free versions. For a vegan meal, swap chicken for jackfruit or mushrooms. You can make coleslaw with a vegan mayo to keep it plant-based. To keep your BBQ chicken sliders fresh, store them in an airtight container. This will prevent them from drying out. If you have leftover components, like the chicken or coleslaw, store them separately. This way, the buns stay soft and the coleslaw remains crunchy. You can use plastic wrap or aluminum foil to cover the sliders too. If you want to freeze extra sliders, wrap each one tightly in plastic wrap. Place them in a freezer bag, removing as much air as possible. This helps keep the flavors intact. When it's time to enjoy leftovers, you can reheat your sliders in a few ways. The best method is to use the oven. Preheat it to 350°F (175°C). Place the sliders on a baking sheet and heat for about 10 minutes. This keeps the buns soft and warms the chicken well. If you want a quick option, use the microwave. Heat them for 30 seconds to 1 minute. To keep the buns from getting tough, cover them with a paper towel. In the fridge, your BBQ chicken sliders last about 3 to 4 days. If you notice any off smell or changes in color, it's best to toss them. When freezing, they can last up to 3 months. Just remember to check for freezer burn. This can happen if they are not sealed well. If your sliders feel dry or hard, they are no longer good to eat. To make simple BBQ sauce, you need a few easy ingredients. Gather: - 1 cup ketchup - 1/4 cup apple cider vinegar - 1/4 cup brown sugar - 1 tablespoon Worcestershire sauce - 1 teaspoon garlic powder - 1 teaspoon onion powder - Salt and pepper to taste Mix all these in a bowl. Taste and adjust to your liking. This sauce pairs great with chicken! Yes, you can prep sliders early. Start by making the BBQ chicken. Keep it in the fridge for up to two days. You can also mix the coleslaw and store it separately. When ready to serve, just assemble the sliders. This saves time and makes serving easy! Great sides for sliders include: - French fries - Potato salad - Coleslaw - Corn on the cob - Baked beans These sides add color and flavor to your meal. They also balance the richness of the sliders! Absolutely! To make sliders fun for kids, let them help assemble. Use smaller pickle slices, and offer toppings like cheese. You can even use fun-shaped buns. Kids love to customize their food. It makes the meal more exciting! In this blog post, we covered how to make delicious BBQ chicken sliders. We looked at all the ingredients, from the chicken to the coleslaw. I shared easy steps to prepare and assemble the sliders. You also got tips on flavors and variations to try. Keep these insights in mind next time you want a simple meal. Enjoy making these sliders for family or friends. They are tasty, fun, and perfect for any gathering. Happy cooking!

BBQ Chicken Sliders with Pickles Flavorful Delight

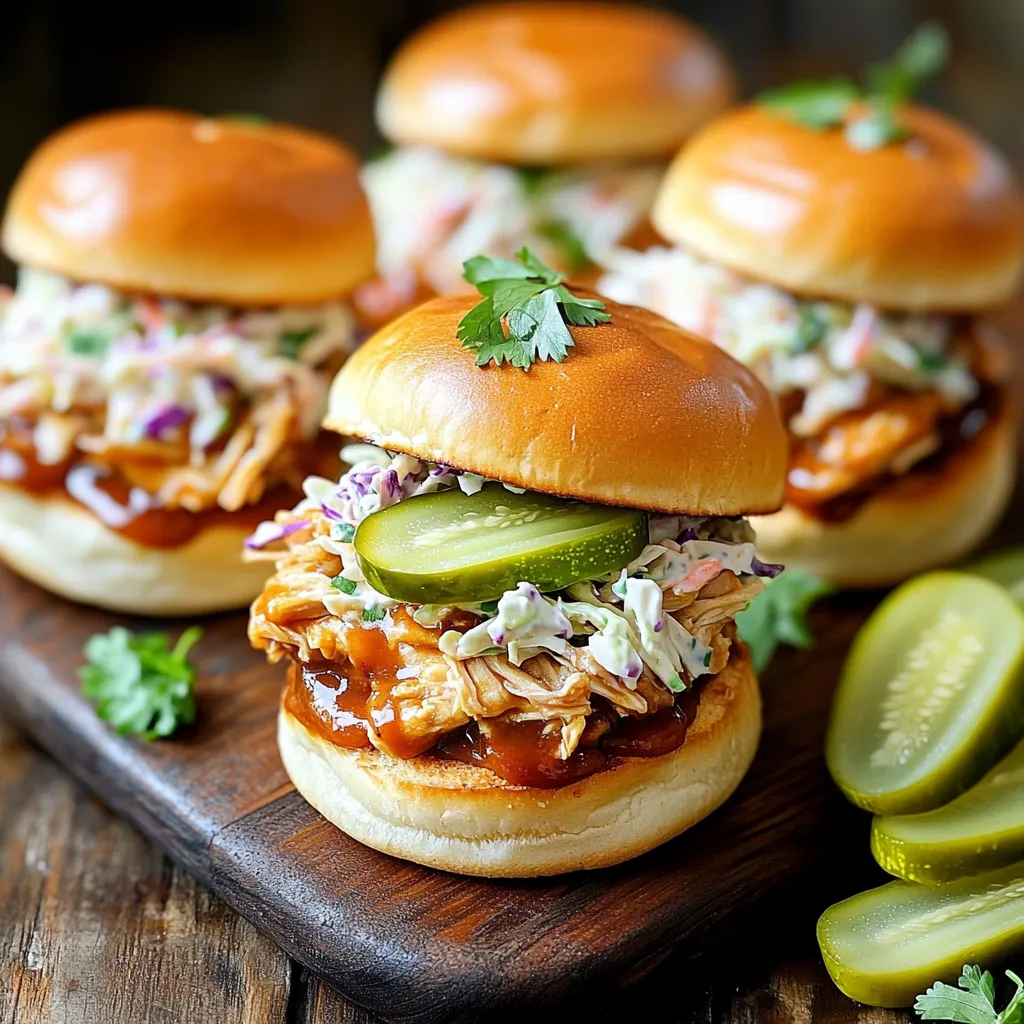
Are you ready to elevate your next gathering with a burst of flavor? BBQ Chicken Sliders with Pickles are here

Older posts
Newer posts
← Previous Page1 … Page12 Page13 Page14 … Page84 Next →

dsad

© 2026 Foodish Talk • Built with GeneratePress

Our Policies

  • Copyright Policy
  • Cookie Policy
  • GDPR Policy
  • Privacy Policy
  • Disclaimer
  • Terms Of Use

More Information

  • Home
  • About
  • Contact
  • Appetizers
  • Dessert
  • Dinner
  • Drinks
©2026, Foodish Talk About Back To Top