Skip to content
DisclaimerTerms Of UseGDPR PolicyCookie Policy

Foodish Talk

  • Home
  • Drinks
  • Appetizers
  • Dinner
  • Dessert
  • About
  • Contact
  • Privacy Policy
DisclaimerTerms Of UseGDPR PolicyCookie Policy

NO-ING-IMG

For this One Pot Spicy Tomato Lentil Soup, gather the following items: - 1 cup dried lentils (green or brown) - 1 tablespoon olive oil - 1 medium onion, chopped - 2 garlic cloves, minced - 1 carrot, diced - 1 celery stalk, diced - 1 red bell pepper, diced - 1 can (14 oz) crushed tomatoes - 4 cups vegetable broth - 1 teaspoon cumin - 1 teaspoon smoked paprika - 1/2 teaspoon red pepper flakes (adjust for heat preference) - Salt and pepper to taste - 2 cups fresh spinach (or kale) - Juice of 1 lemon - Fresh parsley for garnish You can swap some ingredients for better flavor or availability: - Use olive oil or any other cooking oil like canola or avocado oil. - If you don't have fresh spinach or kale, try Swiss chard or collard greens. - For a different taste, replace red bell pepper with yellow or orange bell pepper. - You can use fresh tomatoes instead of canned ones, but they need to be peeled and chopped. - For added protein, include cooked beans or chickpeas. Each serving of this soup, which makes about six servings, contains: - Calories: 180 - Protein: 9g - Carbohydrates: 28g - Fiber: 8g - Fat: 3g - Sodium: 300mg (adjust based on broth used) This soup is rich in nutrients. It offers fiber from lentils and vitamins from veggies. It’s a filling dish that warms you up, especially in cold weather. Enjoying a bowl provides energy and satisfies your taste buds! To start, gather your ingredients. You will need: - 1 cup dried lentils (green or brown) - 1 tablespoon olive oil - 1 medium onion, chopped - 2 garlic cloves, minced - 1 carrot, diced - 1 celery stalk, diced - 1 red bell pepper, diced - 1 can (14 oz) crushed tomatoes - 4 cups vegetable broth - 1 teaspoon cumin - 1 teaspoon smoked paprika - 1/2 teaspoon red pepper flakes - Salt and pepper to taste - 2 cups fresh spinach (or kale) - Juice of 1 lemon - Fresh parsley for garnish Chop your onion, carrot, celery, and red bell pepper. Rinse the lentils under cold water. This removes dirt and debris. Heat the olive oil in a large pot over medium heat. Add the chopped onion, carrot, celery, and red bell pepper. Sauté these veggies for about 5-7 minutes. You want them soft and fragrant. Next, stir in minced garlic, cumin, smoked paprika, and red pepper flakes. Cook for another 1-2 minutes. The spices should smell amazing! Now, add the rinsed lentils, crushed tomatoes, and vegetable broth to the pot. Stir well to mix everything. Bring this mixture to a boil. Once boiling, reduce the heat to low. Cover the pot and let it simmer for about 25-30 minutes. You want the lentils to be tender. After cooking, stir in the fresh spinach or kale and lemon juice. Let it cook for another 5 minutes. The greens should wilt nicely. Don’t forget to season with salt and pepper to taste. For serving, ladle the soup into bowls and garnish with fresh parsley. This soup pairs well with crusty bread. Enjoy this rich and hearty dish! To make your soup burst with taste, start with fresh veggies. Use ripe tomatoes for the best results. Cooking the onions and peppers until soft builds a great base. Adding spices like cumin and smoked paprika early helps release their flavors. For a kick, adjust the red pepper flakes to your heat level. A squeeze of lemon juice at the end brightens the flavors. How long should I cook the lentils? Cook the lentils for 25-30 minutes or until tender. This ensures they are soft but not mushy. Can I skip the spinach? Yes, but adding greens boosts nutrition. Use kale or other leafy greens if you prefer. How can I thicken the soup? If you want a thicker soup, mash some lentils with a fork. This adds body without extra steps. One common mistake is not rinsing lentils. Always rinse them to remove dust and dirt. Don’t skip browning the veggies. It adds depth to your soup. Watch the heat when adding spices. Too high can burn them, ruining flavor. Lastly, remember to season at the end. Taste and adjust salt and pepper to your liking. {{image_2}} You can use different lentils in this soup. Green and brown lentils work well. They hold their shape during cooking. Red lentils cook faster and break down. This makes the soup thick and creamy. Choose based on your taste. Each type adds a unique texture and flavor. Want to boost the protein? Try adding cooked chicken or turkey. You can also use tofu or beans. Chickpeas or black beans mix well in this soup. This adds heartiness and makes it more filling. Adjust cooking times if needed to ensure everything heats through. Adjust the spice levels to fit your taste. Start with less red pepper flakes if you prefer mild soup. You can add more as it cooks. For extra heat, try jalapeños or hot sauce. Taste your soup to find the right balance. Cooking should be fun and suit your preferences! To store leftover soup, let it cool to room temperature first. Pour it into an airtight container. Label the container with the date. Store it in the fridge for up to four days. This keeps the soup fresh and tasty. For long-term storage, freeze the soup. First, cool it completely. Then, transfer it to a freezer-safe container. Leave space at the top for expansion. Seal it tightly. You can freeze it for up to three months. Label the container with the date for easy tracking. When ready to eat, thaw the soup in the fridge overnight. Reheat it on the stove over medium heat. Stir occasionally to prevent sticking. You can add a splash of water or broth if it is too thick. Heat until it is hot throughout. Enjoy the warm, spicy flavors again! Yes, you can use canned lentils. They save time and are ready to eat. Just rinse them first. If you use canned lentils, reduce the cooking time by about 15 minutes. Add them towards the end of cooking to warm them up. The soup will last for about 5 days in the fridge. Store it in an airtight container. Always let it cool down before putting it in the fridge. If you see any signs of spoilage, throw it out. This soup pairs well with crusty bread or a fresh salad. You can also enjoy it with grilled cheese for a fun twist. For a heartier meal, try adding rice or quinoa on the side. Each option adds a nice touch to the rich flavors of the soup. This blog post covered all you need for a great lentil soup. We explored ingredients, including tips for smart substitutions. I shared step-by-step cooking instructions, so you can follow along easily. I also provided tips to enhance flavor and avoid common mistakes. You learned about variations to make the soup your own. Finally, I included storage info to keep leftovers fresh. With this guide, you can create a tasty soup that’s sure to please everyone. Enjoy your cooking journey!

One Pot Spicy Tomato Lentil Soup Rich and Hearty Dish

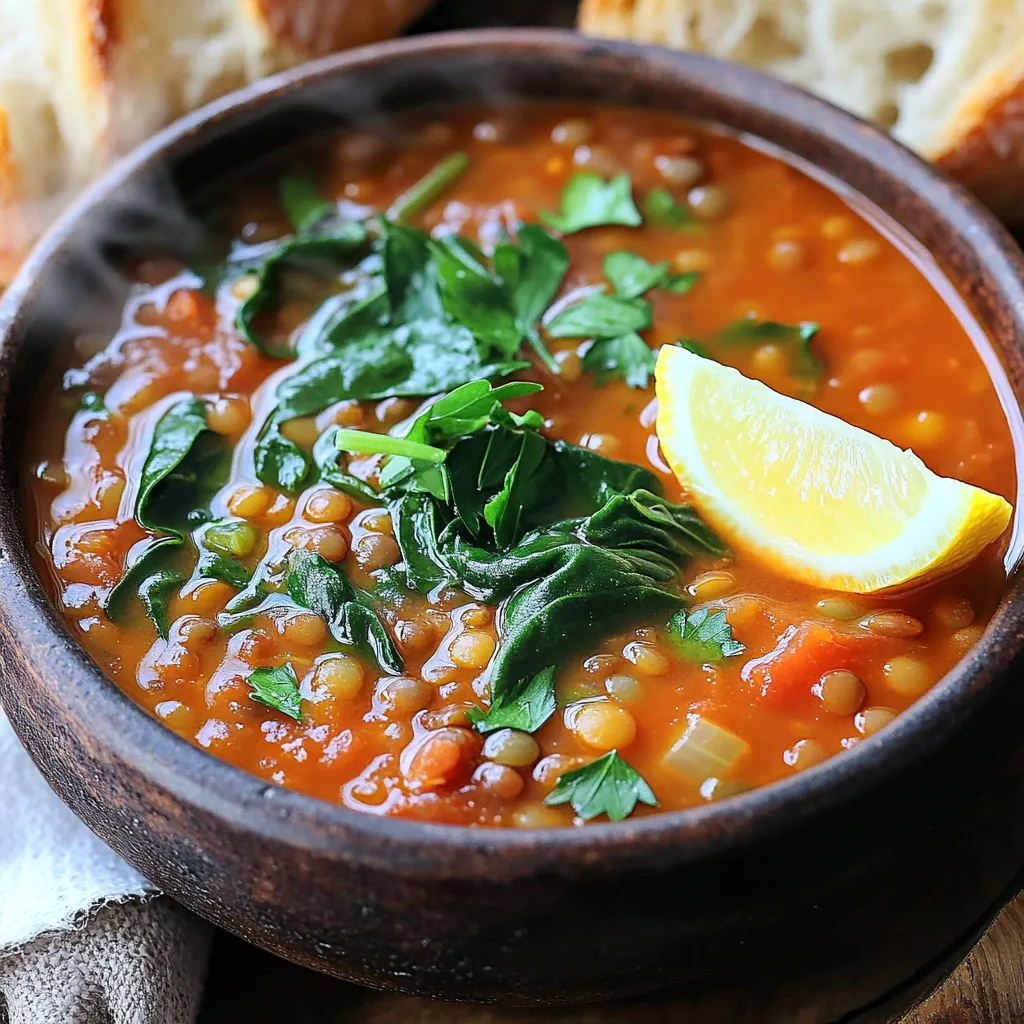
Warm up your kitchen with my One Pot Spicy Tomato Lentil Soup! This rich and hearty dish is perfect for

To make these tasty Cottage Cheese Banana Pancakes, gather these main ingredients: - 1 cup cottage cheese - 2 ripe bananas, mashed - 2 large eggs - 1/2 cup rolled oats - 1 teaspoon baking powder - 1/2 teaspoon vanilla extract - 1/4 teaspoon salt - Cooking spray or butter for the skillet You can add a few optional ingredients for extra flavor: - 1/2 teaspoon cinnamon - Maple syrup or honey for serving These pancakes are not only tasty but also healthy. Each serving gives you: - Calories: 300 - Protein: 18g - Carbohydrates: 40g - Fat: 9g - Fiber: 4g This makes them a filling and nutritious choice for breakfast or a snack. Start by grabbing a large bowl. Add 1 cup of cottage cheese. Next, mash 2 ripe bananas and mix them in. Crack in 2 large eggs, and stir until everything is well blended. Now, it's time to add more ingredients. Toss in 1/2 cup of rolled oats, 1 teaspoon of baking powder, 1/2 teaspoon of vanilla extract, and 1/4 teaspoon of salt. If you like, sprinkle in 1/2 teaspoon of cinnamon for added warmth. Mix this all together until the batter is smooth. Let it sit for 5-10 minutes. This helps the oats soak up some liquid and thicken the mix. Now, heat a non-stick skillet over medium heat. Add a bit of cooking spray or butter to coat the skillet. Once it's hot, pour a ladleful of batter onto the skillet for each pancake. Cook for about 2-3 minutes. Look for bubbles forming on the surface. When you see them, it's time to flip. Carefully turn the pancakes over and cook for another 2-3 minutes. You want them golden brown. Keep cooking until all the batter is used. Add more butter or spray as needed to keep them from sticking. Serve these pancakes warm for the best taste. Drizzle with maple syrup or honey for sweetness. You can also add fresh fruit, like sliced bananas or berries, on top. If you want, sprinkle some nuts for a nice crunch. Enjoy these pancakes for breakfast or a tasty snack! To get the best texture, let the batter rest for 5-10 minutes. This helps the oats absorb some liquid, making the pancakes fluffier. Use ripe bananas; they add natural sweetness and moisture. If you want thicker pancakes, add a bit more oats. For thinner pancakes, just add a little milk or water. One common mistake is over-mixing the batter. You want it combined, but some lumps are okay. If you over-mix, the pancakes can turn out tough. Another mistake is cooking on too high a heat. Medium heat gives you golden-brown pancakes. If the heat is too high, they may burn on the outside and stay raw inside. These pancakes taste great with maple syrup or honey. You can also add fresh fruit like berries or sliced bananas on top. A dollop of yogurt adds creaminess and tang. For a crunchy twist, sprinkle some nuts or seeds. Enjoy these pancakes with a side of bacon for a hearty breakfast! {{image_2}} You can easily make gluten-free Cottage Cheese Banana Pancakes. Just swap the rolled oats for gluten-free oats. These oats work just as well. They keep the pancakes soft and tasty. Add fun flavors to your pancakes. You can mix in chocolate chips for a sweet treat. Nuts like walnuts or pecans add crunch and protein. Try blueberries for a fruity twist. Each addition makes your pancakes special. If you like savory pancakes, I have great ideas. You can add herbs like chives or spinach to the batter. Cheese, like feta or cheddar, gives a nice salty flavor. Serve with avocado or a poached egg on top. These savory twists will surprise your taste buds! To keep your leftover pancakes fresh, stack them on a plate. Use a sheet of wax paper between each pancake to avoid sticking. Cover the stack tightly with plastic wrap or foil. Store them in the fridge for up to three days. If you want to keep them longer, freezing is a great option. When you're ready to enjoy your pancakes again, you can reheat them easily. The best way is to use a skillet. Heat the skillet on low and place the pancakes in it. Cook for about one minute on each side until warm. You can also use a microwave. Just place them on a microwave-safe plate and heat for about 20-30 seconds. Freezing pancakes is simple. Once cooled, lay them flat on a baking sheet. Freeze them until solid, about an hour. After that, stack them in a freezer bag. Be sure to label the bag with the date. Frozen pancakes can last for up to two months. When you want some, take them out and reheat as needed. Yes, you can substitute many ingredients in this recipe. For cottage cheese, try ricotta cheese or Greek yogurt. Use applesauce instead of bananas for a different flavor. If you need to avoid eggs, use flaxseed meal mixed with water. It works well as a binder. You can also use almond flour instead of rolled oats for a different texture. Just keep in mind that each swap may change the taste a bit. To make Cottage Cheese Banana Pancakes vegan, follow these steps: - Replace cottage cheese with silken tofu or vegan yogurt. - Use flax eggs in place of regular eggs. To make one flax egg, mix one tablespoon of flaxseed meal with three tablespoons of water. Let it sit until it thickens. - Change honey to maple syrup or agave syrup to keep it vegan. These swaps keep the pancakes delicious while making them plant-based. You can top these pancakes with many tasty options. Here are some ideas: - Fresh fruits like berries, sliced bananas, or peaches. - A sprinkle of nuts such as walnuts or almonds for crunch. - Drizzle with maple syrup or honey for sweetness. - Add a dollop of yogurt for creaminess. - Sprinkle cinnamon or nutmeg for an extra flavor boost. Feel free to mix and match these toppings to create your favorite flavor combo! In this post, we covered key ingredients, step-by-step instructions, and helpful tips for pancakes. I shared how to achieve the perfect texture and avoid common mistakes. You also learned about delicious variations and smart storage methods. Making pancakes can be easy and fun! Use these ideas to create tasty meals for yourself or loved ones. Enjoy your cooking journey, and remember, practice makes perfect!

Cottage Cheese Banana Pancakes Flavorful and Easy Recipe

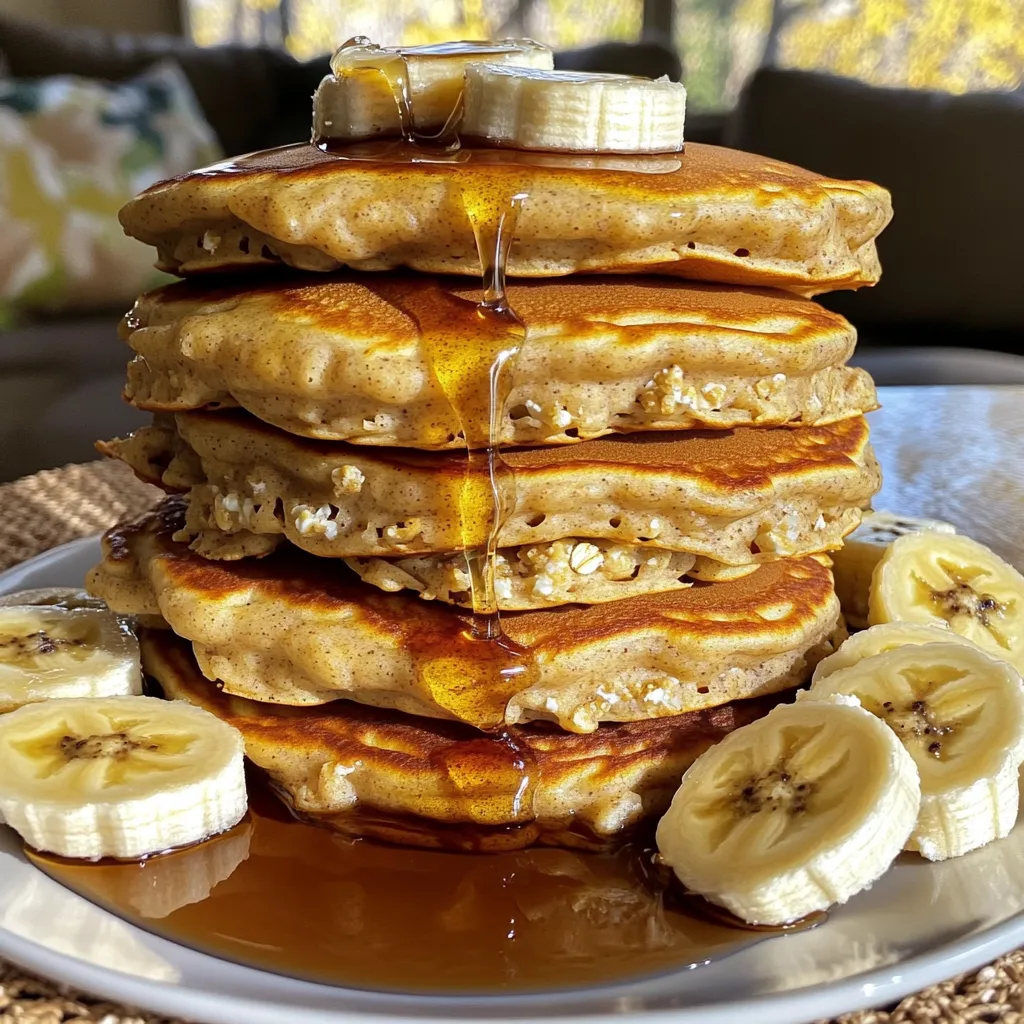
Ready to elevate your breakfast game? Cottage cheese banana pancakes are the perfect blend of flavor and nutrition. They’re easy

- 2 cups white chocolate chips - 1 cup milk chocolate chips - 1 cup hot cocoa mix - ½ cup pumpkin spice mix - ½ cup mini marshmallows - 1 teaspoon vanilla extract These ingredients bring the rich flavor of pumpkin spice to life. The white chocolate chips create a sweet shell. Milk chocolate chips enhance the drink's creaminess. Hot cocoa mix gives you a classic chocolate taste, while pumpkin spice mix adds warmth and depth. Mini marshmallows provide a fun, fluffy texture. Finally, vanilla extract ties all these flavors together beautifully. - Edible gold dust If you want a sparkly touch, use edible gold dust. It makes your hot chocolate bombs look fancy. Just a little bit goes a long way. Brush it on the outside for a festive vibe. You can swap white chocolate chips for dark chocolate or even milk chocolate. For a vegan option, try dairy-free chocolate. Instead of mini marshmallows, use vegan marshmallows or skip them entirely. If you don’t have pumpkin spice mix, mix cinnamon, nutmeg, and ginger for a similar flavor. Start by measuring 2 cups of white chocolate chips. Place them in a microwave-safe bowl. Heat them in the microwave for 30 seconds. Stir the chocolate after each interval. Continue this until the chocolate is smooth and fully melted. Be careful not to overheat. Next, take a silicone mold for half-spheres. Use a spoon to scoop the melted white chocolate. Coat the inside of each mold evenly. Make sure the layer is thick enough to hold its shape. Once coated, place the mold in the freezer for about 10 minutes. This helps the chocolate set properly. While waiting, grab another bowl. Mix 1 cup of hot cocoa mix, ½ cup of pumpkin spice mix, and ½ cup of mini marshmallows. Stir until blended well. This mix will be the heart of your hot chocolate bombs. Set it aside for now. Check the white chocolate shells. Once they are set, carefully remove them from the mold. Fill half of the shells with about 2 tablespoons of your cocoa mixture. Add a sprinkle of marshmallows on top. Take the empty half-spheres and briefly heat their edges in the microwave. Press these onto the filled shells to seal them. To create a smooth look, use the leftover melted white chocolate. Brush it over any seams. If you want a festive touch, use a small brush to dust edible gold dust on the outside of the bombs. This makes them look extra special. To enjoy your pumpkin spice hot chocolate bomb, place one in a mug. Pour hot milk over it and watch it melt. Stir the drink to mix the flavors and see the marshmallows pop up. Enjoy your warm treat! Melting chocolate can be tricky. Use a microwave-safe bowl. Heat the chocolate chips in 30-second bursts. Stir between each burst. This helps prevent burning. Aim for a smooth and shiny texture. If you have a double boiler, that works too. Just remember to keep the water below boiling. To avoid cracks in your chocolate shells, coat the molds evenly. Make sure the chocolate layer is thick enough. Thin layers can crack easily. After coating, chill the molds in the freezer. This helps the shells set properly. If a crack forms, you can fix it with melted chocolate. When filling the chocolate shells, use about 2 tablespoons of the mixture. Add a few mini marshmallows for extra fun. After filling, heat the edges of the empty half-spheres. Just a few seconds in the microwave will do. Press them together gently but firmly. Use leftover melted chocolate to smooth any seams. This makes your hot chocolate bombs look perfect! {{image_2}} You can change the chocolate types for your hot chocolate bombs. Use dark chocolate instead of white chocolate for a rich taste. Try milk chocolate for a sweeter treat. You can mix chocolate types, too. Combining white and milk chocolate makes a unique flavor. Experiment with flavored chocolates like caramel or hazelnut for a fun twist. Add new flavors to your hot chocolate bombs! Peppermint is a classic choice. Just mix in peppermint extract with the cocoa filling. This gives a fresh flavor. Salted caramel is another tasty option. Use caramel sauce in the filling and sprinkle sea salt on top. You can also add a dash of cinnamon for extra warmth. Making these bombs for special diets is easy. Use dairy-free chocolate chips and almond milk for a dairy-free version. Replace the hot cocoa mix with a sugar-free option for a low-sugar treat. If you want a vegan bomb, skip the marshmallows or find vegan ones. These adaptations keep the fun while meeting dietary needs. To keep your pumpkin spice hot chocolate bombs fresh, store them in an airtight container. This helps prevent moisture from ruining their texture. Place them at room temperature, away from direct sunlight. Avoid storing them in the fridge, as cold can cause the chocolate to bloom. When stored correctly, hot chocolate bombs last for about two weeks. You can tell they are fresh if they look smooth and shiny. If you see white spots or a dull surface, the chocolate may have bloomed. While it’s safe to eat, the flavor might not be as good. If you want to gift these treats, use decorative boxes or jars. Line the bottom with tissue paper for a nice touch. Place the bombs in a single layer to avoid breaking them. Seal the container tightly and add a festive label. This way, your gifts will look great and stay fresh! Pumpkin spice hot chocolate bombs are fun treats made of chocolate. They hold a mix of cocoa, pumpkin spice, and mini marshmallows. When you add hot milk, they burst open to release their tasty filling. These bombs combine two fall favorites: hot chocolate and pumpkin spice. They are perfect for cozy nights or festive gatherings. Using a hot chocolate bomb is simple! Place one bomb in a mug. Heat milk until it's hot but not boiling. Pour the milk over the bomb and watch it melt. The chocolate shell breaks open, and marshmallows float to the top. Stir it all together, then enjoy your rich, creamy drink! You can find pre-made pumpkin spice hot chocolate bombs at many local stores. Check specialty shops, bakeries, or online retailers. Always read reviews for quality. If you want something unique, visit local markets or craft fairs. These places often sell homemade versions that taste amazing. Yes, you can make pumpkin spice hot chocolate bombs in advance! Once they cool, store them in an airtight container. Keep them at room temperature. They stay fresh for several weeks. This makes them great for holiday gifts or cozy nights in. Just remember to keep them away from heat and moisture. You can add many tasty things inside your hot chocolate bombs! Try adding different candies like peppermint pieces or toffee bits. You could also mix in flavored syrups or chocolate chips. For a fun twist, add a dash of sea salt for a sweet and salty treat. Let your creativity shine! Packaging pumpkin spice hot chocolate bombs is easy and fun! Use clear bags or small boxes to show off the bombs. Tie them with a festive ribbon for a nice touch. You can also add a card with instructions for use. This makes them a great gift for friends, family, or coworkers. You’ve learned how to make delicious Pumpkin Spice Hot Chocolate Bombs. We covered the best ingredients, easy steps, and tips to avoid issues. Variations let you explore different flavors and meet dietary needs. Proper storage keeps your bombs fresh. Now, you can enjoy a cozy treat or gift a special surprise. With these skills, you’ll impress friends and family all season long. Enjoy every sip of your sweet creation!

Pumpkin Spice Hot Chocolate Bombs Simple and Rich Treat

Are you ready to warm up your fall? Pumpkin Spice Hot Chocolate Bombs are the perfect treat. They are simple

- 2 lbs boneless, skinless chicken thighs - 4 cups low-sodium chicken broth - 1 medium onion, diced - 2 carrots, sliced - 2 celery stalks, diced - 4 cloves garlic, minced - 1 teaspoon dried thyme - 1 teaspoon dried rosemary - 1 teaspoon paprika - 1 cup heavy cream - 2 cups all-purpose flour Gather these ingredients for a dish that warms the heart. The chicken thighs are the star, providing rich flavor. Use low-sodium chicken broth to control salt levels while keeping it tasty. Fresh veggies like onion, carrots, and celery add color and crunch. Garlic adds depth, making every bite delightful. The seasonings elevate the dish. Dried thyme and rosemary bring earthiness. Paprika adds a hint of warmth and color. Heavy cream makes the dish creamy and indulgent. Dumplings are the finishing touch, fluffy and soft, perfect for soaking up the broth. With these ingredients, you can create a comforting meal that feels like a warm hug. Enjoy the process, and remember, cooking is about joy and love! To start, season the chicken thighs with salt and pepper. This adds flavor to the meat. Place the chicken at the bottom of your slow cooker. Next, layer the diced onion, sliced carrots, diced celery, and minced garlic over the chicken. These veggies bring sweetness and depth to the dish. Now, pour in the low-sodium chicken broth. This broth makes the base of your dish. Add the dried thyme, rosemary, and paprika next. Stir gently to mix everything together. Cover the slow cooker and set it on low for 6 to 8 hours. If you're in a hurry, set it on high for 4 to 5 hours. The chicken should be tender and cooked through when done. While your chicken cooks, let’s prepare the dumplings. In a mixing bowl, combine the all-purpose flour, baking powder, and salt. Stir in the milk until a dough forms. It should be soft but not sticky. Once the chicken is ready, take it out of the slow cooker and shred it with two forks. Return the shredded chicken to the pot. Next, add the heavy cream and frozen peas, stirring well. Then, drop spoonfuls of the dumpling dough over the chicken mixture. Cover the slow cooker and cook on high for another 30 minutes. This will make the dumplings fluffy and light. When finished, garnish with chopped parsley for a fresh touch. To get the best tender chicken, focus on time and heat. Use a slow cooker set on low for 6-8 hours. This slow heat breaks down the chicken fibers. If you're in a hurry, use the high setting for 4-5 hours. Always check that the chicken is cooked through before shredding. For fluffy dumplings, avoid overmixing the dough. Mix the flour, baking powder, and salt first. Then, add milk and stir gently. This keeps them light and airy. Drop spoonfuls over the chicken mix. Cover the slow cooker and cook for 30 minutes on high. Don't peek; let the steam work its magic! Presentation makes your dish shine. Serve in deep bowls to show off the dumplings. Place them on top of the creamy chicken mixture for a cozy look. Sprinkle extra parsley for a fresh touch. Pair with crusty bread for a complete meal. Your family will love it! {{image_2}} You can switch up the chicken in this dish. If you want a lighter meal, use chicken breasts. They cook well and stay juicy. You can also use rotisserie chicken for quick prep. Just shred it and mix it in at the end. This saves time and adds great flavor. Feel free to add more vegetables. Try green beans for crunch. Sweet potatoes can add sweetness and color. You can also use corn or zucchini. Just chop them into small pieces. This will help them cook evenly. More veggies mean more nutrients and taste. Change the herbs and spices to mix things up. Try using fresh herbs for a bright flavor. Basil or cilantro can add a fresh twist. You can also play with spices like cumin or curry powder. These changes will give your chicken and dumplings a whole new flavor. Experiment and find what you love! To keep your slow cooker chicken and dumplings fresh, follow these steps: - Allow the dish to cool down first. - Transfer leftovers to an airtight container. - Store in the refrigerator for up to three days. This method helps maintain flavor and texture. Always label your containers with a date. This way, you know when to use them. Want to keep some for later? Freezing works great! Here’s how: - Let the dish cool completely. - Portion it into freezer-safe containers. - Freeze for up to three months. When you’re ready to eat, thaw in the fridge overnight. This keeps the chicken and dumplings tasty. To reheat chicken and dumplings while keeping them delicious, consider these methods: - Microwave: Place a serving in a bowl. Cover it with a damp paper towel. Heat in short bursts, stirring in between. - Stovetop: Heat gently in a pot over low heat. Stir often to avoid sticking. - Oven: For a crispy top, place in an oven-safe dish. Heat at 350°F for about 20 minutes. These methods help keep the dumplings fluffy and creamy. Enjoy your comforting meal! Store your leftovers in airtight containers. Cool the dish before sealing it. You can refrigerate it for up to three days. For longer storage, freeze the chicken and dumplings. They can last up to three months in the freezer. When ready to eat, thaw in the fridge overnight. Reheat in a pot over low heat. Stir often to keep it creamy. Yes, fresh herbs can add great flavor. Use about three times more fresh herbs than dried. For example, if a recipe calls for one teaspoon of dried thyme, use three teaspoons of fresh thyme. Fresh rosemary and parsley can also enhance the dish. Chop them finely before adding them to the slow cooker. The chicken is done when it reaches 165°F. Use a meat thermometer to check. The chicken will also be very tender and easy to shred. If you can pull it apart with a fork, it is ready. This ensures that your chicken is juicy and flavorful. This blog post guides you through making chicken and dumplings in a slow cooker. We covered the main ingredients, from chicken thighs to colorful veggies. I shared simple steps for cooking and making fluffy dumplings. I also gave tips for tender chicken and variations to spice up your dish. Remember, cooking is fun and creative. Feel free to explore your own ideas. Enjoy your meal and share it with loved ones!

Slow Cooker Chicken and Dumplings Simple Comfort Dish

There’s nothing quite like a warm bowl of Slow Cooker Chicken and Dumplings as the days grow cooler. I’ll guide

To make Sheet Pan Maple Dijon Salmon Veggies, gather these simple ingredients: - 4 salmon fillets - 2 tablespoons pure maple syrup - 2 tablespoons Dijon mustard - 1 tablespoon olive oil - 1 teaspoon garlic powder - 1 teaspoon salt - ½ teaspoon black pepper - 1 red bell pepper, sliced - 1 zucchini, sliced - 1 cup cherry tomatoes, halved - 1 cup broccoli florets - Fresh parsley for garnish (optional) These ingredients come together for a tasty meal. The salmon brings rich flavor, while the veggies add color and nutrition. You will need some basic kitchen tools: - Large sheet pan - Parchment paper - Small bowl - Whisk - Large mixing bowl - Knife and cutting board Having these tools ready will make cooking easy and fun. If you can't find certain ingredients, here are some great swaps: - Salmon fillets: Use any firm fish like trout or cod. - Maple syrup: Honey or agave syrup works as a sweetener. - Dijon mustard: Yellow mustard or whole grain mustard are good options. - Olive oil: Any cooking oil like canola or avocado oil is fine. - Vegetables: Feel free to use asparagus, carrots, or bell peppers. These substitutions keep your meal tasty while using what you have on hand. 1. First, preheat your oven to 400°F (200°C). This step is key for even cooking. 2. In a small bowl, whisk together: - 2 tablespoons pure maple syrup - 2 tablespoons Dijon mustard - 1 tablespoon olive oil - 1 teaspoon garlic powder - 1 teaspoon salt - ½ teaspoon black pepper Mix until fully combined. 3. Next, take your salmon fillets and place them on a large sheet pan lined with parchment paper. 4. Use a brush to coat the salmon with the maple Dijon mix. Make sure to cover the tops and sides well. 5. In a separate bowl, combine: - 1 sliced red bell pepper - 1 sliced zucchini - 1 cup halved cherry tomatoes - 1 cup broccoli florets Drizzle with olive oil and season with salt and pepper. Toss to coat. 6. Arrange the seasoned veggies around the salmon on the sheet pan. 7. Bake in your preheated oven for 15-20 minutes. The salmon is done when it reaches an internal temperature of 145°F. The veggies should be tender with a slight caramelization. 8. Once finished, take the pan out of the oven and let it sit for a few minutes. 9. If you like, garnish with fresh parsley before serving. To check if your salmon is done, use a food thermometer. Insert it into the thickest part of the fillet. It should read 145°F. If you don't have a thermometer, look for the salmon to flake easily with a fork. The veggies should feel tender yet crisp. Enjoy your meal! To cook salmon just right, pay attention to time and temperature. Preheat your oven to 400°F (200°C). Bake the salmon for 15 to 20 minutes. Check the salmon’s center; it should be opaque and flake easily with a fork. The internal temperature should reach 145°F. This ensures it is safe to eat and very tasty. The maple Dijon mix is key to great flavor. It combines sweet maple syrup with tangy Dijon mustard. This blend gives the salmon a rich taste. Add garlic powder for depth. Always season your veggies, too! A bit of salt and pepper can bring out their natural sweetness. Feel free to swap in other herbs or spices that you enjoy. One common mistake is overcooking the salmon. Keep an eye on the time to prevent dryness. Another mistake is not coating the salmon well. Make sure each fillet gets a nice layer of the maple Dijon mix. When preparing veggies, cut them evenly for even cooking. Lastly, avoid crowding the sheet pan; this helps everything cook evenly. {{image_2}} You can switch out salmon for other fish. Cod, trout, or tilapia work great. Each fish offers its own flavor. Cod has a mild taste, while trout brings a rich flavor. Cooking time may vary slightly. Always check for doneness. The fish should reach 145°F internally. Feel free to change up the veggies too! Asparagus, carrots, or green beans are tasty options. Each vegetable brings its own crunch and color. You can even use sweet potatoes for a hearty touch. Just make sure to cut them into small pieces for even cooking. This recipe can fit many diets. For gluten-free, ensure your Dijon mustard is safe. You can also skip the maple syrup for a low-carb version. Use lemon juice for a zesty kick. This way, you keep the meal fresh and flavorful without extra carbs. To store leftovers, let the dish cool first. Place the salmon and veggies in an airtight container. Keep it in the fridge. This helps maintain freshness. You can store it for up to three days. If you want to avoid soggy veggies, store them separately from the salmon. When reheating, use the oven for the best results. Preheat the oven to 350°F (175°C). Place the salmon and veggies on a baking sheet. Cover them with foil to lock in moisture. Heat for about 10-15 minutes. This method keeps the salmon moist and the veggies tender. If you want to freeze leftovers, do so right away. Place the salmon and veggies in a freezer-safe bag. Squeeze out the air before sealing. You can freeze them for up to three months. To reheat, thaw overnight in the fridge. Then, follow the reheating instructions above. It takes about 15 to 20 minutes to cook salmon on a sheet pan. The oven should be set to 400°F (200°C). You want to check the salmon’s inside temperature. It should reach 145°F (63°C) when done. The salmon will be flaky and tender when it is fully cooked. Yes, you can use frozen salmon for this recipe. Just make sure to thaw it first. Thaw the salmon in the fridge overnight for best results. If you're short on time, you can use the microwave. After thawing, follow the same steps as with fresh salmon. The cooking time may be slightly longer, so keep an eye on it. Many vegetables pair nicely with salmon. Here are some great options: - Asparagus - Carrots - Green beans - Bell peppers - Broccoli - Zucchini - Cherry tomatoes These veggies add color and flavor. They also cook well in the oven alongside the salmon. Mix and match for your favorite combinations! This post covered how to cook salmon perfectly. We explored ingredients, needed equipment, and great substitutes. I shared step-by-step cooking instructions and tips for checking doneness. You learned how to enhance flavors and avoid common mistakes. We also discussed various fish types, vegetables, and dietary options. Finally, I shared storage and reheating tips. Cooking salmon is fun and easy. With these steps, you can enjoy great meals at home. Happy cooking!

Sheet Pan Maple Dijon Salmon Veggies Easy Meal

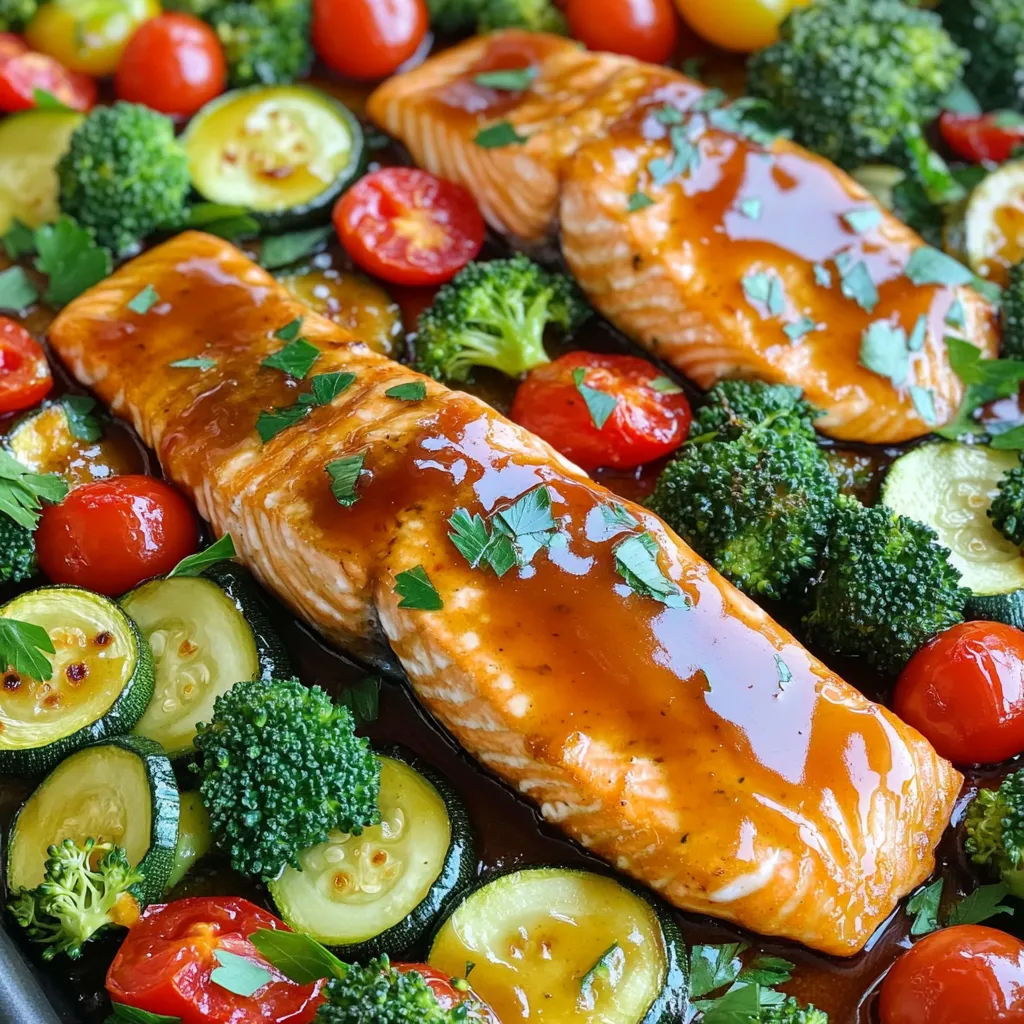
Looking for a quick and tasty dinner? You’ll love this Sheet Pan Maple Dijon Salmon with Veggies! It’s simple, healthy,

- Cauliflower florets - 1 cup all-purpose flour (or gluten-free flour if needed) - 1 cup plant-based milk (such as almond or soy) - 1 teaspoon garlic powder - 1 teaspoon onion powder - 1 teaspoon smoked paprika - ½ teaspoon salt - ½ teaspoon black pepper - ½ cup buffalo sauce (adjust to taste) - 2 tablespoons olive oil - Fresh parsley, chopped (for garnish) To make savory air fryer buffalo cauliflower bites, you need a few simple ingredients. Start with fresh cauliflower florets, which give the dish its crunch and taste. For the batter, you’ll use flour. You can choose all-purpose or gluten-free flour based on your needs. Next, pick a plant-based milk. Almond or soy milk works great to keep the batter smooth and creamy. Seasoning is key to flavor. You will need garlic powder, onion powder, smoked paprika, salt, and black pepper. These spices add a robust taste to the cauliflower. Finally, don’t forget the buffalo sauce! This is what gives our bites that spicy kick. Adjust the amount based on how hot you like it. Toss in a bit of olive oil to help everything crisp up nicely in the air fryer. You can also garnish the finished dish with fresh parsley for a pop of color. Now you have all the ingredients to make these delicious bites! Start by cutting the cauliflower into bite-sized florets. You want pieces that are easy to handle. Next, make the batter. In a mixing bowl, combine 1 cup of flour, 1 cup of plant-based milk, 1 teaspoon of garlic powder, 1 teaspoon of onion powder, 1 teaspoon of smoked paprika, ½ teaspoon of salt, and ½ teaspoon of black pepper. Whisk until the batter is smooth. Preheat your air fryer to 400°F (200°C). Dip each cauliflower floret into the batter. Make sure they are fully coated. Allow the excess batter to drip off. Place the coated florets in the air fryer basket. Make sure they are in a single layer and do not overlap. Lightly spray them with olive oil for a crispy finish. Air fry the cauliflower for 10-12 minutes. Shake the basket halfway through to ensure even cooking. You want them golden brown and crispy. Once the cauliflower is cooked, transfer the bites to a separate bowl. Toss them with ½ cup of buffalo sauce until all pieces are well coated. Return the sauced cauliflower to the air fryer. Air fry them again for 2-3 minutes at 400°F (200°C) to set the sauce. When done, remove them from the air fryer and garnish with fresh parsley before serving. Enjoy your tasty buffalo cauliflower bites! For the best crispiness, focus on batter consistency. Your batter should be smooth but not too runny. This helps the coating stick to the cauliflower and creates a crunchy layer. When you dip the florets, coat them well. Let any extra batter drip off before frying. Using olive oil spray makes a big difference. A light spray on the coated florets helps them crisp up nicely in the air fryer. This gives you that desired crunch without adding too much oil. Pair your buffalo cauliflower bites with tasty dipping sauces. Ranch dressing or blue cheese are classic choices. They balance the heat of the buffalo sauce well. You can also try a yogurt-based dip for a fresh twist. For presentation, serve the bites on a large platter. Add fresh carrot and celery sticks on the side. This adds color and crunch. Place a small bowl of your chosen dip in the center for easy access. This makes your dish look inviting and fun! {{image_2}} If you want this dish to be gluten-free, you can swap out the flour. Use gluten-free all-purpose flour instead. This keeps the texture light and crispy. You can also try using almond flour or chickpea flour. Both work well and add a nice flavor. Want to switch up the taste? You can use different sauces. Garlic parmesan is a great option. Just toss your fried cauliflower in melted butter, garlic, and parmesan cheese. For a sweet twist, try teriyaki sauce. It adds a unique flavor that pairs well with the cauliflower. You can serve these bites as an appetizer or a main dish. As an appetizer, plate them with carrot and celery sticks. Add a small bowl of ranch or blue cheese dressing for dipping. If you serve them as a main dish, pair them with rice or a fresh salad. Both ways, your guests will love the flavor! After enjoying your buffalo cauliflower bites, store any leftovers in the fridge. Place them in an airtight container. This keeps them fresh for about three to five days. Make sure to let them cool completely before sealing the container. This prevents moisture buildup, which can make them soggy. When you’re ready to enjoy your leftovers, reheating them correctly will keep them crispy. The best method is to use the air fryer again. Preheat it to 375°F (190°C) and warm the bites for about five to seven minutes. This method helps restore their crunch. You can also use an oven set to the same temperature. Just spread them on a baking sheet and heat for seven to ten minutes. If you want to save some for later, you can freeze these bites. First, let them cool completely. Then, spread them in a single layer on a baking sheet and freeze for about an hour. This prevents them from sticking together. After they’re frozen, transfer them to a freezer-safe bag or container. They can last up to three months. To thaw, place them in the fridge overnight before reheating. Yes, you can make this recipe in the oven. Preheat it to 450°F (232°C). Spread the coated cauliflower on a baking sheet. Bake for 20-25 minutes, flipping halfway through. This gives a nice crunch, though it may not be as crispy as the air fryer. The best sauces include ranch dressing and blue cheese dressing. Both add creaminess and balance the heat. You can also try a yogurt-based dip for a lighter option. Experiment with your favorites to find what you love. To lower the spice, use less buffalo sauce. You can mix in some honey or maple syrup to sweeten it. Adding more plant-based milk to the sauce can also tone down the heat. Taste as you go to get it just right. You can use frozen cauliflower, but it’s best to thaw and dry it first. Excess moisture can make the batter soggy. After thawing, pat it dry with a towel. Then, coat it in the batter and air fry as usual. Enjoy your tasty bites! This blog post showed you how to make tasty buffalo cauliflower bites. We covered the key ingredients, step-by-step instructions, and useful tips. You learned about flavor variations and how to store leftovers properly. Now, you can enjoy this dish in many ways. Whether as a snack or a meal, buffalo cauliflower is simple and fun. Have fun experimenting with different flavors and serving ideas! Enjoy your tasty creation!

Savory Air Fryer Buffalo Cauliflower Bites Recipe

Are you ready to spice up your snack game? My Savory Air Fryer Buffalo Cauliflower Bites are crunchy, tasty, and

The ingredients for No Bake Salted Caramel Cheesecake Bars are simple yet essential. Each item plays a crucial role in creating that rich, creamy flavor. Here’s what you need: - 1 ½ cups graham cracker crumbs - ½ cup unsalted butter, melted - 1 cup cream cheese, softened - ½ cup granulated sugar - 1 teaspoon vanilla extract - 1 cup heavy whipping cream - 1 cup caramel sauce (store-bought or homemade) - ¼ teaspoon sea salt - Additional sea salt for garnish Gathering these ingredients sets the stage for a delightful dessert. The graham cracker crumbs form a crunchy base, while the melted butter binds them together. Cream cheese adds that creamy texture we love, and the granulated sugar sweetens the mix. Don't forget the vanilla extract, which brings added depth to the flavor. Whipping cream gives the cheesecake its lightness and fluffiness. The caramel sauce is the star of the show, providing that sweet and salty hit. Finally, sprinkling sea salt on top enhances the flavor, making each bite irresistible. With these ingredients in hand, you’re ready to create something truly special. Trust me; these bars will impress everyone! - First, grab a mixing bowl. Add 1 ½ cups graham cracker crumbs and ½ cup melted butter. Mix until all crumbs are coated. This mixture should look sandy and wet. - Next, take an 8x8-inch baking pan. Press the crumb mixture into the bottom. Make sure to pack it tightly. An even crust makes for a better base. - In a clean mixing bowl, beat 1 cup cream cheese with ½ cup granulated sugar and 1 teaspoon vanilla extract. Mix until it is smooth and creamy. You want a nice texture without lumps. - In another bowl, whip 1 cup heavy cream until it forms stiff peaks. This adds fluffiness to your cheesecake. - Pour half of the cheesecake mixture over the crust. Spread it out evenly with a spatula. - Drizzle half of the caramel sauce over this layer. Use a toothpick or knife to create a marbled effect. Swirl it gently for a nice look! - Now, add the rest of the cheesecake mixture on top. Flatten it out with a spatula again. - Drizzle the remaining caramel sauce over this layer. Swirl it as you did before. This creates beautiful patterns. - Finally, sprinkle a bit of sea salt over the top. It adds a nice touch. - Cover the pan with plastic wrap. Refrigerate for at least 4 hours. This helps it set perfectly. - Once firm, cut into bars and serve. Enjoy your tasty creation! To make these bars smooth, use softened cream cheese. Cold cream cheese will not mix well. Let it sit at room temperature for at least 30 minutes. This makes blending easier and gives a creamier texture. When whipping cream, start with very cold heavy cream. Using a chilled bowl helps too. Whip it on medium speed until you see stiff peaks. This means the cream holds its shape well. Don’t over-whip, or it will turn grainy. You can add more toppings to make it special. Try chopped nuts, chocolate shavings, or fresh fruit. These add texture and color. When it comes to caramel, homemade sauce tastes rich and fresh. Store-bought caramel is easy and saves time. Choose what fits your day best. If using store-bought, look for a good-quality brand for the best taste. These cheesecake bars are great for parties or family gatherings. They are simple yet elegant. Serve them for birthdays, holidays, or just because! Pair these bars with coffee, tea, or a glass of milk. The smooth taste of cheesecake matches well with these drinks. You can also serve them with a scoop of vanilla ice cream for extra indulgence. {{image_2}} You can switch up the crust for your No Bake Salted Caramel Cheesecake Bars. Instead of graham crackers, try using Oreos. Crush them and mix with melted butter. This change gives a rich chocolate flavor. You can also use crushed nuts like almonds or pecans. They add a nice crunch and flavor. For gluten-free options, use gluten-free graham cracker crumbs. Some brands make great alternatives. You can also use ground almonds or oats to make a tasty crust. This way, everyone can enjoy these treats. Want to change the taste? You can add chocolate to your cheesecake. Mix in cocoa powder with the cream cheese. You can also add melted chocolate for a rich flavor. This makes a delightful chocolate salted caramel cheesecake. If you like fruit, consider adding fresh fruit toppings. Sliced strawberries or blueberries work well. They add freshness and color to your bars. Just place them on top before serving for a pretty look. If you're looking for vegan options, use plant-based cream cheese. You can also use coconut cream instead of heavy cream. This keeps the creamy texture while being dairy-free. For low-sugar or keto diets, swap regular sugar for a sugar substitute. Use a low-carb cream cheese and adjust the crust with almond flour. This way, you can enjoy these bars without extra carbs. To keep your no bake salted caramel cheesecake bars fresh, refrigeration is key. I recommend placing your bars in an airtight container. This helps avoid any unwanted moisture or odors. If you don’t have an airtight container, wrap the pan tightly with plastic wrap. Make sure it seals well to keep the flavors intact. If you want to save some bars for later, freezing works well. First, cut the bars into squares. Then wrap each piece in plastic wrap. After that, place them in a freezer-safe container. This keeps the flavors fresh and prevents freezer burn. When you’re ready to eat, simply take them out and let them thaw in the fridge for a few hours. This way, they keep their smooth texture and taste great. In the fridge, these cheesecake bars can last about 5 days. If you freeze them, they can stay good for about 3 months. Just remember to check for any signs of freezer burn if you wait that long. Enjoy these sweet treats while they're fresh for the best taste! Yes, you can use low-fat cream cheese. However, the texture will change. Low-fat cream cheese is softer and may not hold its shape as well. This can make your cheesecake bars a bit less firm. The taste might also be less rich. For the best results, I suggest using full-fat cream cheese. If you want to make your own caramel, you can use sugar and cream. Heat one cup of sugar in a pot until it melts. Once it’s brown, add half a cup of cream. Stir until smooth. You can also use maple syrup or honey for a different flavor. Both can add sweetness, but they will not taste the same as caramel. I recommend chilling the bars for at least four hours. This time allows the cheesecake to firm up nicely. If you can wait longer, overnight is even better! This will make the bars easier to cut and serve. This cheesecake bar recipe is both easy and delicious. You learned about the key ingredients, from creamy cheese to rich caramel. I shared step-by-step instructions to guide you as you bake. Tips for texture and flavor help ensure success. There’s even advice on storing your bars and ideas for fun variations. Experiment with crusts or flavors to make this dessert your own. Enjoy these bars at your next gathering or just for yourself. Making them will impress and satisfy any sweet tooth. Happy baking!

No Bake Salted Caramel Cheesecake Bars Delightful Treat

Craving something sweet and easy? You’re in the right place! These No Bake Salted Caramel Cheesecake Bars are the perfect

To make this dish, you need: - 4 cod fillets (about 6 ounces each) - 4 tablespoons unsalted butter, melted - 4 cloves garlic, minced - Juice and zest of 1 large lemon - 1 teaspoon dried parsley - 1 teaspoon smoked paprika - Salt and pepper to taste These main ingredients form the base of your meal. The cod fillets are the star of the show. They cook quickly and soak up all the great flavors. You will also need: - 1 cup cherry tomatoes, halved - 1 cup asparagus spears, trimmed - Lemon slices for garnish The cherry tomatoes add sweetness, and the asparagus brings a nice crunch. Both pair well with the buttery cod. The key seasonings in this recipe are: - Salt - Pepper - Dried parsley - Smoked paprika These seasonings enhance the dish's flavor. Smoked paprika gives a subtle depth that ties everything together. The lemon juice and zest brighten the meal and add freshness. Using fresh ingredients makes a big difference. You can feel good knowing your meal is delicious and healthy! Start by melting the unsalted butter in a small bowl. Use a microwave or a small pot on the stove. Once melted, add the minced garlic. Then, squeeze in the juice of one large lemon. Don’t forget to add the lemon zest for extra flavor. Next, sprinkle in the dried parsley and smoked paprika. Finally, add salt and pepper to taste. Mix all these together until they blend well. This garlic butter mixture brings a rich taste to the cod. Grab your prepared sheet pan and place the cod fillets on one side. Make sure they are not too close together. Brush a generous amount of the garlic butter mixture on top of each fillet. This will keep the fish moist and flavorful. Now, on the other side of the pan, add the halved cherry tomatoes and trimmed asparagus spears. Drizzle the remaining garlic butter mixture over the veggies. Toss them lightly to coat. This way, all the flavors will mix nicely as they roast. Now, it’s time to bake! Preheat your oven to 400°F (200°C). Place the sheet pan in the oven and bake for 15-20 minutes. Keep an eye on the cod; it should be flaky and cooked through when done. Check that the internal temperature of the fish reaches 145°F (63°C). The vegetables should also be tender. Once finished, take the pan out and let it rest for a few minutes. Serve the cod with the roasted vegetables. Garnish with fresh lemon slices for that perfect touch of brightness. Enjoy this simple yet flavorful delight! When choosing cod, look for fillets that are bright and shiny. Fresh cod has a clean smell, like the ocean. Avoid any fish that looks dull or has dark spots. Firmness is also key; the fillets should feel tight and spring back when pressed. If you have a fish market nearby, ask for the freshest catch. Baking cod at 400°F takes about 15 to 20 minutes. The key is to check for flakiness. Cod is done when it flakes easily with a fork and reaches 145°F inside. If your fillets are thick, they may need a few extra minutes. Always keep an eye on them to avoid overcooking. For a beautiful presentation, use a nice platter. Start with the cod in the center. Arrange the colorful vegetables around it for contrast. Squeeze fresh lemon juice over everything for shine and flavor. A sprinkle of fresh parsley adds a nice touch. Lemon slices on top make it look even more inviting. {{image_2}} You can switch up the veggies for more fun. Try bell peppers for sweetness. Zucchini adds great texture. Broccoli or green beans also work well. Mix and match to find your favorite combo. Seasonal vegetables can make your dish fresh and exciting. Want to spice things up? Consider adding cumin for warmth. A pinch of red pepper flakes gives a nice kick. You can also add dill for a fresh taste. Experiment with spices that you love to create your own twist. Not in the mood for baking? You can grill the cod on a barbecue for a smoky flavor. A stovetop pan works too. Cook it in a skillet over medium heat until it flakes easily. Each method adds a unique taste to your dish. To keep leftover cod and veggies fresh, let them cool first. Place the cod and vegetables in an airtight container. Make sure to separate the cod from the veggies to prevent sogginess. Store the container in the fridge. You can keep them for up to three days. When you're ready to eat the leftovers, reheating is key. Preheat your oven to 350°F (175°C). Arrange the cod and vegetables on a baking sheet. Cover them with foil to retain moisture. Heat for about 10-15 minutes, checking that the cod reaches 145°F (63°C). This keeps the flavors intact and the cod flaky. If you want to save the dish for later, freezing works well. Wrap each cod fillet tightly in plastic wrap. Place the wrapped cod in a freezer bag, squeezing out any air. For the vegetables, you can freeze them in a separate container. They will last up to three months. When you’re ready to eat, thaw them in the fridge overnight. Reheat as mentioned above for the best taste. You should bake cod for 15 to 20 minutes at 400°F. The cod is done when it flakes easily. The fish should reach an internal temperature of 145°F. Use a meat thermometer for accuracy. This ensures a moist and tender bite. Yes, you can use frozen cod. Thaw it in the fridge overnight for best results. If you need to cook it from frozen, add a few extra minutes to the baking time. Just make sure it cooks evenly. Check that it also reaches 145°F internally. I love serving this dish with roasted vegetables like asparagus and cherry tomatoes. You can also pair it with rice or quinoa for a hearty meal. A fresh green salad makes a great side too. Don’t forget some lemon slices for extra zest! This blog post covered how to make sheet-pan garlic butter lemon cod. We examined the key ingredients, detailed preparation steps, and offered tips for perfect results. Remember to select fresh cod and try different veggies for fun variations. Store leftovers properly to enjoy later. With these insights, you can cook a delicious, easy meal that impresses. Enjoy your cooking journey!

Sheet-Pan Garlic Butter Lemon Cod Flavorful Delight

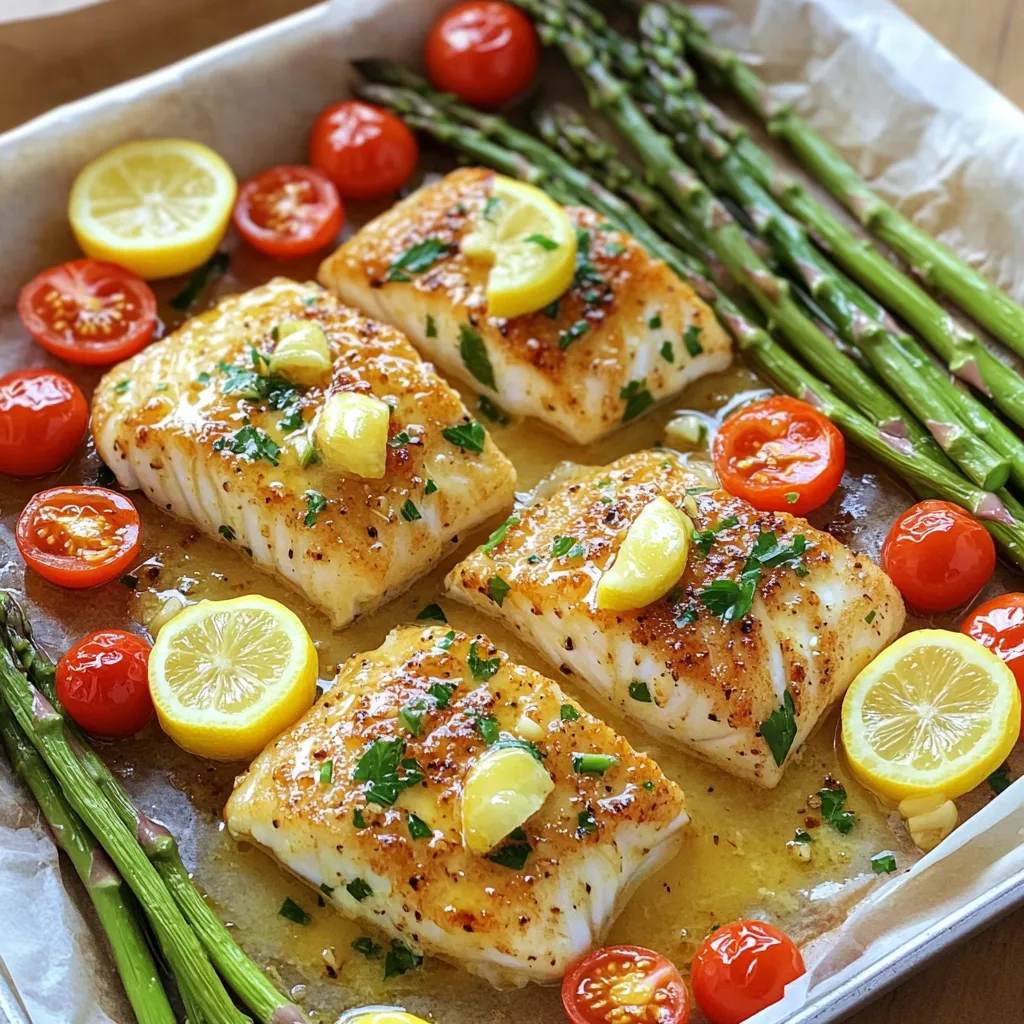
Looking for a simple yet tasty dinner? You’ll love this Sheet-Pan Garlic Butter Lemon Cod recipe! With just a few

To make Pumpkin Pie Energy Bites, you will need: - 1 cup rolled oats - 1/2 cup almond butter (or any nut butter) - 1/2 cup pumpkin puree - 1/4 cup honey or maple syrup - 1 teaspoon pumpkin pie spice - 1/4 teaspoon sea salt - 1/4 cup mini chocolate chips (optional) - 1/4 cup chopped pecans or walnuts (optional) You can make these bites your own! Here are some ideas: - Swap almond butter for peanut or cashew butter. - Use agave syrup instead of honey or maple syrup. - Try adding chia seeds or flaxseeds for extra nutrients. - Mix in dried fruit, like cranberries or raisins, for a sweet touch. These bites are not just tasty; they are also packed with good stuff! Here’s a quick look: - Calories: About 100 per bite - Protein: 3 grams per bite - Fat: 5 grams per bite (mostly healthy fats from nut butter) - Carbs: 10 grams per bite (from oats and pumpkin) - Fiber: 2 grams per bite (great for digestion) - Sugar: 4 grams per bite (natural sugars from honey and pumpkin) These bites offer a nice balance of energy and nutrition. Enjoy them as a snack or a quick breakfast! Start by gathering your ingredients. You need rolled oats, almond butter, pumpkin puree, honey or maple syrup, pumpkin pie spice, and sea salt. If you want, add mini chocolate chips and chopped nuts. In a large mixing bowl, combine the rolled oats and almond butter first. Then, add in the pumpkin puree and honey or maple syrup. Sprinkle in the pumpkin pie spice and sea salt. Mix everything well. The mixture should turn thick and sticky. This texture helps the bites hold together later. Next, it’s time to chill the mixture. Place the bowl in the refrigerator for about 30 minutes. Chilling makes it easier to shape the bites. While you wait, you can clean up your workspace or prepare your storage container. This is a good time to think about how you'll enjoy these bites later. They are perfect for snacks or quick breakfasts! After chilling, the mixture is ready to shape. Take a tablespoon-sized portion from the bowl. Roll it into a ball using your hands. It should hold its shape well. Place each ball on a parchment-lined baking sheet or plate. Repeat this until all the mixture is shaped. Once done, store the energy bites in an airtight container. Keep them in the refrigerator for up to one week. Enjoy your tasty and healthy treats! To get the best texture for your Pumpkin Pie Energy Bites, it is key to mix well. Make sure the rolled oats, almond butter, and pumpkin puree combine fully. The mix should feel thick and sticky. If it feels too dry, add a bit more almond butter or pumpkin puree. For a softer bite, let them chill longer in the fridge. This will help them hold together better. You can swap honey for maple syrup if you want a vegan option. Both sweeteners work great in this recipe. If you want to try something different, consider agave syrup or date syrup. Each one adds a unique flavor while keeping the bites sweet. Use the same amount as you would for honey or maple syrup. Want to boost the flavor? Try adding more pumpkin pie spice. A bit more can make a big difference. You can also add cinnamon or nutmeg for a warm touch. If you love chocolate, mix in cacao powder or dark chocolate chips. For a nutty taste, add chopped nuts or seeds. These small changes can take your energy bites to new heights. {{image_2}} You can switch nut butters to change the taste. Almond butter is great, but you can try peanut butter or cashew butter. Each one adds a unique flavor. If you prefer a seed-based option, sunflower seed butter works well too. This gives a nut-free choice for those with allergies. Adding extra ingredients can make your bites even better. Consider adding: - Chia seeds for more fiber - Dried cranberries for sweetness - Coconut flakes for a tropical twist - Flaxseeds for healthy fats These add-ins boost taste and nutrition. You can mix and match to find your favorite combo. To make these bites vegan, swap honey for maple syrup. Both options keep the sweetness. For gluten-free bites, ensure your oats are certified gluten-free. This keeps everyone safe while enjoying these tasty treats. You can still enjoy pumpkin pie flavor without any gluten! To keep your Pumpkin Pie Energy Bites fresh, store them in an airtight container. Place them in the fridge right after you make them. This helps maintain their texture and flavor. Do not leave them out at room temperature for long. They can get dry or spoil quickly. You can freeze these energy bites for later use. To do this, place them in a single layer on a baking sheet. Freeze them for about an hour until firm. Then, transfer them to a freezer-safe bag or container. These bites can last up to three months in the freezer. Just thaw them in the fridge overnight before enjoying. Check your energy bites for any changes. If you see mold, throw them away. If they smell off or taste strange, it is best to discard them. Always trust your senses. Keeping a close eye on them ensures you enjoy tasty bites every time. Pumpkin Pie Energy Bites stay fresh for one week. Store them in an airtight container in the fridge. They taste great cold and are easy to grab for a snack. Yes, you can use fresh pumpkin. Just cook and mash it first. Make sure it is smooth like puree. This will keep the texture right in your bites. Absolutely! These energy bites are perfect for kids. They are tasty, healthy, and fun to eat. Plus, kids can help make them. Just be mindful of any nut allergies when using nut butter. In this post, we explored how to make delicious pumpkin pie energy bites. We covered the key ingredients and optional ones for a personalized touch. You learned step-by-step instructions for mixing, chilling, and forming each bite. We shared tips for perfect texture and ways to customize flavors. Plus, we discussed various nut butters and storage methods to keep them fresh. These bites are simple and fun to make. Grab your ingredients and give them a try!

Pumpkin Pie Energy Bites Tasty and Easy Recipe

Are you ready to indulge in a sweet treat that’s both healthy and easy to make? Pumpkin Pie Energy Bites

- Chicken: You need 2 boneless, skinless chicken breasts. Cut them into bite-sized pieces. This helps them cook faster and absorb flavor well. - Cajun seasoning: Use 1 tablespoon. This spice mix gives the dish its bold flavor. You can buy it or make your own with spices like paprika and cayenne. - Vegetables: The mix includes a medium onion, 2 cloves of garlic, 1 red bell pepper, and 1 cup of cherry tomatoes. These veggies add color and taste. - Olive oil: You'll need 2 tablespoons. This oil helps cook the chicken and vegetables and adds richness. - Chicken broth: Use 3 cups. It adds depth to the pasta and keeps it moist. - Heavy cream: One cup is needed. This gives the dish its creamy texture and makes it rich and satisfying. - Fresh parsley: Chopped parsley adds a fresh touch. It also adds color to your dish. - Grated Parmesan cheese: This cheese adds a salty, nutty flavor. Sprinkle it on top just before serving for extra taste. This simple list of ingredients will help you create a delicious One-Pan Creamy Cajun Chicken Pasta. Each component plays a key role in making the dish flavorful and enjoyable. - Seasoning the chicken: Start by cutting the chicken into small pieces. Place these in a bowl. Sprinkle 1 tablespoon of Cajun seasoning over the chicken. Toss well until every piece is coated. This will give your dish a warm, spicy flavor. - Chopping vegetables: Next, chop your veggies. Dice 1 medium onion and mince 2 cloves of garlic. Slice 1 red bell pepper into strips. Halve 1 cup of cherry tomatoes. Having these ready makes cooking easier and faster. - Sautéing the chicken: Heat 2 tablespoons of olive oil in a skillet over medium-high heat. Once hot, add the seasoned chicken. Cook for 5-7 minutes. Stir occasionally until the chicken turns golden and is no longer pink inside. Remove the chicken and set it aside. - Cooking the vegetables: In the same skillet, add the diced onion and minced garlic. Sauté for 2-3 minutes until the onion is clear. Then, toss in the sliced bell pepper and cherry tomatoes. Cook for another 3-4 minutes until the veggies are soft and fragrant. - Adding broth and pasta: Pour in 3 cups of chicken broth. Bring it to a boil. Once boiling, add 8 ounces of penne pasta. Stir to mix well. Lower the heat, cover the pan, and let it simmer. Cook for 10-12 minutes, stirring occasionally, until the pasta is al dente. - Stirring in cream: After the pasta is cooked, add the chicken back to the pan. Pour in 1 cup of heavy cream. Stir everything together. Cook for another 2-3 minutes until the dish is warm and creamy. Add salt and pepper to taste. To make your dish stand out, adjust the Cajun seasoning. Start with one tablespoon, then taste it. If you like more heat, add a little extra. Cajun seasoning can vary in spice levels. Always trust your taste buds! Cooking the pasta al dente is key for texture. This means it should be firm but not hard. Follow the pasta package instructions, but check it a minute early. It will keep cooking after you drain it. The best type of pan to use is a large skillet. A skillet allows for even cooking and enough space for all the ingredients. Make sure it has a lid for simmering the pasta. For utensils, use a wooden spoon for stirring. It won't scratch your pan and helps mix the ingredients well. A good set of measuring cups helps keep your portions accurate. Pair your creamy Cajun chicken pasta with a simple side salad. A fresh salad balances the rich flavors of the dish. You can also serve it with garlic bread for a tasty combo. To serve, garnish your pasta with fresh parsley and grated Parmesan cheese. This adds color and flavor. A sprinkle of black pepper on top adds a nice touch too! {{image_2}} You can switch the chicken for shrimp or sausage. Shrimp cooks fast and adds a nice twist. Just sauté it in the pan until it turns pink. Sausage gives a hearty flavor. Slice it and brown it with the veggies. For a vegetarian option, use mushrooms or chickpeas instead. They soak up the sauce and add great texture. Pasta shape matters! You can use rotini, farfalle, or even spaghetti. Each shape holds the sauce differently. If you need gluten-free options, use gluten-free pasta. Look for ones made from rice or chickpeas. They are tasty and work well in this dish. Want more flavor? Add spices like smoked paprika or cayenne for heat. Fresh herbs like basil or cilantro can brighten the dish. You can also toss in veggies like spinach or zucchini. They add color and nutrients. Just add them when you sauté your other veggies for a fresh taste. To store leftovers, let the pasta cool first. Place it in an airtight container. This keeps the flavors fresh. You can store it in the fridge for up to 3 days. I recommend using glass containers, as they do not absorb odors. The best way to reheat this pasta is on the stove. Use a skillet over medium heat. Add a splash of chicken broth or water to keep it moist. Stir often to warm it evenly. If you want to keep the creaminess, avoid the microwave. The microwave can make it dry and clumpy. Yes, you can freeze cooked pasta, but it may change the texture. To freeze, let it cool completely. Then, place it in a freezer-safe bag. Remove as much air as possible. It can last for up to 2 months in the freezer. To defrost, move the bag to the fridge overnight. For reheating, use the stove with a splash of broth. This helps maintain the creaminess. Stir gently to combine everything well. Enjoy your flavorful pasta again! What is Cajun seasoning made of? Cajun seasoning is a blend of spices. It often includes paprika, cayenne pepper, garlic powder, onion powder, and black pepper. Some mixes may add thyme and oregano for extra flavor. You can buy it pre-made or mix your own at home. Can I make this dish ahead of time? Yes, you can make this dish ahead of time. Cook it fully and let it cool. Store it in an airtight container in the fridge for up to three days. When ready to eat, just reheat it on the stove, adding a splash of broth or cream to keep it creamy. How do I avoid overcooked pasta? To avoid overcooked pasta, follow these steps. First, check the package for cooking time. Cook the pasta just until al dente, or firm to the bite. Stir it occasionally while it simmers. Also, remove it from heat as soon as it’s cooked and add the cream right away. What can I substitute for heavy cream? You can use several substitutes for heavy cream. Options include half-and-half, whole milk with a bit of butter, or coconut cream for a dairy-free choice. Each substitute will change the flavor slightly, but they work well in this dish. Is this recipe suitable for a keto diet? Yes, this recipe can fit a keto diet with a few changes. Use a low-carb pasta or zucchini noodles instead of penne. Check the Cajun seasoning for added sugars, and use heavy cream to keep it rich and creamy. Can I make it dairy-free? Yes, you can make it dairy-free. Swap heavy cream with coconut cream or a dairy-free cream substitute. Use a dairy-free cheese or skip cheese altogether. This keeps the dish creamy while being friendly for those who avoid dairy. This recipe highlights key ingredients like chicken, Cajun seasoning, and veggies. You learned how to prep, cook, and combine these elements for a tasty dish. My tips helped you perfect flavors and choose the right pasta. We explored variations, storage methods, and answered common questions. Enjoy experimenting with your own twists! Cooking this dish can be fun and rewarding. The flavors are bold, and the meal is satisfying, so dive in and savor every bite.

One-Pan Creamy Cajun Chicken Pasta Simple Recipe

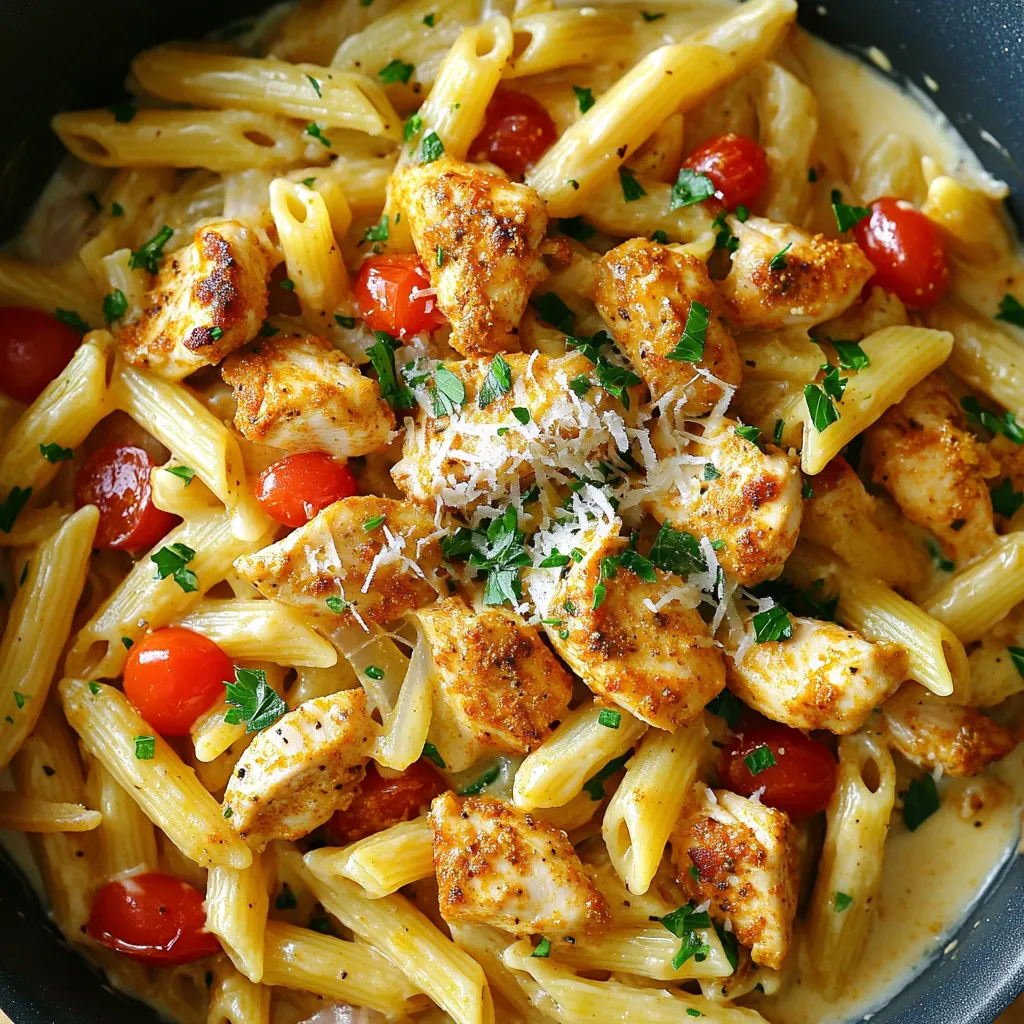
Get ready to spice up your dinner with my One-Pan Creamy Cajun Chicken Pasta! This simple recipe combines juicy chicken,

Older posts
Newer posts
← Previous Page1 … Page11 Page12 Page13 … Page84 Next →

dsad

© 2026 Foodish Talk • Built with GeneratePress

Our Policies

  • Copyright Policy
  • Cookie Policy
  • GDPR Policy
  • Privacy Policy
  • Disclaimer
  • Terms Of Use

More Information

  • Home
  • About
  • Contact
  • Appetizers
  • Dessert
  • Dinner
  • Drinks
©2026, Foodish Talk About Back To Top