
Latest & Greatest
Chickpea Curry in Coconut Milk Tasty and Simple Dish
Are you ready to dive into a world of bold flavors? This Chickpea Curry in Coconut Milk is a tasty
Read more…
Cucumber Tomato Salad with Feta Fresh and Simple
If you crave a fresh, easy dish that shines with flavor, you’ll love this Cucumber Tomato Salad with Feta. Perfect
Read more…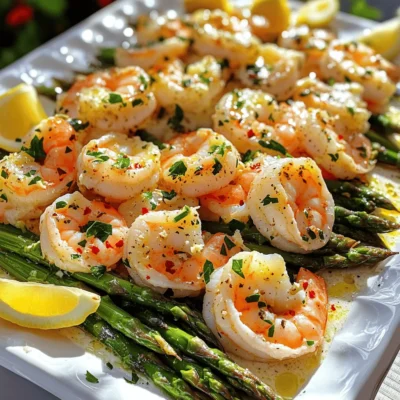
Garlic Butter Shrimp and Asparagus Delightful Meal
Craving a quick and tasty meal? Garlic Butter Shrimp and Asparagus is a true delight! This dish combines succulent shrimp
Read more…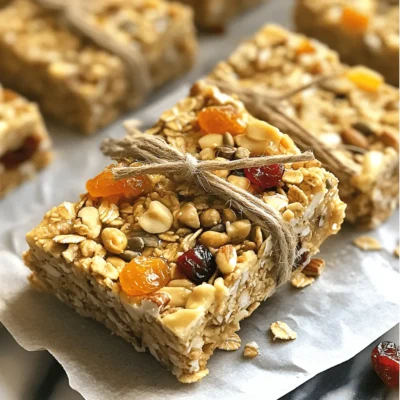
Homemade Granola Bars Easy and Tasty Snack Idea
Looking for a quick, tasty, and healthy snack? Homemade granola bars are your answer! I’ll guide you through an easy
Read more…
Mocha Chocolate Chip Cookies Irresistible and Easy Treat
Craving a sweet treat that packs a flavor punch? These Mocha Chocolate Chip Cookies are just what you need! With
Read more…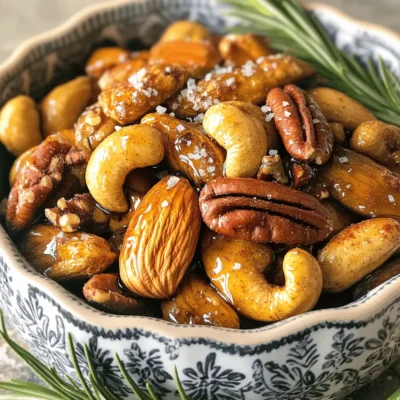
Sweet and Spicy Roasted Nuts Irresistible Snack Recipe
Are you ready to make a snack that’ll wow your taste buds? My Sweet and Spicy Roasted Nuts recipe combines
Read more…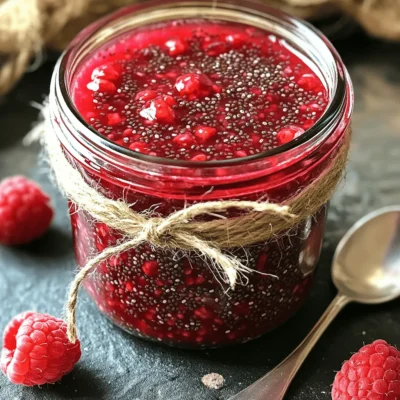
Raspberry Chia Seed Jam Simple and Healthy Recipe
Are you ready to make a delicious treat that’s simple and healthy? This Raspberry Chia Seed Jam recipe combines fresh
Read more…
Rainbow Veggie Sushi Rolls Vibrant and Easy Recipe
Ready to delight your taste buds? This Rainbow Veggie Sushi Rolls recipe is as colorful as it is tasty! With
Read more…browse recipes


![- 1 lb Brussels sprouts, trimmed and halved - 2 tablespoons olive oil - 1 teaspoon garlic powder - 1 teaspoon onion powder - 1/2 teaspoon smoked paprika - Salt and pepper to taste - 1/4 cup grated Parmesan cheese (optional) - Fresh lemon wedges for serving Garlic and onion powder are key to this dish. They add a rich, savory taste. Garlic powder gives a warm, aromatic flavor that lifts the sprouts. Onion powder adds depth and sweetness, balancing the dish. Smoked paprika brings a unique twist. It adds a slight smokiness that enhances the Brussels sprouts. This spice pairs well with the natural nuttiness of the sprouts. Together, these seasonings create a tasty base that makes every bite memorable. For a detailed guide on how to prepare this dish, see the Full Recipe. First, you need to preheat your air fryer to 380°F (190°C) for about 5 minutes. This step is key for getting those Brussels sprouts crispy. While it heats, prepare the Brussels sprouts. To trim them, cut off the stem ends. Then, slice each sprout in half. This helps them cook evenly. If you see any yellow leaves, remove those, too. Fresh sprouts give the best taste. Now comes the fun part! In a big bowl, mix the halved Brussels sprouts with 2 tablespoons of olive oil, 1 teaspoon of garlic powder, 1 teaspoon of onion powder, and 1/2 teaspoon of smoked paprika. Add salt and pepper to taste. Toss until they are well-coated. Place the sprouts in the air fryer basket in one layer. Avoid overcrowding; this helps them crisp up. Air fry for 15 to 20 minutes. Be sure to shake the basket halfway through to ensure even cooking. Look for a golden brown color and a crispy texture. If you want to add a cheesy flavor, sprinkle 1/4 cup of grated Parmesan cheese over the sprouts during the last 2 minutes of cooking. This allows the cheese to melt nicely without burning. Once you take the Brussels sprouts out, squeeze a bit of fresh lemon juice over them. This small step adds a bright flavor that makes the dish pop. Enjoy your crispy air fryer Brussels sprouts! For the full recipe, refer to the earlier sections. To get crispy Brussels sprouts, set your air fryer to 380°F (190°C). This temperature is key for the best texture. Cook them for 15 to 20 minutes. Remember to shake the basket halfway through cooking. This helps them crisp up evenly. Don’t overcrowd the air fryer basket. If you add too many sprouts at once, they will steam instead of fry. Cook in batches if needed for the best results. A common mistake is overcooking or undercooking the Brussels sprouts. Overcooked sprouts become mushy. Aim for golden brown and crispy. If they are too soft, try cooking them a bit longer. Finding the right seasoning balance is also important. Too much salt can overpower the dish. Use just enough garlic powder, onion powder, and smoked paprika for optimal flavor. Taste as you go! For presentation, serve the crispy Brussels sprouts in a rustic bowl. Add lemon wedges on the side for a pop of color. This makes the dish look fresh and inviting. You can pair Brussels sprouts with many options. They go well with roasted chicken or grilled fish. They also complement grain bowls or hearty salads. Try adding them to your next meal for a tasty boost! For the full recipe, check out the Crispy Air Fryer Brussels Sprouts section. {{image_2}} You can change the flavor of your Brussels sprouts with different spices and herbs. Try adding cayenne pepper for some heat. You can use Italian seasoning for a fresh twist. For cheese lovers, you can swap Parmesan with feta or goat cheese. Both add a creamy texture and rich taste. You can sprinkle cheese on just before the cooking ends to get a nice melt. If you're looking for vegetarian or vegan options, you can skip the cheese. Use nutritional yeast instead. It adds a cheesy flavor without dairy. You can also try plant-based sauces. A touch of balsamic glaze or tahini can enhance the taste. Both options bring a unique twist to the dish. Seasonal ingredients can make your Brussels sprouts even better. In fall, add diced apples or nuts for crunch. In winter, toss in pomegranate seeds for a pop of color and sweetness. You can modify the recipe for holidays too. For Thanksgiving, mix in some cranberries or a hint of cinnamon. This adds warmth and festivity to the dish. Explore the [Full Recipe] for more ideas and tips! To keep your leftover crispy Brussels sprouts fresh, use an airtight container. Glass or plastic containers work great. Make sure to cool the sprouts to room temperature before sealing them. This helps prevent moisture build-up, which can lead to sogginess. In the fridge, your Brussels sprouts will last about 3 to 5 days. If you want to enjoy them later, you can freeze them. Place them in a freezer bag, and they will stay good for up to 3 months. For the best results when reheating, use the air fryer again. Set it to 350°F (175°C) and heat for about 5 to 7 minutes. This method helps them stay crispy. If you don't have an air fryer, you can use an oven. Preheat the oven to 375°F (190°C) and spread the sprouts on a baking sheet. Heat for about 10 minutes. Avoid using a microwave, as it can make them soggy. Crispy Brussels sprouts are best when they are hot and crunchy! To make Brussels sprouts less bitter, start by choosing fresh ones. Look for sprouts that are bright green and firm. Avoid any that are yellow or soft. Trim the tough ends and remove any outer leaves. Cooking them with olive oil and spices will also help reduce bitterness. Pairing them with a little lemon juice adds a fresh taste. Yes, you can prepare Crispy Air Fryer Brussels sprouts in advance. Cook them and then let them cool completely. Store them in an airtight container in the fridge. They can last for up to three days. When you want to eat them, just reheat in the air fryer for a few minutes. This will help them regain their crispiness. Brussels sprouts pair well with many dipping sauces. Here are some popular options: - Ranch dressing - Balsamic glaze - Garlic aioli - Spicy sriracha - Honey mustard These sauces enhance the flavor and add a fun twist to your meal. Crispy Air Fryer Brussels sprouts go great with many dishes. Here are some meal ideas: - Grilled chicken or steak - Quinoa or rice bowls - Pasta with creamy sauce - Tacos with beans and veggies - A fresh salad with nuts and cheese These pairings create a balanced meal and are sure to please everyone at the table. For the full recipe, check out the Crispy Air Fryer Brussels Sprouts section! Crispy air fryer Brussels sprouts are simple and fun to make. We covered ingredients, the right steps, and tips for success. Remember to adjust seasonings for your taste and try new flavors. You can also store and reheat leftovers with ease. Enjoy your tasty dish with friends or family. Each bite will leave you wanting more! Happy cooking!](https://foodishtalk.com/wp-content/uploads/2025/07/a3f69f90-1c4f-4e5e-90ab-b742b5ff77af.webp)
Crispy Air Fryer Brussels Sprouts Flavorful and Easy
Are you ready to enjoy perfectly crispy Brussels sprouts? In this post, I’ll share my easy air fryer recipe that packs a flavor punch…
My Latest Desserts

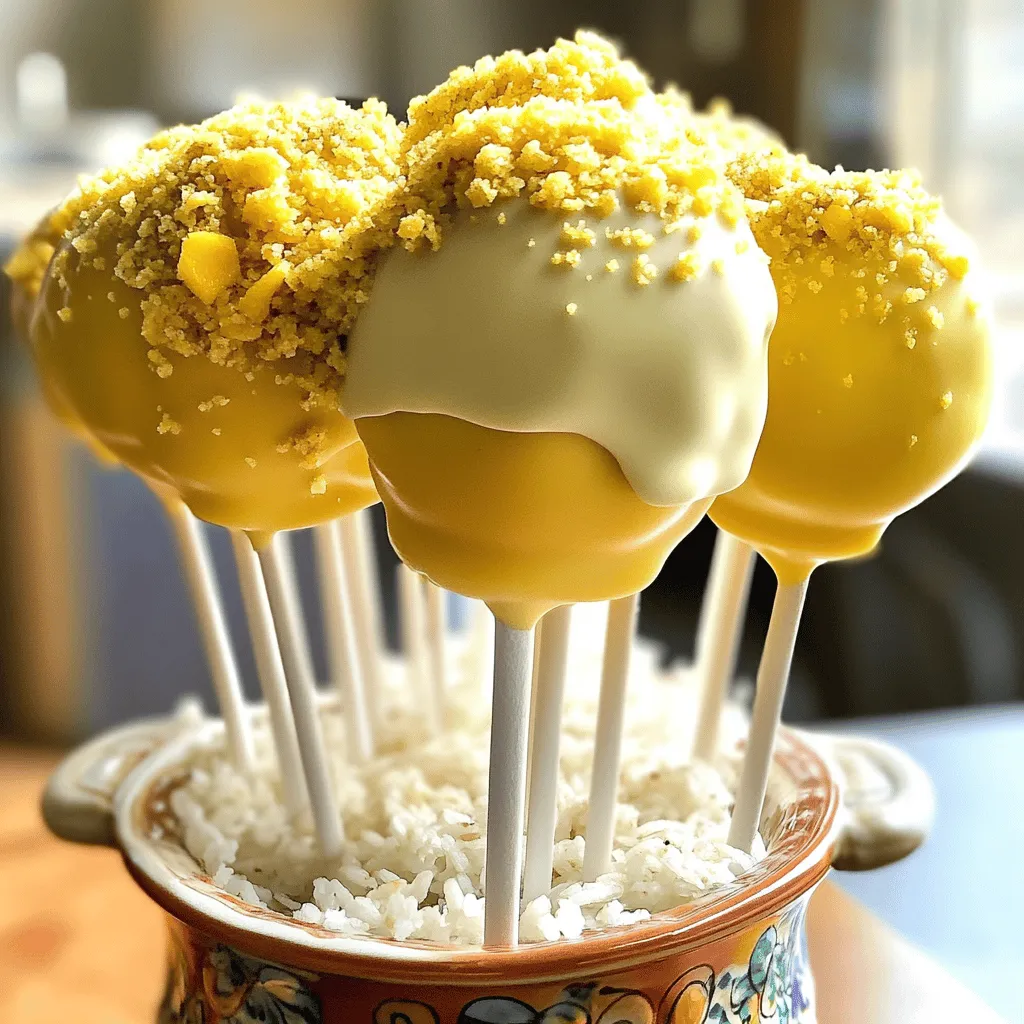
Mango Tajin Cake Pops Tasty and Fun Treats
Craving a unique treat? Try my Mango Tajin Cake Pops! These fun bites blend sweet mango with the zesty kick Read Full Recipe-
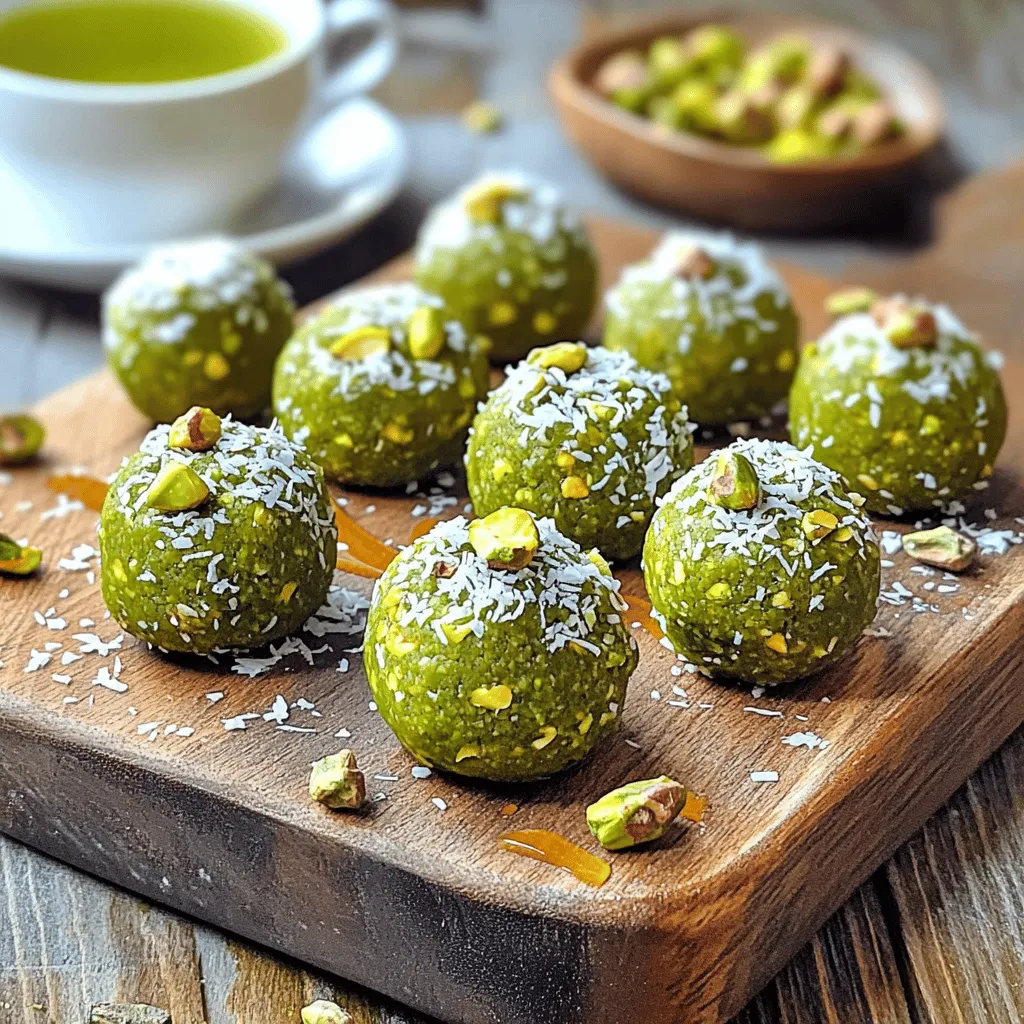
Matcha Pistachio Energy Bites Nourishing Snack Option
Looking for a tasty and healthy snack? Let me introduce you to Matcha Pistachio Energy Bites! Packed with oats, nuts, Read Full Recipe -
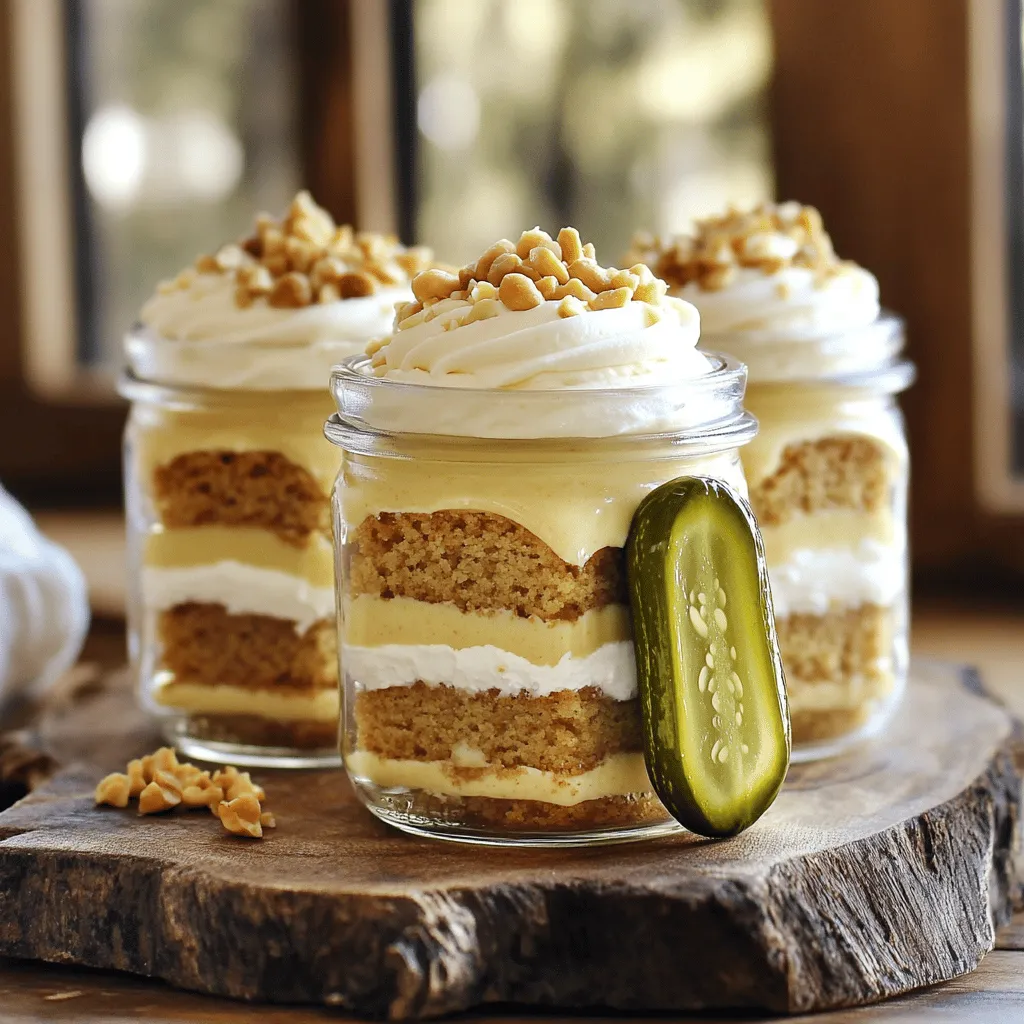
Peanut Butter Pickle Cake Jars Delightful and Unique Treat
Are you ready to try something truly different? Peanut Butter Pickle Cake Jars combine sweet and tangy flavors in a Read Full Recipe -
Healthy Banana Oat Muffins Nutrient-Packed Recipe
Looking for a tasty snack that’s packed with nutrients? You’re in the right place! My Healthy Banana Oat Muffins recipe Read Full Recipe -
No-Bake Chocolate Oat Bars Simple and Tasty Treat
Looking for a quick, tasty treat? You’re in the right place! My No-Bake Chocolate Oat Bars are simple to make Read Full Recipe -
No-Bake Chocolate Oatmeal Bars Simple and Tasty Treat
Looking for a simple and tasty treat that’s also healthy? You’ve found it! My No-Bake Chocolate Oatmeal Bars are a Read Full Recipe -
Peach Pie Cruffins Delightful and Simple Recipe
Are you ready to dive into a sweet and flaky treat? Peach Pie Cruffins are a delightful twist on classic Read Full Recipe -
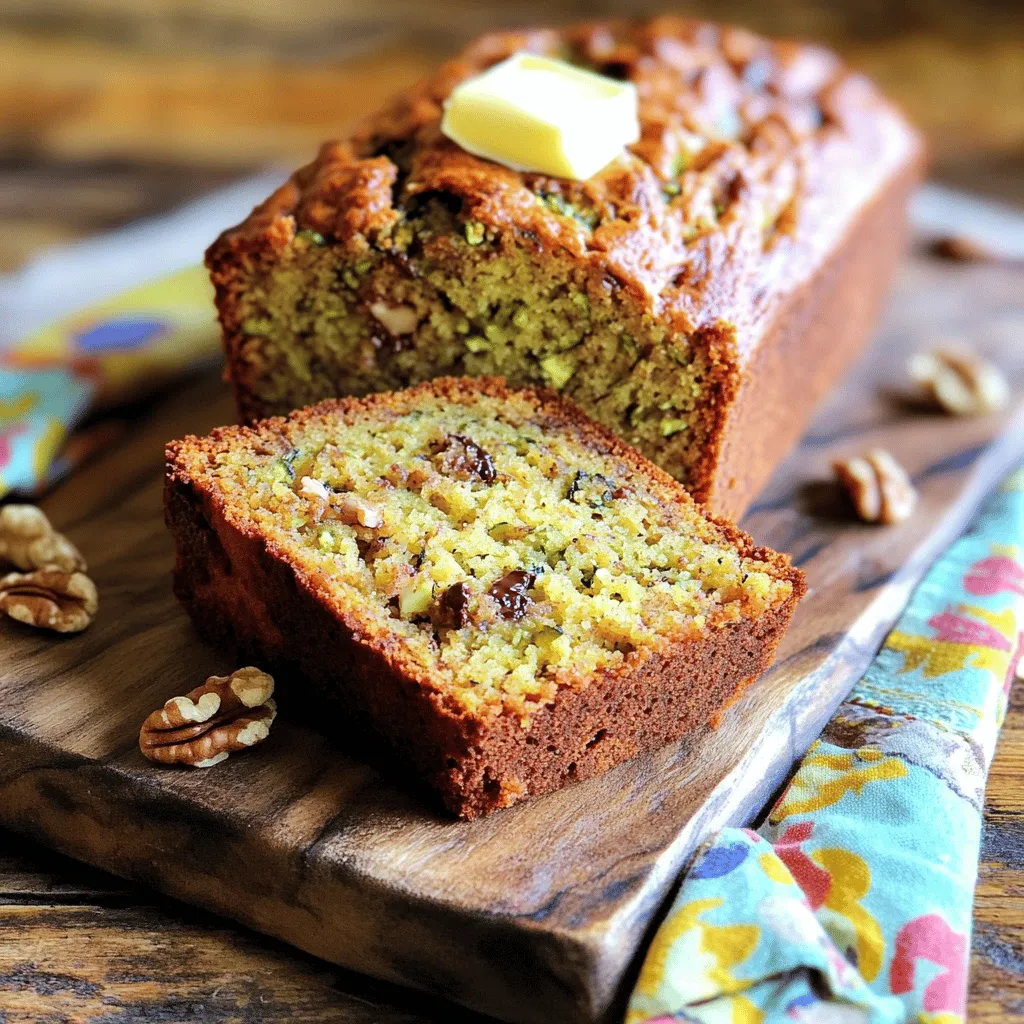
Retro Zucchini Bread Healthy and Flavorful Delight
Are you ready to bake a delicious, healthy treat? Retro Zucchini Bread is packed with flavor and goodness. This simple Read Full Recipe -
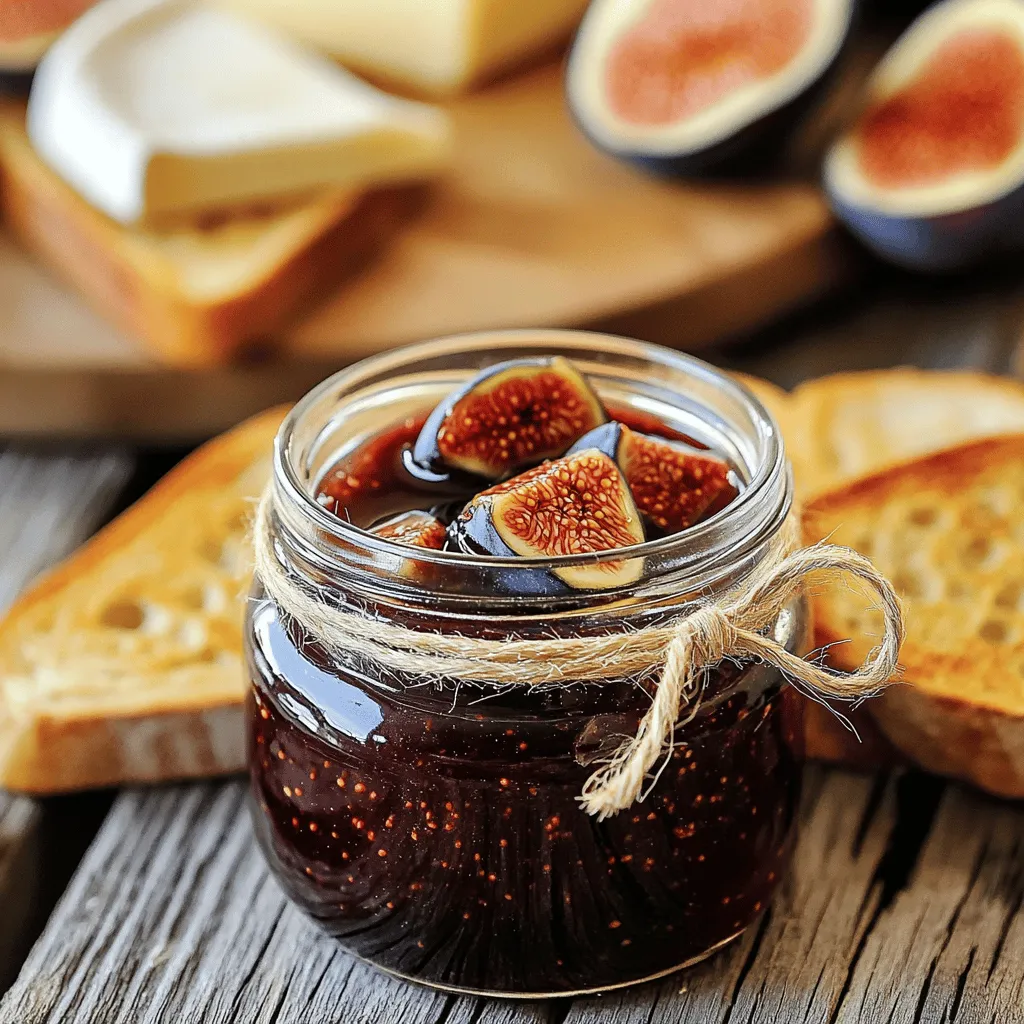
Classic Fig Jam Simple and Delicious Recipe
Are you ready to savor the sweet taste of summer year-round? Making classic fig jam is simple and rewarding. With Read Full Recipe -
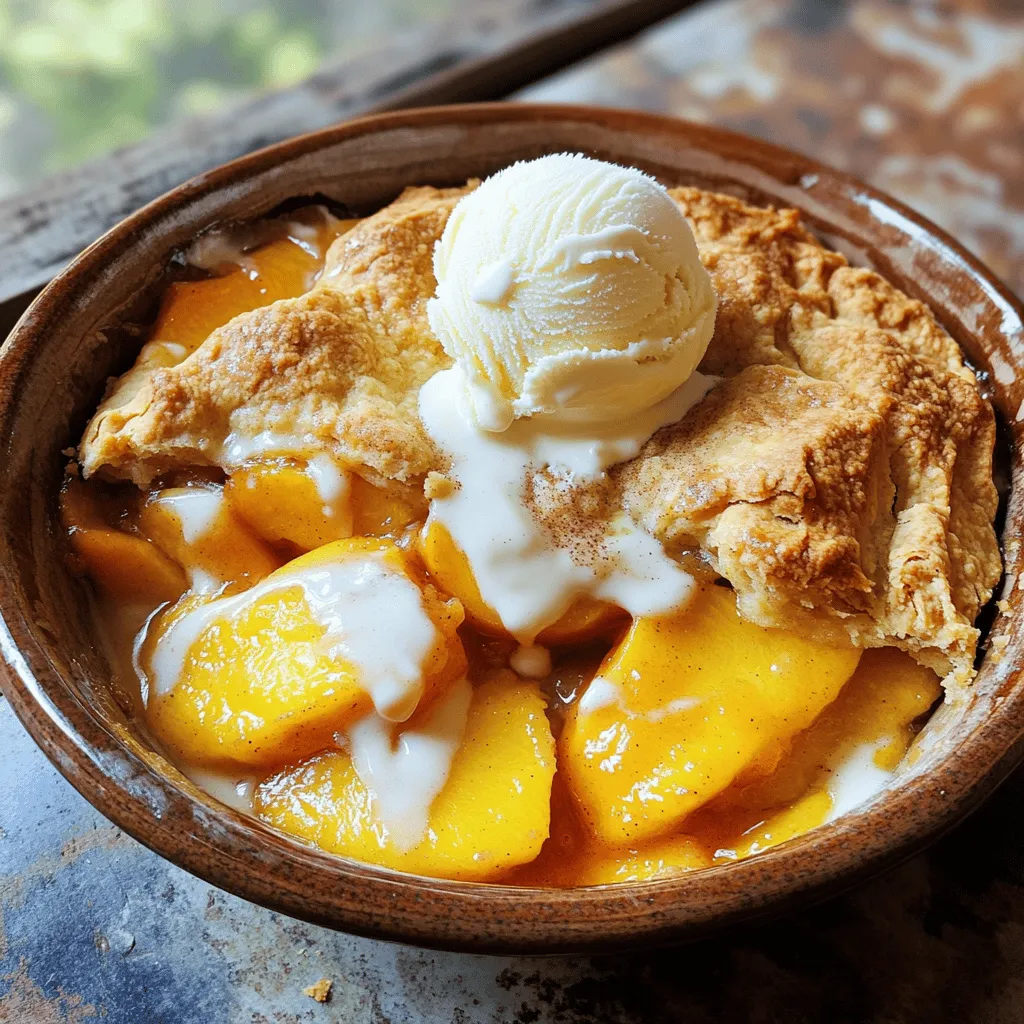
Fresh Peach Cobbler Flavorful and Easy Recipe Guide
Craving a sweet treat that showcases the juicy goodness of fresh peaches? You’re in the right place! In this guide, Read Full Recipe


hey,
i’m !
I’m so happy you’re here!
I pour heart and skill into every recipe I create. I know you’ll taste the difference now let’s enjoy this flavorful adventure together.
![To make these tasty no bake chocolate oat bars, gather the following ingredients: - 2 cups rolled oats - 1 cup almond butter (or any nut butter of your choice) - 1/2 cup honey or maple syrup - 1/2 cup unsweetened cocoa powder - 1/2 cup chocolate chips (dark or semi-sweet) - 1/4 teaspoon sea salt - 1 teaspoon vanilla extract - Optional: 1/4 cup chopped nuts or seeds (like walnuts or chia seeds) for added crunch These ingredients come together to create a delicious and filling snack. You can easily swap ingredients to fit your taste. Here are some ideas: - Nut Butters: Use peanut butter, cashew butter, or sunflower seed butter if you prefer. - Sweeteners: Swap honey for agave nectar or brown rice syrup for a different flavor. - Cocoa Powder: If you want a lighter taste, replace cocoa powder with carob powder. - Chocolate Chips: Use white chocolate chips or omit them for a less sweet bar. Feel free to mix and match based on what you have at home! This recipe can fit many diets: - Vegan: Choose maple syrup and a vegan nut butter to keep it plant-based. - Gluten-Free: Ensure the oats are labeled gluten-free to avoid cross-contamination. - Nut-Free: Use sunflower seed butter instead of nut butter for a nut-free option. These bars can work for many dietary needs, making them a great choice for gatherings! 1. Start by mixing the rolled oats, cocoa powder, and sea salt in a large bowl. Make sure to combine them well. 2. Next, grab a separate microwave-safe bowl. Add your almond butter and honey (or maple syrup) to this bowl. Heat it in the microwave for about 20 to 30 seconds. This step makes it easier to mix. 3. Stir the heated nut butter mix until it becomes smooth. Then, pour it into the bowl with oats. Add the vanilla extract and mix everything until it is well combined. 4. If you want, gently fold in chocolate chips and any nuts or seeds you like. This adds a nice crunch to your bars. 5. Line an 8x8-inch baking dish with parchment paper. Make sure some paper hangs over the sides. This helps you lift the bars out later. 6. Now, transfer the mixture to the baking dish. Spread it evenly and press it down firmly with your hands or a spatula. This helps the bars hold together. 7. Place the dish in the refrigerator for at least 2 hours. This cooling time helps the bars set properly. 8. Once the bars are firm, lift them out using the parchment paper. Cut them into squares or bars. - Always use rolled oats for the best texture. Quick oats can make the bars too mushy. - If you find the mixture too dry, add a little more almond butter or honey. It should stick together easily. - Mixing the heated nut butter and sweetener well is key. This step ensures even sweetness throughout. - Fold in chocolate chips last. This keeps them intact and prevents them from melting too much. - Make sure to press the mixture down firmly in the baking dish. This helps the bars stay compact. - Cover the dish with plastic wrap or a lid while it chills. This keeps the bars from drying out. - Check the bars after 2 hours. They should feel firm but not rock hard. You can let them sit longer if needed. - If your bars don’t set well, they might need more time in the fridge. Just be patient! For the complete recipe, check out the [Full Recipe]. To get the best texture and flavor in your bars, use fresh ingredients. Old oats or nut butter can change the taste. Mix the dry ingredients well before adding the wet ones. This helps them combine smoothly. When you press the mixture into the pan, make sure it is compact. This keeps the bars from crumbling later. One common mistake is not measuring ingredients correctly. Use a scale or measuring cups for accuracy. Also, don’t skip the refrigeration step. Bars need time to set, so resist the urge to cut them too soon. Be careful when heating the nut butter and honey. Overheating can change the flavor, so stick to 20-30 seconds in the microwave. These bars are tasty on their own, but you can add fun touches. Try serving them with a scoop of yogurt or a drizzle of honey. Pair them with a glass of almond milk or a cup of coffee. For a lively snack, add fresh fruit like bananas or berries on the side. You can find the Full Recipe in the article to explore more ideas. {{image_2}} You can easily change the taste of your no bake chocolate oat bars. Adding dried fruits like raisins, cranberries, or apricots brings a sweet and chewy texture. You can also mix in nuts or seeds for crunch. Think walnuts, almonds, or even sunflower seeds. Just stir in about 1/4 cup of your choice when mixing the ingredients. This step not only adds flavor but also boosts nutrition. If you want a healthier twist, swap out some ingredients. Use almond butter or peanut butter to keep it rich without adding too much sugar. Instead of honey, try mashed bananas or unsweetened applesauce. These changes lower calories and add natural sweetness. You can also use 1/4 cup of unsweetened cocoa powder for a richer chocolate flavor without added sugar. You don’t have to stick to squares with these bars. Use a cookie scoop to make small bites. Just drop spoonfuls onto parchment paper and chill. This makes a fun snack for kids and adults alike. You can also use muffin tins to create mini bars. Just press the mixture into each cup, then chill. Whether you choose squares or bites, they will still taste great! For the full recipe, check out the details above. To keep your No Bake Chocolate Oat Bars fresh, store them in an airtight container. This helps keep moisture out and prevents the bars from getting hard. You can place parchment paper between layers to avoid sticking. This small step makes a big difference! When stored correctly, these bars last up to a week in the fridge. For the best taste, enjoy them within the first few days. If you notice any off smell or change in texture, it's best to toss them out. Keeping them cool helps maintain their flavor and texture. You can freeze these bars for longer storage. Wrap each bar tightly in plastic wrap and place them in a freezer bag. This way, you can enjoy a delicious treat anytime. They can stay good in the freezer for about three months. When you're ready to eat, let them thaw in the fridge overnight. No bake chocolate oat bars last about one week. Store them in an airtight container in the fridge. This keeps them fresh and tasty. If you want them to last longer, you can freeze them. They can stay good in the freezer for up to three months. Just cut them into bars before freezing. Use parchment paper to separate layers. This way, you can grab one or two easily later. Yes, you can use other sweeteners. Agave syrup or brown rice syrup works well too. If you prefer granulated sugar, you can use that too. Just mix it with the nut butter and a splash of water to help dissolve it. Remember, different sweeteners can change the taste. Try different ones to find what you like best. No bake chocolate oat bars can be healthy! They are full of oats and nut butter. Oats provide fiber and energy. Nut butter adds protein and healthy fats. However, watch the sweetener amount. Too much can make them less healthy. You can also add seeds or dried fruit for more nutrients. This recipe lets you control what goes in. This way, you can enjoy a treat that also feels good for you. For the complete recipe, check the [Full Recipe]. In this post, we covered how to make delicious no-bake chocolate oat bars. I shared ingredients, cooking steps, and handy tips to get great results. You learned about substituting ingredients and special diet options like vegan and gluten-free. Finally, we explored variations and storage methods to keep your bars fresh. These bars are fun to make and easy to tweak. Enjoy them anytime you need a tasty treat!](https://foodishtalk.com/wp-content/uploads/2025/06/8c41b031-3677-43d2-bcbe-67853270f13b-300x300.webp)
![- 4 boneless, skinless chicken breasts - 1 cup Greek yogurt - ½ cup cucumber, finely grated and excess water squeezed out - 2 cloves garlic, minced - 1 tablespoon fresh dill, chopped (or 1 teaspoon dried) - 1 tablespoon lemon juice - 1 teaspoon olive oil - ½ teaspoon salt - ¼ teaspoon black pepper - 1 teaspoon smoked paprika - 1 cup cherry tomatoes, halved - Fresh greens (like arugula or spinach) for serving - Pita bread or rice, for serving Greek yogurt is the star of this dish. It gives a creamy base and tangy taste. The cucumber adds freshness, while the garlic brings a strong flavor. Fresh dill adds a bright, herbal note, making it more exciting. Lemon juice helps to balance the richness. Olive oil adds a nice smoothness to the sauce. Smoked paprika gives a warm depth to the chicken, enhancing its flavor. Cherry tomatoes provide a sweet burst, making everything better. If you can’t find Greek yogurt, plain yogurt works too. You can swap chicken breasts for thighs if you prefer dark meat. Don’t have dill? Try parsley or mint for a different taste. If you want a less strong flavor, skip the garlic or use garlic powder. You can replace cherry tomatoes with bell peppers for a different texture. Start by preheating your oven to 375°F (190°C). This helps cook the chicken evenly. Next, in a medium bowl, mix the Greek yogurt, grated cucumber, minced garlic, dill, lemon juice, olive oil, salt, and black pepper. This mixture becomes your Tzatziki sauce. Remember to set aside half for drizzling later. Now, take a large baking dish and place the boneless, skinless chicken breasts inside. Rub each piece with smoked paprika for extra flavor. This spice adds a nice smokiness to the dish. Pour the remaining Tzatziki sauce over the chicken, covering it well. This ensures the chicken stays moist while cooking. Scatter halved cherry tomatoes around the chicken for sweetness and color. Cover the dish tightly with aluminum foil. This keeps the moisture in, making the chicken tender. Bake in the preheated oven for about 25 to 30 minutes. Check that the chicken reaches an internal temperature of 165°F (75°C). Once done, remove the foil and bake for another 5 to 10 minutes. This step gives the chicken a lovely golden color. After baking, let the dish cool for a few minutes. This helps the juices settle, making it easier to serve. To serve, place the chicken over a bed of fresh greens, like arugula or spinach. Drizzle the reserved Tzatziki sauce on top for added flavor. It adds a creamy touch that pairs perfectly with the chicken. You can also serve this dish with pita bread or rice on the side. Both options soak up the delicious sauce well. Enjoy your Dump-and-Bake Chicken Tzatziki! To make your Dump-and-Bake Chicken Tzatziki pop, add fresh herbs. Fresh dill works great, but you can also use parsley or mint. A splash of lemon juice brightens the dish too. If you crave heat, sprinkle in some red pepper flakes. For a touch of sweetness, add some honey to the Tzatziki sauce. This makes it more complex and yummy. The oven should be set to 375°F (190°C) for best results. If you want a faster cook, raise the temperature to 400°F (200°C). Just keep an eye on the chicken to avoid overcooking. If you use thick chicken breasts, you may need a bit more time. Always check that the chicken reaches 165°F. This keeps your meal safe and delicious. One mistake is not seasoning the chicken well. Always rub spices on each piece for depth. Another common error is overcooking. Use a meat thermometer to check the temperature. Lastly, don’t skip the foil. Covering the dish helps keep the chicken juicy. These tips will ensure your meal is a hit! For the complete recipe, refer to [Full Recipe]. {{image_2}} You can switch the chicken for other meats. Try using turkey breast or pork tenderloin. Both cook well and soak up the Tzatziki sauce. If you prefer, you can use fish. Salmon or tilapia works great. Just adjust cooking times. Fish cooks faster, so check it around 20 minutes. For a vegetarian twist, use tofu or tempeh. Press tofu to remove moisture, then cube it. Marinate it in Tzatziki sauce before baking. For a vegan option, use chickpeas instead of chicken. Toss them in the same sauce and bake until golden. Both options give you a tasty meal. You can get creative with sauces. Try a spicy harissa if you want heat. A lemon tahini sauce can add creaminess. Use pesto for a fresh herb taste. Each sauce brings a new flavor to the dish. Feel free to mix and match sauces to find your favorite blend. After making Dump-and-Bake Chicken Tzatziki, let it cool. Place leftovers in an airtight container. Store it in the fridge for up to three days. The chicken stays juicy, and the tzatziki flavors blend nicely. When ready to eat, check for any off smells or visible changes before serving. To freeze, allow the dish to cool completely. Transfer it to a freezer-safe container. You can keep it frozen for up to three months. Make sure to label the container with the date. For best results, freeze the chicken and tzatziki sauce separately. This helps maintain texture and flavor. To reheat, thaw in the fridge overnight if frozen. You can use the oven or microwave. For the oven, preheat to 350°F (175°C). Place the chicken in a baking dish, cover with foil, and heat for about 20 minutes. If using the microwave, heat in short bursts, stirring occasionally. Ensure the chicken reaches 165°F (75°C) before serving again. Enjoy it warm with fresh greens and pita bread or rice. Yes, you can use chicken thighs instead of breasts. Chicken thighs have more fat, which makes them juicy and flavorful. They also cook well in this dish. Just remember to check the cooking time. Thighs may take a bit longer than breasts. You want the internal temperature to reach 165°F (75°C). Making tzatziki sauce ahead is a great idea! Simply mix all the tzatziki ingredients in a bowl. Cover it with plastic wrap and store it in the fridge. You can make it up to a day in advance. The flavors will blend nicely if you let it sit. Just remember to save some for drizzling later when you serve. You have many choices for sides! Fresh greens like arugula or spinach work well. They add a nice crunch and color. You can also serve warm pita bread or fluffy rice. Both complement the chicken and tzatziki sauce perfectly. Try adding a simple salad for extra freshness. This article covered key ingredients, clear steps, and useful tips for your dish. You learned about ingredient options and tricks to avoid mistakes. Variations make your meals exciting, while storage tips keep leftovers fresh. Always consider different proteins and sauces to suit your taste. Now, you have the tools to create a delicious meal with ease. Enjoy cooking and exploring flavors that excite your palate.](https://foodishtalk.com/wp-content/uploads/2025/04/98406453-abf2-4a25-a517-2e88f9bc142e-300x300.webp)
![To make Mango Sago dessert pudding, gather these simple ingredients: - 1 ripe mango, diced - 1 cup small tapioca pearls (sago) - 1 can (400ml) coconut milk - 1/2 cup sugar (adjust to taste) - 1/4 teaspoon salt - 1 cup water - 1/2 teaspoon vanilla extract - Extra mango slices and mint leaves for garnish When picking mangoes, look for ripe ones. They should feel slightly soft when you press them. Check for a sweet aroma near the stem. The skin may have some green or red hues, but color varies with type. Choose mangoes that are not too bruised or have dark spots. The best mangoes will have a smooth skin and vibrant color. Sago pearls add a fun, chewy texture to this dessert. They absorb flavors well, making each bite delightful. Coconut milk gives the pudding a rich, creamy taste. It also brings a hint of sweetness and a tropical essence. Together, sago and coconut milk create a perfect base for the fresh mango. This combination brings out the best in your Mango Sago dessert pudding. 1. First, bring 1 cup of water to a boil in a medium saucepan. 2. Add 1 cup of small tapioca pearls to the boiling water. Cook them for 15-20 minutes on medium heat. Stir occasionally until the pearls turn translucent. 3. Once cooked, drain the pearls and rinse them under cold water. This will stop the cooking process. Set them aside. 4. In the same saucepan, mix 1 can of coconut milk, 1/2 cup of sugar, and 1/4 teaspoon of salt. Heat over low-medium heat, stirring until the sugar dissolves. Do not boil. 5. When the coconut milk is warm, add the cooked sago pearls. Stir in 1/2 teaspoon of vanilla extract. Let it simmer for about 5 more minutes. 6. Remove the saucepan from heat and gently stir in the diced mango, saving a few pieces for garnish. 7. Pour the mixture into cups or dessert bowls and refrigerate for at least 2 hours to set. 8. Serve chilled, topping each pudding with reserved mango slices and mint leaves for a fresh touch. - Always use small tapioca pearls for this recipe. They cook faster and give a better texture. - Stir the pearls often while cooking. This helps to prevent them from sticking together. - If you notice the pearls are still hard after cooking, add a little more water and cook for a few extra minutes. - Rinsing the pearls after cooking is key. It stops the cooking and keeps them from getting gummy. - Ensure you measure the coconut milk accurately. Too much can make the pudding too thin. - The sugar helps to balance flavors but don’t add too much. Start with 1/2 cup and adjust as needed. - The sago pearls should be soft but still hold their shape. They should not be mushy. - Refrigerate the pudding long enough to let it set. This step is crucial for the right texture. You can find the Full Recipe for Mango Sago Bliss Pudding above. When making mango sago pudding, some mistakes can ruin your dish. First, don’t overcook the sago. If you do, it can turn mushy. Always keep an eye on the cooking time. Second, avoid using unripe mangoes. They can taste sour and spoil your dessert. Lastly, don’t skip rinsing the sago. This step stops the cooking and helps keep the pearls separate. To create a balanced flavor, focus on the sweetness. Start with half a cup of sugar, then taste the mix. If it needs more sweetness, add a bit more. The coconut milk brings a creamy texture, but too much can make it heavy. A pinch of salt enhances the flavor without making it salty. Finally, the vanilla extract adds warmth. Use it but don’t overdo it. Having the right tools makes cooking easier. You need a medium saucepan for cooking the sago and the coconut milk mix. A strainer is essential for rinsing the pearls. For mixing, a wooden spoon works well. Use measuring cups for accuracy, especially for the sugar and liquid. Small dessert cups or bowls are great for serving. These tools help you enjoy the process and make cooking fun. For the complete process, check the Full Recipe. {{image_2}} You can switch up the fruit in your Mango Sago Dessert Pudding. Try using pineapple or passionfruit for a tasty twist. Simply replace the mango with your chosen fruit. For pineapple, chop it into small pieces and mix it in. If you love passionfruit, scoop out the seeds and pulp. Blend it into the pudding for a tangy flavor. These tropical fruits add a new layer of freshness. You can explore flavors from different regions with these simple changes. If you want a vegan version, use maple syrup instead of sugar. You can also swap coconut milk for almond or cashew milk. This gives you a lighter dessert while keeping it creamy. For a sugar-free treat, choose sugar substitutes like stevia or erythritol. Both options keep the dessert sweet without added sugar. These adaptations make the dessert suitable for everyone, even those with dietary restrictions. Serving your Mango Sago Dessert Pudding can be fun. Use clear glass cups to show off the vibrant colors. Top each cup with extra mango slices and fresh mint leaves. This adds a pop of color and a nice aroma. You can also drizzle a bit of coconut cream on top for extra richness. For a special touch, serve with a small scoop of sorbet on the side. These ideas make your dessert not just tasty, but also beautiful. For the full recipe, check out the Mango Sago Bliss Pudding. To keep your mango sago dessert pudding fresh, store it in the fridge. Use airtight containers. This prevents the pudding from absorbing other smells. Make sure the pudding is fully cooled before covering it. This helps keep the texture smooth. You can keep leftovers for up to three days in the fridge. After three days, the texture may change. The sago may start to harden, and the flavors may fade. Always check for any signs of spoilage before consuming. If you want to refresh your chilled pudding, add a splash of coconut milk. This will help restore creaminess. Stir it well to blend. You can also serve it over crushed ice for a refreshing twist. Avoid reheating in the microwave, as it can change the pudding's texture. For the full recipe to make this delightful treat, check out the Mango Sago Bliss Pudding. Yes, you can use frozen mango. Just let it thaw before using. Other fruits like diced kiwi or strawberries also work. They add fun flavors and colors to the pudding. Fresh fruits give a nice texture, while frozen ones are handy and quick. Remember to taste and adjust sweetness if needed. If you can't find coconut milk, almond milk is a good choice. It has a light flavor and works well in desserts. You can also use cashew milk for a creamier texture. If you want a dairy option, whole milk or heavy cream can replace coconut milk too. Just keep in mind that it will change the taste slightly. You can make this pudding up to two days ahead. Just follow the recipe and chill it in the fridge. The flavors blend nicely when it sits. If you plan to serve it later, keep the mango garnish separate. Add that right before serving for the best look and taste. For the [Full Recipe], just follow the steps mentioned earlier. Enjoy your cooking! Mango Sago Bliss Pudding is a sweet treat that is perfect for warm days. This dessert is light, creamy, and packed with flavor. The main ingredients are ripe mangoes and small tapioca pearls, known as sago. - 1 ripe mango, diced - 1 cup small tapioca pearls (sago) - 1 can (400ml) coconut milk - 1/2 cup sugar (adjust to taste) - 1/4 teaspoon salt - 1 cup water - 1/2 teaspoon vanilla extract - Extra mango slices and mint leaves for garnish This recipe blends sweet mango with creamy coconut milk. The sago adds a chewy texture. Together, these flavors create a delightful experience. The key is to use ripe mangoes for the best taste. You start by cooking the sago pearls. Bring water to a boil in a pot. Add the sago and cook until they turn clear. This usually takes about 15 to 20 minutes. Stir occasionally to avoid clumping. After cooking, rinse them with cold water. This stops the cooking and keeps them chewy. Next, you mix the coconut milk, sugar, and salt in the same pot. Heat it gently. Stir until the sugar dissolves but do not let it boil. This helps make the pudding smooth and sweet. After your coconut milk is ready, add the cooked sago and vanilla extract. Stir well and simmer for 5 minutes. Then, mix in your diced mango, saving some for garnish. Pour the mix into cups and chill in the fridge for at least 2 hours. When ready to serve, top with extra mango slices and fresh mint leaves. This makes your dessert look beautiful and inviting. The mix of colors and flavors will make your taste buds dance. This Mango Sago Bliss Pudding is a refreshing treat that everyone will love. For the full recipe, check the above section. Enjoy every creamy spoonful! Mango Sago Dessert Pudding combines fresh ingredients for a sweet treat. We explored the best mangoes and the role of sago and coconut milk. I shared easy steps for cooking and tips to perfect your pudding. Remember to avoid common mistakes and consider fun variations. Store leftovers well to enjoy later, and feel free to adapt the recipe. Dive in and create your own Mango Sago Bliss today! You’ll love the taste and texture.](https://foodishtalk.com/wp-content/uploads/2025/06/42995667-644f-4ea5-9ea6-178515365254-300x300.webp)

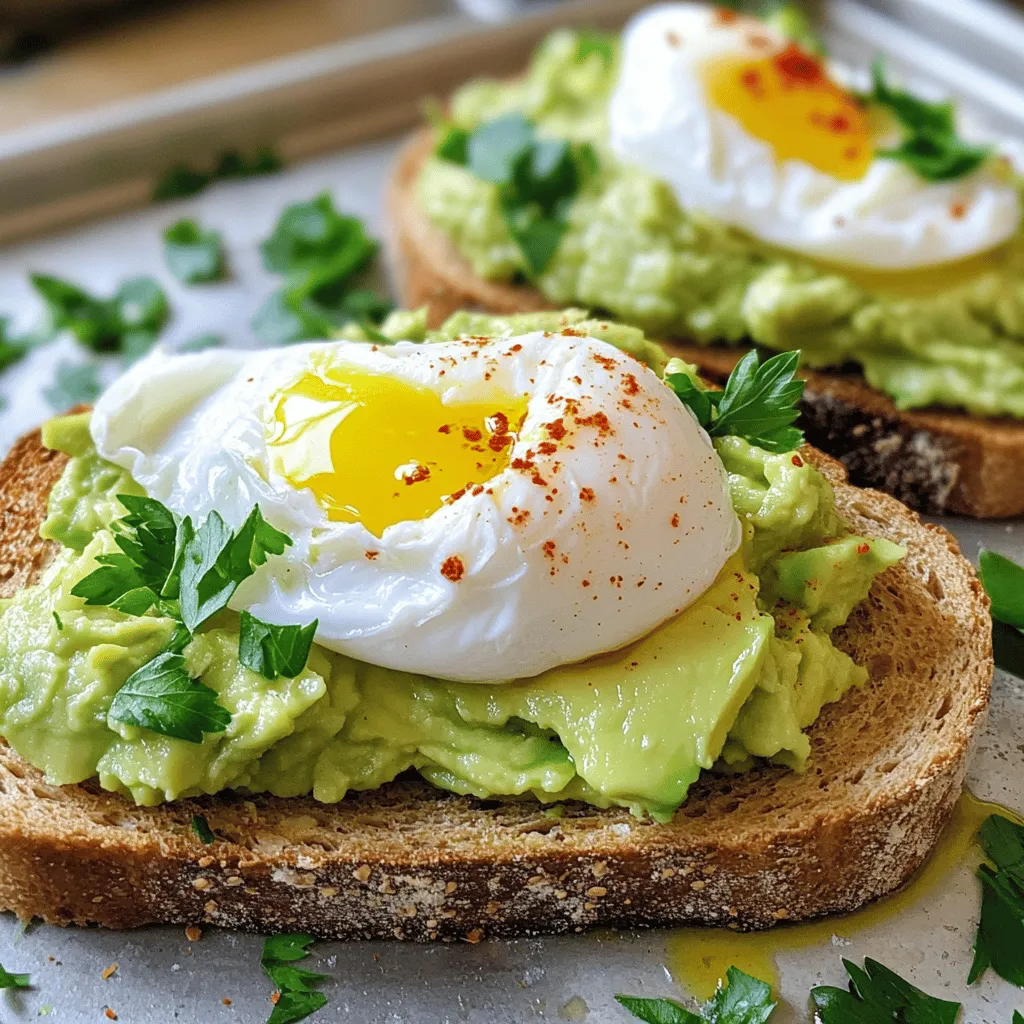
Avocado Toast with Poached Egg Simple and Tasty Dish
Are you ready to enjoy a simple and tasty dish? Avocado toast with a poached egg is a perfect meal for any time of…