Skip to content
DisclaimerTerms Of UseGDPR PolicyCookie Policy

Foodish Talk

  • Home
  • Drinks
  • Appetizers
  • Dinner
  • Dessert
  • About
  • Contact
  • Privacy Policy
DisclaimerTerms Of UseGDPR PolicyCookie Policy

Ava

- 4 cups green cabbage, finely shredded - 1 cup purple cabbage, finely shredded - 2 large carrots, grated - 1/2 cup mayonnaise - 1 tablespoon apple cider vinegar - 1 tablespoon honey - 1 teaspoon Dijon mustard - Salt and pepper to taste - Optional: 1/4 cup green onions, chopped When making coleslaw, the fresh vegetables matter. I use two types of cabbage for color and crunch. Green cabbage gives a nice base, while purple cabbage adds visual appeal. The carrots provide sweetness and texture. For the dressing, I stick to simple yet flavorful ingredients. Mayonnaise is creamy and binds everything. Apple cider vinegar adds tang, while honey gives a hint of sweetness. Dijon mustard rounds out the flavor with a little kick. I always season with salt and pepper. You can also add green onions for a fresh bite. This classic coleslaw is bright, crunchy, and perfect for any meal. Check out the Full Recipe for all the steps! To start, grab a large mixing bowl. First, combine the finely shredded green cabbage and purple cabbage. This mix gives your coleslaw a nice crunch and color. Next, add the grated carrots to the bowl. Carrots add sweetness and make your coleslaw more vibrant. In a separate smaller bowl, whisk together the dressing ingredients. Use 1/2 cup of mayonnaise, 1 tablespoon of apple cider vinegar, 1 tablespoon of honey, and 1 teaspoon of Dijon mustard. Add salt and pepper to taste. Make sure the dressing is smooth and well combined. This dressing is key to making your coleslaw tasty and creamy. Now it’s time to bring everything together. Pour the dressing over the vegetables in the large bowl. Toss everything together until the vegetables are evenly coated with the dressing. If you want, add 1/4 cup of chopped green onions for extra flavor. Cover the coleslaw and refrigerate for at least 30 minutes. This helps the flavors meld together. Serve chilled, and enjoy your refreshing side dish! You can check the Full Recipe for more details. For coleslaw, I love using green and purple cabbage. Green cabbage is crisp and refreshing. Purple cabbage adds a nice pop of color and extra crunch. Always pick fresh heads. Look for tight leaves and no brown spots. Store cabbage in the fridge, wrapped in a damp cloth. It will last about a week this way. To make the dressing creamier, try adding more mayonnaise. You can also mix in some sour cream. If you want a tangy taste, add more vinegar or mustard. For sweetness, increase the honey. Play around until you find the balance that you enjoy the most. Spices can really boost your coleslaw. Try adding celery seeds or black pepper for a kick. Fresh herbs, like dill or parsley, can also brighten the flavor. Want more crunch? Add chopped apples, nuts, or even sunflower seeds. These add-ins make your coleslaw even more exciting and tasty. For the full recipe, check out the detailed steps above. {{image_2}} Coleslaw has many classic forms. The traditional Southern coleslaw is creamy and sweet. It often uses a mix of green and purple cabbage. The dressing blends mayonnaise, sugar, and vinegar for a rich taste. This version pairs well with fried chicken and barbecue. Another classic is mustard-based coleslaw. This style uses mustard instead of mayonnaise. It gives a zesty kick. Combine mustard with vinegar and a bit of sugar. This mix makes a tangy dressing. Use it for a refreshing side with grilled meats. To make coleslaw healthier, swap mayonnaise for Greek yogurt. This change cuts fat while adding protein. Greek yogurt gives a creamy texture and tangy flavor. It’s a great option for a lighter dish. You can also add more vegetables for a nutrient boost. Try adding bell peppers, radishes, or broccoli. These veggies add crunch and color. They also increase vitamins and fiber. Experimenting with different vegetables makes coleslaw even more exciting. Coleslaw isn’t just a classic dish; it has global twists too. An Asian-inspired coleslaw uses sesame oil and soy sauce. This dressing gives a nutty and savory flavor. Add shredded carrots and edamame for extra crunch. It’s perfect for a fresh side with Asian dishes. For a Mexican-style coleslaw, use lime juice and cilantro. This version brightens up the dish. It’s refreshing and pairs well with tacos or grilled fish. Feel free to add jalapeños for some heat. These variations keep coleslaw interesting and fun. You can find the full recipe to explore these ideas at home. To keep your coleslaw fresh, store it in an airtight container. This helps retain crunchiness and flavors. Place the container in the fridge right after mixing. If stored correctly, coleslaw lasts about 3 to 5 days. Always check for signs of spoilage before serving. Coleslaw does not freeze well. The veggies get mushy after thawing. If you must freeze it, do so without the dressing. Store the mix in a freezer-safe bag or container. When you're ready, thaw in the fridge overnight. Add fresh dressing just before serving. Coleslaw pairs well with many dishes. It goes great with grilled meats, sandwiches, and barbecues. For the best taste, serve it chilled. I recommend letting it sit for a few minutes after taking it out of the fridge. This helps revive the flavors before enjoying your crunchy coleslaw. For the full recipe, check out the details above! Coleslaw has roots that trace back to ancient Rome. Romans made a dish of cabbage, eggs, and vinegar. The name "coleslaw" comes from the Dutch phrase "cabbage salad." Over time, it evolved into many styles. In America, coleslaw became a favorite side dish, especially at barbecues. Variations include creamy, vinegar-based, and even fruity styles. Each region adds its twist, making it a fun dish to explore. Yes, you can make coleslaw ahead. This allows the flavors to blend better. I recommend making it a day in advance. Just follow these steps: - Prepare the coleslaw as normal. - Store it in an airtight container. - Keep it in the fridge until you’re ready to serve. This way, you save time and enjoy the crunchy, refreshing taste. Watery coleslaw can be a common issue. This happens when vegetables release moisture. To fix this, use these tips: - Salt the cabbage before mixing. Let it sit for about 15 minutes. - Drain any excess liquid. - Make sure to mix the dressing just before serving. These steps help keep your coleslaw crunchy and prevent it from being soggy. This blog post covered how to make a great coleslaw. You learned about fresh veggies, the perfect dressing, and seasoning tips. I shared ways to choose the right cabbage and how to enhance its flavor. Various coleslaw types, from classic to global twists, offer fun options. Proper storage is key, too. With these tips, you can create a tasty coleslaw. Enjoy customizing your recipe to fit your taste. Now, go make some delicious coleslaw!

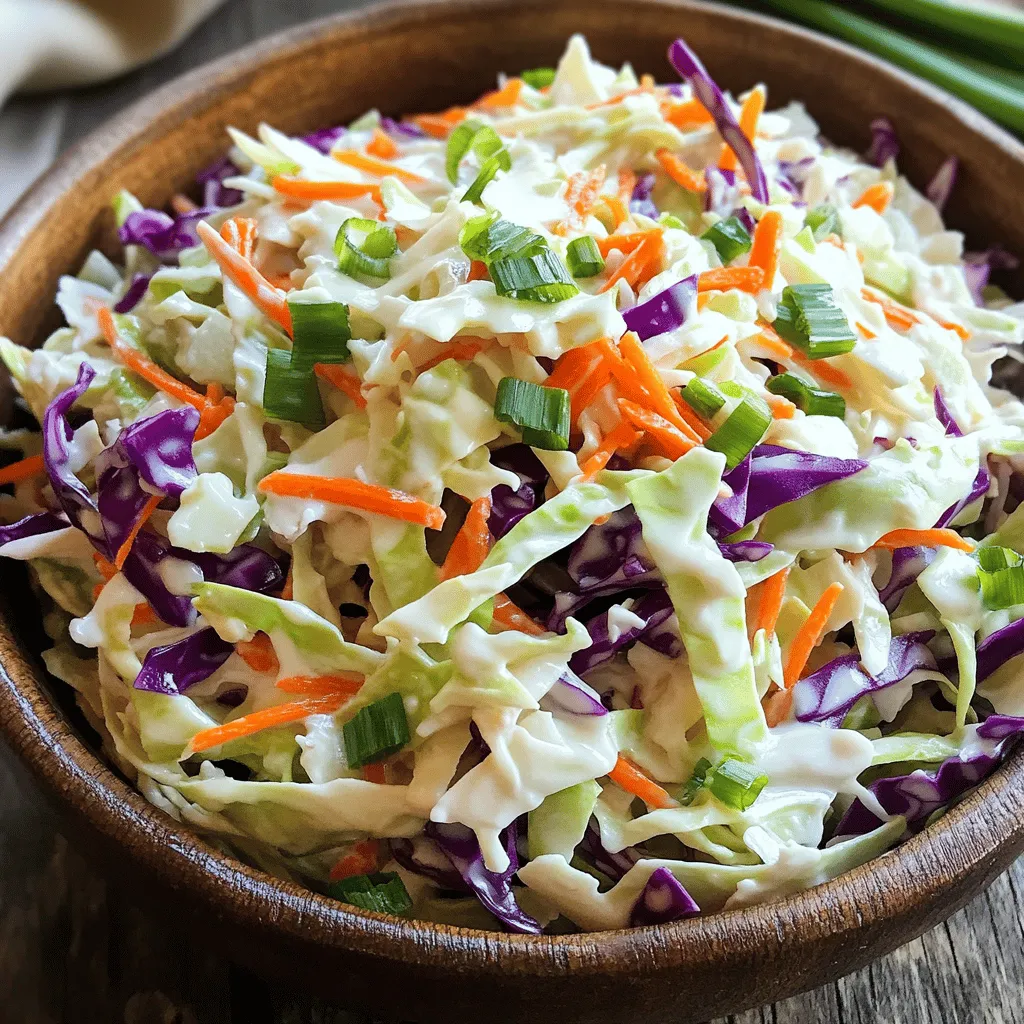
Classic Coleslaw Crunchy and Refreshing Side Dish

Looking for a perfect side dish that’s both crunchy and refreshing? This classic coleslaw recipe hits the mark! Packed with

To make Mango Coconut Chia Pudding, you will need: - 1 cup coconut milk (canned or carton) - 1/2 cup almond milk (or any preferred milk) - 1/4 cup chia seeds - 2 tablespoons maple syrup (or sweetener of choice) - 1 ripe mango, diced - 1 teaspoon vanilla extract - Pinch of salt - Toasted coconut flakes for garnish (optional) You can swap out ingredients for different flavors. If you can't find coconut milk, use oat milk or soy milk. Almond milk can be replaced with cow's milk if you prefer. Chia seeds can be swapped with flax seeds, but they will change the texture. Maple syrup works well, but honey or agave syrup can also sweeten the pudding. If you don’t have mango, try berries or bananas instead. This pudding is not just tasty; it's also healthy! Here are some benefits: - Chia seeds are high in fiber and omega-3 fatty acids. They help with digestion and heart health. - Coconut milk provides healthy fats that may boost energy levels. - Mango is rich in vitamins A and C, which support your immune system. - Almond milk is low in calories and can benefit your bones due to its calcium content. This pudding can fit into many diets while keeping you full and satisfied. Start by gathering all your ingredients. You need coconut milk, almond milk, chia seeds, maple syrup, vanilla extract, salt, and diced mango. Measure carefully for the best taste. In a mixing bowl, whisk together the coconut milk, almond milk, maple syrup, vanilla, and salt. Whisk until the mix is smooth and creamy. This blend gives your pudding a rich flavor. Next, add the chia seeds to your mixture. Stir well to spread the seeds evenly. Let the mixture sit for about 5 minutes. This time helps the seeds absorb some liquid. After 5 minutes, stir again to break any clumps. Cover the bowl with a lid or plastic wrap. Place it in the fridge for at least 4 hours or overnight. This waiting time is vital for the pudding to thicken. Once the pudding is ready, stir it again. Taste it and adjust sweetness if needed. To serve, layer the pudding in glasses or bowls. Start with a layer of pudding, then add diced mango. Repeat until your glass is full. Finish by sprinkling toasted coconut flakes on top for a crunchy touch. You can also add more mango cubes for extra flavor. Enjoy this delightful treat! For a full recipe, check the detailed instructions. To make your chia pudding thick and creamy, use the right ratio of chia seeds to liquid. I suggest using 1/4 cup chia seeds to 1 1/2 cups of liquid. This mix forms a nice gel. Stir the seeds well as you add them. Letting the mixture sit for 5 minutes, then stirring again helps avoid lumps. It needs at least 4 hours in the fridge to get that pudding-like texture. Sweetening your chia pudding can be fun! I often use maple syrup for a rich flavor. Honey or agave syrup are also great choices. If you want it less sweet, add just a dash. You can even skip the sweetener to let the mango shine. Taste the mix before chilling to find your perfect sweetness. Avoid adding chia seeds all at once. This can cause clumping, making it hard to mix. Also, don’t skip the chilling time. It’s crucial for the right texture. If you don’t let it set long enough, it will be runny. Lastly, remember to check the taste before serving. Adjust sweetness or flavor if needed. For the full recipe, check the complete instructions! {{image_2}} You can easily make this pudding plant-based and vegan. Use almond milk or oat milk instead of regular milk. Coconut milk adds a rich flavor, but you can try soy milk for a different taste. Maple syrup is a great sweetener that is vegan. Make sure all your ingredients are plant-based for the best results. Want to spice up your pudding? Add a dash of cinnamon or nutmeg for warmth. A hint of cardamom gives it a unique twist. You can also mix in some cocoa powder for a chocolate flavor. Just remember, a little goes a long way. Taste as you go, and find the balance that you love. Mango is delicious, but you can mix in other fruits too. Try adding diced pineapple for a tropical flair. Berries like strawberries or blueberries can add a nice tartness. Sliced bananas work well too. Layer different fruits for a fun look and taste. Each fruit brings its own flavor, making your pudding even more exciting. For the full recipe, check the detailed steps on how to create this delightful dish. To keep your mango coconut chia pudding fresh, use an airtight container. This helps prevent any smells from other foods. Make sure the lid seals tightly. Store it in the fridge for best results. Mango coconut chia pudding lasts about 5 days in the fridge. After this time, the pudding may lose its texture. If you notice any off smells or changes, it’s best to toss it. You can freeze chia pudding if you want to save some for later. Use freezer-safe jars or containers. Just leave some space at the top; liquids expand when frozen. To thaw, move it to the fridge overnight. Stir it well before serving to get the right texture back. For the best taste, use it within 2 months. You can find the Full Recipe for more details. Chia pudding is a creamy dessert made from chia seeds and liquid. You mix chia seeds with milk or a milk alternative. The seeds soak up the liquid and form a gel-like texture. This pudding is both tasty and fun to eat. Plus, it is easy to make with just a few ingredients. Yes, you can use many fruits! Fresh berries, bananas, or even peaches work well. Just chop the fruit and layer it with the pudding. This adds new flavors and colors to your dish. Feel free to get creative with your favorite fruits. Mango Coconut Chia Pudding can last up to five days in the fridge. Make sure to store it in an airtight container. If you want to keep it longer, you can freeze it. Just remember to thaw it in the fridge before eating. Absolutely! Chia pudding is packed with nutrients. Chia seeds are high in fiber, omega-3 fatty acids, and protein. Coconut milk adds healthy fats, while mango provides vitamins and minerals. This treat is a great choice for a healthy snack or breakfast. To reduce sweetness, cut back on the maple syrup. You can also use unsweetened milk alternatives. If you want more flavor without added sugar, try using spices like cinnamon or vanilla. This way, you still enjoy a tasty pudding without it being too sweet. For a complete guide on how to make this delightful treat, check the [Full Recipe](#). We explored making Mango Coconut Chia Pudding using key ingredients and easy steps. You learned about substitutions and health perks of the main ingredients. I shared tips for that perfect texture and common mistakes to avoid. You can try fun variations and find ways to store your pudding well. Chia pudding is healthy and versatile, making it a great treat. Enjoy experimenting with flavors and enjoy your delicious creation!

Mango Coconut Chia Pudding Delightful Healthy Treat

Craving a delicious and healthy treat? Try my Mango Coconut Chia Pudding! This simple recipe combines creamy coconut milk, sweet

- 2 tablespoons olive oil - 1 medium onion, chopped - 3 cloves garlic, minced - 2 cans diced tomatoes (14.5 oz each) - 2 cups vegetable broth The base of this soup starts with simple, fresh ingredients. I always choose good-quality olive oil to sauté the onions. It adds a rich flavor. The chopped onion brings sweetness when cooked. Garlic adds a nice aroma and depth. The star of the show is the canned diced tomatoes. They provide a bright, tangy taste. I love using two cans to ensure a robust tomato flavor. The vegetable broth complements this nicely, making the soup hearty and filling. - 1 cup heavy cream or coconut cream - 1 teaspoon dried oregano - 1 teaspoon sugar (to balance acidity) - Fresh basil leaves for garnish - Crusty bread or grilled cheese for serving If you want your soup creamy, add heavy cream or coconut cream. Coconut cream is a great choice for a dairy-free option. Dried oregano enhances the herbs' flavor, adding warmth and earthiness. A touch of sugar balances the acidity from the tomatoes perfectly. Fresh basil leaves not only taste amazing but also add a pop of color. Serving with crusty bread or a grilled cheese makes for a cozy meal. You can find the full recipe above for more details on how to blend these flavors together. - Heat 2 tablespoons of olive oil in a large pot over medium heat. - Add 1 medium chopped onion and sauté for about 5 minutes until it turns soft. - Next, stir in 3 cloves of minced garlic. Cook it for another minute until it smells great. - Pour in 2 cans of diced tomatoes and 2 cups of vegetable broth. - Add 1 teaspoon of dried oregano and 1 teaspoon of sugar to balance the acidity. - Stir the mixture well, then bring it to a simmer. Let it cook for 15 minutes so the flavors blend nicely. - Using an immersion blender, purée the soup until it is smooth. If you use a regular blender, let it cool a bit first. - Return the soup to low heat, then stir in 1 cup of heavy cream. Warm it up but don’t boil. - Finally, mix in 1/2 cup of chopped fresh basil leaves. Season it with salt and pepper to taste. - For an extra touch, serve hot with fresh basil leaves on top. Enjoy it with crusty bread or grilled cheese for a cozy meal. Check out the Full Recipe for more details! To make your creamy tomato basil soup shine, balance the acidity with sugar. The tomatoes can be quite tangy. Adding just one teaspoon of sugar helps round out the flavors. This small step makes a big difference. Using fresh ingredients boosts the taste, too. Fresh basil adds a bright flavor. Choose ripe tomatoes for depth. If using canned tomatoes, opt for high-quality brands. They often taste better and have less added salt. A large pot works best for cooking this soup. It allows for even heating and stirring. An immersion blender is my favorite tool for puréeing. It’s quick and mess-free. If you use a traditional blender, wait until the soup cools slightly. This avoids hot splashes that can burn you. For safe blending, fill your blender only halfway. Always cover the lid with a kitchen towel. This adds a layer of protection against splatters. Serve your creamy tomato basil soup with crusty bread or a grilled cheese. These pairings add a comforting touch. You can also serve it with a fresh salad for a light meal. Garnishing the soup elevates its look. Add fresh basil leaves on top for color. Drizzle some olive oil for a rich finish. A sprinkle of black pepper adds a nice touch, too. For the full recipe, check out the details above and get cooking! {{image_2}} You can easily make this soup dairy-free by swapping out the heavy cream. Use coconut cream instead. It adds a subtle sweetness and rich texture. To do this, just replace the heavy cream with 1 cup of coconut cream in the recipe. This small change keeps the soup creamy while being plant-based. Want to make your soup heartier? You can add proteins like cooked chicken or beans. Shredded rotisserie chicken works great here. Simply stir it in when you blend the soup. For beans, use white beans or chickpeas. They add protein and fiber. If you prefer grains, try adding cooked rice or quinoa. Both options work well. Just mix them in after blending the soup. This gives you a satisfying meal in a bowl. To give your soup a unique twist, add different spices. For some heat, try chili flakes. Start with a pinch and adjust to your taste. Fresh herbs also enhance the flavor. Consider adding thyme or parsley along with the basil. You can also experiment with smoked paprika for a smoky flavor. Each spice brings a new layer to the dish. This allows you to customize the soup to fit your mood. So, don't be afraid to play with flavors in your creamy tomato basil soup! For the full recipe, you can refer back to the beginning. To store leftover soup, let it cool first. Place it in airtight containers. This helps keep the soup fresh. I recommend using glass or BPA-free plastic. Label the containers with the date for easy tracking. You can freeze creamy tomato basil soup. Use freezer-safe containers. Leave some space at the top for expansion. The soup can last for about three months in the freezer. When you’re ready to enjoy it, move the container to the fridge to thaw overnight. When reheating, do it slowly over low heat. This keeps the soup creamy and delicious. Stir often to prevent sticking. If you notice the cream separates, whisk the soup gently. This will help bring it back together. For more flavor, add a bit of fresh basil while reheating. To make creamy tomato basil soup from scratch, start by heating olive oil in a pot. Then, add chopped onions and cook them until soft. Next, stir in minced garlic and let it cook for a minute. Pour in canned diced tomatoes and vegetable broth. Add dried oregano and sugar to balance the taste. Simmer the mix for about 15 minutes. After that, blend the soup until smooth, then stir in heavy cream and fresh basil. Season with salt and pepper. This full recipe is simple and quick. Yes, you can use fresh tomatoes. For this soup, select ripe tomatoes. Around 6 to 8 medium-sized tomatoes should work well. First, blanch them in boiling water for a minute. This will make peeling easy. After peeling, chop them and add them to the pot with broth. Fresh tomatoes give a bright taste that many enjoy. Creamy tomato basil soup lasts about 3 to 5 days in the fridge. Store it in an airtight container to keep it fresh. Make sure to let the soup cool before sealing it. This helps keep the flavor intact for a longer time. Yes, you can make this soup in advance. Cook the soup and let it cool down. Then, store it in an airtight container in the fridge. When ready to eat, simply reheat the soup on the stove. Stir frequently to keep it smooth. If the soup thickens, add a splash of broth or cream while reheating. This way, you’ll have a tasty meal ready to go! In this post, we covered how to make creamy tomato basil soup from start to finish. I provided essential ingredients, step-by-step instructions, and helpful tips. You learned about variations, storage methods, and answers to common questions. This soup is easy to make and perfect for any occasion. I hope you try it and enjoy the flavors. Make it your own by adding your favorite touches. Keep cooking and experimenting!

Creamy Tomato Basil Soup Flavorful and Easy Recipe

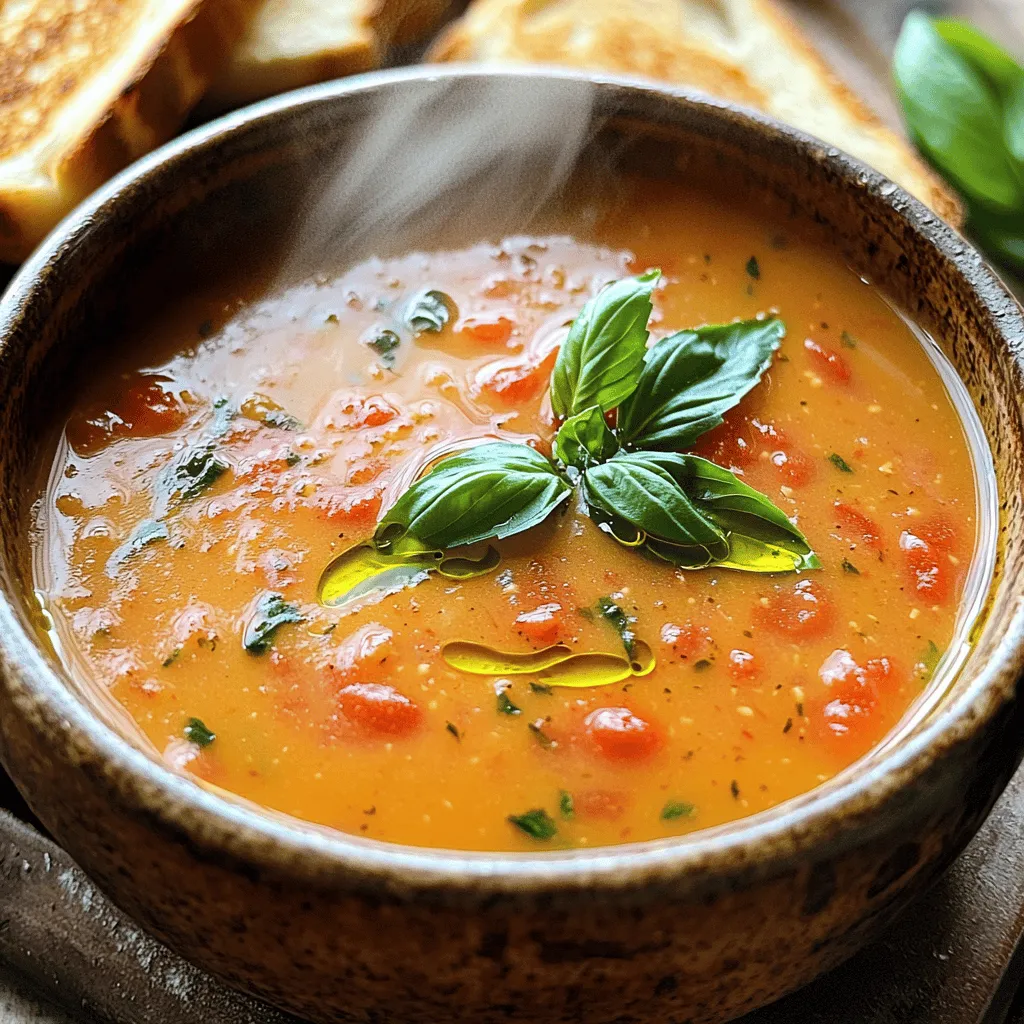
Looking for a comforting dish that packs a punch of flavor? This Creamy Tomato Basil Soup is not only easy

- 4 boneless, skinless chicken breasts - 2 cups fresh spinach, chopped - 1 cup feta cheese, crumbled - 1/2 cup cream cheese, softened - 2 cloves garlic, minced - 1 teaspoon dried oregano - 1 teaspoon lemon zest - Salt and pepper to taste - 1 tablespoon olive oil - Oven-safe skillet - Toothpicks or kitchen twine - Mixing bowl For this dish, I focus on fresh, high-quality ingredients. The chicken breasts serve as a nice canvas for the filling. Fresh spinach adds color and nutrition. Feta cheese provides a tangy kick, while cream cheese binds it all together. I like to use garlic and oregano to bring out the flavors. A hint of lemon zest brightens the dish. If you want extra flavor, consider using the optional ingredients. Garlic adds depth, and oregano brings an earthy taste. Lemon zest brightens the filling. Don't forget salt and pepper to season everything well. Olive oil helps during cooking, giving a nice crust to the chicken. You’ll need some tools to make this dish easy. An oven-safe skillet lets you sear and bake the chicken in one pan. Toothpicks or kitchen twine help keep the filling inside the chicken. A mixing bowl is handy for combining your ingredients. Once you have everything, you can follow the Full Recipe to create this savory delight! Start by mixing the filling. In a bowl, combine the chopped spinach, crumbled feta cheese, softened cream cheese, minced garlic, dried oregano, lemon zest, salt, and pepper. Stir until everything blends well. This filling brings bright flavors and a creamy texture to the chicken. Next, prepare the chicken breasts. Take each chicken breast and cut a pocket in it. Slice halfway through the thickest part. Make sure there is enough space to hold the filling. This pocket is key for holding the tasty spinach and feta mix. Now, it’s time to cook. Heat olive oil in an oven-safe skillet over medium-high heat. Once hot, add the stuffed chicken breasts. Sear each side for about 3 to 4 minutes. Look for a golden-brown color. This step locks in flavor and moisture, making your chicken juicy. Transfer the skillet to the oven, preheated to 375°F (190°C). Bake the chicken for 25 to 30 minutes. Use a meat thermometer to check the internal temperature. It should reach 165°F (74°C) for safe eating. Once done, let the chicken rest for 5 minutes. This helps keep it juicy and tender. Finally, slice the stuffed chicken in half to show off the colorful filling. Enjoy your delicious meal! For the complete steps, refer to the Full Recipe. - Use fresh ingredients for better flavor. - Consider adding herbs or spices for extra taste. For example, a pinch of nutmeg can elevate the filling. You can also try adding a dash of red pepper flakes for a mild heat. To get that golden-brown crust, heat your skillet before adding the chicken. This step seals in the juices and gives a nice sear. Cook each side for about 3-4 minutes. Don’t rush this part; it makes a huge difference in texture. After searing, transfer the skillet to the oven to finish baking. This method keeps the chicken juicy and tender. For a beautiful plate, slice the chicken in half to show off the colorful filling. Arrange the slices neatly on a platter. Drizzle with olive oil and sprinkle fresh herbs, like parsley or dill, for a pop of color. Add lemon wedges on the side for a bright touch. This not only looks great but also adds a zesty flavor when served. For the full recipe, check out the detailed instructions. {{image_2}} You can easily change the stuffing to make it your own. Want a burst of flavor? Add sun-dried tomatoes or olives to the mix. They bring a tasty twist to the dish. Just chop them up and blend them in with the spinach and cheese. If you're looking for vegan options, try using tofu or plant-based cheese. Crumble the tofu to match the texture of feta. You can also add nutritional yeast for a cheesy flavor. This way, everyone can enjoy this dish, no matter their dietary needs. Pair your Spinach Feta Stuffed Chicken with sides that complement its flavors. A simple green salad with a light vinaigrette works great. It adds freshness and crunch to your meal. For something heartier, consider serving it with quinoa or rice. Both options soak up any juices from the chicken. You can also add roasted vegetables on the side. They bring color and extra nutrients to your plate. For more ideas, check out the Full Recipe for great combinations. To store leftovers of your spinach feta stuffed chicken, let them cool first. Place the chicken in an airtight container. Make sure to cover it well to keep out air and moisture. Store the container in your refrigerator. The chicken will stay fresh for about three to four days. Always check for any signs of spoilage before eating. Freezing is great for saving your stuffed chicken for later. Once the chicken cools down, wrap each piece tightly in plastic wrap. Then, place them in a freezer-safe bag. Remove as much air as possible before sealing. This method helps keep the chicken juicy and tasty. You can freeze it for up to three months. When you’re ready to eat, thaw it in the fridge overnight. To reheat the chicken, preheat your oven to 350°F (175°C). Place the stuffed chicken in an oven-safe dish and add a splash of broth or water. Cover it with foil to keep it moist. Heat for 20-25 minutes or until warmed through. If you prefer, you can also reheat it in the microwave. Just make sure to use a microwave-safe dish and cover it to prevent drying out. Enjoy your flavorful meal again! Yes, you can make Spinach Feta Stuffed Chicken ahead. Start by preparing the filling. Mix the spinach, feta, cream cheese, garlic, oregano, lemon zest, salt, and pepper. Stuff the chicken breasts and secure them. You can store the stuffed chicken in the fridge for up to a day. When ready, sear and bake as usual. This method saves time and still gives you a fresh meal. Pair this dish with simple sides that enhance its flavors. Here are some great options: - Roasted vegetables like carrots or broccoli - A light salad with mixed greens and vinaigrette - Quinoa or rice for a hearty base - Mashed potatoes for comfort food lovers - Garlic bread for a tasty addition All these sides balance the savory taste of the chicken and add variety to your meal. Spinach Feta Stuffed Chicken is a nutritious choice. It packs protein from chicken and calcium from feta cheese. Spinach adds vitamins and minerals, making it a well-rounded meal. Each serving provides healthy fats from olive oil and cream cheese. If you watch your sodium, consider using low-salt feta. Overall, this dish fits well in a balanced diet. Enjoy it guilt-free! This blog post covered how to make Spinach Feta Stuffed Chicken. You learned about required and optional ingredients, tools needed, and important steps. We shared tips for perfecting your dish and ideas for variations. Remember, fresh ingredients boost flavor, and don’t hesitate to customize your stuffing. With the right storage and reheating practices, your leftovers will remain delicious. Enjoy making this dish your own, and impress your family or guests with flavors they will love. Happy cooking!

Spinach Feta Stuffed Chicken Savory and Juicy Delight

Looking for a dish that’s both savory and juicy? You’ll love Spinach Feta Stuffed Chicken! This tasty recipe is simple

To make a fresh and vibrant mango avocado salsa, gather these ingredients: - 1 ripe mango, diced - 2 ripe avocados, diced - 1/2 red onion, finely chopped - 1 small red chili, deseeded and minced - 1 small yellow bell pepper, diced - 2 tablespoons fresh cilantro, chopped - Juice of 1 lime - 2 tablespoons olive oil - Salt and pepper to taste Each ingredient adds a unique flavor. Ripe mango brings sweetness. Avocados add creaminess. Red onion gives a sharp bite. Red chili adds heat, while yellow bell pepper adds crunch and color. Fresh cilantro brightens the dish, and lime juice adds tang. Olive oil ties everything together. Salt and pepper enhance all the flavors. When selecting your ingredients, pick ripe fruits. A ripe mango should yield slightly when pressed. Avocados should feel soft but not mushy. Fresh herbs should look vibrant, not wilted. These ingredients make a great salsa for any occasion. You can use this recipe as a dip or a topping for grilled meats. Check out the Full Recipe for step-by-step guidance! Let's start with the fun part: preparing our ingredients. First, you will want to dice the mango and avocados. Make sure they are ripe for the best flavor. Cut the mango into small cubes, about half an inch. For the avocados, slice them in half, remove the pit, and scoop the flesh out. Cut the flesh into equal-sized pieces. Next, it's time to chop the red onion and yellow bell pepper. Use about half of the red onion, finely chop it, and set it aside. For the yellow bell pepper, slice it open, remove the seeds, and cut it into small cubes, like the mango and avocado. Now, let's mince the red chili and chop the cilantro. If you like spice, you can keep some of the seeds from the chili. If not, make sure to remove them. Finely chop the cilantro, as it adds a fresh flavor to the salsa. Now that all your ingredients are prepped, let’s mix them together. In a large mixing bowl, combine the diced mango, avocados, red onion, yellow bell pepper, and minced chili. Be gentle to keep your avocado pieces intact. Next, we’ll prepare the dressing in a separate bowl. Whisk together the juice of one lime, two tablespoons of olive oil, and salt and pepper to taste. This dressing will bring all the flavors together. Finally, toss everything together. Drizzle the dressing over your mixed ingredients and gently fold them to combine. This will help everything blend nicely without smashing the avocado. After mixing, let the salsa rest. I recommend a resting time of about 10 minutes. This time allows the flavors to meld and creates a better taste. As you taste the salsa, you might want to adjust the seasoning. If it needs more salt or lime juice, go ahead and add it. Each bite should burst with flavor! Now, you have a fresh and flavorful mango avocado salsa ready to enjoy. For the complete recipe, check out the Full Recipe section. To make the best mango avocado salsa, you need ripe fruits. A ripe mango feels slightly soft when you press it. Look for a mango with a rich color. The skin can have green, yellow, or orange hues. Avoid any with dark spots or wrinkles. For avocados, choose ones that yield to gentle pressure. They should feel soft but not mushy. Dark green to black skin often indicates ripeness. If you find hard avocados, leave them out at room temp for a few days. Mango avocado salsa shines when served fresh. Use it as a dip with tortilla chips for a fun snack. You can also spoon it onto grilled fish or chicken. It adds a bright touch to tacos or burritos. Try it on top of a fresh salad or as a garnish for soups. Pair it with lime-infused drinks or light beers for a refreshing combo. To keep your salsa fresh, store it in an airtight container. This helps prevent browning from the avocados. You can also squeeze extra lime juice on top before sealing. This adds flavor and keeps it vibrant. Use glass containers for storage when possible. They help maintain taste and texture better than plastic. Enjoy your homemade salsa within a day or two for the best flavor. Make sure to check for freshness before eating. {{image_2}} You can change up the flavors in your mango avocado salsa. Try adding fruits like pineapple or peach. These fruits add a sweet twist. You can also mix in vegetables like corn or black beans. They give the salsa a nice crunch. For those who like heat, you can use different chilies. Swap the red chili for jalapeño for more spice. You can also try serrano peppers for a zesty kick. Adjust the amount to fit your taste. Making this salsa vegan is easy. All the ingredients are plant-based. You can add more veggies or herbs to boost flavor without adding calories. If you’re looking for gluten-free options, this recipe fits that too. Just make sure your seasonings are gluten-free. For a low-calorie version, use less olive oil. You can also skip the salt or use a salt substitute. This way, you keep the great taste while cutting down on calories. Mango avocado salsa works well in salads. Just toss it with greens for a fresh meal. You can also use it as a topping for tacos. It adds a burst of flavor to any dish. If you have leftovers, get creative! Mix it into your morning eggs or use it on a sandwich. The possibilities are endless. You can enjoy this salsa in many ways beyond just a dip. Check out the Full Recipe for more ideas! To make mango avocado salsa, you need just a few fresh ingredients. Here is what you will need: - 1 ripe mango, diced - 2 ripe avocados, diced - 1/2 red onion, finely chopped - 1 small red chili, deseeded and minced - 1 small yellow bell pepper, diced - 2 tablespoons fresh cilantro, chopped - Juice of 1 lime - 2 tablespoons olive oil - Salt and pepper to taste Now, let’s talk about how to make it. First, you combine the diced mango, avocados, red onion, yellow bell pepper, and minced chili in a mixing bowl. Next, add the freshly chopped cilantro. In a small bowl, whisk together lime juice, olive oil, salt, and pepper. Drizzle this dressing over the salsa ingredients. Gently toss everything together to mix well. Taste it and adjust the seasoning if needed. Let the salsa sit for about 10 minutes to let the flavors blend. This salsa is not only tasty but also healthy. Here are some health benefits of the key ingredients: - Mango: Packed with vitamins A and C, mango boosts your immune system. - Avocado: Full of healthy fats, avocados help your heart and keep you full. - Red onion: Rich in antioxidants, red onions can lower blood pressure. - Red chili: Contains capsaicin, which may help with weight loss. - Cilantro: This herb is known for its detoxifying properties. For serving, this recipe makes enough for four people. You can enjoy it with chips or on grilled fish. Each serving is fresh, tasty, and colorful! Yes, you can prepare mango avocado salsa ahead of time. This helps the flavors blend. To make it in advance, chop the mango and avocados. Mix them with the other ingredients, but leave out the lime juice and olive oil until serving. This keeps the salsa fresh and prevents browning. Store it in an airtight container in the fridge. Use it within two days for the best taste. Mango avocado salsa pairs well with many dishes. Try it with tortilla chips for a crunchy snack. It also works great as a topping for grilled fish or chicken. You can add it to tacos for a fresh twist. For drinks, serve it with a light beer or a refreshing mojito. The salsa's bright flavors complement these options nicely. Freezing mango avocado salsa is not ideal. The texture of avocados changes when frozen, making them mushy. If you must freeze it, do so without the avocados. You can freeze the mango, onion, chili, and bell pepper mix. Thaw it in the fridge overnight when you need it. Then, add fresh diced avocados before serving. This way, you maintain the best texture and taste. In this blog post, we explored how to make delicious mango avocado salsa. We covered the key ingredients, how to prepare them, and ways to let the flavors shine. I shared tips on selecting the best fruits and ideas for serving. You can even modify the recipe to fit your needs. Remember, fresh ingredients make the best salsa. Enjoy making this tasty dish and share it with friends. Your salsa will impress everyone with its bright flavors and texture.

Mango Avocado Salsa Fresh and Flavorful Dip Recipe

Are you ready to elevate your dip game? This Mango Avocado Salsa is fresh, vibrant, and bursting with flavor! It

- 2 cups cooked jasmine rice, preferably day-old - 1 cup fresh pineapple, diced - 1/2 cup peas - 1/2 cup carrots, diced - 1/2 bell pepper, diced (any color) - 2 green onions, chopped - 3 cloves garlic, minced - 2 tablespoons soy sauce - 1 tablespoon sesame oil - 1 tablespoon olive oil - 1 teaspoon ginger, grated - Salt and pepper to taste - Fresh cilantro for garnish - Optional: fried egg for topping Pineapple fried rice is a colorful dish. You will need some key ingredients to make it shine. Start with day-old jasmine rice. This rice is fluffy and absorbs flavors well. Fresh pineapple gives a sweet and juicy burst. Diced peas, carrots, and bell peppers add crunch and color. For additional flavor, use green onions, garlic, and ginger. Soy sauce will give it a savory taste. Sesame oil adds a nutty aroma. You can adjust salt and pepper to your liking. Garnishes are fun! Fresh cilantro adds a nice touch. If you want more protein, a fried egg on top is a great choice. Get all your ingredients ready, and you can dive into this tasty meal. For the full recipe, check out the instructions provided above. - Gather and chop all ingredients for efficiency. - Heat olive oil in a large skillet or wok over medium-high heat. - Sauté garlic and ginger for 30 seconds until fragrant. - Add diced carrots, bell pepper, and peas; stir-fry for 3-4 minutes. - Incorporate diced pineapple and cook for 2 minutes until caramelized. - Stir in day-old jasmine rice, breaking apart any clumps. - Add soy sauce and sesame oil, season with salt and pepper, and cook for another 2-3 minutes. - Finish with chopped green onions right before serving. This method brings out bright flavors in your meal. Using day-old rice keeps it from getting mushy. The sweet pineapple pairs well with savory soy sauce. By sautéing garlic and ginger first, you build a great base. This recipe is simple yet full of taste. For more details, check the Full Recipe. Enjoy your cooking! For the best texture, use day-old jasmine rice. It stays firm and does not clump. To make rice in advance, cook it a day before. Cool it, then store it in the fridge. This makes stir-frying easier. Make sure your pan is hot enough for stir-frying. A hot pan gives a nice sear to the rice and veggies. Stir-fry quickly to keep the flavors fresh. Avoid overcooking the vegetables; you want them to stay crisp and colorful. For an eye-catching look, serve the fried rice in a hollowed-out pineapple. This adds fun and flair to your meal. You can also sprinkle toasted sesame seeds for crunch or add extra cilantro for brightness. {{image_2}} Pineapple fried rice is easy to make vegetarian or vegan. Start by swapping out soy sauce for tamari. This change makes the dish gluten-free. You can also add more veggies. Try bell peppers, carrots, or snow peas for extra color and crunch. These additions boost both flavor and nutrition. Want to add protein? You have great options. Shrimp, chicken, or tofu work well. If you use shrimp, cook it for 3-4 minutes until pink. For chicken, dice it small and cook for 5-7 minutes. Tofu should be cubed and sautéed for about 5 minutes. Adjust the cooking time based on your choice of protein to ensure everything cooks evenly. If you like heat, add fresh chili peppers or chili sauce. For a milder spice, crushed red pepper flakes work great. Start with a small amount and taste as you go. This way, you can find the right level of heat for your taste buds. Spice can really bring the dish to life! To keep your Pineapple Fried Rice fresh, put it in the fridge right away. Use an airtight container to prevent it from drying out. Make sure the rice cools to room temperature before sealing the container. This keeps the flavors intact and stops bacteria from growing. When you are ready to enjoy your leftovers, you can reheat them quickly. If using a microwave, place the rice in a bowl. Add a splash of water to keep it moist. Heat in short bursts, stirring in between, until hot. For stovetop reheating, place the rice in a skillet over medium heat. Stir gently until warmed. You can also use the oven by placing it in an oven-safe dish. Cover it with foil to keep it moist while reheating. You can freeze Pineapple Fried Rice for future meals. First, let the rice cool completely. Then, portion it into freezer-safe bags or containers. Make sure to remove as much air as possible before sealing. Label with the date and freeze. When you are ready to eat, thaw it in the fridge overnight before reheating. Pineapple fried rice is a tasty dish from Asian cuisine. It blends rice with fresh pineapple, vegetables, and spices. This dish is loved for its sweet and savory flavors. It's a popular choice in Thai restaurants and homes. Yes, you can use canned pineapple. Canned pineapple is often sweeter and more convenient. However, it may be softer and less juicy than fresh pineapple. Fresh pineapple gives a bright, crisp taste. Choose based on your preference and what you have on hand. Pineapple fried rice lasts about 3 to 4 days in the fridge. Store it in an airtight container for the best quality. If it smells off or looks strange, it's best to throw it away. Absolutely! You can use any veggies you like. Try adding bell peppers, peas, or carrots. Seasonal vegetables work great, too. If you love broccoli or snap peas, toss those in. Make it your own! For the full recipe, check out the details above. Pineapple Fried Rice combines sweet and savory flavors in one dish. We explored main ingredients, cooking steps, tips, and fun variations. This dish is versatile, allowing you to mix in meats or veggies as you like. Using day-old rice ensures a great texture. Remember to use fresh ingredients for the best flavor. Whether you serve it in a pineapple or enjoy it plain, this dish is sure to please. Try it today and enjoy a delicious meal!

Pineapple Fried Rice Flavorful and Easy Meal Recipe

Craving a meal that’s both tasty and simple? Pineapple Fried Rice is your answer! This vibrant dish bursts with sweet

- 2 cans refrigerated cinnamon rolls - 4 large eggs - 1 cup milk - 1/2 cup softened cream cheese To make a great cinnamon roll casserole, you need some key items. First, grab two cans of refrigerated cinnamon rolls. These will be the base of your dish. Next, take four large eggs, which help bind everything together. For a creamy texture, use one cup of milk. Finally, include half a cup of softened cream cheese. This will add richness and flavor. - 1/4 cup maple syrup - 1 tablespoon vanilla extract - 1 teaspoon ground cinnamon - 1/2 cup chopped pecans or walnuts Now, let’s add some fun flavors. You can include a quarter cup of maple syrup for sweetness. One tablespoon of vanilla extract will give it a nice depth. Add a teaspoon of ground cinnamon to boost that warm flavor we love. If you want some crunch, toss in half a cup of chopped pecans or walnuts. These optional ingredients make your casserole even better. - Icing from the cinnamon rolls - Optional: powdered sugar for garnishing Lastly, don’t forget the icing! Use the icing that comes with the cinnamon rolls. Drizzle this on top when your casserole is warm. If you want to make it even prettier, you can sprinkle some powdered sugar for garnish. It adds a nice touch and makes your dish look fancy. For the full recipe, check out the details above. - Preheat your oven to 350°F (175°C) and grease a 9x13-inch baking dish. - Open the cans of cinnamon rolls and cut each roll into quarters. Place them evenly in the greased baking dish. - In a large bowl, whisk together 4 eggs, 1 cup milk, 1/2 cup softened cream cheese, 1/4 cup maple syrup, 1 tablespoon vanilla extract, and 1 teaspoon ground cinnamon until smooth. - Pour this egg mixture over the cut cinnamon roll pieces. Make sure all the pieces soak up the mixture. - Bake in the preheated oven for 25-30 minutes. The casserole should puff up and turn golden brown. - To check for doneness, insert a toothpick into the center. If it comes out clean, your casserole is ready! This simple yet delightful recipe will surely be a hit at breakfast. For the full details, you can check out the [Full Recipe]. To make your casserole great, ensure that the egg mixture covers all the cinnamon roll pieces. This helps each bite stay moist and flavorful. After baking, let the casserole cool for a few minutes. This allows the icing to stick better and not run off. For a beautiful finish, sprinkle some powdered sugar on top or add fresh berries. These not only add color but also a burst of flavor. Pair your casserole with a hot cup of coffee or tea. This creates a cozy breakfast that warms you up. If you want to elevate the dish, think about adding fruits like bananas or apples to the mix. They bring extra sweetness and texture. You can also mix in spices like nutmeg to add warmth and depth to the flavors. These small changes can make your cinnamon roll casserole a true delight. {{image_2}} You can change the flavor of your cinnamon roll casserole with simple tweaks. For a rich twist, add chocolate chips. They melt and blend nicely, making each bite a delight. You can also try different flavored cinnamon rolls. Caramel rolls add a sweet touch that many love. Experimenting with flavors makes this dish fun and unique. If you want a vegan option, substitute the eggs with flaxseed meal. Mix one tablespoon of flaxseed meal with three tablespoons of water to replace one egg. This works well and keeps the casserole tasty. For a dairy-free version, use almond milk or coconut cream. Both options will keep the dish creamy without dairy. You can make this casserole fit the seasons. In fall, add pumpkin puree for a warm, spiced flavor. It gives the dish a festive feel. For the holidays, add peppermint extract. This small change adds a refreshing twist that many enjoy during winter. To keep your cinnamon roll casserole fresh, store it in an airtight container in the refrigerator. This helps prevent it from drying out. When you want to enjoy it again, you can reheat it in the oven or microwave. The oven gives the best results, making it warm and fluffy again. If you have extra casserole, you can freeze it. First, let it cool completely. Then, cut it into portions and wrap each piece tightly in plastic wrap. Place the wrapped pieces in a freezer-safe bag or container. For thawing, move the casserole to the fridge overnight before reheating. This method keeps it tasty and fresh. In the refrigerator, your cinnamon roll casserole lasts about 3 to 4 days. If you notice any mold or a sour smell, it’s best to throw it away. Always trust your senses; they guide you well in the kitchen! Yes, you can prep this dish the night before. Start by cutting the cinnamon rolls into quarters. Place them in the greased baking dish. Then, mix the egg mixture in a bowl. Cover both the rolls and the mixture. Store them in the fridge overnight. In the morning, pour the egg mix over the rolls. Bake as usual. This method saves time and makes breakfast easy. This casserole pairs well with many sides. You might enjoy fresh fruit like berries or bananas. A side of crispy bacon or sausage adds a savory touch. For drinks, serve it with hot coffee or tea. A glass of fresh orange juice also works great. These options make your breakfast complete and satisfying. To keep the casserole from getting soggy, balance the egg mixture. Do not use too much milk. Make sure the rolls soak up the mixture without drowning. Bake it for the right time. Check doneness with a toothpick. If it comes out clean, your casserole is ready. This helps you achieve a fluffy texture. In this article, we explored how to make a delicious cinnamon roll casserole. You learned about key ingredients, preparation steps, and tips for perfecting this dish. Remember to keep an eye on baking time to avoid sogginess. Experiment with flavors and toppings to make it your own. You can store leftovers easily and even make it ahead. Enjoy sharing this warm, comforting dish at breakfast or brunch. Your guests will love it!

Cinnamon Roll Casserole Tasty Breakfast Delight

Are you craving a warm, sweet breakfast that’s easy to make? Meet the Cinnamon Roll Casserole! This tasty dish combines

- Tofu details: Use firm tofu for a nice texture. It holds its shape well when cooked. You can find it in most grocery stores. Tofu is packed with protein and absorbs flavors well. - Key vegetables to include: Choose colorful and crunchy vegetables. I suggest: - 1 red bell pepper, sliced - 1 cup broccoli florets - 1 cup snap peas - 1 carrot, thinly sliced - 1 cup bok choy, chopped These veggies not only add nutrients but also make the dish vibrant. - Sauce ingredients for flavor enhancement: The sauce makes this dish sing! You will need: - 3 tablespoons soy sauce (low sodium) - 1 tablespoon hoisin sauce - 1 tablespoon rice vinegar This mix adds a sweet and salty flavor that pairs perfectly with the tofu and veggies. For the full recipe, check out the details above. Tofu is the star of this dish. First, you need to press the tofu. This step removes excess water. Water can make your stir-fry soggy. After pressing, cut the tofu into cubes. Aim for bite-sized pieces. Next, coat the tofu with cornstarch. This adds a nice crunch when you fry it. Place the cubes in a bowl and sprinkle cornstarch over them. Toss gently until each piece is covered. Heat sesame oil in a large skillet or wok. Use medium-high heat for best results. When the oil is hot, add the tofu cubes. Fry them until golden brown on all sides. This usually takes about 8 to 10 minutes. Once done, remove the tofu and set it aside. Now, add more sesame oil to the same skillet. Sauté minced garlic and grated ginger for about 30 seconds. This step fills your kitchen with a great aroma. Then, add your sliced bell pepper, broccoli, snap peas, and carrot. Stir-fry these veggies for 4 to 5 minutes. You want them to stay crisp and colorful. After that, toss in the chopped bok choy. Stir-fry for an extra 2 minutes until it wilts. In a small bowl, mix soy sauce, hoisin sauce, and rice vinegar. Pour this sauce over the stir-fried veggies and tofu. Toss everything well to coat. Stir-fry for another minute to heat all ingredients through. Remove the stir-fry from heat. Garnish with chopped green onions and sesame seeds. Enjoy your vibrant Vegetable Stir-Fry with Tofu. For the complete recipe, check the Full Recipe section. - Ideal cooking temperatures: Heat is key for a great stir-fry. Use medium-high heat. This helps the tofu and veggies cook fast, keeping them crisp. You want a sizzle when food hits the pan. - Preventing sogginess in vegetables: To keep your veggies crunchy, don’t overcrowd the pan. Cook in batches if needed. Stir-fry quickly, just until tender. This keeps the bright colors and nutrients. - Recommendations for accompaniments: Serve your stir-fry with steamed jasmine rice or fluffy quinoa. These pair well and soak up the flavors. You can also add a side of spring rolls for extra crunch. - Presentation ideas for a vibrant dish: Make your dish pop! Use colorful bowls to showcase the bright veggies. Garnish with green onions and sesame seeds. A sprinkle of lime juice can add a fresh touch. For a fun twist, serve with chopsticks for an authentic feel. Check out the Full Recipe for more details on making this delightful meal. {{image_2}} You can make your vegetable stir-fry unique by changing the veggies. Try using: - Zucchini - Cauliflower - Mushrooms - Spinach - Bell peppers of different colors Each vegetable adds its flavor and texture. Mix and match to find your favorite combo. If you want to swap the protein, consider options besides tofu. Some great choices are: - Tempeh - Seitan - Chickpeas - Edamame These alternatives bring their own taste and nutrition to the dish. The sauce you use can change your stir-fry's taste. Experiment with different sauces such as: - Teriyaki sauce - Sweet chili sauce - Peanut sauce Each sauce gives a new twist and flavor to the meal. You can also add spices for extra heat. Here are some options: - Red pepper flakes - Sriracha - Fresh chili peppers Adding just a pinch can bring a delightful kick to your dish. For the full recipe, check out the Vibrant Vegetable Stir-Fry with Tofu. After enjoying your vegetable stir-fry with tofu, store any leftovers in the fridge. Use an airtight container to keep them fresh. This method helps prevent moisture loss and keeps flavors intact. Consume the leftovers within three days for best taste. If you want to save your stir-fry for later, consider freezing it. Place the cooled stir-fry in a freezer-safe bag. Remove as much air as possible before sealing. This tip helps avoid freezer burn. The stir-fry can last up to three months in the freezer. When it’s time to enjoy your leftovers, reheat them for the best texture. The microwave works well for quick reheating. Place the stir-fry in a bowl and cover it with a damp paper towel. Heat for about two minutes, stirring halfway through. For a better texture, use a skillet. Heat a small amount of oil over medium heat. Add the stir-fry and cook for about five minutes, stirring often. This method keeps the veggies crisp and the tofu nice. Enjoy this flavorful meal again! You can find the full recipe for this dish earlier in the article. Can I make this dish ahead of time? Yes, you can prepare this dish ahead. Cook the stir-fry and store it in the fridge. It stays fresh for about three days. Reheat it on the stove or microwave when ready to eat. What can I substitute for tofu? If you want to skip tofu, try tempeh or seitan. You can also use chickpeas or beans for protein. These options add different textures and flavors. Is this recipe suitable for meal prep? Absolutely! This stir-fry works great for meal prep. Portion it into containers with rice or quinoa. It makes a quick and healthy lunch or dinner during the week. How do I make it gluten-free? To make this stir-fry gluten-free, use tamari instead of soy sauce. Check your hoisin sauce for gluten-free options. Most veggies and tofu are naturally gluten-free, so you’re good to go! For the complete recipe, check out the Full Recipe section. In this blog post, we explored how to make a tasty vegetable stir-fry with tofu. You learned about essential ingredients, step-by-step cooking methods, and expert tips for the best results. Stir-frying lets you mix and match flavors and textures. Whether you want to tweak the recipe or store leftovers, we covered it all. Remember, cooking is all about experimenting. Enjoy making your dish colorful and packed with flavor! Now, get cooking and delight in every bite!

Vegetable Stir-Fry with Tofu Flavorful and Simple Meal

Looking for a healthy and tasty meal that’s quick and easy? You’ve just found it! This Vegetable Stir-Fry with Tofu

To make a delicious savory sweet potato hash, you need just a few fresh ingredients. Each one plays a key role in the flavor and texture of the dish. Here’s what you’ll need: - 2 large sweet potatoes, peeled and diced - 1 small red onion, diced - 1 bell pepper (any color), diced - 1 cup kale, stemmed and chopped - 2 cloves garlic, minced - 1 teaspoon smoked paprika - 1 teaspoon ground cumin - Salt and pepper to taste - 3 tablespoons olive oil - 4 large eggs - Fresh parsley, chopped (for garnish) These ingredients come together to create a delightful meal. The sweet potatoes provide a creamy base, while the vegetables add crunch and color. The spices bring warmth and depth to each bite. Feel free to experiment with the vegetables. You can use zucchini or spinach instead of kale. The spices can also change based on your taste. For the full recipe, check out the detailed instructions included above. Enjoy cooking this vibrant dish! Cooking the Sweet Potatoes Start by heating olive oil in a large skillet over medium heat. Add the diced sweet potatoes, and sprinkle them with salt, pepper, smoked paprika, and ground cumin. Cook for about 10 to 15 minutes. Stir them often until they turn tender and golden. This step builds a great base of flavor. Sautéing the Vegetables Next, toss in the diced red onion and bell pepper. Sauté these for about 5 minutes. You want them to soften slightly but still have some crunch. The sweet onion flavor blends well with the sweet potatoes, making the dish pop. Adding Greens and Garlic Now, stir in the chopped kale and minced garlic. Cook for an additional 3 to 4 minutes. The kale will wilt down, and the garlic will release its aroma. This mix adds freshness and depth to your hash. Frying Instructions Use a separate pan to fry the eggs. You can go for sunny-side up or over-easy. Both styles work well with the hash. Just make sure the yolks stay runny for that perfect bite. Tips for Perfect Eggs To achieve the best fried eggs, use low to medium heat. This keeps the whites from burning while the yolk cooks just right. You can cover the pan to help the whites set without overcooking the yolk. Plating the Dish Once the hash is ready, serve it on plates. Place the fried egg on top of each serving. The egg adds richness, making this dish even more satisfying. Garnishing Finish with a sprinkle of fresh parsley. This adds a pop of color and a fresh taste. The garnish makes the dish look beautiful and inviting. For the full recipe, check the details above. Enjoy your tasty breakfast! Achieving Perfectly Tender Sweet Potatoes To cook sweet potatoes just right, cut them into small, even pieces. This helps them cook faster and more evenly. I recommend boiling them for about 5-7 minutes before frying. This softens them up and gives you that perfect texture. Don't forget to drain them well. Flavor Enhancements Spices can change everything! For a richer taste, add smoked paprika and cumin. These spices give a warm, earthy flavor. You can also try adding a pinch of cayenne for a little heat. Fresh herbs like parsley can brighten the dish. Just sprinkle on top before serving. Preparing Ingredients in Advance Chop your sweet potatoes, onion, and bell pepper the night before. Store them in airtight containers. This saves time in the morning. You can also wash and chop your kale ahead of time. It makes cooking easier and faster. Storing Leftovers Cool any leftover hash before storing it. Place it in a sealed container in the fridge. It will stay fresh for up to three days. You can also freeze it for up to a month. Just remember to thaw it in the fridge overnight before reheating. For the full recipe, check [Full Recipe]. {{image_2}} Adding Different Vegetables You can switch up the vegetables in this hash. Instead of bell peppers, try zucchini or mushrooms. Spinach works great too. Each veggie adds unique taste and texture. Broccoli or diced carrots can also fit well. Get creative with what you have! Protein Additions For a heartier meal, add protein. Cooked sausage or bacon gives a salty kick. If you want a meat-free option, try black beans or chickpeas. These proteins boost nutrition and keep you full longer. You can even scramble in some tofu for a vegan twist. Spice Alternatives While smoked paprika and cumin are classics, feel free to experiment. Try chili powder for heat or turmeric for earthiness. Adding fresh herbs like thyme or rosemary can also enhance the flavor. Don’t be afraid to adjust based on your taste. Dressing Options Drizzle some hot sauce on top for a spicy touch. A squeeze of lemon brightens the dish and adds zest. You can also use a balsamic glaze for a sweet contrast. These dressings bring new life to your sweet potato hash and keep each bite exciting. Refrigerator Storage You can keep your savory sweet potato hash in the fridge. Transfer it to an airtight container. Make sure the hash cools down first. It stays fresh for about 3 to 5 days. When you’re ready to eat, just take out what you want. Freezing the Hash If you want to save it for later, freezing is a great option. Portion the hash into freezer-safe bags. Squeeze out the air to avoid freezer burn. Label the bags with the date. You can freeze it for up to 3 months. Thaw it in the fridge overnight before reheating. Best Practices for Microwaving When reheating in the microwave, place the hash in a microwave-safe dish. Cover it with a lid or a damp paper towel. Heat it in 30-second intervals, stirring in between. This helps the hash heat evenly. Stovetop Reheating Tips For stovetop reheating, heat a bit of olive oil in a skillet. Add the hash and stir occasionally. Cook it on medium heat until it’s hot throughout. This method keeps the texture nice and adds flavor from the oil. How do I make vegan sweet potato hash? To make vegan sweet potato hash, skip the eggs. Use the same ingredients from the Full Recipe. You can add more veggies, like mushrooms or zucchini. For protein, consider black beans or chickpeas. Can I use regular potatoes instead? Yes, you can use regular potatoes, like russet or Yukon gold. They will cook similarly. Just remember, sweet potatoes have a sweeter flavor. You might want to adjust your seasonings to balance it out. What other seasonings can enhance the flavor? You can try adding chili powder or oregano for more depth. Fresh herbs like thyme or rosemary also work well. A splash of hot sauce can kick things up a notch, too. How long can leftovers be stored? Leftovers can be stored in the fridge for up to four days. Ensure they are in an airtight container. This keeps them fresh and safe to eat later. What's the best way to reheat sweet potato hash? The stovetop is best for reheating. Just add a little olive oil in a skillet. Heat it over medium until warm. This method keeps the hash crispy and tasty. Can I prepare this dish ahead of time? Yes, you can prepare the sweet potato hash a day ahead. Cook it as directed, then cool it. Store in the fridge and reheat before serving. This makes busy mornings easier! In this post, I shared the key ingredients for sweet potato hash, including sweet potatoes, vegetables, and seasonings. I provided step-by-step cooking instructions, tips for perfect eggs, and ways to enhance flavors. You can adapt the recipe with various ingredients or flavors to suit your taste. Remember to store leftovers properly and follow reheating tips. With these insights, you can create a delicious dish that fits your style. Enjoy cooking and exploring all the tasty variations!

Savory Sweet Potato Hash Flavorful Breakfast Delight

Are you ready to elevate your breakfast game? My Savory Sweet Potato Hash is the perfect mix of flavors and

- 1 pound shrimp, peeled and deveined - 2 tablespoons olive oil - 2 teaspoons chili powder - 1 teaspoon cumin - 1 teaspoon garlic powder - 1/2 teaspoon cayenne pepper (adjust to taste) - Salt and pepper to taste - 1 ripe mango, diced - 1/2 red onion, finely chopped - 1 red bell pepper, diced - 1 jalapeño, deseeded and minced (adjust for spice level) - 2 tablespoons cilantro, chopped - Juice of 1 lime - Salt and pepper to taste - 8 small corn tortillas - 1 cup shredded red cabbage - 1 avocado, sliced The ingredients for Spicy Shrimp Tacos are simple yet flavorful. You need fresh shrimp and spices for the shrimp, and ripe mango for the salsa. The corn tortillas are perfect for holding all the goodness inside. When you mix these ingredients, you create a dish full of flavor and texture. I love using fresh mango in the salsa. It adds sweetness that balances the spice of the shrimp. The crunch of the cabbage and creaminess of the avocado make each bite exciting. This recipe is great for a fun dinner or casual get-together. For the full recipe, check out the complete guide to making Spicy Shrimp Tacos with Mango Salsa. To start, grab a medium bowl. Combine diced mango, red onion, red bell pepper, jalapeño, and cilantro. These fresh ingredients give the salsa a bright flavor. Next, add lime juice and season with salt and pepper. Mix everything well. Let the salsa chill in the refrigerator while you prepare the shrimp. This helps the flavors blend together nicely. In a large bowl, toss the shrimp with olive oil. Then add chili powder, cumin, garlic powder, cayenne pepper, salt, and pepper. Make sure each shrimp gets coated well with the spices. This step is key for flavor, so don't rush it! Heat a large skillet over medium-high heat. Once hot, add the seasoned shrimp. Cook for 2-3 minutes on each side. Look for the shrimp to turn pink and opaque. This means they are cooked just right. Avoid overcooking, as shrimp can become tough. While the shrimp cooks, warm the corn tortillas. You can do this in the same skillet or use a separate griddle. Heat each tortilla for about 30 seconds on each side. You want them pliable and lightly toasted for the best texture. Now it's time to build your tacos! On each warm tortilla, layer the cooked shrimp, shredded cabbage, and avocado. The cabbage adds crunch, while the avocado gives creaminess. Finally, top each taco with a generous spoonful of mango salsa. This is where the magic happens! Serve your tacos right away. Add lime wedges on the side for an extra burst of flavor. The fresh lime juice will enhance every bite. For the full recipe, check the details provided earlier. Enjoy your delicious creation! Choose fresh or frozen shrimp. I prefer peeled and deveined shrimp for ease. This saves time and effort. Always check for a firm texture and a clean smell. This ensures you get the best taste possible. If you find shrimp on sale, stock up! You can freeze them for later use. You control the heat in your tacos! If you want less spice, reduce the cayenne and jalapeño. Start with a small amount and taste as you go. You can always add more if you want a kick. Remember, everyone has different spice preferences. Find what works for you and your guests. To cook shrimp perfectly, watch them closely. Heat your skillet to medium-high. Cook shrimp for only 2-3 minutes per side. They should be pink and opaque when done. Overcooking makes shrimp tough and rubbery. If they curl tightly, they might be overcooked. Always aim for that tender, juicy bite. For the Full Recipe, check the earlier section. {{image_2}} You can swap shrimp for chicken, tofu, or fish. Each option brings its own flavor. Chicken offers a hearty bite. Tofu is great for a plant-based choice. Fish adds a fresh taste. Adjust the cooking time for each protein. This lets you enjoy different meals while keeping the same tasty taco style. Get creative with your salsa! Try using pineapple or peach instead of mango. Pineapple brings a sweet and tangy zing. Peach adds a juicy, soft texture. Mix in some jalapeño for heat. These unique salsas make the tacos even more exciting. Don't be afraid to experiment with your favorite fruits! Make your tacos look great on the table. Serve them on a big platter. Add lime wedges and fresh herbs for color. This makes the dish pop and invites everyone to dig in. A nice presentation adds to the fun of your taco night. Enjoy every bite! Store your cooked shrimp and mango salsa separately. Use airtight containers to keep them fresh. This way, the shrimp stays juicy and the salsa keeps its bright flavor. In the fridge, they will last for about three days. To reheat the shrimp, use a skillet. Warm it over medium heat. Cook the shrimp until it is heated through. This keeps it tender and tasty. Avoid using the microwave as it can make the shrimp rubbery. For your tortillas, keep them wrapped in foil. You can also use a tortilla warmer. This helps them stay soft and fresh. If you plan to eat them later, avoid stacking them. Yes, prepare salsa up to 24 hours ahead for better flavor. Making it early lets the ingredients blend well. Store it in the fridge to keep it fresh and tasty. Use kitchen scissors or a knife to remove the shell and veins for easy preparation. Start by cutting along the back to expose the vein. Then, pull off the shell and rinse the shrimp. Yes, use corn tortillas which are naturally gluten-free. This makes the dish safe for those with gluten allergies. Always check the package to ensure there are no added ingredients. Use less oil and add more veggies to increase nutritional value. You can toss in extra bell peppers or a side salad. This adds fiber and vitamins without losing flavor. Cooked shrimp can be frozen, but fresh salsa is best enjoyed fresh. If you freeze shrimp, place it in an airtight bag. For salsa, enjoy it right after making for the best taste. You learned how to make spicy shrimp tacos and mango salsa. Fresh shrimp and bright flavors make these tacos a hit. Feel free to adjust the spice levels to match your taste. You can also switch proteins or try new salsas for fun variations. Don't forget about proper storage and reheating tips to enjoy leftovers later. Dive into these tasty tacos, and enjoy every bite!

Spicy Shrimp Tacos with Mango Salsa Delight

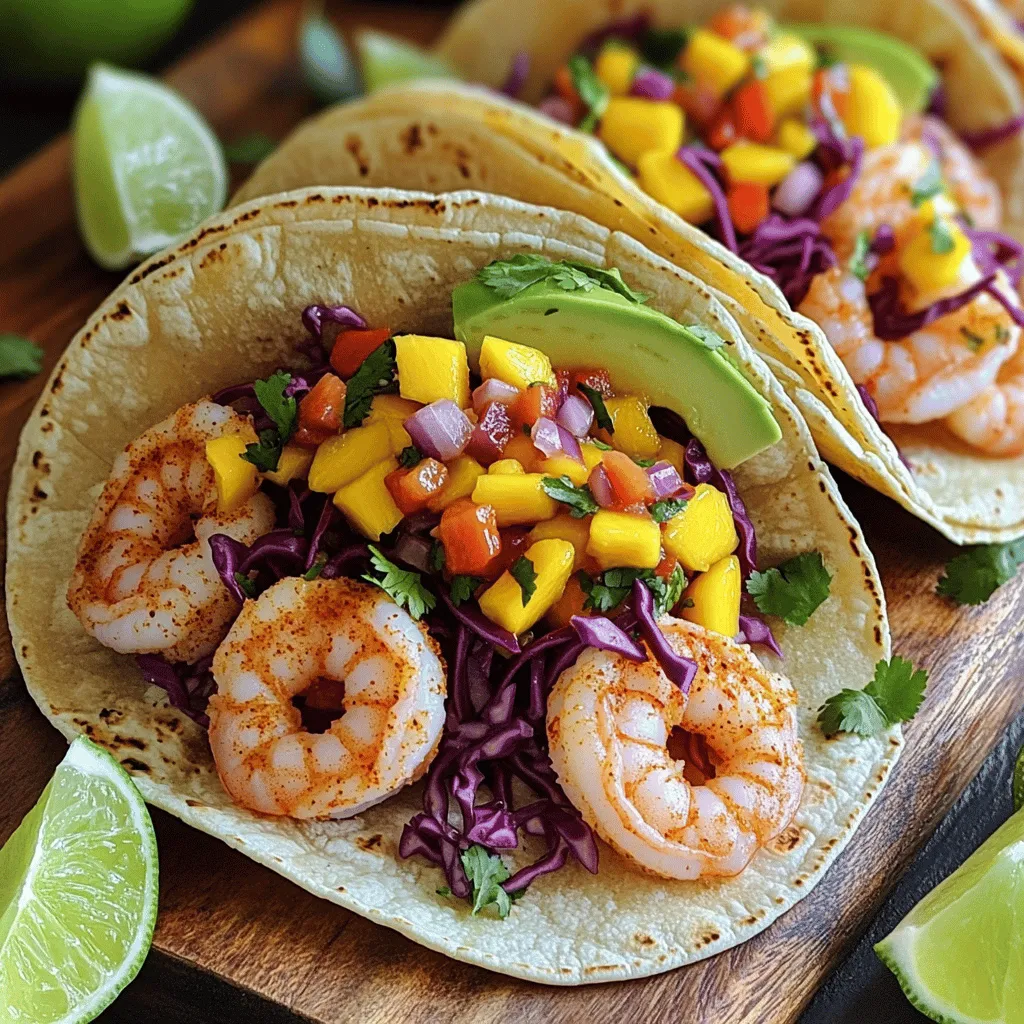
Are you ready to spice up your taco night? In this post, I’ll show you how to make Spicy Shrimp

Older posts
Newer posts
← Previous Page1 … Page37 Page38 Page39 … Page65 Next →

dsad

© 2025 Foodish Talk • Built with GeneratePress

Our Policies

  • Copyright Policy
  • Cookie Policy
  • GDPR Policy
  • Privacy Policy
  • Disclaimer
  • Terms Of Use

More Information

  • Home
  • About
  • Contact
  • Appetizers
  • Dessert
  • Dinner
  • Drinks
©2025, Foodish Talk About Back To Top