Skip to content
DisclaimerTerms Of UseGDPR PolicyCookie Policy

Foodish Talk

  • Home
  • Drinks
  • Appetizers
  • Dinner
  • Dessert
  • About
  • Contact
  • Privacy Policy
DisclaimerTerms Of UseGDPR PolicyCookie Policy

Ava

- 1 pound ground beef - 2 large potatoes, peeled and cubed - 1 small onion, finely chopped - 2 cloves garlic, minced - 1 teaspoon Worcestershire sauce - 1 teaspoon smoked paprika - 1/2 teaspoon salt - 1/2 teaspoon black pepper - 1 tablespoon fresh parsley, chopped - 1/2 cup breadcrumbs - 1 large egg - Vegetable oil for frying - Mixing bowls - Skillet for frying - Potato masher I love using these simple ingredients to create crispy beef and potato cakes. The ground beef gives a rich flavor, while the potatoes add a creamy texture. The onion and garlic bring warmth and depth to the dish. For seasonings, Worcestershire sauce adds a savory kick, and smoked paprika gives a hint of smokiness. Fresh parsley brightens up the cakes, and breadcrumbs help achieve that perfect crunch. You will need some basic kitchen tools like mixing bowls, a skillet, and a potato masher to make this dish. To find the full recipe, check out the details above and get cooking! 1. Start by boiling the cubed potatoes in salted water. Cook them until they are tender, which takes about 15-20 minutes. 2. Once cooked, drain the potatoes. Let them cool for a few minutes. 3. In a large bowl, mash the potatoes until they are smooth. This will be the base for your cakes. 1. In a skillet, heat some vegetable oil over medium heat. 2. Add the finely chopped onion and minced garlic. Sauté until the onion is soft and clear, which takes about 3-4 minutes. 3. Next, add the ground beef to the skillet. Break it apart with a spatula. Cook it until it turns brown, about 5-7 minutes. 4. Drain any fat from the beef. Stir in Worcestershire sauce, smoked paprika, salt, and black pepper. Remove from heat and let it cool a bit. 1. In your bowl with mashed potatoes, combine the beef mixture. 2. Stir in the fresh parsley. Mix everything well until it's evenly combined. 3. Now, form the mixture into small patties, about 2-3 inches wide. 4. In a shallow dish, whisk the egg. In another dish, place the breadcrumbs. 5. Dip each patty first in the egg, then coat it in breadcrumbs. 6. Heat vegetable oil in a skillet over medium heat. Fry the patties in batches for about 4-5 minutes on each side. They should turn golden brown and crispy. 7. When done, place the cakes on a paper towel-lined plate to soak up any extra oil. This recipe is a fun and tasty way to enjoy a family dinner. For the full details, check out the Full Recipe. To get that perfect crispy texture, oil temperature is key. Start by heating the oil over medium heat. You want it hot, but not smoking. Test the oil by dropping in a small piece of your mixture. If it sizzles right away, it's ready. Fry patties in batches to avoid crowding the pan. This helps them cook evenly and stay crispy. Want to add a twist? Try different spices and herbs. A pinch of cumin gives warmth. Fresh thyme or rosemary can add depth. For some heat, add a bit of cayenne pepper. Mix and match until you find your favorite blend. This not only enhances the taste but also makes your cakes unique. You can prep these cakes in advance. Form the patties and place them on a tray. Cover them and chill in the fridge for up to a day. If you want to store them longer, freeze the uncooked patties. Just layer them with parchment paper and keep them in a sealed bag. They can last for up to three months in the freezer. When you’re ready, fry them straight from frozen. Just add a minute or two to the cooking time. This makes dinner easy and quick! {{image_2}} You can swap ground beef for ground turkey or chicken. This change keeps the dish light. Ground turkey has a milder flavor, while chicken adds a nice touch. Use the same amount as the beef. Just follow the cooking steps as normal. You will still get delicious crispy cakes. If you want a veggie-friendly dish, use lentils or beans. Start with one can of drained beans or one cup of cooked lentils. Mash them well to mix with the potatoes. This option keeps the cakes filling and tasty, without any meat. You can add spices to boost the flavor too. Get creative by adding cheese or veggies to your mixture. For cheese lovers, mix in shredded cheese like cheddar or mozzarella. This adds creaminess and flavor. You can also toss in chopped veggies like bell peppers or spinach. These additions make your cakes even more colorful and fun to eat. The result is a unique twist on the classic recipe. For more ideas, check the Full Recipe. To store leftover crispy beef and potato cakes, let them cool first. Place them in an airtight container. They will stay fresh in the fridge for up to three days. When ready to eat, take them out and reheat. You can freeze these cakes for longer storage. First, let them cool completely. Then, lay them on a baking sheet. Freeze them for about one hour. Once frozen, place them in a freezer bag or container. They can last up to three months. To reheat, thaw them in the fridge overnight before cooking. To keep your cakes crispy, use a skillet to reheat. Heat a little oil over medium heat. Place the cakes in the skillet and cook for about three minutes on each side. This method keeps them nice and crunchy. You can also use an oven. Preheat it to 350°F (175°C), and bake the cakes for about 10-15 minutes. This will warm them evenly while maintaining their texture. For the full recipe, check the section above. To make these cakes ahead of time, you can follow a few simple steps. First, prepare the beef and potato mixture as directed in the full recipe. Once you form the patties, place them on a baking sheet lined with parchment paper. Cover them with plastic wrap and store in the fridge for up to 24 hours. If you want to keep them longer, you can freeze the patties. Just make sure to separate them with parchment paper to avoid sticking. When ready to cook, thaw them in the fridge overnight and fry or bake as usual. These crispy cakes taste great with a variety of dipping sauces. Here are some tasty options: - Sour cream or Greek yogurt - Spicy ketchup or sriracha - Creamy ranch dressing - Sweet chili sauce - Homemade garlic aioli These sauces add extra flavor and make the meal even more fun! Yes, you can bake these cakes for a healthier option! Preheat your oven to 400°F (200°C). Place the formed patties on a baking sheet lined with parchment paper. Brush each patty lightly with vegetable oil. Bake for about 20-25 minutes, flipping halfway through, until they are golden brown and crispy. This method reduces oil while still keeping the cakes tasty! We covered a lot about making Crispy Beef and Potato Cakes. You learned about the main ingredients, from ground beef to potatoes and spices. I provided simple steps for cooking, mixing, and shaping the patties. Tips helped you achieve perfect crispiness and enhance flavors. In the end, these cakes are versatile and easy to prep. You can store, freeze, or even bake them. Enjoy this dish and make it your own. Your cooking journey is just getting started!

Crispy Beef & Potato Cakes Easy Family Dinner Recipe

Looking for a simple and tasty dinner that your whole family will love? These Crispy Beef & Potato Cakes are

To make Taco Pasta Salad, you will need some tasty ingredients. Here's what you will need: - 8 oz elbow macaroni or rotini pasta - 1 lb ground turkey or beef - 1 packet taco seasoning - 1 cup cherry tomatoes, halved - 1 cup black beans, drained and rinsed - 1 cup corn (fresh, frozen, or canned) - 1 cup shredded cheddar cheese - 1/2 cup red bell pepper, diced - 1/4 cup red onion, finely chopped - 1/4 cup cilantro, chopped - 1 cup ranch dressing - 1 tablespoon lime juice - Salt and pepper to taste Gather all these ingredients before you start cooking. This way, you will stay organized and enjoy the process. Each item adds a unique flavor and texture, making this salad a hit. The ground turkey or beef gives it a hearty base. The beans and corn add protein and sweetness. Fresh veggies like cherry tomatoes and bell peppers provide crunch. The ranch dressing and lime juice bring everything together. For the full recipe, check the instructions to see how to mix these ingredients perfectly. Enjoy! To make your Taco Pasta Salad, start by cooking the pasta. Use elbow macaroni or rotini pasta. Bring a pot of salted water to a boil. Add the pasta and cook until al dente. This means the pasta should be firm to the bite. Check the package for exact timing; it usually takes about 8-10 minutes. Once cooked, drain the pasta in a colander. Rinse it under cold water to stop the cooking process. This helps keep the pasta from getting mushy in your salad. Set the pasta aside to cool. Next, it's time to prepare the meat. You can use ground turkey or beef. Heat a large skillet over medium heat. Add the ground meat to the hot skillet. Break it apart with a spatula as it cooks. Cook until it is no longer pink, which takes about 5-7 minutes. If there is excess fat, drain it off. Now, add the taco seasoning to the skillet. Pour in half a cup of water and stir well. Let it simmer for about 5 minutes until the sauce thickens. Remove the skillet from heat and let the meat cool slightly. Now that the pasta and meat are ready, it's time to combine everything. In a large mixing bowl, add the cooled pasta. Then, mix in the cooked meat mixture. Next, add in the cherry tomatoes, black beans, corn, shredded cheddar cheese, diced red bell pepper, and red onion. This is where you get all the vibrant colors and flavors. In a small bowl, whisk together the ranch dressing and lime juice. Pour this dressing over the salad mixture. Toss everything gently to coat. Finally, add the chopped cilantro and season with salt and pepper to taste. Toss again and cover the bowl. Refrigerate for at least 30 minutes before serving. This lets the flavors blend nicely. For the full recipe, check the details above. You can easily make this dish fit your needs. Here are some ideas: - Substitutions for dietary restrictions: If you want a gluten-free option, use gluten-free pasta. For a lighter meal, swap ground turkey for chicken or use beans for protein. You can also replace ranch dressing with a dairy-free version. - Suggested toppings and garnishes: Add sliced avocado for creaminess. Fresh jalapeños bring heat. Try crushed tortilla chips for crunch. A dollop of sour cream adds richness. Letting the salad chill is key. It helps all the flavors blend well. Aim for at least 30 minutes in the fridge. This waiting time makes a big difference. Balancing flavors is also important. Use salt to enhance taste. A splash of lime juice adds brightness and freshness. Adjust these to your liking for the best flavor. For the full recipe, be sure to check out Taco Pasta Salad 🥗. {{image_2}} You can easily make this dish meat-free. Swap ground meat for plant-based options like lentils or veggie crumbles. These choices add great texture and flavor. For dressing, use vegan ranch dressing instead of regular ranch. It keeps the salad creamy and delicious without animal products. You can play with flavors to make your Taco Pasta Salad unique. Adding spices like cumin or chili powder boosts the taste. Fresh herbs, like cilantro or parsley, add brightness. You can also try alternative dressings. Instead of ranch, use salsa or a zesty vinaigrette. Each choice gives a new twist to the salad. To keep your taco pasta salad fresh, use airtight containers. These will keep air out and help preserve the flavors. Make sure to let the salad cool before sealing it up. This prevents condensation, which can make your salad soggy. Store the salad in the fridge, away from strong-smelling foods. This keeps it tasty and fresh. When stored in the fridge, taco pasta salad can last about 3 to 4 days. Always check for signs of spoilage before eating. Look for changes in color or texture. If the salad smells bad or has mold, it’s best to throw it away. Enjoy the full recipe while it’s fresh for the best taste! Yes, you can make Taco Pasta Salad ahead of time. I recommend chilling it for at least 30 minutes. This helps the flavors blend well. If you want to prep it earlier, you can chill it for several hours or even overnight. Just remember to give it a good stir before serving. For Taco Pasta Salad, I like to use elbow macaroni or rotini. Both shapes hold the dressing and mix well with other ingredients. Elbow macaroni is classic and gives a nice bite. Rotini has grooves that help grab the sauce. You can also try penne or shell pasta for a fun twist. Each shape offers a different texture. Yes, you can change the dressing. If you want a different taste, try a zesty chipotle ranch or a creamy avocado dressing. For a lighter option, a squeeze of lime and a drizzle of olive oil work well too. If you enjoy making your own dressings, mix Greek yogurt with taco seasoning for a tasty homemade sauce. You can also blend sour cream with lime juice and herbs for a fresh flavor. This blog post covered how to make a tasty Taco Pasta Salad. You learned about the ingredients, cooking steps, and tips to ensure great flavor. Remember, you can customize it to fit your taste. Feel free to make swaps for dietary needs or explore different dressings. Storing leftovers properly is key for freshness. With this recipe, impress your friends at your next gathering! Enjoy your delicious creation and share it with others!

Taco Pasta Salad Flavorful and Fresh Meal Idea

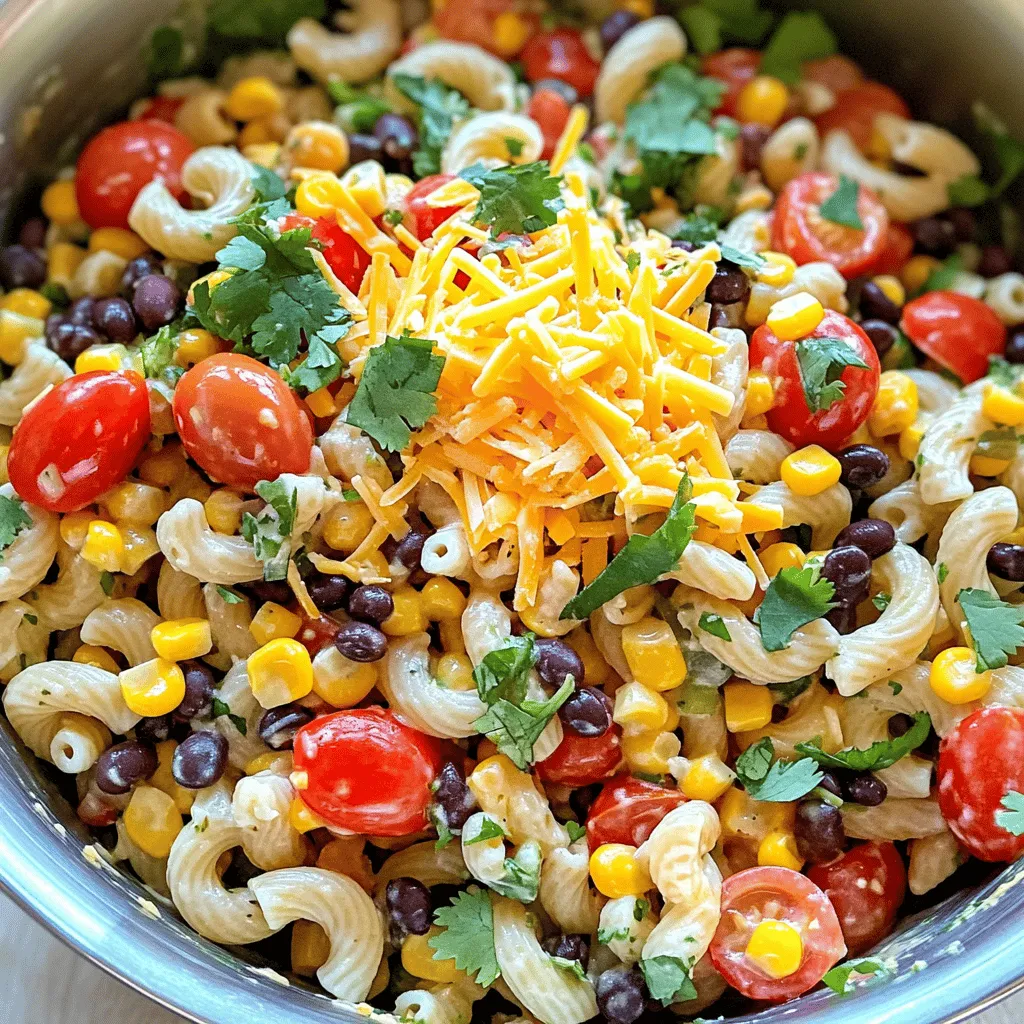
Looking for a fun twist on taco night? Try this Taco Pasta Salad! It’s a colorful and tasty dish that’s

- 4 large carrots, grated - 1 cup dried cranberries - ½ cup walnuts, chopped - ½ cup fresh cilantro, roughly chopped - ¼ cup Greek yogurt - 2 tablespoons honey - 1 tablespoon apple cider vinegar - Salt and pepper to taste - Sliced apples or pears - Feta cheese - Sunflower seeds What nutrients do carrots have? Carrots are rich in beta-carotene, fiber, and vitamins. These nutrients support good vision, skin health, and digestion. What are the benefits of cranberries? Cranberries are full of antioxidants. They help fight infections and may improve heart health. What is the nutritional profile of walnuts? Walnuts provide healthy fats, protein, and fiber. They support brain health and reduce inflammation. The combination of these ingredients makes the carrot cranberry salad a tasty and healthy choice. You can find the full recipe for this delightful dish above. First, grab four large carrots. Use a grater to shred them into a big mixing bowl. This will give your salad a nice crunch. Next, add one cup of dried cranberries. Their sweetness balances the carrots' taste. Now, chop half a cup of walnuts and mix them in. The walnuts add a delightful crunch. Your carrot mixture is now ready! In a small bowl, whisk together a quarter cup of Greek yogurt. Add two tablespoons of honey for sweetness. Pour in one tablespoon of apple cider vinegar for tang. Finish with a pinch of salt and pepper. Whisk until everything blends smoothly. This dressing ties all the flavors together. Now, pour the dressing over the salad ingredients. Toss gently to coat everything. Ensure each piece gets some dressing. For a burst of flavor, fold in half a cup of fresh cilantro. This will make your salad pop! Taste the salad and adjust the seasoning if needed. Enjoy your tasty creation! For the full recipe, check out the details above. Carrot cranberry salad works well for many occasions. You can serve it at family dinners, potlucks, or barbecues. It brings color and freshness to your table. For gatherings, present it in a clear glass bowl. This shows off the vibrant colors. You can also add a sprinkle of walnuts and cranberries on top. This adds a nice touch that makes it look fancy. After your meal, store any leftovers in a sealed container. Place it in the fridge for up to three days. To keep the salad fresh, cover it tightly. If you think you won't eat it soon, think about separating the dressing. This will help keep the salad crisp. Want to add more flavor? Consider using spices like cumin or paprika. They can give your salad an exciting twist. Fresh herbs like mint or parsley can also brighten the taste. If you want to change the dressing, try different vinegars. Balsamic vinegar can add a sweet note, while red wine vinegar gives a tangy kick. Experimenting can lead to your new favorite flavor! {{image_2}} You can change the salad with fresh fruits. In summer, try adding berries or peaches. They offer a sweet and juicy flavor that brightens the dish. In fall, think about adding sliced apples or pears. They give a nice crunch and add sweetness. You can also toss in nuts for extra texture. Chopped pecans or walnuts work well. Making this salad vegan is simple. Replace Greek yogurt with a vegan yogurt or mashed avocado. This keeps the creaminess while making it plant-based. To cater to gluten-free diets, check your dressing ingredients. Use certified gluten-free labels for honey and vinegar. While Greek yogurt dressing is tasty, you can explore other options. A lemon vinaigrette brings a zesty flavor. Mix olive oil, lemon juice, and a pinch of salt. Another idea is a honey mustard dressing. Just whisk together honey, mustard, and olive oil for a sweet twist. These variations keep the salad exciting and fresh. For the full recipe, refer to Crunchy Carrot Cranberry Delight. To keep your carrot cranberry salad fresh, use airtight containers. Glass containers work well. They help you see the salad and keep it crisp. For freezing, use freezer-safe bags. Squeeze out all the air before sealing. This helps prevent freezer burn. You can store this salad in the fridge for about 3 days. After that, it may start to lose its crunch. Watch for signs of spoilage, like a sour smell or slimy texture. If you see any of these, it’s best to toss the salad. To prep the salad for weekly meals, grate the carrots in advance. Store them in a sealed container. You can mix the cranberries and walnuts ahead too. Keep the dressing separate until you are ready to eat. This keeps the salad fresh and crunchy. You can replace walnuts with other nuts or seeds. Try pecans for a sweet taste. Almonds add a nice crunch. If you prefer seeds, sunflower seeds work well. They give a similar texture. Choose what you like best! Using fresh cranberries changes the taste and texture. Fresh cranberries are tart and crunchy. Dried cranberries are sweet and chewy. If you use fresh, add a bit more honey. This helps balance the tartness. Both versions bring unique flavors to the salad. Carrot cranberry salad pairs nicely with many dishes. Serve it with grilled chicken for a healthy meal. It also goes well with fish. For a light lunch, enjoy it with a sandwich. This salad adds color and taste to any plate. For the full recipe, check out the Crunchy Carrot Cranberry Delight. This blog post covered a delicious carrot cranberry salad packed with nutrition. You learned about the fresh ingredients, health benefits, and easy preparation steps. I shared tips for serving, storing, and adding flavors. You can modify the recipe to fit different diets or try seasonal twists. Overall, this salad is a tasty and healthy choice that suits any occasion. Enjoy creating your unique version and make it a staple in your meals. Keep experimenting to find your favorite blend!

Carrot Cranberry Salad Tasty and Nutritious Delight

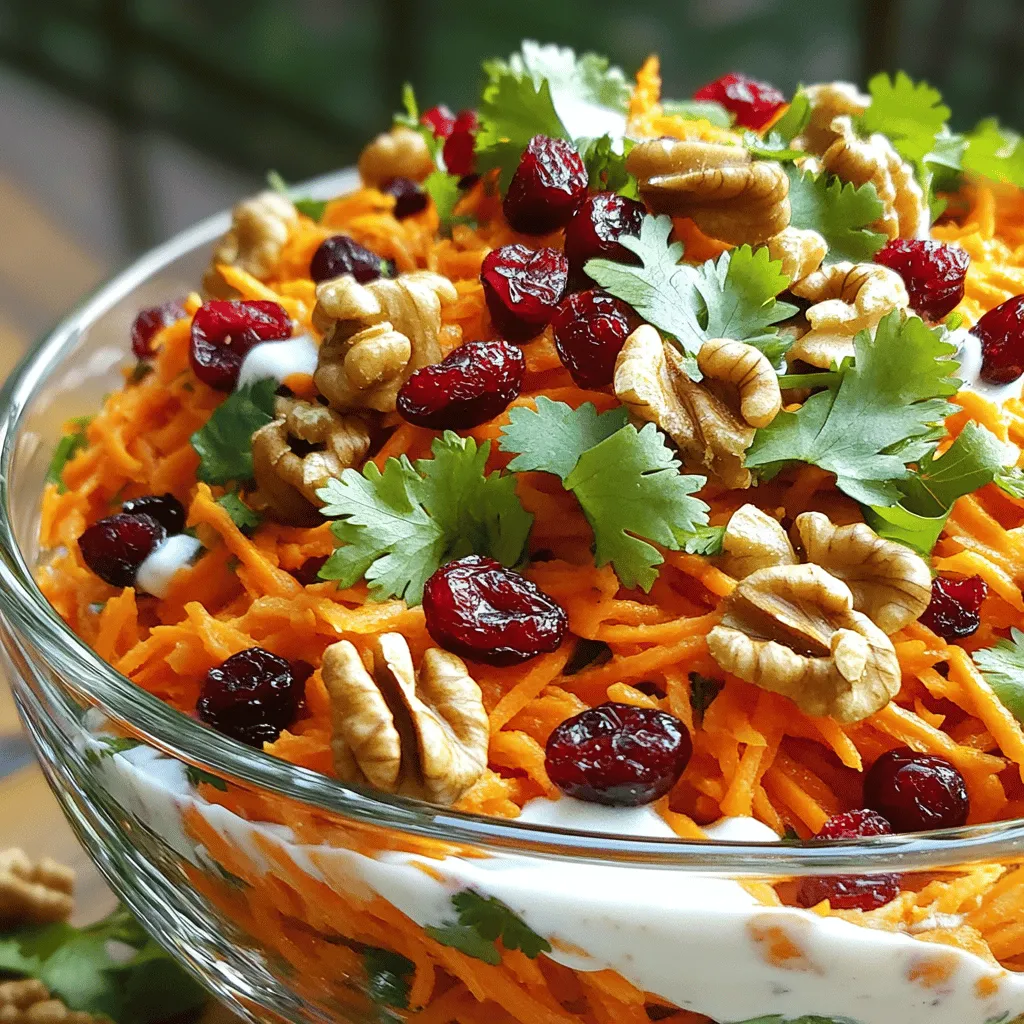
Are you ready to boost your salads with something fresh and tasty? The Carrot Cranberry Salad is a delightful mix

- 2 chicken breasts, sliced - 8 ounces fettuccine pasta - 1 cup sun-dried tomatoes in oil, chopped - 3 cups fresh spinach - 1 cup heavy cream - 1 cup grated Parmesan cheese - 3 cloves garlic, minced - 1 teaspoon Italian seasoning - Salt and pepper to taste - 2 tablespoons olive oil - Fresh basil for garnish You can swap heavy cream for half-and-half or coconut cream for a lighter dish. For gluten-free options, use gluten-free pasta. If you don’t have sun-dried tomatoes, fresh tomatoes or roasted red peppers work well. Using fresh ingredients makes a big difference. Fresh spinach and high-quality cheese enhance taste. Good seasoning is key; it brings out the flavors in your dish. Always taste as you cook to get it just right. For the full recipe, visit the complete guide to Marry Me Chicken Pasta. To cook the fettuccine, start by filling a large pot with water. Add salt to the water and bring it to a boil. Once boiling, add the fettuccine. Cook it according to the package instructions until it is al dente. This means the pasta should be firm to the bite but not hard. Drain the pasta and set it aside. Al dente pasta holds its shape better when mixed with the sauce. For perfect sautéing, use a large skillet. Heat olive oil over medium-high heat. Once hot, add sliced chicken breasts. Season them with salt, pepper, and Italian seasoning. Cook the chicken for about 6-8 minutes, until it turns golden brown and is cooked through. Remove it from the skillet and set it aside. This step locks in flavor and keeps the chicken juicy. In the same skillet, add minced garlic and chopped sun-dried tomatoes. Sauté them for 1-2 minutes until they smell great. Next, pour in the heavy cream, stirring well. Add grated Parmesan cheese and mix until it melts and is smooth. Then, toss in fresh spinach and cook it until wilted. This sauce brings all the flavors together and gives the dish its creamy texture. Now it's time to mix everything. Add the cooked fettuccine and chicken back to the skillet. Toss everything gently until the pasta and chicken are well coated in the creamy sauce. This ensures every bite is rich in flavor. If you need more taste, adjust the seasoning with salt and pepper. Serve your Marry Me Chicken Pasta hot and enjoy! For the full recipe, check out the detailed instructions. To avoid overcooking chicken, use a meat thermometer. Chicken should reach 165°F (74°C). Cook it until golden brown for the best flavor. I recommend searing in a hot skillet for just 6-8 minutes. This keeps the chicken juicy and tender. For perfecting the cream sauce, keep the heat low. Stir in the heavy cream slowly, allowing it to warm up. The key is to mix in the Parmesan cheese until it melts smoothly. This creates a rich and creamy texture. Visual appeal makes your dish stand out. Serve Marry Me Chicken Pasta in a large, shallow bowl. Drizzle a bit of the creamy sauce on top. This creates a lovely layer of flavor. Finish with fresh basil leaves and extra Parmesan cheese. This adds a pop of color and makes it look gourmet. To streamline cooking time, gather all your ingredients first. Chop the sun-dried tomatoes and mince the garlic before you start. This way, you save time when you cook. Preparing ingredients in advance helps too. You can slice the chicken and cook the pasta ahead of time. Store everything in the fridge until you’re ready to make the dish. This makes dinner quick and easy, perfect for busy nights. For the full recipe, check out the complete instructions. {{image_2}} You can easily switch up the ingredients in Marry Me Chicken Pasta to suit your taste. For example, adding vegetables like mushrooms or bell peppers can enhance the dish. These veggies bring color and extra flavor. You can also try varying the protein options. Shrimp or tofu work great as substitutes for chicken. They make the dish lighter and still delicious. Adjusting the spice levels can change how the dish tastes. If you like heat, add some red pepper flakes. For a milder flavor, just stick to the Italian seasoning. You can also add fresh herbs beyond basil. Try parsley or oregano for a fresh twist. These herbs can elevate the dish and make it even better. If you want to make Marry Me Chicken Pasta dairy-free, use plant-based cream instead of heavy cream. This keeps the dish creamy without dairy. For a vegetarian option, skip the chicken and add more vegetables. You could even use chickpeas for protein. These swaps make the dish fit different diets while still tasting great. For the full recipe, check out the details provided earlier. To store leftovers, let the dish cool first. Place the pasta in an airtight container. A glass or plastic container works well. Make sure to seal it tightly to keep out air. Store it in the fridge for up to three days. To freeze Marry Me Chicken Pasta, use a freezer-safe container. Portion it into smaller amounts. This makes it easy to reheat later. When you're ready to eat, take it out of the freezer. Thaw it in the fridge overnight. Reheat in a skillet over low heat. Add a splash of cream or broth to refresh the sauce. This dish lasts up to three days in the fridge. In the freezer, it can last up to three months. Always check for signs of spoilage before eating. Look for any off smells or changes in texture. If it looks or smells bad, throw it away. Marry Me Chicken Pasta is a creamy, flavorful dish that makes you want to propose! It blends tender chicken, sun-dried tomatoes, and fresh spinach in a rich sauce. Many believe the name comes from its ability to impress anyone at the dinner table. This dish gained popularity for its cozy feel and delightful taste. It's perfect for date nights or family gatherings. Yes, you can make this dish ahead! Cook the chicken and pasta, then prepare the sauce. Store each part separately in the fridge. When you are ready to eat, just reheat everything together in a pan. Add a splash of cream to keep it smooth. This way, you save time and enjoy a lovely meal later. Pair this dish with simple sides to enhance your meal. A crisp green salad adds freshness. Garlic bread or a nice crusty baguette is perfect for soaking up the sauce. Steamed vegetables like broccoli or asparagus also work well. These sides create a balanced meal and make it even more enjoyable. Absolutely! To make it lighter, you can use skinless chicken breasts. Swap heavy cream for low-fat milk or a dairy-free alternative. Use whole-grain pasta for more fiber. Adding more vegetables, like zucchini or bell peppers, boosts nutrition without adding many calories. These small changes make the dish healthier while keeping it tasty. Yes, this dish is very kid-friendly! Kids often enjoy creamy pasta and tender chicken. You can adjust the flavors to suit their taste. If they prefer milder food, reduce the seasoning. Offer extra cheese on top for a fun touch. This dish can be a hit with the whole family! In this post, we explored the delightful Marry Me Chicken Pasta. We covered key ingredients, cooking methods, and tips for a perfect dish. Using fresh, high-quality items really enhances the flavor. Simple swaps can make it fit various diets. You can prepare this dish ahead for busy nights, or pair it with sides for a full meal. By following these steps, you’ll impress everyone at your table. Enjoy cooking this delicious pasta recipe!

Marry Me Chicken Pasta Delicious and Simple Recipe

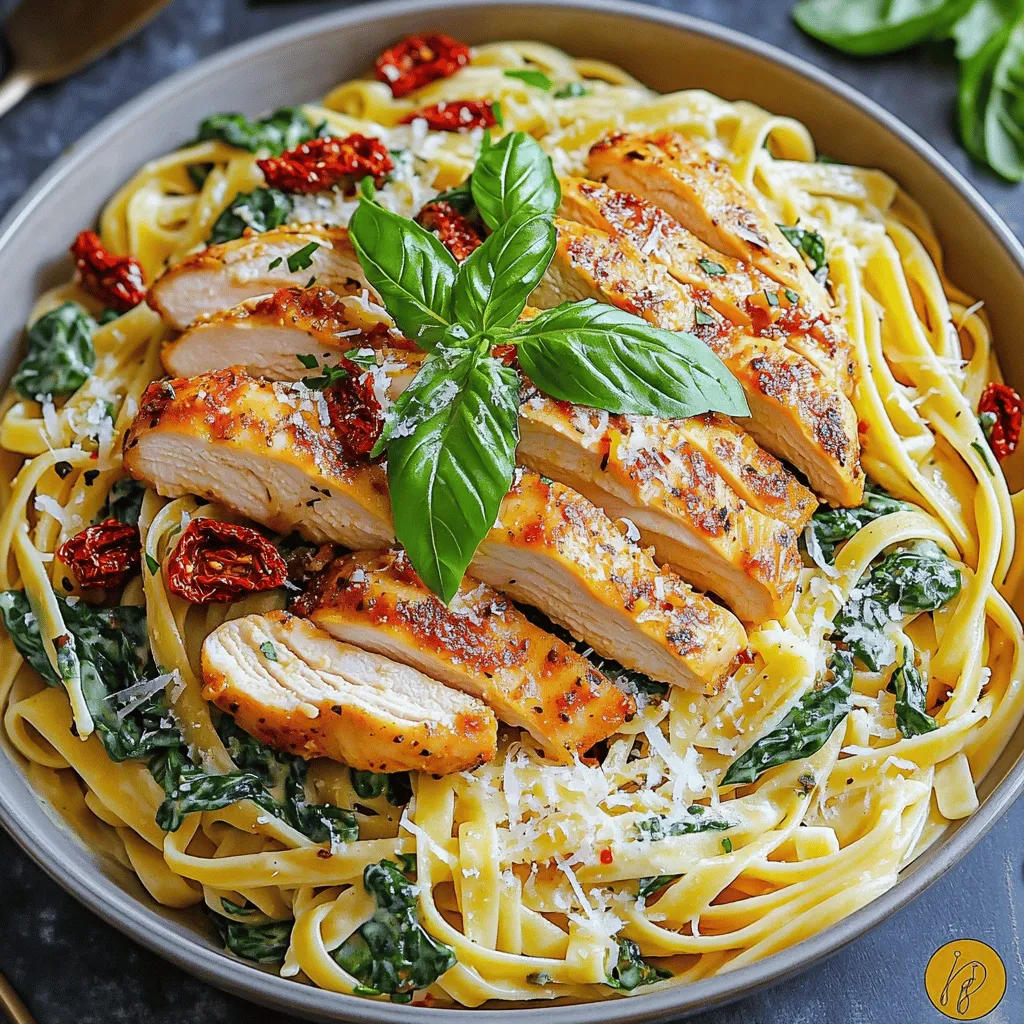
Looking for a cozy dinner that impresses? Marry Me Chicken Pasta is just the ticket! This dish combines tender chicken,

- 1 cup broccoli florets - 1 bell pepper (red or yellow), sliced - 1 cup snap peas - 2 carrots, julienned - 1 zucchini, thinly sliced - 1 cup mushrooms, sliced - 3 cloves garlic, minced - 1 tablespoon ginger, minced - 2 tablespoons soy sauce (or tamari for gluten-free) - 1 tablespoon sesame oil - 1 teaspoon chili paste (optional for heat) - 1 tablespoon sesame seeds - 2 green onions, sliced - Cooked jasmine rice or quinoa In this veggie stir fry, the fresh vegetables play a key role. I love using broccoli florets for their crunch. Bell peppers add a sweet taste and bright color. Snap peas bring a nice snap, while carrots add sweetness with their julienned texture. Zucchini and mushrooms round out the mix, adding depth and flavor. For the aromatics, garlic and ginger are a must. They create a fragrant base that makes the dish vibrant. When you add soy sauce, it brings umami to the mix. Sesame oil adds richness, and chili paste gives a gentle heat if you choose to use it. To finish, I recommend garnishing with sesame seeds and sliced green onions. They enhance the dish's look and taste. Serving it over jasmine rice or quinoa makes it a complete meal. This recipe is not only quick but also packed with flavor and nutrition. You will love how easy it is to bring this dish together. Check out the Full Recipe for more details! - Wash and chop all vegetables prep. - Measure and set aside ingredients for easy assembly. First, gather your fresh veggies. Start by washing them well under cold water. This step keeps your stir fry clean and tasty. Next, chop the veggies into uniform pieces. This helps them cook evenly. For example, slice the bell pepper and julienne the carrots. Set them aside in bowls for quick access. - Heat sesame oil in a large wok or skillet. - Sauté garlic and ginger until fragrant. - Add vegetables and stir-fry. Now, let's cook! Heat sesame oil in a large wok or skillet over medium-high heat. The oil should shimmer, showing it's hot enough. Add the minced garlic and ginger. Stir them for about 30 seconds. This step releases their amazing aroma. Next, toss in our colorful veggies. Stir-fry them for 7-8 minutes. The goal is for them to be bright and slightly tender, but still crisp. - Pour sauce over veggies and toss evenly. - Garnish with sesame seeds and green onions. - Serve over rice or quinoa. Once the veggies are ready, pour the soy sauce over them. If you like heat, add chili paste now. Toss everything together so the sauce coats the veggies well. Cook for another 2-3 minutes. Remove the pan from the heat. Sprinkle sesame seeds and sliced green onions on top for a nice finish. Serve this vibrant stir fry over cooked jasmine rice or quinoa for a hearty meal. Don’t forget to check the Full Recipe for more details on ingredients and steps! Stir-frying is quick and fun. Use a large wok or non-stick skillet for best results. First, heat your pan until it’s very hot. This high heat cooks the food fast and keeps it crisp. Cut your veggies into similar sizes. This helps them cook evenly. Add the aromatics like garlic and ginger first. They add a strong flavor when sautéed. To make your stir-fry pop, add a splash of soy sauce. You can also try hoisin sauce or oyster sauce. A bit of chili paste gives it a nice kick. Balancing flavors is key. Combine salty, sweet, sour, and spicy for the best taste. A pinch of sugar or lemon juice can bring out the flavors even more. Prep your veggies before you start cooking. Wash and chop them ahead of time. This makes cooking quick and easy. You can also use frozen vegetables. They cook fast and are handy when you’re short on time. Just toss them in the hot pan and stir-fry! For detailed steps, check the Full Recipe. {{image_2}} You can make this stir fry fit your needs. For gluten-free options, use tamari instead of soy sauce. Tamari tastes great and works well for everyone. If you want added protein, you can use tofu or chickpeas. Both will fill you up and add a nice texture. Feel free to swap out some veggies based on what you have. In summer, try using fresh corn or bell peppers. In winter, carrots and squash work well. You can also add leafy greens like spinach or kale. Sprouts like bean sprouts give a nice crunch and flavor too. You can change the heat level in your stir fry. For a mild dish, skip the chili paste. If you like it hot, add more chili paste or even red pepper flakes. You can also try different sauces. Sweet soy sauce adds a nice twist. Peanut sauce can give a nutty flavor that you will love. To store leftovers in the fridge, place the veggie stir fry in an airtight container. Make sure it is cool before sealing. It will stay fresh for about three to four days. For reheating, use the stove or microwave. If using a microwave, heat in 30-second bursts to avoid overcooking. For freezing options, you can freeze the veggie stir fry. Use freezer-safe containers or bags. Try to remove as much air as possible to avoid freezer burn. This dish can last up to three months in the freezer. To maintain flavor and texture, thaw in the fridge overnight and reheat gently. Avoid direct heat for best results. For meal prep, I recommend using clear, stackable containers. This way you can see what you have. Portion out servings to make lunches easy. Aim for about one cup per container. You can pair the stir fry with rice or quinoa for a complete meal. Cut vegetables into uniform sizes. This helps them cook evenly. For example, slice bell peppers and zucchini into thin strips. Cut carrots into small matchsticks. This way, each piece cooks at the same speed. It ensures you get that perfect crunch in every bite. Yes, you can meal prep this stir fry. Chop your veggies a day ahead and store them in the fridge. You can also make the sauce in advance. When you're ready, heat your pan, add the oil, and stir-fry your veggies. This saves time on busy weeknights and makes dinner stress-free. If you need a soy sauce alternative, try tamari for a gluten-free option. Coconut aminos also work well and add a sweet flavor. For a tangy kick, you can use rice vinegar or lemon juice. These swaps fit various diets while keeping your stir fry tasty. Leftover stir fry lasts about three to four days in the fridge. Store it in an airtight container to keep it fresh. Check for any off smells or changes in color. If it looks or smells bad, throw it away to stay safe. This blog post covers how to create a tasty vegetable stir fry. We discussed fresh veggies and the right sauces to enhance flavor. You learned easy preparation steps and efficient cooking tips. Remember, you can adjust spice levels and make substitutions to fit dietary needs. Storing leftovers and meal prepping make this dish a weekday winner. Try these tips to enjoy quick, healthy meals anytime. Your kitchen adventure awaits—just stir, serve, and savor!

30-Minute Veggie Stir Fry Easy Weeknight Recipe

Are you ready to whip up a delicious and healthy dinner in just 30 minutes? This easy veggie stir fry

- 3 medium zucchinis, spiralized into noodles - 1 cup bell peppers (mix of colors), sliced - 1 cup carrots, julienned - 1 cup snap peas, trimmed - 1 small onion, thinly sliced - 3 cloves garlic, minced - 1 tablespoon ginger, grated - 2 tablespoons soy sauce - 1 tablespoon sesame oil - 1 tablespoon olive oil - 1 teaspoon red pepper flakes (optional for heat) - 2 tablespoons sesame seeds - Fresh cilantro or green onions for garnish - Salt and pepper to taste I love using fresh produce for this dish. Zucchini noodles are light and fun. They soak up flavors well. Bell peppers add color and crunch, while carrots bring sweetness. Don't forget the snap peas; they give you a nice pop! The oils and sauces bring everything together. Soy sauce adds saltiness, while sesame oil gives a nutty taste. Olive oil helps cook the veggies and keeps them from sticking. Seasoning is key. Red pepper flakes can spice things up if you like heat. Sesame seeds add a nice crunch and look great on top. Fresh herbs, like cilantro or green onions, brighten the dish. For the full recipe, check out the details above. This meal is not only quick but also packed with flavor. Enjoy! Start by spiralizing the zucchinis. This creates fun, noodle-like shapes. Place the noodles on paper towels. This helps absorb extra moisture. Dry noodles keep your stir fry from getting soggy. In a large skillet or wok, heat olive oil over medium-high heat. Add thinly sliced onions first. Cook them for about two minutes. They should become soft and slightly clear. Next, add the minced garlic and grated ginger. Sauté them for one minute until you smell their rich aroma. Now, it's time for the colorful veggies. Toss in the sliced bell peppers, julienned carrots, and trimmed snap peas. Stir-fry these for four to five minutes. You want them tender but still crisp. This crunch adds great texture to your dish. Now, add the zucchini noodles to the skillet. Pour in the soy sauce and sesame oil. Gently toss all the ingredients together. This helps the flavors mix well. Cook everything for another two to three minutes. Be careful not to overcook the zucchini noodles. They should be hot but not mushy. For a bit of heat, sprinkle red pepper flakes if you like. Add salt and pepper to taste. Finish by topping your dish with sesame seeds. You can also garnish it with fresh cilantro or chopped green onions. This adds a nice touch to your meal. For the full recipe, check the previous section. To make great zucchini noodles, start by picking firm zucchinis. Look for ones that feel heavy and have smooth skin. This gives you the best texture. Next, spiralizing is key. Use a spiralizer and go slow. Avoid pressing too hard, as this can cause excess moisture. After spiralizing, lay the noodles on paper towels. This step helps soak up extra water, keeping your noodles from getting soggy. Seasoning can transform your meal. Try adding garlic powder, onion powder, or fresh herbs like basil for extra taste. If you want a kick, add chili flakes. For sauces, soy sauce is classic, but you can mix it up. Consider using teriyaki or hoisin sauce for a sweet touch. A splash of lime juice can also brighten the dish. Stir-frying is simple and fast. Use a hot pan or wok for the best results. Heat the olive oil until it shimmers, then add your veggies. To keep veggies crunchy, don’t overcrowd the pan. Cook in batches if needed. Stir the ingredients quickly and keep them moving. This way, they cook evenly and stay crisp. For the zucchini noodles, add them last. Cook them just until heated through. This keeps them firm and not mushy. For the full recipe, check out the complete details above. {{image_2}} You can easily add protein to your zucchini noodle stir fry. Chicken, shrimp, or tofu works great. For chicken, cut it into bite-sized pieces. Cook it for about 5-7 minutes until it’s golden and cooked through. If you choose shrimp, add it to the pan and cook for around 3-4 minutes until it turns pink. For tofu, use firm tofu, cut it into cubes, and cook for about 4-5 minutes until crispy. These additions will give your meal more flavor and substance. If you need a gluten-free meal, look for gluten-free soy sauce. Many brands offer this option, letting you enjoy the same great taste without worry. Just swap regular soy sauce for gluten-free soy sauce in your stir fry. It keeps the flavor intact while meeting your dietary needs. For a vegetarian or vegan dish, use plant-based protein sources. You can add chickpeas or edamame for extra protein. They also add a nice texture. If you want creaminess, use coconut milk instead of dairy. It pairs well with the flavors in your stir fry. You’ll enjoy a delicious meal that meets your plant-based needs. For more details, check the Full Recipe to see how to make this dish perfect for any preference! To store your zucchini noodle stir fry, let it cool first. Transfer it to airtight containers. This keeps the dish fresh. It will last in the fridge for up to three days. Make sure the lid is tight to avoid odors. When reheating, use the stovetop for the best results. Place the stir fry in a skillet over low heat. Stir gently to warm it up. This method keeps the zucchini noodles from becoming mushy. Avoid using the microwave as it may overcook the noodles. You can freeze zucchini noodle dishes, but it’s not always the best choice. Freezing can change their texture. If you decide to freeze, pack it in a freezer-safe container. When ready to eat, thaw it overnight in the fridge. Reheat gently on the stovetop for the best texture. Yes, you can use regular pasta. However, zucchini noodles are lower in calories and carbs. They add great texture and flavor. Regular pasta takes longer to cook. Zucchini noodles need just a few minutes in the pan. You also save time and gain more veggies with zucchini. To keep zucchini noodles firm, start by spiralizing them and letting them rest on paper towels. This helps absorb excess moisture. When cooking, do not overheat them. Add them to the pan last, and only stir-fry for a few minutes. This way, they stay tender yet crunchy. You can serve a fresh salad or steamed broccoli. These dishes add color and taste. You can also offer rice or quinoa for a filling meal. For protein, try grilled chicken or tofu. They pair well with the flavors of the stir fry. Yes, this dish is great for meal prep! Cook everything ahead of time and store it in airtight containers. You can keep it in the fridge for up to three days. When you are ready to eat, just reheat it on the stove. This keeps the flavors fresh and delicious. For the full recipe, check out the Zucchini Noodle Stir Fry section above! This blog post shared a quick and easy recipe for zucchini noodle stir fry. We covered fresh ingredients and tasty sauces that blend well together. You learned tips for perfect noodles and how to keep veggies crisp. Variations let you add protein or adjust for diet needs. Storing and reheating leftovers was also discussed. Zucchini noodles offer a healthy twist on a classic dish. Try it and enjoy a bright, colorful meal that’s full of flavor!

Zucchini Noodle Stir Fry Quick and Flavorful Meal

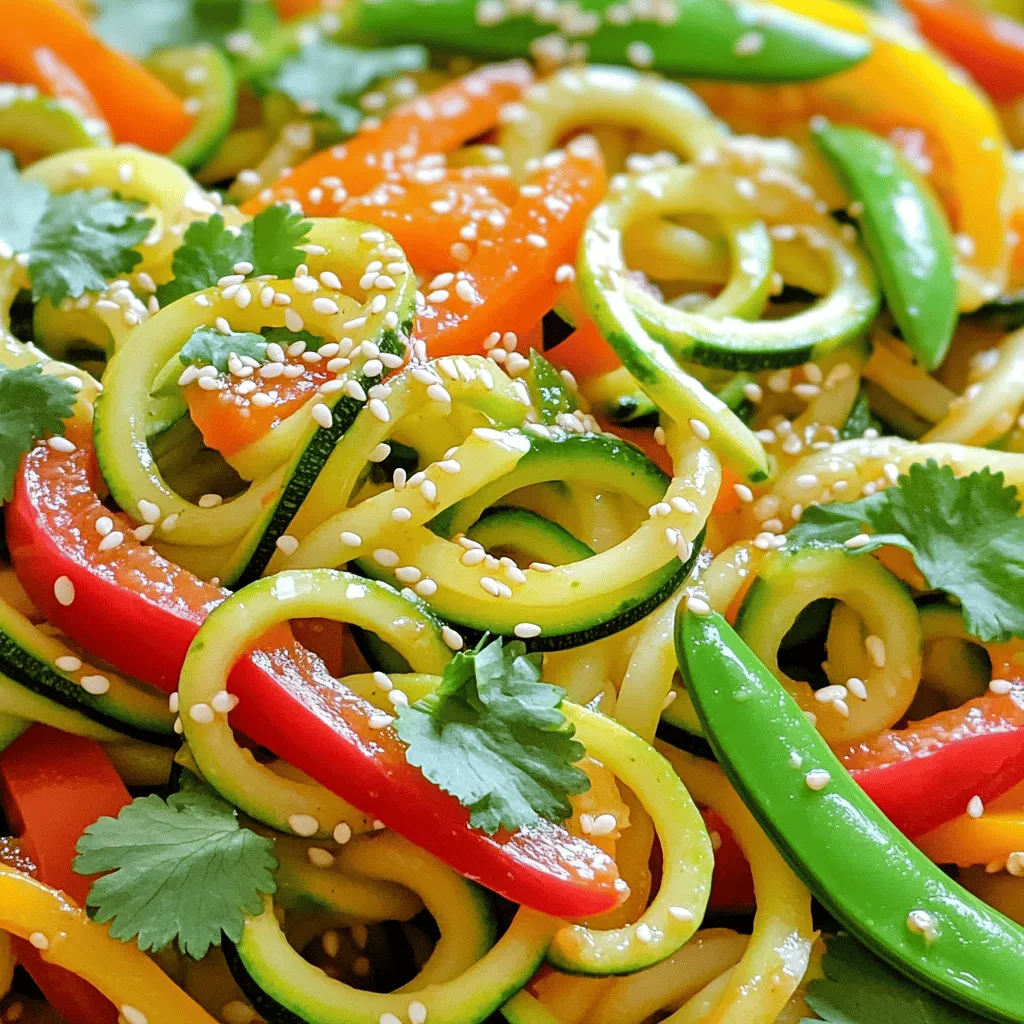
Are you ready for a quick and tasty meal? Zucchini Noodle Stir Fry is your answer! Packed with fresh vegetables

To make One-Pan Chicken Fajitas, gather these items: - 2 boneless, skinless chicken breasts, sliced into thin strips - 1 red bell pepper, sliced - 1 yellow bell pepper, sliced - 1 green bell pepper, sliced - 1 medium onion, sliced - 3 cloves garlic, minced - 2 tablespoons olive oil - 2 teaspoons chili powder - 1 teaspoon cumin - 1 teaspoon paprika - 1/2 teaspoon salt - 1/2 teaspoon black pepper - 1/4 teaspoon cayenne pepper (optional for extra heat) - Fresh cilantro for garnish - Tortillas for serving Freshness matters. Choose firm, bright peppers. Look for chicken that is pink and moist. If you can't find fresh bell peppers, frozen ones work too. You can swap chicken for shrimp or beef if you prefer. For a vegetarian option, try using mushrooms or tofu. You will need a few tools to make this dish: - A large bowl for mixing - A sharp knife for slicing - A cutting board - A large baking sheet or oven-safe pan - A spatula to stir the ingredients - Measuring spoons for the spices This recipe is simple and fun! You can find the Full Recipe to get all the details. Enjoy cooking and savor the flavors of your One-Pan Chicken Fajitas! To start, gather all your ingredients. Here’s what you need: - 2 boneless, skinless chicken breasts, sliced into thin strips - 1 red bell pepper, sliced - 1 yellow bell pepper, sliced - 1 green bell pepper, sliced - 1 medium onion, sliced - 3 cloves garlic, minced - 2 tablespoons olive oil - 2 teaspoons chili powder - 1 teaspoon cumin - 1 teaspoon paprika - 1/2 teaspoon salt - 1/2 teaspoon black pepper - 1/4 teaspoon cayenne pepper (optional for extra heat) - Fresh cilantro for garnish - Tortillas for serving Once you have everything, preheat your oven to 400°F (200°C). In a large bowl, mix the sliced chicken, bell peppers, onion, and garlic. This blend makes the base of your fajitas. Next, add the olive oil, chili powder, cumin, paprika, salt, black pepper, and cayenne pepper if you want extra heat. Stir well until the chicken and veggies are coated. This step helps all the flavors mix together. Now, transfer the mixture to a large baking sheet. Spread it out evenly. This allows for even cooking. Place it in the preheated oven. Bake for 20-25 minutes. At the halfway mark, give the pan a good stir. This ensures everything cooks evenly. You want the chicken to be fully cooked and the veggies nice and tender. Always check that your oven is at the right temperature before baking. The 400°F (200°C) setting works well for this recipe. Stick to the 20-25 minute range for baking time. If the chicken is no longer pink inside, it’s ready. When done, remove the pan from the oven. Garnish with freshly chopped cilantro for a pop of flavor. Serve the warm chicken mix in tortillas. This recipe makes it easy for everyone to build their own fajitas. Enjoy the fun and tasty meal! For the full recipe, refer to the earlier section. For great flavor, use chili powder, cumin, and paprika. I like to add cayenne pepper if you want heat. You can also include lime juice for a fresh taste. Fresh herbs like cilantro add brightness. Experiment with taco seasoning for a different twist. Just remember, balance is key in flavor! To get the best results, cut your chicken and veggies into even strips. This helps them cook evenly. Preheat your oven to 400°F (200°C). Don’t skip mixing the spices with the chicken and veggies. This ensures each bite is flavorful. Stir your mix halfway through baking to cook it all evenly. Serve your fajitas in warm tortillas. This keeps them soft and pliable. You can add toppings like cheese, sour cream, or guacamole. Lettuce and salsa also add a nice crunch and flavor. For sides, try rice or beans to round out the meal. You can find the full recipe for One-Pan Chicken Fajitas in the main article. {{image_2}} If you want a veggie version, try using mushrooms or tofu instead of chicken. Both options soak up flavors well and keep the dish hearty. You can also use black beans or chickpeas for added protein. Just toss them in with the peppers and spices. Bake as you would with chicken, and enjoy a delicious meal. To change things up, try adding different spices. If you love heat, mix in some chipotle powder or smoked paprika. For a fresh taste, add lime zest or fresh herbs like oregano. You could even go sweet with a touch of cinnamon or brown sugar. These twists make each batch unique and fun. For gluten-free fajitas, choose corn tortillas instead of flour ones. Look for brands that are labeled gluten-free to be safe. You can also serve the chicken and veggies over rice or quinoa. This way, everyone can enjoy the flavors without worry. To store your leftover One-Pan Chicken Fajitas, use airtight containers. Label the containers with the date. Place them in the fridge right away. If you want to keep them longer, freeze the fajitas instead. Use freezer bags for easy storage. Make sure to squeeze out as much air as possible. When you are ready to eat leftovers, you can reheat them easily. For the best taste, use the oven. Preheat it to 350°F (175°C). Spread the fajitas on a baking sheet and cover with foil. Bake for about 10-15 minutes until heated through. You can also use a microwave. Place the fajitas in a microwave-safe dish and cover. Heat in short bursts, stirring in between, until warm. Prepared fajitas can last in the fridge for up to 3-4 days. If stored properly in the freezer, they can last for about 2-3 months. Always check for signs of spoilage before eating. If they smell off or look strange, it’s best to throw them away. Enjoy your One-Pan Chicken Fajitas fresh or stored for later! For the full recipe, refer to the main content. To make One-Pan Chicken Fajitas spicier, add more cayenne pepper. Start with a full teaspoon instead of a quarter. You can also add diced jalapeños or a splash of hot sauce. These will boost the heat and bring out the flavors. When you mix the spices, taste them. Adjust based on your heat level. Remember, you can always add more, but it's hard to take heat away! Yes, you can use other proteins. Beef strips or shrimp are great swaps. For beef, choose flank or sirloin. Slice them thin for quick cooking. For shrimp, use raw, peeled, and deveined shrimp. They cook fast, so watch them closely in the oven. You can even try tofu for a vegetarian option. Just make sure to press it to remove extra moisture. One-Pan Chicken Fajitas taste great with many sides. You can serve them with Mexican rice or refried beans. Fresh guacamole and salsa add a nice touch. Add some shredded cheese and sour cream for creaminess. Don't forget crispy tortilla chips for crunch. You can also serve them with a side salad for freshness. Get creative and mix your favorites! For the full recipe, check the link above. In this blog post, I covered how to make One-Pan Chicken Fajitas. I shared the key ingredients, important notes on freshness, and tools you need. You learned step-by-step instructions for prepping, cooking, and baking. I also provided tips on seasoning, cooking techniques, and serving ideas. Try different variations to suit your taste. Store leftovers properly to enjoy for days. Now, you have all the knowledge to impress at your next meal! Enjoy your cooking adventure!

One-Pan Chicken Fajitas Flavorful and Easy Recipe

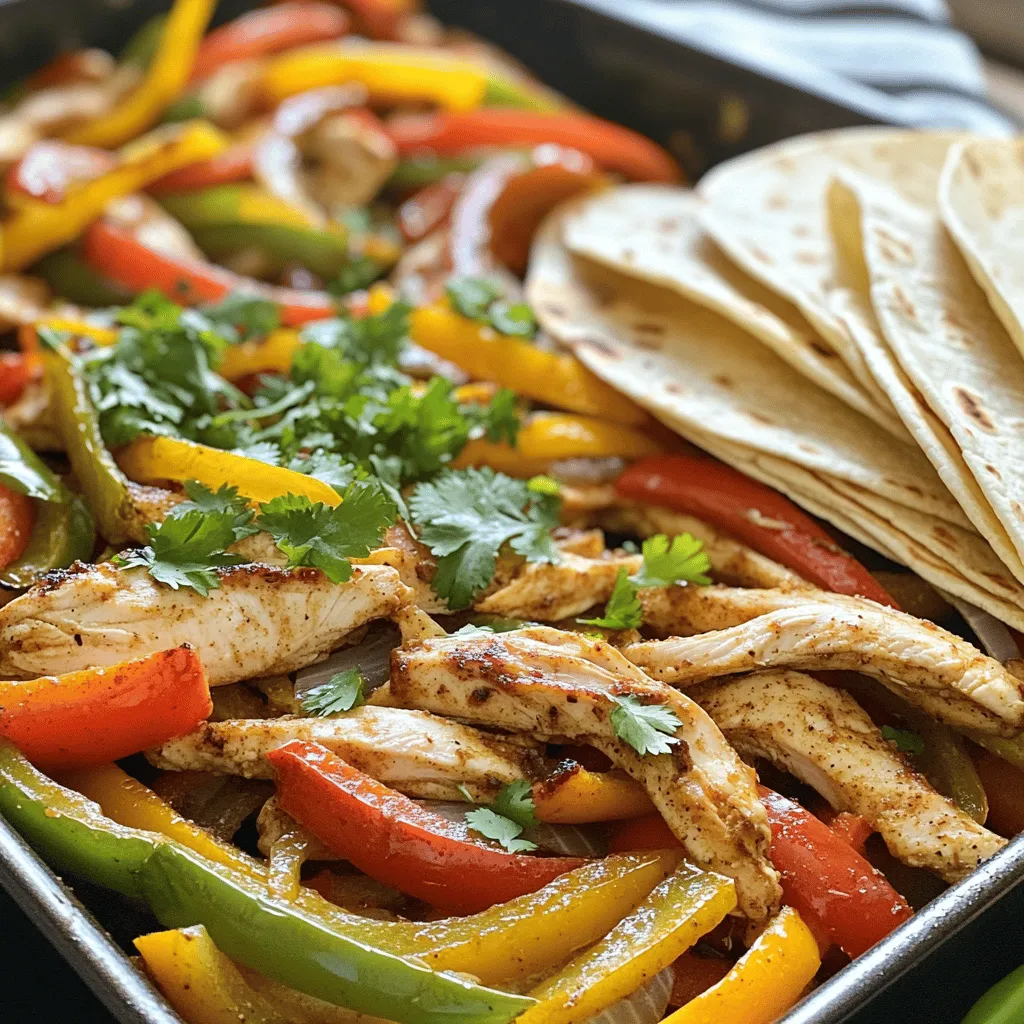
Looking to spice up your dinner routine? You’re in the right place! My One-Pan Chicken Fajitas recipe is packed with

To make a great Mediterranean chickpea salad, you need some key ingredients. Here’s what you should gather: - 1 can (15 oz) chickpeas, drained and rinsed - 1 cup cherry tomatoes, halved - 1 cucumber, diced - 1/2 red onion, finely chopped - 1/2 bell pepper (red or yellow), diced - 1/3 cup Kalamata olives, pitted and sliced - 1/4 cup feta cheese, crumbled (optional) - 2 tablespoons fresh parsley, chopped - 2 tablespoons olive oil - 1 tablespoon red wine vinegar (or lemon juice for a fresh twist) - 1 teaspoon dried oregano - Salt and pepper to taste These ingredients create a bright and fresh flavor. The chickpeas add protein and fiber. The veggies bring crunch and color. You can make this salad even better with some tasty add-ins. Here are a few ideas: - Avocado for creaminess - Capers for a salty kick - Spinach or arugula for more greens - Roasted red peppers for sweetness These options let you customize the salad to your taste. Feel free to mix and match! Sometimes, you might not have all the ingredients. That’s okay! Here are some easy swaps: - Use canned white beans instead of chickpeas for a different texture. - Swap red onion for green onions for a milder taste. - Try different olives, like green olives or black olives. These changes keep the recipe flexible. You can adjust it based on what you have on hand. For the full recipe, check out the details above. Enjoy making your Mediterranean chickpea salad! To start, gather all your ingredients. You need a can of chickpeas, cherry tomatoes, a cucumber, a red onion, a bell pepper, Kalamata olives, and feta cheese if you want. 1. Open the chickpeas: Drain and rinse them under cold water. This helps remove excess salt and improves the taste. 2. Chop the veggies: Cut the cherry tomatoes in half. Dice the cucumber into small pieces. Finely chop the red onion and bell pepper. 3. Slice the olives: Take the Kalamata olives and cut them into thin slices. 4. Combine: In a large bowl, mix all these ingredients together. You’ll have a colorful and fresh base for your salad. Now, let's make the dressing. This adds a burst of flavor to your salad. 1. Gather your dressing ingredients: You will need olive oil, red wine vinegar (or lemon juice), dried oregano, salt, and pepper. 2. Whisk it together: In a small bowl, pour in the olive oil and vinegar. Add the oregano, a pinch of salt, and pepper. Use a whisk to mix until it blends well. Finally, it's time to bring everything together. 1. Pour the dressing: Drizzle your dressing over the salad mixture in the large bowl. 2. Toss gently: Use a spatula or your hands to mix everything together. This helps coat the salad evenly without squishing the ingredients. 3. Taste and adjust: Try a bite. You can add more salt or pepper if needed. If you want extra crunch, toss in more cucumber or bell pepper. 4. Garnish: Before serving, sprinkle chopped parsley on top for a fresh look. This entire process takes just 15 minutes! Enjoy your Mediterranean Chickpea Salad with friends or family for a healthy meal. For the full recipe, check out the section above. When you chop, keep your knife sharp. A sharp knife works better and is safer. Cut your veggies to similar sizes. This makes the salad look nice and ensures even bites. Chop the herbs finely to release their flavor. When mixing, use a gentle hand. Toss the salad lightly to avoid crushing the ingredients. You want to keep the texture crisp. To boost flavor, use fresh herbs like parsley. Fresh herbs add a bright taste. A squeeze of lemon juice can also lift the dish. It adds a zesty note that brightens every bite. Consider adding spices like cumin or smoked paprika for warmth. If you want more depth, try adding a sprinkle of feta cheese. Its creaminess balances the salad well. For a stunning presentation, serve the salad in a large bowl. A shallow bowl allows guests to see all the colors. Drizzle with extra olive oil and sprinkle more feta on top. This makes it look more inviting. Add lemon wedges on the side for a pop of color and flavor. You can pair this salad with grilled chicken or fish for a complete meal. For the full recipe, check out the detailed steps above! {{image_2}} You can easily change the protein in your Mediterranean chickpea salad. Chickpeas are great, but adding other proteins can boost flavor and nutrition. Here are some ideas: - Grilled chicken: This adds a savory taste and makes the salad heartier. - Tuna: Canned tuna gives a nice, salty flavor to the dish. - Shrimp: Cooked shrimp adds a touch of luxury and a light taste. - Hard-boiled eggs: Chopped eggs add creaminess and richness. Mix and match these proteins to find your favorite combo! Adding seasonal veggies can enhance your salad. They add color and crunch, plus they are fresh. Here are some seasonal options to try: - Zucchini: Thinly sliced zucchini gives a nice crunch. - Radishes: Sliced radishes add a peppery bite. - Asparagus: Lightly steamed asparagus gives a unique flavor. - Bell peppers: Use different colors for a vibrant look. Feel free to use what is fresh at your local market. The dressing can change the whole vibe of your salad. While olive oil and vinegar are classic, you can try other options: - Tahini: A creamy tahini dressing adds a nutty flavor. - Yogurt: A yogurt dressing gives a tangy and rich taste. - Citrus vinaigrette: Use lemon or orange juice for a bright flavor. - Balsamic vinegar: This adds sweetness and depth. Experiment with these dressings until you find your favorite! You can find the full recipe to create your base salad and then explore these variations. To store leftover Mediterranean chickpea salad, place it in an airtight container. This keeps the salad fresh and prevents it from drying out. If you have added feta cheese, consider keeping it separate. This way, it stays fresh longer. Always let the salad cool to room temperature before sealing it. When stored correctly, the salad lasts about 3 to 5 days in the fridge. After this time, the veggies may lose their crunch and flavor. Always check for any signs of spoilage. If you see any weird smells or colors, it’s best to toss it. You can enjoy this salad cold, so reheating isn’t needed. If you want to warm it up, do so lightly in the microwave. Heat it for 15 to 30 seconds only. After heating, add a splash of olive oil or lemon juice to refresh the flavors. This salad tastes great cold, so enjoy it as a quick snack or side dish. For the full recipe, check out the details above. To make this salad vegan, skip the feta cheese. You can add more olives or nuts for flavor. Use lemon juice instead of red wine vinegar if you prefer. The salad will still taste fresh and vibrant without cheese. Yes, you can prepare this salad in advance. Make it up to a day before you plan to serve it. Just keep it in the fridge in an airtight container. The flavors will blend nicely, making it even tastier. Common allergens in this salad include chickpeas and feta cheese. If you use olives, check for any allergies there too. Always read labels if you're unsure about any ingredient. Absolutely! You can add bell peppers, radishes, or even spinach. Feel free to mix in whatever fresh veggies you like. This salad is versatile and welcomes new flavors. Yes, Mediterranean Chickpea Salad is gluten-free. Chickpeas are a great protein source and perfect for a gluten-free diet. Enjoy this salad worry-free! To make the salad more filling, consider adding grains like quinoa or farro. You could also include diced avocado or nuts for healthy fats and extra texture. This salad pairs well with grilled meats, pita bread, or hummus. It also complements a light soup for a full meal. Enjoy it however you like! Mediterranean chickpea salad is easy to make and full of flavor. We covered the must-have ingredients, fun add-ins, and ingredient swaps. I shared how to prepare the salad, make the dressing, and mix them well. You learned tips for chopping, flavor boosts, and how to serve it. We also explored protein variations, fresh veggies, and alternative dressings. Proper storage keeps leftovers tasty and fresh. This salad is versatile, healthy, and fun to make. Enjoy creating your unique version!

Mediterranean Chickpea Salad Fresh and Flavorful Dish

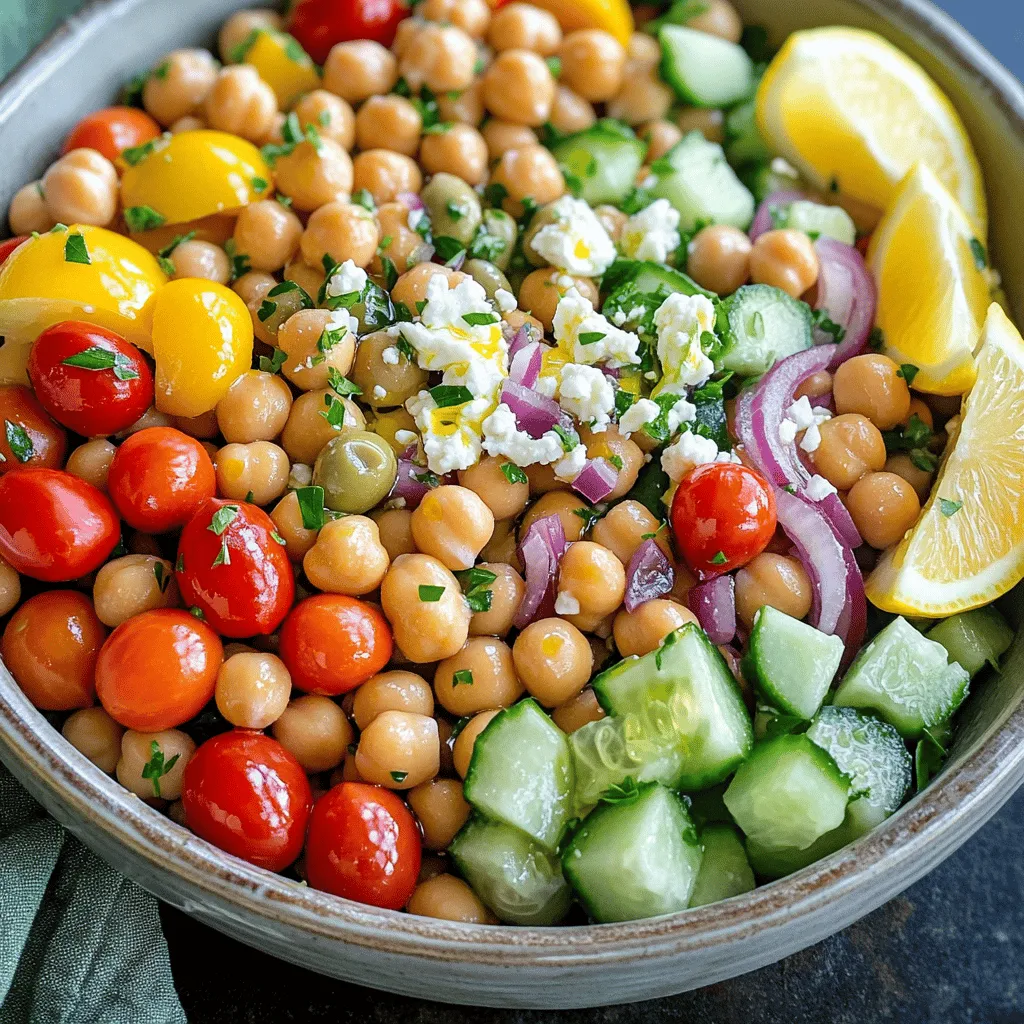
Are you ready to enjoy a dish that bursts with flavor and is super simple to make? This Mediterranean Chickpea

- Large shrimp (1 pound, peeled and deveined) - Garlic (4 cloves, minced) - Unsalted butter (1/4 cup) - Fresh lemons (juice of 2, zest of 1) - Olive oil (1 tablespoon) - Red pepper flakes (1 teaspoon, adjust for heat) - Fresh parsley (1/4 cup, chopped) - Salt and pepper to taste - Optional: Lemon wedges for serving Lemon garlic shrimp shines with its fresh and vibrant flavors. The large shrimp form the base of this dish. They soak up the rich taste of garlic and butter. The fresh lemons add a tangy kick that brightens every bite. Garlic is key in this recipe. Use fresh cloves for the best flavor. Minced garlic will release its oils for a fragrant aroma. Don't forget the unsalted butter; it adds creaminess. The lemon juice and zest balance the richness. Olive oil brings in a fruity note and helps with cooking. Red pepper flakes give a subtle heat. You can adjust them based on your spice level. Fresh parsley adds a pop of color and freshness. Season with salt and pepper to enhance all the flavors. If you like, serve with lemon wedges for an extra zesty touch. For the full recipe, check the details above. First, let's prepare the shrimp. Use one pound of large shrimp. Make sure they are peeled and deveined. This saves time and effort while cooking. Next, mince four cloves of garlic. You want them small, so they blend well with the shrimp. Finally, chop a quarter cup of fresh parsley. This will add color and flavor to your dish. Now, let's cook. Start by melting a quarter cup of unsalted butter in a large skillet. Add one tablespoon of olive oil to the pan over medium heat. This combination gives the dish a rich taste. Once the butter melts, add the minced garlic. Sauté it for about one minute. Be careful not to let it brown. Then, sprinkle in one teaspoon of red pepper flakes. This adds a nice heat. Next, increase the heat to medium-high. Add the shrimp to the skillet. Season them with salt and pepper. Cook the shrimp for two to three minutes on each side. They are done when they turn pink and opaque. Now for the final flavor boost! Squeeze the juice of two lemons over the cooked shrimp. Add the zest of one lemon as well. Stir gently to coat all the shrimp evenly. Turn off the heat and garnish with the chopped parsley. Serve hot, with lemon wedges on the side for an extra zesty kick. For the full recipe, check the section above! To keep shrimp tender, cook them just right. They should turn pink and opaque. Overcooking makes them tough. Aim for 2-3 minutes on each side. Timing is key! Garlic can add great flavor, but it can burn fast. Sauté it for only a minute. You want it fragrant, not brown. Too much heat makes garlic bitter. If you like spice, add red pepper flakes. Start with one teaspoon. You can always add more later if you want more heat. Herbs can change the dish. Feel free to try parsley, basil, or dill. Each herb offers a new twist to the flavor. A good skillet makes cooking easier. I prefer a nonstick one for this recipe. It helps shrimp cook evenly and prevents sticking. A sturdy spatula is essential. You need it to flip the shrimp carefully. A good flip keeps them whole and perfect. Use a spatula with a wide surface for the best results. For the full recipe, check out the detailed instructions included. {{image_2}} You can switch up the shrimp in this dish. Try scallops, crab, or even fish. Each option brings a new taste. For a lighter meal, swap butter for olive oil. This change still gives you great flavor without the extra fat. Want to add depth? White wine works wonders. It adds a rich layer to the dish. You can also mix in spinach or bell peppers. Both add color and nutrition. This makes your meal even more vibrant and healthy. Take this dish to new places. For a Mediterranean style, use herbs like oregano and parsley. This gives it a fresh, bright taste. Want an Asian twist? Add soy sauce for a savory kick. Both styles keep the main flavors but change the vibe. To store leftover lemon garlic shrimp, place it in an airtight container. This helps keep the shrimp fresh. You can store it in the fridge for up to three days. When reheating, use a skillet over low heat. This method warms the shrimp evenly. Avoid cooking it too long, or it may become tough. If you want to freeze cooked shrimp, let it cool first. Then, place it in a freezer-safe bag. Remove as much air as possible to prevent freezer burn. You can keep it frozen for up to three months. To thaw it, place the bag in the fridge overnight. You can also run it under cold water if you're in a hurry. In the refrigerator, lemon garlic shrimp stays fresh for about three days. If you notice any off smells or a slimy texture, it's best to throw it away. Always trust your senses to decide if shrimp is still good. Keeping shrimp stored properly helps you enjoy it longer. For more detailed cooking instructions, check out the Full Recipe. Cooking lemon garlic shrimp takes about 6 to 8 minutes. The time depends on the size of your shrimp. Large shrimp need 2 to 3 minutes per side. If you use smaller shrimp, they cook faster. Always look for that pink color and opaque texture. This tells you they are done! Yes, you can use frozen shrimp! It’s a great option when fresh shrimp is not available. Just make sure to thaw them first. You can do this by placing them in cold water for about 15 to 20 minutes. If you cook them from frozen, add an extra minute to the cooking time. When serving lemon garlic shrimp, you have many tasty options. Here are some great ideas: - Rice: White or brown rice works well. - Pasta: Toss it with olive oil and herbs. - Salad: A fresh green salad adds crunch. - Vegetables: Sautéed or steamed veggies complement the dish nicely. For a complete meal, choose one or more of these sides. Enjoy your cooking! For the full recipe, check out the detailed steps mentioned earlier. This blog post covered how to make lemon garlic shrimp from scratch. You learned about key ingredients like shrimp, garlic, and lemon. I provided step-by-step instructions for cooking and tips for perfecting your dish. You discovered variations to try, storage tips for leftovers, and answers to common questions. With this knowledge, you can create a flavorful meal that impresses. Enjoy experimenting with flavors and making this dish your own! Remember, cooking is fun, so don’t be afraid to play with ingredients.

Lemon Garlic Shrimp Flavorful and Quick Dinner Recipe

If you’re craving a quick and tasty meal, look no further! This Lemon Garlic Shrimp recipe is easy to whip

To make steakhouse creamed corn, gather these ingredients: - 4 cups sweet corn (fresh or frozen) - 1 cup heavy cream - 1/2 cup milk - 4 tablespoons unsalted butter - 1/4 cup grated Parmesan cheese - 2 tablespoons sugar - 1 teaspoon garlic powder - 1/2 teaspoon onion powder - Salt and black pepper to taste - 2 tablespoons chopped fresh chives (for garnish) When picking corn, use fresh corn if you can. Fresh corn tastes sweeter and more vibrant. If fresh corn is not available, good quality frozen corn works well. Choose heavy cream for a rich texture. It makes the dish creamy and delicious. For the best flavor, use unsalted butter. This lets you control the saltiness. Fresh chives add a nice touch at the end. They give a bright flavor that contrasts with the creaminess. You can add other ingredients to boost flavor. Try smoked paprika for a hint of smokiness. A dash of cayenne pepper adds a kick if you like heat. For a sweeter taste, consider adding diced bell peppers or jalapeños. You can also mix in cooked bacon for a savory crunch. These additions can elevate the dish and make it your own. Remember, feel free to play around and find your perfect blend. For the full recipe, check the section above. To make steakhouse creamed corn, gather your ingredients first. You need: - 4 cups sweet corn (fresh or frozen) - 1 cup heavy cream - 1/2 cup milk - 4 tablespoons unsalted butter - 1/4 cup grated Parmesan cheese - 2 tablespoons sugar - 1 teaspoon garlic powder - 1/2 teaspoon onion powder - Salt and black pepper to taste - 2 tablespoons chopped fresh chives (for garnish) Now, let’s cook. Start by melting the butter in a large skillet over medium heat. Once melted, add the sweet corn. Cook the corn for about 5 minutes. Stir it gently to get a nice golden color. Next, pour in the heavy cream and milk. Bring the mixture to a gentle simmer. This part is key, as it helps the flavors mix. Once simmering, stir in the sugar, garlic powder, onion powder, salt, and pepper. Cook for another 10 minutes. This helps thicken the corn mixture. Now, lower the heat and mix in the grated Parmesan cheese. Stir until fully melted. This gives the dish a rich, creamy texture. If you want it creamier, blend a portion of the corn, then mix it back in. Finally, taste your dish and adjust any seasonings if needed. Remove the skillet from the heat. Serve it warm and top with fresh chives for a nice touch. Timing is important for great creamed corn. Here are some tips: - When cooking the corn, stay close. Stir it to prevent burning. - Keep an eye on the cream mixture as it simmers. This helps avoid boiling over. - The last step with the cheese takes only a few minutes. Don’t rush this; let it melt well. Sometimes things might not go as planned. Here are some common issues and fixes: - Too thick? Add a splash of milk or cream to loosen it up. - Too thin? Cook it a bit longer to let it thicken. - Lacks flavor? Adjust salt, pepper, or add more cheese to boost taste. These steps will guide you to a delicious steakhouse creamed corn every time. For the full recipe, check out the complete guide. To boost the taste of your creamed corn, try using fresh corn. It has a sweet, bright flavor. If fresh corn isn't an option, frozen corn works well too. For added depth, mix in some spices. Smoked paprika or cayenne pepper can give a nice kick. You can also add a splash of lemon juice to brighten the flavors. If you want a richer taste, use homemade broth instead of milk. The texture of your creamed corn can change how it feels in your mouth. For a creamy style, blend part of the corn before mixing it in. This gives you a smooth base. If you prefer a chunky style, skip the blending. Just cook the corn until it’s tender. You can also play with the creaminess. Use more heavy cream for a richer dish or less for a lighter version. Steakhouse creamed corn pairs well with many foods. It works great with grilled meats like steak and chicken. You can serve it as a side at your next barbecue or holiday meal. For a twist, try it on a baked potato or in a casserole. Top it with crispy bacon bits for added flavor. Chopped chives add a fresh touch and nice color. For the full recipe, check out the section above. {{image_2}} You can change the flavor of your creamed corn with spices. Try adding cayenne pepper for heat. A pinch of smoked paprika adds depth. If you love herbs, fresh thyme or rosemary works well too. Experiment with different spices to find your favorite mix. Each spice can bring a new taste that will surprise you. If you want a vegetarian or dairy-free option, swap heavy cream and milk with coconut milk or almond milk. Use vegan butter instead of regular butter. Nutritional yeast makes a great substitute for Parmesan cheese. It gives a cheesy flavor without using dairy. This version is rich and nice, perfect for everyone. For a Southern twist, add jalapeños for heat. You can also mix in crispy bacon bits for a smoky flavor. Try adding cream cheese for extra creaminess. A hint of sugar can help balance the heat. Serve it with cornbread for a true Southern feast. This version will surely impress your guests. Enjoy the rich flavors in each bite. For the full recipe, check out the earlier section. Once you finish your steakhouse creamed corn, store the leftovers right away. Allow it to cool to room temperature. Then, transfer it to an airtight container. This keeps it fresh for up to three days in the fridge. When storing, make sure the container is sealed tight. This prevents any odors from mixing with your creamed corn. Reheating creamed corn is easy. You can use the stove or microwave. If using the stove, place the corn in a skillet over low heat. Stir it often to avoid burning. Add a splash of milk or cream if it seems thick. If using the microwave, cover the bowl with a lid. Heat it in short bursts of 30 seconds, stirring in between. This helps keep the flavor and texture just right. Freezing creamed corn is a great way to save it. First, let it cool completely. Then, pour it into a freezer-safe container. Leave some space at the top for expansion. You can also use freezer bags. Just remove as much air as possible before sealing. It will keep well for up to three months. When ready to eat, thaw it overnight in the fridge. Reheat it as mentioned above for the best taste. To make Steakhouse Creamed Corn, start by melting butter in a skillet. Add sweet corn and cook for about five minutes. Pour in heavy cream and milk, then let it simmer. Stir in sugar, garlic powder, onion powder, salt, and pepper. Cook for another ten minutes until it thickens. Add Parmesan cheese and mix well. For a creamier texture, blend part of the corn and return it to the skillet. Finally, serve warm with chives on top. You can find the full recipe above. The best corn for creamed corn is sweet corn. You can use fresh or frozen corn. Fresh corn gives a bright flavor and crunch. Frozen corn is convenient and still tasty. Avoid canned corn, as it can be too soft and mushy. Yes, you can make creamed corn ahead of time. Just cook it as normal and cool it down. Store it in an airtight container in the fridge. When ready to serve, reheat it in a skillet over low heat. Add a splash of milk to make it creamy again if needed. Steakhouse Creamed Corn is easy to make with the right ingredients and steps. Choosing fresh ingredients and adding optional flavors can heighten your dish. Follow my tips on cooking and serving for the best results. Try variations to match your taste, too. Store leftovers properly and follow reheating tips for delicious results. Making this dish from scratch is rewarding and satisfying. Enjoy your creamy corn creation and impress your family or guests!

Steakhouse Creamed Corn Rich and Creamy Recipe Guide

Steakhouse creamed corn is the ultimate comfort food! With its rich and creamy texture, it pairs perfectly with any steak

Older posts
Newer posts
← Previous Page1 … Page33 Page34 Page35 … Page67 Next →

dsad

© 2025 Foodish Talk • Built with GeneratePress

Our Policies

  • Copyright Policy
  • Cookie Policy
  • GDPR Policy
  • Privacy Policy
  • Disclaimer
  • Terms Of Use

More Information

  • Home
  • About
  • Contact
  • Appetizers
  • Dessert
  • Dinner
  • Drinks
©2025, Foodish Talk About Back To Top