Skip to content
DisclaimerTerms Of UseGDPR PolicyCookie Policy

Foodish Talk

  • Home
  • Drinks
  • Appetizers
  • Dinner
  • Dessert
  • About
  • Contact
  • Privacy Policy
DisclaimerTerms Of UseGDPR PolicyCookie Policy

Ava

- ½ cup unsalted butter - 1 cup semi-sweet chocolate chips - 2 large eggs - 2 large egg yolks - ½ cup granulated sugar - ¼ cup all-purpose flour - 1 teaspoon vanilla extract - Pinch of salt - Optional: Powdered sugar, fresh raspberries or strawberries for garnish To make chocolate lava cake, you need a few key ingredients. Start with butter and chocolate chips for a rich base. The eggs and yolks give the cake its structure and creaminess. Sugar adds sweetness, while flour helps bind everything together. Vanilla gives a nice flavor, and a pinch of salt enhances all the tastes. For a pretty touch, you can top your cake with powdered sugar and berries. - Ramekins (6 oz) - Mixing bowls - Whisk or electric mixer - Microwave-safe bowl - Baking tray Having the right tools makes baking easier. Use small ramekins to hold the batter. Mixing bowls and a whisk help you blend the ingredients well. A microwave-safe bowl is perfect for melting chocolate. Finally, a baking tray helps you move the ramekins in and out of the oven safely. For the full recipe, check out the detailed steps below. 1. Preheat your oven to 425°F (220°C). 2. Grease four ramekins (6 oz each) with butter. 3. Set the ramekins on a baking tray for easy handling. 4. In a medium microwave-safe bowl, combine ½ cup unsalted butter and 1 cup semi-sweet chocolate chips. 5. Microwave in 30-second intervals, stirring until smooth. Let it cool slightly. 1. In a separate bowl, whisk together 2 large eggs, 2 large egg yolks, and ½ cup granulated sugar. Mix until light and fluffy, about 3-5 minutes. 2. Carefully fold the melted chocolate and butter mixture into the egg mixture with a spatula. 3. Sift in ¼ cup all-purpose flour, a pinch of salt, and 1 teaspoon vanilla extract. 4. Gently fold the batter until no flour is visible. 1. Evenly pour the batter into the prepared ramekins, filling them about ¾ full. 2. Bake in the preheated oven for 12-14 minutes. The edges should be firm, but the center must be soft and jiggly. 3. Remove the cakes from the oven and let them cool for 1 minute. 4. Carefully run a knife around the edge of each cake. Invert them onto individual plates. 5. Dust with powdered sugar and add fresh raspberries or strawberries for garnish if you like. For the full recipe, refer back to the ingredients section. Enjoy your delicious creation! To get that gooey center, your baking time is key. You should bake for 12 to 14 minutes. Watch the edges; they should be firm, while the center stays soft and jiggly. If you bake too long, you risk losing that molten magic. Also, the temperature of your ingredients matters. Use room-temperature eggs. This helps mix them well and creates the best texture. Melt the chocolate and butter together fully, but let it cool slightly before mixing. This step keeps your cake from cooking too fast. Serving chocolate lava cake with vanilla ice cream is a fantastic choice. The warm cake and cold ice cream create a perfect balance. You can also dust the cake with powdered sugar for a nice touch. For plating, flip the cakes onto individual plates. Add a scoop of ice cream next to the cake. Garnish with fresh raspberries or strawberries for color and taste. This makes the dish look stunning and appetizing. One common mistake is overbaking. Keep an eye on your cakes as they bake. If they rise too much and lose their jiggle, they are likely overbaked. Another mistake is not greasing the ramekins properly. Use plenty of butter to coat the insides. This step ensures the cakes come out easily. If you skip this, your cakes may stick, ruining their shape. {{image_2}} You can make your chocolate lava cake even better! A great way is by adding espresso or coffee. This boosts the chocolate flavor. Just mix in a tablespoon of brewed espresso into the melted chocolate. You can also try different flavored extracts. Almond or orange extracts can add a nice twist. Just a few drops can change the whole taste. If you need gluten-free options, swap the all-purpose flour for almond flour or a gluten-free blend. This keeps the cake rich and tasty. For vegan alternatives, replace the eggs with flaxseed meal or applesauce. Use dairy-free chocolate and a plant-based butter substitute. These swaps keep the cake delicious and friendly for all diets. Seasonal fruits can bring new life to your dessert. In summer, add fresh berries like raspberries or strawberries. In fall, try small pieces of poached pears or apples. Each fruit adds its own flavor and charm. You can also use different types of chocolate. Dark chocolate gives a rich taste, while white chocolate adds sweetness. Mix and match to find your favorite flavors! For the full recipe, check out the detailed steps above. To keep your chocolate lava cake fresh, store it in the fridge. Place the cooled cakes in an airtight container. If you don't have one, cover them tightly with plastic wrap. They will stay good for 1-2 days. After that, the texture may change, and you might lose the gooey center. When reheating, you have a couple of options. The best method is to use the oven. Preheat it to 350°F (175°C) and warm the cakes for about 8-10 minutes. You can also use the microwave for a quick fix. Heat each cake for 15-20 seconds, but watch closely. You want to avoid cooking them too long. This keeps the molten center intact, so you enjoy that delicious ooze when you dig in. You can tell your cake is done by checking the edges. They should be firm, while the center remains soft and jiggly. A good rule of thumb is to bake for 12-14 minutes. If you notice the top has risen and looks set, it may be time to remove it. Remember, underbaking is key for that gooey center! Yes, you can make the batter ahead of time. Just prepare it and cover it well. Store it in the fridge for up to 24 hours. When you're ready to bake, let it sit at room temperature for about 30 minutes. This helps the batter bake evenly. If your cakes lack that gooey center, you may have overbaked them. To fix this next time, reduce the baking time. Start checking at 10 minutes. Also, ensure your oven is calibrated correctly. If it runs hot, your cakes will cook faster than expected. Absolutely! You can use dark chocolate for a richer flavor or milk chocolate for a sweeter treat. Just remember to adjust the sugar if you choose a sweeter chocolate. Each type will give the cake a unique taste, so feel free to experiment! To adjust the serving size, simply multiply the recipe ingredients. For example, if you want to serve eight, double all ingredients. Keep the baking time the same, but check for doneness a bit earlier. If you’re using larger ramekins, they may need a little more time. Yes, you can bake the batter in a larger dish, like a baking pan. Just pour the batter into the prepared dish and adjust the baking time. A larger dish will need more time to bake. Check for doneness by inserting a toothpick in the center; it should come out with some batter on it. For the full recipe, check the complete instructions to ensure success! This blog post covered all you need to bake a perfect chocolate lava cake. We discussed the essential ingredients, kitchen tools, and steps to follow. I also shared tips for flawless results, including common mistakes to avoid. You can explore fun variations to keep this dessert exciting. Don't forget about storage and reheating to enjoy every last bite. With some care, you can impress anyone with this delicious treat. Grab your ingredients and start baking; the gooey center awaits!

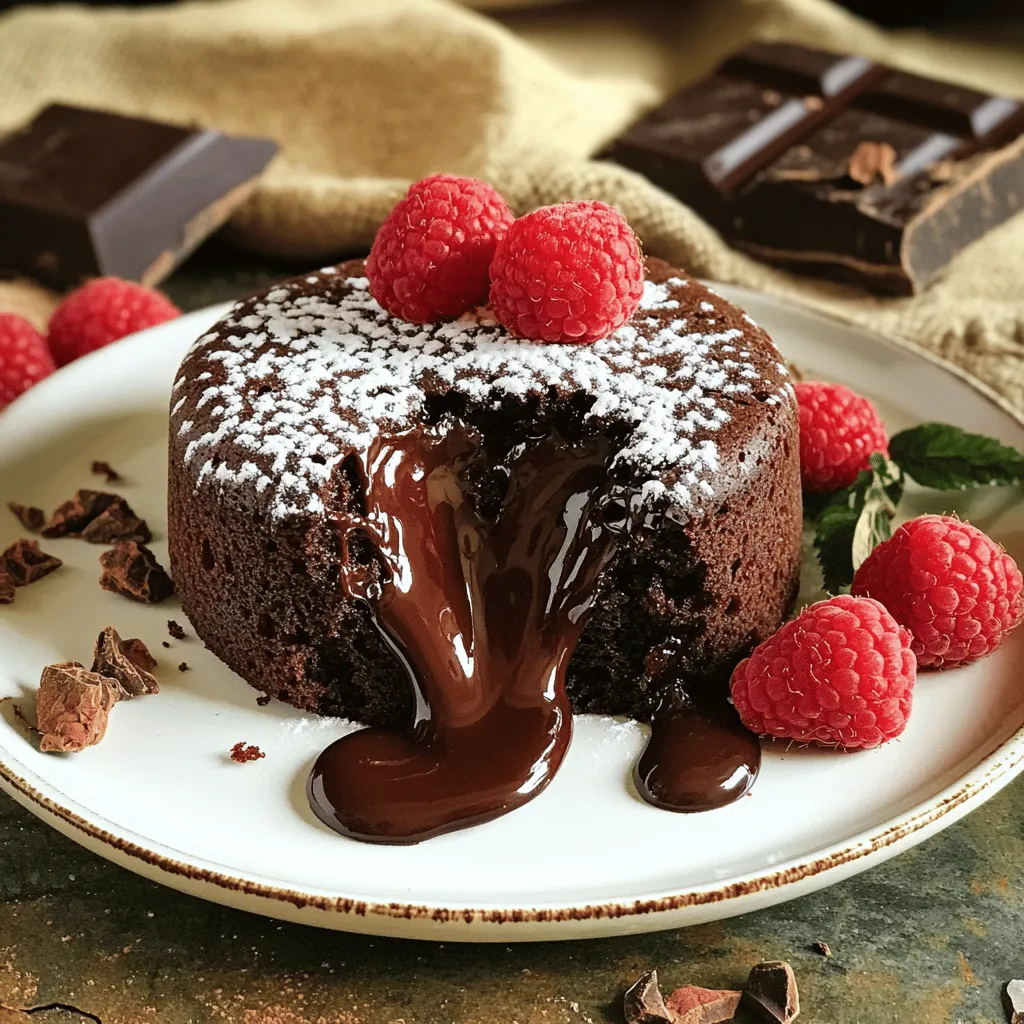
Chocolate Lava Cake Rich and Decadent Delight

If you’re craving a treat that melts in your mouth, this Chocolate Lava Cake recipe is for you! With a

- 2 medium zucchinis, spiralized into noodles - 1 bell pepper (red or yellow), sliced - 1 cup snap peas, trimmed - 1 medium carrot, julienned - 3 green onions, chopped - 2 cloves garlic, minced - 1 tablespoon ginger, grated - 3 tablespoons soy sauce (or tamari for gluten-free) - 1 tablespoon sesame oil - 1 tablespoon olive oil - 1 tablespoon rice vinegar - 1 teaspoon chili flakes (optional) - Sesame seeds for garnish Finding fresh ingredients is key to great flavor. The zucchinis should be firm and smooth for the best texture. You can choose any bell pepper that you like. Red or yellow adds a nice sweetness. The snap peas should look bright and crisp. Select a medium carrot that feels heavy for its size. The garlic and ginger give a nice kick. I love using fresh garlic. It adds so much more taste than powdered garlic. The soy sauce ties everything together. If you want a gluten-free option, tamari works great. The sesame oil adds a rich, nutty flavor. Rice vinegar brightens the dish. You can add chili flakes if you want some heat. To make this dish colorful and healthy, gather all these ingredients before you start cooking. You will find the Full Recipe helpful for the steps ahead. To start, you’ll want to spiralize the zucchinis. Use a spiralizer for this. Here’s how: 1. Wash the zucchinis well. 2. Trim both ends. 3. Insert them into the spiralizer and twist to create noodles. After spiralizing, set the noodles aside. Place them on a clean paper towel. This helps to remove extra moisture. Too much moisture can make the dish watery. Now, heat your skillet over medium heat. Add olive oil and let it warm up. Once hot, add minced garlic and grated ginger. Sauté these for about one minute. They should smell great! Next, add the sliced bell pepper, snap peas, and julienned carrots. Stir-fry these for about 3-4 minutes. You want them to be bright and a bit soft, but still crunchy. It’s time to add the zucchini noodles. Toss them into the skillet with the cooked veggies. Drizzle with soy sauce, sesame oil, and rice vinegar. If you like spice, add chili flakes now. Use a spatula to stir everything together. Cook for another 2-3 minutes. You want the noodles warm but still crunchy. Remove the skillet from heat and fold in the chopped green onions. Serve the dish right away and sprinkle sesame seeds on top for a nice finish. For the full recipe, check the earlier section! To keep zucchini noodles crunchy, don’t cook them too long. Add them last in the stir fry. Cook just until warm. This helps them stay firm and fresh. Adjust the seasoning to match your taste. Start with the basic soy sauce and sesame oil. Then, add more if you like a stronger flavor. A splash of rice vinegar adds a nice zing as well. Avoid overcooking the zucchini noodles. They can turn mushy fast. Keep an eye on them while cooking. Stir-fry for only a few minutes. Choose the right skillet or wok for even cooking. A large, flat surface works best. This allows all the veggies to cook well without steaming. Serve the stir fry with a side of brown rice or quinoa. This gives you a full meal. You can also add protein to make it heartier. Pair it with grilled chicken or tofu for a healthy boost. Both options work great and add flavor. Feel free to experiment with your favorite proteins. {{image_2}} You can swap regular soy sauce for gluten-free soy sauce or tamari. This keeps the dish safe for those with gluten issues. Try adding other veggies like broccoli or mushrooms. They bring extra flavor and nutrition to your stir fry. You can change up the taste with different sauces. Try coconut aminos for a sweet twist. For a spicy kick, add sriracha or chili paste. Mixing in peanut sauce can also give your dish a new flair. To keep it plant-based, stick to the veggies listed in the recipe. For protein, add tofu or chickpeas. Tofu absorbs flavors well and adds a nice texture. Chickpeas bring a hearty bite and extra fiber. You can find the full recipe [here](#). To keep your zucchini noodle stir fry fresh, place any leftovers in the fridge. Use airtight containers to prevent moisture loss. Store them in the fridge for up to three days. This way, you can enjoy your meal again without losing flavor. When reheating, I suggest using a skillet over medium heat. This method keeps the taste and texture just right. Stir often to avoid sticking. Aim for about 3-4 minutes until heated through. Watch closely to prevent overcooking the zucchini noodles. You want them tender, not mushy. Yes, you can freeze zucchini noodles! However, I recommend freezing only the cooked stir fry. First, let it cool completely. Then, place it in freezer-safe bags or containers. Remove as much air as possible. It can last for up to three months in the freezer. When you’re ready to eat, thaw overnight in the fridge before reheating. Enjoy your tasty meal anytime with these storage tips! If you want to make this dish, check out the Full Recipe. You can make zucchini noodles without a spiralizer by using a few methods. One way is to use a vegetable peeler. Just run the peeler along the zucchini to create long strips. You can also use a box grater. Shred the zucchini with the coarse side to get thin ribbons. These methods work well if you don't have a spiralizer. Zucchini noodles can last for about 3 to 5 days in the fridge. To keep them fresh, store them in an airtight container. Make sure to remove any excess moisture. You can place a paper towel in the container to absorb water. This will help keep the noodles crisp and tasty. Yes, you can use other vegetables as noodles. Carrots are a great alternative; they add a sweet crunch. Sweet potatoes also work well. You can spiralize or slice them into thin strips like zucchini. Other options include cucumbers and butternut squash. Each vegetable brings its own flavor and texture to your dish. Try mixing different veggies for a colorful stir fry. For more ideas, check the Full Recipe. This blog post guides you through making a tasty zucchini noodle dish. We covered the ingredients, step-by-step instructions, and essential cooking tips. You learned how to prepare and cook your veggies without losing crunch. Remember to customize your dish with your favorite add-ins. Proper storage and reheating are key for leftovers. Enjoy experimenting with this healthy, quick meal. Your kitchen success awaits!

Zucchini Noodle Stir Fry Flavorful and Healthy Dish

Looking for a tasty way to eat more veggies? My Zucchini Noodle Stir Fry is the answer! This dish is

To make honey garlic shrimp tacos, you need fresh and simple ingredients. Here’s what you will need: - 1 pound shrimp, peeled and deveined - 3 tablespoons honey - 3 tablespoons soy sauce (or tamari for gluten-free) - 2 cloves garlic, minced - 1 teaspoon fresh ginger, grated - 1 tablespoon lime juice - 1 tablespoon olive oil - 8 corn tortillas - 1 cup shredded red cabbage - 1 avocado, sliced - 1/4 cup fresh cilantro, chopped - Lime wedges, for serving - Salt and pepper to taste These ingredients come together to create a fresh and tasty meal. The shrimp is the star of this dish, with honey giving it a sweet touch. The soy sauce or tamari adds a savory note, while garlic and ginger bring warmth and depth. Lime juice brightens the flavors, making every bite refreshing. Corn tortillas provide a soft base for the tacos. The crunchy cabbage and creamy avocado add texture. Fresh cilantro gives a burst of flavor. If you want to spice it up, consider adding chili or hot sauce as optional garnishes. This recipe is all about balance and flavor. To see the full recipe, check the section above. Marinating the Shrimp Start by mixing 3 tablespoons of honey, 3 tablespoons of soy sauce, 2 minced garlic cloves, 1 teaspoon of grated ginger, and 1 tablespoon of lime juice in a bowl. This creates a rich marinade. Add 1 pound of peeled and deveined shrimp to the bowl. Toss the shrimp until they are evenly coated. Let the shrimp marinate for 15 minutes. This step adds great flavor. Cooking the Shrimp Heat 1 tablespoon of olive oil in a large skillet over medium-high heat. Once the oil is hot, add the shrimp but keep the marinade for later. Cook the shrimp for 2 to 3 minutes until they turn pink and opaque. Remove the shrimp from the skillet and set them aside. In the same skillet, pour in the reserved marinade. Bring it to a simmer for about 2 minutes. This step thickens the sauce. Preparing the Marinade After simmering, return the shrimp to the skillet. Toss them in the sauce until they are fully coated and heated through. Season with salt and pepper to taste. This makes the shrimp even more flavorful. Warming the Tortillas Take 8 corn tortillas and warm them in a dry skillet. Heat each side for about 30 seconds until they become pliable. This step makes the tortillas soft and easy to fold. Layering Ingredients To assemble the tacos, place a few shrimp on each tortilla. Top them with 1 cup of shredded red cabbage and slices of 1 avocado. Add a sprinkle of 1/4 cup of fresh cilantro. This creates a colorful and tasty taco. Serving Suggestions Serve the tacos with lime wedges on the side. Squeezing fresh lime juice over the tacos enhances the flavor. Enjoy your delicious Honey Garlic Shrimp Tacos! For the full recipe, refer to the detailed instructions above. Perfectly Cooking Shrimp To cook shrimp right, use fresh or thawed shrimp. Heat your skillet over medium-high heat. Add olive oil and let it heat up. Place the shrimp in the skillet. Cook for 2-3 minutes until they turn pink and opaque. Avoid overcooking, or they will be tough. Remove them when done and set aside. Achieving the Right Sauce Consistency For a great sauce, use the marinade wisely. After cooking the shrimp, pour the reserved marinade into the same skillet. Bring it to a simmer for about 2 minutes. This reduces the sauce and thickens it nicely. It will coat the shrimp well when mixed back in. Pairing with Sides and Drinks These tacos go well with a fresh side salad or chips. You can serve them with lime wedges to add extra flavor. A light drink like sparkling water or a crisp white wine works great too. Presentation Ideas For a stunning presentation, stack the tacos on a colorful plate. Add a sprinkle of cilantro on top. Place lime wedges around the tacos. This makes a beautiful, inviting dish. Check the Full Recipe for more tips on making your meal shine! {{image_2}} Gluten-Free Options If you need gluten-free tacos, use tamari instead of soy sauce. This simple swap keeps the dish safe for those with gluten allergies. You can also choose corn tortillas, which are naturally gluten-free. This way, everyone can enjoy these tasty tacos. Dairy-Free Variations This recipe is already dairy-free, making it easy for those who avoid dairy. You don’t need to change anything for a dairy-free option. If you want a creamier texture, try using a dairy-free yogurt or avocado spread on your tacos. Adding Spice (Chili or Hot Sauce) If you love heat, add chili flakes or hot sauce to the marinade. This will give your shrimp a spicy kick. You can also mix in diced jalapeños for added flavor. Adjust the spice level to match your taste. Alternative Toppings Feel free to switch up the toppings on your tacos. Try adding sliced radishes for crunch or pickled onions for tang. You can also use a drizzle of sriracha or a sprinkle of queso fresco for extra flavor. Get creative with what you like! For the full recipe, check out the Honey Garlic Shrimp Tacos 🦐 section. To keep your honey garlic shrimp tacos fresh, store them properly. - Best Practices for Refrigeration Place leftover tacos in an airtight container. You can keep them in the fridge for up to two days. This helps lock in flavor and texture. It is best to store shrimp separate from tortillas. This way, tortillas stay soft and do not get soggy. - Freezing Instructions If you want to save them longer, you can freeze the shrimp. Wrap them tightly in plastic wrap, then place them in a freezer bag. They can last up to three months in the freezer. However, I don't recommend freezing the tortillas. They do not thaw well and can become tough. How do you reheat shrimp tacos? It’s easy! - How to Reheat Shrimp Tacos For best results, use a skillet. Heat it over medium heat. Add the shrimp and cook for about 2-3 minutes. Stir them gently until they are warm. If you have leftover tortillas, heat them in another skillet for 30 seconds on each side. This keeps them soft and pliable. Enjoy your tacos warm for the best taste! How to Make Honey Garlic Shrimp Tacos? To make honey garlic shrimp tacos, you need to start with fresh shrimp. Combine honey, soy sauce, garlic, ginger, and lime juice in a bowl. Toss the shrimp in this mix and let them marinate for 15 minutes. Next, heat olive oil in a skillet and cook the shrimp until pink. Use the leftover marinade to add flavor. Warm corn tortillas and assemble your tacos with shrimp, cabbage, avocado, and cilantro. For the full recipe, check out the details above. Can I use frozen shrimp? Yes, you can use frozen shrimp. Just make sure to thaw them before cooking. Place frozen shrimp in a bowl of cold water for about 15-20 minutes. Once thawed, peel and devein them if needed. This way, you can enjoy tasty tacos even when short on fresh shrimp. What are good side dishes for shrimp tacos? Great side dishes for shrimp tacos include: - Black beans - Mexican rice - Corn salad - Grilled vegetables - Guacamole and chips These sides pair well with the sweet and savory flavors of the tacos. They add color and nutrition to your meal. Caloric Breakdown A serving of honey garlic shrimp tacos typically contains about 350-400 calories. This number can vary based on ingredients and portion sizes. Each taco packs protein from shrimp, healthy fats from avocado, and fiber from cabbage, making them a balanced choice. Allergens and Dietary Considerations These tacos contain shellfish and soy, which can trigger allergies in some people. For gluten-free options, use tamari instead of soy sauce. You can also make them dairy-free by avoiding any creamy toppings. Always check labels for allergens when trying new ingredients. You now know how to make delicious honey garlic shrimp tacos. We covered each ingredient, from shrimp to olive oil, and shared easy steps for marinating and cooking. We also provided tips for perfecting your dish and serving it well. Variations let you customize flavors and accommodate dietary needs. Remember to store leftovers properly and reheat them for the best taste. Enjoy crafting these tasty tacos and impressing your friends and family with your skills!

Honey Garlic Shrimp Tacos Flavorful Quick Recipe

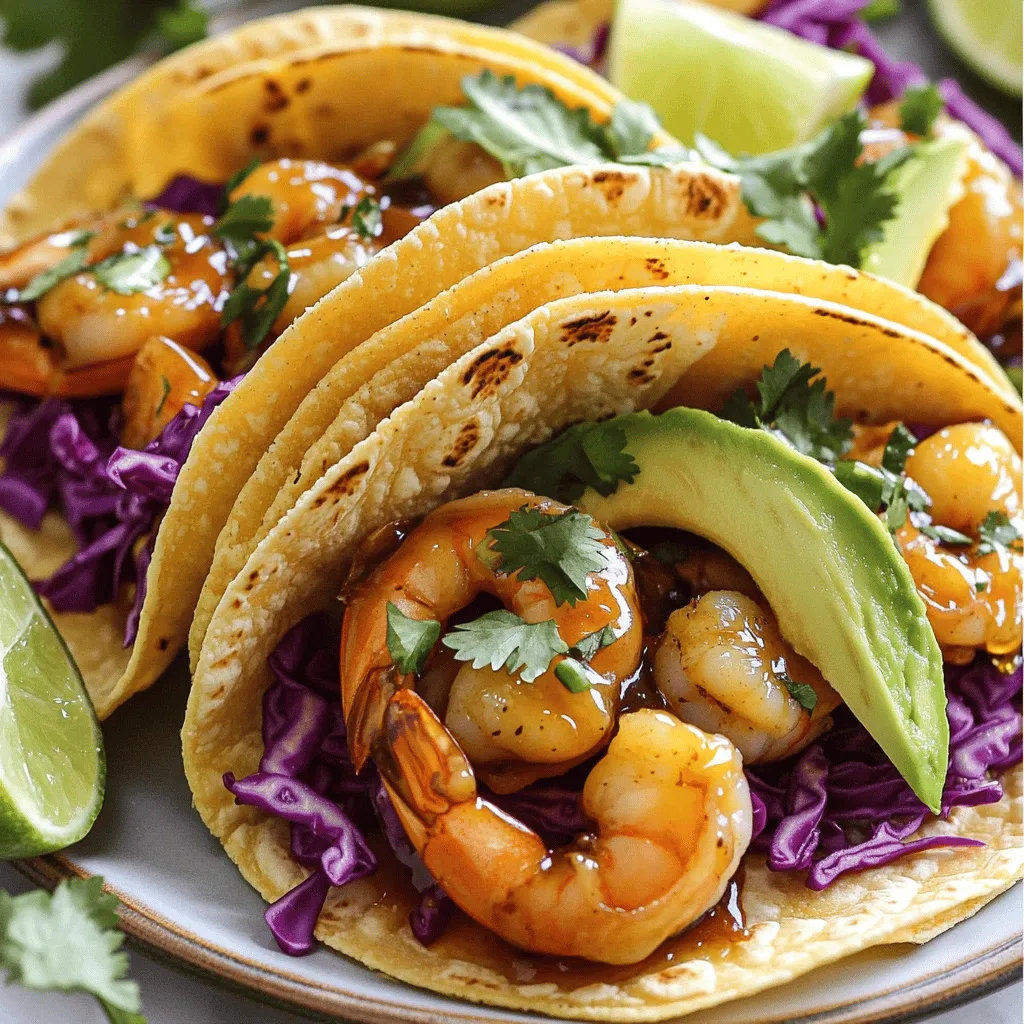
If you crave a quick yet delicious meal, these Honey Garlic Shrimp Tacos are the answer. Juicy shrimp coated in

To make a savory sweet potato casserole, you need a few key items: - 4 large sweet potatoes, peeled and cubed - 1 cup milk (or unsweetened almond milk) - 2 tablespoons butter - 1/2 cup brown sugar - 1 teaspoon cinnamon - 1/2 teaspoon nutmeg - Salt and pepper to taste - 1 cup shredded sharp cheddar cheese - 1/2 cup grated Parmesan cheese - 1 cup pecans, chopped - 1/2 cup rolled oats When selecting sweet potatoes, look for firm ones with smooth skin. Avoid any that have soft spots or wrinkles. Bright orange flesh means more flavor and nutrition. This dish shines with spices like cinnamon and nutmeg. These spices add warmth and depth. Fresh spices enhance flavor much more than dried ones. When possible, choose fresh or whole spices. They give the best taste to your casserole. You can add different ingredients for more flavor or nutrition. Try mixing in some cooked sausage for a meaty twist. If you want a vegan option, swap out the butter and cheese for plant-based versions. You can also use nuts like walnuts or almonds instead of pecans. These substitutions keep the dish interesting and cater to dietary needs. For the full recipe, check the link provided. First, preheat your oven to 350°F (175°C). This helps the casserole cook evenly. Next, prepare your sweet potatoes. Peel and cube four large sweet potatoes. Place them in a large pot. Cover them with water. Bring the water to a boil. Cook the sweet potatoes for 15-20 minutes. They should be fork-tender. Drain the water and let them cool a bit. Now, it’s time to mash the sweet potatoes. In a large mixing bowl, mash them until smooth. You want a creamy texture with no lumps. This step is crucial for a great casserole. Next, add milk and butter to the mashed sweet potatoes. You can use almond milk if you prefer. Mix in brown sugar, cinnamon, nutmeg, salt, and pepper. Stir until everything is well combined. The mixture should look creamy and flavorful. Now, it’s time for cheese! Stir in a cup of shredded sharp cheddar cheese. Keep a small amount for later. This cheese adds a nice richness to the dish. Transfer the sweet potato mixture into a greased baking dish. Spread it evenly across the bottom. Proper layering is key for even cooking. In a separate bowl, mix together chopped pecans, rolled oats, and the remaining cheddar cheese. This mixture will create a wonderful topping. Sprinkle it evenly over the sweet potato layer. Bake the casserole in your preheated oven for 30-35 minutes. Look for a golden brown and crispy top. This texture gives your casserole the perfect finish. Let it cool for a few minutes before serving. Enjoy your delicious savory sweet potato casserole! For the full recipe, check the complete instructions above. To make the best savory sweet potato casserole, start by boiling your sweet potatoes. Peel and cube the potatoes. Place them in a pot and cover them with water. Bring the water to a boil. Cook for 15 to 20 minutes until tender. You can test for doneness by poking a piece with a fork. If it slides off easily, it’s ready! You can enhance the flavor in many ways. Try adding a splash of maple syrup for sweetness. Combine sweet potatoes with savory garlic or onion for depth. Fresh herbs like thyme or rosemary can add a bright flavor. Experiment with spices like smoked paprika or cumin for a twist. Pair your casserole with a fresh salad or roasted veggies. It’s also great alongside grilled meats or fish. For a lovely presentation, serve the casserole in a colorful dish. Sprinkle some fresh parsley or add a drizzle of honey on top for a special touch. Check the Full Recipe for more serving ideas! {{image_2}} You can make tasty swaps to fit different diets. For a vegan version, replace milk with unsweetened almond milk and butter with coconut oil. Use maple syrup instead of brown sugar for sweetness. If you want a gluten-free dish, ensure your oats are certified gluten-free. For lower sugar, cut the brown sugar in half, and add a ripe banana for natural sweetness. Low-carb eaters can use cauliflower instead of sweet potatoes. This keeps the texture without the carbs. You can play with local flavors to make this casserole unique. For a Southern twist, add cooked sausage for extra flavor. If you want a Mediterranean style, mix in sun-dried tomatoes and feta cheese. Fresh herbs like rosemary or thyme can also enhance the flavor. You can even add a dash of cumin for a warm, earthy taste. These small changes can transform the dish into something new and exciting. Use seasonal ingredients to keep the casserole fresh. In fall, add chopped apples or cranberries for a sweet touch. In winter, toss in roasted Brussels sprouts or carrots for added depth. You can also sprinkle pumpkin spice for a holiday flair. As spring arrives, consider adding fresh herbs like parsley or dill. These bright flavors make the dish feel lighter and more vibrant, perfect for family dinners. For the full recipe, try the Savory Sweet Potato Casserole . Store any leftover savory sweet potato casserole in an airtight container. This keeps it fresh and tasty. You can keep it in the fridge for about 3 to 5 days. If you plan to eat it later, make sure to cool it completely before sealing it up. To freeze the casserole, let it cool first. Then, wrap it tightly in plastic wrap and foil. This keeps out air and prevents freezer burn. It can last in the freezer for up to 3 months. When you're ready to eat it, thaw it overnight in the fridge. For reheating, the oven works best. Preheat it to 350°F (175°C) and place the casserole in for about 20 minutes. If you prefer using a microwave, heat it in short bursts, checking often. To keep the top crispy, cover it loosely with foil while baking. Enjoy your warm and delicious dish! How long does it take to make savory sweet potato casserole? Making this casserole takes about 1 hour. You spend 15 minutes prepping and boiling the sweet potatoes. The baking time is around 30-35 minutes. Can I prepare this casserole in advance? Yes, you can make this casserole ahead of time. Prepare it fully and store it in the fridge. Just cover it with foil to keep it fresh. When ready to bake, let it sit at room temp for about 30 minutes. Then bake as directed. What to do if the casserole is too dry or too wet? If your casserole is too dry, add a little milk or more butter. Mix it well to combine. If it's too wet, bake it a bit longer. This helps evaporate excess moisture. How to avoid a soggy bottom crust? To prevent a soggy bottom crust, make sure to drain the sweet potatoes well after boiling. Also, avoid adding too much liquid. Using a greased baking dish helps too. Overview of nutritional benefits of sweet potatoes. Sweet potatoes are packed with vitamins A and C. They are high in fiber and low in calories. This makes them a healthy choice for many diets. How this dish fits into a balanced diet. This savory sweet potato casserole adds nutrients to your meal. It offers carbs, protein, and healthy fats. With cheese and nuts, it balances taste and nutrition well. Enjoy this dish as part of a varied diet. For the full recipe, check out the details above. This blog post covered essential ingredients and their uses in making a delicious sweet potato casserole. I shared tips on preparing sweet potatoes, mixing ingredients, and baking techniques for the best results. You can adapt this dish for various diets or seasonal tastes. Remember the storage tips for leftovers and reheating to keep flavors intact. With these insights, you'll create a tasty and satisfying meal perfect for any occasion. Enjoy making this dish your own!

Savory Sweet Potato Casserole Perfect for Family Dinners

Looking for a dish that brings warmth and comfort to family dinners? Try my Savory Sweet Potato Casserole. With its

To make peanut butter energy bites, you need a few simple ingredients. Each one plays a key role in flavor and texture. Here is the list of ingredients: - 1 cup rolled oats - ½ cup natural peanut butter - ¼ cup honey or maple syrup - ¼ cup ground flaxseed - ¼ cup dark chocolate chips - 2 tablespoons chia seeds - 1 teaspoon vanilla extract - A pinch of salt These ingredients work together to create a tasty and healthy snack. Rolled oats give the bites a great base. Natural peanut butter adds creaminess and protein. Honey or maple syrup sweetens the mix and binds it. Ground flaxseed provides fiber and healthy fats, while dark chocolate chips add a delightful touch of sweetness. Chia seeds boost the nutrition and add a nice crunch. Vanilla extract enhances the flavor, and a pinch of salt balances everything out. When you gather these ingredients, you set the stage for a fun cooking experience. I enjoy making these energy bites. They are quick to prepare and can easily be adjusted to fit your taste. For the full recipe, follow my simple steps to create these delicious snacks. - Mix dry ingredients in a bowl. Start with 1 cup of rolled oats. Add ¼ cup ground flaxseed, 2 tablespoons chia seeds, and a pinch of salt. Stir well until they blend nicely. - Combine wet ingredients in another bowl. Use ½ cup natural peanut butter, ¼ cup honey or maple syrup, and 1 teaspoon vanilla extract. Mix until smooth and creamy. - Blend dry and wet ingredients together. Pour the peanut butter mixture into the dry mix. Stir until everything is well combined and you see no dry spots. - Form the mixture into balls. Use your hands to take small amounts, about 1 inch wide. Roll them gently to create smooth balls. - Place on a baking sheet. Use parchment paper to line the sheet. This helps prevent sticking. Arrange the balls evenly, giving them space to chill. - Refrigerate for firmness. Place the baking sheet in the fridge for at least 30 minutes. This helps the bites hold their shape. - Move to an airtight container for storage. After chilling, transfer the bites to the container. They stay fresh in the fridge for up to a week. You can also freeze them for longer storage. For the full recipe and all the details you need, check the Nutty Delight Peanut Butter Energy Bites recipe above. To make perfect peanut butter energy bites, you need to mix well. Start with the dry ingredients. In a bowl, add rolled oats, ground flaxseed, chia seeds, and salt. Stir them together until they are even. This step ensures all flavors blend. Next, take another bowl for the wet ingredients. Combine the peanut butter, honey, and vanilla extract. Mix until smooth. Pour this mixture into the dry ingredients. Stir carefully. This way, every bite gets the same great taste. Shaping the bites can be fun! Use your hands to roll the mixture into small balls, about one inch wide. Keep your hands slightly wet. This helps prevent the mixture from sticking. If you want, you can also use a small cookie scoop. This gives you uniform sizes. Place each ball on a parchment-lined baking sheet. This makes cleaning easier later. If you want a different shape, try pressing the mixture into a small container. You can cut it into bars later. Peanut butter energy bites are great on their own, but you can serve them in fun ways. Try pairing them with fresh fruit like apples or bananas. You can also sprinkle some nuts on top for extra crunch. Another idea is to serve them with yogurt. The creamy yogurt complements the bites nicely. For a fun twist, you can dip them in melted chocolate. This adds a delicious layer and makes them even more special. For the full recipe, check out Nutty Delight Peanut Butter Energy Bites. Enjoy creating your own tasty snacks! {{image_2}} If you want to switch things up, try different nut butters. Almond butter offers a sweet, nutty flavor. Cashew butter brings a creamy texture that many love. Sunflower seed butter is a great choice for nut-free diets. Each option provides a unique taste and texture. Feel free to experiment and find your favorite! You can boost flavor and nutrition with fun add-ins. Dried fruit like cranberries or raisins adds sweetness. Seeds such as pumpkin or sunflower seeds provide extra crunch. If you want a protein boost, stir in some protein powder. Spices like cinnamon can also add a warm kick. Mix and match until you find your perfect blend! Making healthy swaps is easy with these energy bites. You can lower the sugar by using less honey or maple syrup. Try using mashed bananas for natural sweetness. Adding superfoods like spirulina or cacao powder can enhance nutrition. These simple changes keep your energy bites tasty and healthy. Enjoy making them your own! You can keep your peanut butter energy bites fresh in the fridge. Place them in an airtight container. They will stay good for about a week. This makes them a great snack for busy days. The cool temperature helps maintain their shape and taste. If you want to store them for a longer time, freezing is a good option. To freeze, place the energy bites in a single layer on a baking sheet. This prevents them from sticking together. Once they are frozen solid, move them to a freezer bag or container. They can last for up to three months in the freezer, ready for you when you need a quick snack. When you're ready to eat your frozen bites, thaw them in the fridge overnight. If you're in a hurry, you can leave them at room temperature for about 30 minutes. Avoid using a microwave. This keeps their texture and flavor just right. Enjoy your thawed bites as a snack or energy boost before a workout. Peanut butter energy bites are packed with nutrients. They give you energy and help you feel full. Here are some key benefits: - Protein: Peanut butter and flaxseed provide a good source of protein. This helps build and repair muscles. - Fiber: Rolled oats and chia seeds add fiber. Fiber is good for digestion and keeps you satisfied longer. - Healthy Fats: Natural peanut butter contains healthy fats. These fats are important for brain health and energy. - Antioxidants: Dark chocolate chips have antioxidants, which help protect your cells. These bites are not just tasty but also support your overall health. Peanut butter energy bites can stay fresh for about a week in the fridge. Here are some tips for storing them: - Airtight Container: Always store the bites in an airtight container. This keeps them fresh and prevents them from drying out. - Freezing: If you want to keep them longer, freeze them. They can last for up to three months in the freezer. - Thawing: When ready to eat, thaw them in the fridge overnight. This keeps them tasty and ready to enjoy. Absolutely! You can make these energy bites your own. Here are some options: - Nut Butters: Swap peanut butter for almond or cashew butter if you prefer. - Add-Ins: Mix in dried fruits like cranberries or raisins for extra flavor. - Flavor Boosts: Try adding a bit of cinnamon or cocoa powder for a unique twist. The recipe is flexible, so have fun making it your own! You can find the full recipe to get started. In this blog post, we explored making tasty peanut butter energy bites. We covered the simple ingredients and easy steps to mix, roll, and chill them. Tips for best practices helped ensure great results. We also discussed fun variations and how to store your bites for freshness. These bites are healthy and perfect for snacking anytime. Enjoy making them your way! You now have the tools to create a quick, nutritious snack that fits your taste. Happy making!

Peanut Butter Energy Bites Delicious and Nutritious Snack

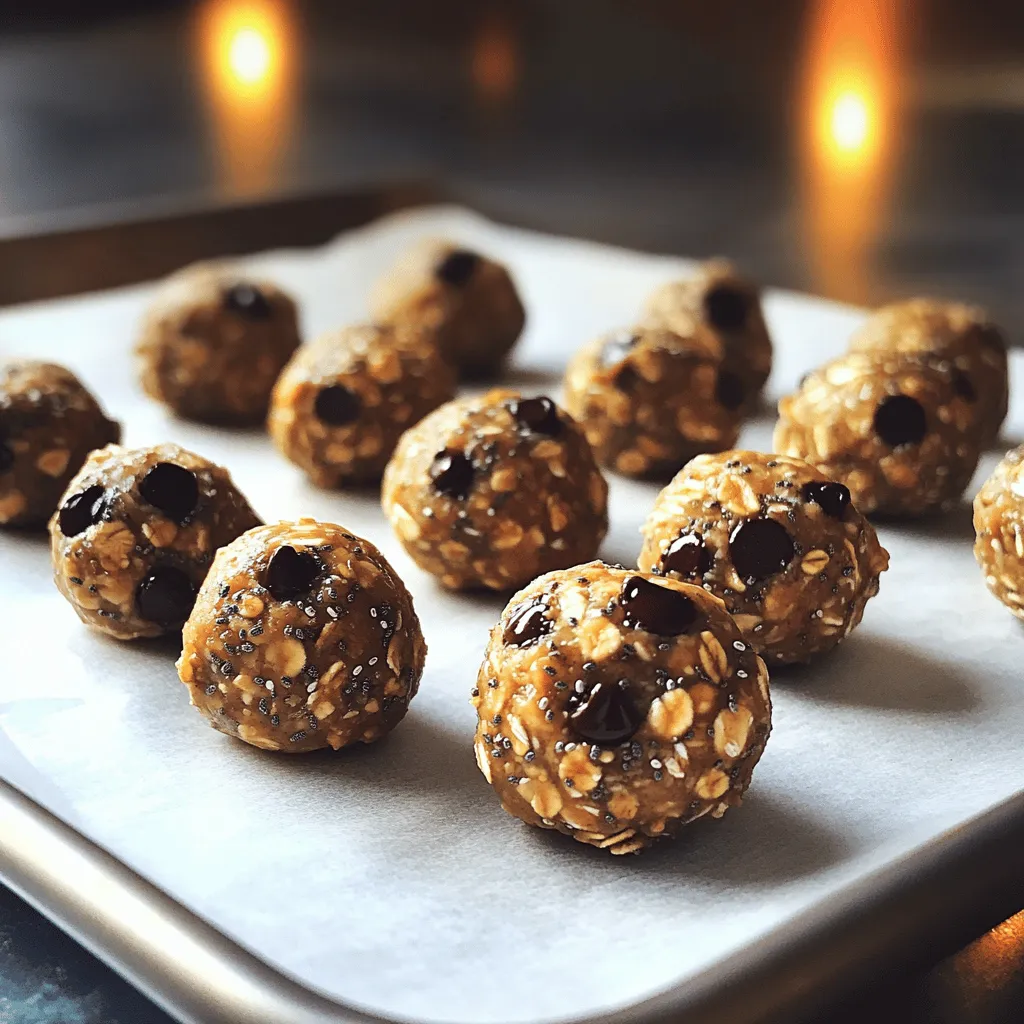
Looking for a quick and tasty snack? Peanut Butter Energy Bites are your answer! Packed with healthy ingredients like oats,

Cooking Vegetable Pad Thai is fun and easy. Gather these fresh ingredients for a tasty meal: - 8 oz rice noodles - 2 tablespoons vegetable oil - 1 cup tofu, cubed - 1 red bell pepper, thinly sliced - 1 carrot, julienned - 1 zucchini, julienned - 2 green onions, chopped - 2 cloves garlic, minced - 2 eggs, lightly beaten (optional) - 1/4 cup soy sauce - 2 tablespoons tamarind paste - 2 tablespoons brown sugar - 1 tablespoon chili sauce (adjust to taste) - 1/2 cup bean sprouts - 1/4 cup crushed peanuts - Fresh cilantro leaves for garnish - Lime wedges for serving These ingredients create rich flavors and bright colors. The rice noodles give you a chewy base. Tofu adds protein, while the vegetables bring crunch and nutrition. The sauce blends sweet, salty, and tangy notes. You can adjust the chili sauce to match your spice level. If you want to skip eggs, that's fine too. Just follow the [Full Recipe] for all the steps needed. Enjoy the process and the delicious results! To cook rice noodles properly, start by bringing a pot of water to a boil. Once boiling, add the noodles. Cook them for about 5 to 8 minutes until they are al dente. Drain the noodles well and rinse them under cold water. This step helps stop the cooking and keeps them firm. Key points to avoid mushy noodles include not overcooking and rinsing them with cold water right after cooking. For cooking tofu to perfection, begin by pressing it to remove excess moisture. Cut it into small cubes. Heat vegetable oil in a large skillet or wok over medium-high heat. Add the tofu and cook for about 5 to 7 minutes until golden brown. Remove the tofu and set it aside. When stir-frying vegetables, aim for a high heat. Add garlic first, then toss in the red bell pepper, carrot, and zucchini. Stir-fry for about 3 to 4 minutes until they start to soften but stay crisp. To incorporate sauce and seasonings, add the cooked rice noodles back into the skillet. Pour in the soy sauce, tamarind paste, brown sugar, and chili sauce. Toss everything together until the noodles are well coated and heated through. Make sure to mix in the tofu, chopped green onions, and bean sprouts evenly. This ensures a balanced flavor distribution. For a final touch, serve it hot, garnished with crushed peanuts, fresh cilantro, and lime wedges on the side. For the complete dish, check the Full Recipe. For a great Vegetable Pad Thai, choose quality ingredients. I recommend using Kikkoman or San-J for soy sauce. For tamarind paste, look for brands like Thai Kitchen or Aroy-D. To balance sweetness and spice, use brown sugar and chili sauce wisely. Start with a small amount of chili sauce, then adjust to your taste. This balance makes your dish flavorful without overwhelming it. Stir-frying is key to a perfect Pad Thai. Use high heat and a well-seasoned wok for the best results. If you use a skillet, keep the heat high too, but watch your cooking time. In a wok, you can toss the food more easily. This helps all the flavors blend well and keeps the veggies crisp. To garnish, add crushed peanuts and fresh cilantro on top. This gives a nice crunch and bright color. Lime wedges on the side add a fresh pop. Serve your Pad Thai in a large bowl or plate to show off the vibrant colors. Pair it with a light salad for a complete meal. Enjoy every bite of this dish! {{image_2}} If you want a vegan dish, skip the eggs. You can use silken tofu instead. It adds creaminess and protein. You can also try chickpeas or lentils for a hearty bite. For more color and flavor, add vegetables like broccoli or snap peas. They bring crunch and nutrition. You can add shrimp or chicken for extra protein. If you choose shrimp, cook them for about three minutes. For chicken, slice it thinly and cook for five to seven minutes. Make sure the chicken is no longer pink. This keeps the meal safe and tasty. To make your Pad Thai gluten-free, look for rice noodles labeled gluten-free. You can also use tamari instead of soy sauce. Always check labels to avoid hidden gluten. When cooking, keep your utensils clean to prevent cross-contamination. Enjoy the fresh flavors without worry. For the complete recipe, check out the Full Recipe. To keep your leftover Pad Thai fresh, use airtight containers. Glass or plastic containers work well. Make sure they seal tightly to prevent air from getting in. Store your Pad Thai in the fridge for up to three days. When reheating, the best method is to use a skillet. Heat it over medium heat. Add a splash of water or oil to keep it moist. Stir often to warm it evenly. Reheat for about 5-7 minutes until hot. Yes, you can freeze Vegetable Pad Thai. To freeze, let it cool completely first. Then, place it in freezer bags or containers. Squeeze out as much air as possible. For thawing, leave it in the fridge overnight before reheating. This keeps the flavors intact. Pad Thai is a famous dish from Thailand. It has a rich history and ties to Thai culture. Street vendors often serve it, making it popular with locals and tourists. The dish combines rice noodles, protein, and vegetables. It usually has a sweet, salty, and tangy flavor. You can find it in many Thai restaurants worldwide. Yes, you can make Vegetable Pad Thai ahead of time. This makes meal prep easy! Cook the noodles and stir-fry the veggies. Store them separately in airtight containers. Keep them in the fridge for up to three days. When you are ready to eat, just heat and combine them. This method helps keep your noodles from getting soggy. Vegetable Pad Thai is packed with nutrients. It has a mix of fresh vegetables like bell peppers, carrots, and zucchini. These veggies add vitamins and fiber. Tofu adds protein, making it a balanced meal. The dish can also be lower in calories if you use less oil. Overall, it’s a healthy choice for lunch or dinner. For the complete recipe, check out the Full Recipe. You’ll find all the steps to make this tasty dish at home. Enjoy cooking! This blog post covered all the key steps to create a tasty Vegetable Pad Thai. We outlined the ingredients you’ll need, including rice noodles, tofu, and vibrant veggies. You learned how to cook and combine these ingredients for the best flavor. I shared tips on achieving authentic taste and suggested variations to suit your needs. In closing, experimenting with this dish can lead to wonderful meals. Enjoy personalizing your Vegetable Pad Thai for family and friends.

Vegetable Pad Thai Flavorful and Nutritious Meal

Looking for a tasty and healthy meal option? Vegetable Pad Thai is your answer! Packed with fresh veggies and bursting

- 3 cups old-fashioned rolled oats - 1 cup pecans, roughly chopped - 1/2 cup sunflower seeds - 1/2 cup pumpkin seeds - 1/2 teaspoon salt - 1 teaspoon cinnamon - 1/3 cup coconut oil, melted - 1/2 cup pure maple syrup - 1 teaspoon vanilla extract - 1 cup dried cranberries or raisins (optional) Using quality ingredients makes a big difference in taste. Old-fashioned rolled oats give the granola a chewy texture. Pecans add a rich flavor and crunch. Sunflower and pumpkin seeds boost nutrition and add variety. Salt enhances all the flavors, while cinnamon brings warmth and sweetness. Coconut oil helps bind the granola and gives it a light taste. Pure maple syrup is a natural sweetener, making the granola sticky and delicious. Lastly, dried cranberries or raisins can add a fruity note if you choose to include them. One serving of maple pecan granola has about 250 calories. This is a good snack to keep you full. Each ingredient offers health benefits. Oats provide fiber, which aids digestion. Pecans are packed with healthy fats and protein. Sunflower seeds and pumpkin seeds offer vitamins and minerals. Coconut oil has medium-chain fatty acids that can support heart health. Maple syrup contains antioxidants, making it a better choice than refined sugar. Pecans and oats are both very good for your health. Pecans help lower bad cholesterol levels. They also contain antioxidants that fight inflammation. Oats are great for heart health and can help control blood sugar. The fiber in oats keeps you feeling full longer. Together, they make a tasty snack that also supports your health. Enjoying maple pecan granola can be a smart choice for a nutritious diet. Start by preheating your oven to 325°F (160°C). This step is key to getting a nice, crunchy granola. Use a large baking sheet and line it with parchment paper. This paper stops the granola from sticking and makes cleanup easy. You want even heat, so your granola bakes perfectly. In a large mixing bowl, add the rolled oats, chopped pecans, sunflower seeds, pumpkin seeds, salt, and cinnamon. Mixing these dry ingredients first ensures that every bite has a balance of flavors. Use a big spoon to stir them well. You want to see a nice, even blend. No clumps! This helps with even cooking later. In a small saucepan, melt the coconut oil over low heat. Once it’s melted, add the pure maple syrup and vanilla extract. Stir until everything is smooth and warm. This warming helps the flavors mix well together. When you pour this mixture over the dry ingredients, it will coat everything nicely. Make sure to mix thoroughly, so every oat and nut gets some love. This step is vital for the best taste and crunch! Now, you're ready to spread the granola on your baking sheet and start the fun of baking! For the full recipe, refer to the earlier section. To get that perfect crunch in your Maple Pecan Granola, use rolled oats. They provide a chewy base that crisps well. Next, stir the mixture halfway through baking. This helps it brown evenly. Bake until golden brown but not burnt. If you like it crunchier, bake a bit longer, but watch closely. If you want more or less sweetness, adjust the maple syrup. Try adding more for a sweeter taste or cutting back for less sugar. You can also mix in other sweeteners like honey or agave. Just remember, these changes can affect the final texture, so adjust carefully. Be careful not to overcrowd the baking sheet. Spread the granola evenly for even baking. If it clumps together, it won't bake well. Also, keep an eye on it during the last few minutes. Granola can go from perfect to burnt quickly, so stay alert. Follow the Full Recipe to ensure best results! {{image_2}} You can change the nuts and seeds for fun flavors. Try almonds for a crunchy bite. Walnuts add a rich taste. Cashews bring a creamy feel. For seeds, use chia or flax for more fiber. These swaps keep your granola fresh and exciting. Adding fruits or spices can make your granola special. Dried cherries or apricots bring sweetness. For a spicy kick, add nutmeg or ginger. You can mix in coconut flakes for a tropical taste. Each choice adds a new twist to your granola. You can easily make this recipe gluten-free and vegan. Use gluten-free oats to keep it safe. Swap coconut oil for a plant-based butter if you like. Maple syrup is already vegan, so you’re good there. These tweaks let everyone enjoy your tasty snack. For more detailed steps, check the Full Recipe. To keep your maple pecan granola fresh, use an airtight container. Glass jars work well. You can also use plastic containers that seal tightly. Store the granola at room temperature, away from heat and light. A dark pantry or cupboard is perfect. Maple pecan granola stays fresh for about two weeks when stored properly. After that, it may lose its crunch and flavor. If you notice any strange smells or tastes, it’s best to toss it. If you want to keep granola for longer, freezing is a great option. First, let it cool completely. Then, place it in a freezer-safe bag or container. Make sure to squeeze out any air before sealing. When you’re ready to eat, just thaw it at room temperature. It will taste fresh and crunchy again! To make this tasty granola, follow these steps: 1. Preheat your oven to 325°F (160°C) and line a large baking sheet with parchment paper. 2. In a big bowl, mix 3 cups of rolled oats, 1 cup of chopped pecans, 1/2 cup of sunflower seeds, 1/2 cup of pumpkin seeds, 1/2 teaspoon of salt, and 1 teaspoon of cinnamon. Stir well. 3. In a small pot, melt 1/3 cup of coconut oil. Add 1/2 cup of pure maple syrup and 1 teaspoon of vanilla extract. Stir until warm. 4. Pour the wet mix over the dry mix. Stir until all oats and nuts are coated. 5. Spread the mix on the baking sheet evenly. 6. Bake for 25-30 minutes, stirring halfway. Watch it closely at the end. The granola should be golden brown. 7. Remove it from the oven and let it cool completely. It will crisp as it cools. 8. If you want, mix in 1 cup of dried cranberries or raisins. 9. Store it in an airtight container at room temperature for up to two weeks. Yes, you can use other sweeteners. Honey is a great choice. It adds a nice flavor. Brown sugar is another option but may change the texture. Agave syrup works too. It is a light sweetener. Each choice will affect the taste and texture. Maple syrup gives a unique flavor, so keep that in mind. You can serve this granola in many ways. Here are some ideas: - Enjoy it with milk or a milk alternative for breakfast. - Top your yogurt with granola for added crunch. - Sprinkle it on smoothies for a tasty twist. - Use it as a topping for baked fruits or desserts. - Store it in a clear jar to show off those pretty layers. For more details, check the full recipe. Making Maple Pecan Granola is simple and fun. We covered ingredients, health benefits, and storage. Each ingredient plays a key role in flavor and nutrition. Preheating your oven and using parchment paper ensures great texture. You can customize sweetness and avoid common mistakes with simple tips. Variations allow you to explore different nuts and add-ins. Store your granola well to keep it fresh. Enjoy this tasty snack at breakfast or anytime. Now, you can make a delicious batch to share or savor on your own!

Maple Pecan Granola Tasty and Crunchy Snack Recipe

Are you ready to enjoy a tasty and crunchy snack that’s both healthy and satisfying? In this article, I’ll guide

- 4 salmon fillets (6 ounces each) - 2 tablespoons olive oil - Juice and zest of 2 lemons - 2 cloves garlic, minced - 1 teaspoon dried oregano - 1 teaspoon dried thyme The main ingredients set the stage for your Lemon Herb Grilled Salmon. Salmon fillets are the star here. Fresh salmon has a rich taste and a firm texture. Next, olive oil adds a nice smoothness and helps the herbs stick. Lemon juice and zest bring bright, tangy notes. Garlic adds warmth and depth. Dried oregano and thyme round out the flavor profile with earthy hints. - 1 teaspoon paprika - Salt and pepper to taste - Fresh parsley, chopped (for garnish) - Lemon wedges (for serving) Seasoning is key to making your salmon shine. Paprika gives a lovely color and a slight smokiness. Salt and pepper enhance all the flavors. Fresh parsley adds a pop of color and freshness when you serve the dish. Finally, lemon wedges offer extra zing for those who want it. You can find the full recipe [here](#). Enjoy grilling! Start by making the marinade. In a mixing bowl, whisk together these ingredients: - 2 tablespoons olive oil - Juice and zest of 2 lemons - 2 cloves garlic, minced - 1 teaspoon dried oregano - 1 teaspoon dried thyme - 1 teaspoon paprika - Salt and pepper to taste Mix until smooth. This marinade adds great flavor to the salmon. Letting the salmon sit in the marinade is key. I suggest at least 30 minutes. If you have time, marinate for up to 2 hours. This will deepen the flavor. Now it's time to grill. First, preheat your grill to medium-high heat. This step is important. It helps cook the salmon evenly. Next, oil the grill grates. Use a paper towel dipped in oil to wipe the grates. This helps prevent sticking. After preheating, remove the salmon from the marinade. Let the excess drip off. Place the salmon skin-side down on the grill. Cook for 4-6 minutes on each side. The salmon is ready when it flakes easily with a fork and has nice grill marks. Presentation is key for serving. After grilling, let the salmon rest for a few minutes. This keeps it juicy. Garnish with fresh chopped parsley and serve with lemon wedges. For sides, try a fresh salad or grilled veggies. Pair with a chilled white wine or sparkling water. These choices enhance the meal experience. For the complete recipe, check the Full Recipe section. How to avoid overcooking To keep your salmon moist, watch the cooking time closely. Grill each side for about 4-6 minutes. You want the fish to flake easily with a fork but not dry out. If it's hard to tell, use a food thermometer. Salmon is done at 145°F. Tips for achieving perfect grill marks Preheat your grill to medium-high heat. After you oil the grates, place the salmon fillets skin-side down. Do not move them for the first few minutes. This helps form those nice grill marks. You can rotate the fillets halfway through cooking for even marks. Suggestions for additional herbs and spices While the lemon and herbs shine in this recipe, you can mix it up. Try adding dill for a fresh twist. Basil adds a sweet note. If you love heat, sprinkle some crushed red pepper flakes for extra kick. Using citrus variations (lime, orange) Lemon is great, but don’t stop there! Lime adds a zesty touch. Orange brings a sweet citrus flavor. You can swap lemon juice for lime juice in the marinade. Or, add orange zest along with the lemon zest. These small changes can make your dish even tastier. For the full recipe, check out the Lemon Herb Grilled Salmon section. {{image_2}} You can change the flavor of your lemon herb grilled salmon with different marinades. Here are two tasty ideas: - Honey and soy sauce: Mix 2 tablespoons of honey with 3 tablespoons of soy sauce. This mix gives a sweet and savory taste. It pairs well with salmon's rich flavor. - Spicy chili and lime: Combine 2 tablespoons of lime juice with 1 teaspoon of chili flakes. This mix adds a kick. It’s perfect for those who love heat. You can cook your salmon in different ways. Each method gives a unique taste and texture. - Baking versus grilling: Baking is easier for beginners. It cooks evenly and keeps the fish moist. Grilling gives a smoky flavor and crispy skin. If you love grill marks, choose grilling. - Using a stovetop grill pan: A stovetop grill pan is great for indoor cooking. It gives you grill marks without needing an outdoor grill. Preheat the pan and oil it lightly before adding the salmon. Cook as you would on a regular grill. Explore these variations to find your favorite way to enjoy lemon herb grilled salmon. For the full recipe, check out the detailed instructions above. To store leftover Lemon Herb Grilled Salmon, place it in an airtight container. You can also wrap it tightly with plastic wrap. This keeps the salmon fresh and prevents it from drying out. The shelf life of grilled salmon in the fridge is about 3 to 4 days. Always check for any off smells or changes in color before eating. If you want to save some salmon for later, freezing is a great option. First, let the salmon cool completely. Wrap each fillet in plastic wrap or aluminum foil to prevent freezer burn. You can also use a freezer bag, removing as much air as possible. Grilled salmon can last up to 3 months in the freezer. When you're ready to eat, thaw the salmon in the fridge overnight. This keeps the texture nice. You can also use the microwave's defrost setting if you're in a hurry. Just be careful not to cook it while thawing. Enjoy your meal later with the same delicious flavor! I suggest marinating salmon for at least 30 minutes. This time allows the flavors to soak in well. For a richer taste, you can marinate for up to 2 hours. Just remember not to go beyond this time. The fish can become too salty or mushy if left too long. Grilling salmon works best at medium-high heat. Aim for about 375°F to 400°F. This temperature helps the fish cook evenly and develop nice grill marks. If your grill has a lid, keep it closed while cooking. This keeps the heat consistent and helps cook the salmon through. Yes, you can use frozen salmon for this recipe. Just make sure to thaw it first. The best way is to leave it in the fridge overnight. If you're in a hurry, you can run it under cold water. Once thawed, pat the salmon dry before marinating. This helps the marinade stick better. Grilling salmon is simple and rewarding. You learned about key ingredients and marinade tips. Following clear instructions helps achieve that perfect grill. Remember to store leftovers right to extend freshness. Don’t shy away from variations or trying new flavors. Each attempt can bring unique tastes that excite your meal. Enjoy your grilling journey and make every bite count!

Lemon Herb Grilled Salmon Tasty and Simple Recipe

Looking for a delicious and easy recipe to impress your family or guests? My Lemon Herb Grilled Salmon is the

To make Buffalo Cauliflower Bites, you need fresh ingredients for the best taste. Here’s what you'll require: - 1 head of cauliflower, cut into bite-sized florets - 1 cup all-purpose flour - 1 cup water - 1 teaspoon garlic powder - 1 teaspoon onion powder - 1 teaspoon smoked paprika - 1/2 teaspoon salt - 1/2 teaspoon black pepper - 1 cup buffalo sauce - 2 tablespoons olive oil - Fresh parsley, chopped (for garnish) These ingredients create a crispy and spicy treat that everyone will love! You can boost the flavor even more with optional ingredients. Consider adding: - Additional spices or herbs - Different types of hot sauce - Dairy-free alternatives for coating Feel free to get creative! Mixing in your favorite spices or trying a new hot sauce can make these bites even more fun. To start, you need to cut the cauliflower into bite-sized florets. First, remove the leaves and the stem. Then, cut the head into quarters. From each quarter, slice off small florets. Aim for pieces that are about the size of a golf ball. Next, wash the cauliflower well. Rinse each floret under cool, running water. This helps remove any dirt or debris. After washing, dry the florets with a clean kitchen towel. Make sure they are dry to help the batter stick better. Now, let’s make the batter. In a large bowl, combine your dry ingredients. Mix together 1 cup of all-purpose flour, 1 teaspoon of garlic powder, 1 teaspoon of onion powder, 1 teaspoon of smoked paprika, 1/2 teaspoon of salt, and 1/2 teaspoon of black pepper. Next, add 1 cup of water. Whisk everything together until you have a smooth batter. It should be thick enough to coat the cauliflower but not too runny. If it feels too thick, you can add a little more water. Now comes the fun part: baking the cauliflower! First, preheat your oven to 450°F (230°C) and line a baking sheet with parchment paper. Dip each floret into the batter. Make sure to coat each piece well. Allow any extra batter to drip off before placing the florets on the baking sheet. Spread them out evenly so they have space to cook. Bake the florets for about 20 minutes. Check them when they are golden brown. This will help them become crispy. While the cauliflower is baking, prepare the buffalo sauce. In a bowl, mix 1 cup of your favorite buffalo sauce with 2 tablespoons of olive oil. Stir well until combined. When the cauliflower bites finish baking, remove them from the oven. Drizzle the buffalo sauce mixture over the florets. Toss them gently to coat evenly. Return the coated cauliflower to the oven. Bake for another 10 to 15 minutes. This will help the sauce soak in and add more flavor. You can find the Full Recipe for these delicious buffalo cauliflower bites to guide you through the process! Marinating cauliflower makes a big difference. I suggest marinating it for at least 30 minutes. This allows the flavors to soak in well. If you want to adjust the heat, add more or less buffalo sauce. You can mix in honey for a sweet touch if you like. You can use an oven or an air fryer. Both methods work great but differ in texture. The air fryer gives you a crispier bite, while the oven is easier for larger batches. To ensure the batter sticks, shake off any extra batter before baking. This way, you get a nice coating that stays on. Buffalo cauliflower bites pair well with dips. Ranch and blue cheese dressings are the best choices. For a fun twist, serve them with sliced veggies on a platter. You can also add toothpicks for easy eating. This makes them great for parties or game day. For the full recipe, check out the instructions shared earlier. {{image_2}} You can switch up the taste of your buffalo cauliflower bites with different sauces. Try BBQ sauce for a sweet twist. Honey mustard adds a tangy flavor. For a rich touch, sprinkle some cheese or use a dairy alternative. Nutritional yeast gives a cheesy taste without dairy. If you're looking for gluten-free options, substitute all-purpose flour with almond or chickpea flour. These flours work well in the batter. You can also make your sauce vegan. Use a plant-based butter or coconut oil to mix with your favorite hot sauce. Buffalo cauliflower bites shine as appetizers at parties. They also work great as main dishes. Try serving them in bowls with rice or salads. You can even add them to tacos for a fun twist. Enjoying them this way makes meals exciting and flavorful! To keep your Buffalo Cauliflower Bites fresh, use airtight containers. Glass containers work well. You can also use plastic ones, but make sure they seal tightly. Store them in the fridge for up to three days. After that, they may lose their crispiness. For the best reheating, use an oven or an air fryer. Preheat your oven to 350°F (175°C). Place the bites on a baking sheet. Bake for about 10 to 15 minutes. This helps them stay crispy. Avoid using a microwave as it makes them soggy. If you must, heat them for a short time and check often. To freeze Buffalo Cauliflower Bites, let them cool completely first. Place them in a single layer on a baking sheet. Freeze for 1 to 2 hours, then transfer them to a freezer-safe bag. They can last up to three months. To thaw, move the bites to the fridge a day before. When ready to eat, reheat them in the oven or air fryer for best results. This keeps them crispy and delicious. For the full recipe, check out the instructions provided earlier. Buffalo cauliflower bites are a tasty snack made from cauliflower. You cut the cauliflower into small pieces, coat them, and bake. The main ingredients are: - 1 head of cauliflower, cut into bite-sized florets - 1 cup all-purpose flour - 1 cup water - 1 teaspoon garlic powder - 1 teaspoon onion powder - 1 teaspoon smoked paprika - 1/2 teaspoon salt - 1/2 teaspoon black pepper - 1 cup buffalo sauce - 2 tablespoons olive oil - Fresh parsley, chopped (for garnish) You mix the flour, water, and spices to make a batter. Then, you dip the cauliflower into the batter and bake it until crispy. After that, you coat it with buffalo sauce. Making buffalo cauliflower bites takes about 50 minutes. Here is how the time breaks down: - Prep time: 10 minutes - Cook time: 40 minutes (20 minutes for the first bake and 10-15 minutes for the second bake) Yes, you can prep buffalo cauliflower bites ahead of time. Here are some tips: - Cut the cauliflower and store it in the fridge for up to 24 hours. - Make the batter in advance and keep it in the fridge. - You can bake them and store them for later. Just reheat them in the oven. Choosing the right buffalo sauce depends on your taste. Here are some recommendations: - For mild heat, try a classic buffalo sauce. - If you like spice, go for a hot sauce with extra flavor. - You can also mix sauces for a unique taste. Buffalo cauliflower bites are a healthy snack. They are lower in calories than traditional buffalo wings. Here are some health benefits: - Cauliflower is high in fiber and vitamins. - The dish is lower in fat compared to fried options. - You can make it vegan by using dairy-free sauces. You can find the full recipe for buffalo cauliflower bites above. You learned how to make tasty Buffalo Cauliflower Bites from start to finish. We covered the ingredients, how to prepare, and the best cooking methods. You can mix flavors or adjust spice levels for your taste. Remember to store leftovers properly or freeze for later. These bites are not just snacks; they can be fun meals. Enjoy experimenting with new dips and serving ideas. Dive in and have fun creating flavors you love!

Buffalo Cauliflower Bites Tasty and Easy Recipe

Looking for a tasty snack that’s easy to make? Buffalo Cauliflower Bites pack a punch of flavor and are perfect

To make stuffed zucchini boats, gather these key ingredients: - 4 medium zucchini - 1 cup cooked quinoa - 1 cup cherry tomatoes, halved - 1/2 cup corn kernels (fresh or frozen) - 1/2 cup black beans, rinsed and drained - 1/4 cup red onion, finely chopped - 1 teaspoon cumin - 1 teaspoon smoked paprika - Salt and pepper to taste - 1/2 cup shredded cheese (cheddar or a blend) - Fresh cilantro, for garnish These ingredients create a delicious and healthy dish. The quinoa is a great base, adding texture and protein. The zucchini acts as a perfect vessel for all the flavors. You can change this recipe to fit your taste. Here are some ideas: - Bell peppers for extra crunch - Spinach for added nutrients - Different beans, like pinto or chickpeas - Spices such as chili powder or garlic powder - Different types of cheese like feta or mozzarella Feel free to mix and match these options. Customizing your filling makes this dish even more fun! Having the right tools helps make cooking easier. Here’s what you need: - A sharp knife for cutting - A spoon for scooping out the zucchini - A skillet for cooking the filling - A baking sheet for the zucchini boats - An oven for baking These simple tools will help you create a beautiful dish. With the right setup, you’ll enjoy making stuffed zucchini boats! For the full recipe, check the provided link and get started! First, preheat your oven to 375°F (190°C). This helps the zucchini cook just right. Next, take your medium zucchinis and cut them in half lengthwise. Use a spoon to scoop out the seeds and create boats. Save the flesh you scoop out; it adds great flavor to your filling. In a skillet over medium heat, add a splash of olive oil. Then, add the finely chopped red onion. Sauté it for about 3-4 minutes until it turns soft. Now, chop the reserved zucchini flesh and add it to the skillet. Toss in halved cherry tomatoes, corn, black beans, cumin, smoked paprika, salt, and pepper. Cook this mixture for about 5 minutes. You want the tomatoes to soften a bit. Finally, stir in 1 cup of cooked quinoa until everything is mixed well. Place your zucchini boats on a baking sheet. Spoon the filling into each boat generously. Don’t be shy; pack it in! Top each filled boat with shredded cheese. Bake them in your preheated oven for 20-25 minutes. Look for tender zucchini and bubbly, golden cheese. Once done, take them out and let them cool for a few minutes. Garnish with fresh cilantro before serving. For the complete recipe, check out the link to the [Full Recipe]. To cook zucchini so it stays tender, start with fresh ones. Look for firm, medium-sized zucchini. Cut them in half lengthwise to make boats. Use a spoon to scoop out the seeds gently. This creates space for the filling. Bake them at 375°F (190°C) for 20-25 minutes. This method keeps them soft without turning mushy. You can mix and match fillings to suit your taste. The base recipe uses quinoa, beans, and veggies. You can add other ingredients like sausage or mushrooms. If you want a spicy kick, add jalapeños or hot sauce. For a creamier texture, try cream cheese or sour cream in the filling. Always taste your mix and adjust spices as needed. This way, you ensure it suits your palate. Serve stuffed zucchini boats with a fresh salad or rice. A side of garlic bread complements the dish well. For a complete meal, pair them with grilled chicken or fish. You can also top them with extra cheese or fresh herbs for added flavor. Consider a drizzle of balsamic glaze for a sweet touch. These options make your meal more exciting and balanced. For the full recipe, check out Stuffed Zucchini Boats . {{image_2}} For a tasty vegetarian option, you can change the filling. Try adding mushrooms, bell peppers, or spinach. You can also use brown rice or couscous instead of quinoa. Another idea is to mix in some feta cheese for a salty kick. This adds great flavor and texture. To make these zucchini boats vegan, simply skip the cheese. You can use nutritional yeast for a cheesy flavor without dairy. For the filling, add lentils or chickpeas for a hearty bite. Swap out any animal products and focus on fresh veggies. This makes the dish healthy and satisfying. If you want more protein, ground turkey or chicken works well. Brown the meat before adding it to the filling mix. You can also use tofu or tempeh for a plant-based option. Just crumble and sauté it with the veggies. These additions make the dish more filling and delicious. For the full recipe, check out the link! Store leftover stuffed zucchini boats in an airtight container. Keep them in the fridge for up to four days. Make sure they cool down before sealing them. This helps keep the flavor fresh and tasty. To reheat, place the zucchini boats on a baking sheet. Preheat your oven to 350°F (175°C). Heat them for about 15-20 minutes. This method warms the filling and keeps the zucchini tender. You can also use the microwave for a quick method. Heat for one to two minutes, but the oven gives the best results. You can freeze stuffed zucchini boats for later. First, let them cool completely. Wrap each boat in plastic wrap and then place them in a freezer bag. They can stay fresh for up to three months. To cook frozen zucchini, thaw them in the fridge overnight. Then, bake them at 350°F (175°C) until heated through. This keeps them tasty and ready for your next meal. For the full recipe, check out the link to make your own delicious stuffed zucchini boats! Yes, you can make stuffed zucchini boats ahead of time. Prepare the filling and stuff the zucchini boats. Cover them tightly with plastic wrap or foil. Store them in the fridge for up to 24 hours. When ready to cook, just bake them as directed in the full recipe. This saves time on busy days. You can get creative with your fillings! Some great options include: - Ground turkey or beef - Cooked rice or couscous - Spinach and feta cheese - Sauteed mushrooms and garlic - Lentils or chickpeas Feel free to mix and match these ingredients. This lets you tailor the dish to your taste. Stuffed zucchini boats last about 3 to 5 days in the fridge. Store them in an airtight container to keep them fresh. Reheat them in the oven or microwave before serving. This way, you can enjoy leftovers without losing flavor or texture. We explored how to make delicious stuffed zucchini boats. You learned about essential and optional ingredients, plus cooking tools you need. The step-by-step guide walked through preparing, cooking, and baking. I shared tips for perfect cooking and filling choices. We discussed fun variations and how to store leftovers. With these facts, you can enjoy tasty stuffed zucchini anytime. Try your own twists and make it your dish!

Stuffed Zucchini Boats Flavorful and Healthy Recipe

Looking for a tasty and healthy meal? Stuffed zucchini boats are the answer! This fun dish is easy to make

Older posts
Newer posts
← Previous Page1 … Page31 Page32 Page33 … Page67 Next →

dsad

© 2025 Foodish Talk • Built with GeneratePress

Our Policies

  • Copyright Policy
  • Cookie Policy
  • GDPR Policy
  • Privacy Policy
  • Disclaimer
  • Terms Of Use

More Information

  • Home
  • About
  • Contact
  • Appetizers
  • Dessert
  • Dinner
  • Drinks
©2025, Foodish Talk About Back To Top