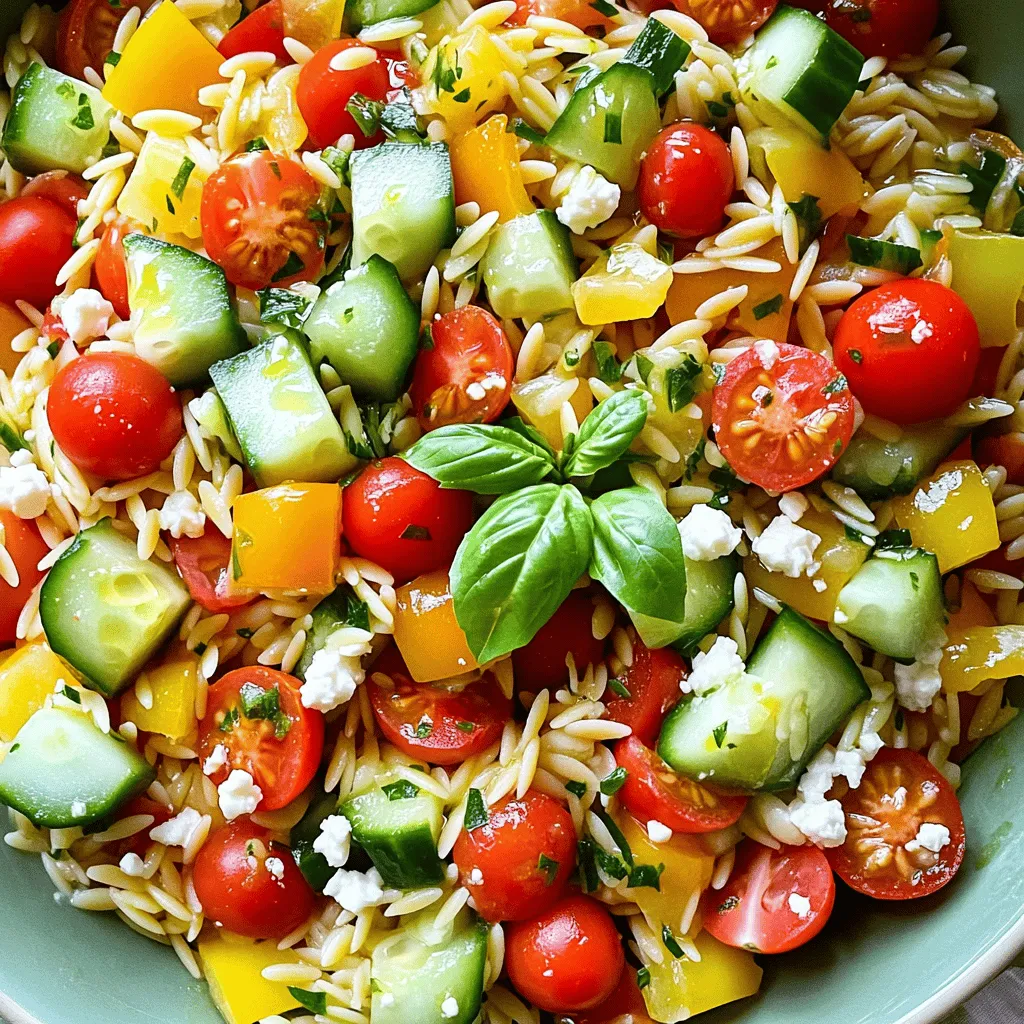
Orzo Summer Salad Fresh and Flavorful Recipe Ideas
Looking for a fresh and vibrant dish to brighten your summer meals? This Orzo Summer Salad is the perfect choice!
Looking for a fresh and vibrant dish to brighten your summer meals? This Orzo Summer Salad is the perfect choice!
![To make Mango Sago dessert pudding, gather these simple ingredients: - 1 ripe mango, diced - 1 cup small tapioca pearls (sago) - 1 can (400ml) coconut milk - 1/2 cup sugar (adjust to taste) - 1/4 teaspoon salt - 1 cup water - 1/2 teaspoon vanilla extract - Extra mango slices and mint leaves for garnish When picking mangoes, look for ripe ones. They should feel slightly soft when you press them. Check for a sweet aroma near the stem. The skin may have some green or red hues, but color varies with type. Choose mangoes that are not too bruised or have dark spots. The best mangoes will have a smooth skin and vibrant color. Sago pearls add a fun, chewy texture to this dessert. They absorb flavors well, making each bite delightful. Coconut milk gives the pudding a rich, creamy taste. It also brings a hint of sweetness and a tropical essence. Together, sago and coconut milk create a perfect base for the fresh mango. This combination brings out the best in your Mango Sago dessert pudding. 1. First, bring 1 cup of water to a boil in a medium saucepan. 2. Add 1 cup of small tapioca pearls to the boiling water. Cook them for 15-20 minutes on medium heat. Stir occasionally until the pearls turn translucent. 3. Once cooked, drain the pearls and rinse them under cold water. This will stop the cooking process. Set them aside. 4. In the same saucepan, mix 1 can of coconut milk, 1/2 cup of sugar, and 1/4 teaspoon of salt. Heat over low-medium heat, stirring until the sugar dissolves. Do not boil. 5. When the coconut milk is warm, add the cooked sago pearls. Stir in 1/2 teaspoon of vanilla extract. Let it simmer for about 5 more minutes. 6. Remove the saucepan from heat and gently stir in the diced mango, saving a few pieces for garnish. 7. Pour the mixture into cups or dessert bowls and refrigerate for at least 2 hours to set. 8. Serve chilled, topping each pudding with reserved mango slices and mint leaves for a fresh touch. - Always use small tapioca pearls for this recipe. They cook faster and give a better texture. - Stir the pearls often while cooking. This helps to prevent them from sticking together. - If you notice the pearls are still hard after cooking, add a little more water and cook for a few extra minutes. - Rinsing the pearls after cooking is key. It stops the cooking and keeps them from getting gummy. - Ensure you measure the coconut milk accurately. Too much can make the pudding too thin. - The sugar helps to balance flavors but don’t add too much. Start with 1/2 cup and adjust as needed. - The sago pearls should be soft but still hold their shape. They should not be mushy. - Refrigerate the pudding long enough to let it set. This step is crucial for the right texture. You can find the Full Recipe for Mango Sago Bliss Pudding above. When making mango sago pudding, some mistakes can ruin your dish. First, don’t overcook the sago. If you do, it can turn mushy. Always keep an eye on the cooking time. Second, avoid using unripe mangoes. They can taste sour and spoil your dessert. Lastly, don’t skip rinsing the sago. This step stops the cooking and helps keep the pearls separate. To create a balanced flavor, focus on the sweetness. Start with half a cup of sugar, then taste the mix. If it needs more sweetness, add a bit more. The coconut milk brings a creamy texture, but too much can make it heavy. A pinch of salt enhances the flavor without making it salty. Finally, the vanilla extract adds warmth. Use it but don’t overdo it. Having the right tools makes cooking easier. You need a medium saucepan for cooking the sago and the coconut milk mix. A strainer is essential for rinsing the pearls. For mixing, a wooden spoon works well. Use measuring cups for accuracy, especially for the sugar and liquid. Small dessert cups or bowls are great for serving. These tools help you enjoy the process and make cooking fun. For the complete process, check the Full Recipe. {{image_2}} You can switch up the fruit in your Mango Sago Dessert Pudding. Try using pineapple or passionfruit for a tasty twist. Simply replace the mango with your chosen fruit. For pineapple, chop it into small pieces and mix it in. If you love passionfruit, scoop out the seeds and pulp. Blend it into the pudding for a tangy flavor. These tropical fruits add a new layer of freshness. You can explore flavors from different regions with these simple changes. If you want a vegan version, use maple syrup instead of sugar. You can also swap coconut milk for almond or cashew milk. This gives you a lighter dessert while keeping it creamy. For a sugar-free treat, choose sugar substitutes like stevia or erythritol. Both options keep the dessert sweet without added sugar. These adaptations make the dessert suitable for everyone, even those with dietary restrictions. Serving your Mango Sago Dessert Pudding can be fun. Use clear glass cups to show off the vibrant colors. Top each cup with extra mango slices and fresh mint leaves. This adds a pop of color and a nice aroma. You can also drizzle a bit of coconut cream on top for extra richness. For a special touch, serve with a small scoop of sorbet on the side. These ideas make your dessert not just tasty, but also beautiful. For the full recipe, check out the Mango Sago Bliss Pudding. To keep your mango sago dessert pudding fresh, store it in the fridge. Use airtight containers. This prevents the pudding from absorbing other smells. Make sure the pudding is fully cooled before covering it. This helps keep the texture smooth. You can keep leftovers for up to three days in the fridge. After three days, the texture may change. The sago may start to harden, and the flavors may fade. Always check for any signs of spoilage before consuming. If you want to refresh your chilled pudding, add a splash of coconut milk. This will help restore creaminess. Stir it well to blend. You can also serve it over crushed ice for a refreshing twist. Avoid reheating in the microwave, as it can change the pudding's texture. For the full recipe to make this delightful treat, check out the Mango Sago Bliss Pudding. Yes, you can use frozen mango. Just let it thaw before using. Other fruits like diced kiwi or strawberries also work. They add fun flavors and colors to the pudding. Fresh fruits give a nice texture, while frozen ones are handy and quick. Remember to taste and adjust sweetness if needed. If you can't find coconut milk, almond milk is a good choice. It has a light flavor and works well in desserts. You can also use cashew milk for a creamier texture. If you want a dairy option, whole milk or heavy cream can replace coconut milk too. Just keep in mind that it will change the taste slightly. You can make this pudding up to two days ahead. Just follow the recipe and chill it in the fridge. The flavors blend nicely when it sits. If you plan to serve it later, keep the mango garnish separate. Add that right before serving for the best look and taste. For the [Full Recipe], just follow the steps mentioned earlier. Enjoy your cooking! Mango Sago Bliss Pudding is a sweet treat that is perfect for warm days. This dessert is light, creamy, and packed with flavor. The main ingredients are ripe mangoes and small tapioca pearls, known as sago. - 1 ripe mango, diced - 1 cup small tapioca pearls (sago) - 1 can (400ml) coconut milk - 1/2 cup sugar (adjust to taste) - 1/4 teaspoon salt - 1 cup water - 1/2 teaspoon vanilla extract - Extra mango slices and mint leaves for garnish This recipe blends sweet mango with creamy coconut milk. The sago adds a chewy texture. Together, these flavors create a delightful experience. The key is to use ripe mangoes for the best taste. You start by cooking the sago pearls. Bring water to a boil in a pot. Add the sago and cook until they turn clear. This usually takes about 15 to 20 minutes. Stir occasionally to avoid clumping. After cooking, rinse them with cold water. This stops the cooking and keeps them chewy. Next, you mix the coconut milk, sugar, and salt in the same pot. Heat it gently. Stir until the sugar dissolves but do not let it boil. This helps make the pudding smooth and sweet. After your coconut milk is ready, add the cooked sago and vanilla extract. Stir well and simmer for 5 minutes. Then, mix in your diced mango, saving some for garnish. Pour the mix into cups and chill in the fridge for at least 2 hours. When ready to serve, top with extra mango slices and fresh mint leaves. This makes your dessert look beautiful and inviting. The mix of colors and flavors will make your taste buds dance. This Mango Sago Bliss Pudding is a refreshing treat that everyone will love. For the full recipe, check the above section. Enjoy every creamy spoonful! Mango Sago Dessert Pudding combines fresh ingredients for a sweet treat. We explored the best mangoes and the role of sago and coconut milk. I shared easy steps for cooking and tips to perfect your pudding. Remember to avoid common mistakes and consider fun variations. Store leftovers well to enjoy later, and feel free to adapt the recipe. Dive in and create your own Mango Sago Bliss today! You’ll love the taste and texture.](https://foodishtalk.com/wp-content/uploads/2025/06/42995667-644f-4ea5-9ea6-178515365254.webp)
Craving a cool treat? Mango Sago Dessert Pudding is a delicious way to beat the heat! This tropical dessert combines

Are you ready for a refreshing treat that’s perfect for any occasion? Look no further than this Strawberry Lime Margarita
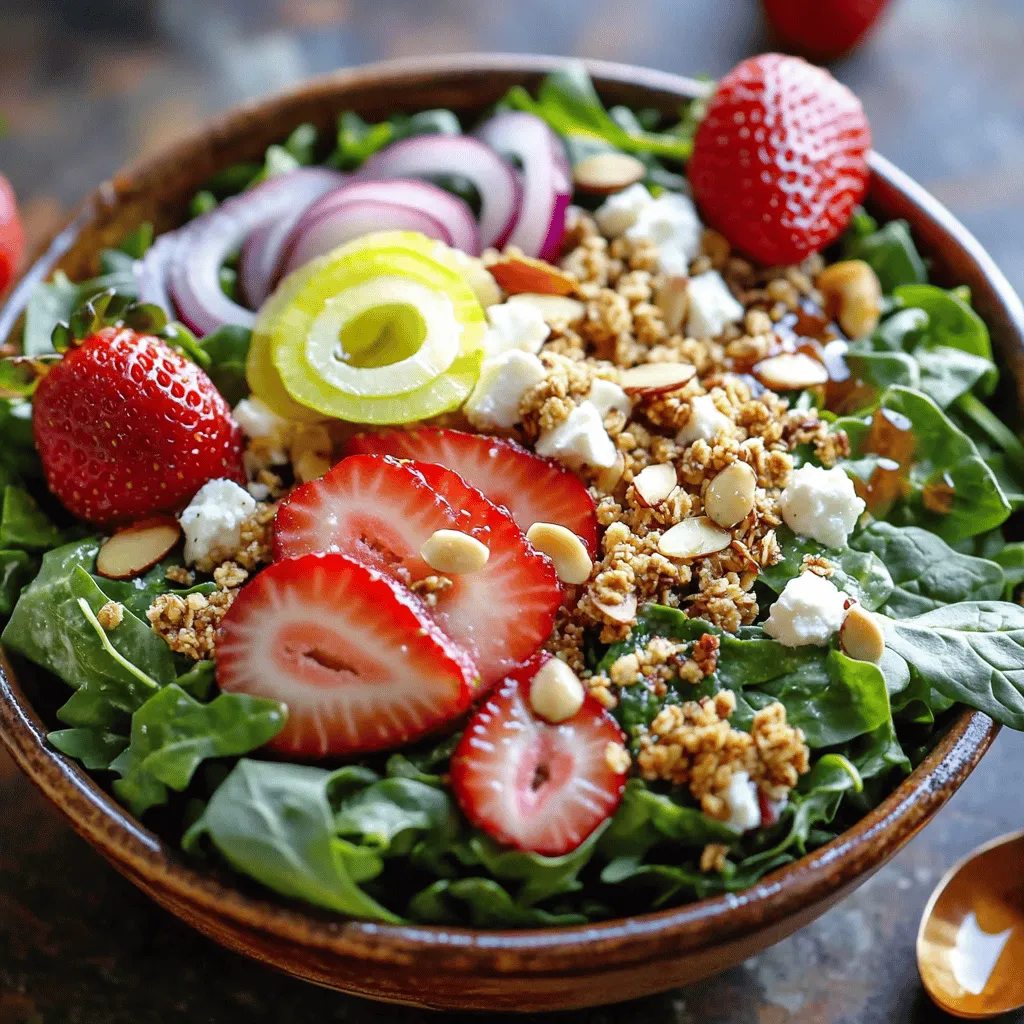
Looking for a fresh and vibrant salad that dazzles? You’re in the right place! My Strawberry Crunch Salad with Champagne
![To make Greek loaded hummus, you need some key ingredients. These form the base and flavor of your dish: - 1 can (15 oz) chickpeas, drained and rinsed - 1/4 cup tahini - 2 tablespoons lemon juice - 2 cloves garlic, minced - 1/4 cup olive oil - 1 teaspoon ground cumin - Salt to taste These ingredients create a smooth, creamy hummus that is both tasty and healthy. Chickpeas give it protein and fiber. Tahini adds a nutty flavor, while lemon juice and garlic bring brightness. Olive oil makes it rich and smooth. Next, let’s talk about the fun toppings. These add color and crunch: - 1/2 cup cherry tomatoes, halved - 1/2 cucumber, diced - 1/4 red onion, finely chopped - 1/2 cup Kalamata olives, pitted and sliced - 1/2 cup feta cheese, crumbled - Fresh parsley, for garnish These toppings not only look good but also enhance the taste. Tomatoes add juiciness, while cucumbers give a refreshing crunch. Red onion provides a bit of bite, and olives add saltiness. Feta cheese brings creaminess and tang. Finally, don’t forget the spices and seasonings. These are key to adding depth to your hummus: - 1 teaspoon ground cumin - Salt to taste Cumin gives a warm, earthy flavor. Salt is vital for bringing all the tastes together. For the full recipe, check out the detailed steps. Enjoy making this Greek loaded hummus that is both flavorful and healthy! To make Greek loaded hummus, follow these easy steps. First, gather all your ingredients. You will need a food processor for this recipe. 1. Combine Ingredients: Start by adding the chickpeas, tahini, lemon juice, minced garlic, olive oil, ground cumin, and salt into the food processor. 2. Blend Until Smooth: Blend the mix for about one minute. You want it creamy and smooth. 3. Adjust Consistency: If your hummus feels thick, add a bit of water or extra olive oil to thin it out. Blend again until you reach your desired texture. Next, it's time to layer the toppings. 4. Transfer the Hummus: Carefully move the hummus to a shallow serving dish. 5. Create a Well: Use the back of a spoon to make a well in the center. This is where your toppings will go. 6. Layer Toppings: Start with the cherry tomatoes, then add the diced cucumber, red onion, and Kalamata olives into the well. Now, finish your masterpiece. 7. Add Feta: Evenly sprinkle crumbled feta on top of the hummus and toppings. 8. Drizzle Olive Oil: Pour a little olive oil over the whole dish. This adds flavor and makes it look nice. 9. Garnish: Finally, add some fresh parsley for a splash of color. Serve your Greek loaded hummus with warm pita bread or fresh veggies. Enjoy! For the full recipe, see the section above. To make your Greek loaded hummus even tastier, try adding spices. A pinch of smoked paprika gives a nice smoky flavor. You could also use a dash of cayenne for heat. Both will make your dish pop. If your hummus is too thick, don’t worry! Add a bit of water or more olive oil. Blend well until you reach a smooth and creamy texture. Adjust to your liking. When it comes to serving, presentation is key. Use a shallow dish for a beautiful look. Create a well in the center. This allows for a colorful display of toppings. Layer your cherry tomatoes, cucumber, onion, and olives neatly. Finish with crumbled feta on top. A drizzle of olive oil adds shine. For even more flair, garnish with fresh parsley. You can also serve it with warm pita bread. This adds a delightful touch for dipping. For the full recipe, check out the [Full Recipe]. {{image_2}} You can make Greek loaded hummus even more fun! Try adding roasted red peppers or artichokes for a smoky, sweet flavor. These add-ins bring a new taste and texture. You can also switch up the toppings. For a vegan option, leave out the feta cheese. Instead, use a sprinkle of nutritional yeast for a cheesy flavor. Serve the hummus with different sides. Instead of pita bread, use fresh veggie sticks, like carrots or bell peppers. You can even spoon it onto a salad for a healthy twist. The options are endless, and each variation makes it unique! For the full recipe, check out the [Full Recipe]. When you have extra Greek loaded hummus, store it properly to keep it fresh and tasty. Place the hummus in an airtight container. This helps seal in the flavor and maintain texture. Refrigerate it as soon as possible. For the best taste, use the hummus within three to five days. This keeps the ingredients fresh and safe to eat. If you notice any strange smells or colors, it is time to toss it out. To refresh stored hummus before serving, stir it well. If it seems dry, add a splash of olive oil or a bit of water. This helps bring back the creamy texture. You can also mix in fresh toppings like diced cucumbers or tomatoes. This adds a burst of flavor and color. For more details on making this dish, check the Full Recipe. What can I use instead of tahini? You can use sunflower seed butter or Greek yogurt. Both add creaminess. If you want a nut-free option, try using olive oil. Each choice gives a nice flavor. Can I prepare Greek loaded hummus in advance? Yes, you can make it a day ahead. Store it in the fridge in an airtight container. Just add the toppings right before serving for the best taste and texture. How do I make hummus without a food processor? You can mash chickpeas with a fork or potato masher. Mix in other ingredients by hand. It may take longer, but you can still enjoy tasty hummus. Is Greek loaded hummus gluten-free? Yes, Greek loaded hummus is gluten-free. Just be sure to serve it with gluten-free pita or veggies. This way, everyone can enjoy it safely. For the full recipe, check out the Greek Loaded Hummus section. In this post, I covered how to make Greek loaded hummus. We talked about key ingredients like chickpeas, tahini, and spices. I provided step-by-step instructions to make it easy for you. You learned tips to enhance flavor and serve it creatively. Lastly, I shared storage tips to keep it fresh. Greek loaded hummus is versatile and tasty. Now, you can enjoy it with your favorite dishes or share it at gatherings. Making this dish is simple and satisfying. Enjoy your delicious creation!](https://foodishtalk.com/wp-content/uploads/2025/06/38fa5a0c-55d9-44ba-87e7-4386ce332865.webp)
Are you ready to elevate your snack game with a vibrant twist? Greek Loaded Hummus is not just a dish;

Craving a dessert that combines creamy coconut and rich chocolate? You’re in the right place! This Coconut Chocolate Dome recipe
![- Romaine lettuce - Vegetarian-friendly Caesar dressing - Croutons (store-bought or homemade) For a tasty vegetarian Caesar salad, start with fresh romaine lettuce. It gives a crisp texture and vibrant color. Next, choose a vegetarian-friendly Caesar dressing. This dressing is key for that classic flavor. You can find many options at stores or make your own. Lastly, add croutons. You can buy them or make them at home. Croutons add a nice crunch. - Vegetarian Parmesan cheese - Protein alternatives (chickpeas, beans) - Seasonal vegetables (like bell peppers or cucumbers) If you want to enhance your salad, consider some optional add-ins. Vegetarian Parmesan cheese gives a savory flavor. You can also add protein alternatives like chickpeas or beans. They help make the salad more filling. Seasonal vegetables, like bell peppers or cucumbers, can add color and freshness. Mix and match these to suit your taste. For the full recipe, check out the details above. 1. In a pot, boil 2 cups of vegetable broth. 2. Add 1 cup of rinsed quinoa to the boiling broth. 3. Reduce heat to low, cover the pot, and simmer for about 15 minutes. 4. Check when the liquid is absorbed. Fluff the quinoa with a fork. 5. Set it aside to cool while you prepare the other ingredients. 1. Preheat your oven to 350°F (175°C). 2. Spread 4 cups of torn kale leaves on a baking sheet. 3. Drizzle with 1 tablespoon of olive oil and season with salt and pepper. 4. Massage the leaves gently with your hands to coat evenly. 5. Bake for 10-15 minutes until crispy and slightly browned. 1. In a small bowl, whisk together 2 tablespoons of lemon juice, 1 tablespoon of Dijon mustard, 1 minced garlic clove, and 2 tablespoons of tahini. 2. Gradually add water, one tablespoon at a time, until you reach your desired consistency. 1. In a large mixing bowl, combine the cooked quinoa, crispy kale, and 1 cup of halved cherry tomatoes. 2. Add ½ cup of grated Parmesan cheese or nutritional yeast for a vegan option. 3. Drizzle the dressing over the salad and toss to combine well. 4. Top with sliced avocado and croutons before serving. Find the full recipe above for a delicious twist on a classic salad. To make crispy kale, start by removing the stems and tearing the leaves. Wash them well and dry thoroughly. Next, drizzle with olive oil. Sprinkle salt and pepper. Massage the leaves gently to coat them evenly. Bake at 350°F (175°C) for 10-15 minutes until they are crisp and golden. Keep an eye on them to avoid burning. For fluffing quinoa, use a fork after cooking. Once the quinoa is done, let it sit for five minutes. Then, gently fluff it with a fork to separate the grains. This will give it a light and airy feel. It’s key for a great salad texture. To make the dressing pop, mix the lemon juice, Dijon mustard, garlic, and tahini well. Taste as you go. Adjust with salt, pepper, or a bit more lemon juice if needed. This adds a bright flavor that lifts the whole salad. For extra nutrition, try adding toppings like sliced avocado, cherry tomatoes, or chickpeas. You can also sprinkle vegetarian Parmesan cheese or nutritional yeast on top for a cheesy touch. These simple additions make your salad more filling and colorful. {{image_2}} You can easily make this salad vegan. First, swap out the cheese. Use nutritional yeast instead of Parmesan. It gives a great cheesy taste without dairy. Next, choose a plant-based dressing. Many brands offer tasty vegan dressings. This change keeps your salad creamy and rich. Want to try something new? Add global flavors to your salad. For a Mediterranean twist, mix in some olives and feta cheese. This adds a briny taste that pairs well with the greens. Or, go for a Southwest style! Toss in corn and black beans for a hearty touch. These additions bring a fun and fresh vibe to the classic Caesar. Explore these variations and use the [Full Recipe] as your base. You can create a unique salad every time! Store your Vegetarian Caesar Salad in an airtight container. This keeps it fresh longer. If you have leftovers, separate the dressing from the salad. This helps avoid soggy ingredients. You can store the salad in the fridge for up to three days. To keep the kale crispy, lay a paper towel inside the container. This absorbs extra moisture. For the best taste, use the salad within two days. Reheating quinoa and kale can be tricky. You want to keep the texture nice. For quinoa, place it in a microwave-safe bowl. Add a splash of water to keep it moist. Heat in short bursts, stirring in between. For kale, try a quick sauté in a pan. Just a minute or two will revive its crunch. If you stored the whole salad, freshen it up with a drizzle of lemon juice. This adds a bright flavor. You can also toss in a few fresh ingredients to give it life again. For the full recipe, check out the instructions above! Yes, this Vegetarian Caesar Salad is healthy. It uses fresh greens and whole grains. Quinoa adds protein and fiber. Kale offers vitamins A, C, and K. This salad has fewer calories than a classic Caesar, which uses creamy dressing and anchovies. By swapping in nutritional yeast for cheese, you reduce fat and keep flavor. This makes it a great choice for a light meal. You can prepare parts of this salad ahead of time. Cook the quinoa and store it in the fridge. You can also wash and tear the kale. Just wait to bake it until you're ready to serve. Make the dressing and keep it in a jar. This way, you can mix everything together quickly when it's time to eat. The salad stays fresh for about 2-3 days in the fridge. Keep the dressing separate until serving. If you add avocado, eat it within a day. The kale and quinoa hold up well, but the tomatoes may get soggy. Always check for freshness before eating any leftovers. If you don't like kale, try spinach or arugula. Both greens add a nice flavor and crunch. You can also use romaine lettuce for a traditional feel. Swiss chard is another option, giving a slightly different taste. Each green brings its own twist to this Vegetarian Caesar Salad. This blog post shared a simple and tasty recipe for a Vegetarian Caesar Salad. You learned about the key ingredients, like romaine lettuce and a vegetarian-friendly dressing. We covered step-by-step instructions for cooking quinoa and making crispy kale. I also shared helpful tips to enhance flavors and textures. Now, you can customize your salad with add-ins or different twists. Enjoy sharing this fresh dish with friends or family. Remember, a little creativity goes a long way in the kitchen!](https://foodishtalk.com/wp-content/uploads/2025/06/0e74eefd-67f9-4b0c-bd88-922531802cda.webp)
Ready to elevate your salad game? This Vegetarian Caesar Salad is fresh, flavorful, and oh-so-satisfying! Packed with crispy romaine, rich

Are you ready to sip on something delicious? The Chocolate Pistachio Cold Brew Shake is the perfect treat for coffee
![- 2 cups brewed green tea, cooled - 1 cup unsweetened pomegranate juice - 1 tablespoon honey or agave syrup (optional) - 1/4 cup fresh mint leaves - 1 cup sparkling water - Pomegranate arils for garnish - Ice cubes To make Pomegranate Mint Sparkling Green Tea, you want the best ingredients. Start with green tea. I prefer brewing two cups and letting it cool. Use unsweetened pomegranate juice to keep it fresh and bright. If you like some sweetness, add honey or agave syrup. Just one tablespoon is enough. Fresh mint leaves add a lovely aroma. I like to use 1/4 cup, but feel free to adjust. Sparkling water gives the drink its fizz. One cup will do the trick. Finally, pomegranate arils make a perfect garnish. They add color and a burst of flavor. Don’t forget the ice cubes to keep it cold and refreshing. This drink is not only tasty but also easy to make. You can find the full recipe to explore all the steps. Enjoy the mix of flavors as you sip this delightful drink! To brew the perfect green tea, start with fresh, filtered water. Bring it to a boil and let it cool slightly. Green tea tastes best at around 175°F (80°C). Steep 2 cups of green tea for 2-3 minutes. This keeps the flavor bright and fresh. Once brewed, let it cool to room temperature. If you're in a hurry, you can chill it in the fridge for a quick cool down. Now, let’s mix the base ingredients. In a large pitcher, combine the cooled green tea with 1 cup of unsweetened pomegranate juice. Stir well to blend the two flavors together. If you like your drink sweeter, you can add 1 tablespoon of honey or agave syrup. Stir until the sweetener dissolves completely. This step adds a lovely touch to the drink. For the final touches, you need fresh mint leaves. Gently crush them with your fingers to release their oils. This makes the mint flavor pop. Add the crushed mint to your tea mixture and stir. Just before serving, add ice cubes to the pitcher. Pour in 1 cup of sparkling water and stir gently. This step gives your drink a refreshing fizz. To serve, fill glasses with your Pomegranate Mint Sparkling Green Tea. Garnish each glass with extra mint leaves and a sprinkle of pomegranate arils. Enjoy your refreshing drink! For the full recipe, check [Full Recipe]. To get the most flavor from your drink, use the right sweetener. I suggest starting with one tablespoon of honey or agave syrup. Taste it first. If it needs more sweetness, add a bit more. Remember, you can always add, but you can't take away. When choosing pomegranate juice, look for 100% juice with no added sugar. The best juice comes from ripe pomegranates. It should be bright red and taste sweet yet tart. This balance makes your drink shine. Garnishing makes your drink pop. Use fresh mint leaves and sprinkle pomegranate arils on top. This adds color and an inviting look. Serve your drink in clear glasses to showcase the vibrant colors. For gatherings, consider using a large pitcher, so guests can serve themselves. This makes it easy and fun. You can also add extra mint sprigs for a nice touch. Green tea is full of antioxidants. It boosts metabolism and supports heart health. Pomegranate juice also has health benefits. It may improve memory and reduce inflammation. Mint adds a refreshing taste. It may aid digestion and soothe headaches. Together, these ingredients create a drink that is not only tasty but also good for you. {{image_2}} You can sweeten your Pomegranate Mint Sparkling Green Tea in many ways. Natural sweeteners like agave or stevia work great. They add sweetness without extra calories. Just use them to match your taste. You can also try flavored syrups. Fruit syrups can give a fun twist. They add a new layer of flavor. Adjust the amount based on your taste. Feel free to explore other types of tea. Herbal teas can create a unique taste. Black tea offers a stronger flavor. Both can work well with pomegranate and mint. You can also add fruit slices for extra flavor. Citrus fruits like lemon or orange can enhance the drink. Think about adding berries for a burst of sweetness. Seasonal changes can inspire your drink. In summer, add fresh fruits like strawberries or peaches. These fruits pair well with the mint and pomegranate. They enhance the refreshing quality. In winter, consider spice infusions. Cinnamon or nutmeg can add warmth. This variation makes it cozy for cold days. Enjoy your drink all year long! You can find the full recipe to make this delightful drink and explore these variations. To keep your Pomegranate Mint Sparkling Green Tea fresh, store it in the fridge. Use a sealed pitcher to avoid spills and keep it cold. This drink stays tasty for up to three days. After that, the mint may lose its flavor and freshness. You can freeze pomegranate juice for later use. Pour it into ice cube trays and freeze. This way, you can add a cool touch to drinks. For mint, chop it and mix with a bit of water. Freeze in small containers. This gives you mint ready to use when you want. For the best taste, drink it within a day of making it. If you want to warm it up, pour it into a pot and heat gently. Just make sure not to boil it, as this can change the flavors. Enjoy it cold for a refreshing treat! Pomegranate Mint Sparkling Green Tea has a bright and refreshing taste. You will notice the sweet, tart flavor of pomegranate first. The green tea adds a smooth and earthy tone. Fresh mint gives it a cool kick. The sparkling water brings a fun fizz. Together, these flavors create a drink that is light, crisp, and very enjoyable. Yes, you can prepare this drink in advance! Brew and cool the green tea a day before. Mix the pomegranate juice and mint leaves into the cooled tea. Store it in the fridge. Just before serving, add the sparkling water and ice. This keeps the fizz fresh. You’ll have a tasty drink ready to enjoy at any time. You can find the ingredients at most grocery stores. Look for fresh mint, pomegranate juice, and green tea in the beverage aisle. Many stores also sell sparkling water. If you prefer online shopping, check websites like Amazon or local grocery delivery services. They often have everything you need to make this refreshing drink. Yes, this drink is quite versatile! It is free from gluten and dairy. You can adjust the sweetness to fit your needs. If you're vegan, use agave syrup instead of honey. Always check store-bought juices for added sugars or allergens. This drink is a safe choice for many dietary needs, making it a great option for gatherings. This blog post guides you through making Pomegranate Mint Sparkling Green Tea. You learned about the key ingredients, step-by-step instructions, and helpful tips for flavor and presentation. You also explored variations, storage methods, and answers to common questions. This drink offers a fresh taste and health benefits. Try different sweeteners or fruits to find your favorite mix. Enjoy your refreshing drink!](https://foodishtalk.com/wp-content/uploads/2025/06/769c6b19-3368-4b2b-b74f-b559a7f7397a.webp)
Craving a refreshing drink that bursts with flavor? I’ve got just the thing for you: Pomegranate Mint Sparkling Green Tea!

Looking for a fun and tasty treat? The Cherry Cola Cream Float is your answer! This easy-to-make drink combines rich
