Skip to content
DisclaimerTerms Of UseGDPR PolicyCookie Policy

Foodish Talk

  • Home
  • Drinks
  • Appetizers
  • Dinner
  • Dessert
  • About
  • Contact
  • Privacy Policy
DisclaimerTerms Of UseGDPR PolicyCookie Policy

NO-ING-IMG

To make my zesty baked ziti, you will need: - 12 oz ziti pasta - 2 cups marinara sauce (homemade or store-bought) - 1 cup ricotta cheese - 1 cup mozzarella cheese, shredded - 1/2 cup grated Parmesan cheese - 1 large egg - 2 cloves garlic, minced - 1 teaspoon dried Italian herbs (oregano, basil, thyme) - Salt and pepper to taste - Fresh basil leaves for garnish I love using brands that offer rich flavor. For marinara, try Rao's or Prego. They both give a nice, hearty taste. For cheese, I recommend Galbani for ricotta and Polly-O for mozzarella. These brands melt well and add creaminess to your dish. You can mix it up if you lack some items. Here are some swaps: - Use penne pasta instead of ziti. - Try cottage cheese if you don't have ricotta. - For a dairy-free option, use vegan cheese. - Add fresh spinach or mushrooms for a veggie boost. These simple swaps let you customize your baked ziti while keeping it tasty. For the full recipe, check the previous section. First, bring a large pot of salted water to a boil. Once boiling, add the ziti pasta. Cook it according to the package instructions. You want the pasta to be al dente, which means it should still have a little bite. This usually takes about 8-10 minutes. After cooking, drain the pasta in a colander and set it aside to cool slightly. Now, grab a mixing bowl. In this bowl, combine the ricotta cheese, one large egg, and minced garlic. Add the dried Italian herbs, salt, and pepper. Mix everything together until it becomes smooth. This mixture adds creaminess and flavor to your baked ziti. Make sure all the ingredients are well blended for the best taste. Take a large mixing bowl and combine the cooked ziti with the marinara sauce and half of the shredded mozzarella cheese. Stir well to coat all the pasta with the sauce. Next, grab a baking dish. Layer half of the ziti mixture in the dish. Spread the ricotta mixture evenly on top. Then, add the remaining ziti mixture on top of the ricotta layer. Finally, sprinkle the rest of the mozzarella cheese and the grated Parmesan cheese on top. Cover the dish with aluminum foil and bake it in the preheated oven at 375°F (190°C) for 20 minutes. After that, remove the foil and bake for an additional 10-15 minutes. The cheese should become bubbly and golden brown. Let it cool for a few minutes before serving. Enjoy your meal! You can find the Full Recipe for more details and tips. To get the best texture, cook your ziti pasta al dente. This means it should be firm but not hard. Drain it right away to stop cooking. Mixing it with sauce helps keep it moist. If you overcook the pasta, it can turn mushy. Adding fresh herbs makes a big difference. Try using fresh basil or parsley in your ricotta mix. A splash of lemon juice can brighten the dish. You can also mix in some sautéed mushrooms or spinach for added flavor. These simple changes create a richer taste. One common mistake is using too much ricotta. This can make the dish heavy. Always measure well and mix it smoothly. Also, don’t skip the foil when baking. Covering it helps keep moisture in. Finally, let it cool for a few minutes before serving. This allows the flavors to settle and makes it easier to serve. For the full recipe, check out the details above. {{image_2}} You can make your baked ziti even better by adding vegetables. Spinach, zucchini, or bell peppers work well. Just chop them up and mix them in with the ziti. This adds color and nutrition to your meal. You can use fresh or frozen veggies. If you use frozen, make sure to thaw them first. This way, they won't make your dish watery. For a heartier meal, you can add ground beef or sausage. Brown the meat in a pan before mixing it with the ziti. This gives the dish extra flavor and protein. You can choose beef, turkey, or even chicken sausage. It’s a great way to make the dish more filling. Just remember to drain any excess fat from the meat before adding it to the pasta. If you like spice, try adding red pepper flakes. Just a pinch can bring a nice kick to the dish. Mix them into the marinara sauce or sprinkle them on top before serving. Adjust the amount to your taste. This simple change can make your baked ziti exciting and bold. Each bite will surprise your taste buds! Feel free to explore these variations with the full recipe to create your perfect ziti. To keep leftover baked ziti fresh, place it in an airtight container. Make sure it cools first. You can also cover it with plastic wrap or foil. Store it in the fridge for up to three days. Enjoy it warm for a quick meal! When you reheat baked ziti, use the oven for best results. Preheat it to 350°F (175°C). Place the ziti in an oven-safe dish. Add a splash of marinara sauce to keep it moist. Cover with foil to prevent drying. Heat for about 20 minutes or until warm. You can freeze baked ziti for later meals. First, let it cool completely. Then, wrap it tightly in plastic wrap and foil. Alternatively, use a freezer-safe container. It can last for up to three months in the freezer. When you are ready, thaw it in the fridge overnight before reheating. For a quick meal, check out the Full Recipe to guide you! Yes, you can make Baked Ziti ahead of time. Prepare it up to the baking step. Cover the dish and store it in the fridge. You can bake it the next day. Just add extra time to bake if it’s cold. This makes meal prep easy for busy days. If your Baked Ziti comes out dry, there are simple fixes. First, add more sauce. Marinara sauce can help add moisture. You can also drizzle some olive oil on top. Another idea is to cover it with foil while reheating. This keeps the steam in and helps it stay moist. Baked Ziti pairs well with many sides. A fresh green salad adds crunch. You can use a classic Caesar salad or a simple mixed greens salad. Garlic bread is also great for scooping up that cheesy goodness. For a light touch, serve with steamed vegetables. These sides make your meal balanced and tasty. For the Full Recipe, check the details provided above. You learned how to make baked ziti with ricotta, including ingredient choices and steps. We discussed brands to trust and substitutions to try. I shared tips for great texture and flavor, plus common mistakes to avoid. Variations can make your dish unique, whether you like veggies or meat. Proper storage keeps leftovers tasty. Now you can confidently prepare and enjoy baked ziti. It's a fun dish that will satisfy everyone at your table. Enjoy your cooking journey!

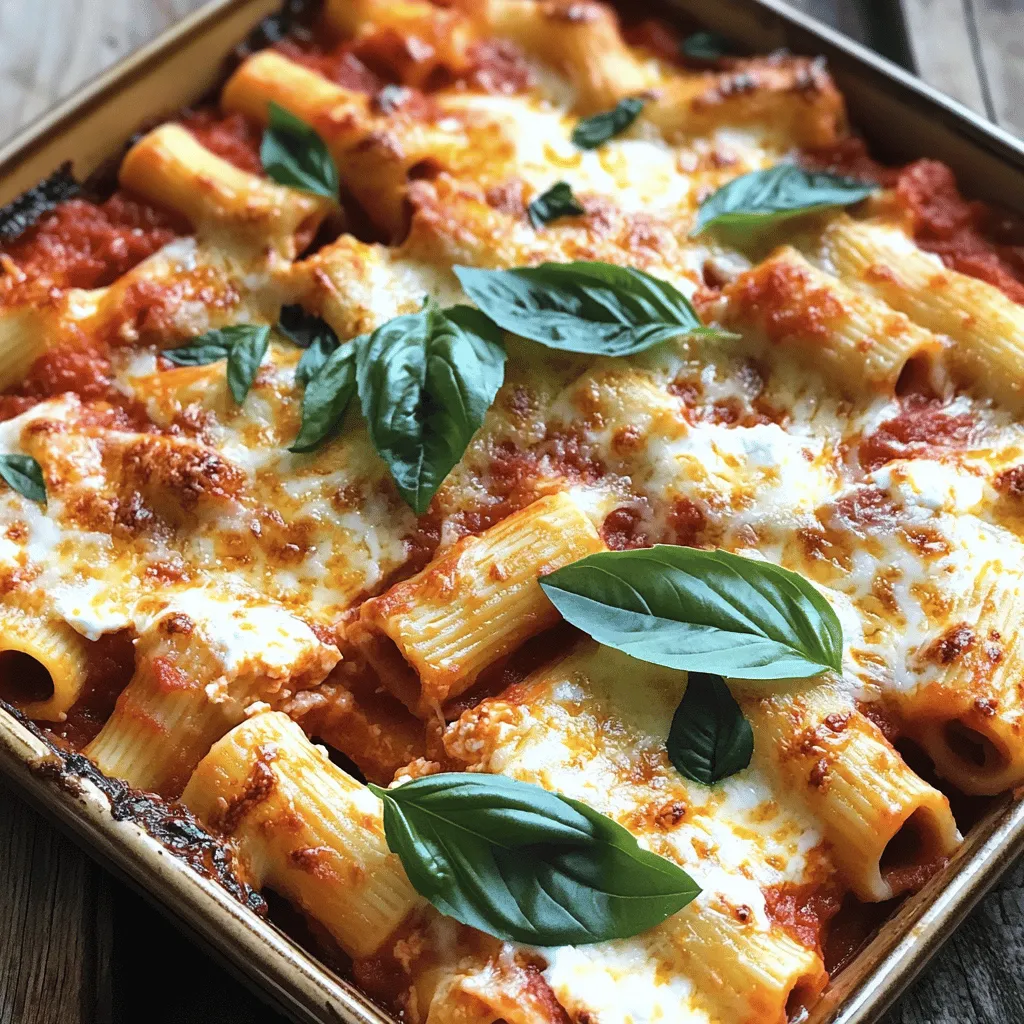
Baked Ziti with Ricotta Flavorful and Easy Recipe

If you crave a cozy meal that’s both flavorful and easy to make, you’ll love this Baked Ziti with Ricotta!

For my Easy Sheet Pan Fajitas, you need a few key items. Here’s the list: - 1 pound boneless chicken breast, sliced into thin strips - 1 red bell pepper, sliced - 1 yellow bell pepper, sliced - 1 medium red onion, sliced - 3 tablespoons olive oil - Salt and pepper to taste - Fresh cilantro, for garnish - Flour tortillas, for serving - Lime wedges, for serving These ingredients come together to create a colorful and tasty dish. The chicken adds protein, while the peppers and onion give it a fresh crunch. To make your fajitas pop with flavor, you’ll want to add some seasonings. Here’s what I use: - 2 teaspoons chili powder - 1 teaspoon cumin - 1 teaspoon garlic powder - 1 teaspoon onion powder These seasonings create a warm and zesty taste. Chili powder brings heat, while cumin adds a nice earthy flavor. Garlic and onion powder boost the overall taste without being too overpowering. Serving your fajitas can be fun and creative. I like to wrap them in warm flour tortillas. It makes each bite soft and satisfying. Fresh lime wedges are a must. Squeeze lime juice on top for a zesty kick. You can also add toppings like diced avocado, sour cream, or salsa. Fresh cilantro adds a nice touch, too. With these options, you can customize your meal to fit everyone’s taste. For the complete recipe, check out the [Full Recipe]. It gives you all the steps to make this easy and delicious meal! First, gather all your ingredients. You need one pound of boneless chicken breast. Slice the chicken into thin strips. Next, take one red bell pepper and one yellow bell pepper. Slice them into thin strips too. Then, grab a medium red onion and slice it as well. Add these veggies to a large bowl with the chicken. Now, drizzle three tablespoons of olive oil over the chicken and veggies. Sprinkle two teaspoons of chili powder, one teaspoon of cumin, one teaspoon of garlic powder, and one teaspoon of onion powder. Add salt and pepper to taste. Toss everything together until the chicken and veggies are well coated with the spices. Preheat your oven to 425°F (220°C). Line a large baking sheet with parchment paper. Spread the chicken and veggie mixture in a single layer on the baking sheet. This helps them cook evenly. Bake in the preheated oven for 20 to 25 minutes. Stir the mixture halfway through for even cooking. The chicken should be cooked through, and the veggies should be tender. Once the timer goes off, carefully remove the baking sheet from the oven. Let the fajitas rest for a few minutes. This helps the flavors blend together. To serve, warm your flour tortillas in the oven or microwave. Spoon the chicken and veggie mix onto the tortillas. Garnish with fresh cilantro for a pop of color and flavor. Squeeze some fresh lime juice over the top for extra zest. Enjoy your easy sheet pan fajitas with friends or family. For the complete recipe, check out the Full Recipe section. To cook chicken and veggies just right, use thin strips. This helps them cook evenly. When roasting, space them out on the pan. Crowding the pan can lead to steaming instead of roasting. Stir halfway through to ensure all pieces get the heat. Look for the chicken to reach 165°F. The vegetables should be tender and slightly charred. To amp up the taste, try adding lime juice and zest before serving. Fresh herbs, like cilantro, make a big difference. You can also add a dash of smoked paprika for a smoky kick. If you like heat, toss in some sliced jalapeños. For a sweet touch, add a bit of honey or agave to your spice mix. A large baking sheet is key for even cooking. Use one that is rimmed to catch any juices. Parchment paper helps with easy clean-up and prevents sticking. A good mixing bowl makes it easy to toss ingredients with oil and spices. If you have a meat thermometer, it’s a handy tool to check chicken doneness. For serving, grab some warm flour tortillas and lime wedges to complete your meal. For the full recipe, check the notes above. {{image_2}} You can make sheet pan fajitas without meat. Replace chicken with hearty veggies. Try using mushrooms, zucchini, or chickpeas. These options give you great texture and flavor. Season them just like the meat version. Use the same spices for a tasty meal. Serve with warm tortillas and fresh toppings. Add avocado or guacamole for creaminess. Switching proteins can bring fun twists. Use shrimp, beef, or pork for different tastes. If you want leaner options, turkey works well too. Each protein will soak up the spices nicely. Adjust cooking times based on what you choose. Shrimp cooks quickly, while beef may need more time. Keep an eye on them to avoid overcooking. Exploring flavors can make your fajitas unique. For a smoky taste, add chipotle powder. If you prefer a sweet touch, include some paprika or cinnamon. Fresh herbs like oregano or thyme can brighten the dish. You can also experiment with citrus zest for a fresh kick. Don't hesitate to mix and match spices from what you have at home. Each batch can be a new adventure! For the full recipe, check the Easy Sheet Pan Fajitas section. After you enjoy your sheet pan fajitas, store any leftovers right away. Place them in an airtight container. Make sure to cool them down first before sealing. This step keeps your fajitas fresh and tasty. Store them in the fridge for up to three days. When it's time to eat your leftovers, you can reheat them easily. The best way is to use your oven. Preheat the oven to 350°F (175°C). Spread the fajitas on a baking sheet and heat for about 10-15 minutes. This method keeps the chicken juicy and the veggies crisp. You can also microwave them, but the oven gives better results. If you want to save your fajitas for later, freezing is a great option. First, let the fajitas cool completely. Then, place them in a freezer-safe bag or container. Squeeze out any air and seal it tightly. They can last in the freezer for up to three months. When you're ready to enjoy them, thaw in the fridge overnight and reheat as mentioned above. For the full recipe, check out the Easy Sheet Pan Fajitas section! You bake the fajitas for 20 to 25 minutes. This time allows the chicken to cook fully and the veggies to get soft. Stir halfway through to ensure even cooking. Always check the chicken's internal temperature to make sure it’s 165°F (75°C). Yes, you can use different vegetables in this recipe. Try zucchini, mushrooms, or corn for a twist. Just remember to cut them into even pieces so they cook well. Mixing colors adds great visual appeal and flavor. Serve sheet pan fajitas in warm flour tortillas. You can add fresh cilantro and lime juice for extra flavor. Some like to add cheese, salsa, or guacamole on top. Let everyone customize their own fajitas for fun and flavor. Absolutely! You can prep the chicken and veggies a day before. Just store them in the fridge until you’re ready to bake. This makes dinner even easier. Just remember to mix the spices right before baking for the best flavor. Yes, you can freeze sheet pan fajitas before cooking. Place the raw chicken and veggies in a freezer bag. Add the spices and oil, then seal tightly. When you’re ready, let it thaw in the fridge overnight before baking. Enjoy a quick and easy meal any night! For the full recipe, check out Easy Sheet Pan Fajitas. You now know how to make easy sheet pan fajitas. We covered key ingredients, cooking steps, and tips for a tasty meal. Remember, you can mix and match flavors and proteins, so have fun with your recipes. Proper storage ensures your leftovers stay fresh and delicious. Don't forget to experiment with different veggies and spices. Enjoy your cooking, and make this meal a family favorite!

Easy Sheet Pan Fajitas Simple and Flavorful Meal

Looking for a quick and tasty meal? My Easy Sheet Pan Fajitas are the answer! With vibrant veggies and juicy

To make these copycat Chick-fil-A nuggets, you need a few key items. Here’s the list: - 1 pound chicken breast, cut into bite-sized pieces - 1 cup buttermilk (or milk with 1 tablespoon of lemon juice added) - 1 cup all-purpose flour - 1 teaspoon paprika - 1 teaspoon garlic powder - 1 teaspoon onion powder - 1 teaspoon black pepper - ½ teaspoon salt - ½ teaspoon cayenne pepper (optional for spice) - Peanut oil (for frying) Each ingredient plays a role. The chicken gives the base. Buttermilk keeps it juicy and tender. Flour and spices create a flavorful crust. Buttermilk is essential for flavor and texture. If you don’t have it, mix milk with lemon juice. Let it sit for five minutes to sour. Paprika adds color and a hint of sweetness. Cayenne pepper is optional but adds a nice kick. If you want less spice, skip it. Peanut oil is best for frying. It has a high smoke point, which means it won’t burn easily. You can also use canola oil, but it may not give the same flavor. If you want to change things up, here are some substitutes: - Chicken breast can be swapped with chicken thighs for more flavor. - For a gluten-free option, use gluten-free flour instead of all-purpose flour. - If you dislike peanut oil, use vegetable or sunflower oil. These swaps keep the recipe tasty while allowing flexibility. Enjoy creating your own version of these nuggets! You can find the full recipe above. To make these copycat Chick-fil-A nuggets, start by marinating the chicken. In a medium bowl, mix 1 cup of buttermilk with 1 pound of chicken breast pieces. Make sure they are well coated. Let the chicken sit for at least 30 minutes. You can also marinate it for up to 4 hours in the fridge. This step adds a lot of flavor and moisture. Next, prepare the coating. In another bowl, whisk together 1 cup of all-purpose flour, 1 teaspoon each of paprika, garlic powder, onion powder, black pepper, and ½ teaspoon of salt. If you like a kick, add ½ teaspoon of cayenne pepper. This mix gives the nuggets their tasty crust. Now, heat about 1 inch of peanut oil in a deep skillet. Get the oil to 350°F (175°C) for frying. Make sure the oil is hot enough before adding the chicken. Once the oil is ready, take the marinated chicken out of the buttermilk. Let the excess buttermilk drip off. Dredge each piece in the flour mix. Ensure the chicken is evenly coated, so every bite is crunchy. Carefully drop the chicken nuggets into the hot oil. Fry them in batches to avoid overcrowding. Cook each batch for about 3-4 minutes on each side. Look for a golden brown color and check that they are fully cooked. When they are done, transfer the nuggets to a plate lined with paper towels. This step helps drain off extra oil. Now your chicken nuggets are ready to serve! For the best flavor, marinate your chicken for a longer time. If you have 4 hours, use it! The buttermilk tenderizes the meat and adds flavor. You can also add spices to the buttermilk. Try a pinch of salt or a dash of hot sauce. This will enhance the taste even more. Frying is key to getting crispy nuggets. Make sure the oil is hot enough before frying. If the oil is not hot, the nuggets will soak up too much oil and become soggy. Always fry in small batches. This keeps the temperature steady and helps cook the nuggets evenly. After frying, let them drain on paper towels to remove excess oil. This keeps the nuggets crispy and not greasy. Follow these steps, and you will have delicious copycat Chick-fil-A nuggets that everyone will love! For the complete recipe, check the Full Recipe. To get that classic Chick-fil-A taste, marinating is key. Use buttermilk for richness. Let the chicken soak for at least 30 minutes. For deeper flavor, marinate up to 4 hours. The spices in the flour mix are also vital. Paprika, garlic powder, and onion powder bring warmth. Add a pinch of cayenne for heat, if you like. Frying the nuggets in peanut oil gives them a nice crunch. Keep the oil hot at 350°F (175°C) for best results. One common mistake is overcrowding the frying pan. This cools down the oil and makes soggy nuggets. Fry in small batches to keep the oil hot. Another mistake is not letting the chicken marinate long enough. A short soak means less flavor. Avoid skipping the dredging step; it’s crucial for a crispy coating. Lastly, check the internal temperature. Chicken should reach 165°F (74°C) to be safe to eat. Serve these nuggets hot for the best experience. Pair them with your favorite dipping sauces. Honey mustard or barbecue sauce works well. You can also add a side salad for freshness. Try serving them with waffle fries for a fun twist. For a simple meal, place nuggets in a sandwich. Add lettuce and pickles for a Chick-fil-A vibe at home. Find more ideas in the Full Recipe. {{image_2}} You can enjoy Chick-fil-A nuggets in a healthier way. Instead of frying, try baking or air-frying them. For baked nuggets, preheat your oven to 400°F (200°C). Place the coated chicken on a baking sheet lined with parchment paper. Spray lightly with cooking oil. Bake for about 15-20 minutes, flipping halfway through. For air-fried nuggets, set your air fryer to 400°F (200°C). Cook in a single layer for about 10-12 minutes. Both methods cut down on oil and fat. If you love heat, add cayenne pepper to the flour mix. You can also use hot sauce in the buttermilk. For a kick, try adding crushed red pepper flakes. These small changes bring big flavor. You can even mix in spices like chili powder or smoked paprika for a smoky taste. Adjust the heat to match your taste. Dipping sauces can make your meal more fun. While the classic choice is honey mustard, you can try many others. Barbecue sauce adds a sweet and smoky flavor. Ranch dressing gives a creamy finish. For something different, try sriracha mixed with mayo for a spicy blend. Experiment with your favorite sauces or create new ones. The right sauce can elevate every bite. For the full recipe, check out the details above. To keep your leftover nuggets fresh, place them in an airtight container. This helps lock in moisture and flavor. You can store them in the fridge for up to 3 days. Make sure they cool down before sealing the container. If you want to enjoy them later, freezing is a great option. When reheating, aim to keep the nuggets crispy. The best method is to use an oven. Preheat your oven to 400°F (200°C). Spread the nuggets on a baking sheet in a single layer. Heat them for about 10-15 minutes, or until warm and crispy. You can also use an air fryer for quick reheating. Just set it to 375°F (190°C) and heat for 5-7 minutes. If you want to freeze your nuggets, first, let them cool completely. Arrange them in a single layer on a baking sheet. Freeze them for 1-2 hours until solid, then transfer them to a freezer-safe bag. They can stay fresh for up to 3 months. When you’re ready to eat, thaw them in the fridge overnight before reheating. This keeps them juicy and tasty. To get crispy nuggets, focus on the coating. Start by marinating the chicken in buttermilk. This keeps the meat juicy. After marinating, coat each piece in the seasoned flour. Make sure the oil is hot enough before frying. This helps create a nice, crunchy crust. Fry in small batches to avoid steaming. Let them drain on paper towels to keep them crispy. Yes, you can use chicken thighs. They add more flavor and stay moist. Thighs have more fat, which can make your nuggets juicier. Just cut the thighs into similar-sized pieces as the breasts. The cooking time will remain the same. You’ll still get that crispy, tasty coating. Many sides go great with chicken nuggets. Here are some of my favorites: - French fries - Sweet potato fries - Coleslaw - Macaroni and cheese - Green salad - Fruit salad These sides can balance the meal and add extra flavor. Try different combinations to find your favorite! For the full recipe, check the earlier section. You learned about the key ingredients needed for making copycat Chick-fil-A nuggets and how to substitute them. The step-by-step cooking process guides you to perfect marination and frying techniques. Tips and tricks help you avoid common mistakes and achieve that signature flavor. You also discovered healthy variations and storage tips for leftovers. In short, these nuggets can be tasty and fun to make. Enjoy creating your own delicious chicken nuggets!

Copycat Chick-fil-A Nuggets Flavorful and Easy Recipe

Do you crave the crispy, tender taste of Chick-fil-A nuggets but want to make them at home? You’re in luck!

To make this creamy tomato basil soup, gather these ingredients: - 2 tablespoons olive oil - 1 medium onion, diced - 3 garlic cloves, minced - 2 cans (14 oz each) diced tomatoes (preferably fire-roasted) - 2 cups vegetable broth - 1 teaspoon sugar - 1 teaspoon dried oregano - Salt and pepper to taste - 1 cup heavy cream (or coconut cream for a dairy-free option) - 1 cup fresh basil leaves, roughly chopped - 1 tablespoon balsamic vinegar You can swap some ingredients for a different taste: - Use coconut oil instead of olive oil for a unique flavor. - Substitute yellow onion with shallots for milder sweetness. - You can replace heavy cream with almond milk for a lighter soup. - If you want more spice, add red pepper flakes to the mix. - Fresh basil can be swapped with parsley if needed. Choosing the right brands can enhance your soup: - Olive Oil: Look for extra virgin olive oil for the best flavor. - Canned Tomatoes: San Marzano tomatoes are rich and sweet, ideal for this soup. - Vegetable Broth: Use low-sodium broth to control salt levels. - Cream: Organic heavy cream offers the richest taste and texture. - Balsamic Vinegar: Aged balsamic vinegar adds depth and sweetness. These choices can help you make a delicious and rich soup. For the full recipe, check out the complete steps to create this comfort dish. 1. Start by heating the olive oil in a large pot over medium heat. 2. Add the diced onion and sauté until it turns soft and clear, about 5-7 minutes. 3. Stir in the minced garlic and cook for one more minute. You want it to smell good! 4. Pour in the diced tomatoes and their juices, along with the vegetable broth. 5. Add the sugar and dried oregano, then season with salt and pepper. 6. Bring the mixture to a simmer and let it cook on low heat for 15 minutes. 7. Remove the pot from the heat. Use an immersion blender to blend the soup until smooth. 8. If you don’t have an immersion blender, carefully blend the soup in batches in a regular blender. 9. Return the pot to low heat. Stir in the heavy cream and warm it up, but do not let it boil. 10. Add the fresh basil and balsamic vinegar, stirring well. Taste and adjust the seasoning if needed. 11. Serve hot, garnished with a few basil leaves or a swirl of cream. - Always keep the blender submerged when blending. This prevents splatters. - Move the blender slowly up and down to ensure a smooth texture. - If you are blending a larger batch, do it in sections for easier handling. - Clean the blender right away to avoid stuck food. - Don’t skip sautéing the onion and garlic. It builds a rich base flavor. - Ensure the soup simmers for the full time. This helps all the flavors blend well. - Do not boil the soup after adding the cream. This can cause it to curdle. - Taste the soup before serving. Adjust seasoning if it needs more salt or pepper. By following these steps carefully, you will create a creamy tomato basil soup that is rich and flavorful. For the full recipe, check out the main section. Enjoy your cooking! To boost the flavor of your creamy tomato basil soup, consider a few key steps. Start by using high-quality canned tomatoes, preferably fire-roasted. Their rich taste adds depth. Fresh basil is vital. It brings brightness and freshness. Adding a teaspoon of sugar balances the acidity from the tomatoes. For extra richness, try adding a splash of balsamic vinegar. It gives a sweet tang that rounds out the flavors nicely. For a smooth and creamy texture, blending is key. After cooking, use an immersion blender to puree the soup until smooth. If you don’t have one, a regular blender works too. Just be careful with hot liquids. Always let the soup cool a bit before blending in batches. When you add cream, do it on low heat. This prevents the cream from curdling. If you're avoiding dairy, coconut cream is a great alternative. Serve your soup hot with a few fresh basil leaves on top. A drizzle of cream adds a nice touch. Pair it with crusty bread or grilled cheese for a comforting meal. A simple salad also complements the soup well. For a fun twist, try adding a sprinkle of crushed red pepper for some heat. Enjoy your delicious bowl of creamy tomato basil soup! Check out the Full Recipe for more details. {{image_2}} To make a vegan version, swap the heavy cream for coconut cream. Coconut cream adds a rich texture without dairy. Use the same amount as the heavy cream. You can also add a splash of lemon juice for extra brightness. This gives the soup a nice twist while keeping it creamy and delicious. This soup is already gluten-free! Use canned tomatoes and broth that are gluten-free. Always check the labels to be sure. You can enjoy this soup without worrying about gluten. It pairs well with gluten-free bread for dipping. Want a kick? Add crushed red pepper flakes to the pot. Start with a pinch and taste as you go. You can also use jalapeños for fresh heat. For a smoky flavor, try adding a dash of smoked paprika. These spices enhance the soup while keeping it rich and flavorful. For the full recipe, refer back to the main section. To store leftover soup, let it cool first. Pour the soup into an airtight container. Seal it tightly to keep the flavors fresh. Place the container in your fridge. It can stay good for up to four days. If you want to enjoy it later, freezing is a great option. When freezing, use a freezer-safe container. Leave some space at the top for expansion. You can also use freezer bags. Just make sure to squeeze out the air before sealing. This soup can last for three months in the freezer. When ready to eat, thaw it in the fridge overnight for best results. To reheat, pour the soup into a pot. Heat it over medium-low on the stove. Stir often to prevent sticking. If it seems too thick, add a splash of broth or water. You can also microwave it in a bowl. Heat in short bursts, stirring in between to warm evenly. Enjoy your warm, creamy tomato basil soup! For the full recipe, check out the link above. The best way to thicken this soup is by blending it well after cooking. You can also add a bit more heavy cream for a richer texture. If you want a quick fix, mix a tablespoon of cornstarch with water and stir it in while cooking. This will give your soup a nice, creamy feel. Yes, you can use fresh tomatoes instead of canned ones. If you choose fresh, you will need about 2 pounds. Roast them first for deeper flavor. Peel and chop them before adding them to the pot. You may need to add a little more broth for the right consistency. Creamy Tomato Basil Soup can last about 3 to 5 days in the fridge. Store it in an airtight container to keep it fresh. If you want to keep it longer, consider freezing it. Just remember to leave out the cream until you reheat it for the best taste. For the full recipe, check out the full recipe link. We discussed key ingredients, step-by-step cooking, and tips for the best soup. Remember, using fresh ingredients makes a big difference in flavor. With easy storage methods, you can enjoy this soup for days. Don't forget the variations; they can help you tweak recipes to fit your diet. Lastly, address common FAQs to make your soup perfect every time. You now have all the tools you need to create a delicious creamy tomato basil soup! Enjoy making it your own.

Creamy Tomato Basil Soup Rich and Flavorful Recipe

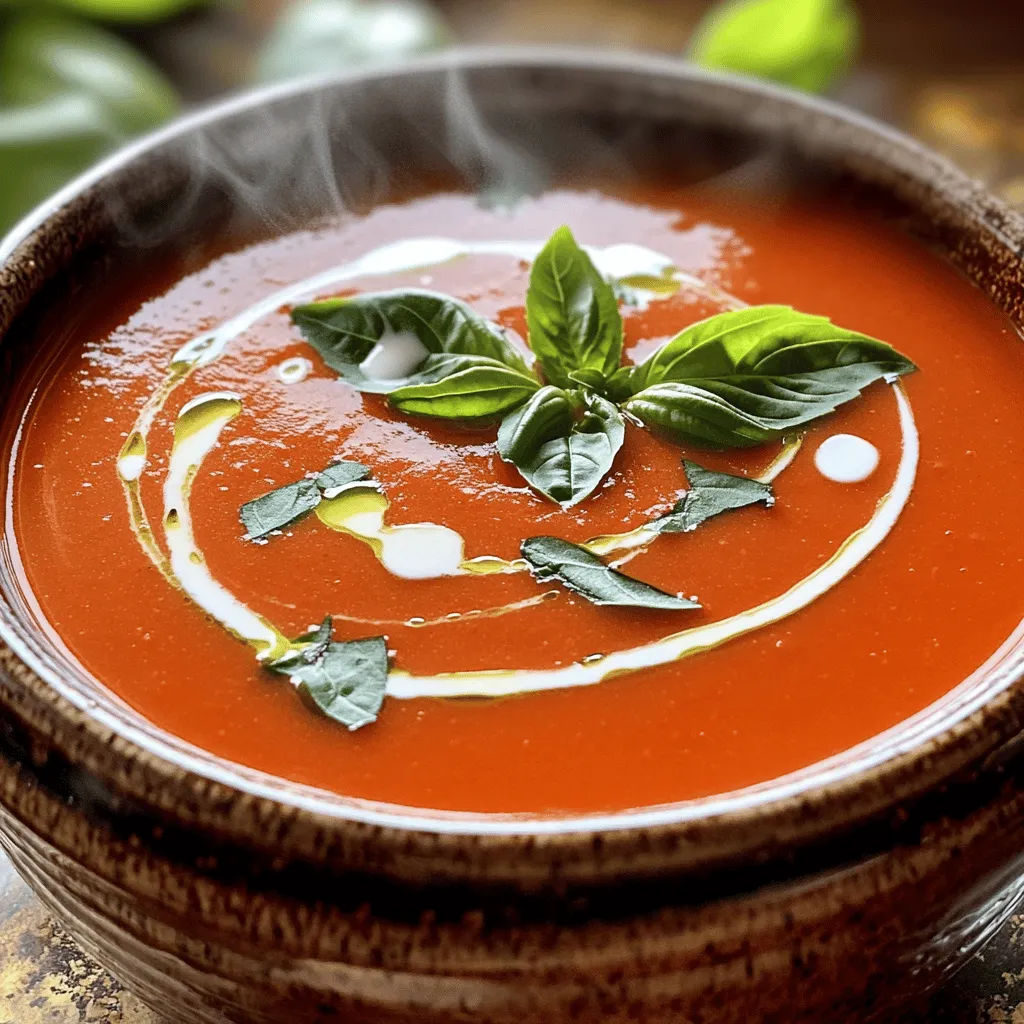
Warm, comforting, and full of flavor, Creamy Tomato Basil Soup is a must-try! In this recipe, I’ll walk you through

To make the perfect homemade cinnamon rolls, gather these simple ingredients: - 4 cups all-purpose flour - 1 packet (2 1/4 teaspoons) active dry yeast - 1 cup milk, warmed (about 110°F) - 1/2 cup granulated sugar - 1/3 cup unsalted butter, melted - 2 large eggs - 1 teaspoon salt - 1 tablespoon ground cinnamon - 1/2 cup brown sugar, packed - 1/3 cup raisins or nuts (optional) - 1 cup powdered sugar (for icing) - 1 tablespoon vanilla extract - 2 tablespoons milk (for icing) You can customize your rolls by adding raisins or nuts. They add a nice crunch and flavor. If you have allergies or dietary needs, you can swap these items: - Use almond milk or soy milk instead of regular milk. - Replace all-purpose flour with gluten-free flour for a gluten-free option. - Use coconut oil instead of butter for a dairy-free choice. - For a vegan option, replace eggs with flaxseed meal or applesauce. These substitutions will keep your cinnamon rolls delicious while fitting your needs. To make your dough, start by mixing the wet and dry ingredients. In a large bowl, combine warm milk and sugar. Then, sprinkle the active dry yeast on top. Let it sit for five minutes until it gets frothy. This shows the yeast is alive and ready to work. Next, add melted butter, eggs, and salt into the bowl. Mix everything well. Now, gradually add flour. Do this one cup at a time. Keep mixing until a soft dough forms. You can use your hands or a stand mixer fitted with a dough hook. Kneading is key for great texture. Flour your work surface and place the dough on it. Knead for five to seven minutes. You want the dough to feel smooth and elastic. This step builds the gluten, which helps your rolls rise nicely. Rising is crucial for fluffy rolls. Once you knead the dough, place it in a greased bowl. Cover it with a clean kitchen towel. Let it rise in a warm area for about one hour. The dough should double in size. After rising, punch the dough down gently to release air. Roll it out on a floured surface into a rectangle about 1/4 inch thick. This is where the fun begins! Spread melted butter evenly over the dough. In a small bowl, mix brown sugar and cinnamon. Sprinkle this mix over the buttered dough. You can add raisins or nuts for a fun twist. Starting from one long side, roll the dough tightly into a log. Pinch the seam to seal it. Cut the log into 12 equal pieces. Place them in a greased 9x13 inch baking dish, side by side. Cover again with a towel. Let them rise for another 30 minutes until they puff up. Preheat your oven to 350°F (175°C). This step is important for even cooking. Bake the rolls for 25 to 30 minutes. You want them golden brown on top. Keep an eye on them after the 20-minute mark. To check if they are done, tap the top. If it sounds hollow, they are ready. Once baked, take them out and let them cool a bit. This helps set the icing you will drizzle on top. For the icing, whisk together powdered sugar, vanilla, and milk until smooth. And there you have it! Follow these steps, and you'll enjoy warm, fluffy cinnamon rolls. For the complete recipe, refer to the Full Recipe section. To make the best cinnamon rolls, avoid some common mistakes. First, don't use cold ingredients. Cold milk or eggs can slow down yeast action. Always warm your milk to around 110°F. This helps yeast to activate properly. Next, don't skip the kneading step. Kneading develops gluten, which gives the dough structure. Aim for about 5-7 minutes of kneading until smooth. This helps your rolls rise well and stay fluffy. To achieve that perfect fluffy texture, let the dough rise in a warm area. Cover it with a towel to keep the heat in. If your kitchen is cold, place the dough near a warm oven. This will help it rise higher. Icing adds a sweet finish to your cinnamon rolls. For a twist, try cream cheese frosting. Mix cream cheese, powdered sugar, and a bit of vanilla. This gives a rich flavor that pairs well with the rolls. You can also add flavor to your icing. Try mixing in some citrus zest, like lemon or orange. This adds a fresh taste. Another great idea is to add spices, like nutmeg or cardamom, for extra warmth. For more details, check out the Full Recipe to see how to make the icing. Enjoy your delicious rolls! {{image_2}} You can add fun flavors to your cinnamon rolls. Try mixing in spices or zest. A pinch of nutmeg or cardamom can enhance the taste. You can also add orange or lemon zest for a bright twist. For chocolate lovers, make chocolate cinnamon rolls. Just add cocoa powder to the dough. Spread chocolate chips inside with the cinnamon and sugar mix. This gives you a rich, sweet treat. If you need a gluten-free version, use gluten-free flour. Look for blends made for baking. This way, your rolls will still be fluffy and tasty. For a vegan adaptation, swap milk with almond or soy milk. Use flaxseed meal mixed with water instead of eggs. Melt coconut oil and use it in place of butter. These changes keep the flavor while making it plant-based. Check out the Full Recipe for more details on how to make these delicious rolls! To keep your cinnamon rolls fresh, let them cool completely first. Place them in an airtight container. If you do not have a container, wrap them tightly in plastic wrap. This helps to keep them soft and moist. Use a container that seals well to prevent air from getting in. To enjoy your cinnamon rolls again, you can reheat them in several ways. The best method is to heat your oven to 350°F (175°C). Place the rolls on a baking sheet and cover them with foil. Bake for about 10 minutes. This keeps them warm and soft. You can also use the microwave. Heat them one at a time for about 15-20 seconds. If they seem dry, add a small piece of butter on top before heating. This will help maintain their fluffy texture. Enjoy your cinnamon rolls warm and fresh, just like when they first came out of the oven! To make homemade cinnamon rolls from scratch, start by mixing warm milk and sugar. Add active dry yeast and let it sit for a few minutes until it bubbles. Then, mix in melted butter, eggs, and salt. Gradually add flour, kneading until smooth. Let the dough rise until it doubles in size. Roll out the dough, spread melted butter, and sprinkle cinnamon and sugar. Roll it up, cut into pieces, and let them rise again before baking. This process creates soft, fluffy rolls with a rich flavor. For the full recipe, check out the details above. Cinnamon rolls can last up to 2 days at room temperature. Store them in an airtight container to keep them fresh. If you want them to last longer, place them in the fridge. They can stay good for about a week in the fridge. Remember to wrap them well to keep out moisture and air. Yes, you can freeze cinnamon rolls both before and after baking. To freeze before baking, roll and cut the dough. Place the pieces on a baking sheet and freeze until firm. Then, transfer them to a freezer bag. For baking, let them rise in the fridge overnight before baking. If you freeze them after baking, let them cool completely. Wrap them tightly and place them in a freezer bag. They can stay good for up to 3 months. Just reheat them in the oven for a warm treat! Making cinnamon rolls from scratch is fun and rewarding. We explored ingredients, mixing, rising, baking, and tasty variations. Remember to customize with your favorite add-ins and frost with unique icings. Proper storage keeps your rolls fresh for days. Use the tips to avoid common mistakes and achieve that perfect fluffiness. Enjoy creating and sharing delicious cinnamon rolls with family and friends. Each step brings you closer to a mouthwatering treat that everyone will love.

Homemade Cinnamon Rolls Fluffy and Easy Recipe

If you crave warm, fluffy cinnamon rolls straight from your oven, this easy recipe is for you! I’ll guide you

- 4 large bell peppers (any color) - 1 lb ground turkey (or beef) - 1 cup cooked rice (white or brown) - 1 can (15 oz) black beans, drained and rinsed - 1 cup corn kernels (fresh, frozen, or canned) - 1 cup salsa - 1 teaspoon taco seasoning - 1 cup shredded cheese (cheddar or Mexican blend) - Fresh cilantro, chopped (for garnish) - Salt and pepper to taste For this recipe, I love using vibrant bell peppers that bring color and taste to the dish. The ground turkey or beef provides protein and flavor. I often choose brown rice for a nutritious touch, but white rice works just as well. The black beans add fiber and richness, while corn gives a sweet crunch. You can use any salsa you like; it adds moisture and zest. Taco seasoning gives that classic flavor, and cheese? Well, cheese is essential! Finally, a sprinkle of fresh cilantro at the end brightens everything up. If you're curious about the full recipe, check out the details above. - Preheat the oven to 375°F (190°C). - Cut the tops off the bell peppers and remove the seeds. Start by heating your oven. This step helps the peppers cook evenly. Next, take each bell pepper and slice off the top. Make sure to remove all the seeds inside. This keeps the filling from getting too messy. You want the peppers to stand upright in your baking dish. - Brown the ground turkey (or beef) in a skillet. - Mix in cooked rice, black beans, corn, salsa, and spices. In a skillet, cook the ground turkey or beef over medium heat. Stir it often until it turns brown, which takes about 5 to 7 minutes. Drain any fat that collects. Then, add cooked rice, black beans, corn, and salsa. Don’t forget the spices! Stir well and let it cook for a few more minutes until it’s warm. - Fill each bell pepper with the mixture. - Top with shredded cheese and prepare for baking. Now, it’s time to fill the peppers! Spoon the warm mixture into each pepper. Pack it down gently to fit as much as you can inside. After that, sprinkle shredded cheese on top of each one. This will melt and create a delicious layer when baked. - Add water to the baking dish and cover with foil. - Bake and finish without foil until cheese is melted. Add about 1/4 cup of water to the baking dish. This helps steam the peppers and keeps them moist. Cover the dish tightly with foil. Bake for 25 to 30 minutes. After that, remove the foil and bake for another 10 to 15 minutes. You will know they are done when the cheese is bubbly and the peppers are tender. Enjoy your tasty taco stuffed bell peppers! For the full recipe, check out the details above. Using leftover taco meat or rice makes this dish quicker. You can save time and reduce waste in your kitchen. If you like spice, adjust the heat to fit your taste. Add more taco seasoning or some diced jalapeños for a kick. For a vegetarian option, substitute meat with lentils or more beans. This keeps it hearty and healthy. If you need a gluten-free version, check that all ingredients are certified gluten-free. This way, everyone can enjoy the meal. To enhance the recipe, consider adding spices or herbs. A pinch of cumin or smoked paprika can bring out the flavors. For toppings, think about sour cream, avocado, or hot sauce. These add creaminess and zest to your dish. For the full recipe, visit the [Full Recipe]. {{image_2}} You can switch up the protein in these taco stuffed bell peppers. Ground beef offers a classic taste. Ground turkey is leaner but still tasty. If you prefer chicken, that works too. For a plant-based option, try using beans or lentils. They add protein and fiber. This way, you can enjoy a meatless version that still satisfies. You can get creative with the flavors. Making your own taco seasoning is easy and fun. Try adding smoked paprika or cumin for a twist. Different salsas can change the whole dish. You can use mild salsa for kids or spicy salsa for adults. Experiment with different sauces like chipotle or verde for extra zest. Don’t forget to add more nutrition! Diced zucchini or mushrooms blend well with the filling. Spinach adds color and boosts vitamins. You can also top your peppers with fresh ingredients. Guacamole adds creaminess, while pico de gallo offers a fresh crunch. These small changes can make a big difference in taste and health. To store leftovers, let the taco stuffed bell peppers cool. Place them in an airtight container. You can keep them in the fridge for 3-4 days. Be sure to label the container with the date. You can freeze taco stuffed bell peppers for later. Wrap each pepper in plastic wrap or foil. Then, place them in a freezer-safe bag. They can last up to three months. To reheat, thaw in the fridge overnight. Heat them in the oven at 375°F (190°C) until warm, about 20-25 minutes. These stuffed peppers pair well with many sides. Consider serving them with a fresh salad. Breadsticks also make a great choice. You can add some guacamole or sour cream on the side for extra flavor. Enjoy experimenting with your favorite combinations! Yes, you can make Taco Stuffed Bell Peppers ahead. Prepare the filling and stuff the peppers. Store them in the fridge for up to 24 hours. When ready to bake, just pop them in the oven. This saves time on busy days. To spice things up, add chopped jalapeños or a pinch of cayenne pepper. You can also use spicy salsa instead of mild. If you like heat, sprinkle some crushed red pepper flakes on top before serving. Absolutely! Taco Stuffed Bell Peppers are great for meal prep. You can make a big batch and store them in individual containers. This way, you have tasty meals ready for the week. Just reheat them in the microwave or oven. If you want a rice substitute, try quinoa, cauliflower rice, or even cooked lentils. These options add a nice twist to the dish. They also keep the peppers low in carbs but high in flavor. The peppers are done when they are tender and the cheese is melted. You can test this by poking a fork into the side of a pepper. If it goes in easily, they are ready. For the best taste, let them cool slightly before serving. Enjoy your delicious Taco Stuffed Bell Peppers! Check out the Full Recipe for more details. Taco stuffed bell peppers are easy to make and full of flavor. We covered the key ingredients, like bell peppers, ground turkey or beef, and beans. You learned how to prep, cook, and bake the peppers for a tasty dish. For a fun twist, change up the protein or add extras like veggies. These peppers are great for meal prep and leftovers are simple to store. Enjoy your cooking and have fun exploring different flavors!

Taco Stuffed Bell Peppers Flavorful and Easy Recipe

Looking for a fun and tasty dish? Taco Stuffed Bell Peppers are the answer! This easy recipe blends bold flavors

- 1 pound fresh asparagus, trimmed - 2 tablespoons olive oil - 3 cloves garlic, minced - Zest of 1 lemon - Juice of 1 lemon - Salt and freshly ground black pepper to taste - 1 teaspoon red pepper flakes (optional) - 2 tablespoons grated Parmesan cheese (optional) - Fresh parsley for garnish Lemon garlic roasted asparagus is a simple dish, yet it bursts with flavor. The fresh asparagus brings a bright green color and a crisp bite. The garlic adds depth, while lemon gives it a zesty punch. I love using simple ingredients that you can find in your kitchen. You can adjust the seasoning as you like. For a little heat, add red pepper flakes. If you want a touch of creaminess, sprinkle some Parmesan cheese on top. When you prepare this dish, use fresh asparagus. Look for firm stalks that are not too thick. Thin asparagus cooks faster and has a nice tender crunch. Don't forget to try the full recipe for step-by-step guidance! This dish pairs well with many meals. Enjoy the bright and fresh flavors of lemon and garlic! To start, wash your asparagus under cold water. This helps remove any dirt. Next, trim the tough ends. You can do this by bending the asparagus until it snaps. It will break at the right spot. Now, preheat your oven to 425°F (220°C). This high heat makes the asparagus crisp and tasty. In a large bowl, combine the olive oil, minced garlic, lemon zest, and lemon juice. Add salt and pepper to taste. If you like a little heat, toss in red pepper flakes. Mix everything well. This mixture will coat the asparagus and give it great flavor. Now, add the trimmed asparagus to your bowl. Toss it in the zesty mixture until all the spears are coated. Spread the asparagus in a single layer on a baking sheet. This helps them roast evenly. Place it in the oven and roast for 12-15 minutes. If you want, sprinkle Parmesan cheese on top during the last 2 minutes. This adds a nice cheesy touch. Enjoy your Lemon Garlic Roasted Asparagus as a great side dish. You can find the Full Recipe to guide you through each step. To get crispy asparagus, stir it halfway through cooking. This helps every piece cook evenly. You want that nice crunch! When choosing asparagus, look for bright green stalks. The ends should be firm, not mushy. Thin stalks are tender, while thicker ones have more bite. You can boost the taste of your lemon garlic roasted asparagus by adding other seasonings. Try a pinch of chili powder for heat or a sprinkle of lemon pepper for more zing. Fresh herbs work best, but dried ones also add flavor. Fresh parsley or thyme elevates the dish nicely. Just remember, dried herbs are stronger, so use less. For the full recipe, check the complete guide above. {{image_2}} You can easily change the taste of lemon garlic roasted asparagus. One fun twist is to add chili powder. This gives the dish a spicy kick. The heat from the chili pairs well with the zesty lemon and garlic. Just sprinkle in about a teaspoon. Adjust it to your heat level. Another idea is to infuse the dish with herbs. Use thyme or rosemary for a fresh taste. They add a lovely earthiness that balances the lemon. Simply chop the herbs and toss them with the asparagus before roasting. If you are vegan, you can skip the Parmesan cheese. The dish still tastes great without it. The lemon and garlic provide all the flavor you need. For gluten-free options, this recipe fits the bill. All the ingredients are naturally gluten-free. Just make sure any added spices or toppings are also gluten-free. Enjoy your meal without worry! For the complete recipe, check out the *Full Recipe*. After enjoying your lemon garlic roasted asparagus, store leftovers in an airtight container. Let the asparagus cool to room temperature before sealing it. This helps prevent condensation, which can make the asparagus soggy. Place the container in the fridge. To reheat, try using the oven or a skillet. Preheat your oven to 350°F (175°C). Spread the asparagus on a baking sheet and heat for about 10 minutes. This way, you keep the crisp texture. If you use a skillet, warm over medium heat, stirring gently until heated through. Lemon garlic roasted asparagus lasts about 3 to 4 days in the fridge. Keep an eye on it, as freshness may vary. If you want to store it longer, freezing is an option. To freeze, first lay the cooled asparagus on a baking sheet in a single layer. Freeze them for about an hour. Once frozen, transfer them to a freezer-safe bag. They can last for up to 3 months in the freezer. When you are ready to use them, thaw overnight in the fridge before reheating. For the complete cooking experience, check out the Full Recipe for your lemon garlic roasted asparagus. Can I use frozen asparagus for this recipe? Yes, you can use frozen asparagus. Just remember to thaw it first. Drain excess water to avoid sogginess. The flavors will still shine through, but fresh asparagus gives a better texture. How do I know when asparagus is cooked properly? Cooked asparagus should be bright green and slightly crispy. It should be tender but still have a little bite. You can test it by piercing a piece with a fork. If it goes in easily, it’s ready! Calories and key nutrients in lemon garlic roasted asparagus One serving of lemon garlic roasted asparagus has about 100 calories. This dish provides fiber, vitamins A, C, and K, and folate. It’s low in calories but high in nutrients, making it a healthy choice. Health benefits of asparagus and garlic Asparagus is rich in antioxidants. It supports digestion and heart health. Garlic boosts your immune system and has anti-inflammatory properties. Combining these ingredients makes this dish not only tasty but also good for you. Best sides to pair with lemon garlic roasted asparagus This dish pairs well with grilled chicken or fish. It also complements rice or quinoa nicely. You can serve it with a light salad for a fresh touch. Creating a complete meal with this dish To make a full meal, pair lemon garlic roasted asparagus with a protein source. Try it with baked salmon or a hearty steak. Add a starch, like mashed potatoes or couscous, for a balanced plate. For the full recipe, check the earlier section. This blog post covered how to make lemon garlic roasted asparagus. We detailed the ingredients, instructions, and some helpful tips for the best flavor. You can also explore different seasonings and meal pairings. Remember, roasting brings out great taste and texture. Try these methods to impress at your next meal. Enjoy your cooking and have fun experimenting with flavors. Roasted asparagus can be simple, tasty, and healthy!

Lemon Garlic Roasted Asparagus Tasty Side Dish

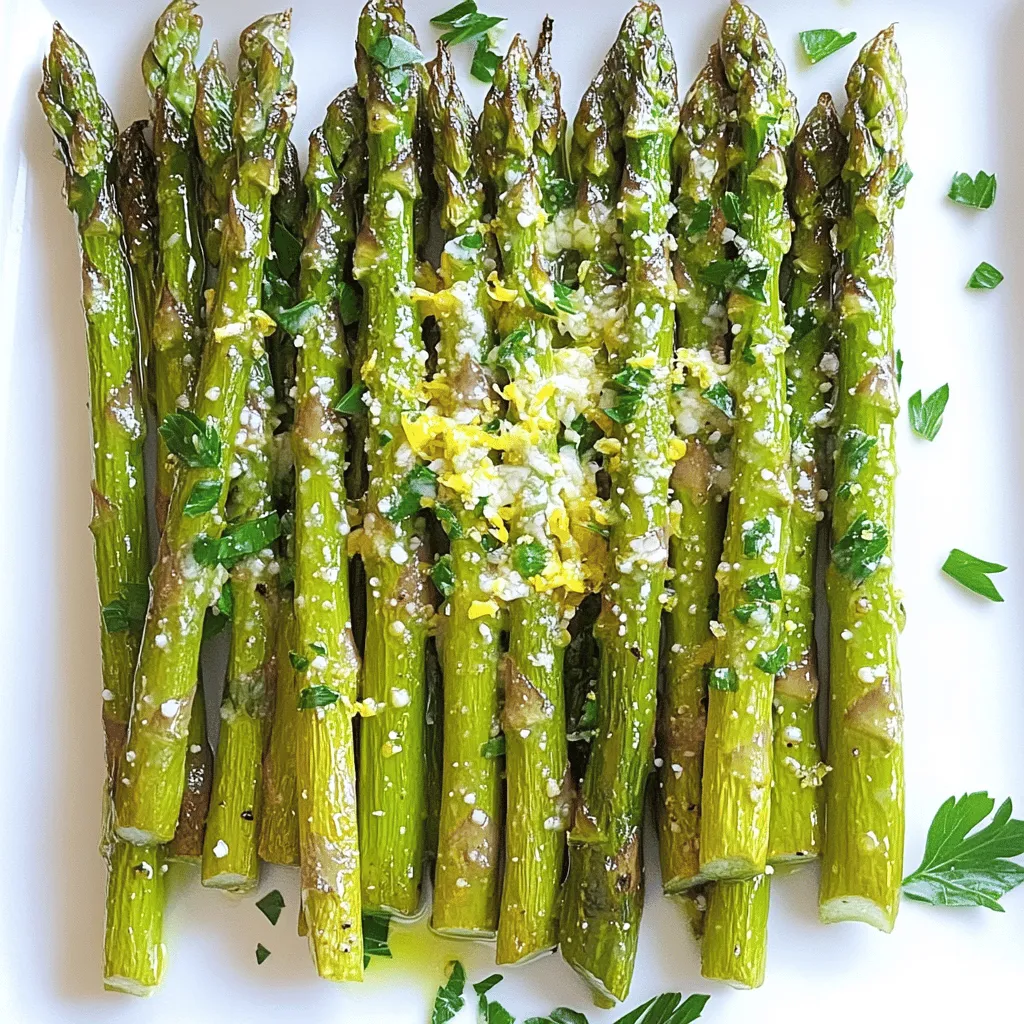
Looking for a quick and tasty side dish? Lemon Garlic Roasted Asparagus is your answer! This simple recipe combines fresh

To make a tasty Easy Chicken Alfredo Bake, you need some key ingredients. Here’s what you’ll need: - 2 cups cooked rotini pasta - 2 cups cooked chicken breast, shredded - 2 cups broccoli florets, steamed - 2 cups Alfredo sauce (store-bought or homemade) - 1 cup shredded mozzarella cheese - 1/2 cup grated Parmesan cheese - 1 teaspoon garlic powder - 1 teaspoon Italian seasoning - Salt and pepper to taste - Fresh parsley, chopped (for garnish) Each ingredient plays a big role. The rotini pasta gives a fun twist, while shredded chicken adds protein. Broccoli adds color and nutrients, and the Alfredo sauce brings creaminess. Cheese on top makes everything gooey and golden. You can add some optional ingredients to make your dish even better. Here are a few ideas: - Cooked mushrooms for an earthy taste - Sliced sun-dried tomatoes for a burst of flavor - Spinach for extra green goodness - Red pepper flakes for a little heat These optional ingredients can take your bake to a new level. Feel free to mix and match based on what you like. If you have dietary needs, there are easy swaps you can make. Here are some substitutions: - Use gluten-free pasta if you're avoiding gluten. - For a dairy-free option, try vegan cheese and a plant-based Alfredo sauce. - Chicken can be replaced with cooked tofu or chickpeas for a vegetarian twist. These substitutions keep your Easy Chicken Alfredo Bake friendly for everyone. Enjoy the flavors without worry! For the complete details of this recipe, check the Full Recipe. To make this Easy Chicken Alfredo Bake, start with the right ingredients. You will need: - 2 cups cooked rotini pasta - 2 cups cooked chicken breast, shredded - 2 cups broccoli florets, steamed - 2 cups Alfredo sauce (store-bought or homemade) - 1 cup shredded mozzarella cheese - 1/2 cup grated Parmesan cheese - 1 teaspoon garlic powder - 1 teaspoon Italian seasoning - Salt and pepper to taste - Fresh parsley, chopped (for garnish) First, preheat your oven to 375°F (190°C). In a large bowl, mix the cooked rotini pasta, shredded chicken, steamed broccoli, Alfredo sauce, garlic powder, Italian seasoning, salt, and pepper. Stir until all the ingredients blend well. Next, transfer the mixture into a greased 9x13 inch baking dish. Spread it out evenly for best results. After that, sprinkle the shredded mozzarella and grated Parmesan cheese on top. Cover the dish with aluminum foil and place it in the oven. Bake for 20 minutes. After 20 minutes, remove the foil. Bake for another 10 to 15 minutes. Look for the cheese to be bubbly and golden brown. Once done, take it out and let it sit for about 5 minutes. This helps everything set before serving. To get that perfect cheese melt, here are a few tips: - Use fresh mozzarella for a creamier texture. - Grate your own cheese for better melting and flavor. - Avoid overcrowding the dish; this helps the heat circulate. - Broil for a minute at the end for an extra golden finish. These steps will help you create a rich and creamy chicken Alfredo bake that everyone will love. For the full recipe, check out [Full Recipe]. For the creamiest Alfredo sauce, start with fresh ingredients. Use real cream and butter. High-fat dairy gives it a rich taste. You can also make it at home. Combine butter, heavy cream, and Parmesan cheese in a pan. Stir over low heat until smooth. Add garlic for extra flavor. This method ensures a thick, creamy sauce. Avoid these common mistakes for a better bake. Don't overcook the pasta. It should be firm, as it will cook more in the oven. Also, don't skip the seasoning. A pinch of salt and pepper makes a big difference. Be careful with the cheese; too much can make it greasy. Lastly, let it rest after baking to set properly. Want to save time? Use rotisserie chicken instead of cooking your own. This cuts down on prep time. You can also use store-bought Alfredo sauce. It saves time and still tastes great. Prepare the dish in the morning and bake it later. This is perfect for busy days. Enjoy a comforting meal without the fuss. For the full recipe, check the link above! {{image_2}} You can make a great vegetarian version of this dish. Replace chicken with cooked mushrooms or diced tofu. These options add a nice texture and flavor. You can also use chickpeas for added protein. The rest of the recipe remains the same. It’s just as creamy and rich without the meat. Adding more veggies boosts nutrition and taste. You can mix in spinach, bell peppers, or zucchini. Try roasted red peppers for a sweet twist. Just chop them small and add them to the mix with the pasta and sauce. This makes the bake more colorful and healthy. While rotini works well, feel free to switch up the pasta. Penne, farfalle, or even fusilli can add fun shapes. Each pasta grabs the sauce in its own way, giving you a new experience. Choose what you like best or whatever you have on hand. Each shape brings a little twist to the dish. To store your Easy Chicken Alfredo Bake, let it cool first. Place the leftovers in an airtight container. Make sure to cover it tightly. This keeps the dish fresh and tasty. You can store it in the fridge for up to three days. If you want it to last longer, consider freezing it. When you reheat the Chicken Alfredo Bake, use the oven for the best texture. Preheat your oven to 350°F (175°C). Place the leftovers in a baking dish. Cover it with aluminum foil to keep moisture in. Heat for about 20 minutes or until it’s hot all the way through. You can also use a microwave, but this may make the pasta a bit mushy. To freeze your Easy Chicken Alfredo Bake, you should cool it down completely first. Then, slice it into portions. Wrap each piece tightly in plastic wrap. Place the wrapped portions in a freezer-safe bag or container. Label it with the date. It can stay in the freezer for up to three months. When you're ready to eat, thaw it in the fridge overnight before reheating. This method helps keep the flavor and texture. If you want the full recipe, check the recipe section above! Yes, you can use store-bought Alfredo sauce. It saves time and still tastes great. Many brands offer good quality sauces. Just check the label for flavor and ingredients. If you prefer a homemade taste, try adding garlic or herbs. This way, you can make the dish more personal. Chicken Alfredo Bake lasts about three to four days in the fridge. Make sure to store it in an airtight container. This keeps it fresh and safe to eat. If you want to enjoy it later, label the container with the date. This way, you won’t forget when you made it. Yes, you can prepare this dish ahead of time. Just follow the steps up to the baking part. Cover the dish and keep it in the fridge for up to 24 hours. When ready to bake, you may need to add a few extra minutes to the cooking time. This makes it easy to serve a tasty meal without a lot of stress. For the Full Recipe, check the section above. In this blog post, we explored how to make a Chicken Alfredo Bake that’s both easy and delicious. We looked at key ingredients, optional additions, and substitutions for diet needs. Step-by-step, I guided you through preparation, baking, and tips for perfect cheese. We also shared variations, like vegetarian options and ways to add veggies. Lastly, I provided storage tips and answered common questions. Now, you can enjoy a tasty meal that's simple to prepare, adaptable, and great for leftovers. Enjoy your cooking!

Easy Chicken Alfredo Bake Simple and Delicious Recipe

Are you ready to whip up a dish that’s both easy and delicious? This Easy Chicken Alfredo Bake will have

To make these cookies, you need some key ingredients. Here’s the list: - 2 ¾ cups all-purpose flour - 1 teaspoon baking soda - 1 teaspoon salt - 1 cup unsalted butter, softened - ¾ cup granulated sugar - ¾ cup packed brown sugar - 1 teaspoon vanilla extract - 2 large eggs - 2 cups semi-sweet chocolate chips - Sea salt for sprinkling These ingredients work together to create a soft, chewy cookie. The butter adds richness, while brown sugar gives a nice depth of flavor. You can also add in some fun extras. Chopped nuts are a great choice. Here’s what you can use: - 1 cup chopped walnuts or pecans Nuts add a nice crunch and extra flavor. If you don’t like nuts, feel free to skip them. The cookies will still taste amazing. Using good quality ingredients makes a big difference. Fresh flour and real butter will give you the best taste. Don't settle for cheap chocolate chips. Look for high-quality semi-sweet chips. They melt beautifully and enhance the cookie's flavor. Remember, better ingredients lead to better cookies. Trust me on this one! For the full recipe, check out the Ultimate Chocolate Chip Cookies. Start by preheating your oven to 375°F (190°C). This gets it hot and ready. Next, grab a medium bowl. Whisk together 2 ¾ cups of flour, 1 teaspoon of baking soda, and 1 teaspoon of salt. Set this mix aside. In a large bowl, beat 1 cup of softened butter with ¾ cup of granulated sugar and ¾ cup of brown sugar. Add 1 teaspoon of vanilla extract and mix for about 2-3 minutes until it's light and fluffy. Now, add 2 large eggs one at a time, mixing well after each. Then, slowly add the flour mixture and mix just until combined. Overmixing can ruin the dough. Finally, fold in 2 cups of semi-sweet chocolate chips (and nuts if you want). Scoop rounded tablespoons of dough onto a lined baking sheet. Keep space between each scoop. This lets the cookies spread without sticking together. Sprinkle a little sea salt on top of each cookie ball. The salt adds a nice touch. Bake the cookies for 9-11 minutes. Look for golden edges and soft centers. This is the sweet spot for texture. When done, remove the cookies from the oven. Let them cool on the baking sheet for 5 minutes. This helps them set before moving them. After that, transfer the cookies to a wire rack to cool completely. Once cooled, these cookies are ready to enjoy. Serve them warm with a glass of milk or a hot cup of coffee. For a lovely presentation, place them on a nice plate. Dust with powdered sugar for a fun touch. You can even stack them high for a delightful display. Eating them fresh from the oven is a must! Check out the Full Recipe for more details. To make your cookies soft, use more brown sugar. Brown sugar adds moisture. For a chewy texture, try using a mix of both brown and white sugars. Also, do not overbake them. Keep an eye on the edges. They should be golden, but the middle should still look soft. Overmixing the dough is a big mistake. This creates tough cookies. Another mistake is baking them too long. Always check your cookies a minute or two before the time is up. Lastly, don’t skip the sea salt on top! It boosts the sweet flavor. Here are the tools that will help you bake the best cookies: - Mixing bowls - Whisk or electric mixer - Measuring cups and spoons - Baking sheet - Parchment paper - Spatula - Wire rack Using these tools will make your baking easier and more fun. Follow the Full Recipe for a step-by-step guide to bake these ultimate chocolate chip cookies. {{image_2}} You can change the flavor of your cookies by using different types of chocolate chips. Here are some options: - Semi-sweet: This is the classic choice. It gives a rich, sweet taste. - Dark chocolate: For a bolder flavor, use dark chocolate chips. They pair great with the dough. - Milk chocolate: If you like sweeter cookies, go for milk chocolate chips. They melt beautifully. - White chocolate: This adds a creamy, sweet touch. It works well with nuts too. - Butterscotch or peanut butter chips: These bring a fun twist to the mix. Mix and match these chocolate types to find your favorite blend! If you need gluten-free cookies, simply swap all-purpose flour for a gluten-free blend. Many brands offer great mixes that work well. For vegan cookies, replace the butter with coconut oil or vegan butter. Use flax eggs instead of regular eggs. Just mix one tablespoon of ground flaxseed with three tablespoons of water. Let it sit for a few minutes to thicken. These changes allow everyone to enjoy these cookies! Adding flavors can make your cookies even more exciting. Here are some fun ideas: - Coconut: Add one cup of shredded coconut to the dough for a tropical twist. - Peanut butter: Swirl in half a cup of peanut butter for a nutty flavor. You can even use peanut butter chips. - Oats: Mix in one cup of rolled oats for a chewy texture and heartiness. - Cinnamon: A teaspoon of cinnamon adds warmth and spice. Feel free to experiment and create your own unique cookie! For the complete cookie experience, check out the Full Recipe. To keep your cookies fresh, place them in an airtight container. You can stack them, but do not squish them. If you have different types of cookies, store them separately. This way, each kind keeps its taste and texture. Store cookies at room temperature for up to a week. If you want them to last longer, consider freezing them. You can freeze cookie dough to enjoy fresh cookies later. Scoop the dough into balls and place them on a baking sheet. Freeze the balls for about an hour. After they freeze, put them in a freezer bag. Label the bag with the date and type of cookie. The dough can last for up to three months in the freezer. When you’re ready, bake them straight from the freezer. Add a minute or two to the baking time. To maintain freshness, keep cookies away from heat and light. A cool, dark place works best. You can also add a slice of bread to the container. The bread helps keep cookies soft by adding moisture. If you prefer crispy cookies, avoid this tip. Always check the cookies for any signs of spoilage before eating. Enjoy your cookies at their best! For the full recipe, check out the Ultimate Chocolate Chip Cookies. These cookies are ultimate because they balance texture and flavor. You get a crispy edge and a soft center. The mix of brown and white sugar gives a rich taste. Using semi-sweet chocolate chips adds just the right amount of sweetness. The sea salt on top makes every bite pop. This recipe combines simple ingredients in a perfect way. To get chubby cookies, use cold dough. After mixing, chill the dough for at least 30 minutes. This helps the cookies hold their shape when baking. Also, use a larger scoop for the dough balls. Place them farther apart on the baking sheet. This allows room for spreading while keeping them thick and fluffy. Yes, you can use granulated sugar only. However, it will change the cookie’s taste and texture. Brown sugar makes cookies softer and chewier. If you want a crispier cookie, use all granulated sugar. Just remember, you lose some of that rich flavor. The cookies will still be tasty, just not as chewy. To reheat cookies, use the oven. Preheat it to 300°F (150°C). Place the cookies on a baking sheet. Heat them for about 5 to 10 minutes. This method keeps them soft and warm. You can also use the microwave for a quick fix. Heat for about 10 seconds, but don’t overdo it. You want them warm, not hard. For the full recipe, check out the Ultimate Chocolate Chip Cookies section above. You learned how to make ultimate chocolate chip cookies. We covered key ingredients, steps, and helpful tips. Quality matters, so pick the best ingredients. Follow the steps to get perfect cookies every time. Try the variations to discover new flavors. Store your cookies right to keep them fresh. With these tips, you can enjoy baking and sharing cookies. Happy baking!

Irresistible Ultimate Chocolate Chip Cookies Recipe

If you crave the ultimate chocolate chip cookies, you’re in the right place! I’m excited to share my favorite recipe

- 12 oz white chocolate chips - 12 oz dark chocolate chips - 1 teaspoon peppermint extract - 1/2 cup crushed peppermint candies - A pinch of sea salt (optional) For this easy peppermint bark, you need simple and fun ingredients. Start with 12 ounces of white chocolate chips. These will give your bark a creamy base. Next, grab 12 ounces of dark chocolate chips. This chocolate adds a rich flavor that pairs well with the white chocolate. To give your bark a refreshing taste, you need 1 teaspoon of peppermint extract. This tiny amount packs a big flavor punch. Then, you will want 1/2 cup of crushed peppermint candies. You can use candy canes for this. They add a nice crunch and a pop of color. Lastly, if you like, sprinkle a pinch of sea salt on top. This creates a lovely contrast to the sweet chocolate. With these ingredients ready, you can create a sweet treat that will impress everyone. Each bite is minty and chocolatey, making it perfect for any holiday gathering or just a fun snack at home. {{ingredient_image_1}} First, take a baking sheet. Line it with parchment paper. Make sure the paper covers the whole bottom. This step helps the bark come off easily later. Grab a microwave-safe bowl. Add the dark chocolate chips to the bowl. Heat it in the microwave for 30 seconds. After each time, take it out and stir. This helps prevent burning. It should take about 1-2 minutes to melt fully. Once the dark chocolate is smooth, pour it onto the lined baking sheet. Use a spatula to spread it out evenly. Aim for about 1/4 inch thick. Now, place the baking sheet in the fridge. Let it chill for about 10-15 minutes until it hardens. Next, use another microwave-safe bowl for the white chocolate chips. Melt them the same way as the dark chocolate. After they are smooth, stir in the peppermint extract. This adds a great minty flavor. Take the baking sheet with the hardened dark chocolate out of the fridge. Pour the melted white chocolate on top of the dark chocolate. Quickly spread it to cover evenly. This creates a beautiful layer of flavors. Before the white chocolate sets, sprinkle the crushed peppermint candies on top. Do this while the chocolate is still soft. Press the candies down a bit so they stick well. Now, return the baking sheet to the fridge. Let it chill for another 30-60 minutes. This helps the bark harden completely. Once it's solid, take it out. Break the bark into pieces using your hands or a knife. If you want, sprinkle a pinch of sea salt on top for a nice touch. To create great peppermint bark, melting chocolate correctly is key. Use short bursts in the microwave. Heat for 30 seconds, then stir. This helps the chocolate melt evenly. If it looks lumpy, stop heating. Stirring helps it get smooth. Avoid seizing chocolate by keeping water away. Even a drop can ruin your batch. Use dry bowls and utensils to mix. This small step makes a big difference. Think about fun ways to serve your peppermint bark. Cut it into shapes for the holidays. You can also place pieces in cute bags as gifts. The bright colors make it festive and fun. Pair peppermint bark with other sweets. It goes well with vanilla ice cream or hot cocoa. The cool mint taste balances rich flavors. You can also serve it with coffee for a nice treat. Many people overheat chocolate. This causes it to seize and become grainy. Always watch the time and stir often. Layering can be tricky. Pour the white chocolate gently on the dark. If you pour too fast, it can mix together. Make sure each layer is cool before adding the next. This keeps them separate and pretty. Pro Tips Use a Good Quality Chocolate: The quality of your chocolate greatly affects the final flavor of the bark. Use high-quality chocolate chips for the best results. Cool Between Layers: Allow the dark chocolate to completely harden before adding the white chocolate layer to prevent mixing and achieve clean layers. Crush Peppermint Candies Finely: For a more even distribution and a better texture, crush your peppermint candies into smaller pieces before sprinkling them on the bark. Storage Tips: Store the peppermint bark in an airtight container at room temperature for up to two weeks to maintain freshness. {{image_2}} You can easily switch up the chocolate in peppermint bark. Try using milk chocolate instead of dark chocolate. This change gives a sweeter taste. If you prefer, swap white chocolate for flavored options, like caramel or mocha. Flavored chocolates can add a fun twist to your bark. Get creative with your peppermint bark by adding nuts or dried fruits. Chopped almonds or pecans add a nice crunch. Dried cranberries or cherries offer a sweet and tart flavor. You can also explore other flavors beyond peppermint. Consider using orange zest or vanilla for a different taste. These options help you make unique treats for everyone. Peppermint bark works well for any season or holiday. For a festive touch, make holiday-themed peppermint bark. Use red and green sprinkles or festive shapes. You can also make seasonal versions. Try using flavors like pumpkin spice in fall or coconut in summer. This way, you can enjoy peppermint bark all year long. To keep your peppermint bark fresh, store it in an airtight container. This keeps moisture out and preserves flavor. Place a piece of parchment paper between layers to prevent sticking. The ideal temperature for storing peppermint bark is a cool, dry place. Avoid direct sunlight or heat sources, as they can melt the chocolate. Peppermint bark can last about two weeks when stored properly. After that, it may lose its taste and texture. Signs that it has gone bad include a dull appearance or a strange smell. If the chocolate looks white or grainy, it may not be safe to eat. Yes, you can freeze peppermint bark! Cut it into pieces before freezing for easy access. Place it in a freezer-safe container or bag. For best results, consume it within three months. When you’re ready to enjoy it, thaw the bark in the fridge overnight. This helps it maintain its texture and flavor. Yes, you can! Feel free to swap dark chocolate for milk chocolate. Milk chocolate will add a sweeter touch. If you enjoy white chocolate, try using it alone. You can even mix it up with flavored chocolate, like caramel or toffee. Each option gives a unique taste. Experimenting can lead to fun flavors. Peppermint bark usually takes about one hour to set. After spreading the dark chocolate, chill it for 10-15 minutes. Then pour the white chocolate on top. Chill again for 30-60 minutes. Make sure it’s fully hard before breaking it into pieces. Check if it feels firm and solid. You can use other flavors if you lack peppermint extract. Vanilla extract can work well for a different taste. You might also try almond or orange extracts. Just remember, these will change the final flavor. Use them sparingly to keep it balanced. Yes, peppermint bark is gluten-free! All the key ingredients, like chocolate and peppermint, are safe for those with gluten issues. Just check the candy packaging if you use store-bought peppermint candies. Some brands may include gluten in their ingredients. Always play it safe and read labels. You now know how to make delicious peppermint bark with simple steps. We covered ingredients, tools, and methods to ensure success. Remember to melt your chocolate carefully and layer with care. Don't forget to add your crushed peppermint for that festive touch. With these tips, you’ll avoid common mistakes and create a treat that impresses everyone. Enjoy your peppermint bark fresh or store it well for later. Happy baking!

Easy Peppermint Bark Simple and Tasty Treat

Looking for a sweet treat that’s both easy to make and sure to impress? I’ve got the perfect recipe for

Older posts
Newer posts
← Previous Page1 … Page76 Page77 Page78 … Page84 Next →

dsad

© 2026 Foodish Talk • Built with GeneratePress

Our Policies

  • Copyright Policy
  • Cookie Policy
  • GDPR Policy
  • Privacy Policy
  • Disclaimer
  • Terms Of Use

More Information

  • Home
  • About
  • Contact
  • Appetizers
  • Dessert
  • Dinner
  • Drinks
©2026, Foodish Talk About Back To Top