![- 4 cups cranberry juice - 1 tablespoon fresh ginger, grated - 1 cup sparkling water - 1/4 cup honey (or to taste) - 1 lime, juiced - 1 cup fresh cranberries (for garnish) - Fresh mint leaves (for garnish) - Ice cubes - Additional citrus fruits (e.g. oranges or lemons) - Flavored sparkling water (like lemon-lime or berry) The key to making a great Cranberry Ginger Punch lies in the ingredients. Start with high-quality cranberry juice. This juice should be 100% juice, not a cocktail mix. The fresh ginger gives the punch a zesty kick. Grate it finely for the best flavor. Honey adds sweetness. You can adjust the amount based on your taste. Fresh lime juice brightens the drink. It balances the sweetness and adds a fresh note. The sparkling water adds a fun fizz. You can switch it up with flavored sparkling water for more taste. Fresh cranberries are perfect for garnish. They add color and a festive touch. Mint leaves not only look good but also smell great. For a twist, consider adding slices of oranges or lemons. They enhance the drink's flavor and make it even more vibrant. With these ingredients, you can create a refreshing drink that is perfect for any holiday gathering. For the full recipe, check out the details above. - Grate the fresh ginger - Juice the lime Start by grating the fresh ginger. A fine grater works best. You need just one tablespoon. This ginger gives a spicy kick to the drink. Next, cut the lime in half and juice it. You want about one lime's worth of juice. It adds a bright, tangy flavor. - Mix cranberry juice, ginger, honey, and lime juice Now, grab a large pitcher. Pour in four cups of cranberry juice. Add the grated ginger, the lime juice, and a quarter cup of honey. Stir well. Make sure the honey dissolves fully. This mix becomes the base of your punch. - Strain the mixture - Add sparkling water and serve over ice Let the mixture sit for 30 minutes. This helps the flavors blend. After that, strain the mix through a fine mesh sieve into another pitcher. This step removes the ginger bits and pulp. Just before serving, add one cup of sparkling water. Stir gently to keep the bubbles. Fill glasses with ice. Pour the drink over the ice. For a beautiful touch, add fresh cranberries and mint leaves. Enjoy this refreshing holiday drink! For the full recipe, check out the details above. Letting the mix sit for 30 minutes helps the flavors blend. The longer it sits, the better it tastes. You can also adjust sweetness levels to suit your taste. If you find it too sweet, add more lime juice. If you want it sweeter, add more honey. Serving in chilled glasses makes each sip refreshing. This simple step elevates the drink. Use attractive garnishes like fresh cranberries and mint leaves for visual appeal. It makes the punch look festive and inviting. Cranberry juice is great for your health. It helps prevent urinary tract infections and boosts your immune system. Ginger has anti-inflammatory properties, which can help with digestion. Both ingredients make this punch not just tasty, but also good for you. {{image_2}} You can easily change the taste of your punch. Try adding fresh orange or lemon juice. Both give a bright, zesty kick. You can also mix in other fruits. Berries like strawberries or blueberries add color and flavor. They enhance the drink's fruity vibe. Simply chop them up and toss them in. Want to make your punch a festive cocktail? Add vodka or rum for a fun twist. Vodka works well since it blends in nicely. Rum brings a sweet, tropical taste. Use about one cup of alcohol for a balanced flavor. Just mix it in before adding the sparkling water. Not a fan of fizz? You can make a still version. Instead of sparkling water, use plain water. This keeps the drink light and refreshing. Just mix it in after you strain the mixture. Enjoy the same great taste without the bubbles. This option is great for kids or those who prefer non-carbonated drinks. For the full recipe and more ways to enjoy this drink, don't forget to check out the [Full Recipe]. You can keep any leftover Cranberry Ginger Punch in an airtight container. Make sure to place it in the fridge. This way, it stays fresh and tasty for your next drink. For the best flavor, drink your punch within 2-3 days. This ensures you enjoy its bright, fresh taste. If you have leftover punch, consider using it in fun ways! You can: - Use it as a mixer for cocktails. - Pour it over fruit salad for a zesty twist. - Freeze it in ice cube trays to add to future drinks. - Blend it with yogurt for a fruity smoothie. These ideas let you enjoy the punch in different ways! For the full recipe, check the earlier section. To make your Cranberry Ginger Punch less sweet, try these tips: - Reduce honey: Start with half the amount and add more if needed. - Add citrus: Squeeze more lime juice for a tangy kick. - Use tart cranberry juice: Choose a cranberry juice with no added sugar. - Include more ginger: Grate extra ginger for a zesty flavor boost. These changes help balance the sweetness and enhance the punch's overall taste. Yes, you can prepare Cranberry Ginger Punch in advance. Here’s how: - Make the base: Combine cranberry juice, ginger, honey, and lime juice in a pitcher. - Chill: Store it in the fridge for up to 24 hours. - Add sparkling water last: Just before serving, mix in the sparkling water to keep it fizzy. This way, you save time and still impress your guests with fresh flavors. Absolutely! You can serve Cranberry Ginger Punch as a delicious mocktail. Just follow the same recipe. - Skip the alcohol: No vodka or rum needed for this fruity drink. - Garnish: Use fresh mint and cranberries to make it look festive. This mocktail option is perfect for all ages and keeps the holiday spirit alive! This blog has outlined a tasty recipe for Cranberry Ginger Punch. You learned about the ingredients, the step-by-step process, helpful tips, and variations. You can even store leftovers for later use! This drink isn't just refreshing; it offers health benefits too. You can easily adjust sweetness and make mocktail versions. Enjoy sharing your punch or serving it at your next gathering. With these simple steps, you can impress everyone with your drink skills. Have fun mixing and tasting this delightful beverage!](https://foodishtalk.com/wp-content/uploads/2025/06/474fc252-34b1-41c2-ab6b-ed5567e65cf7.webp)
Cranberry Ginger Punch Refreshing Holiday Drink Idea
Looking for a festive drink that’s both tasty and refreshing? I’ve got the perfect recipe for you: Cranberry Ginger Punch!
Looking for a festive drink that’s both tasty and refreshing? I’ve got the perfect recipe for you: Cranberry Ginger Punch!
![- Fresh Peaches - Raspberries - Sweetener Options - Sparkling Water or Club Soda - Lime Juice - Garnishes To create a Peach Raspberry Bellini Mocktail, you need fresh peaches and ripe raspberries. These fruits give the drink its sweet and tangy flavor. Choose peaches that are soft but not mushy. Look for raspberries that are plump and vibrant. You can use honey or agave syrup to sweeten your drink. Adjust the amount based on your taste. For a fizzy touch, use sparkling water or club soda. Lime juice adds a pleasant tartness, balancing the sweetness. Don't forget your garnishes! Fresh mint leaves look great and smell amazing. - Blender - Fine-Mesh Sieve - Pitcher or Bowl - Serving Glasses You will need a blender to mix your fruits until smooth. A fine-mesh sieve helps strain out the pulp, giving you a nice juice. Use a pitcher or bowl to hold the juice mixture. Finally, grab your favorite serving glasses to show off this delightful drink. For the full recipe, check out the complete guide. Enjoy making this refreshing mocktail! How to Blend the Fruit First, take the ripe peaches and peel them. Dice them into small pieces. Next, add the diced peaches and fresh raspberries to your blender. Also, include the honey or agave syrup and the juice of one lime. Blend the mixture until it is smooth. This step brings all the flavors together. Straining the Mixture After blending, it’s time to strain the mixture. Use a fine-mesh sieve and place it over a bowl or pitcher. Pour the blended fruit mix into the sieve. This step removes any pulp, ensuring a smooth juice. You want a nice, clear liquid for your mocktail. Filling the Glasses Now, grab your serving glasses. Fill each glass halfway with the peach-raspberry juice you just made. This juice is where the magic starts. Adding Sparkling Water Next, top each glass with sparkling water or club soda. This adds fizz and makes your drink refreshing. Stir gently to combine the juice and soda. Be careful not to lose all the bubbles. Mint Leaves Placement To make your mocktail look pretty, add fresh mint leaves. Place a few leaves on top of each drink. This adds a nice pop of green and a lovely scent. Optional Garnish Ideas If you want to get creative, consider adding slices of peach or a few whole raspberries on top. These not only look great but also give hints of the flavors inside the drink. You can find the full recipe above for more details. Choosing ripe peaches is key for a great taste. Look for peaches that feel soft and smell sweet. This means they are juicy and ready. For the best flavor, use fresh raspberries. These berries add a nice tartness. If you want a sweeter drink, adjust the honey or agave syrup. Start with one tablespoon, then taste. Add more if you like it sweeter. You can prep the peach and raspberry mixture ahead of time. Blend the fruits and store the juice in the fridge. This way, you can serve it quickly. If you have leftover juice, keep it in a sealed container. It can stay fresh for about three days in the fridge. For a lovely presentation, serve the mocktail in clear glasses. This lets the vibrant colors shine. You can also rim the glasses with sugar for a fun touch. Don’t forget to garnish with mint leaves. They add a nice pop of color and smell great. For a twist, try adding a slice of peach on the rim. Enjoy this Peach Raspberry Bellini Mocktail! For the full recipe, refer to the section above. {{image_2}} You can switch up the berries in your Peach Raspberry Bellini Mocktail. Try using strawberries or blueberries for a new twist. Each berry brings its unique flavor. You can also mix in blackberries for a deeper taste. When it comes to sweeteners, you have options. Honey adds a floral note, while agave syrup gives a cleaner sweetness. Adjust based on your taste. Both work well in the recipe. Want to brighten your drink? Incorporate citrus flavors like lemon or orange juice. This change adds zing and freshness. You can also use zest from these fruits for extra flavor. For holidays, adapt the mocktail to fit the season. Add a splash of cranberry juice for a festive touch during winter. You can also use seasonal fruits like pomegranate for a colorful look. If you want to make a Peach Raspberry Bellini Cocktail, add a splash of prosecco or champagne. Pour the alcohol gently to keep the bubbles intact. This change elevates the drink for special occasions. Enjoy your peach raspberry delight! For the complete recipe, check out the [Full Recipe]. To keep your peach raspberry juice fresh, store it in the fridge. Use an airtight container for best results. This helps to lock in the flavor and aroma. You can enjoy the juice for up to three days. After that, it may lose some taste. Always check for any off smell or changes in color before using. If you want to save some juice, freezing is a great choice. Pour the juice into ice cube trays or freezer bags. This way, you can use it later for smoothies or another mocktail. Be sure to leave some space in the containers. This space helps the juice expand as it freezes. When you're ready to use the frozen juice, take it out and let it thaw. You can leave it in the fridge overnight or set it on the counter for a few hours. After thawing, stir it well before serving. This ensures a nice, smooth drink. You can also mix it with fresh sparkling water for that fizzy delight. Enjoy the taste of summer any time! Yes, this mocktail is great for kids. It has no alcohol, making it safe for all ages. You can serve it at parties or family gatherings. Kids love the sweet taste of peaches and raspberries. You can also let them help make it. They'll enjoy blending and pouring the drinks. This can be a fun kitchen activity. You can even encourage creativity with garnishes. Yes, you can use frozen fruit. Frozen fruit can make this drink easy year-round. It’s often picked at peak ripeness, so it tastes great. However, be mindful of a few things: - Pros: - Frozen fruit is convenient and reduces prep time. - It can be more affordable, especially out of season. - Cons: - Frozen fruit may result in a thicker texture. - It might make the drink slightly less fresh in flavor. You can thaw frozen fruit before blending for better results. Each serving has about 80 to 100 calories. This can vary based on the sweetener you use. Here’s a quick breakdown: - Peaches: 60 calories per medium fruit - Raspberries: 65 calories per cup - Honey or agave: 60 calories per tablespoon - Sparkling water: 0 calories This makes the mocktail a light, refreshing option. It’s perfect for those watching their calorie intake. To make this mocktail less sweet, you can adjust the sweetener. Try these tips: - Use less honey or agave: Start with half a tablespoon and taste. - Add more lime juice: This adds tartness and balances sweetness. - Incorporate more sparkling water: Diluting the juice can reduce sweetness. Feel free to experiment to find your perfect taste. You want it refreshing, not overly sweet. This blog post covered how to craft a refreshing peach raspberry mocktail. We explored its main ingredients, like fresh peaches and raspberries, and discussed the kitchen tools you need. I provided step-by-step instructions for blending and serving, plus tips for achieving the best flavor. In summary, this mocktail is perfect for all ages and occasions. Feel free to customize it with different berries or sweeteners. Get creative with garnishes for a beautiful presentation. Enjoy this drink and impress your family and friends!](https://foodishtalk.com/wp-content/uploads/2025/06/bd8c9b5e-bf7a-4de0-8764-a079351a9d45.webp)
Looking for a refreshing drink that everyone can enjoy? The Peach Raspberry Bellini Mocktail is your answer! Bursting with fresh
![To make a delicious Roasted Hazelnut Mocha Latte, you need a few key ingredients: - 1 cup brewed strong coffee or espresso - 1 tablespoon roasted hazelnut syrup (or homemade hazelnut paste) - 2 tablespoons unsweetened cocoa powder - 1 cup steamed milk (dairy or plant-based) - 1-2 teaspoons sugar or sweetener of choice (optional) - Whipped cream for topping (optional) - Chopped roasted hazelnuts for garnish - A pinch of sea salt These ingredients create a rich and cozy drink that warms the soul. You can make your latte even better with some fun additions: - Flavored syrups like vanilla or caramel - A dash of cinnamon or nutmeg for spice - Different milk options such as oat, almond, or coconut - Chocolate shavings or cocoa powder for extra garnish Feel free to mix and match based on your taste! If you can’t find a specific item, here are some options: - Use chocolate syrup instead of cocoa powder for sweetness. - Maple syrup can replace hazelnut syrup for a different flavor. - Any milk will work if you run out of your favorite kind. These substitutes will still give you a tasty latte experience. For the full recipe, check out the details above! Start by brewing your coffee or espresso. Use a strong brew for the best taste. You can use a coffee maker, French press, or espresso machine. Aim for about one cup. If you like espresso, pull a double shot for extra strength. Set your coffee aside while you prepare the other ingredients. In a small bowl, mix two tablespoons of unsweetened cocoa powder with sugar, if desired. Add a splash of hot water to the bowl. Stir until you get a smooth paste. This paste will add rich chocolate flavor to your latte. Make sure there are no lumps. If you prefer a sweeter drink, adjust the sugar to your taste. In a saucepan, combine your brewed coffee, roasted hazelnut syrup, and the chocolate paste. Whisk the mixture well over medium heat. Heat it until warm but not boiling. In a separate pan, steam your milk until it's hot and frothy. If you don't have a steamer, you can heat the milk on the stove or in the microwave. Use a whisk to froth it up. Grab a large mug. Pour the chocolate-hazelnut coffee mixture into the mug, leaving some space for the milk. Gently pour the frothed milk over the coffee blend. This will create a lovely layered effect. If you want, top your latte with whipped cream. Sprinkle chopped roasted hazelnuts and a pinch of sea salt on top for extra flair. Enjoy every sip of this cozy drink! For the complete recipe, refer to the [Full Recipe]. To get the best froth for your latte, start with cold milk. Use a milk frother if you have one. If not, heat the milk on the stove or in the microwave. Whisk the milk quickly to create bubbles. Aim for a thick, creamy texture. Try to incorporate air as you whisk. This step gives your latte that lovely, foamy top. You can make your latte even more special. Consider adding a splash of vanilla extract. This adds a warm sweetness. A sprinkle of cinnamon or nutmeg can also boost flavor. For a richer taste, add a dash of chocolate syrup. Don't forget, you can adjust sweetness with more sugar or sweeteners. Each addition makes your drink unique. Choose coffee beans that match your taste. Dark roast beans work well for a bold flavor. They balance the chocolate and hazelnut nicely. Look for beans labeled as “espresso” for a rich base. If you prefer something lighter, try a medium roast. Freshly ground coffee always tastes best. Aim for a grind size that suits your brewing method. For your Roasted Hazelnut Mocha Latte, quality beans make a big difference. {{image_2}} If you want a dairy-free or vegan Roasted Hazelnut Mocha Latte, it's easy! Use plant-based milk like almond, oat, or soy. These milks froth well and blend nicely. For the hazelnut syrup, check if it's dairy-free. Many brands offer vegan options. You can also make your own syrup by blending roasted hazelnuts with water and a sweetener. This way, you control all the ingredients. To enjoy a chilled version, make an Iced Roasted Hazelnut Mocha Latte. Start by brewing your coffee and letting it cool. Mix the cooled coffee with hazelnut syrup and cocoa powder. Pour this mixture over ice in a tall glass. Then, top with cold frothed milk. Stir it all together for a refreshing drink. It’s perfect for warm days and still tastes rich and cozy. You can play with flavors based on the seasons. In fall, add a pinch of cinnamon or nutmeg for a warm spice twist. For winter, try a splash of peppermint for a festive vibe. In spring, a hint of vanilla can brighten the drink. Use seasonal ingredients like pumpkin or caramel for a unique twist. These variations keep your Roasted Hazelnut Mocha Latte exciting all year long. For the full recipe, check out the earlier section. If you have leftover mocha latte, store it in the fridge. Use an airtight container to keep it fresh. It will stay good for two days. Before drinking, check for any changes in smell or taste. If it seems off, toss it out. Store your roasted hazelnut syrup in a cool, dark place. Keep it tightly sealed to avoid air exposure. Cocoa powder should go in a dry spot, away from moisture. For milk, always check the date and store it in the fridge. Fresh ingredients make a better drink. When you reheat your mocha latte, do it gently. Use the stove or microwave on low heat. Stir it well to mix any separated layers. Avoid boiling, as it can change the taste. For the best flavor, enjoy it warm, not hot. You can also add a little fresh whipped cream before serving. For the full recipe, check out the Roasted Hazelnut Mocha Latte section. A Roasted Hazelnut Mocha Latte can offer several health benefits. First, coffee provides antioxidants that help fight free radicals. Hazelnuts are rich in healthy fats, vitamins, and minerals. They can boost heart health and support brain function. Cocoa powder adds magnesium and iron, which are good for energy and mood. When you enjoy this drink, you get a tasty treat with some health perks too. You can find roasted hazelnut syrup at many grocery stores. Look in the coffee aisle or the baking section. You can also check specialty coffee shops. If you prefer online shopping, websites like Amazon and specialty food retailers often carry it. Just make sure to read the labels to choose a brand that uses real ingredients. Yes, you can make this drink without an espresso machine. Brew strong coffee using a drip coffee maker, French press, or pour-over method. Just make sure the coffee is strong for the best flavor. If you want frothy milk, heat it on the stove or in the microwave. Then whisk it vigorously to create some froth. Making roasted hazelnut syrup at home is easy. Start with these ingredients: - 1 cup water - 1 cup sugar - 1 cup roasted hazelnuts 1. Combine water and sugar in a saucepan and heat until sugar dissolves. 2. Add roasted hazelnuts to the saucepan. 3. Simmer for about 10 minutes, then let it cool. 4. Strain the syrup into a bottle and store in the fridge. You can use this syrup in your latte for a rich flavor. Many brands make great roasted hazelnut mocha latte products. Popular coffee chains often have their own versions. You can also try brands like Torani and DaVinci for syrup. If you prefer ready-made options, check out local cafes. They often offer unique drinks that feature roasted hazelnut mocha latte flavors. For a full recipe, click [Full Recipe]. You learned how to make a delicious Roasted Hazelnut Mocha Latte. We covered the key ingredients along with helpful tips and fun variations. With a few simple steps, you can enjoy this drink at home. Don’t forget to experiment with flavors and ingredients. Whether you prefer it hot or cold, there's a version for you. Now, grab your coffee gear and create your perfect cup. Enjoy the process and the rich taste!](https://foodishtalk.com/wp-content/uploads/2025/06/adc44de0-cabc-4210-be2e-833681039afd.webp)
Looking for a drink that warms your soul? The Roasted Hazelnut Mocha Latte is just what you need! This rich,

Looking for a fresh, delicious meal that’s quick to make? One Skillet Salmon with Lemon Orzo is your answer! This
![- 1 cup fresh strawberries, hulled and sliced - 10 fresh mint leaves, plus extra for garnish - 2 tablespoons honey or agave syrup (adjust to taste) - 1 lime, juiced - 1 cup soda water - Ice cubes When choosing strawberries, look for bright red ones. They should feel firm and smell sweet. If strawberries are out of season, use frozen ones. Just thaw them before mixing. For mint, fresh is best. Dried mint lacks flavor. You can swap honey for maple syrup if needed. If you want a sugar-free option, use a sweetener like stevia. Soda water gives a fizzy touch, but you can use tonic water for a new taste. Strawberries are packed with vitamin C. They help boost your immune system. Mint aids digestion and adds a refreshing taste. Lime is low in calories and high in antioxidants. It helps keep your skin healthy. Honey provides energy and has natural antibacterial properties. This drink is not just tasty; it’s good for you too! Enjoy this Strawberry Mint Mojito Mocktail and feel great about what you sip. For the complete recipe, check the Full Recipe section. Making a Strawberry Mint Mojito Mocktail is easy and fun. Start by gathering all your ingredients. You will need fresh strawberries, mint leaves, lime, honey or agave syrup, soda water, and ice. Have a sturdy glass or cocktail shaker ready. This drink comes together in just a few minutes. Muddling is key to this mocktail. Begin with the sliced strawberries and mint leaves in your glass. Use a muddler or the back of a spoon. Press down gently and twist. You want to mash the strawberries and release the mint's scent. Be careful not to over-muddle. You want juicy bits, not mush. This step brings out the bright flavors in the drink. To make a perfect mix, add the lime juice and honey to your muddled ingredients. Stir well, so the honey dissolves. Fill your serving glass with ice cubes before pouring the mix over the ice. Top with soda water, stirring gently. This keeps your mocktail fizzy and refreshing. Garnish with extra mint and strawberry slices for a beautiful finish. Enjoy your Strawberry Mint Mojito Mocktail, a refreshing delight for everyone! For more details, check the [Full Recipe]. Serve your Strawberry Mint Mojito Mocktail in clear glasses. This lets the bright colors shine. Add ice cubes to keep drinks cool. For a fun touch, use a colorful straw. You can also add fresh strawberries on the rim. This adds style and makes each drink look special. To boost the flavor, try adding a splash of fruit juice. Pineapple or orange juice works great. You can also mix in some fresh basil leaves. This adds a nice twist to the minty taste. Experiment with different herbs to find your favorite mix. If you like it sweet, use more honey or agave syrup. Start with two tablespoons, then taste it. You can add more if needed. For less sweetness, reduce the syrup. Try using unsweetened soda water for a fresh taste. This way, you keep the balance just right. {{image_2}} You can switch up the flavors in your Strawberry Mint Mojito Mocktail. Try using different berries like blueberries, raspberries, or blackberries. Each berry adds a unique taste. You can mix them together for a berry blast. Just muddle the berries as you do with strawberries. This simple change can make your drink exciting and new. When strawberries are out of season, use other fruits. Fresh peaches or watermelon are great choices. Just chop them into small pieces. Muddle them just like the strawberries. Each fruit brings its own flavor and sweetness. You can also try citrus fruits like oranges or grapefruits. They add a fresh zing to your drink. To make your mocktail even more fun, add herbs. Basil pairs well with strawberries and mint. Crush a few leaves with the strawberries to release their scent. You can also try rosemary for a more earthy taste. These herbs give your drink a unique twist. They not only look nice but also taste amazing. Experimenting with these variations makes your Strawberry Mint Mojito Mocktail even more special. For the full recipe, check out the original instructions. If you have leftover Strawberry Mint Mojito Mocktail, store it in the fridge. Use an airtight container to keep it fresh. Try to drink it within a day for the best taste. The fizz from the soda water will fade over time. Always use fresh strawberries and mint for the best flavor. Keep strawberries in the fridge and wash them just before use. Store mint in a glass of water or wrap it in a damp paper towel. This keeps them fresh longer. You can freeze strawberries for later use. Wash and slice them first, then place them in a single layer on a baking sheet. Once frozen, transfer them to a freezer bag. Mint can also be frozen. Chop it up, place it in ice cube trays, and cover with water. This way, you can add it to drinks later. For the full recipe, check out the detailed guide to make your own Strawberry Mint Mojito Mocktail. Yes, you can make this mocktail in advance. Prepare the strawberry and mint mixture ahead of time. Keep it in the fridge for a few hours. When you are ready to serve, add ice and soda water. This keeps the drink fresh and fizzy. If you want to skip honey or agave, try maple syrup or simple syrup. You can also use stevia or other sugar substitutes. Just be careful with the amount, as these can be sweeter than honey. Adjust to taste for the best flavor. Yes, you can use sparkling water or tonic water instead of soda water. If you prefer less fizz, try lemonade or fruit juice. Just remember, these options may change the flavor a bit. Experiment to find what you like best! This article covered key ingredients, steps, and tips for creating a delicious Strawberry Mint Mojito Mocktail. You learned about ingredient substitutions, health benefits, and how to muddle fruit for maximum flavor. I shared serving ideas and variations to suit your taste. Proper storage tips help keep your mocktail fresh for longer. With these insights, you can impress your guests and enjoy this refreshing drink anytime. Dive into your mocktail-making journey and have fun experimenting with flavors!](https://foodishtalk.com/wp-content/uploads/2025/06/1ee2f9ac-0401-4681-ab87-fe2a2b904707.webp)
Looking for a refreshing drink that’s both tasty and alcohol-free? You’ll love the Strawberry Mint Mojito Mocktail! This vibrant drink
![- 1 pound ground beef (lean) - 2 medium zucchini, diced - 1 medium sweet potato, peeled and diced - 1 bell pepper (any color), diced - 1 small onion, chopped - 3 cloves garlic, minced - 1 teaspoon ground cumin - 1 teaspoon smoked paprika - 1/2 teaspoon chili powder - Salt and pepper to taste - 2 tablespoons olive oil This dish shines due to its vibrant mix of flavors and colors. The ground beef provides a hearty base. Zucchini adds freshness, and sweet potato brings a touch of sweetness. Together, they create a balanced meal. Using fresh vegetables makes a big difference in taste. I love how bell pepper and onion add a sweet and savory note. Garlic gives it a lovely aroma. Each ingredient plays a key role in making this skillet dish special. The spices elevate the flavor profile. Ground cumin adds warmth, while smoked paprika gives a hint of smokiness. Chili powder can add a kick if you like it spicy. Adjust the seasonings to match your taste. For a full guide on making this dish, check out the [Full Recipe]. This meal is not just easy to make, but it also packs great nutrition. Enjoy crafting this delightful skillet! Start by washing your veggies. Chop the zucchini into half-moons. Cut the sweet potato into small cubes. Dice the bell pepper into bite-sized pieces. Next, mince the garlic cloves. Finally, chop the onion finely. This prep work makes cooking easier. Heat the olive oil in a large skillet over medium heat. Add the chopped onion and sauté for about 3 to 4 minutes. The onion should turn soft and translucent. Then, throw in the minced garlic. Cook for one more minute until it smells great. Now it’s time for the ground beef. Add it to the skillet, breaking it up with a spoon. Cook until the beef turns brown, about 5 to 7 minutes. If there's too much fat, drain it off carefully. Next, add the diced sweet potato to the skillet. Pour in one tablespoon of water and cover the pan. Let it cook for about 10 minutes. Stir it often until the sweet potatoes are tender. Once they're soft, mix in the zucchini and bell pepper. Now, sprinkle the cumin, smoked paprika, chili powder, salt, and pepper over the top. Stir everything well, then let it cook for another 5 to 7 minutes. This helps the flavors combine nicely. For the full recipe, check out the instructions above. Enjoy your cooking! - Best practices for sautéing: Always heat your skillet first. Add olive oil and let it warm. This helps your onions and garlic cook evenly. Stir them often to avoid burning. - How to achieve perfect browning: Cook the ground beef in a single layer. Don't overcrowd the pan. This allows all sides to brown nicely. Make sure to break it up as it cooks. - Suggestions for herbs and spices: Fresh herbs like parsley or cilantro add nice flavor. You can also try thyme or oregano for a twist. - Tips on adjusting seasonings to taste: Start with the recipe’s spices, then taste as you cook. If you want more heat, add extra chili powder. If you prefer a savory taste, increase the cumin. - Modifying cook time for softer vegetables: If you like softer veggies, cook the sweet potatoes a bit longer. Add a few more minutes before adding zucchini and bell pepper. - Recommendations for meal texture preferences: For crunchier vegetables, reduce cooking time. Keep an eye on the skillet and check for your desired texture. For a full recipe, check out the Ground Beef Zucchini Sweet Potato Skillet. {{image_2}} You can change the ground beef if you want. Try ground turkey or chicken for a leaner option. If you prefer plant-based meat, use lentils or black beans. These swaps keep the dish tasty and healthy. You can also add other vegetables. Consider carrots, corn, or spinach for more color and flavor. These veggies mix well and add nutrients. Feel free to get creative with what you have on hand! To make this dish gluten-free, use gluten-free seasonings. Most spices are safe, but check the labels. For a dairy-free version, skip any cheese toppings. The flavors still shine through without dairy. If you're watching carbs, skip the sweet potato. You can use cauliflower instead. This makes the meal low-carb but still filling. You can cook this dish on the stovetop or in the oven. For oven-baking, preheat to 400°F. Combine all ingredients in a baking dish and cook for 25-30 minutes. This method gives a nice roasted flavor. For slow cooker fans, brown the beef and add everything to the slow cooker. Cook on low for 6-8 hours or high for 3-4 hours. This makes the meal easy and hands-off. Find the full recipe for more details! To keep your Ground Beef Zucchini Sweet Potato Skillet fresh, store leftovers properly. Place them in an airtight container. This helps prevent moisture loss and keeps the meal tasty. You can refrigerate them for up to four days. For longer storage, freeze the skillet dish. It stays good in the freezer for up to three months. Just make sure to cool it first before freezing. When reheating, use the stovetop for best results. Heat a skillet over medium-low heat. Add a splash of water or olive oil to keep it moist. Stir often until heated through. If you prefer the microwave, use a microwave-safe dish. Cover it with a damp paper towel. Heat in short bursts, stirring in between, until hot. This method keeps the flavors intact and prevents overcooking. Meal prep can save time and effort. Chop your veggies ahead of time. You can store them in separate containers. This makes cooking quick and easy on busy days. Consider browning the ground beef in advance too. Store it in the fridge or freezer. You can mix all components together right before serving. This keeps everything fresh and flavorful. This dish lasts about 3 to 4 days in the fridge. Store it in an airtight container. To ensure the best taste, eat it within this time. The flavors improve as it sits, making it a tasty leftover option. Yes, you can use frozen vegetables! They work well in this recipe. Just add them a bit later in the cooking process. This way, they heat through without becoming mushy. Frozen veggies can save time and still taste great. To spice it up, add more chili powder or some red pepper flakes. You can also include diced jalapeños for a fresh kick. Adjust the spice to your taste for the perfect heat level. Absolutely! Doubling this recipe works great for meal prep. Just ensure your skillet is big enough. You can divide it into portions and store them in the fridge or freezer. This makes for easy, quick meals later on. For the full recipe, check it out here! In this blog post, we explored how to make a tasty Ground Beef Zucchini Sweet Potato Skillet. We covered the key ingredients like ground beef, zucchini, and sweet potatoes, plus seasonings that boost flavor. I shared step-by-step instructions for prep and cooking, along with helpful tips and variations to suit your diet. Don't forget to store leftovers properly for future meals. This dish is versatile and can adapt to your tastes. Enjoy cooking and experimenting with ingredients to make it your own!](https://foodishtalk.com/wp-content/uploads/2025/06/28144dd1-2d74-4917-bfdf-18c4fe1be16f.webp)
Looking for an easy and tasty weeknight dinner? Try my Ground Beef Zucchini Sweet Potato Skillet Delight! This one-pan meal

Get ready to enjoy a burst of flavor with my Honey Lime Basil Peach Fruit Salad! This refreshing dish is

Looking for a tasty family meal that’s quick and easy? Try my One-Pan Honey BBQ Chicken Rice! This dish bursts
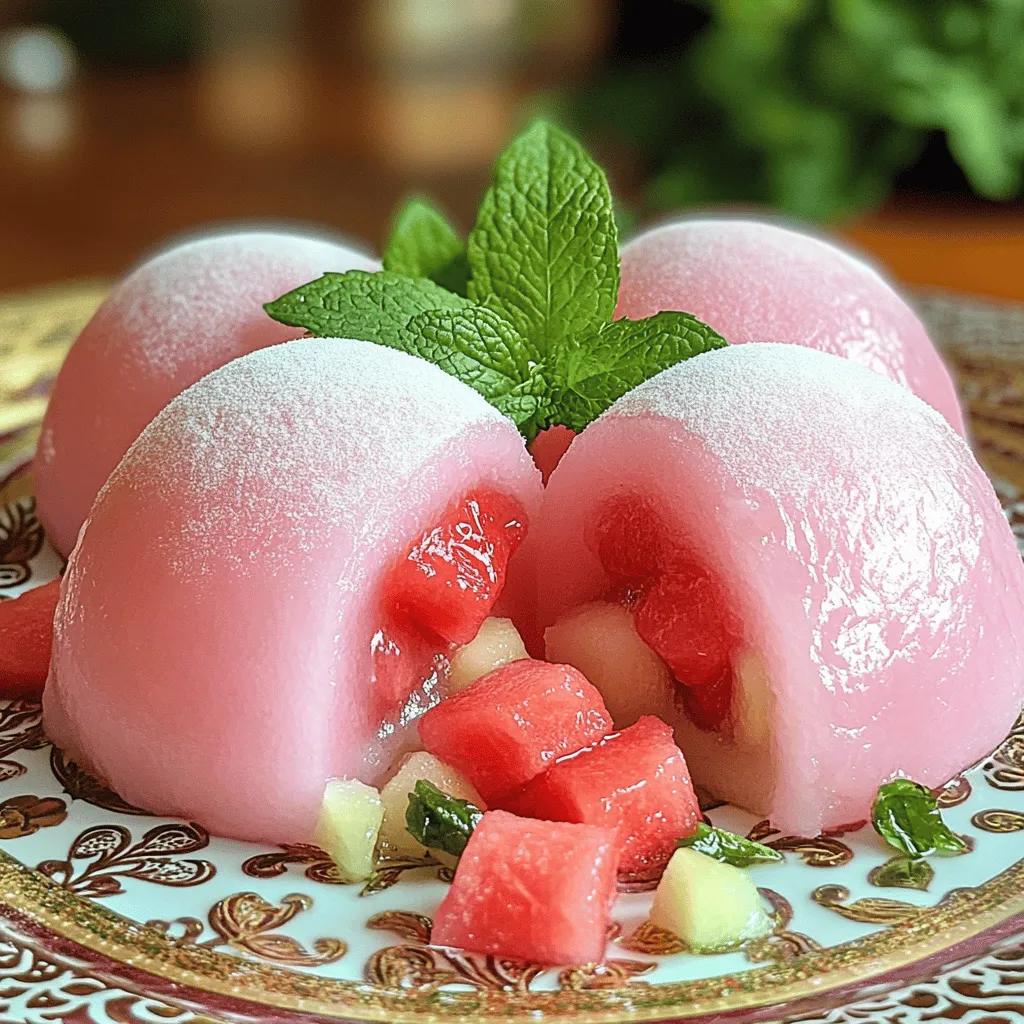
Watermelon mochi is a delightful treat that screams summer fun. This easy recipe combines the sweetness of ripe watermelon with
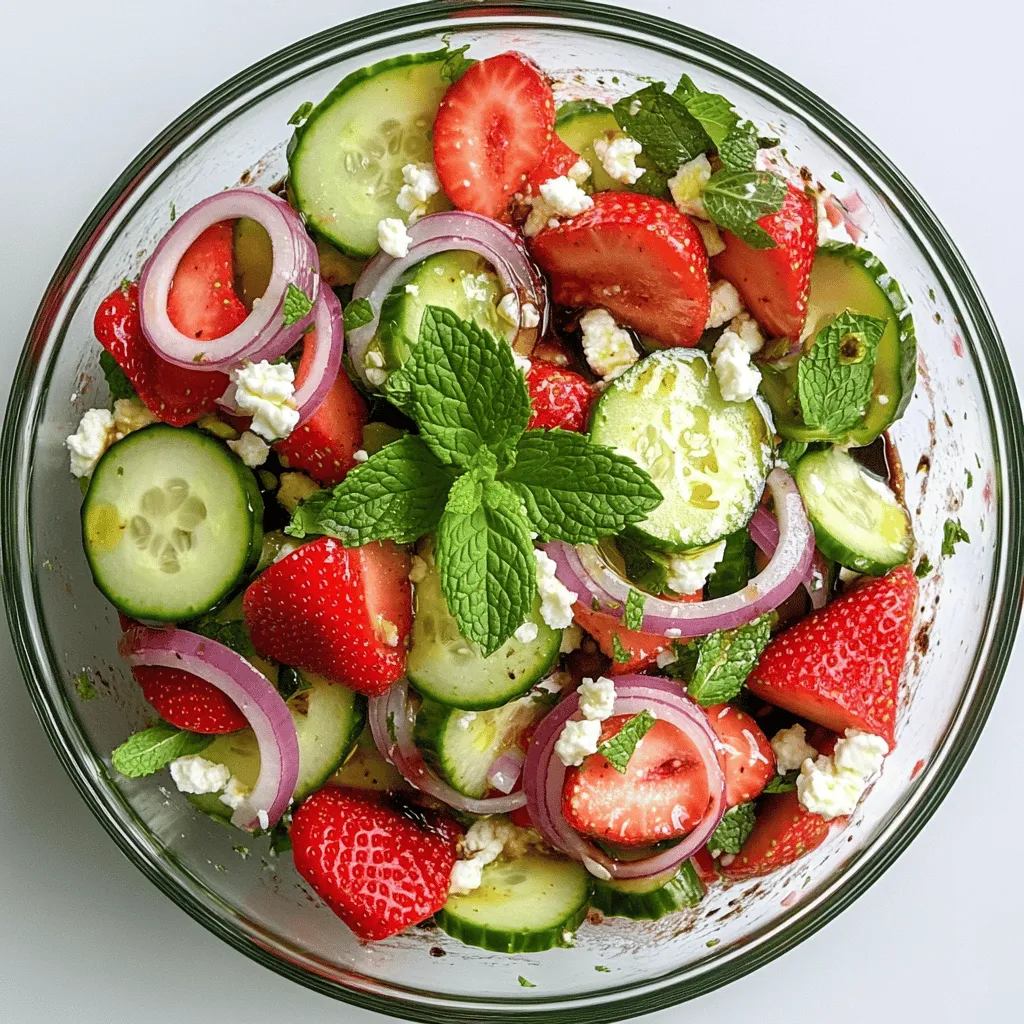
Looking for a vibrant dish that bursts with flavor? Try my Cucumber Strawberry Salad! This fresh pairing of sweet strawberries
