Skip to content
DisclaimerTerms Of UseGDPR PolicyCookie Policy

Foodish Talk

  • Home
  • Drinks
  • Appetizers
  • Dinner
  • Dessert
  • About
  • Contact
  • Privacy Policy
DisclaimerTerms Of UseGDPR PolicyCookie Policy

NO-ING-IMG

- 1 lb (450g) chicken breast, cut into bite-sized pieces - 4 cloves garlic, minced - 4 tablespoons unsalted butter - 1 teaspoon Italian seasoning For the garlic butter chicken bites, start with fresh chicken breast. Cut it into small pieces. You want them to cook quickly and evenly. Minced garlic adds a rich flavor. Unsalted butter gives a creamy taste and helps the chicken brown nicely. Italian seasoning brings a mix of herbs that pairs well with the chicken. - 8 oz (225g) fettuccine pasta - 1 cup heavy cream - 1/2 cup grated Parmesan cheese - 1/4 cup fresh parsley, chopped Next, for the creamy pasta, fettuccine works great. It holds the sauce well. Heavy cream creates that rich, smooth texture. Grated Parmesan cheese adds a salty bite. Fresh parsley not only adds color but also a fresh taste. - Salt and pepper - Zest of 1 lemon - Extra Parmesan Don’t forget the salt and pepper. They enhance all the flavors in your dish. Lemon zest gives a bright, zesty note that cuts through the creaminess. Finally, an extra sprinkle of Parmesan on top looks and tastes amazing. For the full recipe, check out the specific steps that bring these ingredients together in a delightful dish. - Step 1: Melt butter and sauté garlic First, take a large skillet and place it on medium heat. Add 2 tablespoons of unsalted butter. Allow it to melt slowly. Once melted, add 4 cloves of minced garlic. Stir it for about 1 minute until it smells great. - Step 2: Cook chicken pieces in the skillet Now, increase the heat to medium-high. Add 1 pound of chicken breast pieces to the skillet. Season the chicken with salt, pepper, and 1 teaspoon of Italian seasoning. Cook for about 5 to 7 minutes. You want the chicken to turn golden brown and be fully cooked. Once done, remove the chicken from the skillet and set it aside. - Step 3: Boil fettuccine and drain In a large pot, boil salted water. Cook 8 ounces of fettuccine pasta according to the package instructions until it is al dente. When done, drain the pasta and set it aside. - Step 4: Make the creamy sauce In the same skillet you used for chicken, add the remaining 2 tablespoons of butter. Let it melt. Pour in 1 cup of heavy cream and bring it to a simmer. Stir in 1/2 cup of grated Parmesan cheese. Cook for 2 to 3 minutes until the sauce thickens nicely. - Step 5: Mix everything together Add the cooked fettuccine and the chicken bites back into the creamy sauce. Toss everything gently to coat the pasta and chicken evenly with the sauce. - Step 6: Garnish and serve Finally, add the zest of 1 lemon and mix again. For a lovely touch, sprinkle fresh parsley on top. Serve the dish in large bowls, adding an extra sprinkle of Parmesan if you like. Enjoy your Garlic Butter Chicken Bites with Creamy Pasta! For the complete recipe, check the Full Recipe section. To get the best chicken bites, season your chicken well. Use salt, pepper, and Italian seasoning. This mix brings out the flavor. Cook the chicken for about 5-7 minutes until golden brown. A good skillet is key. I like using a cast-iron or non-stick skillet. They heat evenly and help the chicken cook well. For pasta, you want it al dente—firm but not hard. Boil salted water first. Add the fettuccine and cook as the package says. This usually takes about 8-10 minutes. To stop pasta from sticking, stir it well in the first couple of minutes. You can add a dash of olive oil to the boiling water, too. Want to boost the taste? Add fresh herbs like basil or thyme. They add a great touch. You can also throw in some veggies. Spinach, cherry tomatoes, or bell peppers work well. They not only taste good but also make the dish colorful. Check out the Full Recipe for more ideas and tips! {{image_2}} You can use many types of pasta for this dish. Fettuccine is great, but try penne, linguine, or even rotini for a fun twist. Each pasta type brings its own unique texture. If you prefer gluten-free options, look for rice pasta or chickpea pasta. Both work well and taste delicious. Just be sure to follow the cooking times on the package for the best results. For a change, you can swap chicken for shrimp or tofu. If you choose shrimp, cook them for 2-3 minutes until they turn pink. For tofu, use firm tofu, cut into cubes. Sauté it until golden brown, about 5-7 minutes. Adjust your cooking times based on the protein you pick. Each option brings a new flavor and texture to the dish. To spice things up, you can add red pepper flakes to the creamy sauce. This gives it a nice kick. If you want a fresh taste, consider adding diced tomatoes or fresh basil. Both options add color and flavor to your meal. Mix and match these ideas to create your perfect dish. For the full recipe, check out the original version. Store any leftover Garlic Butter Chicken Bites with Creamy Pasta in the fridge. Use airtight containers to keep the dish fresh. Make sure to cool it down before sealing. This helps avoid condensation that can make it soggy. To reheat, use a skillet over medium heat. Add a splash of milk or cream to the pasta. This keeps the sauce creamy and smooth. Stir often to avoid burning. You can also use a microwave, but cover it to keep moisture in. This will help the dish stay tasty. Yes, you can freeze Garlic Butter Chicken Bites with Creamy Pasta! To freeze, place it in a freezer-safe container. Make sure to label it with the date. When you're ready to eat, thaw it in the fridge overnight. Reheat it gently to keep the flavors fresh. You can serve this dish with a fresh salad. A simple green salad with mixed greens works well. You can also pair it with roasted vegetables. Garlic bread is a great choice too. It adds a nice crunch. For a light touch, try serving lemon wedges. They add a zesty flavor that brightens the meal. Yes, you can prepare this dish ahead of time. Cook the chicken and pasta, then store them separately. Keep the creamy sauce in another container. Store everything in the fridge. When you are ready to eat, reheat each part. Combine them just before serving for the best taste. This way, you save time on busy days. To make this dish healthier, you can swap heavy cream for Greek yogurt. This reduces fat while keeping it creamy. You can also use whole wheat pasta instead of regular fettuccine. This adds fiber and nutrients. For a lighter option, cut back on butter. Use just two tablespoons instead of four. Adding more veggies is a great idea too. Spinach or broccoli can boost nutrition and flavor. For the Full Recipe, check the main section above. In this blog post, we explored a simple yet delicious recipe for Garlic Butter Chicken Bites with Creamy Pasta. You learned about key ingredients, step-by-step cooking instructions, and helpful tips. Variations allow you to customize flavors and textures. Remember to store leftovers properly and consider reheating the right way. Enjoy this dish with suggested sides to elevate your meal. This recipe is easy to make and perfect for sharing with family. Happy cooking!

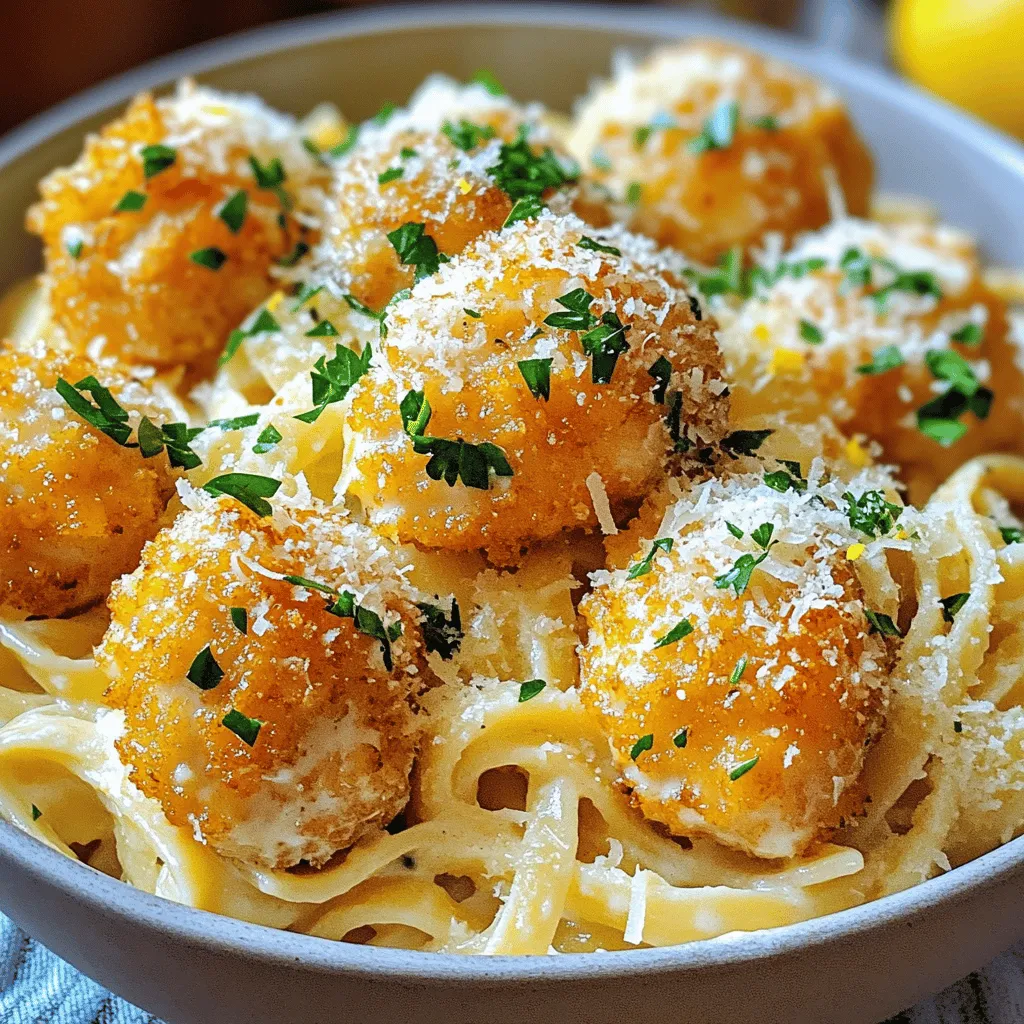
Garlic Butter Chicken Bites with Creamy Pasta Delight

Love rich flavors and creamy dishes? You’re in for a treat! This Garlic Butter Chicken Bites with Creamy Pasta recipe

To make a tasty Bang Bang Chicken Bowl, you need a few key items. Here’s what you’ll need: - 2 cups cooked jasmine rice - 1 lb chicken breast, diced - 1/2 cup cornstarch - 1 tablespoon vegetable oil - 1 cup shredded cabbage - 1 carrot, julienned - 1/2 cucumber, sliced - 3 green onions, chopped - Sesame seeds for garnish These items create a filling meal that looks great and tastes even better. The sauce is what makes this bowl pop with flavor. For the Bang Bang sauce, you will need: - 1/2 cup mayonnaise - 3 tablespoons sweet chili sauce - 1 tablespoon sriracha (adjust for spice level) - 1 teaspoon lime juice Mix these ingredients well. This sauce adds creaminess and a kick! Fresh veggies brighten the dish and add crunch. I recommend these: - Shredded cabbage - Julienned carrots - Sliced cucumber - Chopped green onions Feel free to add your favorites. This recipe is flexible! For the full recipe, check the link. To make the Bang Bang sauce, start with a mixing bowl. Add 1/2 cup of mayonnaise, 3 tablespoons of sweet chili sauce, and 1 tablespoon of sriracha. If you like it spicier, add more sriracha. Then, squeeze in 1 teaspoon of lime juice. Whisk everything together until it’s smooth and creamy. Set this sauce aside for later. Next, take your diced chicken breast and place it in a bowl. Sprinkle 1/2 cup of cornstarch over the chicken. Toss it well, so each piece is coated. This step makes the chicken crispy. Heat 1 tablespoon of vegetable oil in a skillet over medium-high heat. Once hot, add the coated chicken. Cook for about 6 to 8 minutes. Stir occasionally until the chicken turns golden brown and is fully cooked. Remove it from the heat and let it cool slightly. Now it’s time to put everything together. Start with 2 cups of cooked jasmine rice as your base. Next, place the cooked chicken on top of the rice. Then, add shredded cabbage, julienned carrots, and sliced cucumber. Drizzle the Bang Bang sauce generously over the chicken and veggies. For the final touch, sprinkle some chopped green onions and sesame seeds on top. Enjoy your colorful and tasty Bang Bang Chicken Bowl! For the complete recipe, refer to the Full Recipe section. To get perfectly cooked chicken, start with even-sized pieces. This helps them cook at the same rate. Coat the diced chicken in cornstarch well. This gives it a nice crispy texture. Heat the oil until it shimmers before adding the chicken. Cook it for 6 to 8 minutes. Check that it is golden brown and fully cooked. Use a meat thermometer. The chicken should reach 165°F for safety. To store leftovers, let your Bang Bang Chicken Bowl cool down first. Place it in an airtight container. It can stay in the fridge for up to three days. If you want to keep it longer, freeze it. Just remember to separate the sauce. The chicken and veggies can go in one container. The sauce should be in another. This keeps everything fresh and tasty. You can swap out some ingredients for a healthier bowl. Use brown rice instead of jasmine rice for more fiber. For the chicken, try using turkey or tofu for a different protein. Instead of mayonnaise, you could use Greek yogurt for a tangy twist. Adding more veggies? Try bell peppers, spinach, or edamame. These changes keep the flavor while boosting nutrition. {{image_2}} You can make a tasty vegetarian or vegan version of the Bang Bang Chicken Bowl. Swap the chicken for tofu or tempeh. Both options soak up flavor well. Use the same cornstarch coating for crispiness. If you want a nutty taste, try marinated and baked eggplant. For the sauce, ensure you use vegan mayonnaise. This keeps the rich flavor of the dish while staying plant-based. If you love heat, add more spice to your Bang Bang Chicken Bowl. Increase the amount of sriracha in the sauce. You can also add red pepper flakes to the chicken while cooking. For an extra kick, serve with sliced jalapeños. This spicy twist brings a new level of flavor that heat lovers will enjoy. The base of your bowl can change to make it healthier. Instead of jasmine rice, try brown rice or quinoa. Both options boost fiber and nutrients. Cauliflower rice is another great choice for a low-carb meal. These alternatives keep the dish filling while adding more health benefits. To store your Bang Bang Chicken Bowl, let it cool first. Place the chicken, rice, and veggies in an airtight container. Make sure to keep the Bang Bang sauce separate. This helps maintain the crunch of the veggies and the flavor of the sauce. Store in the fridge for up to three days. If you want to freeze leftovers, use freezer-safe containers. Divide the chicken and rice into portions. You can freeze the chicken and rice together, but keep the veggies and sauce separate. This way, the veggies stay fresh. You can freeze them for up to three months. To reheat, take the bowl out of the fridge or freezer. If frozen, let it thaw overnight in the fridge. For reheating, use a microwave-safe dish. Add a splash of water to keep it moist. Heat in the microwave for 2-3 minutes or until hot. Stir halfway to heat evenly. Drizzle the Bang Bang sauce on top before serving. Enjoy your meal! Bang Bang sauce is a mix of four simple ingredients. You need mayonnaise, sweet chili sauce, sriracha, and lime juice. The mayonnaise gives it a creamy texture. Sweet chili sauce adds sweetness and a hint of spice. Sriracha brings heat, and lime juice adds a refreshing zing. This sauce ties the whole dish together. It’s perfect for dipping or drizzling. Yes, you can make Bang Bang chicken ahead of time. Cook the chicken and prepare the sauce separately. Store each in an airtight container. Keep the chicken in the fridge for up to three days. The sauce can last about a week. When ready to eat, simply reheat the chicken and assemble your bowl. This helps save time on busy days. To find the best Bang Bang Chicken Bowl, check local food apps and websites. Look for restaurants with high ratings for Asian cuisine. Ask friends or family for recommendations too. Many places offer this dish, but each has its twist. You might discover a hidden gem serving an amazing version. Enjoy the search as part of the fun! This article covered everything you need to create a Bang Bang Chicken Bowl. We explored key ingredients and the creamy bang bang sauce. I shared easy steps to cook the chicken and put the bowl together. You got tips for perfect cooking, storing leftovers, and healthier swaps. Plus, we looked at tasty variations and how to store your dish. Now, go enjoy your fresh, flavorful bowl that suits your needs!

Bang Bang Chicken Bowl Flavorful and Easy Recipe

Are you ready to try a simple recipe that packs a punch? The Bang Bang Chicken Bowl is not just

- 2 cups uncooked basmati rice - 4 boneless, skinless chicken breasts - 2 cups low-sodium chicken broth - 1 cup Greek yogurt - 1 medium cucumber, grated - 2 cloves garlic, minced - 1 tablespoon fresh dill, chopped - 2 tablespoons lemon juice - ½ cup cherry tomatoes, halved Gather these ingredients before you start. The basmati rice forms the base of this dish. The chicken breasts add protein and flavor. Using low-sodium chicken broth helps keep the dish balanced. For the tzatziki sauce, Greek yogurt gives it a rich texture. The cucumber adds crunch and freshness. Garlic brings in a punch of flavor, making the sauce delicious. Fresh dill gives the dish a bright taste. Lemon juice adds a zesty kick. Cherry tomatoes bring a splash of color and sweetness. This recipe is simple yet packed with flavor. You can find the full recipe above for all the details. - Preheat the oven to 375°F (190°C). - In a large baking dish, add: - 2 cups uncooked basmati rice - 2 cups low-sodium chicken broth - 1 teaspoon salt - ½ teaspoon black pepper - 1 teaspoon dried oregano - Stir gently to combine the rice and broth. - Place 4 boneless, skinless chicken breasts on top of the rice. - Season the chicken with salt, pepper, and a sprinkle of oregano. - Cover the baking dish tightly with aluminum foil. This step traps steam to cook the rice and chicken. - Bake in the preheated oven for 40 minutes. - After 40 minutes, remove the foil. Check if the chicken is fully cooked. The internal temperature should reach 165°F (75°C). Also, check that the rice is tender. - If needed, return it to the oven uncovered for 5-10 minutes. - While the chicken and rice bake, prepare the tzatziki sauce. - In a medium bowl, combine: - 1 cup Greek yogurt - 1 medium cucumber, grated - 2 cloves garlic, minced - 1 tablespoon fresh dill, chopped (or 1 teaspoon dried dill) - 2 tablespoons lemon juice - 1 teaspoon salt - A dash of black pepper - Mix until smooth. Stir well to blend all the flavors. To ensure perfectly cooked chicken, use a meat thermometer. The internal temperature should reach 165°F (75°C). This step keeps your chicken juicy and safe to eat. If you find the chicken is not cooking evenly, check the size of your chicken breasts. Smaller pieces cook faster than larger ones. When it comes to fluffing rice, use a fork. After baking, let the rice sit for five minutes. Then, gently lift and separate the grains. This step makes your rice light and fluffy, not sticky. For a stunning presentation, you can add fresh vegetables. Sliced cucumbers, cherry tomatoes, and a sprinkle of dill brighten up your dish. Serve the chicken and rice family-style right in the baking dish. This makes for a relaxed meal. Pair your Dump and Bake Chicken Tzatziki Rice with a Greek salad. A side of roasted vegetables also works well. These options add color and nutrients to your meal. If you want lower calorie alternatives, consider using skinless chicken thighs. They are flavorful and slightly lower in calories. You can also swap out white basmati rice for brown rice or quinoa. These grains provide more fiber and nutrients. For dietary restrictions, try dairy-free yogurt in the tzatziki. This keeps the creaminess without dairy. If you're avoiding carbs, use cauliflower rice instead of regular rice. Each of these swaps helps you stay on track with your meal goals. For the full recipe, check out the earlier section. {{image_2}} You can change the taste of this dish easily. Try adding fresh herbs like parsley or mint. They give a bright note to the meal. You can also add spices like paprika or cumin for warmth. If you have other veggies, toss them in too. Bell peppers and zucchini add color and crunch. You can even mix in spinach for added nutrition. If you want a different protein, turkey works great. Use ground turkey for a fun twist. You can also try tofu for a vegetarian option. Just press it to remove water and cube it before baking. Chickpeas are another tasty choice. They add protein and a nice texture. You can swap basmati rice for quinoa. Quinoa cooks quickly and is high in protein. Cauliflower rice is another healthy option. It’s low-carb and adds a nice crunch. If you prefer brown rice, use it! Just remember it may need more cooking time. Adjust the liquid as needed to keep it moist. Store any leftover Dump and Bake Chicken Tzatziki Rice in an airtight container. This helps keep the dish fresh and tasty. You can keep it in the refrigerator for up to three days. Make sure to let it cool down first before sealing the container. This way, you avoid any extra moisture that can make it soggy. To freeze this dish safely, let it cool completely. Then, transfer it to a freezer-safe container or bag. Seal tightly to prevent freezer burn. You can freeze it for up to three months. When you're ready to eat, thaw it in the fridge overnight. For reheating, warm it in the oven or microwave until hot. Ensure the chicken reaches 165°F (75°C) before serving. Meal prepping can save you time on busy days. You can prepare the chicken and rice mixture ahead of time. Just follow the recipe until the baking step. Store it in the fridge for up to a day. For quick meals, portion out the leftovers into single servings. This makes it easy to grab and heat up whenever you need. Enjoy your easy, healthy meals! If you need a Greek yogurt substitute, consider these options: - Sour cream: It has a similar texture and tangy flavor. - Plain yogurt: Regular yogurt works well, but it may be thinner. - Silken tofu: Blend it to get a creamy texture for a dairy-free option. - Cashew cream: Soak cashews and blend for a rich, vegan alternative. These choices fit different diets and keep your dish tasty. Cooking time for chicken depends on weight and thickness. - For boneless, skinless breasts, cook for about 40 minutes at 375°F (190°C). - Thicker pieces may need an extra 5-10 minutes. - Always check for an internal temperature of 165°F (75°C). This ensures your chicken is safe and juicy. Yes, you can prepare this dish in advance. - Assemble the ingredients in the baking dish. - Cover and refrigerate for up to 24 hours. - When ready to cook, add an extra 10 minutes to the baking time. This makes meal planning easy and convenient. To complement this dish, try these sides: - A fresh Greek salad: It adds crunch and brightness. - Roasted vegetables: Carrots, zucchini, or bell peppers are great options. - Pita bread: Serve with tzatziki for dipping. - Lemon wedges: They add a nice zing to the meal. These sides balance flavors and enhance your dining experience. This blog post shared a simple, tasty way to make Dump and Bake Chicken Tzatziki Rice. We covered the main ingredients, including basmati rice and boneless chicken. You learned step-by-step instructions for preparation and baking. I shared tips for cooking and serving, plus variations to keep things exciting. In the end, this dish is flexible and healthy. You can easily customize it. Use what you have on hand to make it your own. Happy cooking!

Dump and Bake Chicken Tzatziki Rice Simple Dish

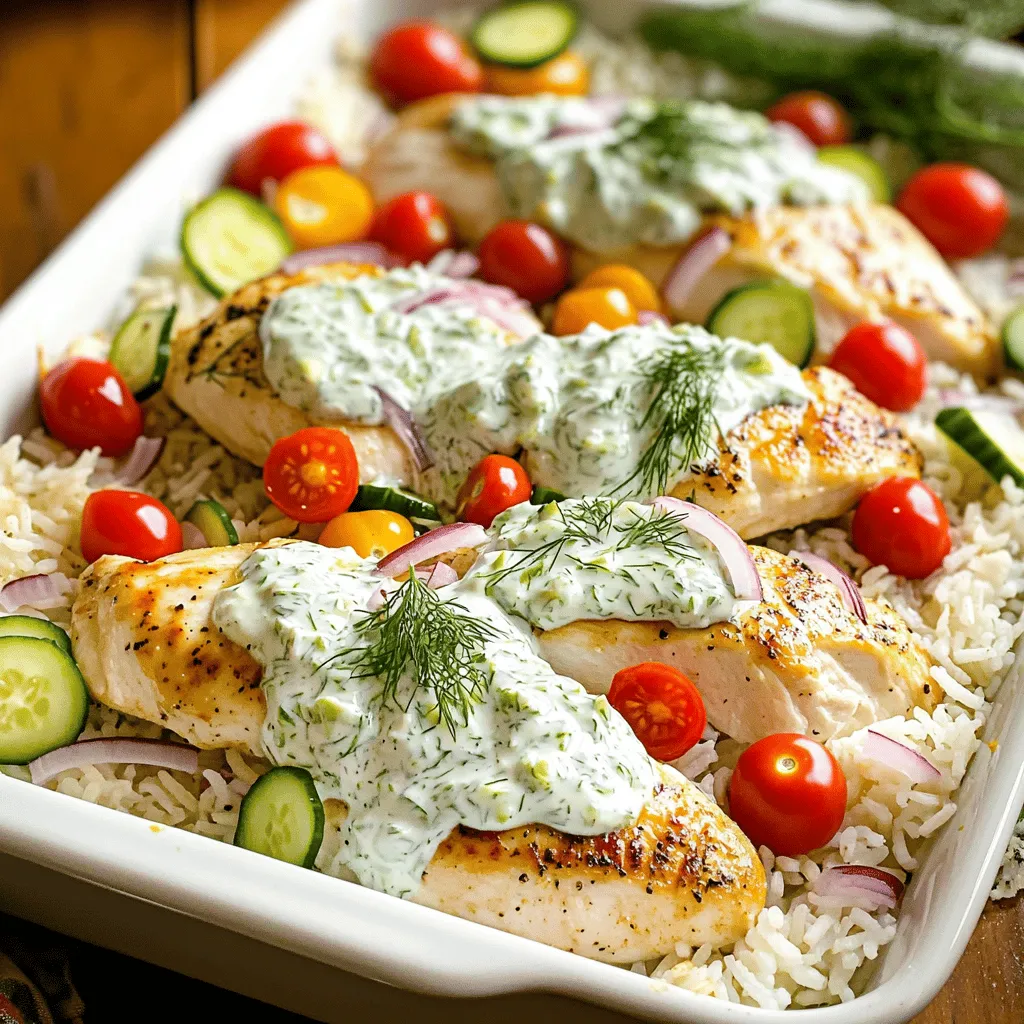
Looking for a simple, delicious meal that practically cooks itself? Let me introduce you to Dump and Bake Chicken Tzatziki

When making a Teriyaki chicken rice bowl, fresh ingredients make a big difference. Here’s what you need: - Chicken: 2 boneless, skinless chicken thighs, cut into bite-sized pieces - Rice: 1 cup jasmine rice - Vegetables: 1 cup broccoli florets, 1/2 cup carrot, julienned, 2 green onions, sliced - Sauces & Oils: 1 tablespoon vegetable oil, 1/4 cup soy sauce, 2 tablespoons honey, 1 tablespoon freshly grated ginger, 2 cloves garlic, minced, 1/2 teaspoon sesame oil - Seasonings: Sesame seeds for garnish Using quality ingredients enhances the flavor. The chicken brings protein, while jasmine rice gives a nice base. Fresh vegetables add crunch and color. The sauces and oils blend to create that sweet and savory teriyaki taste. Don't forget the sesame seeds! They add a nice touch when you serve the dish. For the full recipe, check out the instructions later. Start by boiling 2 cups of water or chicken broth in a medium pot. Once it boils, add 1 cup of jasmine rice. Lower the heat and cover the pot. Let it simmer for about 15 minutes. The rice will absorb the liquid and become fluffy. Fluff it with a fork and set it aside. In a small bowl, mix together 1/4 cup soy sauce, 2 tablespoons honey, 1 tablespoon freshly grated ginger, 2 minced garlic cloves, and 1/2 teaspoon sesame oil. Whisk until well combined. This sauce brings sweet and savory flavors to your dish. Heat 1 tablespoon of vegetable oil in a large skillet over medium-high heat. Add the bite-sized chicken thighs. Cook for about 5-7 minutes. Stir occasionally until the chicken turns golden brown and is cooked all the way through. Reduce the heat to medium. Toss in 1 cup of broccoli florets and 1/2 cup of julienned carrots. Sauté the vegetables for another 3-5 minutes. You want them to be tender but still crisp. This adds color and nutrition to the bowl. Pour the teriyaki sauce over the chicken and vegetables. Stir everything together to coat evenly. Cook for an additional 2-3 minutes. The sauce will thicken and become shiny, making it even more tasty. Divide the cooked rice into two serving bowls. Top the rice with the teriyaki chicken and vegetable mix. For the final touch, sprinkle sliced green onions and sesame seeds on top. This adds flavor and a nice crunch. You now have a delicious teriyaki chicken rice bowl ready to enjoy! Check the Full Recipe for more details. To make a great teriyaki sauce, balance is key. Use soy sauce, honey, ginger, garlic, and sesame oil. Mix them well in a bowl until smooth. Taste it! Adjust sweetness or saltiness to your liking. If you want more depth, add a splash of rice vinegar. This twist enhances the flavor. For juicy chicken, start with boneless thighs. Cut them into bite-sized pieces. Heat your skillet to medium-high and add oil. Cook the chicken for about 5-7 minutes. Stir often for even browning. Make sure the inside reaches 165°F. This ensures it is safe to eat and tasty. You can switch up the veggies based on what you have. Broccoli and carrots are great, but try bell peppers or snap peas too! Just chop them into similar sizes for even cooking. Add them to the pan after the chicken. Sauté until they are tender but still crisp. Serve your teriyaki chicken rice bowl hot. Start with a base of jasmine rice. Top it with the chicken and veggies. Finish with green onions and sesame seeds for crunch. For extra flavor, drizzle more sauce on top. You can also add pickled ginger or avocado for a fresh twist. For the full recipe, check out the details above! {{image_2}} To make a gluten-free teriyaki chicken rice bowl, swap soy sauce for tamari. Tamari is a gluten-free soy sauce. You can also use coconut aminos, which are sweet and salty. This change keeps the dish tasty without gluten. For a vegetarian option, replace chicken with tofu or tempeh. Press the tofu to remove extra water and cut it into cubes. Sauté it until golden brown. Use the same teriyaki sauce to flavor the tofu. You can add more veggies like bell peppers or snap peas. You can try other proteins in this bowl. Shrimp or salmon work great with teriyaki sauce. Simply cook the seafood until it's done and follow the same steps. You can also use beef or pork if you prefer red meat. Each protein gives a unique flavor, keeping the dish exciting. For the full recipe of Teriyaki Chicken Rice Bowl, refer back to the earlier section. After enjoying your Teriyaki chicken rice bowl, store leftovers quickly. Place them in an airtight container. This keeps your meal fresh and tasty. You can keep it in the fridge for up to three days. Make sure it cools down before you seal it. This way, it stays safe and yummy. When you’re ready to eat again, reheating is easy. You can use a microwave or stovetop. If using a microwave, place the bowl in and heat for about two minutes. Stir halfway through for even heating. If you prefer the stovetop, warm it in a pan over low heat. Add a splash of water or broth to prevent drying. Heat until it’s hot throughout. Freezing is a great option for longer storage. Divide the bowl into single servings. Place each in a freezer-safe container. Make sure to leave some space at the top, as food expands when frozen. You can freeze the teriyaki chicken rice bowl for up to three months. When you’re ready to eat, thaw it in the fridge overnight. Then reheat as mentioned above. Enjoy your flavorful meal anytime! For the full recipe, check out the Teriyaki Chicken Rice Bowl . A teriyaki chicken rice bowl is a tasty meal. It features cooked chicken tossed in sweet and savory teriyaki sauce. The chicken sits on a bed of fluffy rice. You can add fresh vegetables like broccoli and carrots. This dish is colorful and full of flavor. It’s a quick meal that is perfect for busy days. You can swap out some ingredients for healthier options. Use brown rice instead of jasmine rice for more fiber. You can add more veggies like bell peppers or snap peas. Try using less honey in the sauce. You can also grill the chicken instead of frying it. These changes will keep the meal light and bright. Yes, you can use any rice you like! Brown rice adds a nutty flavor and more nutrients. Quinoa is a good choice for a protein boost. Cauliflower rice is great for a low-carb option. Just adjust the cooking time based on the rice you choose. To check if chicken is done, use a meat thermometer. The inside should reach 165°F (75°C). If you don’t have a thermometer, cut the chicken open. The meat should be white, not pink. Juices should run clear. This ensures your chicken is safe to eat. You can use maple syrup as a great substitute for honey. Agave nectar is another option. If you want a sugar-free choice, try stevia or a sugar substitute. These will still give you a sweet flavor without using honey. This article covered creating a tasty teriyaki chicken rice bowl. We explored key ingredients like chicken, rice, and veggies. I shared simple steps to make and mix each part. You learned tips to enhance flavor and variations for different diets. Now you can enjoy this dish tailored to your taste. Cooking can be fun and rewarding. Keep experimenting and make this bowl your own! Happy cooking!

Teriyaki Chicken Rice Bowl Flavorful and Easy Meal

Looking for a quick and tasty meal? The Teriyaki Chicken Rice Bowl is your answer! This dish combines juicy chicken,

To make a yummy Strawberry Dole Whip, you need just a few simple items: - 2 cups frozen strawberries - 1 cup canned coconut milk - 1 tablespoon honey or agave syrup (adjust for sweetness) - 1 teaspoon vanilla extract - A pinch of salt These ingredients come together to create a creamy, fruity delight. The frozen strawberries give it a sweet and tangy flavor, while coconut milk adds richness. Honey or agave syrup sweetens the mix just right. Adding toppings can make your Strawberry Dole Whip even more special. Here are some fun ideas: - Fresh strawberry slices - Shredded coconut - Mint leaves - Chocolate chips or sprinkles These toppings offer extra flavor and nice textures. You can mix and match to find your favorite! If you don’t have some ingredients, don’t worry! Here are some swaps you can try: - Use fresh strawberries instead of frozen, but add ice to keep it cold. - Swap coconut milk for almond or soy milk for a different flavor. - Use maple syrup in place of honey or agave syrup for a unique taste. These substitutes keep the recipe easy and fun, allowing you to enjoy your treat no matter what! Check out the Full Recipe for more details. To make Strawberry Dole Whip, gather your ingredients first. You need 2 cups of frozen strawberries, 1 cup of canned coconut milk, 1 tablespoon of honey or agave syrup, 1 teaspoon of vanilla extract, and a pinch of salt. 1. Start by adding the frozen strawberries and coconut milk into a blender. 2. Next, add the honey (or agave), vanilla extract, and the salt. 3. Blend on high speed until the mix is smooth and creamy. You may need to stop and scrape down the sides to ensure everything blends well. If your mixture is too thick, don’t worry! Just add more coconut milk, a tablespoon at a time. Blend again until you reach the right consistency. Aim for a soft-serve texture. This makes it easier to pipe into bowls. Also, if your blender struggles, try cutting the frozen strawberries into smaller pieces. This helps the blender work better and makes blending faster. Once your Strawberry Dole Whip is ready, it’s time to serve! Use a piping bag or a zip-top bag with one corner cut off. Pipe the creamy mix into bowls or cups in a swirling motion. This creates a fun and inviting look. For added flair, top your Dole Whip with fresh strawberry slices, shredded coconut, or a mint leaf. Serve right away for the best taste and texture. Enjoy this refreshing treat with family and friends on a hot summer day! To get the best texture for your Strawberry Dole Whip, blend well. Start with frozen strawberries and coconut milk. Blend until smooth. If it's too thick, add more coconut milk. Do this slowly, one tablespoon at a time. You want it creamy but not runny. Use a piping bag for fun shapes. This method gives you that classic soft-serve look. Sweetness is key in a good Dole Whip. I recommend starting with one tablespoon of honey or agave syrup. Taste the mixture as you blend. If it's not sweet enough, add more honey. Remember, fresh strawberries can vary in sweetness. Adjust to your taste for the best experience. If your Dole Whip doesn't come out right, don’t worry. Here are common problems and fixes: - Too Thick: Add a bit more coconut milk and blend again. - Too Sweet: Mix in a tiny pinch of salt to balance the flavors. - Not Smooth: Blend longer and scrape down the sides of the blender. These tips will help you create a delightful treat every time. For a full guide, check the Full Recipe. {{image_2}} To make a vegan version of Strawberry Dole Whip, stick with the main ingredients. The recipe already uses coconut milk, which is plant-based. You can swap honey with agave syrup for a fully vegan treat. This small change makes a big difference for those who avoid animal products. Enjoy a creamy, fruity delight that fits your vegan lifestyle. If you want a dairy-free treat, this recipe is perfect. Coconut milk provides a rich, creamy base without any dairy. You can also use almond or oat milk as a substitute. Just keep in mind that these options may change the flavor slightly. Stick to the original recipe or substitute wisely to keep it smooth and tasty. Want to mix things up? You can add other fruits to your Strawberry Dole Whip. Try blending in bananas for a creamier texture. You can also add a splash of lime or lemon juice for a tart twist. If you like chocolate, mix in some cocoa powder or chocolate chips. Get creative with your flavors to find your favorite combo. For more ideas, check the Full Recipe to inspire your next creation! To keep your Strawberry Dole Whip fresh, store it in an airtight container. This helps prevent ice crystals from forming. You can also use a zip-top bag; just squeeze out the air before sealing. Keep it in the freezer for the best texture and flavor. If you want to enjoy it later, consider dividing it into smaller portions. This way, you can take out just what you need. Dole Whip is best served cold, so reheating is not recommended. If it becomes too hard, let it sit at room temperature for about 5 minutes. This softens it enough to scoop and enjoy. Avoid using the microwave, as it changes the texture. You want that smooth and creamy delight! Strawberry Dole Whip can last up to two weeks in the freezer. However, for the best taste, enjoy it within a week. If you freeze it longer, it may lose some flavor. Always check for any odd smells or changes in texture before serving. For a quick treat, consider making a big batch and storing it. You’ll have a refreshing dessert ready whenever you want. If you want to explore more, check out the Full Recipe for other tips. Strawberry Dole Whip is a creamy and fruity dessert. It has just a few simple ingredients. You need: - 2 cups frozen strawberries - 1 cup canned coconut milk - 1 tablespoon honey or agave syrup - 1 teaspoon vanilla extract - A pinch of salt These ingredients blend together to create a smooth, rich treat. The frozen strawberries give it a vibrant color and sweet taste. The coconut milk adds creaminess and a hint of tropical flavor. Yes, you can make Dole Whip without a blender! You can use a food processor or even a hand mixer. If you don’t have either, you can mash the strawberries by hand. Mix all the ingredients in a large bowl. Keep stirring until you get a smooth texture. It takes more time, but it can be fun! To make your Dole Whip softer, add more coconut milk. Just add one tablespoon at a time. Blend it well until it reaches the right softness. If you want a firmer consistency, place it in the freezer for about 30 minutes. Scoop it out and enjoy! Adjust the texture based on your personal taste. For more details, check out the Full Recipe for Strawberry Dole Whip Delight. You learned about the main ingredients for Strawberry Dole Whip and optional toppings. I shared tips on blending and serving, plus ways to perfect the texture. I also covered how to store Dole Whip properly and offered answers to common questions. Remember, you can try vegan or dairy-free options too. Making Dole Whip at home is easy and fun. Enjoy your creation!

Strawberry Dole Whip Refreshing Treat for Summer

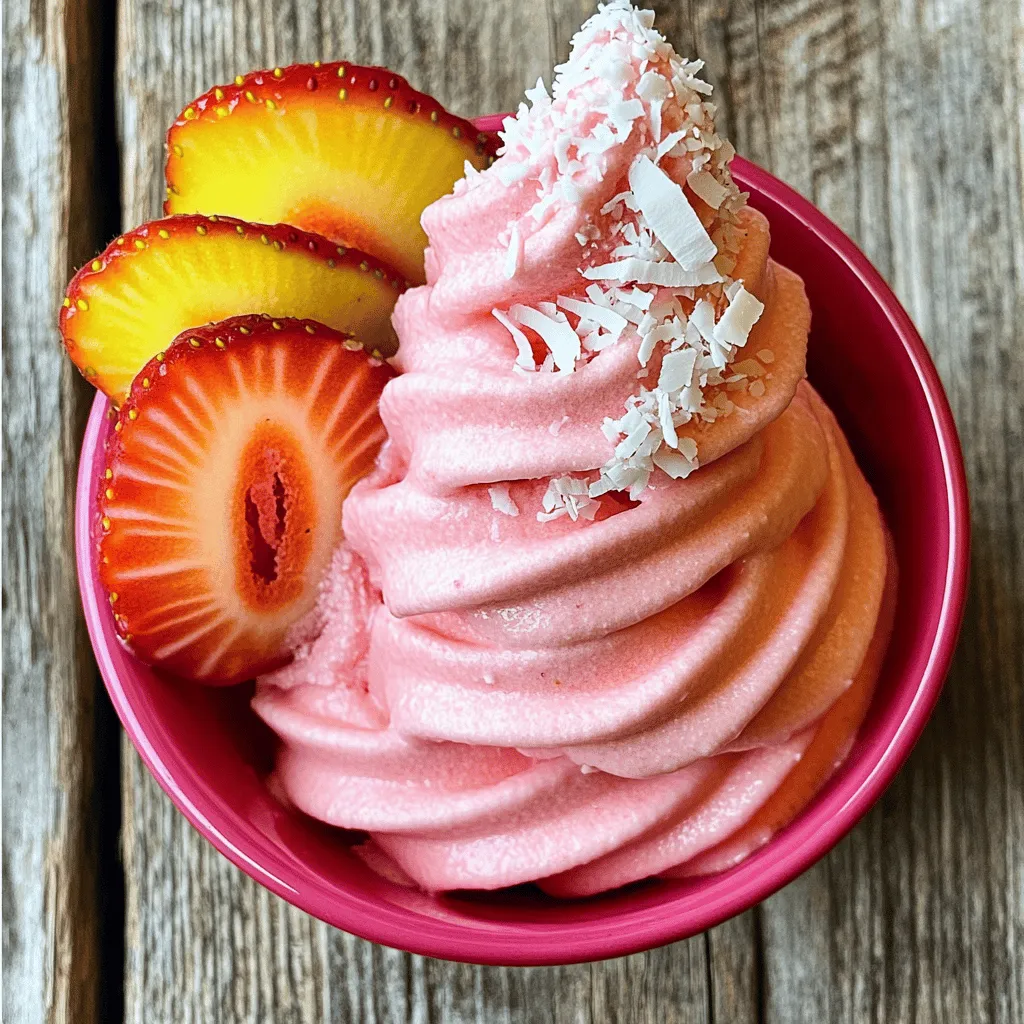
Ready to beat the summer heat? Try this delicious Strawberry Dole Whip! It’s cool, fruity, and super easy to make.

- Ripe peaches: Choose peaches that are soft but not bruised. They should smell sweet. - Fresh lemons: Use juicy lemons for the best flavor. About 6-8 lemons give you one cup of juice. - Granulated sugar: This sweetens the lemonade. You can adjust the amount for your taste. - Mint leaves: Fresh mint adds a nice touch. It also makes the drink look pretty. - Ice cubes: Add ice to keep your drink cold. It makes the lemonade refreshing. - Alternative sweeteners: Try honey or agave if you want a different sweetness. These can change the flavor profile. This Peach Lemonade recipe is perfect for hot days. For the full recipe, check out the section above! 1. Start by taking 1 cup of water and placing it in a small saucepan. Add 4 ripe, sliced peaches. 2. Heat the mixture over medium heat until it simmers. Stir it occasionally. This process helps release the peach flavor. 3. After about 5 to 7 minutes, the peaches should start breaking down. Add 1 cup of granulated sugar. Stir until the sugar dissolves completely. 4. Remove the saucepan from heat and let it cool a bit. Strain the syrup through a fine sieve or cheesecloth into a bowl. Press down on the solids to get more juice. Set this syrup aside until it cools completely. 1. In a large pitcher, pour 1 cup of fresh lemon juice. This is about 6 to 8 lemons. 2. Add 3 cups of cold water to the pitcher and stir it well. 3. Now, pour in the chilled peach syrup. Mix until everything is combined. 4. Taste your lemonade. If you want it sweeter, add more sugar or syrup. 1. Chill your lemonade in the fridge for at least 30 minutes. This makes it extra refreshing. 2. When ready to serve, fill glasses with ice cubes. 3. Pour the Peachy Zesty Lemonade over the ice. 4. For a lovely touch, garnish each glass with fresh mint leaves. To make great peach lemonade, start with ripe peaches. Look for peaches that feel soft but not mushy. The skin should have a warm color, often a golden hue. If you smell a sweet scent, it’s a good sign they are ripe. The best peach varieties for lemonade include: - Freestone peaches: Easy to pit and sweet. - Clingstone peaches: Juicy and flavorful, but harder to pit. - Donut peaches: Flat and sweet, they add a unique twist. Want to take your peach lemonade to the next level? Try infusing it with herbs or spices. Fresh mint or basil can add a refreshing touch. Just muddle a few leaves into your pitcher before serving. Using sparkling water instead of regular water gives your lemonade a fun fizz. This makes it even more refreshing. You can mix sparkling water in just before serving to keep the bubbles alive. {{image_2}} You can make your peach lemonade more fun by adding some alcohol. Vodka or rum works well. Here’s how you can do it: - Vodka: Add 1.5 ounces of vodka for each glass. This gives a nice kick without overpowering the flavor. - Rum: For a sweeter touch, use 1.5 ounces of light rum. It complements the peach nicely. Mix the alcohol into the lemonade and serve. Always taste before serving, as you want a balanced drink. Want to mix things up? Combining your peach lemonade with other fruits is a great idea. Here are some options: - Berries: Add fresh strawberries or blueberries. They bring a burst of color and flavor. - Citrus: A splash of orange or lime juice adds zing. It makes the drink even more refreshing. You can also create a layered effect. Pour peach lemonade over crushed ice first. Then gently pour berry or citrus juice on top. This makes a beautiful drink to enjoy. Explore these variations to find your favorite twist on peach lemonade. For the full recipe, check out the detailed instructions above. To keep your peach lemonade fresh, follow these easy steps. First, pour the lemonade into a clean, airtight container. Glass jars or plastic pitchers work well. Make sure the container is sealed tightly. This helps to keep out air and light, which can spoil the drink. Store it in the fridge. This keeps it cold and tasty. Your peach lemonade lasts about 5 to 7 days in the fridge. After that, it may lose its flavor. Watch for signs of spoilage. If you see any floating bits or odd smells, it’s best to toss it. Always trust your senses to decide if it’s still good. Enjoy the freshness while it lasts! You can reduce the sweetness in Peach Lemonade by using less sugar. Try using only half the amount of sugar. You can also use natural sweeteners like honey or agave syrup. These options have a different taste but can work well. Another method is to add more lemon juice. The tartness from the lemons can balance the sweetness. You could also add a pinch of salt. This helps enhance the flavor without adding more sugar. Yes, you can use frozen peaches in this recipe. Just make sure to thaw them first. Thawed peaches will blend well into the syrup. You may need to simmer them a bit longer to break down. Using frozen peaches may change the flavor slightly. They can taste less fresh than ripe, in-season peaches. However, they still provide a nice peach flavor. Peach Lemonade offers several health benefits. Peaches are low in calories and high in vitamins. They contain vitamins A and C, which help boost your immune system. Lemon juice is rich in vitamin C, too. It helps with hydration and digestion. Plus, this drink is refreshing on hot days. The water in this recipe helps keep you hydrated. Staying hydrated is important, especially in summer. So enjoy this tasty drink and feel good about it! Peach lemonade is a fresh and tasty drink. We covered the best ingredients, from ripe peaches to fresh lemon juice. I explained how to make a smooth peach syrup and mix everything properly. Plus, you'll find tips on choosing ripe peaches and adding fun flavors. In the end, you can enjoy this refreshing drink at any time. It’s simple to customize and store. Make it your way, and share it with friends! This drink is sure to brighten your day.

Peach Lemonade Refreshing Summer Drink Recipe

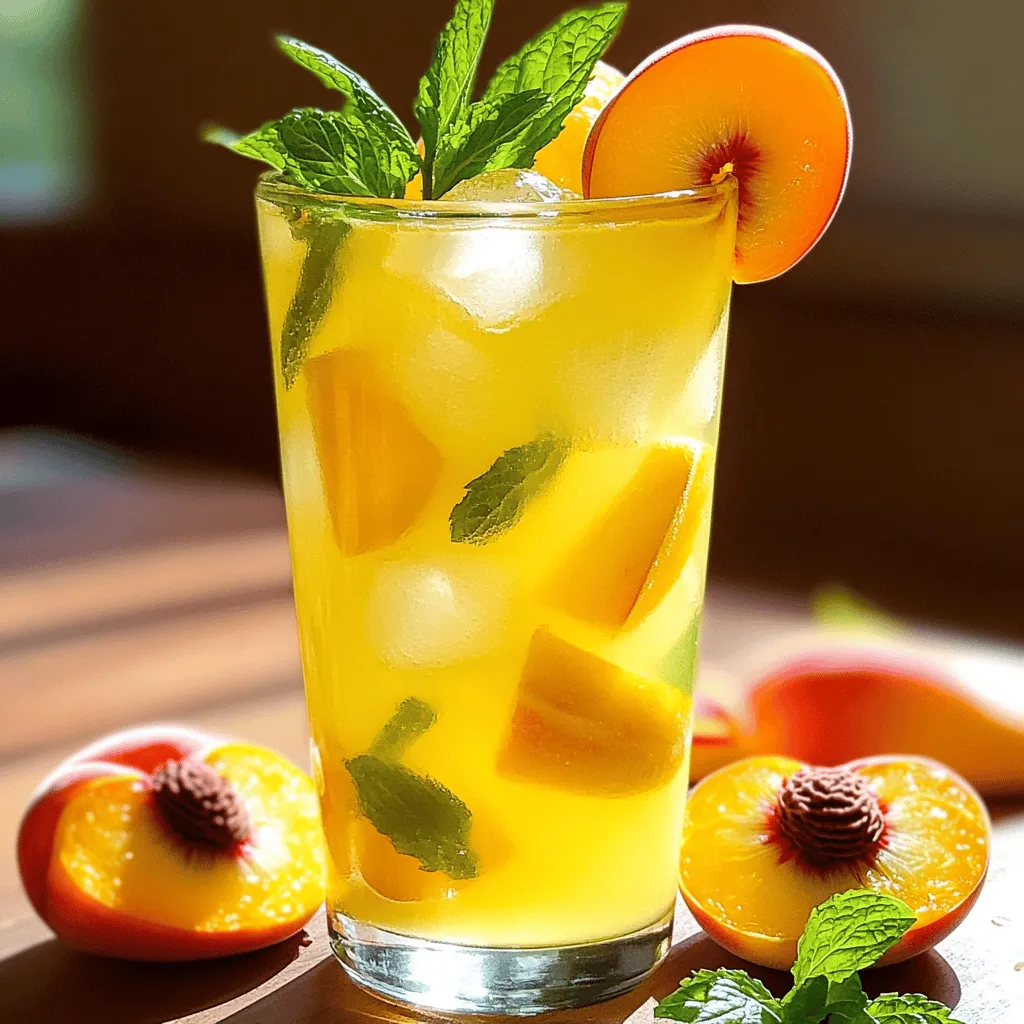
Looking for a cool and refreshing summer drink? Peach lemonade is just what you need! This simple recipe blends ripe

- 2 ripe avocados - 4 hard-boiled eggs, peeled and chopped - 2 tablespoons Greek yogurt - 1 tablespoon Dijon mustard - 1 tablespoon lemon juice - ½ teaspoon garlic powder - ¼ teaspoon smoked paprika - Salt and black pepper to taste - 4 slices of whole-grain bread - Fresh chives, chopped (for garnish) - Red pepper flakes (optional, for heat) To create this creamy and vibrant avocado egg salad, you need fresh ingredients. The avocados should be ripe for the best flavor. I prefer using large eggs for a richer taste. Greek yogurt adds creaminess without the extra fat of mayonnaise. Dijon mustard gives a nice tang that brightens the dish. Lemon juice keeps the avocado from browning too quickly and adds a fresh zing. Garlic powder and smoked paprika give depth to the salad. Season with salt and black pepper to enhance all the flavors. Whole-grain bread adds fiber and crunch, making the toast hearty. Chives add a mild onion flavor and a pop of color. If you like heat, sprinkle on some red pepper flakes. This dish is not only delicious but also packed with nutrients. - Calories per serving: Approximately 290 - Macronutrient breakdown: - Carbohydrates: 30g - Fats: 18g - Proteins: 10g This meal is rich in healthy fats from avocados, making it filling. The eggs provide protein, which is essential for muscle health. The Greek yogurt adds probiotics that help your gut. Eating this avocado egg salad toast can support heart health and keep you energized. How to prepare the avocados First, choose ripe avocados. They should feel soft but not mushy. Cut each avocado in half and remove the pit. Use a spoon to scoop out the flesh into a bowl. Mash the avocado with a fork, leaving it a bit chunky for texture. Mixing the egg salad ingredients Next, add the chopped hard-boiled eggs to the mashed avocado. Then, stir in the Greek yogurt, Dijon mustard, lemon juice, garlic powder, and smoked paprika. Mix everything until it is well combined. Taste the mixture and add salt and black pepper as needed. Toasting the bread Now, take your slices of whole-grain bread. Toast them until they are golden brown and crispy. This step adds a nice crunch to your dish. Best ways to plate and serve the dish Spread a generous layer of the avocado egg salad on each slice of toast. Make sure to cover the entire surface for a beautiful look. Sprinkle chopped chives on top for a pop of color and flavor. If you like some heat, add a pinch of red pepper flakes too. Pairing ideas (sides or beverages) You can serve this dish with a side of fresh fruit or a light salad. For beverages, consider a glass of iced tea or fresh juice. These pairings enhance the meal and make it feel more complete. For the full recipe, check out the details above. To make a great avocado egg salad, focus on the texture of the avocado. I like my avocado creamy but with some chunks. This gives the salad a nice bite and makes it more interesting. When mashing, use a fork and stop when it’s still a bit chunky. This will help keep the toast from getting too mushy. Balancing flavors is key. I add Greek yogurt for creaminess and a bit of tang. Dijon mustard gives it a nice kick. A splash of lemon juice brightens the dish. Season with garlic powder and smoked paprika for depth. Taste as you mix, and adjust salt and pepper until it feels just right. If you're in a rush, consider using pre-boiled eggs. Many stores sell them, which cuts down your prep time. Just chop them up and mix them with the avocado. Mashing avocado can take time, but I have a quick tip. Use a ripe avocado and a sturdy fork. Press down hard and twist. It should mash easily. If you want to speed it up even more, slice the avocado and scoop it into the bowl. This way, you get a smooth mash without much effort. For the full recipe, check out the detailed instructions above! {{image_2}} You can make small changes to this tasty dish. Instead of using Greek yogurt, try avocado. It makes the dish creamier and adds healthy fats. You still get a smooth texture and great flavor. Just mash the avocado and mix it with the eggs and spices. For those who need gluten-free options, choose gluten-free bread. There are many great types available. Look for brands made from almond flour, coconut flour, or even chickpeas. These breads taste great and keep the meal light. To add a punch of flavor, try different spices or herbs. For instance, a pinch of cumin or dill can change the taste. You can also add fresh herbs like parsley or cilantro. They bring freshness to each bite. Don’t forget to play with toppings! Sliced tomatoes or crunchy cucumbers add color and texture. You can even try radishes for a nice crunch. Each topping can make your avocado egg salad toast unique and fun. Enjoy creating your perfect version! To keep your avocado egg salad toast fresh, store it in an airtight container. This method helps prevent browning and keeps the flavors intact. If you have leftover salad, place it in the fridge right away. It stays good for about 2 days. However, the toast will get soggy, so only store the salad and toast separately. You should not reheat avocado toast. Heating changes the creaminess of the avocado, making it less enjoyable. If you have leftover egg salad, you can eat it cold or let it sit at room temperature for a short time. This way, it tastes fresh without losing texture. Enjoy it on new toast for a quick meal! For the full recipe, check out the Avocado Egg Salad Toast section. What can I replace Greek yogurt with in this recipe? You can use mashed avocado instead. It adds creaminess and keeps it healthy. Another option is sour cream for a tangy flavor. Just remember to adjust the salt for taste. How do I know when my avocados are ripe enough? A ripe avocado feels soft but not mushy when you squeeze it gently. The skin should be dark green or black. If it’s too firm, it needs more time to ripen. Can I make this recipe in advance? Yes, you can prepare the egg salad ahead and store it in the fridge. Just keep it in an airtight container. It will last for about two days. The toast is best made fresh to keep it crispy. Is this dish suitable for meal prep? Absolutely! You can make the egg salad and store it separately. This way, you can toast the bread fresh each time. It makes for a quick and healthy meal during busy days. What are some good substitutes for eggs? If you want a vegan option, try using chickpeas. Mash them to create a similar texture. You can also use silken tofu for a creamy base. How do I choose the best bread for this recipe? Look for whole-grain or sourdough bread. Whole-grain provides more fiber, while sourdough gives a nice tang. Choose a bread that can handle the weight of the egg salad without getting soggy. For the full recipe, check out the detailed steps above! This blog post outlined a tasty egg salad toast with avocados. We covered ingredients, preparation, and storage. You learned how to balance flavors and enhance your dish. Final thoughts: This recipe is easy, healthy, and versatile. You can make it your own. Enjoy crafting a delicious meal that fits your taste!

Avocado Egg Salad Toast Simple and Healthy Meal

Looking for a quick and healthy meal? Try my Avocado Egg Salad Toast! This dish combines creamy avocados with protein-rich

To make Polish creamy cucumber salad, you need: - 3 medium cucumbers, thinly sliced - 1 cup sour cream - 1 tablespoon apple cider vinegar - 1 tablespoon fresh dill, chopped - 1 clove garlic, minced - 1 tablespoon honey - Salt and pepper to taste - 2 green onions, chopped for garnish For this recipe, I recommend using: - Daisy for sour cream. Their sour cream is thick and creamy. - Bragg for apple cider vinegar. It has a rich flavor that works well here. - McCormick for dried dill if you can't find fresh. You can swap ingredients if you need to. - Use Greek yogurt instead of sour cream for a tangy taste. - If you like heat, add a pinch of red pepper flakes. - You can also throw in some cherry tomatoes for extra color and taste. - For a sweeter twist, try maple syrup instead of honey. These options help you customize your salad to match your taste. Enjoy your cooking! First, wash your cucumbers well. You can keep the skin on for extra crunch. If you like, you can peel them for a softer bite. Next, thinly slice the cucumbers. Aim for even slices to help with mixing later. Place the slices in a large bowl. This will hold all the goodness we are about to create. Now, grab another bowl to mix your dressing. Add one cup of sour cream. Then, pour in one tablespoon of apple cider vinegar. This adds a nice tang. Next, chop your fresh dill finely and add it to the mix. Don’t forget the minced garlic! It gives a lovely flavor. Finally, add one tablespoon of honey for a hint of sweetness. Whisk these ingredients together until the mixture is smooth and creamy. It’s time to bring everything together! Pour the creamy dressing over the sliced cucumbers in your large bowl. Gently toss the cucumbers to coat them evenly. You want every slice to have that creamy goodness. Season the salad with salt and pepper to taste. Feel free to adjust the seasoning based on your preference. After that, chill the salad in the refrigerator for at least 30 minutes. This helps the flavors blend well. Before serving, give it a light stir and top it with chopped green onions for a fresh touch. Enjoy your Polish creamy cucumber salad as a refreshing side dish! To get that satisfying crunch, choose fresh, firm cucumbers. Look for ones that feel heavy for their size. The skin adds a nice texture, so I often leave it on. If you peel them, the salad will still taste great but lose some crunch. After slicing, let the cucumbers sit for about 10 minutes. This helps draw out some moisture. You can pat them dry before adding the dressing for an even better crunch. To boost the flavor, consider adding a splash of lemon juice. It adds brightness and balances the creaminess. You can also try a pinch of smoked paprika for a smoky twist. Fresh herbs like parsley or mint can give a refreshing note. If you like spice, add a dash of cayenne pepper. These small tweaks can make the salad unique every time. Serve this salad cold for the best taste. It pairs well with grilled meats, making it perfect for summer barbecues. You can also serve it as a light lunch with crusty bread. For a fancy touch, place it in a glass bowl to show off the layers. Garnish with extra dill or chives for a pop of color. For the full recipe, check out the details above. {{image_2}} You can mix things up with different dressings. A yogurt-based dressing gives a lighter feel. You can also use buttermilk for a tangy twist. For a spicy kick, add some hot sauce. Each option adds a new flavor to your salad. Feel free to add more vegetables. Thinly sliced radishes or bell peppers add color and crunch. You can also toss in some cherry tomatoes for a sweet burst. Carrots can bring a nice crunch too. These veggies enhance the salad's texture and taste. Adding protein makes this salad a meal. Try diced chicken or shrimp for a filling option. Tofu works well for a plant-based choice. You can also sprinkle in some feta cheese for a salty flavor. These additions keep the salad fun and satisfying. For the full recipe, you can find clear instructions above. To keep your salad fresh, use an airtight container. This helps prevent any odors from mixing. Make sure to store it in the refrigerator. This will keep the cucumbers crisp and the dressing creamy. When stored properly, Polish creamy cucumber salad lasts about 3 days in the fridge. After that, the cucumbers may become soggy. If you notice any off smells or changes in texture, it’s best to toss it. Freezing this salad is not recommended. The creamy dressing and cucumbers do not hold up well when frozen. Instead, make only what you plan to eat. This ensures that you enjoy the salad at its freshest. For the full recipe, check out the recipe section. You can use Greek yogurt as a great substitute for sour cream. It has a similar texture and taste. If you want a dairy-free option, try using cashew cream. Just blend soaked cashews with water until smooth. This will give you a creamy base that works well. Yes, you can use other herbs! If you prefer, try parsley or chives. Each herb adds its own flavor to the salad. Fresh herbs work best for a bright taste. Dried herbs can work too, but use less since they are stronger. This salad stays fresh in the fridge for about three days. Make sure to store it in a covered container. The longer it sits, the softer the cucumbers become. For the best crunch, enjoy it within the first couple of days. For the full recipe, check the details above. We explored the key ingredients, steps, and tips for making Polish Creamy Cucumber Salad. You can easily customize the salad with different brands, herbs, and proteins. Storing leftovers is simple, too. Remember, the crunch and flavor make this salad special. Try various variations to find your favorite mix. I hope you feel inspired to create your version of this delicious dish. Enjoy your cooking journey and savor every bite!

Polish Creamy Cucumber Salad Refreshing and Light Dish

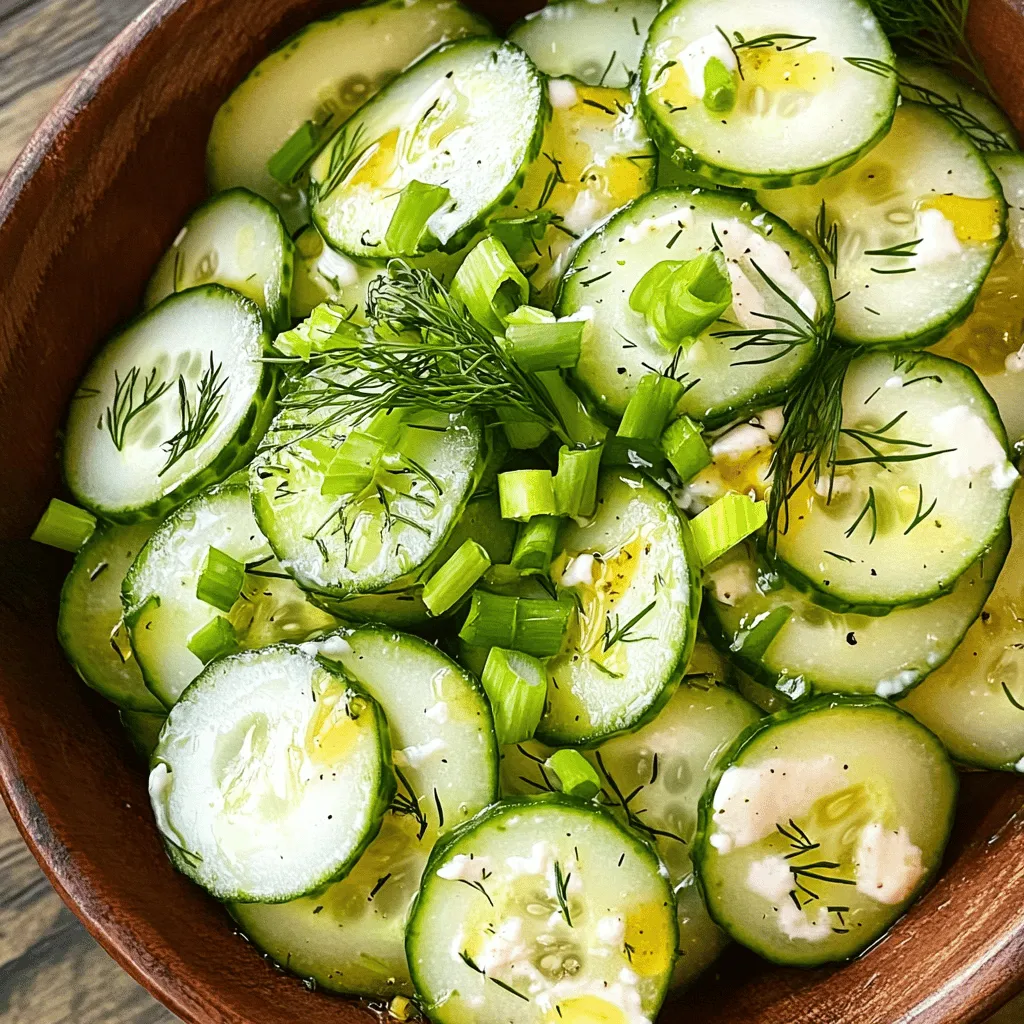
Are you ready to discover a dish that perfectly balances freshness and creaminess? In this article, I’ll show you how

- 1 cup orzo pasta - 1 cup cherry tomatoes, halved - 1 medium cucumber, diced - 1 bell pepper (red or yellow), diced - 1/2 red onion, finely chopped - 1/4 cup fresh basil leaves, chopped - 1/4 cup feta cheese, crumbled - 3 tablespoons olive oil - 2 tablespoons lemon juice - Salt and pepper to taste - Optional: 1/4 cup black olives, pitted and sliced The orzo pasta serves as the base for this colorful salad. I love using fresh cherry tomatoes for their sweet flavor. Diced cucumber and bell pepper add crunch and color. Finely chopped red onion gives a nice bite, while fresh basil brings a bright note. Feta cheese adds creaminess, making each bite delightful. The dressing, made from olive oil and lemon juice, brings everything together. You can use different types of olive oil for varied flavors. Try flavored oils like garlic or herb-infused. For vinegar, options like balsamic or red wine vinegar work well too. They can add a tangy kick to your dish. This salad is light yet filling. One serving has about 200 calories. It contains carbs from the orzo and healthy fats from the olive oil. You’ll also get fiber from the veggies. Each ingredient adds its own health benefits, making this salad both tasty and nutritious. Be sure to check out the Full Recipe for detailed steps and tips! To start, boil a pot of salted water. Bring it to a rolling boil. Next, add 1 cup of orzo pasta. Cook it for about 8 to 10 minutes. You want the orzo to be al dente, which means it should be firm to the bite. After cooking, drain and rinse the pasta under cold water. This stops the cooking process and cools it quickly. In a large mixing bowl, combine the cooked orzo with the veggies. Add 1 cup of halved cherry tomatoes, a diced cucumber, a diced bell pepper, and 1/2 finely chopped red onion. Stir in fresh basil leaves and 1/4 cup of crumbled feta cheese. If you like, toss in black olives too. This mix brings color and flavor to your salad. For the dressing, gather 3 tablespoons of olive oil and 2 tablespoons of lemon juice. In a small bowl, whisk these ingredients together with salt and pepper to taste. This dressing gives your salad a bright, zesty flavor. Make sure to whisk until it is well-combined, so every bite gets that tasty coating. Now, pour the dressing over your salad mix. Gently toss everything together. Make sure all the ingredients get coated. Then, let the salad rest for at least 10 minutes. This resting time is key. It allows the flavors to meld together, making each bite even more delicious. Enjoy your vibrant and fresh orzo summer salad! For the full recipe, check out the details provided above. - Cooking orzo al dente for best texture: Cook the orzo just until firm. This keeps it from getting mushy. Follow the package for timing. Drain and rinse with cold water to stop the cooking. - Using fresh herbs for maximum flavor: Fresh herbs bring life to your salad. I love using basil, parsley, or mint. Chop them just before adding to keep their flavor bright. - Serving suggestions for gatherings: Use a large, colorful bowl to serve. This makes your salad stand out. Garnish with extra herbs or a sprinkle of feta. - Creative plating techniques: For a fun twist, serve the salad in mason jars. This is great for picnics or meal prep. It also looks cute and keeps the salad fresh. - Additional herbs to consider: Try dill or cilantro for a new taste. They can change the salad's vibe. Just chop them finely before adding. - Spice up your salad with extras: Add a sprinkle of red pepper flakes for heat. You can also toss in some nuts or seeds for crunch. For a salty kick, add capers or olives. {{image_2}} You can easily change the vegetables based on what’s fresh. Try zucchini, corn, or snap peas. These veggies add color and great taste. You can also add protein. Grilled chicken or shrimp makes the salad heartier. Just cook the protein separately and mix it in with the orzo. Dressings can change your salad's flavor a lot. A creamy dressing made with yogurt can be a tasty twist. Just mix yogurt, lemon juice, and a pinch of salt. For a zesty option, use lime or orange juice. The citrus adds a nice kick that brightens the dish. Making a vegan version is easy. Simply leave out the feta cheese. You can add avocado for creaminess instead. If you need a gluten-free option, use gluten-free orzo pasta. Many brands offer this, so you won’t miss out on flavor. Explore these variations to create your perfect Orzo Summer Salad. For the full recipe, check out the previous section. To keep your orzo summer salad fresh, store it in an airtight container. This helps prevent moisture loss and keeps flavors intact. Place the salad in the fridge right after serving. It lasts about 3 to 5 days. If you notice any changes in smell or color, it’s best to toss it. You may wonder if you should heat orzo salad. Typically, this salad is best served cold. Heating can change its texture and flavor. If you really want to warm it, try the stovetop method. Place the salad in a pan over low heat. Stir gently until it's warm. Can it be frozen? Yes, but with caution. Freezing can alter the texture of fresh vegetables. If you plan to freeze the salad, leave out the fresh herbs and feta. Store it in a freezer-safe container. When you want to eat it, thaw it in the fridge overnight. Serve it cold with fresh herbs and feta added back in. Enjoy your meal! Yes, you can make Orzo Summer Salad ahead of time. This salad tastes great when chilled. To prep in advance, follow these steps: - Cook the orzo and let it cool. - Chop the veggies and store them separately. - Mix the dressing in a small bowl and keep it aside. - Combine everything right before serving for the best flavor. This way, the salad stays fresh and crunchy. If you want to skip feta cheese, several tasty options exist. Here are some great substitutes: - Goat cheese gives a creamy texture. - Ricotta adds a mild flavor. - Vegan feta works well for a dairy-free choice. - Try mozzarella for a softer bite. Each option brings a unique flavor to the salad, so choose what you like best. To make Orzo Summer Salad gluten-free, pick the right pasta. Here are some good brands: - Banza offers chickpea orzo. - Explore Cuisine has lentil-based orzo. - Tinkyada makes brown rice orzo. You can also use gluten-free ingredients like: - Fresh veggies like cucumbers and bell peppers. - Olive oil and lemon juice for the dressing. This way, everyone can enjoy the salad! Orzo Summer Salad is fresh, colorful, and full of flavor. It includes tasty vegetables and a bright dressing that ties it all together. Remember, cooking the orzo just right makes a big difference. You can also swap in different veggies or proteins to suit your taste. Store leftovers properly to keep your salad fresh. With a few simple tips, you can serve an amazing dish at your next gathering. Enjoy making this vibrant salad that everyone will love!

Orzo Summer Salad Fresh and Flavorful Recipe Ideas

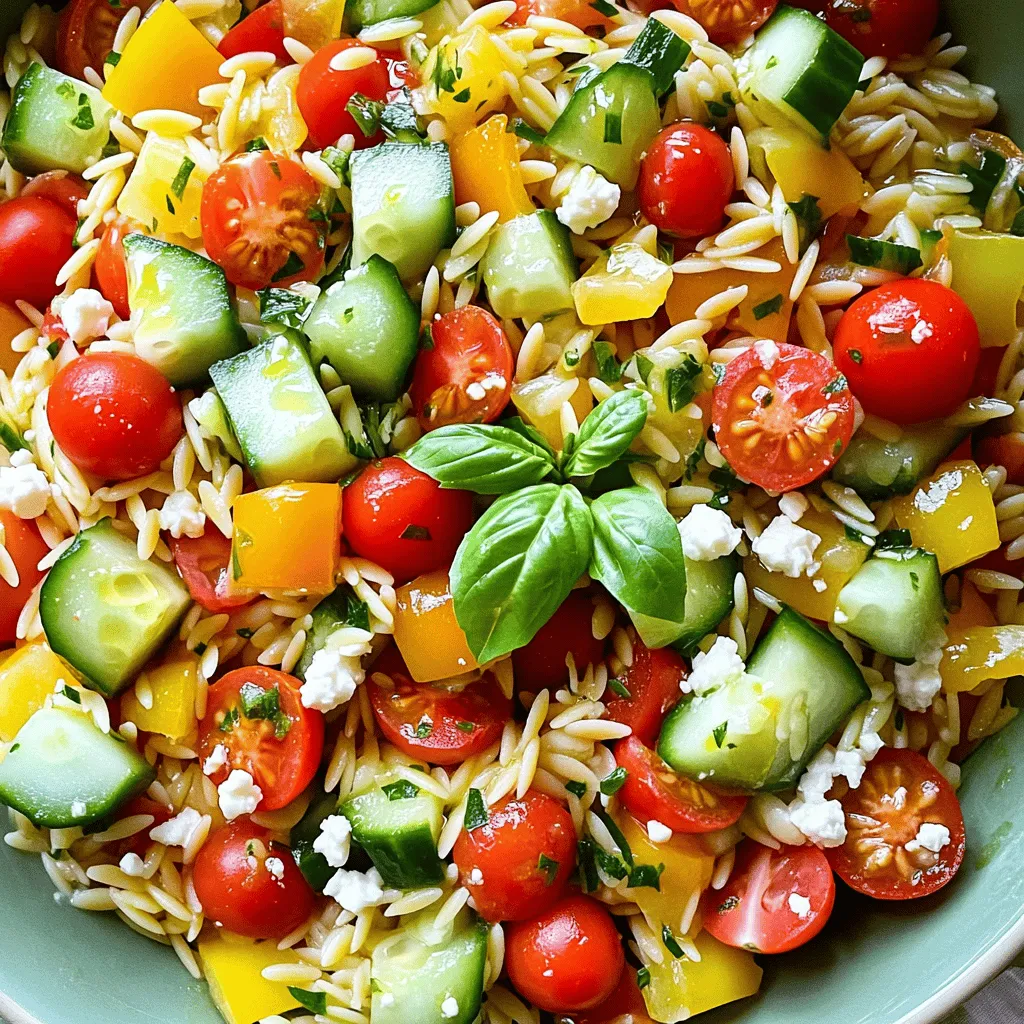
Looking for a fresh and vibrant dish to brighten your summer meals? This Orzo Summer Salad is the perfect choice!

To make Mango Sago dessert pudding, gather these simple ingredients: - 1 ripe mango, diced - 1 cup small tapioca pearls (sago) - 1 can (400ml) coconut milk - 1/2 cup sugar (adjust to taste) - 1/4 teaspoon salt - 1 cup water - 1/2 teaspoon vanilla extract - Extra mango slices and mint leaves for garnish When picking mangoes, look for ripe ones. They should feel slightly soft when you press them. Check for a sweet aroma near the stem. The skin may have some green or red hues, but color varies with type. Choose mangoes that are not too bruised or have dark spots. The best mangoes will have a smooth skin and vibrant color. Sago pearls add a fun, chewy texture to this dessert. They absorb flavors well, making each bite delightful. Coconut milk gives the pudding a rich, creamy taste. It also brings a hint of sweetness and a tropical essence. Together, sago and coconut milk create a perfect base for the fresh mango. This combination brings out the best in your Mango Sago dessert pudding. 1. First, bring 1 cup of water to a boil in a medium saucepan. 2. Add 1 cup of small tapioca pearls to the boiling water. Cook them for 15-20 minutes on medium heat. Stir occasionally until the pearls turn translucent. 3. Once cooked, drain the pearls and rinse them under cold water. This will stop the cooking process. Set them aside. 4. In the same saucepan, mix 1 can of coconut milk, 1/2 cup of sugar, and 1/4 teaspoon of salt. Heat over low-medium heat, stirring until the sugar dissolves. Do not boil. 5. When the coconut milk is warm, add the cooked sago pearls. Stir in 1/2 teaspoon of vanilla extract. Let it simmer for about 5 more minutes. 6. Remove the saucepan from heat and gently stir in the diced mango, saving a few pieces for garnish. 7. Pour the mixture into cups or dessert bowls and refrigerate for at least 2 hours to set. 8. Serve chilled, topping each pudding with reserved mango slices and mint leaves for a fresh touch. - Always use small tapioca pearls for this recipe. They cook faster and give a better texture. - Stir the pearls often while cooking. This helps to prevent them from sticking together. - If you notice the pearls are still hard after cooking, add a little more water and cook for a few extra minutes. - Rinsing the pearls after cooking is key. It stops the cooking and keeps them from getting gummy. - Ensure you measure the coconut milk accurately. Too much can make the pudding too thin. - The sugar helps to balance flavors but don’t add too much. Start with 1/2 cup and adjust as needed. - The sago pearls should be soft but still hold their shape. They should not be mushy. - Refrigerate the pudding long enough to let it set. This step is crucial for the right texture. You can find the Full Recipe for Mango Sago Bliss Pudding above. When making mango sago pudding, some mistakes can ruin your dish. First, don’t overcook the sago. If you do, it can turn mushy. Always keep an eye on the cooking time. Second, avoid using unripe mangoes. They can taste sour and spoil your dessert. Lastly, don’t skip rinsing the sago. This step stops the cooking and helps keep the pearls separate. To create a balanced flavor, focus on the sweetness. Start with half a cup of sugar, then taste the mix. If it needs more sweetness, add a bit more. The coconut milk brings a creamy texture, but too much can make it heavy. A pinch of salt enhances the flavor without making it salty. Finally, the vanilla extract adds warmth. Use it but don’t overdo it. Having the right tools makes cooking easier. You need a medium saucepan for cooking the sago and the coconut milk mix. A strainer is essential for rinsing the pearls. For mixing, a wooden spoon works well. Use measuring cups for accuracy, especially for the sugar and liquid. Small dessert cups or bowls are great for serving. These tools help you enjoy the process and make cooking fun. For the complete process, check the Full Recipe. {{image_2}} You can switch up the fruit in your Mango Sago Dessert Pudding. Try using pineapple or passionfruit for a tasty twist. Simply replace the mango with your chosen fruit. For pineapple, chop it into small pieces and mix it in. If you love passionfruit, scoop out the seeds and pulp. Blend it into the pudding for a tangy flavor. These tropical fruits add a new layer of freshness. You can explore flavors from different regions with these simple changes. If you want a vegan version, use maple syrup instead of sugar. You can also swap coconut milk for almond or cashew milk. This gives you a lighter dessert while keeping it creamy. For a sugar-free treat, choose sugar substitutes like stevia or erythritol. Both options keep the dessert sweet without added sugar. These adaptations make the dessert suitable for everyone, even those with dietary restrictions. Serving your Mango Sago Dessert Pudding can be fun. Use clear glass cups to show off the vibrant colors. Top each cup with extra mango slices and fresh mint leaves. This adds a pop of color and a nice aroma. You can also drizzle a bit of coconut cream on top for extra richness. For a special touch, serve with a small scoop of sorbet on the side. These ideas make your dessert not just tasty, but also beautiful. For the full recipe, check out the Mango Sago Bliss Pudding. To keep your mango sago dessert pudding fresh, store it in the fridge. Use airtight containers. This prevents the pudding from absorbing other smells. Make sure the pudding is fully cooled before covering it. This helps keep the texture smooth. You can keep leftovers for up to three days in the fridge. After three days, the texture may change. The sago may start to harden, and the flavors may fade. Always check for any signs of spoilage before consuming. If you want to refresh your chilled pudding, add a splash of coconut milk. This will help restore creaminess. Stir it well to blend. You can also serve it over crushed ice for a refreshing twist. Avoid reheating in the microwave, as it can change the pudding's texture. For the full recipe to make this delightful treat, check out the Mango Sago Bliss Pudding. Yes, you can use frozen mango. Just let it thaw before using. Other fruits like diced kiwi or strawberries also work. They add fun flavors and colors to the pudding. Fresh fruits give a nice texture, while frozen ones are handy and quick. Remember to taste and adjust sweetness if needed. If you can't find coconut milk, almond milk is a good choice. It has a light flavor and works well in desserts. You can also use cashew milk for a creamier texture. If you want a dairy option, whole milk or heavy cream can replace coconut milk too. Just keep in mind that it will change the taste slightly. You can make this pudding up to two days ahead. Just follow the recipe and chill it in the fridge. The flavors blend nicely when it sits. If you plan to serve it later, keep the mango garnish separate. Add that right before serving for the best look and taste. For the [Full Recipe], just follow the steps mentioned earlier. Enjoy your cooking! Mango Sago Bliss Pudding is a sweet treat that is perfect for warm days. This dessert is light, creamy, and packed with flavor. The main ingredients are ripe mangoes and small tapioca pearls, known as sago. - 1 ripe mango, diced - 1 cup small tapioca pearls (sago) - 1 can (400ml) coconut milk - 1/2 cup sugar (adjust to taste) - 1/4 teaspoon salt - 1 cup water - 1/2 teaspoon vanilla extract - Extra mango slices and mint leaves for garnish This recipe blends sweet mango with creamy coconut milk. The sago adds a chewy texture. Together, these flavors create a delightful experience. The key is to use ripe mangoes for the best taste. You start by cooking the sago pearls. Bring water to a boil in a pot. Add the sago and cook until they turn clear. This usually takes about 15 to 20 minutes. Stir occasionally to avoid clumping. After cooking, rinse them with cold water. This stops the cooking and keeps them chewy. Next, you mix the coconut milk, sugar, and salt in the same pot. Heat it gently. Stir until the sugar dissolves but do not let it boil. This helps make the pudding smooth and sweet. After your coconut milk is ready, add the cooked sago and vanilla extract. Stir well and simmer for 5 minutes. Then, mix in your diced mango, saving some for garnish. Pour the mix into cups and chill in the fridge for at least 2 hours. When ready to serve, top with extra mango slices and fresh mint leaves. This makes your dessert look beautiful and inviting. The mix of colors and flavors will make your taste buds dance. This Mango Sago Bliss Pudding is a refreshing treat that everyone will love. For the full recipe, check the above section. Enjoy every creamy spoonful! Mango Sago Dessert Pudding combines fresh ingredients for a sweet treat. We explored the best mangoes and the role of sago and coconut milk. I shared easy steps for cooking and tips to perfect your pudding. Remember to avoid common mistakes and consider fun variations. Store leftovers well to enjoy later, and feel free to adapt the recipe. Dive in and create your own Mango Sago Bliss today! You’ll love the taste and texture.

Mango Sago Dessert Pudding Delightfully Refreshing Treat

Craving a cool treat? Mango Sago Dessert Pudding is a delicious way to beat the heat! This tropical dessert combines

Older posts
Newer posts
← Previous Page1 … Page66 Page67 Page68 … Page84 Next →

dsad

© 2026 Foodish Talk • Built with GeneratePress

Our Policies

  • Copyright Policy
  • Cookie Policy
  • GDPR Policy
  • Privacy Policy
  • Disclaimer
  • Terms Of Use

More Information

  • Home
  • About
  • Contact
  • Appetizers
  • Dessert
  • Dinner
  • Drinks
©2026, Foodish Talk About Back To Top