![To make mini vegan lemon tarts, gather these fresh ingredients: - 1 cup almond flour - 2 tablespoons coconut oil, melted - 2 tablespoons maple syrup - 1/4 teaspoon salt - 1 cup cashews, soaked for at least 4 hours and drained - 1/2 cup coconut milk - 1/4 cup fresh lemon juice - 1/4 cup maple syrup (for filling) - 1 tablespoon lemon zest - 1 teaspoon vanilla extract - Fresh berries and mint leaves for garnish (optional) These ingredients work together to create a bright, zesty flavor in each bite. If you want to switch things up, you can try these alternatives: - Use oat flour instead of almond flour for a gluten-free crust. - Swap coconut oil for vegan butter if you prefer a different taste. - You can use agave syrup instead of maple syrup for sweetness. - Try silken tofu in place of cashews for a creamy filling. These alternatives keep the recipe vegan while offering unique flavors. Using high-quality ingredients makes a big difference in taste. Fresh lemons add brightness, while good cashews give a creamy texture. When you choose organic or local products, you enhance flavor and nutrition. Great ingredients lead to a great dish, so always opt for the best! This attention to detail helps you create mini vegan lemon tarts that are delightful and fresh. For the complete recipe, check out the Full Recipe section. To make the crust, you need to mix a few simple ingredients. Grab a mixing bowl. Combine 1 cup of almond flour, 2 tablespoons of melted coconut oil, 2 tablespoons of maple syrup, and a pinch of salt. Use a spatula or your hands to mix. Keep mixing until the dough feels soft and slightly sticky. Next, preheat your oven to 350°F (175°C). While it heats, prepare a mini muffin tin. Grease it with some non-stick spray or a bit of coconut oil for easy removal later. Once the oven is ready, press the dough evenly into each muffin cup. Make sure the dough covers the bottom well. When baking the crust, watch the clock closely. Bake for 10 to 12 minutes. You want the edges to turn a light golden color. If you see any browning, your crust is ready. After baking, take the tin out of the oven and let it cool completely. This cooling step is key. It helps the crust hold its shape when you add the filling. Now, it's time for the filling! Start with 1 cup of soaked cashews. Make sure they soaked for at least 4 hours and then drained. Add them to a blender along with 1/2 cup of coconut milk, 1/4 cup of fresh lemon juice, 1/4 cup of maple syrup for sweetness, 1 tablespoon of lemon zest, and 1 teaspoon of vanilla extract. Blend these together until the mixture becomes smooth and creamy. If you need to, stop the blender and scrape down the sides. This helps mix everything evenly. Once blended, your filling is ready to pour into the cooled crusts, following the [Full Recipe]. When baking vegan, use fresh ingredients. Fresh fruits and nuts add flavor. Measure ingredients carefully. Accurate measurements lead to better results. Always soak cashews for a smooth filling. This step is key for a creamy texture. Do not skip chilling the tarts. Skipping this step makes the filling runny. Avoid over-blending the filling. Over-blending can make it too thin. Also, ensure your oven is preheated. Baking in a cold oven can ruin the crust. To get a creamy filling, blend soaked cashews well. Add coconut milk slowly for the right consistency. Lemon juice adds tang, so measure it carefully. Adjust sweetness by adding more maple syrup if needed. Chill the tarts long enough for them to set. This will help the filling hold its shape. For the best results, follow the Full Recipe closely. {{image_2}} You can give your mini vegan lemon tarts a twist by adding herbs or spices. Fresh basil or mint can enhance the tart's flavor. Simply blend a few leaves into your filling. For a warm touch, try adding a pinch of ginger or cardamom. This can create a unique taste that surprises your guests. If you need a gluten-free crust, almond flour works great. You can also use oat flour or a gluten-free blend. Just follow the same steps in the recipe. These options will give you a delicious tart without the gluten. Make sure to check labels for any hidden gluten. To make the tarts nut-free, replace cashews with silken tofu. It will still give you a creamy texture. For sugar-free options, use a sugar substitute like monk fruit sweetener or stevia. Adjust the amount based on your taste. You can still enjoy these delightful tarts while meeting your dietary needs. Explore the [Full Recipe](#) for more details on making these tasty treats! To keep your mini vegan lemon tarts fresh, store them in the fridge. Place them in an airtight container. This will help them stay cool and tasty for longer. Make sure the tarts are fully chilled before putting them away. They can last up to five days in the fridge. If you want to keep the tarts longer, freezing is a great option. First, let the tarts cool completely. Then, wrap each tart in plastic wrap. After that, place them in a freezer-safe bag or container. This helps prevent freezer burn. You can freeze them for up to three months. When you want to eat them, thaw them in the fridge overnight. Mini vegan lemon tarts taste best within a few days. After five days, they might lose some flavor and texture. For the best experience, enjoy them fresh. If you have extra tarts, freezing is the way to go. This ensures you can savor their bright lemon flavor anytime. For the full recipe, check out the section above. Yes, you can make these tarts ahead of time. Once you prepare the tarts, chill them in your fridge. They taste great after a few hours or even the next day. This makes them a perfect dessert for parties or special meals. Just keep them covered to maintain freshness. If you can't use cashews, try silken tofu or sunflower seeds. Both can give a creamy texture. Soak the sunflower seeds for a few hours to soften them. Blend them with the other filling ingredients, just like you would with cashews. This swap keeps the tarts tasty and smooth. You know the tarts are ready when the filling feels firm to the touch. After chilling, gently press the center. If it holds its shape and doesn't jiggle, it's set. You can also check if the edges look firm. Let them cool completely before serving for the best taste. For more details, check the Full Recipe. You learned how to make mini vegan lemon tarts with great flavor and texture. We covered key ingredients and their quality. You now have the steps to prepare the crust and filling. I shared tips for baking and common mistakes to avoid. Plus, you saw variations for different diets and tastes. Lastly, you learned how to store these treats. Enjoy your baking journey and impress others with your delicious vegan tarts!](https://foodishtalk.com/wp-content/uploads/2025/07/996d0413-c700-4c0a-8fed-4aa4b2ce966c.webp)
Mini Vegan Lemon Tarts Delightful and Fresh Treat
Are you ready to brighten your dessert table? These Mini Vegan Lemon Tarts are the perfect blend of tart and
Are you ready to brighten your dessert table? These Mini Vegan Lemon Tarts are the perfect blend of tart and
![To make the Blue Violet Gradient Drink, you will need: - 1 cup blue spirulina powder - 1 cup coconut water - 1 cup violet butterfly pea flower tea, cooled - 1 lime, juiced - Ice cubes If you like your drink sweeter, you can add: - 1 tablespoon honey or agave syrup For a touch of flair, consider these garnishes: - Fresh mint leaves for garnish These ingredients create a colorful and tasty drink. Each one plays a key role in the drink's look and flavor. The blue spirulina adds a vibrant hue and health benefits. Coconut water gives a tropical twist. The butterfly pea flower tea adds a lovely violet color. Lime juice gives it a refreshing zing. Feel free to adjust the sweetness. The optional honey or agave syrup can make a big difference. Finally, fresh mint leaves not only enhance the look but also add a fresh aroma. You can find the Full Recipe at the end of this section. To make butterfly pea flower tea, start with dried flowers. Use 1-2 teaspoons and add them to hot water. Let them steep for about 10 minutes. You want a deep blue color. After steeping, strain the tea to remove the flowers. Allow the tea to cool. This step is vital for a lovely gradient. Now it’s time to blend the base mixture. Grab a blender and add these ingredients: - 1 cup blue spirulina powder - 1 cup coconut water - 1 lime, juiced - 1 tablespoon honey or agave syrup (optional) Blend until the mix is smooth and frothy. The bright blue color will excite you. This mixture is the base for your drink. Get a tall glass and fill it with ice cubes. Pour the spirulina mixture over the ice, filling the glass halfway. Next, take your cooled butterfly pea flower tea. Pour it gently over the back of a spoon. This trick lets the tea float on top of the spirulina layer. You will see a stunning blue-violet gradient. It looks great and tastes even better! Enjoy your Blue Violet Gradient Drink! For the complete recipe, check the [Full Recipe]. To get that stunning blue-violet gradient, pour slowly. Start with the spirulina mix over ice. Then, use the back of a spoon to add the butterfly pea tea. This method helps it float. If you pour too fast, the colors will mix. You want the layers to stay separate. Feel free to tweak the taste! If you prefer a sweeter drink, add more honey or agave syrup. For more tartness, squeeze in extra lime juice. You can even try flavored coconut water for a twist. Each change will give you a unique drink. A good-looking drink makes it even better! Use clear glasses to show off the layers. Add fresh mint leaves on top for color and aroma. You can also use a slice of lime on the rim for a nice touch. This drink is all about beauty and taste, so make it shine! {{image_2}} You can choose many sweeteners for your Blue Violet Gradient Drink. Honey and agave syrup work well. If you want a healthy option, try stevia or monk fruit. They add sweetness without the extra sugar. Adjust the amount based on your taste. Just remember, less is often more! Want to mix it up? You can add different flavors to your drink. Try fresh fruit juices like pineapple or orange for a tropical twist. You can also add a splash of vanilla extract for a smooth taste. Experiment with different herbs, like basil or rosemary, for a unique touch. Each flavor brings a new vibe to your drink. Layering your drink is fun and easy! You can use other colorful drinks to create stunning layers. For example, try using pomegranate juice or raspberry puree. These add bright contrast and taste. Pour slowly over the back of a spoon to keep the layers separate. Mix and match colors for a beautiful effect. The more colors, the more fun! Storing leftover Blue Violet Gradient Drink is easy. Pour any extra drink into a clean, airtight container. You can keep it in the fridge for up to two days. Make sure to seal it well to prevent any flavors from mixing with other foods. To keep your drink fresh, store the spirulina mixture and butterfly pea tea separately. This helps maintain the drink's layers and flavors. When you're ready to serve, just mix the two again over ice. This way, you can enjoy that stunning gradient each time. This drink is best served cold. If you want to repurpose it, try using it as a smoothie base. Blend it with fruits like bananas or mangoes for a new treat. You can also freeze it into popsicles for a fun summer snack. The possibilities are endless! Blue spirulina is full of nutrients. It is high in protein, vitamins, and minerals. It boosts energy and supports your immune system. Spirulina also contains antioxidants, which help fight free radicals. These can cause cell damage. Adding blue spirulina to your diet may improve overall health and wellness. This makes it a great choice for a refreshing drink. Yes, you can use fresh butterfly pea flowers. Just steep them in hot water. This will create a lovely blue color. The flavor may differ slightly, but it will still taste great. Make sure to strain the flowers after steeping. This will give you a smooth drink. You can still make the drink without a blender. Mix the blue spirulina powder with coconut water using a whisk or fork. Stir until there are no lumps. Then, pour this mixture over ice in your glass. Slowly add the cooled butterfly pea flower tea over a spoon for the gradient effect. It may take a little more effort, but the drink will still look and taste amazing! This blog post covered all you need to create a stunning butterfly pea flower drink. We explored required and optional ingredients, along with step-by-step instructions for blending. I shared tips for the perfect gradient and variations to personalize your drink. Remember, presentation matters too. Store any leftovers properly to keep freshness. Try different flavors or sweeteners to find your favorite. Enjoy making this colorful drink, and impress your friends with your skills!](https://foodishtalk.com/wp-content/uploads/2025/07/e81d922f-f50f-490e-8796-dfe95e4c4116.webp)
Are you ready to impress your friends with a stunning and tasty Blue Violet Gradient Drink? This drink is not
![For One-Pan Honey BBQ Chicken Rice, gather these key ingredients: - 4 boneless, skinless chicken thighs - 1 cup long-grain rice - 2 cups low-sodium chicken broth - 1 cup BBQ sauce (your favorite) - 1 tablespoon honey - 1 tablespoon olive oil - 1 red bell pepper, diced - 1 cup frozen peas - 2 cloves garlic, minced - 1 teaspoon paprika - Salt and pepper to taste - Chopped green onions for garnish These items form the backbone of the dish. The chicken brings protein, while rice offers a hearty base. Adding veggies like bell pepper and peas boosts color and nutrition. You can enhance the dish with these optional ingredients: - Lemon juice for brightness - Chili flakes for a spicy kick - Fresh herbs like parsley or cilantro These extras can make the dish more exciting. A splash of lemon adds freshness, while herbs bring depth. If you can't find something, here are some swaps: - Chicken thighs can be replaced with breasts, but they may dry out. - Brown rice works if you adjust cooking time. - Any BBQ sauce will do, but try to choose one you love. Using substitutes can still yield tasty outcomes. Just remember to tweak cooking times for different rice or chicken cuts. Enjoy experimenting! For the complete recipe, check out the [Full Recipe]. Start by gathering all your ingredients. For this dish, you need chicken thighs, rice, chicken broth, BBQ sauce, honey, olive oil, red bell pepper, peas, garlic, paprika, salt, and pepper. 1. Heat the olive oil in a large skillet over medium-high heat. 2. Season the chicken thighs with salt, pepper, and paprika. This adds flavor. 3. Place the chicken in the pan and sear it for about 5 minutes on each side. Look for a golden-brown color. 4. Once done, remove the chicken and set it aside on a plate. Now, let’s build flavor in the same pan. 1. Add minced garlic and diced red bell pepper to the pan. Sauté for 2-3 minutes. You want them soft but not mushy. 2. Stir in the long-grain rice. Make sure it gets coated with the oil and flavors from the pan. Cook for 1-2 minutes. This helps the rice absorb flavors. 3. Pour in 2 cups of chicken broth and bring it to a gentle boil. While the mixture boils, let's prepare the honey BBQ sauce. 1. In a small bowl, mix your favorite BBQ sauce with honey. This will give a sweet and tangy flavor. 2. Return the seared chicken thighs to the pan. Spoon the honey BBQ mixture over them. 3. Reduce the heat to low, cover the pan, and let it simmer for 20 minutes. The rice will cook and absorb the broth. 4. About 5 minutes before it's done, add frozen peas on top. Do not stir. The steam will cook them perfectly. 5. Once finished, remove from heat. Let it sit, covered, for 5 minutes. Then fluff the rice with a fork and garnish with chopped green onions. Follow these steps for a delicious one-pan meal! You can find the Full Recipe for more details. When cooking chicken, start with high-quality meat. I prefer boneless, skinless thighs for their rich flavor. Always season the chicken with salt and pepper. This basic step enhances the taste. Sear the chicken until it's golden brown. This step gives the chicken a nice crust. It also locks in moisture. Remember to let the chicken rest after cooking. This helps keep it juicy. For perfect rice, rinse it before cooking. Rinsing removes excess starch and prevents clumping. Use long-grain rice for the best texture. I always measure the broth carefully. The right liquid-to-rice ratio is key. Bring the broth to a boil before adding the rice. Stir it gently and cover the pan. Avoid lifting the lid while it cooks. This lets steam escape, which can ruin the rice. To boost flavor, try using a mix of BBQ sauce and honey. This combo gives a sweet and tangy taste. Adding garlic and red bell pepper during cooking builds depth. Frozen peas add color and a pop of sweetness. Finish with chopped green onions for freshness. They add crunch and a bright flavor. For a smoky twist, consider adding a pinch of smoked paprika. Each of these tips makes your one-pan honey BBQ chicken rice even more delicious. For the full recipe, check out the previous section. {{image_2}} You can make a tasty vegetarian version of this dish. Instead of chicken, try using chickpeas or tofu. Both options add protein and texture. Cook the chickpeas or tofu in the same way as the chicken. Use the same spices to keep the flavor strong. You can also add more veggies, like zucchini or carrots, for extra nutrition. If you want a spicy kick, add some chili powder or diced jalapeños. For a tangy twist, mix in some apple cider vinegar or a splash of lime juice. You can also try using different BBQ sauces. Experiment with fruity sauces like mango or peach for a sweet touch. These small changes can make your meal more exciting. Seasons change, and so can your ingredients! In spring, add fresh asparagus or snap peas to your rice. In summer, use diced tomatoes or corn. For fall, consider pumpkin or butternut squash. In winter, root vegetables like sweet potatoes work well. Each season brings new flavors, so don't hesitate to switch things up. You can find the Full Recipe to try these variations and create your own special dish! To keep your One-Pan Honey BBQ Chicken Rice fresh, let it cool first. Place the leftovers in an airtight container. Make sure to separate the rice from the chicken if you prefer. Store it in the fridge for up to three days. This helps maintain the best flavor and texture. If you plan to eat it later, storing it properly is key. When you're ready to enjoy the leftovers, use the stovetop or microwave. For the stovetop, add a splash of water or broth to the pan. Heat on low, stirring gently until warmed through. This keeps the rice moist and fluffy. If using a microwave, cover the dish with a damp paper towel. Heat in short bursts, stirring in between, until hot. This method prevents the rice from drying out. You can freeze One-Pan Honey BBQ Chicken Rice for longer storage. Use a freezer-safe container or bag. It stays good for up to three months. When you’re ready to eat, thaw it overnight in the fridge. To reheat, follow the same stovetop or microwave methods above. This way, you’ll enjoy a quick, tasty meal without losing flavor. Yes, you can use brown rice. Brown rice has more fiber and nutrients. It takes longer to cook, so adjust the cooking time. You’ll need about 1.5 cups of chicken broth. Brown rice adds a nice texture and nutty flavor. Check the chicken's internal temperature with a meat thermometer. It should reach 165°F (75°C). The juices should run clear, not pink. Cut into the thickest part to check for doneness. If it looks white and firm, it’s ready. I recommend using your favorite BBQ sauce. Sweet, smoky, or tangy sauces work well. You can try a honey BBQ sauce for extra sweetness. A spicy version adds a kick, if you like heat. Experiment with different flavors for fun! For the complete steps to make this dish, refer to the Full Recipe. This post covered the key ingredients, simple steps, and smart tips for making chicken and rice. You learned about essential and optional ingredients, plus how to switch them out. I shared methods to cook chicken and rice together for tasty results. Lastly, you found storage advice and answers to common questions. Enjoy experimenting with flavors and making this dish your own!](https://foodishtalk.com/wp-content/uploads/2025/07/b5a00583-3b33-44cd-86fb-bb1bd9d40b92.webp)
Looking for a simple, tasty meal prep idea? You’re in the right place! This One-Pan Honey BBQ Chicken Rice recipe
![- 1 lb (450g) chicken breast, thinly sliced - 1 cup raw cashews - 1 red bell pepper, sliced - 1 green bell pepper, sliced - 1 small onion, sliced - 3 cloves garlic, minced - 1 tablespoon grated ginger - 1 cup broccoli florets You start with chicken breast, as it cooks fast and stays juicy. Cashews add a great crunch. Use fresh vegetables like bell peppers, onion, and broccoli for color and nutrition. They keep the dish light and vibrant. - 3 tablespoons soy sauce - 1 tablespoon oyster sauce (or mushroom sauce for a vegetarian option) - 1 tablespoon fish sauce (optional for extra depth) These sauces bring umami to the dish. Soy sauce adds saltiness, while oyster sauce gives sweetness. Fish sauce, though optional, deepens the flavor. You can skip it if you want a lighter dish. - 1 tablespoon cornstarch - 2 tablespoons vegetable oil - 2 teaspoons sesame oil Cornstarch is your thickener. It helps the sauce cling to the chicken and veggies. Vegetable oil is perfect for high heat, while sesame oil adds a nutty flavor at the end. For the full recipe, check out the details above. 1. Prepare the cornstarch mixture. In a small bowl, mix 1 tablespoon of cornstarch with 1 tablespoon of water. This thickens the sauce later. 2. Slice the chicken and vegetables. Cut 1 pound of chicken breast into thin strips. Slice 1 red bell pepper, 1 green bell pepper, and 1 small onion. Mince 3 cloves of garlic and grate 1 tablespoon of ginger. This helps in quick cooking and even flavor. 1. Toast the cashews. Heat 1 tablespoon of vegetable oil in a large skillet or wok over medium-high heat. Add 1 cup of raw cashews and toast them for 2-3 minutes until they turn golden. Remove them and set aside. 2. Stir-fry the chicken and vegetables. In the same skillet, add another tablespoon of vegetable oil. Once hot, add the sliced chicken with a pinch of salt and pepper. Cook for 5-7 minutes until the chicken is done. Take it out and set aside. 3. In the skillet, add the sliced onion, minced garlic, and grated ginger. Stir-fry for about 1 minute until fragrant. Then, add 1 cup of broccoli florets and the sliced bell peppers. Stir-fry for another 3-4 minutes until the veggies are crisp-tender. 1. Add the cooked chicken back to the skillet. Pour in 3 tablespoons of soy sauce, 1 tablespoon of oyster sauce, and 1 tablespoon of fish sauce if you want extra depth. Add 2 teaspoons of sesame oil too. Stir everything well for about 2 minutes. 2. Now, slowly pour in the cornstarch mixture while stirring. Cook for another minute until the sauce thickens and coats the chicken and veggies nicely. 3. Finally, sprinkle the toasted cashews over the stir fry. Toss everything together before removing it from heat. When you serve this dish, make sure to enjoy it over fluffy jasmine rice for the best taste! For the complete step-by-step guide, check out the Full Recipe. To make a great stir fry, start by adjusting flavors to suit your taste. Taste the sauce before adding it to the pan. If you want it sweeter, add more soy sauce or a bit of sugar. For more heat, try adding some chili flakes. Cooking times matter for crisp-tender vegetables. Stir-fry broccoli for about three to four minutes. This keeps it bright and crunchy. Always add the softer vegetables, like bell peppers, later. This way, they stay tasty. For the best results, use a non-stick skillet or a wok. These pans heat evenly and let food slide easily. If you want a great sear, use a heavy cast iron skillet. High heat is key for stir frying. It cooks food fast and keeps flavors locked in. Make sure to preheat your pan before adding oil. This helps achieve that perfect crisp. Garnish your dish for a visual treat. Top with extra cashews for crunch. A sprinkle of green onions adds color and freshness. Serve your stir fry over fluffy jasmine rice. The rice soaks up the tasty sauce. This makes each bite better. Enjoy a colorful dish that looks as good as it tastes. For the complete recipe, check out the [Full Recipe]. {{image_2}} You can make Thai Cashew Chicken Stir Fry vegetarian or vegan. To do this, replace the chicken with tofu or tempeh. Use mushroom sauce instead of oyster sauce. This keeps all the flavor without meat. For a gluten-free version, swap soy sauce with tamari. This simple change keeps the dish safe for those with gluten issues. Feel free to play with nuts and proteins. Instead of cashews, try peanuts or almonds. These nuts add a different taste. You can also use shrimp, beef, or pork if you prefer meat. For veggies, add snap peas, carrots, or zucchini. These can change the stir fry’s look and taste. Want more heat? Add chili peppers like Thai bird's eye or serrano. Slice them thin and toss them in while cooking. This gives the dish a nice kick. If you want a milder flavor, skip the chili peppers. Use sweet bell peppers instead. They add color and taste without the heat. To keep your Thai Cashew Chicken Stir Fry fresh, store leftovers in the fridge. Use airtight containers to prevent air from drying out the food. If you have a lot left, divide it into smaller portions. This makes it easy to grab a quick meal later. When it's time to eat, you want to reheat without losing texture. The best method is using a skillet over medium heat. Stir often to warm it evenly. If you're in a hurry, the microwave works too. Heat in short bursts of 30 seconds, stirring in between, until hot throughout. If you want to freeze your stir fry, let it cool first. Use freezer-safe containers or bags. Press out as much air as you can to avoid freezer burn. For best taste, eat within three months. To reheat, thaw in the fridge overnight, then heat in a skillet or microwave. How to make Thai Cashew Chicken Stir Fry spicy? To add spice, include sliced fresh chili peppers. You can also add chili paste or sriracha. Start with a little, then increase to your taste. This will give your dish a nice kick. Can I make this dish ahead of time? Yes, you can prepare this dish ahead. Cook the chicken and veggies, then store them in the fridge. When ready to eat, just reheat and add the sauce. This saves time on busy nights. Caloric content per serving Each serving has about 400 calories. This can vary based on how much oil and sauce you use. It is a hearty meal that fills you up without being too heavy. Health benefits of the ingredients - Chicken breast is lean and a great protein source. - Cashews provide healthy fats and vitamins. - Broccoli is packed with fiber and vitamins C and K. - Bell peppers bring in antioxidants and add color. These ingredients work together to create a balanced dish. What to serve with Thai Cashew Chicken Stir Fry? Serve this dish over cooked jasmine rice. The rice soaks up the sauce well. You can also use quinoa or cauliflower rice for a low-carb option. Pairing options for a complete meal Try pairing this dish with a simple cucumber salad. The freshness of the salad balances the rich flavors. You can also serve spring rolls on the side for a fun twist. For the full recipe, check out the details above. This blog post covered all the essentials for making a delicious Thai Cashew Chicken Stir Fry. We discussed the main ingredients, cooking methods, and tips to perfect your dish. You can adapt the recipe for dietary needs or different tastes. Remember to store leftovers properly for freshness. Enjoy the burst of flavors, and don't hesitate to get creative with ingredients. This meal can be simple, tasty, and healthy. With practice, you’ll impress everyone at the table. Happy cooking!](https://foodishtalk.com/wp-content/uploads/2025/07/ce7663e8-45f2-44b5-8667-e41cf73e8579.webp)
Looking for a quick, tasty meal? Thai Cashew Chicken Stir Fry is your answer! This dish combines tender chicken, crunchy
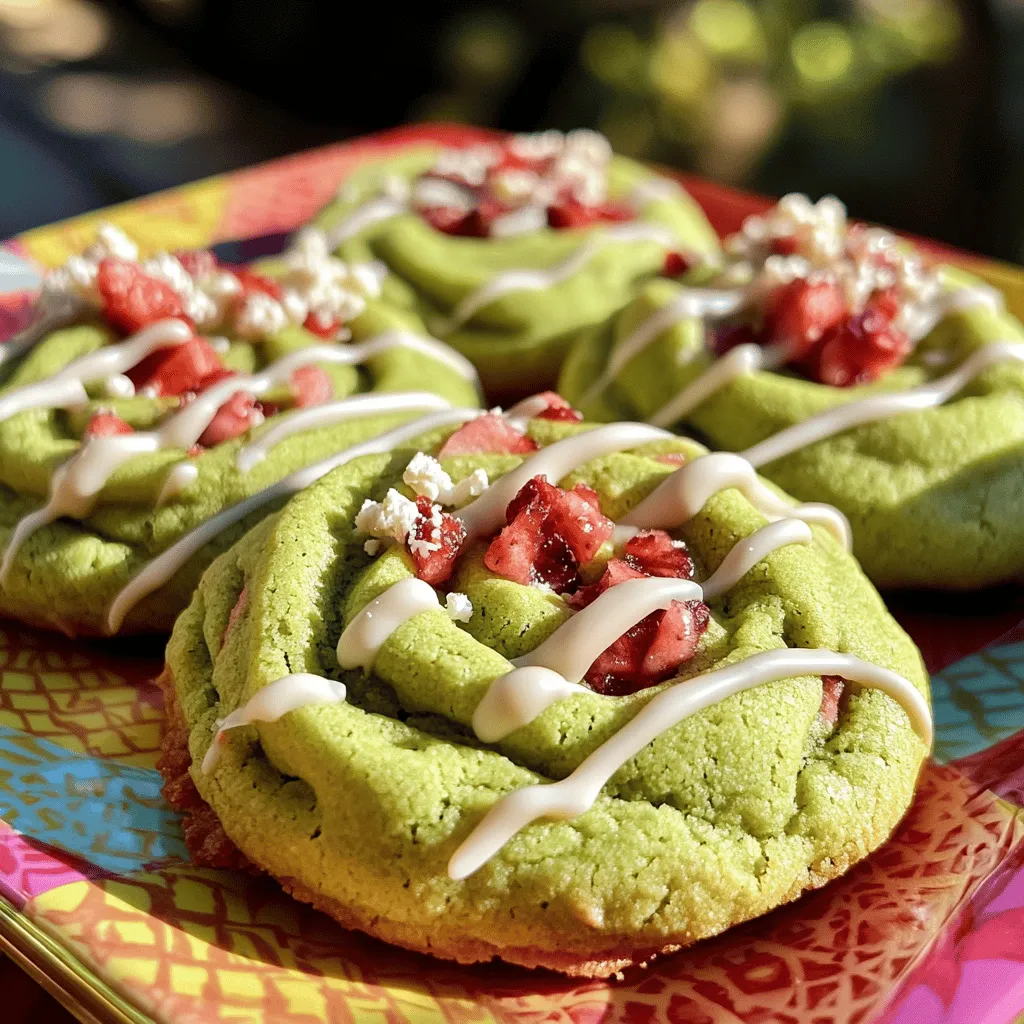
Ready to bake a treat that’s as beautiful as it is delicious? These Swirled Strawberry Matcha Cookies are a fun
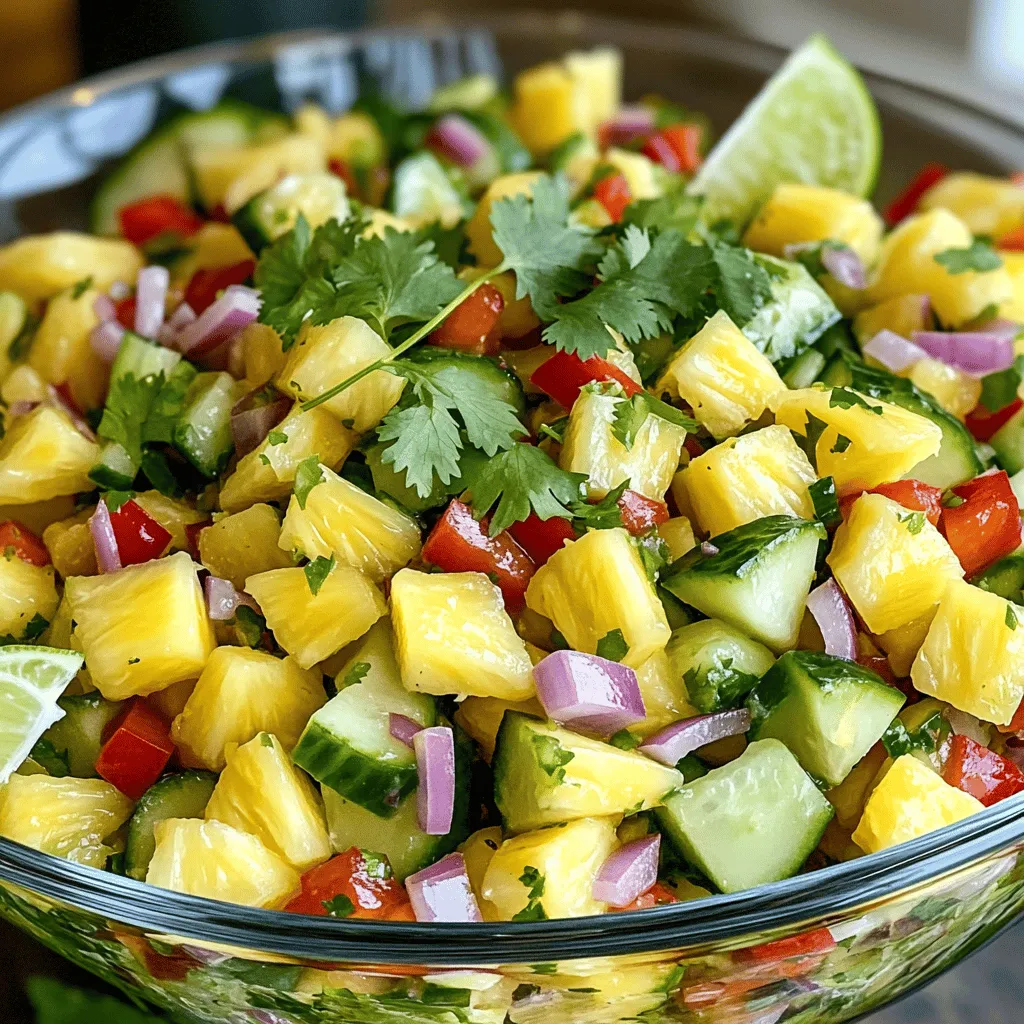
If you’re looking for a bright, tasty dish that boosts your health, try my Pineapple Cucumber Salad. This simple recipe
. {{image_2}} To give your bow tie pasta salad a Mediterranean twist, add sun-dried tomatoes and artichokes. These ingredients bring a rich flavor that brightens each bite. You can also try mixing in fresh herbs like oregano or dill. These herbs add a fresh pop that complements the tangy feta cheese. For a fun Asian-inspired version, use sesame oil and soy sauce as your dressing. This adds a nutty flavor that pairs well with the pasta. You can also add colorful carrots and crunchy edamame. These ingredients not only taste great but also make your salad look vibrant and fresh. Seasonal vegetables can make your pasta salad even better. In the summer, try adding zucchini for a light, fresh taste. In the fall, roasted root vegetables like carrots and sweet potatoes work wonders. These swaps ensure your salad stays exciting throughout the year. Feel free to explore these variations for a new take on your bow tie pasta salad! You can find the full recipe [here](#). Store your leftover salad in an airtight container. This keeps the salad fresh and safe. Place it in the fridge right after serving. Bow tie pasta salad stays fresh for about 3 to 5 days. Always check for any changes in smell or texture before eating. You can freeze pasta salad, but it may change texture. If you choose to freeze it, make sure to use a freezer-safe container. Divide the salad into portions to make it easier to thaw later. When you’re ready to eat, place the salad in the fridge overnight to thaw. Avoid refreezing after thawing. When reheating, focus on keeping the texture nice. Use a microwave for quick reheating, but do it in short bursts. Stir the salad between bursts to heat it evenly. If your salad seems dry, add a splash of olive oil or vinegar to freshen it up. This keeps everything tasty and vibrant. Bow Tie Pasta Salad can last about 3 to 5 days in the fridge. For best taste, eat it within this time. Store it in an airtight container. This keeps it fresh and safe. Yes, you can make this pasta salad ahead of time. In fact, it tastes better after chilling. Prepare it a day before serving. Just follow these best practices: - Store it in a sealed container. - Let it cool completely before refrigerating. - Mix it again before serving to refresh the flavors. To make your pasta salad pop, try these suggestions: - Spices and Herbs: Fresh basil, oregano, or dill add great taste. - Crunchy Additions: Add nuts like walnuts or almonds for texture. You can also try crispy veggies like carrots or bell peppers. These tips will bring your dish to the next level! Bow tie pasta salad is simple and fun to make. We covered key ingredients, cooking tips, and variations. Remember to choose fresh veggies and don’t overcook the pasta. Feel free to customize the salad with flavors you love. Practice these tips, and your salad will shine at any meal. Enjoy creating your perfect dish!](https://foodishtalk.com/wp-content/uploads/2025/07/a18d47cf-1772-4758-b947-974ac8cdcd4c.webp)
Looking to spice up your meal routine? This Bow Tie Pasta Salad is fresh, vibrant, and bursting with flavor! Packed
![- Ripe peaches - Arugula or mixed greens - Fresh basil leaves - Burrata cheese - Toasted walnuts - Balsamic glaze - Olive oil - Salt and pepper The key to a great Peach Burrata Salad lies in fresh and quality ingredients. Start with ripe peaches. They should be soft and fragrant. Choose arugula or mixed greens as your base. Their peppery flavor pairs well with sweet peaches. Fresh basil leaves add a nice touch of aroma and color. For the creamy element, you need burrata cheese. It has a rich, milky flavor that enhances the dish. Next, add toasted walnuts for crunch. Their nutty taste adds depth to the salad. Don't forget the balsamic glaze. It brings sweetness and acidity, balancing the flavors. A drizzle of olive oil adds richness. Finally, season with salt and pepper to taste. For the complete recipe, check out the [Full Recipe]. 1. Wash and slice peaches: Start by rinsing the peaches under cool water. Make sure no dirt remains. Slice them into thin wedges. Set the slices aside on a plate to keep them fresh. 2. Prepare the greens: Take 4 cups of arugula or mixed greens. Rinse them gently under cold water. Spin them dry in a salad spinner or pat them with a clean towel. Place the greens in a large serving bowl. This will be the base of your salad. 1. Layering technique for optimal presentation: Begin layering the salad. Spread the greens evenly at the bottom. Next, arrange the peach slices over the greens. This adds a colorful look. 2. Adding burrata and walnuts: Tear the 200g of burrata into pieces. Scatter the burrata on top of the peach slices. It adds a creamy texture. Now, sprinkle 1/4 cup of toasted walnuts across the salad. This gives you a nice crunch. 1. Drizzling oils and seasonings: Grab your 2 tablespoons of olive oil and 1/4 cup of balsamic glaze. Drizzle them over the salad. This adds flavor and richness. 2. Tossing lightly without damaging burrata: Now, season with salt and pepper to taste. Gently toss the salad. Be careful not to break the burrata. You want to keep its lovely shape. Enjoy your beautiful Peach Burrata Salad with Balsamic Drizzle! For the full recipe, check out the details above. - Look for peaches that are slightly soft when you press them. - They should smell sweet and fragrant. - Choose yellow or orange peaches for the best flavor. - I recommend using freestone varieties, like Yellow Peach or Donut Peach. - To tear burrata without a mess, use your fingers gently. - Avoid using a knife, as it can cause the cheese to ooze out. - Serve burrata at room temperature for the best taste and texture. - Place it on top of the salad, so it stays intact until you eat it. - Drizzle honey on top for a sweet touch. - Add a pinch of red pepper flakes for a spicy kick. - Consider balsamic vinegar instead of glaze for a tangy flavor. - Fresh herbs like mint or thyme can add depth to your dish. For the full recipe, check out the Peach Burrata Bliss Salad. {{image_2}} You can add protein to your salad for extra flavor. Grilled chicken is a great choice. It adds a nice smoky taste. Shrimp is another option. It cooks quickly and pairs well with peaches. If you prefer plant-based options, try chickpeas or lentils. They add protein and fiber. Tofu is also a great option. It soaks up flavors and adds a nice texture. Feel free to get creative with your ingredients. Try using different nuts like pecans or almonds. They will give your salad a unique crunch. Swap out arugula for spinach or kale for a different flavor. You can also change the dressing. A honey mustard vinaigrette can add a sweet twist. A citrus dressing will give it a fresh kick. Just make sure the flavors blend well with the peaches. This salad is perfect for many occasions. It works well as a light lunch or a side at dinner. Pair it with grilled meats for a complete meal. It also goes great with a crusty baguette. For special events, serve it on a large platter. It makes a beautiful presentation. Add extra balsamic drizzle on top for a lovely touch. You can find the Full Recipe for this delightful salad to try at home! To store leftover salad, place it in an airtight container. This keeps moisture in and air out. You can also use a glass jar or a bowl with a lid. Make sure to cover the salad tightly. This helps keep the flavors fresh. Your peach burrata salad lasts about 2 to 3 days in the fridge. Look for signs of spoilage like brown, mushy peaches or a sour smell. If the greens become wilted or slimy, it's time to toss the salad. You can repurpose leftover ingredients in many ways. Consider making a peach burrata sandwich or topping off a pizza. To refresh the salad, add a splash of olive oil or a dash of balsamic glaze. This can bring back its vibrant taste. If you have leftover nuts, sprinkle them on top for added crunch. For the full recipe, check out the Peach Burrata Bliss Salad. Yes, you can prep some parts in advance. Slice the peaches and store them in a bowl with lemon juice. This keeps them fresh and bright. You can also wash the arugula and dry it well. Keep it in a sealed container in the fridge. Toast the walnuts ahead of time and store them in an airtight bag. Just wait to assemble the salad until right before serving. This way, the salad stays fresh and crunchy. If you can't find burrata, try these cheeses: - Fresh mozzarella: It has a similar creamy texture. - Goat cheese: This adds a tangy flavor. - Feta cheese: Crumbled feta gives a salty kick. These options won’t match burrata exactly, but they can give you a tasty salad. To make this salad vegan, use non-dairy cheese. Here are some great options: - Vegan mozzarella: This melts well and has a mild flavor. - Cashew cheese: It’s creamy and rich, perfect for salads. - Tofu: Use firm tofu, crumbled, as a protein boost. These substitutes maintain the salad's delightful taste while keeping it vegan. In this blog post, we explored creating a fresh, peach salad. We covered ingredients, from ripe peaches to creamy burrata and crunchy walnuts. I shared tips on selecting the best produce and offered variations to fit your tastes. Remember, using fresh ingredients makes a big difference. You can customize this salad for any occasion or dietary preference. Enjoy experimenting with flavors and textures. With the right care, your salad will shine on any table.](https://foodishtalk.com/wp-content/uploads/2025/07/b4c618ef-6bb5-4cf8-bf4f-c02396cbb650.webp)
Are you ready to savor a refreshing summer dish? My Peach Burrata Salad with Balsamic Drizzle brings together ripe peaches,

If you love lemon desserts, you’re in for a treat! This Lemon Impossible Pie is the perfect mix of sweet,
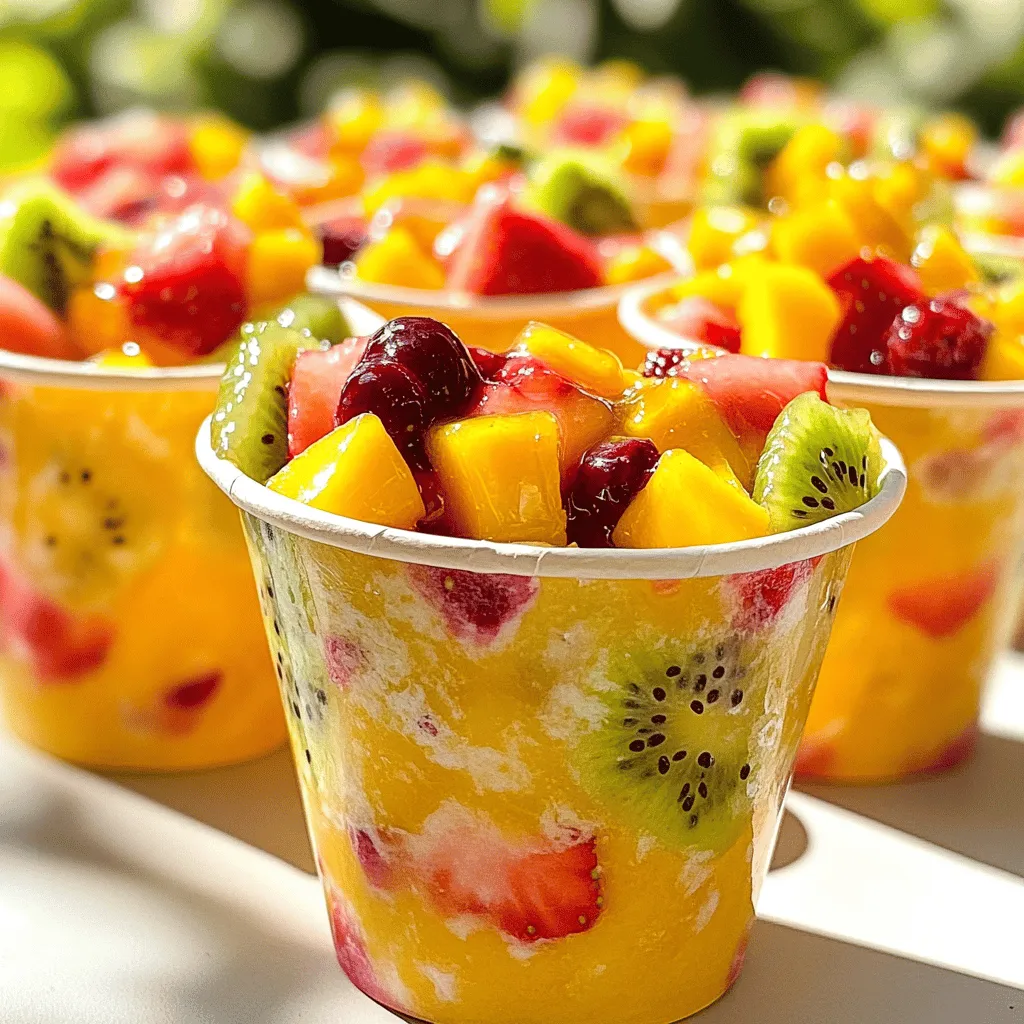
Summer is the perfect time for Otter Pops! These frozen treats are easy to make and super fun. In this
