Skip to content
DisclaimerTerms Of UseGDPR PolicyCookie Policy

Foodish Talk

  • Home
  • Drinks
  • Appetizers
  • Dinner
  • Dessert
  • About
  • Contact
  • Privacy Policy
DisclaimerTerms Of UseGDPR PolicyCookie Policy

NO-ING-IMG

- 8 oz penne pasta - 2 cups cooked chicken, shredded - 1 cup buffalo sauce (adjust to taste) - 1 cup heavy cream - 1 cup shredded cheddar cheese - 1 tablespoon olive oil - 1 tablespoon garlic, minced - 1/2 teaspoon onion powder - 1/2 teaspoon paprika - Salt and pepper to taste - Chopped green onions or parsley for garnish Gathering the right ingredients is key to making this dish shine. Start with 8 ounces of penne pasta. This shape hugs the sauce well. You’ll need 2 cups of cooked chicken, shredded. Rotisserie chicken works great here! Next, grab 1 cup of buffalo sauce. You can adjust this to your spice level. Then, you’ll need 1 cup of heavy cream to create that luscious sauce. For cheese lovers, 1 cup of shredded cheddar cheese adds flavor and creaminess. Use 1 tablespoon of olive oil to sauté your garlic. Speaking of garlic, you need 1 tablespoon of minced garlic. For extra flavor, add 1/2 teaspoon each of onion powder and paprika. Don’t forget salt and pepper to taste! For garnish, chopped green onions or parsley adds a fresh touch. These ingredients come together to create a creamy, flavorful meal. Enjoy the process as you prepare this delicious buffalo chicken pasta! 1. Bringing Water to a Boil: Start by filling a large pot with water. Add a pinch of salt to enhance the flavor. Set the pot on high heat and wait for it to boil. You will know it's ready when large bubbles form. 2. Cooking Time for Penne: Once the water is boiling, add the 8 oz of penne pasta. Cook it according to the package instructions, usually around 10-12 minutes. Stir occasionally to prevent sticking. You want the pasta to be al dente, firm but not hard. Drain it in a colander when done and set aside. 1. Sautéing the Garlic: While the pasta cooks, heat 1 tablespoon of olive oil in a large skillet over medium heat. Once hot, add 1 tablespoon of minced garlic. Cook it for about 1 minute until it smells great. Be careful not to burn it! 2. Combining Chicken and Buffalo Sauce: Next, add 2 cups of shredded chicken to the skillet. Pour in 1 cup of buffalo sauce, adjusting the amount to your taste. Stir everything well so the chicken gets coated. Cook for 2-3 minutes until the chicken is heated through. 1. Adding Heavy Cream and Seasonings: Pour in 1 cup of heavy cream to the chicken mix. Stir it all together until combined. Then, add 1/2 teaspoon of onion powder, 1/2 teaspoon of paprika, salt, and pepper to taste. 2. Simmering for Thickness: Let the sauce simmer for about 5 minutes. This helps it thicken up a bit and blend the flavors. 1. Mixing in Cheddar Cheese: Gradually add 1 cup of shredded cheddar cheese to the sauce. Stir well until the cheese melts and the sauce is smooth. 2. Combining Sauce with Pasta: Add the drained penne pasta to the skillet with the sauce. Toss everything together until the pasta is well covered with the buffalo chicken sauce. 3. Garnishing Before Serving: Serve the pasta hot on plates. Top with chopped green onions or parsley for a fresh touch. Enjoy your creamy and flavorful meal! - Ensuring Perfectly Cooked Pasta Start by boiling salted water in a large pot. Add the penne and cook it until al dente. This means it should be firm when bitten. Drain the pasta, but reserve a cup of the pasta water. It helps to improve the sauce later. - Tips for Sautéing Garlic Use medium heat to sauté minced garlic. This keeps it from burning. Cook it for about one minute until it smells great. If it turns brown, it can taste bitter, so watch it closely. - Adjusting Buffalo Sauce Levels You can change how spicy your dish is by adding more or less buffalo sauce. Start with one cup. Taste it and decide if you want more heat. Just remember, it’s easy to add spice, but hard to take it away. - Cheese Variations While cheddar cheese is great, you can try other types too. Cream cheese can make the sauce extra creamy. Blue cheese adds a different flavor. Experiment to find your favorite mix! - Presentation Tips To make your dish look nice, use a large bowl. Toss the pasta and sauce together well. Garnish with chopped green onions or parsley for color. A sprinkle of cheese on top adds a nice touch. - Pairing Options with Salad or Bread Serve your pasta with a side salad for a fresh bite. Garlic bread is also a tasty choice. Both can balance the spicy flavors and make your meal complete. {{image_2}} Using Different Pasta Types You can swap penne for any pasta you like. Bowtie, rotini, or even spaghetti work well. Each type brings its own fun twist. Just keep the cooking time in mind as it may vary. Substituting Chicken with Other Proteins If you want a change, try using turkey or shredded beef. You can even use tofu for a vegetarian option. Each protein adds its own flavor to the dish. Making it Dairy-Free To make this dish dairy-free, swap heavy cream for coconut cream or a dairy-free alternative. Use a dairy-free cheese for that creamy touch. This way, everyone can enjoy the meal. Gluten-Free Version For a gluten-free option, choose gluten-free pasta. There are many great brands available. Just make sure to check the sauce for gluten ingredients. Adding More Heat If you love heat, add more buffalo sauce or some chopped jalapeños. You can also sprinkle in red pepper flakes for that extra kick. Adjust it to your taste for a spicy thrill. Mild Alternatives If you prefer less spice, use a milder wing sauce. You can also mix in some ranch dressing to tone down the heat. This way, you can still enjoy the creamy goodness without the burn. Refrigeration Guidelines After you finish your meal, let the pasta cool down. Store it in an airtight container. It will stay fresh in the fridge for up to three days. Make sure to seal it well to keep the flavors locked in. Reheating Techniques When it’s time to eat again, reheat the pasta in a skillet over medium heat. Add a splash of milk or cream to keep it creamy. Stir it often until it’s hot. You can also use the microwave. Just heat it in short bursts, stirring in between. How to Freeze and Thaw Properly You can freeze the buffalo chicken pasta if you want to save some for later. Allow it to cool completely before freezing. Place it in a freezer-safe container. It can last up to three months. When you're ready to eat, thaw it overnight in the fridge. Recommended Freezer Containers Use plastic containers or freezer bags for easy storage. If using bags, squeeze out as much air as you can. This helps prevent freezer burn. Label your containers with the date so you know how long it’s been in the freezer. Can I use rotisserie chicken? Yes, you can use rotisserie chicken in this recipe. It saves time and adds great flavor. Just shred the chicken before mixing it with the buffalo sauce. How long does it take to cook? This dish takes about 25 minutes to cook. You spend 10 minutes prepping and 15 minutes cooking everything together. What can I substitute for buffalo sauce? If you want a milder taste, use barbecue sauce instead. You can also mix hot sauce with ranch dressing for a creamy twist. Can I make this dish ahead of time? Yes, you can make Easy Buffalo Chicken Pasta ahead of time. Just store it in the fridge for up to three days. Is this recipe suitable for meal prep? Absolutely! This dish is perfect for meal prep. You can portion it into containers for easy lunches or dinners. Caloric content per serving Each serving has around 600 calories. This can vary based on the amount of cheese and sauce you use. Healthier ingredient options To make it lighter, use low-fat cream or reduced-fat cheese. You can also add more veggies like spinach or bell peppers for extra nutrients. This blog post detailed how to make Easy Buffalo Chicken Pasta. You learned about all the ingredients needed, from penne pasta to garnishes. I explained the cooking steps clearly, so you can follow along. Tips and variations help make the dish yours, whether you're a novice or seasoned cook. You now know the best ways to store it, along with FAQs for any lingering questions. Enjoy creating and sharing this tasty dish with friends and family!

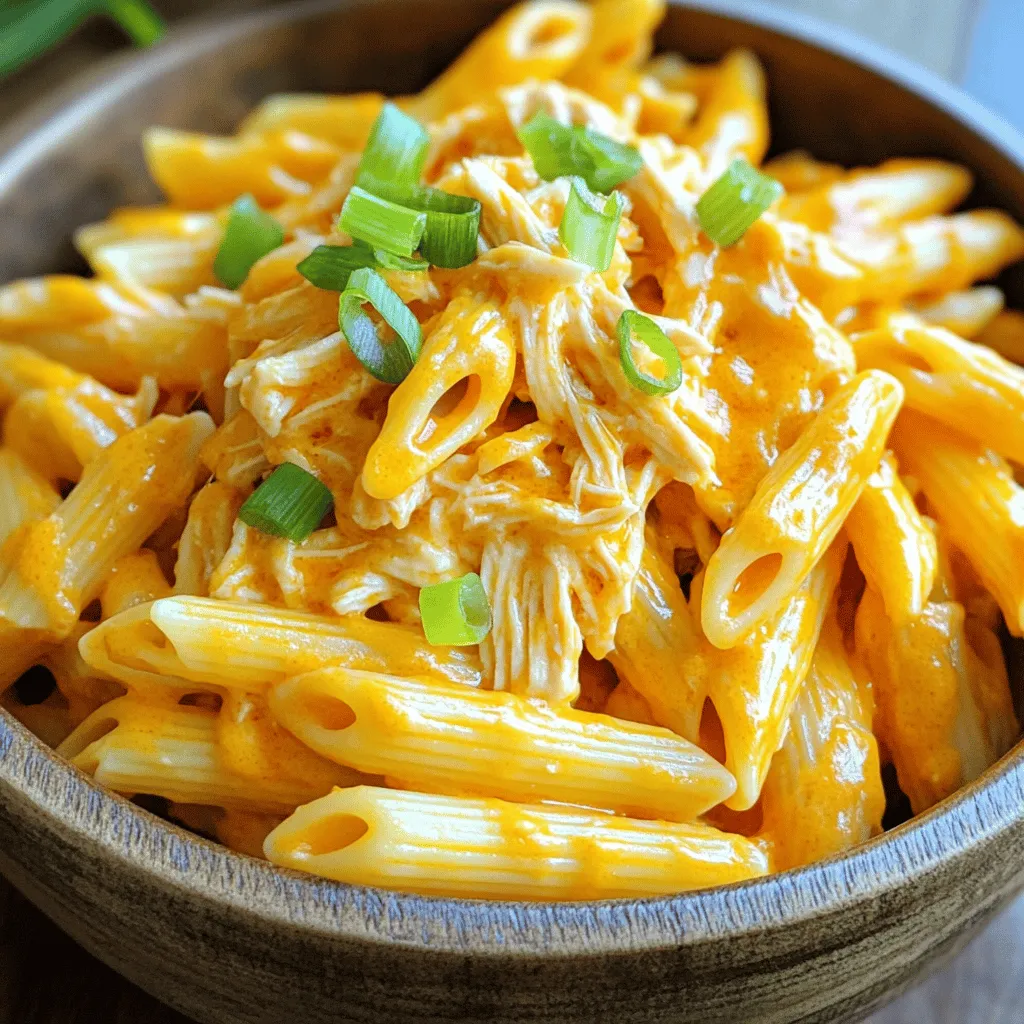
Easy Buffalo Chicken Pasta Creamy and Flavorful Meal

Craving a quick, tasty meal? This Easy Buffalo Chicken Pasta is your answer! Imagine creamy, cheesy pasta twirled with juicy

Creamy Cajun Chicken Pasta Soup is a tasty dish. It combines chicken, spices, and creamy broth. You can make this soup in about 40 minutes. It serves 4 to 6 people. This soup is great for a family meal or a cozy night in. - Chicken and Vegetables - 1 lb chicken breast, diced - 1 medium onion, chopped - 2 cloves garlic, minced - 1 bell pepper (red or green), diced - 1 carrot, diced - 1 cup corn (frozen or fresh) - 1 cup diced tomatoes (canned or fresh) - Seasonings and Broth - 1 tablespoon Cajun seasoning - 1 tablespoon olive oil - 4 cups chicken broth - 1/2 teaspoon thyme - Salt and pepper to taste - Creamy Elements and Pasta - 1 cup heavy cream - 1 cup pasta (e.g., penne or shell) - Fresh parsley, chopped (for garnish) This list provides all you need for a rich, flavorful soup. Each ingredient plays a key role. The chicken adds protein, while the veggies give texture. The Cajun seasoning brings warmth and spice. Heavy cream makes the soup rich and smooth, while the pasta adds heartiness. Gather these ingredients to create a dish that pleases everyone. You can use fresh or canned ingredients based on what you have. Enjoy the process of cooking this delightful meal! Start with 1 pound of diced chicken breast. I like to season it with 1 tablespoon of Cajun seasoning. This adds great flavor. In a large pot, heat 1 tablespoon of olive oil over medium heat. Once hot, add the chicken. Cook for about 5 to 7 minutes. You want it browned and fully cooked. After cooking, remove the chicken from the pot and set it aside. Now, let’s get those veggies in! In the same pot, add 1 medium chopped onion, 2 minced garlic cloves, 1 diced bell pepper, and 1 diced carrot. Sauté these for about 5 minutes. You want the vegetables to soften and release their juices. This step builds the soup’s base flavor. Next, pour in 4 cups of chicken broth. Bring the mixture to a gentle simmer. This is where the magic starts! Add 1 cup of your choice of pasta, like penne or shell. Cook according to the package instructions. It usually takes about 8 to 10 minutes for al dente pasta. Stir occasionally to prevent sticking. After the pasta is cooked, it's time to make it creamy! Stir in 1 cup of heavy cream, 1 cup of corn (fresh or frozen), and 1 cup of diced tomatoes. Then, add the cooked chicken back to the pot along with 1/2 teaspoon of thyme. Let it simmer for another 5 minutes. This helps blend all the flavors. Finally, season with salt and pepper to taste. Serve hot, garnished with chopped fresh parsley for a touch of color and freshness. Enjoy your delicious creamy Cajun chicken pasta soup! To enhance the taste of your creamy Cajun chicken pasta soup, focus on the spices. Cajun seasoning packs a punch. You can mix it with smoked paprika or cayenne for more heat. Taste as you go. This way, you can find the perfect balance. Fresh herbs, like parsley, bring brightness to the dish. Add them just before serving for a burst of flavor. The creaminess of your soup depends on the heavy cream. If you want it thicker, add more cream. For a lighter version, use half-and-half or milk. You can also mix in cream cheese for a rich texture. Just heat it gently to blend it well. Remember to stir constantly to avoid lumps. Timing and temperature are crucial for great results. Always heat your olive oil before adding chicken. This helps the chicken brown and lock in juices. When you sauté veggies, don’t rush. Give them time to soften and release flavor. When simmering, keep your heat low. This allows flavors to meld without overcooking the pasta. Check pasta doneness a minute early to keep it al dente. {{image_2}} You can switch the chicken for other meats. Shrimp works well in this dish. Just cook it until pink. You can also use turkey for a leaner option. For a heartier flavor, try smoked sausage. This adds a nice twist. Ensure you adjust cooking times for each protein. If you want a vegetarian or vegan dish, swap chicken for mushrooms or tofu. Both options soak up flavors well. Use vegetable broth instead of chicken broth. For creaminess, try coconut milk or almond milk. These will give a rich texture without dairy. You can add extra veggies like zucchini or spinach for more nutrients. While penne or shell pasta is great, you can use other types. Fusilli or rotini work well, too. These shapes hold the soup better. Gluten-free pasta is a good choice for those with allergies. Just cook it slightly less to avoid mushiness. Want more heat? Add extra Cajun seasoning or red pepper flakes. You can also use fresh chili peppers. If you prefer less spice, reduce the Cajun seasoning. Start with a small amount, then taste as you go. This lets you control the heat for everyone at the table. After enjoying the creamy Cajun chicken pasta soup, let it cool. Once cool, put it in an airtight container. Store it in the fridge for up to three days. Make sure to label the container with the date. This way, you can keep track of how fresh it is. To freeze the soup, use a freezer-safe container. Leave some space at the top because the soup will expand. It can last in the freezer for about three months. When you’re ready to eat, thaw it in the fridge overnight. To reheat, pour the soup into a pot over medium heat. Stir it often to warm it evenly. Add a splash of chicken broth or cream if it looks too thick. You can also use the microwave. Heat it in short bursts, stirring in between to avoid hot spots. - Best Containers for Storage - Airtight glass containers - BPA-free plastic containers - Freezer bags for easy storage Yes, you can use frozen chicken in this soup. Just make sure to cook it longer. Thaw it first if possible. This makes it easier to cut into pieces. If cooking from frozen, add extra time to ensure it cooks through. To add more spice, you can use extra Cajun seasoning. Add a pinch of cayenne pepper for a kick. You can also toss in some chopped jalapeños. Taste as you go to find the right heat for you. If you don't have Cajun seasoning, you can mix your own. Use paprika, garlic powder, onion powder, thyme, and black pepper. Adjust the amounts to match your taste. You can also try other spice blends, like Creole seasoning. Yes, feel free to add other veggies. Zucchini, spinach, or mushrooms work well. Just chop them small so they cook quickly. This recipe is flexible and allows for your favorite ingredients. We covered a great chicken pasta dish from start to finish. You learned about the key ingredients, step-by-step cooking, and tips for perfect flavor. Variations let you customize your meal, while storage info ensures leftovers last. Cooking should be fun and easy. Now, with this guide, you can make a tasty dish your way. Enjoy the process and make it your own!

Creamy Cajun Chicken Pasta Soup Flavorful Delight

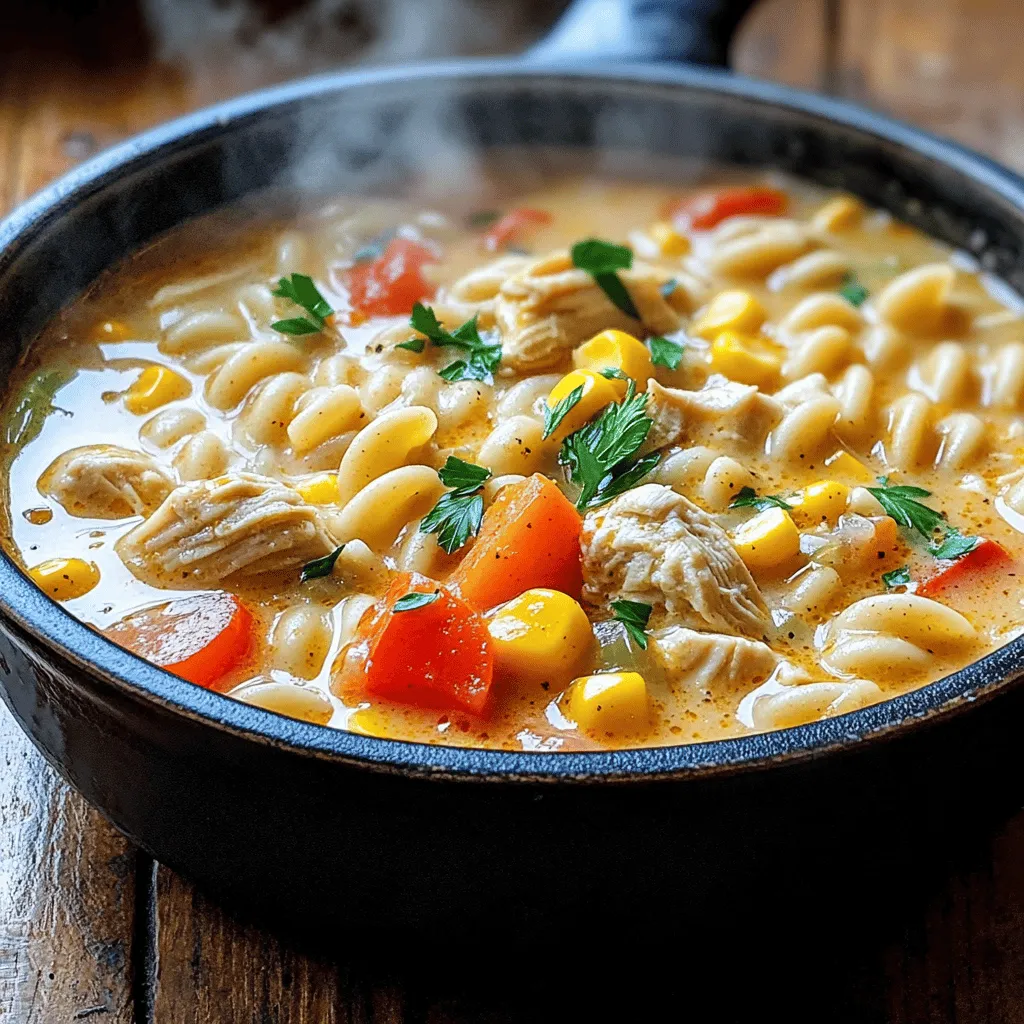
Are you ready to elevate your dinner game? This Creamy Cajun Chicken Pasta Soup is a warm hug in a

- 1 large head of green cabbage - 1 cup cooked rice (white or brown) - 1 pound ground turkey or chicken - 1 small onion, finely chopped - 2 cloves garlic, minced - 1 carrot, grated - 1 teaspoon dried oregano - 1 teaspoon smoked paprika - 1 teaspoon salt - ½ teaspoon black pepper - 1 can (15 oz) tomato sauce - 1 can (15 oz) diced tomatoes, undrained - 2 tablespoons olive oil - 1 tablespoon lemon juice - Fresh parsley, for garnish Using these ingredients, you can create stuffed cabbage rolls that are both healthy and tasty. The green cabbage provides a sturdy wrap for our filling. The rice adds bulk and texture. Ground turkey or chicken keeps the dish lean and flavorful. The onion, garlic, and carrot bring sweetness and depth to the mix. Seasonings like oregano and smoked paprika give a warm, earthy taste. Salt and black pepper enhance all the flavors. Tomato sauce and diced tomatoes create a rich, tangy base. Olive oil and lemon juice provide brightness and balance. Fresh parsley adds a pop of color and freshness when serving. Gather these ingredients, and you’re ready to make a delicious meal that will impress your family and friends! First, you need to blanch the cabbage. Bring a large pot of water to a boil. Carefully cut out the core of the cabbage head. Place the whole cabbage in the boiling water for about 3 minutes. This softens the leaves. After that, take the cabbage out and let it cool. Once it is cool, gently separate the leaves. Set them aside for later. Now, it's time to make the filling. In a big bowl, mix together the cooked rice, ground turkey or chicken, chopped onion, minced garlic, and grated carrot. Add in the dried oregano, smoked paprika, salt, and black pepper. Stir everything until it combines well. You want the flavors to blend nicely. Next, we will stuff the rolls. Take one cabbage leaf and lay it flat on a clean surface. Place about 2 to 3 tablespoons of the filling at the base of the leaf. Fold the sides over the filling, then roll it up from the bottom to the top. This keeps the filling inside. Repeat this for all the leaves and filling. For the sauce, grab a separate bowl. Combine the tomato sauce with the diced tomatoes. Add olive oil and lemon juice to this mix. Stir it well until everything is blended. This sauce will add great flavor to your cabbage rolls. Now, let's layer in the pot. Spread a thin layer of the sauce mixture on the bottom of a large pot. Place the stuffed cabbage rolls seam-side down in the pot. Pack them tightly together. Pour the remaining sauce over the rolls to keep them moist. Finally, cover the pot and simmer the rolls on low heat. Let them cook for about 40 to 50 minutes. This allows the flavors to meld together. It's key for the meat to cook through. Enjoy the delicious aroma that fills your kitchen! When you choose cabbage, look for a fresh head. It should feel heavy and firm. The leaves should be crisp and bright green. A large head works best for rolling, as it gives you more leaves to use. I prefer green cabbage for its mild taste and flexibility. For the filling, mix ground turkey or chicken with rice, onion, and garlic. You can also add spices like cumin or chili powder for a twist. If you use turkey, cook it for 40-50 minutes. Chicken needs a bit less time. Adjust cooking times based on the meat you choose. Store leftover rolls in an airtight container in the fridge. They can last up to four days. When reheating, use low heat on the stove. This way, you keep the rolls moist and flavorful. You can also add a splash of water to the pot to help steam them. {{image_2}} You can easily make stuffed cabbage rolls vegetarian. Instead of meat, use lentils or beans. These options add protein and fiber. They also bring great flavor. For grains, try using quinoa instead of rice. Quinoa cooks fast and adds a nice texture. You can mix it with your veggies for extra taste. Stuffed cabbage rolls have many global styles. Eastern European recipes often use beef and pork. They may also add spices like dill or caraway. In Mediterranean cuisine, you can find versions with lamb or chicken. These rolls often include fresh herbs and spices, giving a unique twist. When serving stuffed cabbage rolls, think about toppings. Sour cream or yogurt adds creaminess and tang. You can also drizzle some lemon juice for brightness. Pair these rolls with a simple salad or crusty bread. This way, you create a balanced meal. These sides complement the rolls well and make the dish more filling. Stuffed cabbage rolls last in the fridge for about 3 to 4 days. To store them properly, place the rolls in an airtight container. This keeps the flavors fresh and prevents odors from mixing. Make sure the rolls are cool before sealing the container. You can freeze stuffed cabbage rolls both before or after cooking. If freezing raw, wrap each roll tightly in plastic wrap, then place them in a freezer bag. For cooked rolls, let them cool, then follow the same wrapping method. To thaw, move the rolls to the fridge overnight. Reheat in the oven or on the stove, adding a bit of sauce to keep them moist. Check for signs of spoilage before eating leftovers. Bad cabbage rolls may smell sour or look discolored. If the texture feels slimy, it's best to discard them. Always trust your senses; if in doubt, throw them out! To keep the cabbage leaves whole, start with a large head of green cabbage. Remove the core carefully. Blanch the whole head in boiling water for about 3 minutes. This makes the leaves soft and easy to handle. After blanching, let the cabbage cool. Then, gently peel off the leaves. If any leaves tear, use them for the bottom of the pot. Yes, you can use various meats for stuffing. Ground turkey or chicken works well. You can also try ground beef or pork for a richer taste. For a plant-based option, use lentils or mushrooms. Just make sure to adjust cooking times based on the meat you choose. Stuffed cabbage rolls pair nicely with many sides. A simple salad with fresh greens adds crunch. You can also serve crusty bread or garlic bread for dipping. For a drink, try a light red wine or sparkling water with lemon. These options balance the flavors of the dish. To prepare ahead, you can make the filling and stuff the rolls in advance. Store them in the fridge for up to a day. When ready to cook, layer them in the pot with sauce and simmer. You can also freeze them after stuffing. Just thaw in the fridge overnight before cooking. Yes, you can make this recipe gluten-free. Use gluten-free rice instead of regular rice. Ensure that the tomato sauce and diced tomatoes do not contain gluten. Double-check all labels when purchasing ingredients to be safe. This way, everyone can enjoy the dish! Stuffed cabbage rolls are a tasty dish made with simple ingredients. You learned how to prepare the cabbage, make the filling, and cook the rolls for maximum flavor. I also shared tips for variations and storing your rolls. Enjoy experimenting with different ingredients to suit your taste. Whether you go with meat or a vegetarian option, stuffed cabbage rolls can fit any meal. Now, gather your ingredients, start cooking, and savor every bite. Happy cooking!

Stuffed Cabbage Rolls Healthy and Flavorful Delight

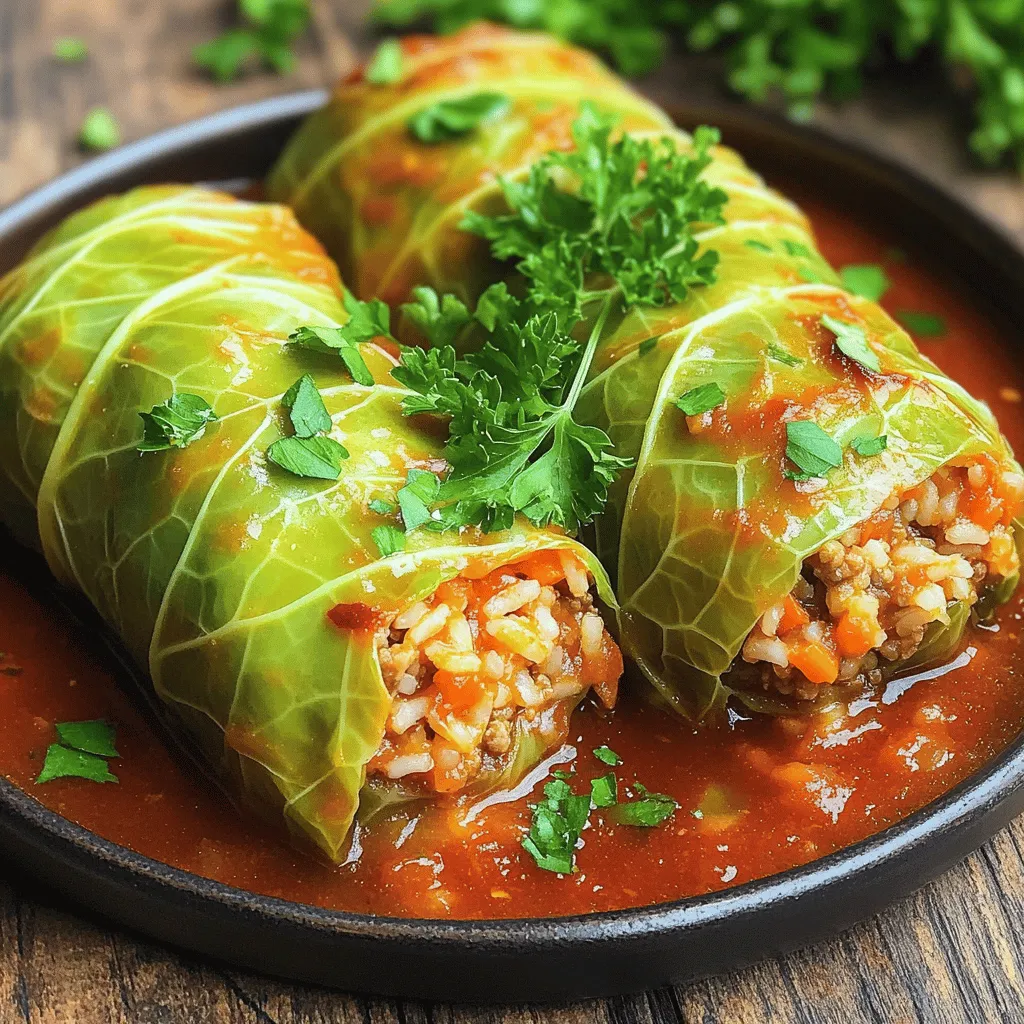
Are you ready to enjoy a healthy meal that’s packed with flavor? Stuffed cabbage rolls are your answer! This dish

To make these delicious cabbage burgers, you will need: - 1 large green cabbage, leaves separated - 1 pound ground turkey or chicken - 1 cup cooked quinoa - 1 small onion, finely chopped - 2 cloves garlic, minced - 1 teaspoon paprika - 1 teaspoon cumin - 1 teaspoon salt - ½ teaspoon black pepper - 1 tablespoon olive oil These ingredients create a tasty filling. The cabbage provides a sturdy wrap. The ground turkey or chicken adds protein. Quinoa gives a nice texture and flavor. Onion and garlic offer great taste. Spices like paprika and cumin enhance the dish. You can make your cabbage burgers even better with these optional items: - ½ cup shredded cheese - ½ cup diced tomatoes - Lettuce, pickles, and sliced avocado for toppings Adding cheese makes the burgers creamy. Diced tomatoes give freshness. Toppings like lettuce and pickles add crunch. Sliced avocado brings richness to each bite. Feel free to mix and match these options. These burgers are not just tasty; they are good for you, too. Each serving has: - Calories: Approximately 300 - Protein: About 25 grams - Carbohydrates: Roughly 20 grams - Fiber: Around 5 grams - Fat: About 12 grams This meal is low in calories but high in protein. It provides a good amount of fiber, which helps digestion. Overall, these burgers are a smart choice for a healthy meal. To start, you need to prepare the cabbage leaves. First, grab a large green cabbage. Remove the leaves carefully. Bring a large pot of salted water to a boil. Once boiling, add the cabbage leaves. Blanch them for about 3 to 4 minutes. This step makes the leaves tender but still strong enough to hold the filling. After blanching, remove them from the pot. Place them on a paper towel to cool and dry. Next, we will make the burger filling. In a large mixing bowl, add one pound of ground turkey or chicken. Then, pour in one cup of cooked quinoa. Add one small onion, finely chopped, and two cloves of minced garlic. Sprinkle in one teaspoon of paprika, one teaspoon of cumin, one teaspoon of salt, and half a teaspoon of black pepper. Mix all these ingredients well until they are combined evenly. This filling is packed with flavor and great nutrition. Now comes the fun part: assembling the burgers. Take a blanched cabbage leaf. Spoon about a quarter cup of the meat mixture into the center of the leaf. Fold the sides over the filling and roll it tightly to make a burger. Repeat for all the cabbage leaves. Once all the burgers are rolled, place them seam side down on a baking sheet lined with parchment paper. Brush the tops with one tablespoon of olive oil. If you like, add half a cup of shredded cheese on top. Preheat your oven to 375°F (190°C) and bake the burgers for 30 to 35 minutes. They will be fully cooked and lightly crispy. Let them cool slightly before serving. Top with diced tomatoes, lettuce, pickles, and sliced avocado for the perfect finish. To make the best cabbage burgers, follow these tips: - Choose fresh cabbage: Select a firm, green cabbage for the best flavor. - Don’t skip blanching: Blanching softens the leaves and helps them roll easily. - Mix well: Combine the meat and veggies thoroughly for even flavor. - Avoid overstuffing: Use about a quarter cup of filling for each leaf. - Brush with oil: This adds flavor and helps the burgers crisp up nicely. Serving cabbage burgers can be fun and creative: - Wooden board: Place burgers on a wooden board for a rustic look. - Toppings on the side: Offer diced tomatoes, lettuce, pickles, and avocado separately. - Drizzle sauces: Add sauces or dressings on top for extra flavor. - Colorful plates: Use colorful plates to make the meal visually appealing. The right sauce can elevate your cabbage burgers: - Greek yogurt sauce: Mix yogurt with lemon juice and herbs for a refreshing taste. - Sriracha mayo: Combine mayonnaise with Sriracha for a spicy kick. - Avocado dressing: Blend avocado with lime juice for a creamy topping. - Sweet chili sauce: This adds a sweet and tangy flavor that pairs well. {{image_2}} You can easily make these burgers vegetarian. Instead of meat, use 1 cup of cooked lentils or black beans. They provide protein and a nice texture. Mix the beans with quinoa, onion, and garlic, just like in the original recipe. This swap keeps the burger filling and tasty. If you love heat, add some spice! Mix in 1 to 2 teaspoons of chili powder or diced jalapeños into the meat mixture. You can also use hot sauce on top after baking. This adds a kick that will make your taste buds dance. Herbs and spices can take your cabbage burgers to the next level. Try adding fresh parsley, cilantro, or basil to the filling. You can also use dried herbs like oregano and thyme. These additions boost flavor without adding calories. Experiment and find your favorite mix! Store leftover cabbage burgers in an airtight container. Keep them in the fridge for up to three days. If you have extra toppings, store them separately. This keeps the burgers fresh and prevents sogginess. To reheat your cabbage burgers, use the oven. Preheat the oven to 350°F (175°C). Place the burgers on a baking sheet. Heat them for about 10-15 minutes. This keeps them crispy and tasty. You can also use a microwave if you're short on time. Just heat for 1-2 minutes, but know they might get soft. You can freeze cabbage burgers for later! First, let them cool completely. Wrap each burger tightly in plastic wrap. Then, place them in a freezer bag. They will stay good for up to three months. To cook, thaw them overnight in the fridge. Bake at 375°F (190°C) until they are warm. Enjoy your meal prep success! To make your cabbage burgers gluten-free, use gluten-free grains like rice or quinoa. Avoid wheat-based products. Check all spice labels to confirm they are gluten-free. This ensures everyone can enjoy your dish safely. Flavor remains rich and tasty without gluten. Yes, you can use other meats! Ground beef, pork, or lamb work well. You may also try plant-based meats for a vegetarian option. Each meat will bring its own flavor and texture. Adjust cooking time based on the meat chosen. Cabbage burgers taste great with many sides. Here are some ideas: - Sweet potato fries - Fresh garden salad - Grilled vegetables - Coleslaw - Quinoa salad These sides add color and nutrition to your meal. Each option complements the burgers nicely, enhancing your dining experience. Oven-baked cabbage burgers offer a tasty way to enjoy veggies. We explored the main and optional ingredients, a step-by-step guide, and helpful tips for success. You learned about variations and how to store leftovers. Remember, customizing flavors makes your burgers unique. Try different herbs or spice levels to find what you love. Embrace this healthy dish and make it your own. Enjoy your cooking journey!

Oven-Baked Cabbage Burgers Tasty and Healthy Meal

Looking for a tasty and healthy meal? Oven-baked cabbage burgers are the answer! These burgers offer a fun twist on

To make these tasty snacks, you need some basic items. Here’s what to gather: - 1 cup cornmeal - 1 cup all-purpose flour - 1 tablespoon baking powder - 1/2 teaspoon salt - 1/4 cup granulated sugar - 1 cup milk - 1/4 cup melted butter - 2 large eggs - 1/4 cup honey - 1/2 cup corn kernels (fresh, frozen, or canned) These ingredients work together to create a soft and sweet cornbread that pops with flavor. You can make these poppers even better with a few extra touches. Consider adding: - 1/4 cup chopped green onions - Extra melted butter, for brushing - Honey, for drizzling Chopped green onions give a fresh taste. Brushing melted butter adds richness, and a drizzle of honey makes it sweet. If you have special dietary needs, you can swap some ingredients. Here are some ideas: - Use gluten-free flour instead of all-purpose flour. - Substitute almond milk for regular milk for a dairy-free option. - Use maple syrup instead of honey for a vegan alternative. These swaps let everyone enjoy the poppers without worry. Start by preheating your oven to 375°F (190°C). Grease a mini muffin tin or use mini muffin liners. In a large bowl, whisk together these dry ingredients: - 1 cup cornmeal - 1 cup all-purpose flour - 1 tablespoon baking powder - 1/2 teaspoon salt - 1/4 cup granulated sugar Mix these well. This blend gives your poppers a great base. In another bowl, combine the wet ingredients: - 1 cup milk - 1/4 cup melted butter - 2 large eggs - 1/4 cup honey Whisk these until the mixture is smooth. This step adds moisture and flavor. Pour the wet mix into the dry mix and stir gently. Fold in: - 1/2 cup corn kernels (fresh, frozen, or canned) - 1/4 cup chopped green onions (optional) Spoon the batter into the muffin tin, filling each cup about 3/4 full. Bake for 12-15 minutes. They’re ready when golden brown. A toothpick should come out clean. Once baked, brush the tops with more melted butter. Let them cool slightly before serving. Drizzle more honey on top for added sweetness. Enjoy your tasty snack! When making honey butter cornbread poppers, avoid overmixing the batter. This can make the poppers tough. Mix just until the ingredients come together. Also, watch the baking time. If the poppers are too brown, they might dry out. Keep an eye on them starting around 12 minutes. Lastly, don’t skip brushing melted butter on top. This adds flavor and helps keep them moist. To get that light, fluffy texture, use fresh baking powder. This helps the poppers rise well. Make sure your wet ingredients are at room temperature before mixing. Cold milk or eggs can lead to a dense texture. Also, folding in corn kernels gently prevents the batter from becoming too heavy. Aim for a slightly lumpy batter for the best texture. Serve these poppers warm for the best taste. Place them in a cute basket lined with a cloth napkin. This keeps them warm and adds charm. Drizzle honey on top for a sweet touch. You can also serve a small dish of honey on the side for extra dipping. Garnish with fresh mint sprigs for color and a fresh look. This simple touch makes your dish look special and appetizing. {{image_2}} You can spice up honey butter cornbread poppers by adding cheese and jalapeños. Choose a sharp cheddar for a bold flavor. Add about 1 cup of shredded cheese to the batter. For heat, chop one or two jalapeños and mix them in. This adds a nice kick to your poppers. If you enjoy sweet treats, consider adding fruit or nuts. Blueberries or chopped peaches mix well with the cornbread. They add natural sweetness and moisture. You can also use nuts like pecans or walnuts for crunch. Just fold in about 1/2 cup of your choice into the batter. For those who need gluten-free options, you can swap the all-purpose flour. Use a gluten-free flour blend instead. Make sure the blend works for baking. Also, check that the baking powder is gluten-free. This way, everyone can enjoy these tasty poppers without worry. To keep your honey butter cornbread poppers fresh, let them cool first. Place them in an airtight container. This helps to keep them moist and tasty. Store them at room temperature if you plan to eat them in a few days. If you want to keep them longer, the fridge is a good choice. They can last up to four days in the fridge. When it's time to enjoy your leftovers, reheating is key. Preheat your oven to 350°F (175°C). Place the poppers on a baking sheet. Heat them for about 5 to 10 minutes. This warms them up and helps them stay soft. You can also microwave them. Just heat them for 15 to 20 seconds at a time. Be careful not to overheat them, or they might get tough. If you want to save your honey butter cornbread poppers for later, freezing is a great option. Wrap each popper in plastic wrap. Then, place them in a freezer bag. This keeps out air and helps prevent freezer burn. You can freeze them for up to three months. When you're ready to eat, thaw them in the fridge overnight. Then, reheat as mentioned above. Enjoy your tasty snack anytime! Honey butter cornbread poppers last about three days when stored in an airtight container. Keep them at room temperature for best taste. If you refrigerate them, they may dry out. Yes, you can make the batter ahead of time. Mix the dry and wet ingredients separately, then combine them just before baking. This keeps the poppers fresh and fluffy. Serve honey butter cornbread poppers with chili, soup, or a fresh salad. They also pair well with barbecue dishes. Drizzling more honey on top adds a sweet touch! Honey butter cornbread poppers are simple to make and very tasty. We explored the key ingredients, ways to enhance flavors, and dietary swaps. I shared step-by-step instructions for mixing, baking, and finishing them perfectly. We discussed common mistakes to avoid and how to serve them well. You learned about flavor variations and storage tips to keep them fresh. Remember, these poppers are great for snacks or meals. With these methods and ideas, you can impress friends and family with your cooking skills. Enjoy your cooking adventure!

Honey Butter Cornbread Poppers Tasty and Easy Snack

Looking for a quick treat that’s both sweet and savory? You’re in the right place! Honey Butter Cornbread Poppers are

- 8 oz fettuccine or spaghetti - 2 cups fresh spinach, roughly chopped - 1 lb shrimp, peeled and deveined - 1 tablespoon olive oil - 3 cloves garlic, minced - 1 can (15 oz) crushed tomatoes - 1 cup heavy cream - 1/2 cup grated Parmesan cheese - 1 teaspoon Italian seasoning - Salt and pepper to taste - Fresh basil leaves for garnish Gather these ingredients to create a rich and creamy dish. The fettuccine or spaghetti forms a great base. The shrimp brings protein and a delightful texture. Fresh spinach adds color and nutrition to the plate. Next, minced garlic gives a strong flavor. Crushed tomatoes create a savory sauce. Heavy cream makes the sauce smooth and rich. Grated Parmesan cheese adds a nice, cheesy finish. For seasoning, Italian seasoning ties all the flavors together. Salt and pepper enhance the taste. Fresh basil leaves add a touch of freshness when you serve. With these ingredients, you can craft a delicious meal that brings joy to any table. - Cook the pasta according to package instructions until al dente. - Drain and set aside for later use. - Heat olive oil in a skillet over medium-high heat. - Season shrimp with salt, pepper, and Italian seasoning, cooking until pink. - Sauté minced garlic until fragrant, then add crushed tomatoes. - Simmer for 5-7 minutes to combine flavors, then add cream and Parmesan cheese. Cooking pasta is simple. First, boil water and add salt. This helps the pasta flavor. Choose fettuccine or spaghetti, and cook until it is firm but tender. Draining it allows you to use it later. Next, let’s cook the shrimp. The shrimp need flavor. Season them with salt, pepper, and Italian herbs. Heat olive oil in a skillet and add the shrimp. They cook quickly, just 2-3 minutes on each side. Once they turn pink, they are ready. Now, we make the sauce. Start by sautéing garlic. It gives a nice aroma. After that, pour in crushed tomatoes. Let it simmer for 5-7 minutes. This step helps the sauce become rich. Finally, stir in the cream and Parmesan cheese. This makes it creamy and delicious! - Use high-quality tomatoes for the best flavor. Good tomatoes make your sauce shine. - Adjust the cream and cheese for desired richness. If you want a creamier sauce, add more cream. - Remember to add salt to boiling water for better taste. Salt enhances the pasta flavor. - Reserve pasta water for adjusting sauce consistency if needed. This water helps your sauce stick. - Experiment with additional herbs like thyme or oregano. Fresh herbs can brighten the dish. - Adding a splash of white wine can elevate the sauce. Wine gives a nice depth to the flavor. {{image_2}} You can switch shrimp for chicken or tofu. This gives a new twist to the dish. Shrimp cooks fast, while chicken takes a bit longer. Cook it until it reaches 165°F for safety. Tofu can soak up the sauce well, making it tasty. Want to try something different? Use scallops or a mix of seafood. Both options add depth and flavor to your meal. Scallops cook quickly and taste great with the creamy sauce. Feel free to add more veggies! Bell peppers and mushrooms work well in this pasta. They give extra color and crunch. You can sauté them with garlic for more flavor. If you can’t find fresh spinach, frozen works just as well. Just thaw and drain it before adding. This is a great way to save time and still enjoy a healthy dish. Want to make it gluten-free? Use gluten-free pasta instead. Many options on the market taste great and fit well in this recipe. For a lighter version, swap heavy cream for half-and-half or Greek yogurt. Both will still give you creaminess without all the fat. This way, you can enjoy a guilt-free meal that is still delicious. Store any leftovers in an airtight container. Keep it in the fridge for up to 3 days. This helps maintain the flavor and texture of your creamy tomato spinach shrimp pasta. For longer storage, freeze the pasta in portions. It will stay fresh for up to 2 months. Make sure to use freezer-safe containers to prevent freezer burn. When you are ready to eat, reheat gently on the stove. Add a splash of water to loosen the sauce. This keeps the pasta creamy and avoids drying it out. Avoid microwaving, as it may overcook the shrimp. Enjoy your meal just like the first time! Yes, thaw them before cooking to ensure proper texture. Frozen shrimp can be handy. Just place them in the fridge overnight to thaw. If you’re in a hurry, run them under cold water for a few minutes. This way, your shrimp will cook evenly. Use half-and-half or a dairy-free alternative like coconut cream. Half-and-half gives a creamy texture without being too heavy. Coconut cream adds a nice flavor and works well for dairy-free diets. Both options keep the dish rich and smooth. They should be pink and opaque when fully cooked, taking about 2-3 minutes on each side. When shrimp curl into a "C" shape, they are often done. Be careful not to overcook them. Overcooked shrimp can become tough and chewy. Check the recipe link for the full prep and cooking instructions for Creamy Tomato Spinach Shrimp Pasta. You'll find step-by-step guidance that makes cooking this dish easy and fun. Enjoy the process and the delicious results! This blog post covered how to make Creamy Tomato Spinach Shrimp Pasta. We discussed main ingredients, steps for cooking, and tips for perfecting the dish. You can adjust flavors and swap proteins or veggies for variety. Storing leftovers carefully helps with freshness. Whether you choose shrimp or another protein, this recipe is sure to please. Enjoy this dish and have fun cooking!

Creamy Tomato Spinach Shrimp Pasta Delight Recipe

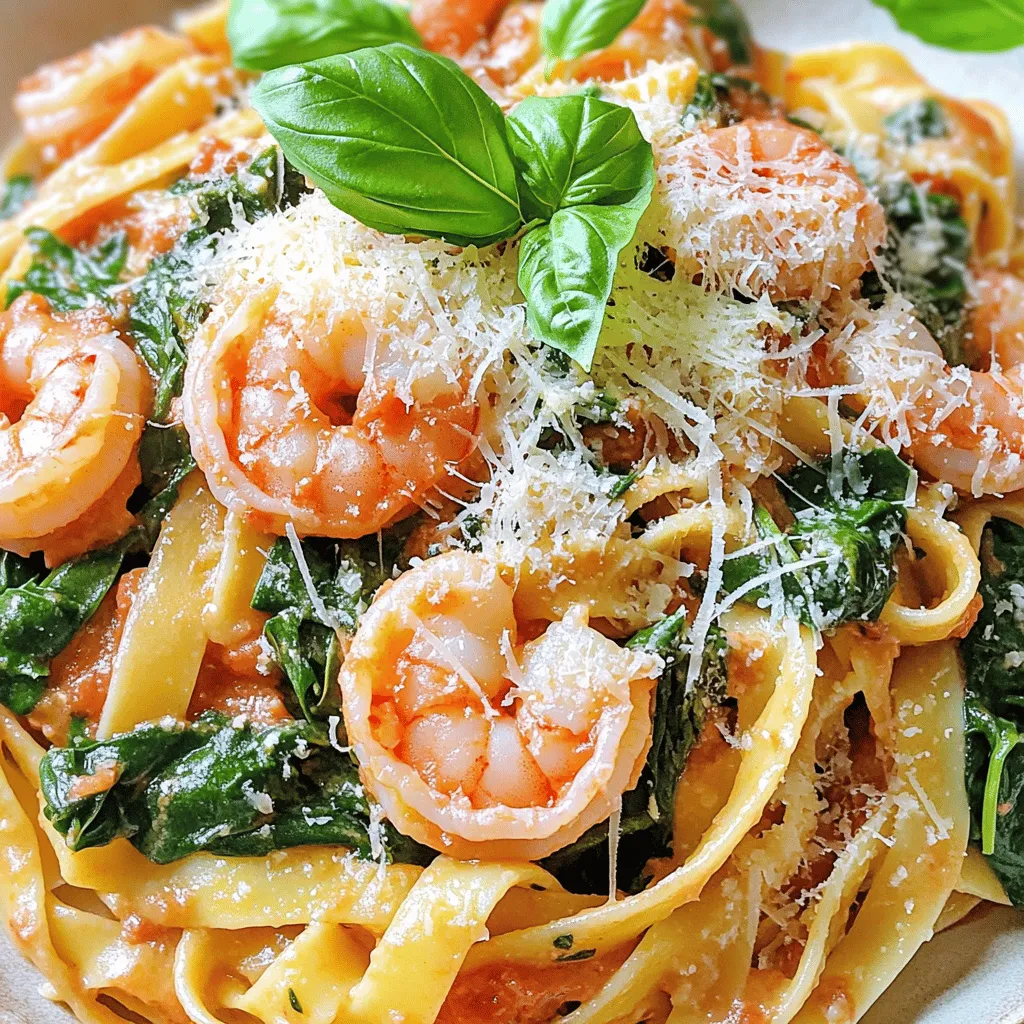
Are you looking for a quick, delicious meal that impresses? My Creamy Tomato Spinach Shrimp Pasta is just what you

- 2 cups all-purpose flour - 1 cup sourdough starter (fed and bubbly) - 1 large egg - 1 teaspoon salt - 1 tablespoon olive oil - Water (as needed) - All-purpose flour: This flour gives the pasta its structure and chew. It works well for pasta. - Sourdough starter: This is the star of the dish! Use a bubbly starter. It adds flavor and helps the pasta rise. - Large egg: The egg binds the dough and adds richness. It helps make the pasta smooth. - Salt: Salt enhances the flavor. It is a must for any dough. - Olive oil: This gives the pasta a lovely texture and adds flavor. It keeps the dough from sticking. - Water: You might need this to adjust the dough. Add it slowly until you get the right texture. - Herbs: Try adding fresh herbs like basil or parsley for a burst of flavor. - Spices: A pinch of garlic powder or red pepper flakes can spice things up. - Vegetable puree: Mix in spinach or beet puree for colorful and tasty pasta. To start, gather your ingredients. You need: - 2 cups all-purpose flour - 1 cup sourdough starter (fed and bubbly) - 1 large egg - 1 teaspoon salt - 1 tablespoon olive oil - Water (as needed) In a large bowl, mix the flour and salt. Make sure the salt is evenly spread. Next, create a well in the center. Add the sourdough starter, egg, and olive oil into this well. Using a fork, mix the flour into the wet ingredients. Keep mixing until a shaggy dough forms. If it feels too dry, add water, one tablespoon at a time, until it holds together. Now it's time to knead the dough. Transfer it to a lightly floured surface. Knead the dough for about 8-10 minutes. You want it to be smooth and elastic. If the dough sticks to your hands, sprinkle on a little more flour. Once you have a nice dough, shape it into a ball. Wrap it in plastic wrap. Let it rest at room temperature for at least 30 minutes. This rest helps the gluten relax, making your pasta easier to roll out. After the dough has rested, divide it into four equal pieces. Keep the pieces covered to stop them from drying. Roll out each piece using a pasta machine or a rolling pin. Aim for your preferred thickness, dusting with flour to prevent sticking. Once rolled out, cut the dough into your favorite pasta shape. You can choose fettuccine, tagliatelle, or even lasagna sheets. Dust the cut pasta with a bit of flour. This will help keep it from sticking together. Now your homemade sourdough pasta is ready for cooking! To get the right dough, start with the right flour. Use all-purpose flour for a great texture. The sourdough starter should be fed and bubbly. This gives the pasta a nice rise and flavor. Mix the flour and salt well before adding wet ingredients. Create a well in the center for the starter, egg, and oil. If your dough feels dry, add water slowly, one tablespoon at a time. Knead until smooth and elastic. This should take about 8-10 minutes. Rest the dough so the gluten can relax. This makes rolling easier. One common mistake is not measuring ingredients properly. Use cups for flour and a liquid measure for water. Another mistake is adding too much water too fast. This can make the dough too sticky. If this happens, add more flour gradually. Make sure to knead for a full 8-10 minutes. Not kneading long enough will give you tough pasta. Lastly, don’t skip the resting time. This step is key for good texture. For extra flavor, try adding herbs or spices to the flour. A teaspoon of garlic powder or dried basil can work wonders. You can mix in pureed vegetables, like spinach or beet, for color and taste. This also adds nutrients. If you want a richer flavor, use a little more olive oil. Experiment with different types of salt too. Sea salt can give a nice crunch. Don’t be afraid to get creative! {{image_2}} You can make ravioli with your sourdough pasta. Start by rolling out your dough thin. Cut circles or squares for the pasta pieces. Place a spoonful of your filling in the center. Then, fold the dough over and seal the edges with a fork. You can use ricotta, spinach, or any filling you like. This makes a tasty meal that impresses anyone! Flavor your sourdough pasta with fun ingredients. For spinach pasta, blend fresh spinach with a bit of water. Mix this with your dough. For beet pasta, use roasted beets and puree them. This adds a vibrant color and taste. You can try other flavors too, like herbs or spices. Get creative and make your pasta unique! If you need gluten-free pasta, you can use gluten-free flour blends. Look for one that mixes well with sourdough starter. The texture may differ, but it still tastes great. You can also try chickpea or rice flour for a different flavor. Just follow the same steps, and you’ll have delicious gluten-free sourdough pasta! To keep your homemade sourdough pasta fresh, store it properly. Start by laying the pasta on a clean surface. Dust it lightly with flour to prevent sticking. Then, arrange the pasta in a single layer. You can use parchment paper between layers if needed. Place it in an airtight container or a zip-top bag. Make sure to remove excess air before sealing. This way, your pasta stays fresh and tasty. Freezing your sourdough pasta is easy. First, let the pasta dry for about 30 minutes. Then, spread it flat on a baking sheet. Freeze it for about one hour until firm. Once firm, transfer the pasta to a freezer bag. Be sure to label the bag with the date. To thaw, take out the pasta and let it sit at room temperature for about 15 minutes. Cook it straight from frozen or after thawing. Fresh sourdough pasta will last in the fridge for about 2 to 3 days. If you freeze it, the pasta can last for up to 3 months. After that, the quality may drop. Always check for any signs of spoilage before cooking. When you follow these tips, your homemade pasta remains delicious for longer! Using sourdough in pasta adds a unique flavor. It gives the pasta a slight tang. This tanginess makes each bite more exciting. Sourdough also helps with texture. It creates a chewy and firm pasta that holds sauce well. Plus, sourdough is easier to digest for some people. This is due to the fermentation process. It can also enhance the nutrients in the flour. Yes, you can make sourdough pasta without eggs. Just replace the egg with more sourdough starter. Use about half a cup of starter instead. You might need to adjust the flour and water. Start with the same amount of flour. Add water slowly until the dough comes together. This eggless version will still taste great! The texture will be slightly different but still delicious. Fresh pasta cooks fast, usually in 2-4 minutes. Start checking it after 2 minutes. It should be tender yet firm to the bite. This is called “al dente.” If it’s too soft, it may be overcooked. Always taste a piece to be sure! Once done, drain the pasta and enjoy it with your favorite sauce. In this post, we explored how to make delicious sourdough pasta. We covered the key ingredients and how each one plays a part. You learned step-by-step instructions, tips for a great dough, and tasty variations. Remember, practice makes perfect. Don’t let a few mistakes stop you. Each batch helps you get better. Enjoy your homemade pasta with flavors that shine. Cooking is a fun journey, so keep experimenting and tasting. Your kitchen is waiting for your next creation!

Homemade Sourdough Pasta Easy and Delicious Recipe

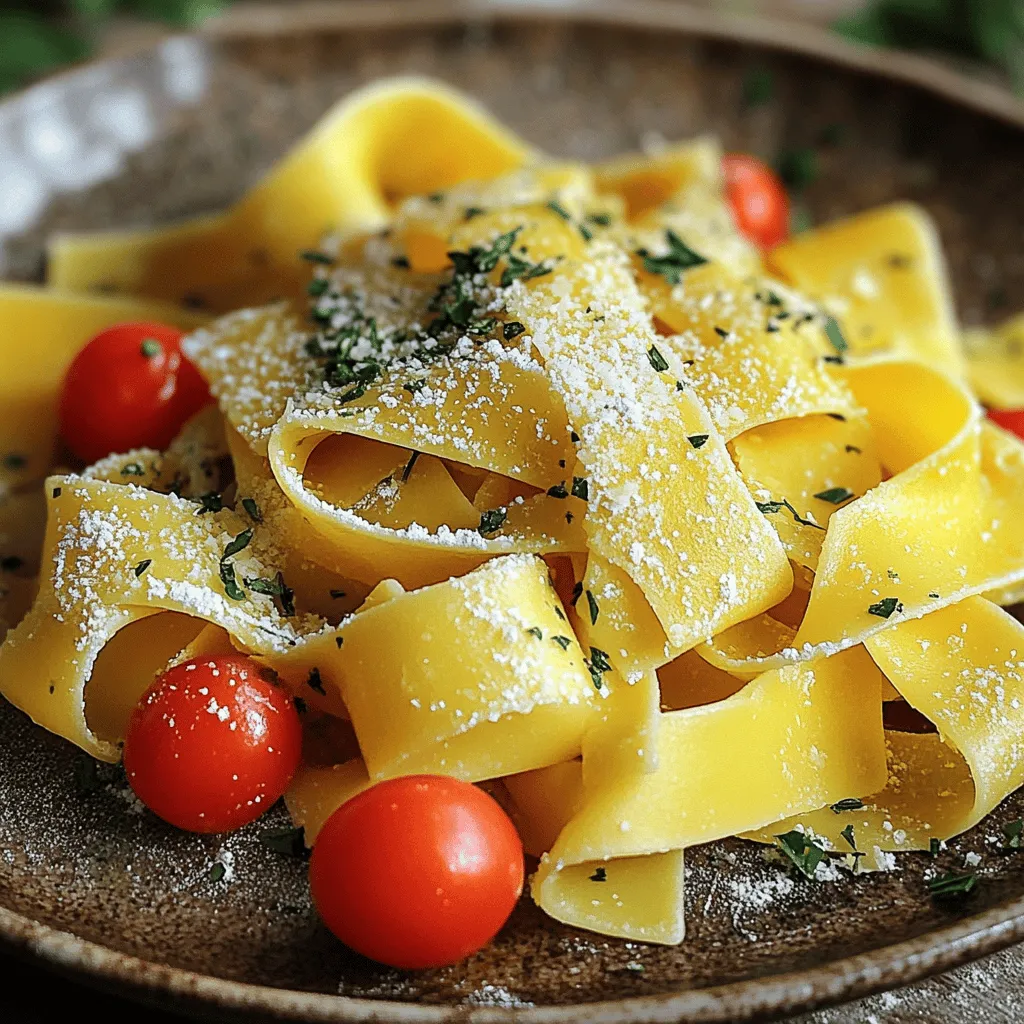
Do you want to elevate your pasta game? Let me show you how to make homemade sourdough pasta. This easy

- RITZ Crackers - Cream cheese and its variations For these sandwiches, you need a box of RITZ crackers. They give a nice crunch. You will also need 8 ounces of cream cheese. Softened cream cheese blends well with other flavors. You can use plain cream cheese or try flavored ones. - Diced red bell pepper - Green onions - Deli meats like turkey or ham Next, add some diced red bell pepper. This gives a sweet taste and bright color. Chopped green onions add a fresh bite. If you like, slice some deli turkey or ham for extra protein. These meats make your sandwiches heartier and more filling. - Garlic powder - Cayenne pepper - Garnishes like parsley or chives For extra flavor, you can add garlic powder. Just half a teaspoon works well. If you want a little heat, use a pinch of cayenne pepper. It's optional but worth a try. Finally, consider garnishing your sandwiches with fresh parsley or chives. They add a lovely touch and make the dish more appealing. First, gather your ingredients. In a medium bowl, combine 8 oz of softened cream cheese, 1/2 cup of diced red bell pepper, 1/4 cup of chopped green onions, 1/2 tsp of garlic powder, and a pinch of cayenne pepper if you like some heat. Mix them well until the cream cheese is smooth and all the bits are blended in. Next, take a RITZ cracker and spread about a tablespoon of your creamy mixture on top. Make sure to cover the cracker well for the best flavor. If you want, you can add a slice of deli turkey or ham on top of the cream cheese mixture for extra taste. Now, it’s time to make the sandwiches! Place another RITZ cracker on top of the cream cheese mix. Press down gently to hold everything together. Repeat this step until you have used all of the mixture. You will end up with a lovely platter of RITZ cracker sandwiches that are ready to impress. To make your sandwiches look pretty, add a garnish of fresh parsley or chives on top. This adds color and a bit more flavor. For serving, arrange the sandwiches on a nice platter. You can even use a colorful plate to make them stand out at your gathering. Enjoy your delicious RITZ cracker party sandwiches! To get the best taste, start with softened cream cheese. Softened cream cheese blends easily with other ingredients. It helps create a smooth and creamy filling. If the cream cheese is cold, it will be hard to mix. Next, balance flavors with spices and veggies. Diced red bell pepper adds sweetness and crunch. Green onions bring a mild onion flavor. Garlic powder adds depth without being too strong. If you like heat, add a bit of cayenne pepper. It gives the sandwiches a nice kick. Make your sandwiches look great! You can arrange the sandwiches in fun shapes. Try stacking them in a pyramid or a circle. This makes your platter eye-catching. Using colorful garnishes adds more appeal. Fresh parsley or chives not only look nice but also add flavor. Scatter them on top of the sandwiches for a pop of color. If you have a party coming up, prepare the filling in advance. You can make it a few hours before your guests arrive. Just store it in the fridge until you’re ready to assemble. For quick assembly, have your RITZ crackers and filling ready. You can spread the mixture and stack the sandwiches in just a few minutes. This way, you won’t rush when guests arrive. {{image_2}} You can switch up the fillings to suit your taste. For a vegetarian option, try using mashed avocado or hummus. Both add creaminess and flavor. If you want meat, consider chicken salad or roast beef. These options bring different textures and tastes to the table. Want a little heat? Add sliced jalapeños for a spicy kick. This will give your sandwiches a zesty twist. If you like sweet and savory, try using fruit spreads like fig or apple. These spreads complement the cream cheese well and add a fun flavor mix. Make your sandwiches match the season! For holidays, use red and green veggies or festive spreads. This adds a fun touch to your party table. For kids' parties, use fun ingredients like peanut butter and jelly or mini pepperonis. Kids love colorful and playful food! To keep RITZ cracker sandwiches fresh for a day, place them in an airtight container. This helps to keep the crackers crisp and the filling creamy. If you stack them, add parchment paper between layers. This will prevent sticking. For longer storage, you can freeze the sandwiches. Wrap each sandwich tightly in plastic wrap. Then, place them in a freezer bag. This method keeps the flavors intact. Use the sandwiches within three months for the best taste. To refresh stored sandwiches, let them sit out for a few minutes. This helps them regain some texture. If you want them warm, use a microwave. Heat them for about 10-15 seconds. This will warm the filling without making the crackers soggy. Enjoy your tasty bites! Yes, you can make these sandwiches in advance. Just prepare them a few hours before your event. Keep them in a sealed container in the fridge. This helps the flavors mix well. But, don't stack them too high. The crackers might get soggy if they sit too long. For best taste, eat them within 24 hours. There are many fun ways to change up these sandwiches! Here are some ideas: - Use different cheeses, like cheddar or goat cheese. - Add veggies like cucumbers or olives for crunch. - Swap turkey or ham with chicken salad or roast beef. - Try using hummus or avocado for a vegetarian option. - For a sweet twist, add a fruit spread with cream cheese. You can find RITZ crackers in many places. Check your local grocery store in the snack aisle. If you can't find them, try online shopping. Websites like Amazon often have them. You can also visit big-box stores. They usually have a wider selection of snacks. Don't forget to check specialty food stores too. RITZ cracker sandwiches are simple, tasty, and fun. We covered the main ingredients like RITZ crackers and cream cheese, as well as add-ins like meats and veggies. Remember to use fresh garnishes for a special touch. You can customize these sandwiches for any event. Make them spicy or sweet based on your taste. With the right storage tips, they stay fresh and tasty. Now, you’re ready to impress your guests with these easy, delicious snacks. Enjoy your culinary adventure!

RITZ Cracker Party Sandwiches Delicious and Easy Recipe

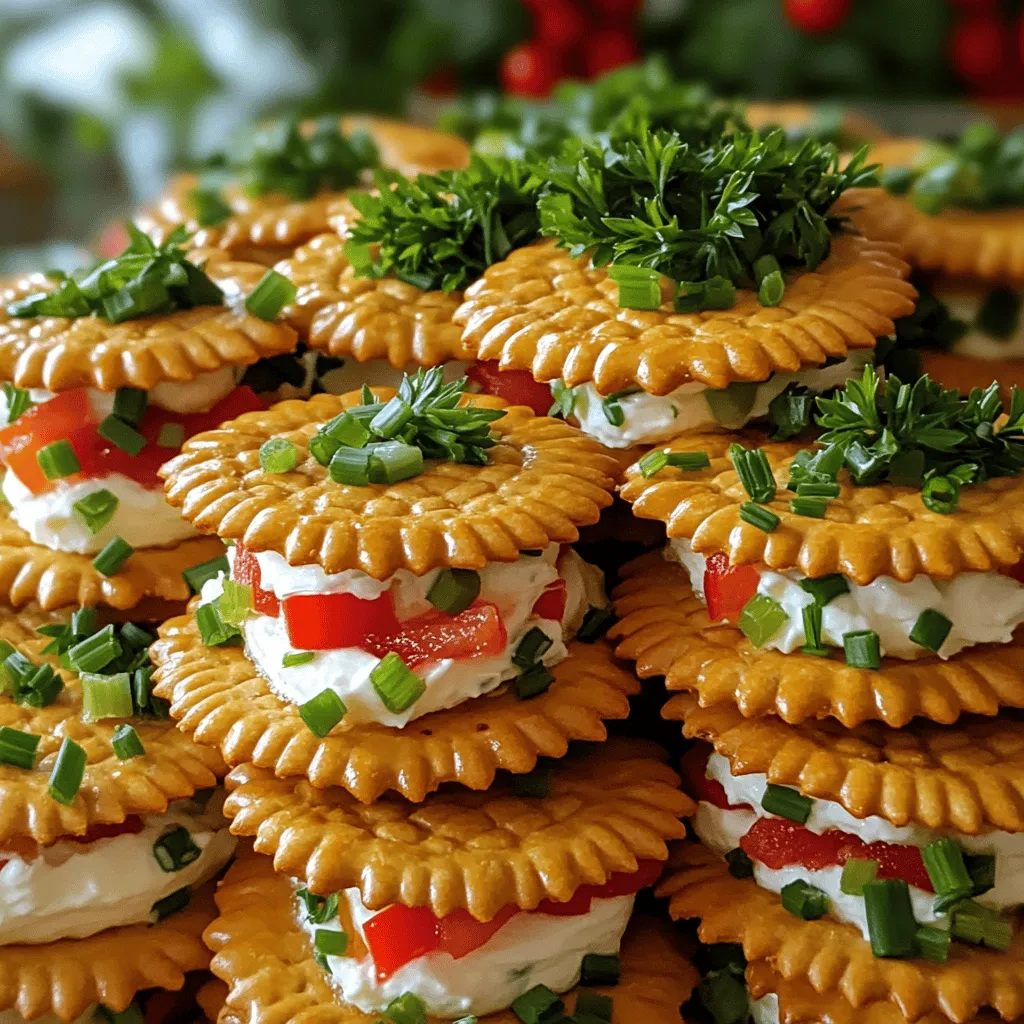
Looking for a fun and easy party snack? RITZ Cracker Party Sandwiches fit the bill! These tasty bites are simple

- 2 boneless, skinless chicken breasts, diced - 8 oz penne pasta - 1 cup heavy cream - Red pepper flakes - Fresh parsley - 1 teaspoon Italian seasoning - Salt and pepper to taste The main ingredients form the base of this dish. First, you need chicken breasts, which provide great protein and flavor. Next is penne pasta, a classic choice that holds the sauce well. Finally, the heavy cream gives the dish its creamy texture. You can enhance the flavor with optional ingredients. Red pepper flakes add a nice kick if you like spice. Fresh parsley not only adds color but also a fresh taste. Seasonings round out the dish. Italian seasoning brings herbs together, while salt and pepper help balance the flavors. This simple list of ingredients makes it easy to whip up a delicious meal that impresses family and friends. First, you need to cook the penne pasta. Follow the package instructions. Make sure to cook it until it is al dente. This means it should have a slight bite when you chew it. Once done, drain the pasta in a colander. Set it aside while you prepare the chicken. Next, let’s cook the chicken. Take two boneless, skinless chicken breasts and dice them into small pieces. Heat a large skillet over medium heat. Add two tablespoons of unsalted butter. Once the butter melts, add the diced chicken. Season it well with salt and pepper. Cook the chicken for about 5 to 7 minutes. It should turn golden brown and be fully cooked. Afterward, remove the chicken from the skillet and set it aside. This helps to keep it juicy. Now, it’s time to make the sauce. In the same skillet, add the remaining two tablespoons of butter. Then, add four minced garlic cloves. Sauté the garlic for 1 to 2 minutes. You want it to smell nice but not burn. Next, pour in 1 cup of heavy cream. Bring it to a gentle simmer. Stir in 1 teaspoon of Italian seasoning. Let the sauce cook for about 3 to 4 minutes. This thickens it up and adds flavor. Gradually whisk in 1 cup of grated Parmesan cheese. Keep stirring until it melts and the sauce is smooth. Return the cooked chicken to the skillet. Then, add the penne pasta. Toss everything together well, so the pasta is coated in the creamy sauce. If you want, you can adjust the seasoning with extra salt, pepper, or red pepper flakes. Cook it for another 2 to 3 minutes until it’s all hot. Now, your Garlic Parmesan Chicken Pasta is ready to serve! To keep the chicken tender and juicy, cook it over medium heat. This helps seal in moisture. Cut the chicken into small bites for even cooking. Always season with salt and pepper before cooking. For a creamy sauce, make sure to use heavy cream. Heat it slowly to avoid curdling. Stir in the Parmesan cheese gradually. This keeps it smooth and creamy. If the sauce gets too thick, add a splash of pasta water to loosen it. Garnish your dish with fresh parsley for a pop of color. You can also sprinkle some extra Parmesan on top. For a bit of heat, add red pepper flakes. Pair this pasta with a crisp green salad. Garlic bread also works great on the side. If you enjoy wine, a chilled white wine complements the flavors well. Avoid overcooking the pasta. Cook it until it's al dente, so it stays firm. Drain it right away to stop the cooking. Make sure to balance the seasoning. Taste the sauce before serving. Adjust with more salt, pepper, or spices as needed. A well-seasoned dish makes all the difference in flavor. {{image_2}} You can switch up the protein in this dish easily. Shrimp works great with garlic and cream. Just sauté the shrimp until pink. Tofu is another option. It soaks up flavors well. Press the tofu to remove excess water, then cube and cook it. You can also add vegetables like broccoli or bell peppers for a tasty vegetarian option. They add color and crunch. Just toss them in with the chicken or tofu for a hearty meal. If you want to change the taste, try different cheeses. Cheddar or mozzarella can bring a new twist. Mixing in cream cheese will make the sauce extra rich. You can also spice things up! Add red pepper flakes for some heat. Or try smoked paprika for a smoky flavor. Experiment with herbs like basil or thyme for more depth. While penne is great, you can use other pasta shapes. Fusilli or farfalle are fun choices. They hold sauce well and look nice on the plate. If you need a gluten-free option, use gluten-free pasta. Look for brands made from rice or quinoa. They cook similarly and taste good too. Just keep an eye on the cooking time, as it may differ. To store your Garlic Parmesan Chicken Pasta, let it cool first. Place it in an airtight container. This pasta stays fresh for about 3-4 days in the fridge. Make sure to check for any changes in smell or texture before eating. You can freeze this dish for future meals. Use a freezer-safe container and leave some space for expansion. It freezes well for up to 2 months. When ready to eat, thaw it overnight in the fridge. Reheat it gently on the stove or in the microwave. Add a splash of cream to keep it creamy. Leftover pasta can be fun! You can turn it into a pasta bake. Just add some extra cheese and bake until bubbly. Another idea is to mix it into a salad with fresh veggies. You can also use it in a wrap with some greens. This way, you can enjoy your meal in a new way! To make Garlic Parmesan Chicken Pasta easier, focus on meal prep. Here are a few tips: - Prep chicken ahead: Dice your chicken breasts the night before. Store them in a sealed bag. - Cook pasta in bulk: Make extra penne pasta and store it in the fridge. It lasts well for about five days. - Use pre-minced garlic: This saves time. You can find it in jars at the store. - Make sauce in advance: Prepare the creamy sauce a day before. Just reheat it when ready to use. These steps help you save time and make cooking more fun. Yes, you can use different types of cheese in this recipe. Here are some tasty options: - Mozzarella: Offers a milder taste and great stretch. - Fontina: Adds a rich flavor and melts well. - Asiago: Gives a sharper taste that pairs well with garlic. Feel free to mix and match cheeses. This lets you create your own flavor profile. Pairing side dishes with Garlic Parmesan Chicken Pasta can elevate your meal. Here are a few great options: - Garlic bread: Perfect for soaking up the creamy sauce. - Steamed broccoli: Adds color and nutrition. - Caesar salad: A crisp salad complements the rich pasta. - Roasted vegetables: Carrots and zucchini add a nice touch. These sides bring balance to the meal and make it more satisfying. In this blog post, we covered all you need for a delicious Garlic Parmesan Chicken Pasta. I shared the key ingredients and detailed steps for cooking, making a creamy sauce, and serving. We also explored tips to enhance flavor and avoid common mistakes. Remember, you can easily swap proteins or pasta shapes to fit your taste. Always store leftovers properly to enjoy later. With these insights, you're ready to impress at your next meal. Enjoy your cooking adventure!

Garlic Parmesan Chicken Pasta Fuss-Free Delight

Ready to whip up a delicious meal? Garlic Parmesan Chicken Pasta is not only tasty but also super easy! This

- 1 cup mashed ripe bananas - 1 cup canned pumpkin puree - 1/2 cup vegetable oil - 1 cup brown sugar - 1/2 cup granulated sugar To make banana chocolate chip pumpkin bread, you need a blend of flavors. Start with ripe bananas. They should be soft and sweet. Use about two to three bananas for one cup of mash. Canned pumpkin puree gives the bread a rich texture and taste. It is smooth and easy to mix in. Vegetable oil keeps the bread moist. Using brown sugar adds depth, while granulated sugar sweetens it just right. - 1/2 cup semi-sweet chocolate chips - 1/2 cup chopped walnuts or pecans For extra fun, consider adding chocolate chips. They melt and create little pockets of sweetness. Nuts like walnuts or pecans add crunch and flavor, but they are not necessary. You can skip them if you prefer a smoother texture. - All-purpose flour - Baking soda, baking powder, and salt - Ground spices: cinnamon and nutmeg All-purpose flour is your main base. It helps the bread rise and gives it structure. Baking soda and baking powder are key for leavening. They help the bread become light and fluffy. Don’t forget the salt; it enhances all the flavors. Ground cinnamon and nutmeg bring warmth and spice. They make the bread smell amazing while baking. First, preheat your oven to 350°F (175°C). This step is key for even cooking. Next, get a 9x5-inch loaf pan ready. You can grease it or line it with parchment paper. This makes it easy to remove the bread later. Now, let’s mix the wet ingredients. In a large bowl, combine: - 1 cup mashed ripe bananas (about 2-3 bananas) - 1 cup canned pumpkin puree - 1/2 cup vegetable oil (or melted coconut oil) - 1 cup brown sugar, packed - 1/2 cup granulated sugar - 2 large eggs - 1 teaspoon vanilla extract Stir these until the mixture is smooth and well combined. In a separate bowl, whisk together the dry ingredients. You will need: - 2 cups all-purpose flour - 1 teaspoon baking soda - 1 teaspoon baking powder - 1/2 teaspoon salt - 1 teaspoon ground cinnamon - 1/2 teaspoon ground nutmeg Whisking helps to mix everything evenly. Next, we will slowly add the dry ingredients into the wet mix. Stir gently until just combined. It is important to not overmix. A few lumps are okay. Now, it’s time to add some fun! Fold in: - 1/2 cup semi-sweet chocolate chips - 1/2 cup chopped walnuts or pecans (optional) Make sure they are evenly spread in the batter. Pour the batter into your prepared pan. Use a spatula to smooth the top. Bake it in your preheated oven for 55-65 minutes. Check for doneness by inserting a toothpick into the center. If it comes out clean, your bread is ready! - Avoid overmixing the batter. Mix just until the dry ingredients blend with the wet ones. This keeps the bread light and fluffy. - Allow the bread to cool for optimal slicing. If you cut it too soon, the slices might crumble. Patience pays off! - Use ripe bananas for natural sweetness. The darker the bananas, the sweeter they get. This adds a rich taste to your bread. - Experiment with spice levels. If you love a kick, add more cinnamon or nutmeg. Adjusting spices lets you create a unique flavor every time. - Adjust baking time for different ovens. Some ovens run hotter or cooler, so check your bread earlier or later than the time stated. - Use a toothpick to test for doneness. Insert it into the center; if it comes out clean, your bread is ready! This simple trick helps you avoid underbaking. {{image_2}} You can switch out brown sugar for honey or maple syrup. This change adds a unique taste. Honey offers a floral note, while maple syrup gives a rich flavor. Both options are great for those who want a different sweetness. If you want a healthier option, try using coconut sugar. Coconut sugar has a lower glycemic index than regular sugar. It also has a hint of caramel flavor. This makes it a tasty choice for your bread. To add more texture and taste, try adding dried fruit. Raisins or cranberries work well in this recipe. They bring sweetness and chewiness to each bite. You can mix in about 1/2 cup of your chosen dried fruit. Another fun idea is to incorporate citrus zest. A bit of orange or lemon zest can brighten the flavor. This small addition can elevate your bread to new heights. If you need a gluten-free option, consider using almond or oat flour. Both flours will work well in this recipe. Just replace all-purpose flour with the same amount of your chosen flour. For a vegan adaptation, use flax eggs instead of regular eggs. To make one flax egg, mix 1 tablespoon of ground flaxseed with 2.5 tablespoons of water. Let it sit for a few minutes to thicken. This simple swap keeps your bread delicious and plant-based. To keep your Banana Chocolate Chip Pumpkin Bread fresh, wrap it tightly in plastic wrap. This helps seal in moisture. You can also store the bread at room temperature for a few days. For best results, place the wrapped bread in an airtight container. This keeps out air and helps maintain its soft texture. Make sure to store it away from direct sunlight. If you want to save your Banana Chocolate Chip Pumpkin Bread for later, freezing is a great option. First, let the bread cool completely. Then, wrap it in plastic wrap, ensuring no air gets in. Next, place it in a freezer-safe bag or container. When you're ready to enjoy it again, thaw the bread in the fridge overnight. For the best texture, let it sit at room temperature for a bit before slicing. You can even warm it up in the oven for a few minutes to refresh it. This delicious bread is best enjoyed within a week. After this time, it may start to lose its flavor and moisture. Look for signs that your bread has gone bad. If you see mold or notice an off smell, it’s time to toss it. Trust your senses to determine if it’s still good! Yes, this bread can be made and stored for later. You can bake it a day or two in advance. Just let it cool completely before wrapping it. Store it in an airtight container at room temperature. If you want a longer shelf life, freeze it. Wrap it well in plastic wrap and then in foil. This way, it stays fresh for up to three months. Use a toothpick to check for doneness. Insert the toothpick into the center of the bread. If it comes out clean, your bread is done. If there is wet batter on the toothpick, it needs more time. Keep an eye on the time but trust your toothpick. It is the best tool for this job. Yes, there are several options for substitutions. You can swap brown sugar for honey or maple syrup. Coconut sugar works well too. If you want to make it gluten-free, use almond or oat flour instead of all-purpose flour. For a vegan version, replace eggs with flax eggs. These changes can still give you a tasty bread. In this blog post, we explored how to make delicious Banana Chocolate Chip Pumpkin Bread. I shared essential ingredients, detailed steps, and helpful tips to ensure your success. Remember to adjust ingredients for personal taste and dietary needs. You can experiment with flavors and textures while keeping the basics intact. This bread is perfect for sharing or enjoying alone. With proper storage, you can savor it longer. Dive in, have fun baking, and enjoy each tasty slice!

Delicious Banana Chocolate Chip Pumpkin Bread Recipe

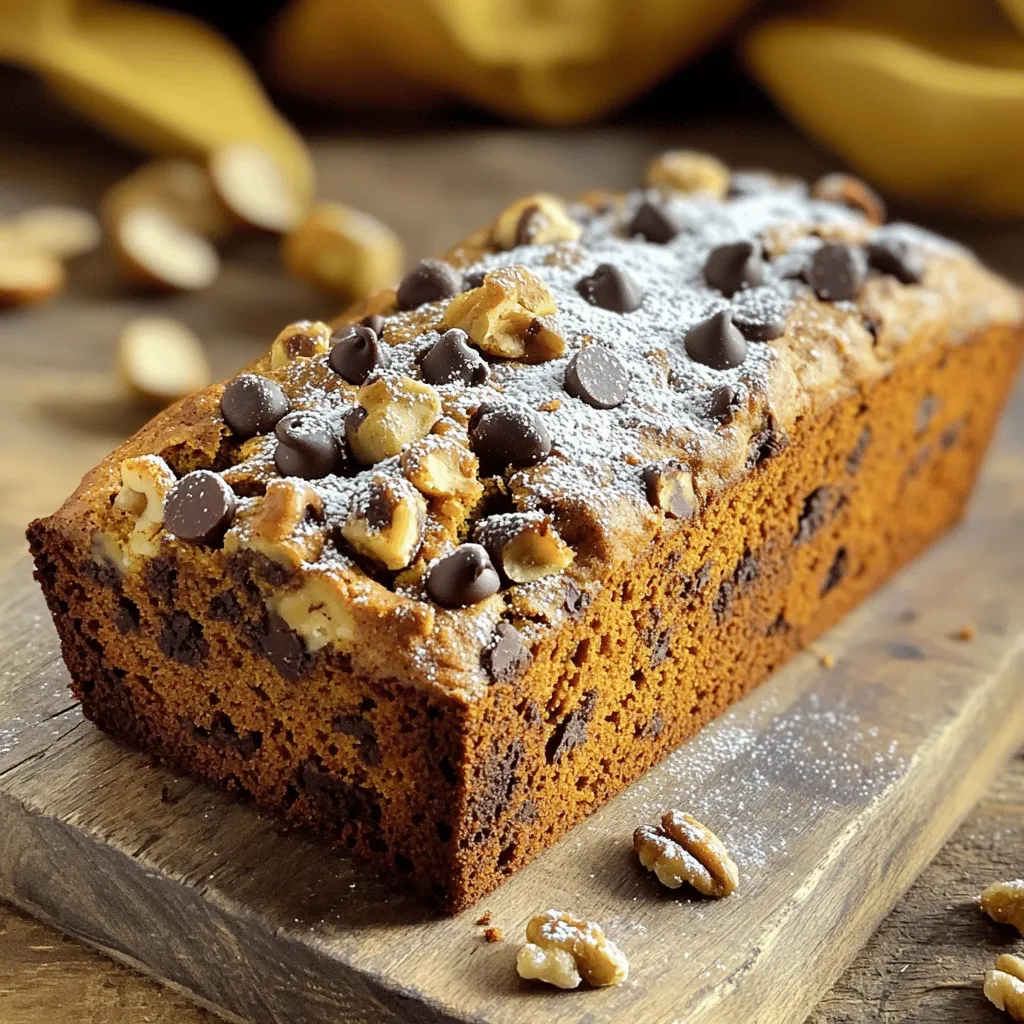
Are you craving a warm, sweet treat that’s perfect for any season? Look no further! This Banana Chocolate Chip Pumpkin

Older posts
Newer posts
← Previous Page1 … Page39 Page40 Page41 … Page84 Next →

dsad

© 2026 Foodish Talk • Built with GeneratePress

Our Policies

  • Copyright Policy
  • Cookie Policy
  • GDPR Policy
  • Privacy Policy
  • Disclaimer
  • Terms Of Use

More Information

  • Home
  • About
  • Contact
  • Appetizers
  • Dessert
  • Dinner
  • Drinks
©2026, Foodish Talk About Back To Top