Skip to content
DisclaimerTerms Of UseGDPR PolicyCookie Policy

Foodish Talk

  • Home
  • Drinks
  • Appetizers
  • Dinner
  • Dessert
  • About
  • Contact
  • Privacy Policy
DisclaimerTerms Of UseGDPR PolicyCookie Policy

NO-ING-IMG

- Large shrimp (1 lb, peeled and deveined) - Unsweetened shredded coconut (1 cup) - Panko breadcrumbs (1 cup) - All-purpose flour (1/2 cup) - Large eggs (2, beaten) - Garlic powder (1 tsp) - Paprika (1 tsp) - Salt (1/2 tsp) - Black pepper (1/4 tsp) - Cooking spray or oil Gathering the right ingredients is key. First, choose large shrimp. I like to use fresh shrimp, but frozen works too. Just make sure they are peeled and deveined. This saves time and makes cooking easier. Next, unsweetened shredded coconut gives a nice crunch. It adds flavor without being too sweet. Panko breadcrumbs are important for that extra crisp. They make the shrimp light and airy. For the coating, you need all-purpose flour. It helps the shrimp stick to the coconut and panko. The seasoning is simple, but tasty. Garlic powder and paprika add depth. Salt and black pepper bring everything together. Finally, you'll need eggs. Beaten eggs help the coating adhere. Cooking spray or oil is essential for a crispy finish. It helps the shrimp cook evenly in the air fryer. Now you have all the ingredients ready. Let’s move on to the next steps! - Rinse shrimp under cold water. - Pat dry with paper towels. First, rinse your shrimp under cold water. This step removes any unwanted grit. After rinsing, pat them dry with paper towels. This helps the coating stick better. - Prepare flour mixture. - Beat eggs. - Combine coconut and panko. Next, grab a shallow dish to prepare the flour mixture. Mix the all-purpose flour, garlic powder, paprika, salt, and black pepper. In another bowl, beat two large eggs until they are frothy. For the third dish, combine the shredded coconut and panko breadcrumbs. This mixture gives the shrimp a nice crunch. Now, it's time to coat the shrimp. First, dredge each shrimp in the flour mixture. Shake off any extra flour. Next, dip the shrimp into the beaten eggs, letting the excess drip off. Finally, coat the shrimp in the coconut and panko mix. Press gently to help it stick. - Preheat air fryer to 375°F (190°C). - Place shrimp in the air fryer and spray with cooking spray. - Cook for 8-10 minutes, flipping halfway through. Preheat your air fryer to 375°F (190°C) for about five minutes. Lightly spray the basket with cooking spray to stop the shrimp from sticking. Place the coated shrimp in a single layer in the basket. Make sure they are not crowded. Spray the tops of the shrimp with a little more cooking spray. This helps them get crispy. Cook the shrimp for 8-10 minutes. Flip them halfway through to ensure they cook evenly. Your shrimp should turn a lovely golden brown and become crispy. Once done, remove them and let them cool slightly before serving. Enjoy your crispy air fryer coconut shrimp! To ensure your shrimp turn out crispy, proper coating is key. Start with dry shrimp. Rinse them and pat them dry with paper towels. This helps the coating stick better. Use a three-step method for coating: - Dip shrimp in the flour mix first. Shake off any extra. - Next, dip it in the beaten eggs. Let the excess drip off. - Finally, roll the shrimp in the coconut and panko mix. Press gently to help it stick. Using cooking spray effectively can also improve crispiness. Lightly spray the air fryer basket before adding shrimp. This prevents sticking and helps them crisp up. Spray the tops of the shrimp as well. A little oil goes a long way! For a fun twist, pair your coconut shrimp with delicious sauces. Sweet chili sauce is a great choice. It adds a sweet and spicy kick. You can also try mango salsa. Its fresh taste complements the shrimp well. Don't forget about garnishes! Lime wedges and fresh cilantro not only add flavor but also look great on the plate. A colorful presentation makes the dish more appealing. Cooking times can vary based on shrimp size. Larger shrimp may need more time, while smaller ones cook faster. Always check for doneness. The shrimp should be golden brown and crispy. If you have different sizes, cook them in batches for even results. Flipping the shrimp halfway through also helps them cook evenly. {{image_2}} You can easily change the taste of your coconut shrimp. Add spices like cayenne for heat. A pinch of cumin or chili powder also works well. Fresh herbs like cilantro or parsley can bring a bright flavor. Experiment with your favorites to find the perfect mix. If you want to switch things up, try using crushed cornflakes instead of panko. They give a nice crunch! You can also use flavored breadcrumbs for added taste. Get creative with what you have in your pantry! Pair your shrimp with tasty sauces. Sweet chili sauce is a classic choice. For something different, try mango salsa or a tangy yogurt dip. You can make your own sauces with simple ingredients. Explore store-bought options too. There’s no wrong way to dip! To keep your leftover coconut shrimp fresh, store them in an airtight container. This keeps the shrimp from drying out. You can place them in the fridge for up to three days. Before serving, check to ensure they still smell fresh. To freeze crispy coconut shrimp, first let them cool completely. Then, place them in a single layer on a baking sheet. Freeze them for about an hour. Once solid, transfer the shrimp to a freezer bag. Make sure to remove as much air as possible. You can freeze them for up to three months. To reheat the shrimp and keep them crispy, use your air fryer. Preheat it to 375°F (190°C). Place the shrimp in a single layer in the basket. Heat them for 4-5 minutes, flipping halfway through. This method keeps the shrimp crunchy and delicious. You can also use an oven at the same temperature, but the air fryer works best for crispiness. To make coconut shrimp, follow these steps: 1. Rinse shrimp under cold water, then dry with paper towels. 2. Mix flour, garlic powder, paprika, salt, and black pepper in a shallow dish. 3. Beat eggs in a second dish until frothy. 4. Combine shredded coconut and panko breadcrumbs in a third dish. 5. Dredge shrimp in flour, dip in eggs, and coat with coconut mixture. 6. Preheat air fryer to 375°F (190°C) for 5 minutes. 7. Spray air fryer basket with cooking spray. 8. Place shrimp in a single layer and spray tops with cooking spray. 9. Cook for 8-10 minutes, flipping halfway until golden brown. This method gives you shrimp that are crispy outside and tender inside. Yes, you can use frozen shrimp. Just remember to thaw them first. - Place frozen shrimp in cold water for about 15-20 minutes. - Pat them dry before coating. - Using fresh shrimp may give better texture, but frozen works well too. Both options taste great, so pick what you have! Coconut shrimp pairs nicely with several side dishes. Here are some good options: - Sweet chili sauce for dipping adds a nice kick. - Mango salsa brings sweetness and freshness. - A simple green salad can balance the dish. - Serve with rice or quinoa for a filling meal. These sides enhance the flavors and make your meal complete! In this post, I shared how to make crispy coconut shrimp in the air fryer. You learned about the key ingredients, step-by-step cooking instructions, and tips for extra crispiness. I offered ideas for flavor variations, serving suggestions, and safe storage tips. With a few easy steps, you can enjoy this tasty dish. Experiment to find your favorite flavors and pairings. Try making this recipe soon, and enjoy a delicious meal that impresses!

Crispy Air Fryer Coconut Shrimp Delightful Recipe

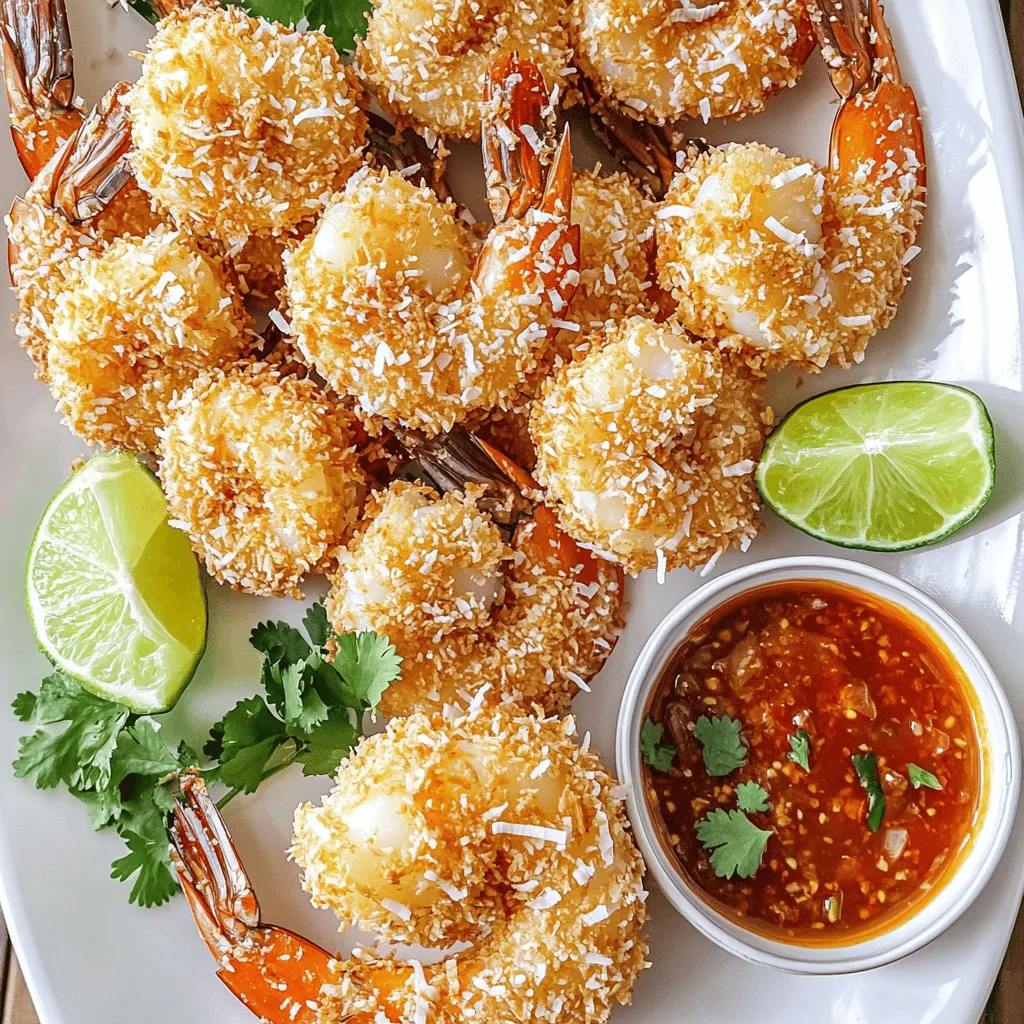
If you crave a crispy snack that’s both delicious and easy to make, you’ll love my Crispy Air Fryer Coconut

To make salted brown butter blondies, gather these simple ingredients: - 1 cup (2 sticks) unsalted butter - 1 cup packed brown sugar - 1/2 cup granulated sugar - 2 large eggs - 2 teaspoons vanilla extract - 2 cups all-purpose flour - 1 teaspoon baking powder - 1/2 teaspoon baking soda - 1/2 teaspoon salt - 1 cup chocolate chips (semi-sweet or milk chocolate) - Flaky sea salt for topping Choosing good ingredients makes a big difference. Here are a few tips: - Butter: Pick high-quality unsalted butter. It helps the brown butter shine. - Sugars: Use fresh brown sugar. Old brown sugar can harden and clump. - Eggs: Fresh eggs are key. They make your blondies fluffy and rich. - Flour: Look for all-purpose flour with high protein content. It gives the right texture. - Chocolate Chips: Use semi-sweet or milk chocolate chips. They melt beautifully in the blondies. If you need to swap some ingredients, here are some ideas: - Butter: You can replace unsalted butter with coconut oil for a dairy-free option. - Sugars: Instead of granulated sugar, you can use coconut sugar for a deeper flavor. - Chocolate Chips: Dark chocolate chips work well for a richer taste. - Flour: Use a gluten-free blend if you want gluten-free blondies. - Eggs: Try flaxseed meal mixed with water as an egg replacement. Use 1 tablespoon flaxseed and 2.5 tablespoons water per egg. Experimenting with these options can help you customize your blondies for your taste! First, gather all your ingredients. This will make the process easier. You need: - 1 cup unsalted butter - 1 cup packed brown sugar - 1/2 cup granulated sugar - 2 large eggs - 2 teaspoons vanilla extract - 2 cups all-purpose flour - 1 teaspoon baking powder - 1/2 teaspoon baking soda - 1/2 teaspoon salt - 1 cup chocolate chips - Flaky sea salt for topping Make sure your butter is at room temperature. This helps with mixing later. Also, measure your flour carefully for the best texture. Now it’s time to start baking. First, preheat your oven to 350°F (175°C). Grease an 8x8-inch pan and line it with parchment paper. This makes removing the blondies easy. Next, brown the butter. In a medium saucepan, melt the butter over medium heat. Stir often. You want it to foam and turn golden brown. This takes about 5-7 minutes. When it has a nutty smell, remove it from heat and let it cool slightly. In a large bowl, mix the brown butter with brown sugar and granulated sugar. Whisk until it’s smooth. Let it cool for a few minutes before adding eggs. This prevents egg scrambling. Add the eggs one at a time. Whisk well after each addition. Next, mix in the vanilla extract. In another bowl, whisk together the flour, baking powder, baking soda, and salt. Gradually add this dry mixture to the wet mixture. Stir gently until just combined. Avoid overmixing to keep them chewy. Now fold in the chocolate chips. Make sure they are evenly spread throughout the batter. Pour the batter into the prepared pan. Smooth the top with a spatula. Sprinkle a pinch of flaky sea salt on top. Place the pan in the oven. Bake for 25-30 minutes. The edges should be golden. A toothpick inserted in the center should come out with moist crumbs. After baking, let the blondies cool for about 10 minutes in the pan. Use the parchment paper to lift them out. Place them on a wire rack to cool completely. Once cooled, cut them into squares. You can serve them on a rustic board. Dust with powdered sugar and add more sea salt on top for a nice look. Enjoy your delicious blondies! To get the best brown butter flavor, watch your butter closely. Melt it slowly over medium heat. Stir often to stop it from burning. Look for a golden color and a nutty smell. This takes about 5-7 minutes. If it smells burnt, start over. Brown butter makes your blondies rich and delicious. For chewy blondies, mix your batter gently. Overmixing can make them tough. Use room temperature eggs for better mixing. Also, don’t skip the brown sugar; it helps keep them soft. Finally, bake just until the edges are golden. A few moist crumbs on the toothpick means they are perfect. Don't rush the cooling times. Let the butter cool before adding eggs. If the butter is hot, it can cook the eggs. Another mistake is not lining the pan properly. Use parchment paper for easy removal. Lastly, don’t skip the flaky sea salt on top. It balances the sweetness and adds flavor. {{image_2}} You can make these blondies even better with fun add-ins. Here are some ideas: - Chopped Nuts: Walnuts, pecans, or almonds add crunch and flavor. - Dried Fruits: Try adding raisins, cranberries, or cherries for sweetness. - M&Ms: These colorful candies bring a playful twist to your blondies. Feel free to mix and match any of these to suit your taste. Just remember to keep the total volume similar to the chocolate chips. Blondies are very versatile! You can play with flavors to create your perfect treat. Here are some combinations to try: - Coconut: Add shredded coconut for a tropical feel. - Peanut Butter: Swirl in some creamy peanut butter for a nutty kick. - Coffee: Mix in instant coffee granules for a rich, bold flavor. Experiment with these flavors to find your favorite. It’s a fun way to switch things up! You can make these blondies fit different diets! Here’s how to adapt the recipe: - Gluten-Free: Use a gluten-free flour blend instead of all-purpose flour. - Dairy-Free: Swap the butter for coconut oil or a dairy-free butter alternative. These changes keep the blondies tasty while fitting your needs. Just be sure to check the labels for any hidden ingredients. Enjoy making these blondies your own! To keep your blondies fresh, store them in an airtight container. Place parchment paper between layers to prevent sticking. Blondies stay tasty at room temperature for about three days. If you want to keep them longer, move to the fridge. They can last up to a week this way. Freezing is a great way to save blondies for later. First, let them cool completely. Then, cut them into squares. Wrap each piece tightly in plastic wrap. Place the wrapped blondies in a freezer-safe bag or container. They can stay frozen for up to three months. When you’re ready to enjoy, just thaw in the fridge or at room temperature. Reheating blondies brings back that warm, gooey goodness. You can heat them in the microwave for about 10-15 seconds. If you prefer an oven, preheat to 350°F. Place the blondies on a baking sheet and warm for about 5-10 minutes. This helps revive the soft texture and flavor. Add a sprinkle of sea salt on top for extra delight! Yes, you can swap sugars. Brown sugar adds moisture and richness. If you use only granulated sugar, the blondies may be less chewy and more cake-like. A mix of both sugars keeps the great texture. Experiment with coconut sugar for a unique flavor. Just remember, the sweetness can change. Check for golden edges and a slight spring to the top. Insert a toothpick into the center. If it comes out with a few moist crumbs, they are done. If it’s wet, bake for a few more minutes. Keep an eye on them to avoid overbaking. Absolutely! Brown butter can be made in advance. Store it in the fridge for up to a week. Just let it come back to room temperature before using. This saves time and still gives you that nutty flavor. In this post, we explored the key ingredients, steps, and tips for making blondies. I shared how to choose quality items and common substitutions. You learned the best methods for prepping and baking, plus how to cool and serve. We discussed achieving great flavor and texture, along with variations for everyone’s taste. Finally, you now know how to store leftovers and reheat them. With these insights, you can bake perfect blondies that everyone will enjoy. Happy baking!

Salted Brown Butter Blondies Irresistible and Delightful

Ready to treat your taste buds? Let’s dive into the world of Salted Brown Butter Blondies! These sweet treats combine

To make the Edamame Quinoa Power Salad, you will need: - 1 cup quinoa, rinsed - 2 cups water - 1 cup shelled edamame (fresh or frozen) - 1 red bell pepper, diced - 1 small cucumber, diced - 1 avocado, diced - 1/4 cup red onion, finely chopped - 1/4 cup fresh cilantro, chopped - 3 tablespoons olive oil - 2 tablespoons lime juice - 1 teaspoon honey (or agave syrup for a vegan option) - Salt and pepper to taste You can switch up some of the ingredients if you like. Here are a few options: - Quinoa: You can use farro, barley, or brown rice instead. - Edamame: Try green peas or chickpeas if you need a change. - Red bell pepper: Yellow or orange peppers work well too. - Avocado: Substitute with diced mango for a sweet twist. - Olive oil: Use avocado oil or a nut oil like walnut oil. This salad is packed with nutrition: - Quinoa: A complete protein and rich in fiber. It helps keep you full longer. - Edamame: Offers high protein and fiber. Great for muscle repair and digestion. - Red bell pepper: Full of vitamin C, it boosts your immune system. - Cucumber: Hydrating and low in calories, it adds crunch and freshness. - Avocado: Provides healthy fats that are good for your heart. - Cilantro: Contains antioxidants and adds a bright flavor. Each ingredient brings its own health benefits, making this salad a nourishing choice for any meal. To cook the quinoa, start by rinsing 1 cup of quinoa under cold water. This step helps remove any bitter taste. In a medium saucepan, add the rinsed quinoa and 2 cups of water. Bring this mix to a boil over high heat. Once boiling, reduce the heat to low, cover the pan, and let it simmer for about 15 minutes. The water will absorb, and the quinoa will become fluffy. After cooking, remove it from heat and let it cool in the pan. If you're using frozen edamame, place it in a pot of boiling water. Cook for about 3 to 5 minutes until it is heated through. Then, drain the edamame and set it aside to cool. If you have fresh edamame, you can simply shell it and set it aside. In a large mixing bowl, combine the cooked quinoa and edamame. Next, add 1 diced red bell pepper, 1 diced cucumber, 1 diced avocado, 1/4 cup finely chopped red onion, and 1/4 cup fresh chopped cilantro. Stir gently to mix the ingredients together. For the dressing, take a small bowl and whisk together 3 tablespoons of olive oil, 2 tablespoons of lime juice, 1 teaspoon of honey, and a pinch of salt and pepper. Whisk until everything is well blended. This dressing adds a fresh and zesty flavor to the salad. Drizzle the dressing over the quinoa and edamame mixture. Toss gently to coat all the ingredients well. It’s important to mix carefully so you don’t mash the avocado. Taste the salad and adjust the seasoning if needed, adding more lime juice, salt, or pepper. You can serve it right away or refrigerate it for 30 minutes. Chilling helps the flavors blend beautifully. Enjoy your Edamame Quinoa Power Salad! To cook quinoa well, start by rinsing it. Use cold water to wash off any bitter taste. Add one cup of rinsed quinoa and two cups of water to a pot. Bring the water to a boil. Once it boils, lower the heat and cover the pot. Let it simmer for about 15 minutes. The quinoa should absorb all the water and fluff up. After cooking, let it cool for a bit before mixing it into your salad. This will help keep the texture light and airy. If you have leftovers, store them in a clean, airtight container. This helps keep the salad fresh. You can put it in the fridge for up to three days. When ready to eat, just give it a good stir. You may want to add a splash of lime juice or olive oil to refresh the flavor. Always check for any signs of spoilage before eating. To give your salad a flavor boost, consider adding spices or herbs. A pinch of cumin or smoked paprika can add warmth. Fresh herbs like basil or mint can bring a bright taste. You can also try adding nuts or seeds for crunch. A sprinkle of sesame seeds or sunflower seeds adds a nice touch. Don't forget to taste as you go! Adjust the salt and lime juice to suit your palate. {{image_2}} You can add proteins to make your salad heartier. Grilled chicken adds a nice flavor and keeps it filling. Tofu is a great plant-based choice. Use firm tofu and grill or pan-sear it. Beans like chickpeas or black beans also work well. They add protein and a touch of creaminess. Feel free to swap in seasonal veggies. In spring, add peas or asparagus. In summer, try cherry tomatoes or zucchini. Fall can bring roasted sweet potatoes or butternut squash. In winter, use kale or Brussels sprouts. These swaps keep your salad fresh and exciting year-round. Explore various dressings to change the flavor. A sesame dressing gives a nutty kick. A spicy sriracha dressing adds heat and depth. For a creamy option, try a yogurt-based dressing. You can also mix herbs like basil or mint into your dressing for a fresh twist. Each dressing can transform the whole dish. To keep your Edamame Quinoa Power Salad fresh, store it in an airtight container. This helps lock in moisture and flavor. Place the salad in the fridge right after you make it. It can stay good for about three days. Before serving, give it a quick toss. If it seems dry, add a splash of lime juice to refresh it. If you want to save some for later, freezing is an option. However, I don’t recommend freezing the whole salad. The avocado and cucumber may not taste great after thawing. Instead, you can freeze the cooked quinoa and edamame separately. Store them in airtight bags. They can last up to three months in the freezer. When you’re ready, just thaw and mix with fresh veggies. Knowing how long each ingredient lasts helps reduce waste. Here’s a quick guide: - Quinoa: Uncooked quinoa lasts about two years in a cool, dry place. - Edamame: Fresh edamame lasts about a week in the fridge. Frozen edamame can stay good for six months. - Avocado: A ripe avocado lasts about two to three days in the fridge. - Cucumber: Store in the fridge for about one week. - Red Bell Pepper: It can last up to one week in the fridge. - Red Onion: Keep it in a cool, dark place for about a month. - Cilantro: Use fresh cilantro within one week for best flavor. This storage info helps you enjoy your salad at its best! Yes, you can make this salad ahead of time. Prepare it up to one day in advance. Just keep it in the fridge. The flavors get better as they sit. However, add the avocado just before serving to keep it fresh and green. Yes, this salad is vegan-friendly. Use agave syrup instead of honey. All the other ingredients are plant-based. It’s a great choice for anyone following a vegan diet. This salad is gluten-free as it is. Quinoa is naturally gluten-free. Just ensure that any other ingredients you use are also gluten-free. Check labels for any hidden gluten. If you want to swap quinoa, try brown rice or millet. Both are good options. They add a nice texture and flavor. You could also use cauliflower rice for a lower-carb choice. Just make sure to adjust cooking times as needed. This blog post covered how to make an Edamame Quinoa Power Salad. We listed the key ingredients and their benefits, along with cooking steps. I shared tips for perfect quinoa and ways to enhance flavors. We explored variations, like adding proteins and seasonal veggies. Lastly, I provided storage tips to keep your salad fresh. Remember, you can customize this salad to your taste. Enjoy experimenting with flavors and ingredients for a dish you'll love. Happy cooking!

Edamame Quinoa Power Salad Healthy and Nourishing

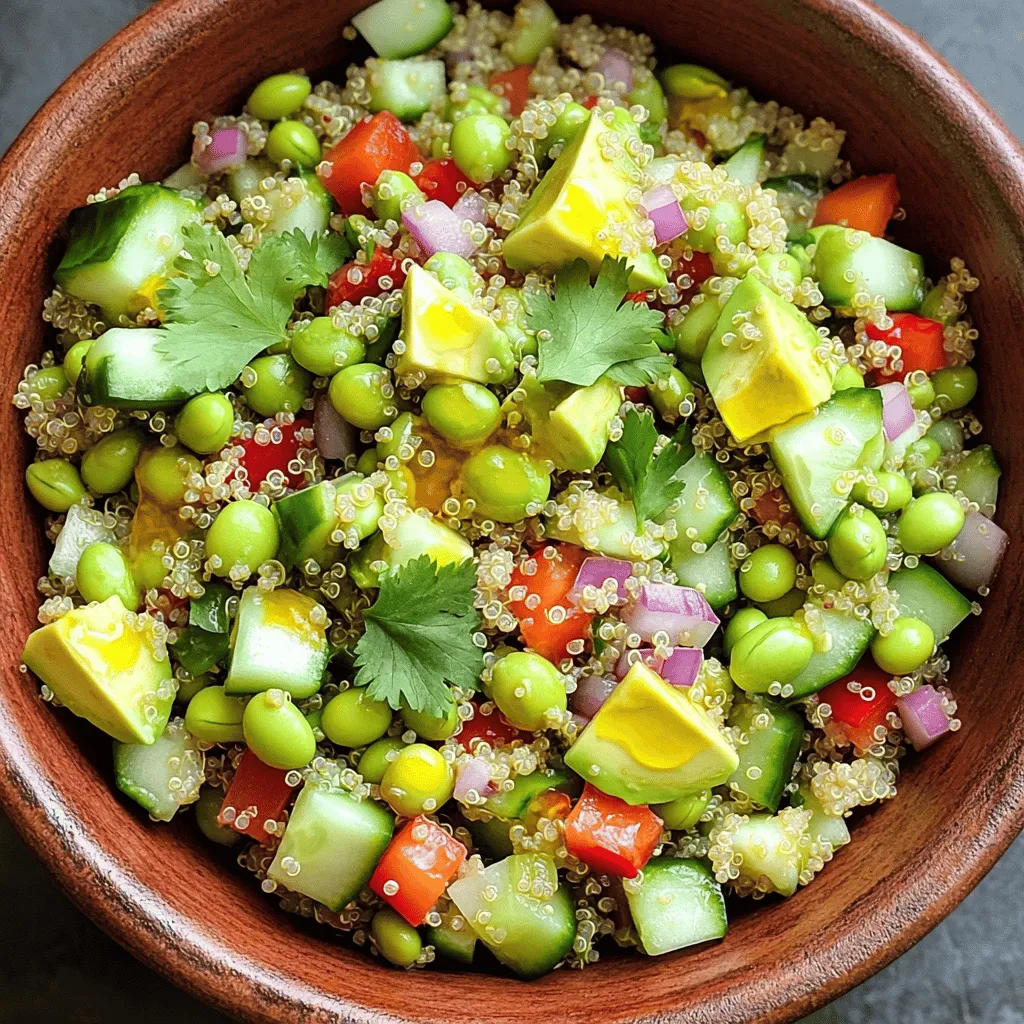
Looking for a delicious and healthy meal? Try my Edamame Quinoa Power Salad! This vibrant dish is packed with protein,

To make the creamy tomato basil gnocchi, gather these key items: - 1 package (16 oz) gnocchi - 2 cups cherry tomatoes, halved - 1 medium onion, diced - 3 cloves garlic, minced - 1 cup vegetable broth - 1 cup heavy cream (or coconut cream for a dairy-free option) - 1 cup fresh basil, chopped - 1 teaspoon dried oregano - 1 tablespoon olive oil - Salt and pepper to taste - Grated Parmesan cheese for serving (optional) These ingredients create a rich and creamy dish filled with flavor. You can personalize this dish by adding: - Spinach or kale for extra greens - Red pepper flakes for a spicy kick - Lemon zest for a fresh twist - Cooked chicken or shrimp for added protein These extras can enhance the meal and make it your own. If you have dietary needs, here are some easy swaps: - Use gluten-free gnocchi for a gluten-free meal. - Coconut cream works well for dairy-free diets. - Swap heavy cream with cashew cream for a lighter option. These substitutions keep the taste while fitting your dietary choices. Gather all your ingredients first. This makes cooking easier. You will need: - 1 package (16 oz) gnocchi - 2 cups cherry tomatoes, halved - 1 medium onion, diced - 3 cloves garlic, minced - 1 cup vegetable broth - 1 cup heavy cream (or coconut cream for a dairy-free option) - 1 cup fresh basil, chopped - 1 teaspoon dried oregano - 1 tablespoon olive oil - Salt and pepper to taste - Grated Parmesan cheese for serving (optional) Now, prepare your workspace. Chop and dice the onion and garlic. Halve the cherry tomatoes. This way, you have everything ready when you start cooking. Heat the olive oil in a large pot over medium heat. Add the diced onion. Sauté for about 3 to 4 minutes until the onion turns soft and clear. Next, add the minced garlic. Cook it for just 1 minute. This will make your kitchen smell great! Now, stir in the halved cherry tomatoes. Cook them for about 5 minutes. You want them to soften and release their juices. After that, pour in the vegetable broth. Bring it to a simmer, which means small bubbles should form. Add the gnocchi to the pot. Stir well to mix everything. Cook the gnocchi according to the package instructions, usually 2 to 3 minutes. Once the gnocchi is soft, lower the heat. Stir in the heavy cream and dried oregano. Mix everything well, and cook for another 2 to 3 minutes. This helps the sauce thicken up nicely. Now it’s time to add the fresh basil. Stir it in gently. Season with salt and pepper to taste. Remove the pot from heat. Serve your creamy tomato basil gnocchi right away. For a special touch, sprinkle grated Parmesan cheese on top if you like. For a beautiful presentation, serve in bowls. Add a few extra basil leaves and a drizzle of olive oil on top. This makes your dish look colorful and appetizing! Enjoy your delightful meal! To make your creamy tomato basil gnocchi extra tasty, use fresh ingredients. Fresh basil brings a bright flavor. Try adding a splash of lemon juice for a tangy twist. A pinch of red pepper flakes will add a nice kick. When you cook the garlic, let it become fragrant but not brown. This keeps the flavor fresh and mild. If your sauce is too thick, add a little vegetable broth. This will loosen it up without losing flavor. In case your sauce tastes bland, add more salt or a dash of vinegar. If the gnocchi sticks together, stir gently but often while cooking. This helps keep them separated and tender. A large pot or Dutch oven is best for this recipe. It allows even cooking and easy stirring. A good chef's knife will help you chop the onion and garlic quickly. Use a wooden spoon to stir the mixture well. For serving, a ladle can help dish out perfect portions. Keep a measuring cup handy for broth and cream to ensure accuracy. {{image_2}} You can easily make this dish vegan. First, swap the heavy cream for coconut cream. This gives a rich flavor without dairy. Use vegetable broth to keep it plant-based. Make sure to check the gnocchi package for any hidden dairy. Many brands offer vegan-friendly options. Want more protein in your meal? Add cooked chickpeas or lentils. They blend well with the sauce and add texture. You can also toss in some sautéed mushrooms or spinach. These not only boost protein but also add depth to the dish. Use seasonal ingredients to change things up. In summer, fresh zucchini or bell peppers work great. In fall, roasted butternut squash adds a sweet touch. You can even replace cherry tomatoes with diced ripe tomatoes in the summer months. This keeps the dish fresh and exciting! To store leftovers, let the gnocchi cool down. Transfer it to an airtight container. Keep it in the fridge. It stays fresh for up to three days. You can also add a little extra cream to keep it moist. Reheat the gnocchi on the stove for the best taste. Use a medium heat and add a splash of broth or cream. Stir gently until it warms through. You can also microwave it in short bursts. Cover it to keep moisture in. To freeze, place the cooled gnocchi in a freezer-safe container. It can last up to three months in the freezer. When ready to eat, thaw overnight in the fridge. Reheat it on the stove or oven. The texture may change slightly, but it will still taste great. You can serve creamy tomato basil gnocchi with a fresh salad. A simple green salad adds crunch and freshness. Garlic bread pairs well too, giving a nice touch of flavor. You could also serve it with grilled chicken or shrimp for extra protein. The rich sauce of the gnocchi complements these sides perfectly. Yes, you can make creamy tomato basil gnocchi ahead of time. Cook it as the recipe says, then cool it down. Store it in an airtight container in the fridge for up to two days. When you are ready to eat, just reheat it on the stove. Add a splash of broth or cream to keep it creamy. Yes, you can make a gluten-free version of creamy tomato basil gnocchi. Look for gluten-free gnocchi made from potato or rice flour. The rest of the recipe stays the same. Use the same fresh ingredients and enjoy a tasty dish that fits your needs. In this post, I shared a detailed guide on making creamy tomato basil gnocchi. We covered essential ingredients, step-by-step cooking, helpful tips, and tasty variations. Remember, you can customize and adjust based on your needs. These easy steps will help you create a delicious meal every time. Explore different options and enjoy your cooking journey. With practice, you'll make this dish a favorite in your home.

Creamy Tomato Basil Gnocchi One Pot Delightful Meal

If you’re craving a warm, comforting meal with minimal cleanup, look no further! My Creamy Tomato Basil Gnocchi One Pot

- 1 lb sirloin steak, cut into 1-inch cubes - 4 tablespoons unsalted butter - 5 cloves garlic, minced - 1 teaspoon fresh rosemary, chopped - 1 teaspoon fresh thyme leaves - Salt and pepper - Fresh parsley, chopped for garnish To make garlic butter steak bites, you need a few key ingredients. Sirloin steak is the star of this dish. It is tender and full of flavor. You want to cut it into small cubes for a quick cook. Next, you need unsalted butter. Butter adds richness and flavor. Garlic is a must in this recipe. Fresh garlic gives the best taste. For a bit of herbal magic, use fresh rosemary and thyme. These herbs add a lovely aroma and depth to the dish. Finally, don’t forget about seasoning! Salt and pepper will enhance the steak's natural taste. Fresh parsley adds a pop of color and freshness on top. Gather all these ingredients, and you’re ready to start cooking. Each one plays an important role in making this dish delicious. - Drying and seasoning the steak Start by patting the steak cubes dry with paper towels. This helps get a nice sear. Next, season the cubes with salt and pepper. Don’t be shy; flavor is key! - Preparing the herbs and garlic Mince five cloves of garlic for a strong flavor. Chop fresh rosemary and thyme leaves, about a teaspoon each. Fresh herbs add a wonderful taste to the dish. - Melting the butter in a skillet Heat two tablespoons of unsalted butter in a large skillet. Use medium-high heat for the best results. Make sure the butter is fully melted and bubbly. - Searing the steak bites Add the steak cubes to the skillet in a single layer. Cook them for 2-3 minutes on each side. You want them browned and cooked to your liking. If needed, do this in batches. - Sautéing garlic and herbs After the steak is cooked, remove it from the skillet. In the same skillet, add the remaining butter, minced garlic, rosemary, and thyme. Sauté for about one minute until fragrant. Stir often to avoid burning. - Tossing steak bites in the garlic butter mixture Return the steak bites to the skillet. Toss them in the garlic herb butter for 1-2 minutes. This allows the steak to soak up all the delicious flavors. - Garnishing and serving suggestions Remove from heat and garnish with fresh chopped parsley. Serve the garlic butter steak bites hot. Make sure each piece is coated in the garlic and herb mixture for maximum flavor. To get that nice brown crust, pat the steak dry with paper towels. This step helps the steak sear better. If the steak is wet, it will steam instead of sear. Cook the steak in batches. This way, you avoid overcrowding the pan. Each bite gets a chance to brown well. You can add spices or herbs if you want more flavor. A pinch of paprika or a dash of cayenne can spice things up. Fresh herbs like parsley or basil can also add a nice touch. Always choose the right cut of steak. Sirloin is great, but ribeye adds more fat and flavor. Pair these steak bites with sides like mashed potatoes or green beans. They also go well with dips like ranch or garlic aioli. For a nice look, arrange the steak bites on a platter. Add some fresh herbs on top for color. A sprinkle of chopped parsley makes it even more appealing. {{image_2}} You can use different cuts of steak for garlic butter steak bites. Sirloin works great, but ribeye adds more fat and flavor. Ribeye is juicy, making each bite rich and tender. Sirloin offers a leaner option, which is also tasty. If you want to switch things up, try chicken or pork. Chicken thighs can be juicy and absorb flavors well. Pork tenderloin gives a mild taste that pairs perfectly with garlic butter. To change the flavor, add a spicy twist. Mix in some red pepper flakes with your garlic butter. This will give your steak bites a nice kick. You can also make a lemon garlic butter. Swap out herbs for fresh lemon juice and zest. This adds a bright, zesty flavor that complements the richness of the butter and steak. You can cook steak bites in different ways. Try making them in the oven for a hands-off approach. Preheat your oven to 400°F (200°C) and bake the seasoned steak bites for about 10-12 minutes. This method keeps them tender and juicy. If grilling is more your style, use skewers for easy flipping. Marinate your steak bites with olive oil, garlic, and herbs for extra flavor before grilling. This adds a smoky taste that is hard to resist. To keep your garlic butter steak bites fresh, store them in the fridge. Use an airtight container to seal in flavor. Make sure to let them cool first before sealing. This helps avoid condensation inside the container. If you want to save some for later, you can freeze garlic butter steak bites. Place the cooled steak bites in a freezer-safe bag. Remove air to prevent freezer burn. When you are ready to eat, thaw them in the fridge overnight. Reheat in a skillet over low heat. This keeps them tender and tasty. Leftovers last about 3 to 4 days in the fridge. Always check for signs of spoilage. Look for changes in color or a sour smell. If anything seems off, it’s best to toss them. Garlic butter steak bites take about 15 minutes to cook. The prep time is just 5 minutes. You will spend 10 minutes cooking. Start by heating the butter in a skillet. Then, sear the steak bites, which take 2-3 minutes per side. The garlic and herbs cook quickly too. Follow these quick tips: - Preheat your skillet before adding the steak. - Cook in batches if needed. - Keep an eye on the time for perfect bites. Yes, you can use frozen steak. But it is best to thaw it first. To thaw, place the steak in the fridge overnight. If you're in a hurry, you can use the cold water method. Just seal the steak in a bag and submerge it in cold water. Change the water every 30 minutes until thawed. Here are some best practices for cooking frozen steak: - Pat it dry before cooking. - Season well to enhance flavor. - Adjust cooking time if steak is still slightly frozen. You can use dried herbs instead of fresh ones. For this recipe, dried rosemary and thyme work well. Use about one-third of the amount since dried herbs are more potent. Here are some recommended dried herb substitutes: - 1 teaspoon of dried rosemary for 1 teaspoon fresh. - 1 teaspoon of dried thyme for 1 teaspoon fresh. - Add a pinch of dried parsley for garnish. Feel free to experiment with other dried herbs too! This article covered how to make delicious garlic butter steak bites using simple ingredients and steps. You learned about the main ingredients like sirloin steak, butter, garlic, and fresh herbs. I shared tips to achieve the perfect sear and ways to enhance flavor, along with storage info and variations to inspire your cooking. In the end, enjoy making these steak bites. They are quick, easy, and full of flavor. You can impress your friends and family with this tasty dish. Happy cooking!

Garlic Butter Steak Bites in 15 Easy Steps

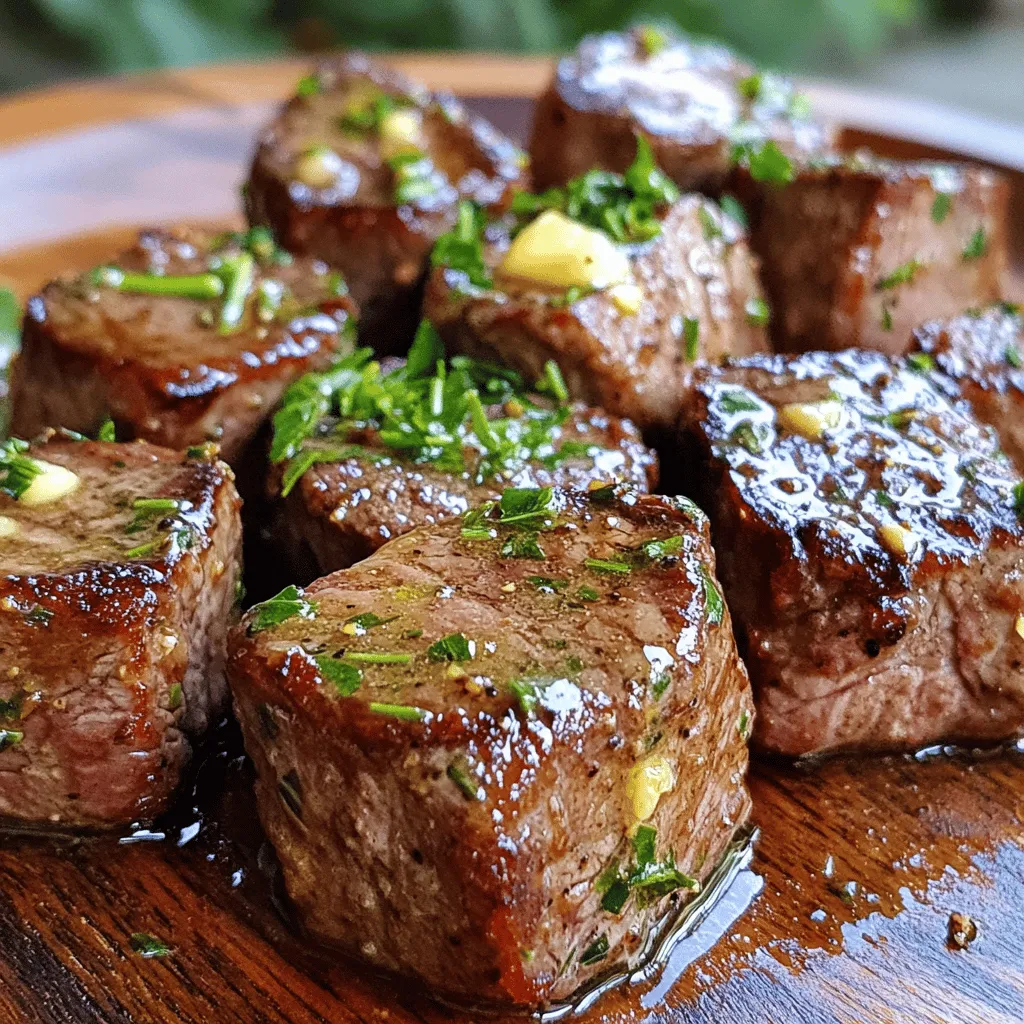
Are you ready to impress your friends and family with a delicious dish? Garlic Butter Steak Bites in 15 Easy

To make a delicious pumpkin chocolate chip bread, you will need some key ingredients. Here’s what you’ll gather: - 1 cup pumpkin puree - 1/2 cup vegetable oil - 3/4 cup brown sugar - 1/2 cup granulated sugar - 2 large eggs - 1 teaspoon vanilla extract - 1 1/2 cups all-purpose flour - 1 teaspoon baking soda - 1/2 teaspoon baking powder - 1/2 teaspoon salt - 1 teaspoon ground cinnamon - 1/2 teaspoon ground nutmeg - 1/2 teaspoon ground ginger - 1 cup chocolate chips - 1/2 cup chopped walnuts (optional) Now, let’s dive deeper into why each ingredient matters. Pumpkin puree is the star of the show. It adds moisture and a rich flavor. Use canned puree or make your own from fresh pumpkin. I prefer vegetable oil for its light taste. It keeps the bread soft and tender. Brown sugar adds a hint of caramel flavor. Granulated sugar gives sweetness. Together, they create the perfect balance. Eggs bind the ingredients. They also help the bread rise and stay fluffy. This tiny addition boosts the bread's flavor. It adds warmth and richness. Flour gives structure. It’s essential for the bread to hold its shape. These two are leavening agents. They help the bread rise, making it light and airy. Salt is a must. It enhances all the flavors in the bread. Cinnamon, nutmeg, and ginger add warmth and depth. They make the bread feel cozy and inviting. Chocolate chips bring sweetness and richness. They melt into gooey pockets throughout the bread. Walnuts add crunch and nuttiness. If you love texture, toss them in! With these ingredients, you’re ready to create a delightful pumpkin chocolate chip bread that bursts with flavor. Enjoy baking! - Preheat oven and prepare the loaf pan First, set your oven to 350°F (175°C). Grease a 9x5 inch loaf pan. This helps the bread release easily. - Combine wet ingredients In a large bowl, whisk together 1 cup of pumpkin puree, 1/2 cup of vegetable oil, 3/4 cup of brown sugar, and 1/2 cup of granulated sugar. Mix until smooth. - Mix dry ingredients In another bowl, sift together 1 1/2 cups of all-purpose flour, 1 teaspoon of baking soda, 1/2 teaspoon of baking powder, and 1/2 teaspoon of salt. Add 1 teaspoon of ground cinnamon, 1/2 teaspoon of ground nutmeg, and 1/2 teaspoon of ground ginger. - Combine wet and dry ingredients Gradually add the dry mix to the wet ingredients. Stir gently until just combined. Avoid overmixing to keep the bread light and fluffy. - Fold in chocolate chips and walnuts Gently fold in 1 cup of chocolate chips and 1/2 cup of chopped walnuts if you like. This adds great texture and flavor. - Pour batter into the loaf pan Pour the batter into the prepared loaf pan. Smooth the top with a spatula for an even bake. - Baking time and method Bake for 60-65 minutes. Check with a toothpick in the center. It should come out clean when done. - Cooling the bread Remove the bread from the oven. Let it cool in the pan for 10 minutes. Then, transfer it to a wire rack to cool completely. This helps it set and makes slicing easier. Preventing overmixing Mixing your batter too much can ruin the texture. When you combine the dry and wet ingredients, stir gently. Stop mixing as soon as you see no dry flour. This keeps your bread tender and light. Ideal baking time and temperature Bake your bread at 350°F (175°C) for 60-65 minutes. Check if it's done by inserting a toothpick in the center. If it comes out clean, your bread is ready. Let it cool in the pan for ten minutes before moving it to a rack. Presentation tips for serving Slice the bread when it is warm. For an extra treat, drizzle melted chocolate on top. You can also add a dollop of whipped cream on the side. These touches make your bread look and taste great. Pairing ideas with drinks or toppings Pair your bread with warm apple cider or a cup of coffee. You can also enjoy it with cream cheese or a scoop of ice cream. These pairings enhance the flavors of your pumpkin chocolate chip bread. {{image_2}} You can easily change the taste of this bread with simple swaps. Here are some ideas: - Using different types of sugar: You can try using coconut sugar or maple sugar. This can add a unique flavor. Brown sugar adds moisture, while granulated sugar gives a nice crunch. - Substitutes for chocolate chips: If you want a twist, use white chocolate chips or dark chocolate. You can even use butterscotch chips for a sweeter touch. Chopped dried fruit, like cranberries or raisins, can also work well. - Adding spices or other mix-ins: Try adding a pinch of cardamom for warmth. You can also fold in shredded coconut or even chopped apples for extra flavor and texture. For those with specific diets, here are some options: - Gluten-free options: Use a gluten-free flour blend in place of all-purpose flour. Make sure it contains xanthan gum for proper texture. This way, you can still enjoy the bread without gluten. - Vegan adaptations: Replace the eggs with flax eggs or applesauce. Use a plant-based oil and ensure your chocolate chips are dairy-free. This makes the bread suitable for vegan diets. These variations let you personalize your pumpkin chocolate chip bread. Whether you want to make it healthier or simply try something new, have fun with these ideas! After baking, you may have some delicious bread left. You have two great options for storing it. First, you can keep it at room temperature. Just wrap it in plastic wrap or foil. This method keeps it fresh for about three days. Place it in a cool, dry spot away from sunlight. The second option is refrigeration. While it keeps the bread safe longer, it can dry it out. If you choose to refrigerate, wrap it well to prevent this. If you want to save it for longer, freezing is best. Here’s how you can do it: - Let the bread cool completely. - Wrap it tightly in plastic wrap, then in foil. - Label it with the date and place it in the freezer. This way, it can last up to three months. The shelf life of your pumpkin chocolate chip bread is quite good. At room temperature, the bread stays fresh for about three days. If you store it in the fridge, it can last up to a week. When frozen, you can enjoy it for up to three months. Always check for signs of spoilage, like mold or a strange smell. If you find any, it's best to toss it. This way, you can enjoy your pumpkin chocolate chip bread at its best! Can I use fresh pumpkin instead of puree? Yes, you can use fresh pumpkin. First, cook the pumpkin until soft. Then, mash it well and strain any excess liquid. This gives you a great puree to use in your bread. How can I make this recipe healthier? To make it healthier, try these tips: - Use whole wheat flour instead of all-purpose flour. - Reduce the sugar by using applesauce or honey. - Add in some flaxseeds or chia seeds for extra fiber. What can I do if my bread is too moist or dense? If your bread is too moist, you may have added too much pumpkin or not baked it long enough. To fix this, try: - Reducing the pumpkin puree by a few tablespoons. - Extending the baking time by 5-10 minutes. Why did my bread sink in the middle? Your bread may sink due to overmixing the batter. Mix until just combined. Also, check your oven temperature with an oven thermometer. If it runs low, your bread may not rise properly. How to prevent chocolate chips from sinking? To keep chocolate chips from sinking, toss them in a bit of flour before folding them into the batter. This helps them stay suspended in the mix as it bakes. In this article, we explored how to make Pumpkin Chocolate Chip Bread, from gathering the right ingredients to baking tips and storage advice. You learned about ingredient swaps for different diets and how to present it beautifully. Remember, each step counts for great results. With these tips, you can enjoy delicious bread anytime. Get creative with your variations, and always have fun in the kitchen!

Pumpkin Chocolate Chip Bread Bakery Delight in Bites

Craving a sweet treat that combines the warm flavors of fall with a touch of chocolate? Look no further! In

- 2 cooked chicken breasts, shredded - 1 cup cream cheese, softened - 1 cup sour cream - 1 cup shredded Monterey Jack cheese - 1 can (10 oz) green enchilada sauce, divided - 1 small onion, finely chopped - 2 cloves garlic, minced - 8 small flour tortillas - Fresh cilantro, for garnish - Sliced jalapeños, for garnish (optional) To make white chicken enchiladas, you need simple and fresh ingredients. Start with cooked chicken breasts. Shred them into small pieces. Cream cheese adds great creaminess, while sour cream gives a nice tang. Monterey Jack cheese melts beautifully, making it a favorite choice. Green enchilada sauce brings flavor and a hint of spice. - 1 teaspoon cumin - ½ teaspoon chili powder - Fresh herbs for garnish Cumin and chili powder add warmth to your dish. These spices enhance the flavors of the chicken and cheese. Fresh herbs like cilantro make a bright garnish. They add color and freshness to the finished plates. - Flour tortillas - Size and type variations Use soft flour tortillas for a great texture. They hold the filling well and are easy to roll. You can choose small or larger tortillas based on your preference. This choice can change the number of servings you get from the recipe. {{ingredient_image_1}} First, preheat your oven to 350°F (175°C). This step is key for even cooking. While the oven warms up, gather your ingredients. You’ll need 2 cooked chicken breasts, cream cheese, sour cream, and spices. In a large bowl, combine the shredded chicken, softened cream cheese, sour cream, half of the Monterey Jack cheese, chopped onion, minced garlic, cumin, and chili powder. Mix these well. You want a smooth blend. This mixture is the heart of your enchiladas. Now, grab your flour tortillas. Spoon about ⅓ cup of the chicken mixture into the center of each tortilla. Roll them up tightly. Make sure to place them seam-side down in a large baking dish. This keeps the filling inside. Next, pour the remaining green enchilada sauce over the top of the rolled tortillas. Use a spatula to spread it evenly. Then, sprinkle the last of the Monterey Jack cheese on top. This will create a nice, gooey layer once baked. Bake the enchiladas in your preheated oven for 25-30 minutes. Keep an eye on them. You want the cheese to be bubbly and golden brown. This step makes the dish look inviting. Once baked, remove them from the oven. Let them cool for a few minutes before serving. This helps the flavors settle. For a touch of freshness, garnish with cilantro and sliced jalapeños if you like some heat. Enjoy your delicious creation! Many cooks overfill their tortillas. This can lead to messy enchiladas and spills. Aim for about ⅓ cup of filling per tortilla. This keeps your enchiladas neat and helps them cook evenly. Another mistake is not monitoring baking times and temperatures. Baking at 350°F (175°C) usually works well. Keep an eye on them. You want bubbly cheese, not burnt edges. To get a fluffier filling, mix cream cheese carefully. Soften it first to make blending easier. This helps it blend smoothly with the other ingredients. You want a creamy and rich filling. Mix the chicken, sour cream, and spices well. This ensures each bite is full of flavor. Use a fork to break up any lumps. A smooth mixture makes for better enchiladas. You can prep your enchiladas in advance. Assemble them and cover with foil. Store them in the fridge for up to a day. This saves time when you are ready to bake. For reheating, take them out of the fridge first. Let them sit at room temperature for 30 minutes. Then, bake at 350°F (175°C) for about 30 minutes. This ensures they heat evenly and taste great. Pro Tips Use Rotisserie Chicken: For a quicker prep time, consider using store-bought rotisserie chicken instead of cooking your own. Make Ahead: You can prepare the enchiladas a day ahead, refrigerate them, and bake right before serving for easy entertaining. Customize the Heat: Adjust the level of spiciness by adding more or less green enchilada sauce or by including diced jalapeños in the filling. Garnish Creatively: Enhance presentation and flavor by topping with avocado slices or a drizzle of lime crema before serving. {{image_2}} You can change the protein in your enchiladas easily. Shredded turkey works well if you prefer a lighter option. Beef also makes a hearty filling. Simply swap the chicken for cooked, shredded beef or turkey. For a vegetarian twist, consider using beans. Black beans or pinto beans add great texture and taste. They also provide protein without meat. Just mash the beans and mix them with your favorite spices. While green enchilada sauce is classic, you can switch it up. Red enchilada sauce is a bold choice. It has a rich flavor that pairs well with chicken. You can also try a creamy white sauce. Use cream cheese and sour cream as a base for a smooth, rich topping. Mix in some green chilies for a kick. This adds a new layer of taste to your dish. Toppings can take your enchiladas to the next level. Fresh cilantro adds a pop of color and flavor. Diced tomatoes provide freshness. Sliced jalapeños add some heat if you like spice. Cheese options are endless. Monterey Jack is mild and melts nicely. Try pepper jack for a spicy twist. Crumbled queso fresco gives a crumbly texture and tangy taste. Mix and match toppings to find your favorite combination! To keep your white chicken enchiladas fresh, store them in an airtight container. Place them in the fridge right after they cool down. Use them within three days for the best taste. If you want to keep them longer, freezing is a great option. Wrap each enchilada in plastic wrap and then in foil. This method helps prevent freezer burn. They can stay in the freezer for up to three months. When reheating, you can choose the oven or microwave. The oven keeps the enchiladas crispy. Preheat it to 350°F (175°C) and heat them for about 20 minutes. If you use a microwave, place one enchilada on a plate. Heat it for one to two minutes. Cover it with a damp paper towel to keep moisture. This way, the flavor and texture stay great. In the fridge, your enchiladas will last about three days. Always check for signs of spoilage. If they smell sour or look discolored, it’s time to toss them out. Trust your senses! Keeping track of how long they’ve been stored helps you enjoy them at their best. You can use several options if you need a cream cheese substitute. - Dairy-free alternatives: Try using silken tofu or cashew cream. Both provide a creamy texture without dairy. - Other cheese options: You can also use ricotta cheese or goat cheese. They will add a unique flavor to your enchiladas. Yes, you can easily add spice to your enchiladas. - Adding heat with jalapeños or hot sauce: Slice fresh jalapeños and mix them into the chicken filling. You can also drizzle hot sauce on top before serving. Serving these enchiladas is simple and fun. - Side dish recommendations: Serve with a fresh salad, Mexican rice, or refried beans. These sides balance the rich flavors of the enchiladas. - Pairing drinks for an optimal meal experience: Enjoy your meal with a cold Mexican beer or a refreshing limeade. These drinks enhance the dish's taste and make it a complete meal. You now have all the tools to make tasty white chicken enchiladas. We explored the key ingredients, including chicken, cream cheese, and green sauce. I shared step-by-step instructions to make the process easy. Plus, I offered tips to avoid mistakes and ways to customize your dish. Remember, practice makes perfect, so don’t worry if you need to try again. Enjoy making these delicious enchiladas for yourself and your loved ones!

White Chicken Enchiladas Tasty and Simple Recipe

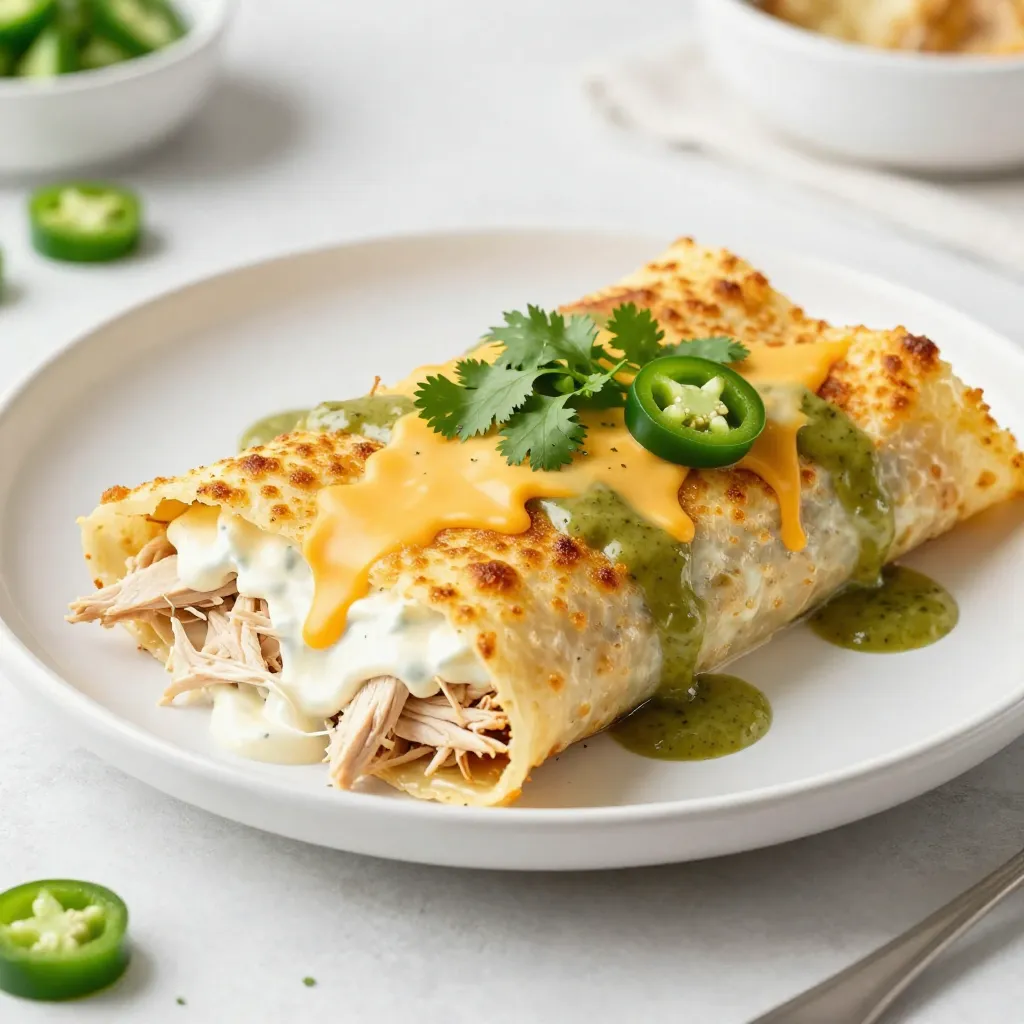
Looking for a tasty dinner idea? White chicken enchiladas are both simple and delicious! This recipe combines tender chicken, creamy

To make Garlic Parmesan Roasted Brussels Sprouts, you will need: - 1 lb Brussels sprouts, trimmed and halved - 4 tablespoons olive oil - 4 cloves garlic, minced - 1/2 cup grated Parmesan cheese - 1 teaspoon garlic powder - 1 teaspoon onion powder - Salt and pepper to taste - 1/4 teaspoon red pepper flakes (optional) - Fresh parsley, chopped (for garnish) You will need a few key tools: - A large mixing bowl - A baking sheet - Parchment paper - A sharp knife for trimming - A cutting board - A spatula for tossing If you don't have everything, here are some swaps: - Use any oil you like instead of olive oil. - Swap Parmesan cheese with nutritional yeast for a vegan option. - Garlic powder can be replaced with garlic salt. - Fresh parsley can be skipped or swapped with other herbs like thyme or oregano. - For heat, use black pepper if red pepper flakes are not available. Start by washing the Brussels sprouts. You want them clean. Trim off the tough ends and cut each sprout in half. This helps them cook evenly. Next, grab a large bowl. Add the halved Brussels sprouts, 4 tablespoons of olive oil, and 4 cloves of minced garlic. Sprinkle in 1 teaspoon each of garlic powder and onion powder. Season with salt and pepper to your taste. Toss everything together. Ensure each sprout gets coated well. This mix makes them tasty and flavorful. Now it’s time to roast! Preheat your oven to 400°F (200°C). Line a baking sheet with parchment paper. Spread the Brussels sprouts on the sheet in a single layer. This is key for even roasting. Place them in the oven and set a timer for 20 minutes. Halfway through, give them a stir. This helps them brown nicely. When they look golden and tender, it’s time for the next step. Take the baking sheet out of the oven. Sprinkle 1/2 cup of grated Parmesan cheese over the sprouts. This cheese adds a rich flavor. Return the sheet to the oven. Bake for another 5-7 minutes. Watch for the cheese to melt and get a bit crispy. Once done, remove the sheet and add red pepper flakes if you like a bit of heat. Finally, sprinkle chopped fresh parsley over the top for a bright finish. Serve these warm, and enjoy a delightful side dish! To roast Brussels sprouts well, choose fresh ones. Look for bright green, firm sprouts. Trim the ends and cut them in half. This helps them cook evenly. Always use a large bowl to mix. This gives them space to coat in oil and spices. To get that perfect crisp, use enough olive oil. Four tablespoons work great. Spread the sprouts in a single layer on your baking sheet. Crowding them leads to steaming, not roasting. Stir halfway through cooking. This helps them brown all over. Garlic Parmesan roasted Brussels sprouts make a great side dish. They pair well with chicken, fish, or steak. For a fun twist, try them on a salad. Add nuts or dried fruit for extra flavor. You can also serve them with a squeeze of lemon for brightness. {{image_2}} You can add more flavor to your Garlic Parmesan Roasted Brussels Sprouts. Try fresh herbs like thyme or rosemary. These herbs add a nice aroma and depth to the dish. You can also mix in spices. For a kick, add smoked paprika or cumin. If you want more garlic flavor, increase the minced garlic or add garlic powder. If you want a vegan version, skip the Parmesan cheese. You can use nutritional yeast instead. It brings a cheesy flavor without dairy. If gluten-free is your goal, this recipe is naturally gluten-free. Just make sure any added ingredients, like spices, are also gluten-free. There are many fun ways to serve these Brussels sprouts. Try them on a bed of quinoa for a hearty meal. You can also mix them into pasta dishes for a flavor boost. Adding them to a salad with a tangy dressing can elevate your meal. For a party, serve them as a tasty appetizer with toothpicks. Enjoy the versatility of this dish! Store your Garlic Parmesan Roasted Brussels sprouts in an airtight container. This keeps them fresh. Let them cool down first. This helps avoid extra moisture. You can keep them in the fridge. Reheat in the oven for best results. Set the oven to 350°F (175°C). Spread the Brussels sprouts on a baking sheet. Heat for about 10-15 minutes. This keeps them crispy. You can also use a microwave. Just heat them for 1-2 minutes. They won’t be as crispy, but they’ll still taste good. These Brussels sprouts last for about 3-4 days in the fridge. Check for any signs of spoilage before eating. If they smell bad or look slimy, throw them away. Enjoy your leftovers while they are still tasty! Yes, you can use frozen Brussels sprouts. Just make sure to thaw and dry them first. Frozen sprouts might not get as crispy as fresh ones. They also may take longer to cook. Adjust your roasting time as needed to ensure they are tender. Garlic Parmesan Roasted Brussels sprouts pair well with many dishes. Here are some great options: - Grilled chicken - Baked salmon - Quinoa salad - Mashed potatoes - Garlic bread These sides enhance the meal and add more flavor to your table. You can prep the Brussels sprouts a day in advance. Just wash and cut them, then store them in the fridge. Mix the oil, garlic, and spices ahead of time too. When you're ready to cook, toss them together and roast. This saves time and makes cooking easy! In this blog post, we explored how to cook delicious Garlic Parmesan Roasted Brussels Sprouts. We covered the ingredients and needed equipment, along with great substitutes. I shared step-by-step instructions for roasting, plus tips for getting them perfectly crisp. You learned about flavor variations and how to store leftovers. Roasting Brussels sprouts can be fun and tasty. With these tips, you can impress your guests and enjoy healthy meals at home! Give it a try!

Garlic Parmesan Roasted Brussels Sprouts Delight

If you’re craving a side dish that packs flavor and crunch, look no further. Garlic Parmesan Roasted Brussels Sprouts are

- 1 cup all-purpose flour - 1/2 cup unsweetened cocoa powder - 1/2 teaspoon baking powder - 1/4 teaspoon salt - 1/2 cup unsalted butter, melted - 1 cup granulated sugar - 2 large eggs - 1 teaspoon vanilla extract - 1 cup pumpkin puree - 1 teaspoon pumpkin pie spice - 4 oz cream cheese, softened - 1/4 cup powdered sugar Each ingredient plays a key role in the taste and texture of these brownies. If you need to swap something, here are some ideas: - All-purpose flour: You can use whole wheat flour for a nutty flavor. - Unsweetened cocoa powder: Dark cocoa powder gives a richer taste. - Unsalted butter: You can use coconut oil for a dairy-free option. - Granulated sugar: Brown sugar adds moisture and a hint of caramel flavor. - Pumpkin puree: Use homemade puree or canned puree. Just check for no added sugar. - Cream cheese: Neufchâtel cheese works well, too, for a lighter option. Pumpkin brings a lovely moisture and flavor to these brownies. It adds a warm, earthy taste and a beautiful orange hue. Pumpkin also packs in vitamins and fiber, making these brownies a bit healthier. Cream cheese creates a rich, creamy swirl. It balances the sweetness of the brownie and adds a nice tang. Together, they make a perfect pair for a delightful treat. You get the flavors of fall in every bite. Start by preheating your oven to 350°F (175°C). This is the perfect heat for baking. Next, take a 9x9 inch baking pan. Grease it well with butter or line it with parchment paper. This will help the brownies come out easily. In a medium bowl, whisk together the all-purpose flour, cocoa powder, baking powder, and salt. This mix helps the brownies rise. Set this bowl aside. In a large bowl, combine the melted butter and granulated sugar. Mix them until they are creamy. Now, add two large eggs one at a time. Stir well after each egg. Finally, mix in one teaspoon of vanilla extract. In another bowl, take 4 oz of softened cream cheese. Add in 1 cup of pumpkin puree, 1 teaspoon of pumpkin pie spice, and 1/4 cup of powdered sugar. Mix this until it is smooth. This will create a rich and tasty layer for your brownies. Pour half of the brownie batter into your baking pan. Spread it evenly across the bottom. Next, drop spoonfuls of the cream cheese mixture on top of the brownie batter. Then, pour the remaining brownie batter over this layer. Use a knife or skewer to gently swirl the cream cheese mixture into the brownie batter. This creates a beautiful marbled effect. Place the pan in the preheated oven. Bake for 25-30 minutes. You can check if they are done by inserting a toothpick in the center. It should come out with a few moist crumbs. Once baked, let them cool in the pan for about 15 minutes. After that, lift the brownies out using the parchment paper. Move them to a wire rack to cool completely before cutting into squares. To get the best brownie texture, use room temperature butter. Melted butter helps mix well, but room temperature butter gives a nice fluff. Mix the sugar and butter until creamy. This ensures a light and moist brownie. Avoid overmixing the batter. Stir just enough to blend the wet and dry ingredients. This keeps the brownies tender and not tough. Swirling adds beauty to your brownies. After layering the batter and cream cheese, use a knife or skewer to create swirls. Don’t overdo it! Just a few gentle strokes make lovely patterns. Aim for a marbled look that shows both the brownie and cream cheese. This makes them look fancy and fun. Even baking is key for perfect brownies. Make sure your oven is preheated to 350°F (175°C). Grease your pan well or use parchment paper for easy removal. Rotate the pan halfway through baking. This helps them cook evenly on all sides. Check for doneness by inserting a toothpick. You want it to come out with a few moist crumbs. This means they are ready to enjoy! {{image_2}} You can add chocolate chips to your pumpkin cream cheese swirl brownies. This will give you a rich, sweet treat. Use about 1 cup of semi-sweet or dark chocolate chips. Mix them into the brownie batter before you pour it into the pan. This adds a nice contrast to the pumpkin flavor. The gooey chocolate bits melt in your mouth and enhance the overall taste. Want to make these brownies gluten-free? It’s easy! Simply swap the all-purpose flour for a gluten-free blend. Make sure the blend has a good mix of starch and flour. You can also use almond flour or oat flour, but the texture may change a bit. Always check if your cocoa powder is gluten-free to avoid any issues. Nuts add a nice crunch to your brownies. Try adding 1/2 cup of chopped walnuts or pecans. You can mix them in with the brownie batter. If you like a flavor twist, consider adding dried cranberries or mini marshmallows. Just be careful not to overload the batter, or it may not bake evenly. Each of these options can make your brownies even more special! To keep your Pumpkin Cream Cheese Swirl Brownies fresh, store them in an airtight container. Use parchment paper to separate layers. This helps avoid sticking and keeps each square intact. You can store them at room temperature for up to four days. If you want them to last longer, refrigerate them for up to a week. Freezing these brownies is easy and effective. First, cut them into squares. Wrap each piece tightly in plastic wrap. Then, place the wrapped brownies in a freezer-safe bag or container. They will stay fresh for up to three months. When you're ready to enjoy, let them thaw in the fridge overnight or on the counter for a few hours. These delicious brownies can last up to a week in the fridge. They taste great cold or at room temperature. For a fun twist, serve them warm with a scoop of vanilla ice cream. You can also dust them with powdered sugar for extra flair. Adding a drizzle of caramel sauce makes them even more delightful. Enjoy your treats any way you like! You can swap some ingredients to make them healthier. Use whole wheat flour instead of all-purpose flour. Replace regular sugar with coconut sugar or a sugar substitute. You can also use applesauce to replace half the butter for less fat. This keeps the brownies moist but cuts calories. Yes, you can. For each egg, use a quarter cup of unsweetened applesauce. You can also try using flaxseed. Mix one tablespoon of ground flaxseed with three tablespoons of water. Let it sit for a few minutes until it thickens. If you lack pumpkin pie spice, you can make your own! Combine one teaspoon of cinnamon, one teaspoon of ginger, half a teaspoon of nutmeg, and a pinch of cloves. This mix gives a warm flavor, just like pumpkin pie spice does. To check if the brownies are ready, insert a toothpick into the center. If it comes out with a few moist crumbs, the brownies are done. If it comes out wet with batter, bake them for a few more minutes. Keep an eye on them! Yes, you can make these brownies ahead of time. Bake them and let them cool completely. Cover the pan with plastic wrap or foil. They stay fresh for about three days at room temperature. You can also freeze them for up to three months! In this post, we explored how to make delicious pumpkin cream cheese swirl brownies. We covered the essential ingredients, from measurements to substitutions. Step-by-step instructions guided you through mixing batter and creating a swirl. Tips helped you perfect texture and presentation. Variations offered fun twists, while storage info ensured freshness. In conclusion, enjoy experimenting with flavors and techniques. Your baking will impress friends and family. Happy baking!

Pumpkin Cream Cheese Swirl Brownies Delightful Treat

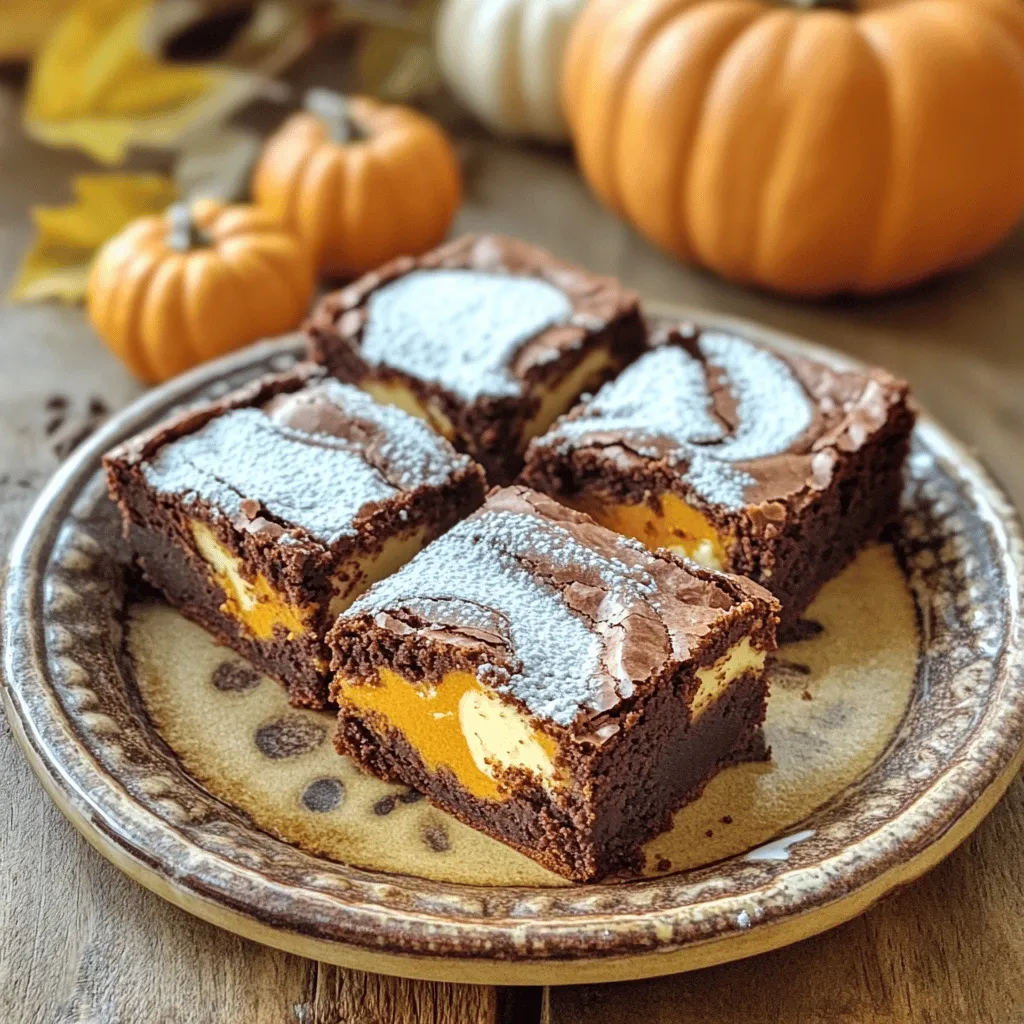
Get ready for a treat that combines the rich flavors of fall with the classic delight of brownies! In this

- 1 medium head of cauliflower, cut into bite-sized florets - 1 cup all-purpose flour - 1 cup water - 1 teaspoon garlic powder - 1 teaspoon smoked paprika - 1 teaspoon onion powder - Salt and pepper to taste - 1 cup buffalo sauce - 8 small corn tortillas - 1 cup shredded green cabbage - 1/2 cup shredded carrots - 1/2 cup mayonnaise - 1/4 cup buttermilk - 1 teaspoon dried dill - 1 tablespoon lemon juice The main ingredients for these tacos start with cauliflower. Cauliflower is the star here. It has a great texture and soaks up flavor well. Next, we have the flour and water mix. This creates the batter that gives the cauliflower a perfect crunch. The buffalo sauce adds the heat and tang. For the slaw, we use shredded cabbage and carrots. These give a nice crunch and color. The creamy ranch dressing has mayonnaise and buttermilk. This makes the slaw rich and tasty. Dried dill and lemon juice add freshness to the dressing. - Fresh cilantro, chopped (for garnish) - Slices of avocado (for serving) You can add toppings like fresh cilantro. This adds a pop of color and flavor. Avocado slices are a great choice too. They bring a creamy texture that balances the spice of the buffalo sauce. Feel free to be creative with your toppings. You can use other herbs or even some cheese if you like. These ingredients can help you make your tacos even more special! To make the batter for coating, start by mixing flour, water, garlic powder, smoked paprika, onion powder, salt, and pepper in a bowl. Whisk until smooth. This batter will give the cauliflower its tasty crunch. Next, dip each cauliflower floret into the batter. Make sure to coat each piece evenly. Place them on a lined baking sheet in a single layer. Bake these beauties at 450°F (232°C) for 20 minutes. Halfway through, flip them to ensure they cook evenly. After 20 minutes, they should be golden brown and crisp. Now, it’s time to add the buffalo sauce. Remove the cauliflower from the oven and toss the florets in the sauce. Make sure they are well-coated. Return them to the oven for another 10 minutes. This step makes them spicy and flavorful. While the cauliflower bakes, let’s prepare the creamy ranch slaw. In a large bowl, mix the shredded cabbage and shredded carrots. These veggies add crunch and color to your tacos. In a separate bowl, whisk together mayonnaise, buttermilk, dried dill, lemon juice, salt, and pepper. This dressing will give your slaw a tangy bite. Pour the dressing over the cabbage and carrots. Toss everything to coat evenly. This slaw is creamy and refreshing. To get started with the tacos, heat the corn tortillas for about 30 seconds on each side in a dry skillet. This makes them warm and pliable, perfect for holding all that goodness. Now, it’s time to assemble! Place a generous portion of buffalo cauliflower on each tortilla. Follow this with a handful of creamy ranch slaw. Garnish with fresh cilantro for a pop of color. If you like, add avocado slices for an extra creamy touch. Your buffalo cauliflower tacos are now ready to enjoy! To make your cauliflower nice and crispy, dip each floret in the batter. Make sure the batter coats the cauliflower well. Bake them at 450°F (232°C) for 20 minutes. Flip halfway through to ensure even cooking. For more flavor, try adding a bit of hot sauce to the batter. You can also toss the cauliflower in garlic powder or smoked paprika for extra zest. You can make your slaw even better by adding diced bell peppers or green onions. They add color and crunch. You can prepare the slaw ahead of time. Just mix the veggies and dressing. Store it in the fridge for up to two days. This will save you time when you are ready to eat. When you assemble your tacos, layer the buffalo cauliflower first. Then add a good amount of creamy ranch slaw on top. To make it look nice, serve the tacos on a large platter. You can add lemon wedges for a pop of color. A small bowl of extra buffalo sauce on the side is great for drizzling or dipping. For portion sizes, two tacos per person is a good rule of thumb. {{image_2}} You can add more protein to your tacos. For a plant-based twist, try adding cooked lentils or chickpeas. These options are rich in protein and fiber. You can also mix them with the buffalo cauliflower for a hearty dish. If you prefer meat, consider using shredded chicken or beef. These proteins pair well with buffalo sauce. You can toss them in the sauce just like the cauliflower. This adds a spicy kick and keeps everything flavorful. Explore different vegetables for your slaw. You can swap cabbage for kale or add bell peppers for color. Thinly sliced radishes give a nice crunch too. Experimenting with different veggies keeps your dish fresh. For dressings, try Greek yogurt instead of mayonnaise. It’s lighter and still creamy. You could also use a vinaigrette for a tangy twist. This way, you can tailor the slaw to your taste. Lettuce wraps make a great low-carb option. They hold the filling well and add freshness. You can use large leaves of romaine or butter lettuce for this. If you want something different, try flour tortillas. They are soft and can hold more filling. Corn tortillas give a nice flavor and are gluten-free. For creative serving, stack tacos on a platter. Add lemon wedges for a pop of color. Serve with a bowl of extra buffalo sauce for dipping. This makes it fun for everyone at the table. To keep your buffalo cauliflower fresh, store it in an airtight container. This helps keep out moisture and air. You can store it in the fridge for up to three days. For the creamy ranch slaw, place it in a separate container. The slaw stays fresh for about two days. This way, the flavors stay bright and crunchy. When you're ready to enjoy leftovers, there are a few great ways to reheat the tacos. You can use a skillet over medium heat. Heat each taco for about two to three minutes. This method helps keep the tortilla soft and the cauliflower crispy. You can also use a microwave, but it may make the tortillas a bit soggy. If you do use a microwave, heat for just 30 seconds at a time. Yes, you can freeze buffalo cauliflower! Just place it in a freezer-safe bag. Make sure to remove as much air as possible. It can stay frozen for up to three months. When you're ready to eat it, thaw it in the fridge overnight before reheating. However, I don’t recommend freezing the creamy ranch slaw. The texture of the cabbage can change when frozen and thawed. It’s best to enjoy the slaw fresh for the best taste and crunch. If you don’t like spicy food, you can tweak the buffalo sauce. Start with a milder sauce. You can also mix in some honey or butter. This will help tone down the heat. You can even use barbecue sauce for a sweet twist. Enjoy the great flavor without the burn! Yes, you can make these tacos gluten-free easily. Use a gluten-free flour blend instead of all-purpose flour. For the tortillas, swap corn tortillas with gluten-free versions. Check the labels to be sure. You can enjoy delicious tacos without gluten! Leftovers can last about 3-4 days in the fridge. Store the buffalo cauliflower and slaw in separate containers. This keeps them fresh and tasty. Make sure they are sealed tightly. You can reheat the cauliflower in the oven for a crispy texture! This blog post covered how to make delicious buffalo cauliflower tacos with creamy ranch slaw. You learned about key ingredients, step-by-step instructions, and helpful tips to make your tacos shine. Remember, you can customize these tacos with toppings, proteins, and different slaws. Don’t forget to store leftovers properly for maximum freshness. Now, you can enjoy this tasty dish your way! Get creative and have fun while cooking!

Buffalo Cauliflower Tacos with Creamy Ranch Slaw Delight

Are you ready to elevate your taco night? These Buffalo Cauliflower Tacos with Creamy Ranch Slaw combine crispy cauliflower with

Older posts
Newer posts
← Previous Page1 … Page26 Page27 Page28 … Page84 Next →

dsad

© 2026 Foodish Talk • Built with GeneratePress

Our Policies

  • Copyright Policy
  • Cookie Policy
  • GDPR Policy
  • Privacy Policy
  • Disclaimer
  • Terms Of Use

More Information

  • Home
  • About
  • Contact
  • Appetizers
  • Dessert
  • Dinner
  • Drinks
©2026, Foodish Talk About Back To Top