Skip to content
DisclaimerTerms Of UseGDPR PolicyCookie Policy

Foodish Talk

  • Home
  • Drinks
  • Appetizers
  • Dinner
  • Dessert
  • About
  • Contact
  • Privacy Policy
DisclaimerTerms Of UseGDPR PolicyCookie Policy

NO-ING-IMG

To make the sheet-pan maple glazed chicken and carrots, gather these items: - 4 bone-in chicken thighs, skin-on - 1 pound baby carrots, peeled - 1/4 cup pure maple syrup - 2 tablespoons Dijon mustard - 2 tablespoons olive oil - 1 teaspoon garlic powder - 1 teaspoon onion powder - 1/2 teaspoon smoked paprika - Salt and pepper to taste - Fresh thyme or parsley for garnish These ingredients blend together to create a sweet and savory dish. You can swap a few ingredients for different flavors. If you can't find bone-in thighs, use skin-on chicken breasts. They cook faster, so check them sooner. Instead of baby carrots, chop regular carrots into sticks. You can also use honey if maple syrup is not available. For a different taste, try yellow mustard instead of Dijon. Each serving of this dish has about: - Calories: 410 - Protein: 27g - Carbohydrates: 25g - Fat: 24g - Fiber: 3g - Sugars: 10g This meal offers a good balance of protein and carbs. It brings together wholesome ingredients for a tasty dinner. Enjoy the flavors while knowing you're eating something good for you! First, gather all your ingredients. You will need chicken thighs, baby carrots, and the glaze. The glaze mixes maple syrup, Dijon mustard, olive oil, and spices. It adds flavor and sweetness. 1. Preheat your oven to 400°F (200°C). This helps the chicken cook evenly. 2. In a small bowl, whisk the maple syrup, Dijon mustard, olive oil, garlic powder, onion powder, smoked paprika, salt, and pepper. This is your glaze. 3. On a large baking sheet, arrange the chicken thighs and baby carrots. Lay them out in a single layer. 4. Pour the maple glaze over the chicken and carrots. Use a brush or spoon to coat them well. 5. Bake in the preheated oven for about 35-40 minutes. The chicken should reach 165°F (75°C). The carrots need to be tender. 6. Halfway through, baste the chicken with pan juices. This adds more flavor. 7. When done, take the sheet pan out of the oven. Let it rest for a few minutes. 8. Garnish with fresh thyme or parsley before serving. To check if the chicken is done, use a meat thermometer. The inside should be 165°F (75°C). Test the carrots by piercing them with a fork. They should be soft but not mushy. This ensures a perfect meal every time. Marinating the chicken is key for flavor. Mix the maple syrup, Dijon mustard, olive oil, garlic powder, onion powder, smoked paprika, salt, and pepper in a bowl. Coat the chicken thighs well. Let them sit in the marinade for at least 30 minutes. For more taste, marinate them overnight in the fridge. To get crispy skin, start with bone-in, skin-on chicken thighs. Pat the skin dry with paper towels before marinating. This helps the skin crisp up while cooking. Bake the chicken at a high temperature, like 400°F (200°C). Basting halfway through cooking adds extra flavor and helps the skin crisp up too. Don’t throw away the leftover glaze! You can use it for extra flavor. Brush it on the chicken and carrots during the last few minutes of cooking. You can also save it for later. Store it in the fridge for up to a week. Reheat it before using to add flavor to other dishes. {{image_2}} You can switch up the carrots. Try using green beans, zucchini, or bell peppers. These veggies add color and flavor. Each option cooks well with the chicken and glaze. You can also add potatoes for a heartier dish. Just be sure to cut them small so they cook evenly. Want to change the protein? You can use bone-in chicken breast instead of thighs. They will cook a bit faster. For a fun twist, try pork chops or bone-in turkey thighs. Salmon also works great with this glaze. It offers a nice sweet flavor when baked. Feel like mixing up the glaze? You can add soy sauce for a salty touch. Honey can replace maple syrup for a different sweetness. For a spicy kick, add sriracha or red pepper flakes. You can even try fresh herbs like rosemary or basil to change the flavor. After enjoying your sheet-pan maple glazed chicken and carrots, let leftovers cool first. Place the chicken and carrots in an airtight container. Store in the refrigerator. Use them within three days for the best taste. If you're saving just the glaze, keep it in a small jar. To reheat, use your oven for the best flavor. Preheat it to 350°F (175°C). Place the chicken and carrots on a baking sheet. Cover them with foil to keep moisture in. Heat for about 15-20 minutes or until warm. You can also reheat in the microwave. Just cover the dish to avoid drying out. You can freeze the chicken and carrots if you have extra. Wrap them tightly in plastic wrap, then place them in a freezer bag. Remove as much air as possible. They can stay in the freezer for up to three months. When you're ready to eat, thaw in the fridge overnight. Reheat as mentioned above for a tasty meal. Yes, you can use chicken breasts instead of thighs. Chicken breasts are leaner and cook faster. Adjust the cooking time to about 25-30 minutes. Check the internal temperature to ensure it’s 165°F (75°C). Breasts may not stay as juicy as thighs, but they will still taste great with the maple glaze. No, it is not necessary to peel the carrots. Baby carrots are often sweet and tender with skin on. However, peeling can improve the look and texture if you prefer. If you do peel them, wash them well to remove any dirt. Both options will work in this dish. You can serve many sides with this dish. Rice or quinoa works well to soak up the glaze. A fresh salad adds a nice crunch and balances the meal. Mashed potatoes or crusty bread can also be great choices. Feel free to mix and match based on your taste! This blog post covered all you need for making maple glazed chicken and carrots. We looked at essential ingredients, helpful cooking steps, and smart tips to boost flavor. Variations let you mix things up, while storage info shows you how to keep leftovers fresh. Each section aimed to give you clear guidance. Enjoy making this dish, and don't hesitate to experiment. Cooking should be fun and tasty, so go ahead and get creative!

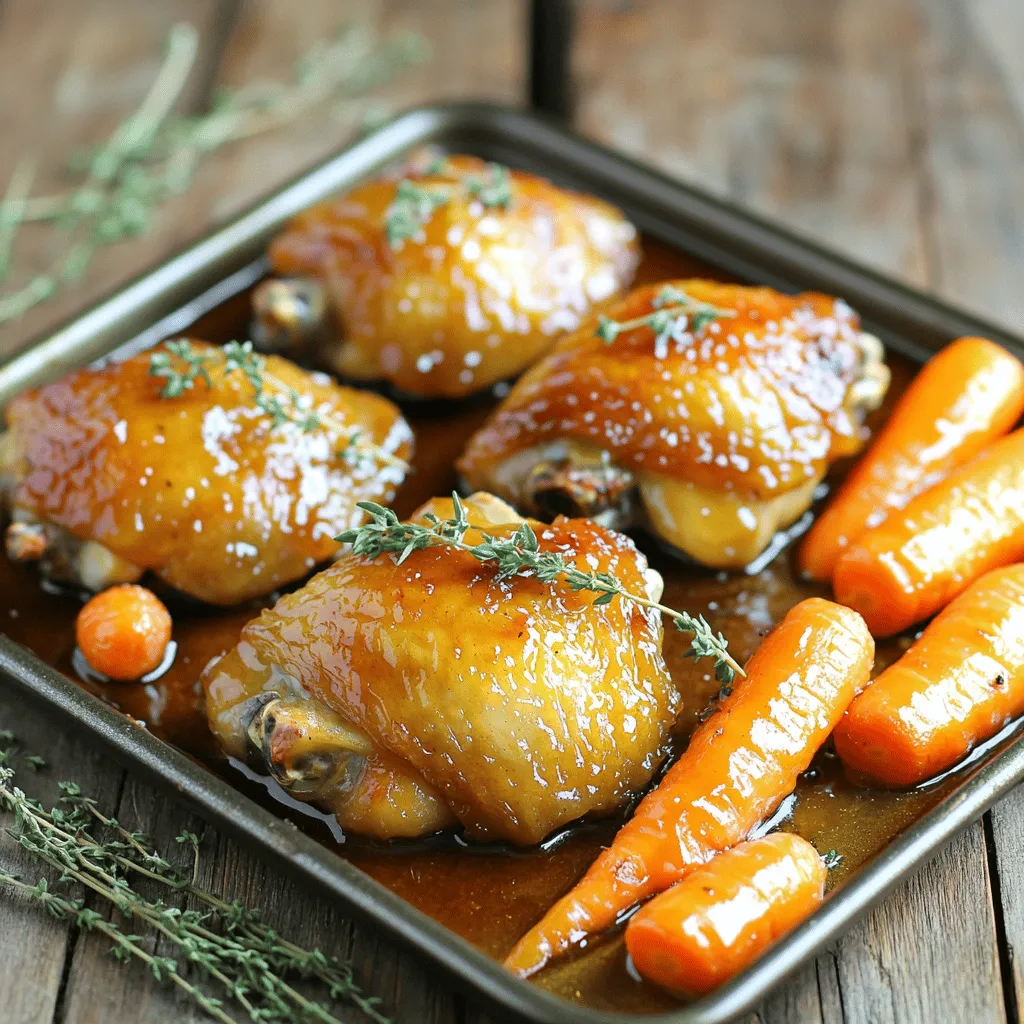
Sheet-Pan Maple Glazed Chicken and Carrots Delight

Looking for an easy, tasty dinner? You’re in the right place! In this blog post, I’m sharing my favorite Sheet-Pan

- 1 cup cottage cheese - 1 cup rolled oats - 1 banana, mashed - 2 large eggs - 1 teaspoon baking powder - ½ teaspoon vanilla extract - ¼ teaspoon cinnamon - Pinch of salt - Cooking spray or butter for frying Each serving of these pancakes provides: - Calories: 200 - Protein: 14g - Carbohydrates: 30g - Fat: 5g - Fiber: 4g - Cottage cheese: High in protein and calcium. It helps build muscles and supports bone health. - Rolled oats: Packed with fiber, they keep you full longer. They also help regulate blood sugar. - Banana: Adds natural sweetness and potassium. This helps with muscle function and heart health. - Eggs: Provide protein and healthy fats. They support brain health and help with energy. - Baking powder: Helps pancakes rise. This keeps them fluffy and light. - Vanilla extract: Adds flavor without extra sugar. It makes the pancakes taste great. - Cinnamon: Offers antioxidants and a warm flavor. It can also help lower blood sugar. - Salt: Enhances all the flavors in the pancakes. Just a pinch makes a big difference. - Cooking spray or butter: Used for frying, it prevents sticking and adds flavor. To make the batter, gather your ingredients first. You need: - 1 cup cottage cheese - 1 cup rolled oats - 1 banana, mashed - 2 large eggs - 1 teaspoon baking powder - ½ teaspoon vanilla extract - ¼ teaspoon cinnamon - Pinch of salt Start by placing all these ingredients into a blender or food processor. Blend until the mix is smooth and creamy. You want everything to mix well. If you see lumps, blend a bit more. This batter is packed with protein and flavor! Next, it's time to cook. Preheat a non-stick skillet or griddle over medium heat. Lightly grease it with cooking spray or butter. This step helps the pancakes not stick. Once hot, pour about ¼ cup of batter onto the skillet for each pancake. Watch for bubbles to form on the surface. This should take about 2-3 minutes. When you see bubbles, it’s time to flip the pancake. Cook the other side for another 2-3 minutes. You want them golden brown. Repeat this with the rest of the batter. Adjust the heat if needed to avoid burning. Once cooked, serve the pancakes warm. They taste great on their own, but toppings make them even better! Try fresh fruit like berries or sliced bananas. Honey and maple syrup are delicious choices too. You can also add a sprinkle of nuts for crunch. Enjoy the meal that’s tasty and full of protein! To get fluffy pancakes, start with fresh ingredients. Use fresh cottage cheese and eggs. Blend the batter just enough to mix. Over-blending can make the pancakes dense. Let the batter rest for a few minutes before cooking. This helps the oats absorb moisture and swell. Use a non-stick skillet or griddle for the best results. Preheat it over medium heat. A good test is to sprinkle water on the surface. If it sizzles and dances, it’s ready! Lightly grease the skillet with cooking spray or butter. This prevents sticking and adds flavor. Cook each pancake until bubbles form on the surface, then flip. One common mistake is cooking on too high heat. This can burn the outside while leaving the inside raw. Another mistake is not greasing the pan enough. Your pancakes may stick and fall apart. Lastly, avoid skipping the resting time for the batter. This can lead to flat pancakes. Following these tips helps you make perfect, fluffy cottage cheese pancakes every time! {{image_2}} You can make your cottage cheese pancakes even better with fun add-ins. Here are some ideas: - Berries: Add fresh blueberries or strawberries for a burst of flavor. - Nuts: Chopped walnuts or almonds give a nice crunch. - Chocolate Chips: For a sweet treat, mix in dark chocolate chips. - Pumpkin: Stir in canned pumpkin for a fall twist. These add-ins can change the taste and texture. Mix and match to find your favorite! If you want a different sweetness, try these options: - Honey: Use honey for a natural sweet touch. - Maple Syrup: It adds a rich flavor that's hard to beat. - Stevia: For a low-calorie choice, stevia works well. - Coconut Sugar: This gives a slight caramel taste. Choosing a sweetener can change how the pancakes taste. Experiment to find what you love best! If you need gluten-free pancakes, it’s easy to adapt. Just use: - Gluten-Free Oats: Make sure your oats are certified gluten-free. - Almond Flour: This can replace oats for a nutty flavor. - Coconut Flour: It adds a light texture and is gluten-free. With these swaps, everyone can enjoy these pancakes! You’ll still get all the protein and flavor. After making high-protein cottage cheese pancakes, you may have some left. Let them cool to room temperature first. Then, stack the pancakes with parchment paper between each one. Place the stack in an airtight container. Store it in the fridge for up to three days. This way, your pancakes stay fresh and tasty. Reheating pancakes is simple, and you want them to taste great. The best way is to use the microwave. Place a pancake on a microwave-safe plate. Cover it with a damp paper towel. Heat for about 20-30 seconds. If you want a crisp edge, use a skillet. Heat the pan on medium for a minute. Then, add the pancake and warm it for 1-2 minutes on each side. Freezing pancakes is a smart choice for meal prep. Place the cooled pancakes in a single layer on a baking sheet. Freeze them for about an hour. Then, transfer them to a freezer-safe bag. They can last for up to two months. When ready to eat, take out the pancakes and let them thaw in the fridge overnight. You can also reheat them directly from the freezer. Just add a little extra time to the microwave or skillet. Yes, you can make these pancakes ahead of time. Cook them as directed and let them cool. Once cool, stack them on a plate and cover with plastic wrap. You can store them in the fridge for up to three days. For longer storage, freeze them. Place a sheet of parchment paper between each pancake to keep them from sticking. They will last in the freezer for up to three months. When you want to eat them, just reheat in the microwave or on a skillet. If you don’t have a banana, you can use applesauce. Use ½ cup of unsweetened applesauce instead of one banana. It adds moisture and a hint of sweetness. You can also try mashed sweet potatoes or pureed pumpkin. These options will give a nice flavor and keep the pancakes moist too. Each of these choices works well with the other ingredients in the recipe. To cut calories, use fat-free cottage cheese instead of regular. This swap lowers fat and calories without losing protein. You can also skip the added sugar or syrup when serving. Instead, use fresh fruit as a topping. Another tip is to reduce the number of eggs to one. This change cuts calories while still keeping the pancakes fluffy. In this article, we explored the key ingredients for delicious pancakes and their benefits. I shared step-by-step instructions for making fluffy pancakes and offered tips to avoid common mistakes. We discussed fun variations and storage tips to keep your pancakes fresh. Pancakes are easy to personalize, making breakfast fun and tasty. Remember, with simple changes, you can enjoy this dish in many ways. Enjoy creating your perfect pancake breakfast!

High-Protein Cottage Cheese Pancakes Easy and Tasty

If you want a tasty breakfast that boosts your protein intake, try my High-Protein Cottage Cheese Pancakes! These easy-to-make pancakes

To make the Warm Apple Crisp with Oatmeal Crumble Topping, gather these ingredients: - 4 large apples (Granny Smith or Honeycrisp), peeled and sliced - 1 tablespoon lemon juice - 1/4 cup brown sugar - 1 teaspoon cinnamon - 1/4 teaspoon nutmeg - 1/2 cup rolled oats - 1/2 cup all-purpose flour - 1/3 cup granulated sugar - 1/2 cup cold unsalted butter, cubed - 1/4 teaspoon salt - 1/2 cup chopped walnuts or pecans (optional) I recommend using Granny Smith or Honeycrisp apples. Granny Smith apples add a nice tartness. Honeycrisp apples are sweet and juicy. Mixing these varieties can give your crisp great flavor. You can also try Fuji or Braeburn apples for a different taste. Want to make your apple crisp even better? Consider adding some optional ingredients. You can mix in 1/2 cup of chopped walnuts or pecans for crunch. Dried cranberries or raisins can add sweetness. A splash of vanilla extract boosts flavor, too. To start, you need to choose your apples. I love using Granny Smith or Honeycrisp apples. They give the best taste and texture. Peel and slice four large apples. Use a sharp knife for easy slicing. In a large bowl, toss the apples with one tablespoon of lemon juice. This keeps the apples fresh and bright. Next, add 1/4 cup of brown sugar, one teaspoon of cinnamon, and 1/4 teaspoon of nutmeg. Mix everything until the apples are well coated. Once mixed, spread the apple mixture in a greased 9x13 inch baking dish. Now, it’s time for the oatmeal crumble topping. In a separate bowl, combine 1/2 cup of rolled oats, 1/2 cup of all-purpose flour, 1/3 cup of granulated sugar, and 1/4 teaspoon of salt. Stir these ingredients together to mix well. Then, add 1/2 cup of cold, cubed unsalted butter. Use your fingers or a pastry cutter to mix until the mix looks like coarse crumbs. If you like, fold in 1/2 cup of chopped walnuts or pecans for extra crunch. Once you have the crumble ready, spread it evenly over the apples in your baking dish. Preheat your oven to 350°F (175°C) while you prepare. Bake the dish for 30 to 35 minutes. You want the apples to be tender and the topping to turn a nice golden brown. When done, remove it from the oven and let it cool for a bit. This will help the flavors come together. Enjoy your warm apple crisp with a scoop of vanilla ice cream or whipped cream for a delightful treat! When making apple crisp, pick the right apples. I love using Granny Smith or Honeycrisp. Both types add great taste and texture. Granny Smith apples offer a nice tartness. Honeycrisp apples provide a sweet crunch. Always choose firm apples. Avoid soft or bruised ones. Fresh apples make a big difference in your dish. For a great crumble, combine oats, flour, and butter well. Use cold butter for the best texture. I recommend cutting the butter into small cubes. Then, mix it with your dry ingredients. You want the mixture to look like coarse crumbs. If you want some added crunch, mix in chopped nuts. Walnuts or pecans work well here. To ensure even cooking, spread the apple mixture evenly in the dish. Make sure the crumble topping covers all the apples. This helps them cook evenly. Keep an eye on your crisp while it bakes. The apples should be tender, and the topping should turn golden brown. If it browns too quickly, cover it with foil. This way, your warm apple crisp turns out perfect every time! {{image_2}} You can easily make this dish gluten-free. Use gluten-free flour instead of all-purpose flour. Check that your oats are certified gluten-free too. This way, everyone can enjoy this warm apple crisp. If you need a nut-free option, just skip the walnuts or pecans. This dessert still tastes great without nuts. You can add a bit of extra oats to the topping. This keeps the texture nice and crunchy. Want to boost the flavor? Try adding a splash of vanilla extract to the apples. You can also drizzle some caramel sauce over the topping. This adds a sweet touch that pairs well with the apples. A pinch of ginger can also bring a nice kick to the dish. To store leftovers, let the apple crisp cool. Cover it tightly with plastic wrap or foil. You can also transfer it to an airtight container. Keep it in the fridge for up to five days. The crisp may lose some crunch, but the taste will still be great. To reheat, preheat your oven to 350°F (175°C). Place the apple crisp in an oven-safe dish. Cover it with foil to prevent burning. Heat for about 15-20 minutes. This will warm it through and help revive some of the crisp topping. You can also microwave it in short bursts, about 30 seconds at a time. Freezing apple crisp is easy. Allow it to cool completely. Cut it into portions and wrap each piece in plastic wrap. Then, place the wrapped portions in a freezer bag. Squeeze out the air and seal it well. You can freeze it for up to three months. To enjoy, just thaw it in the fridge overnight, then reheat as mentioned above. Yes, you can use many fruits. Pears, peaches, or berries work well. Each fruit adds its own flavor. For a twist, mix apples with another fruit. Just be sure to adjust sugar based on sweetness. You can tell it's done when the topping is golden brown. The apples should be soft. You can poke them with a fork to check. If they give easily, it's ready to enjoy. Yes, you can make it a day before. Just store it in the fridge. When you're ready, bake it until warm. This can save time on busy days or special occasions. This blog covered how to make a delicious apple crisp. We talked about ingredients, step-by-step instructions, and tips for the best results. You learned how to choose apples and make optional add-ins for more flavor. Remember to store leftovers properly for later. Feel free to experiment with different fruits or flavors. With these easy steps, you can create a great dessert. Enjoy your homemade apple crisp!

Warm Apple Crisp with Oatmeal Crumble Topping Delight

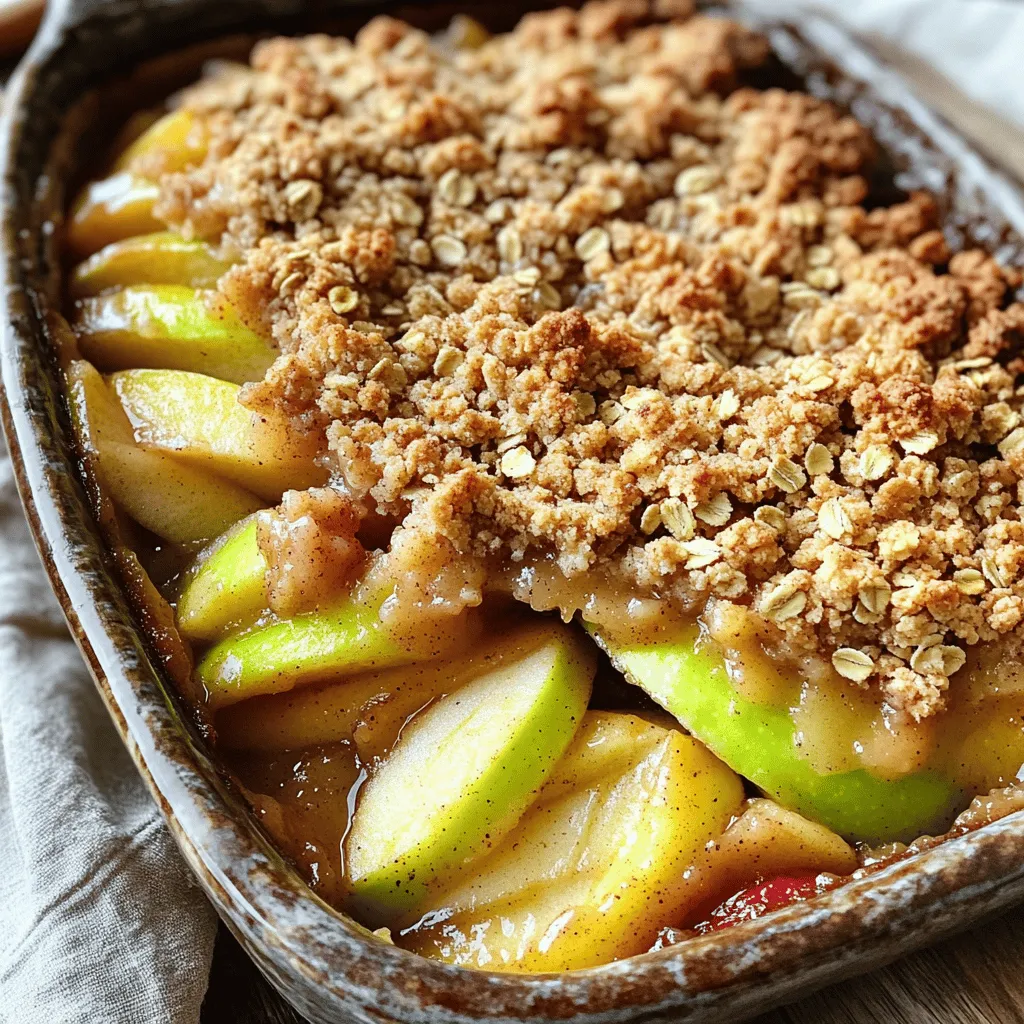
When the leaves turn and the air cools, nothing warms the soul quite like a Warm Apple Crisp with Oatmeal

To make this dish, gather these key ingredients: - 12 oz penne pasta - 1 lb smoked sausage, sliced - 1 medium onion, diced - 1 red bell pepper, diced - 2 cloves garlic, minced - 1 can (14.5 oz) diced tomatoes, with juices - 1 cup chicken broth - 1 cup heavy cream - 2 tablespoons Cajun seasoning - 1 teaspoon dried oregano - Salt and pepper to taste - 1/2 cup grated Parmesan cheese - Fresh parsley for garnish These ingredients create a rich and creamy pasta that bursts with flavor. If you need to adjust the recipe, here are some useful tips: - You can swap penne pasta for any short pasta, like fusilli or rigatoni. - Use turkey sausage for a leaner option. - Chicken broth can be replaced with vegetable broth for a vegetarian version. - Heavy cream can be substituted with half-and-half for a lighter sauce. These changes keep the dish tasty while meeting your needs. Want to make your dish even better? Here are some fun add-ins: - Add 1 cup of spinach or kale for extra greens. - Toss in some sliced mushrooms for an earthy taste. - A pinch of crushed red pepper flakes can give it a spicy kick. - Try adding a squeeze of lemon juice for brightness. These options boost flavor and nutrition, making the meal even more delightful. First, grab a large pot or a Dutch oven. Heat a splash of olive oil over medium heat. Once hot, add the sliced sausage. Cook until browned, which takes about 5 to 7 minutes. The sausage will add great flavor. After browning, remove the sausage and set it aside for later. Next, in the same pot, add the diced onion and red bell pepper. Sauté them for about 3 to 4 minutes. You want them to soften a bit. After that, toss in the minced garlic. Cook for another minute until you smell that wonderful aroma. Now it’s time to add more ingredients. Pour in the diced tomatoes with their juices. Then add the chicken broth and heavy cream. Sprinkle in the Cajun seasoning and dried oregano. Don’t forget to add salt and pepper to taste. Stir everything well to make sure it mixes nicely. Once combined, add the penne pasta to the pot. Don’t forget to return the browned sausage to the mix. Bring this mixture to a boil. Once boiling, reduce the heat to low. Cover the pot and let it simmer for about 15 minutes. Stir occasionally during this time. You want the pasta to cook al dente, and the sauce should thicken up nicely. When the pasta is ready, remove the pot from heat. Stir in the grated Parmesan cheese until it melts and becomes creamy. Taste it and adjust seasoning if needed. For a lovely finish, garnish with fresh parsley before serving. This dish looks great in deep bowls. You might also add extra Parmesan or a sprinkle of crushed red pepper flakes for some heat. Enjoy your creamy Cajun pasta! - Use a large pot to give the pasta room to cook. - Stir the pasta often to prevent sticking. - Add the cheese last for a creamy finish. - Use fresh ingredients for the best flavor. - Always taste as you cook to adjust seasonings. Cooking creamy pasta is easy with these tips. Make sure to use enough liquid. The pasta absorbs it while cooking. If your sauce is too thick, add a splash of broth or cream. - Use fresh Cajun seasoning for a bold taste. - Add a splash of hot sauce for heat. - Sauté a few shrimp with the sausage for extra flavor. - Try adding celery or green onions to the mix. - Lemon juice adds brightness to the dish. Cajun flavors shine with spices and fresh ingredients. Don't be afraid to experiment. Each step adds a new layer of taste. - Don’t skip browning the sausage; it adds depth. - Avoid overcooking the pasta; it should be al dente. - Don’t forget to stir often; this helps mix flavors. - If the sauce is too runny, simmer longer. - Avoid using pre-grated cheese; it doesn't melt as well. These mistakes can change your dish. Pay attention to each step for the best results. Cooking can be simple with the right tips and tricks! {{image_2}} You can change this dish easily. Swap the smoked sausage for chicken or shrimp. Both add great flavors. Another option is to use turkey sausage for a leaner meal. Think about adding vegetables like spinach or zucchini. These add color and more nutrients. Just toss them in during the last few minutes of cooking. They will cook quickly without losing their crunch. Want a meatless meal? Just skip the sausage and use plant-based sausage instead. You can also use mushrooms for a hearty texture. For a vegan twist, replace heavy cream with coconut milk or a cashew cream. This will keep the dish creamy and delicious. Use nutritional yeast instead of Parmesan for a cheesy flavor. This way, you can enjoy Cajun pasta without any animal products. While penne works great, you can use other shapes too. Fusilli or rigatoni can hold sauce well. If you're gluten-free, look for gluten-free pasta made from rice or quinoa. It cooks similarly and fits well in this dish. Just watch cooking time for different pasta shapes. No matter what, the creamy Cajun sauce will still shine through! To keep your One-Pot Creamy Cajun Pasta fresh, store it in an airtight container. Let it cool to room temperature first. This step helps prevent moisture build-up. Place the container in the fridge. It can last for 3 to 5 days. Make sure to label the container with the date, so you know when to eat it. When you're ready to enjoy your leftovers, reheat them gently. You can use a microwave or stovetop. If using a microwave, place the pasta in a bowl. Add a splash of water or cream to keep it moist. Heat it in short intervals, stirring in between. On the stovetop, warm it over low heat. Stir often until it's heated through. If you want to store it longer, freeze the pasta. Place the cooled pasta in freezer-safe bags or containers. Remove as much air as possible. This keeps the pasta from getting freezer burn. It can last up to 3 months in the freezer. To thaw, move it to the fridge overnight. Reheat it as described above for a tasty meal ready to go! Yes, you can make this dish without sausage. You might try using mushrooms or a mix of veggies instead. This keeps the flavor and adds healthy options. You can also use plant-based sausage if you want a similar taste without meat. I suggest using penne pasta for this recipe. Penne holds the sauce well and adds a nice texture. You can also use rotini or fusilli if you prefer. Just make sure to adjust the cooking time as needed. To make the pasta spicier, add more Cajun seasoning. You can also sprinkle in some crushed red pepper flakes. If you want more heat, try adding diced jalapeños or a dash of hot sauce. Be careful not to add too much at once. Yes, you can prepare this in advance. Cook the pasta and sauce, then cool it down. Store it in the fridge for up to three days. When you're ready to eat, reheat it on the stove or in the microwave. If the sauce is too thick, add a splash of chicken broth or cream. This blog post covered how to create a tasty one-pot creamy Cajun pasta. We looked at key ingredients, cooking steps, and storage tips. You learned how to avoid common mistakes and make delicious variations. In closing, experimenting with this recipe can lead to fun meals. Don't shy away from adding your twist! With simple changes, you can make this dish your own. Enjoy cooking and savoring your new favorite pasta!

One-Pot Creamy Cajun Pasta with Sausage Delight

Are you ready to spice up your dinner routine? One-Pot Creamy Cajun Pasta with Sausage is the perfect way to

To create a tasty Cranberry Pecan Sweet Potato Casserole, gather the following ingredients: - 4 medium sweet potatoes, peeled and chopped - 1/2 cup brown sugar - 1/4 cup milk (or almond milk for a dairy-free option) - 1/4 cup unsalted butter, melted - 1 teaspoon vanilla extract - 1/2 teaspoon cinnamon - 1/4 teaspoon nutmeg - 1 cup fresh or frozen cranberries - 1 cup pecans, chopped - 1/4 cup maple syrup - Pinch of salt These ingredients work together to create a comforting dish. The sweet potatoes provide a creamy base. The brown sugar adds sweetness, while the milk makes it rich. Butter and vanilla bring warmth and depth. The spices like cinnamon and nutmeg give a cozy feel. Cranberries add a burst of tartness, balancing the sweetness. Pecans offer a nice crunch and nutty flavor. Maple syrup adds a touch of earthiness. Finally, a pinch of salt enhances all the flavors. You can mix and match these ingredients based on your taste. If you like it sweeter, add more brown sugar or maple syrup. For a richer flavor, use more butter. This dish is not just food; it’s an experience. Enjoy the process and the delicious results! - Preheat your oven to 350°F (175°C). - Peel and chop the sweet potatoes into small pieces. - Boil the sweet potatoes in a large pot for 15-20 minutes. They should be tender when done. - Drain the water and let the potatoes cool slightly. - In a large bowl, mash the sweet potatoes until smooth. - Add brown sugar, milk, melted butter, vanilla, cinnamon, nutmeg, and a pinch of salt. Mix until well combined. - Gently fold in the cranberries and half of the chopped pecans. - Transfer the sweet potato mixture to a greased 9x13 inch baking dish. Spread it evenly. - In another bowl, mix the remaining pecans with maple syrup. Toss them to coat well. - Sprinkle the pecan mixture over the sweet potato layer. - Bake for 25-30 minutes until heated through and the top is slightly crispy. - Remove from the oven and let it cool for a few minutes before serving. To make the best sweet potato casserole, start with the right potatoes. Choose medium sweet potatoes. Peel and chop them into even pieces. This helps them cook evenly. Boil them for 15 to 20 minutes until they are tender. You can check by poking with a fork. Drain and let them cool slightly before mashing. If you want a dairy-free option, use almond milk instead of regular milk. The flavor stays rich and creamy. You can also swap the butter for a dairy-free spread. This keeps the dish tasty without dairy. Timing is key when baking. Preheat your oven to 350°F (175°C) before you start mixing. This ensures your casserole cooks evenly. Bake for 25 to 30 minutes. It should be hot and have a slight crisp on top. Garnishing adds flair to your dish. A sprig of fresh rosemary looks great on top. You can also sprinkle extra cinnamon for added flavor. Pair the casserole with roasted turkey or glazed ham. This dish brings both sweet and savory flavors to your meal. It works well with green beans or a fresh salad. For presentation, serve the casserole warm. Use a nice baking dish to show off the colors. A deep dish allows the layers to shine. You can also add a drizzle of maple syrup on top just before serving to make it even more inviting. {{image_2}} You can try different nuts like walnuts or almonds. Each brings a unique crunch. Walnuts add a rich, earthy taste. Almonds offer a milder flavor. You can also switch up the fruits. Try adding diced apples or pears instead of cranberries. For sweeteners, consider using honey or agave syrup. Both can add a new sweetness level to your dish. If you want a slow cooker version, it works well. Just combine all the ingredients in the slow cooker. Set it on low for about four hours. This makes it easy for gatherings. For smaller servings, halve the recipe and use an 8x8-inch dish. You can also double the recipe for larger groups. Just make sure to adjust the baking time. Add seasonal spices like ginger or cloves for a warm touch. They enhance the dish's flavor profile. During holidays, consider topping the casserole with mini marshmallows. They add sweetness and a fun texture. You can also use fresh herbs like rosemary or thyme as a garnish. These bring a lovely aroma to your table. To store your leftover casserole, use airtight containers. Glass or plastic containers work well. Make sure the casserole is cool before sealing. In the fridge, it lasts about 3 to 5 days. If you want to keep it longer, freeze it. In the freezer, it stays good for about 2 to 3 months. Just remember to label your containers with the date. When it’s time to eat leftovers, you can reheat them in several ways. The oven gives the best results. Preheat the oven to 350°F (175°C). Place the casserole in a baking dish, cover it with foil, and heat for about 20 minutes. You can also use the microwave for quick reheating. Just heat it in short bursts, stirring in between. To keep the texture and flavor, avoid overheating. If it seems dry, add a splash of milk or water before reheating. Enjoy every bite of your delicious casserole! Can I prepare the casserole ahead of time? Yes, you can prepare the casserole a day before. Just cover it and store it in the fridge. When you are ready, bake it at 350°F for about 25-30 minutes until hot. What can I substitute for pecans? If you cannot use pecans, try walnuts or almonds. Both give a nice crunch. You can also skip nuts for a nut-free version. Is this recipe suitable for vegans? Yes, this recipe can be vegan. Use almond milk and replace the butter with vegan butter. The dish will still taste great! How do I know when the sweet potatoes are done? The sweet potatoes are done when they are tender. You can poke them with a fork. If it goes in easily, they are ready. Can I use canned sweet potatoes instead? You can use canned sweet potatoes, but it may change the texture. Drain them well and mash them before mixing with other ingredients. What goes well with sweet potato casserole? Sweet potato casserole pairs well with roasted turkey or ham. It also goes great with green beans or a fresh salad. How do I enhance the flavor profile further? To boost flavor, add a pinch of cayenne pepper or a splash of orange juice. Both can add a nice twist to the dish. This blog post covers the key steps to make a tasty sweet potato casserole. We explored ingredients like sweet potatoes, spices, and nuts. I shared tips on preparation, mixing, and baking. You learned ways to store and reheat leftovers. Experimenting with variations can make the dish shine for any meal. Remember, this casserole is versatile and easy to customize. Enjoy making it your own!

Cranberry Pecan Sweet Potato Casserole Delight

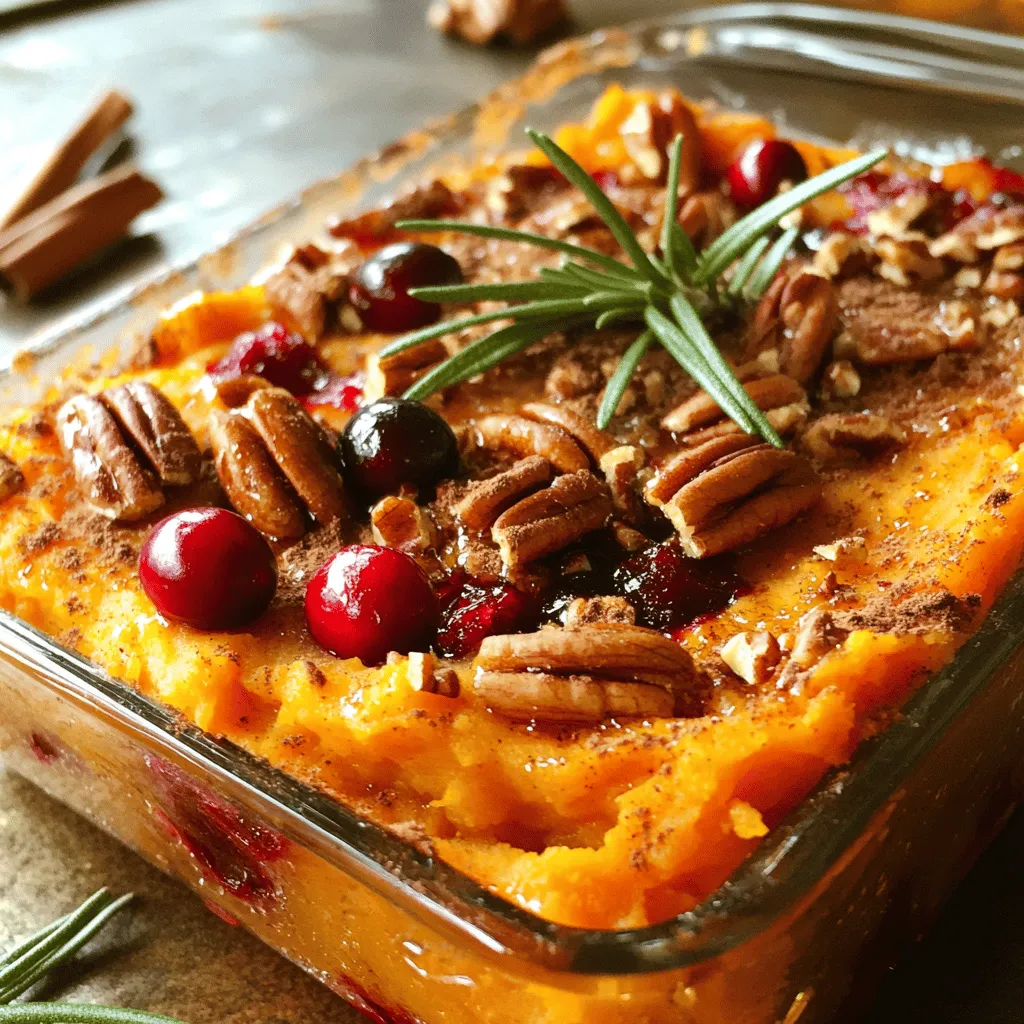
Are you ready to impress your family and friends this holiday season? Try my Cranberry Pecan Sweet Potato Casserole Delight.

- 12 large cremini or button mushrooms - 4 oz cream cheese, softened - 1/4 cup shredded mozzarella cheese - 1/4 cup finely chopped green onions - 1/4 cup plain breadcrumbs - 2 tablespoons everything bagel seasoning - 1 tablespoon olive oil - Salt and pepper to taste You can add extras to make these mushrooms unique. Try: - Crumbled bacon for a savory twist. - Chopped spinach for more greens. - Different cheeses, like feta or cheddar. When picking mushrooms, look for these signs: - They should feel firm and plump. - Check for smooth, unblemished caps. - Avoid mushrooms that look slimy or shriveled. - Smell them; fresh mushrooms have a light, earthy scent. With these ingredients and tips, you’re set to make delightful Air Fryer Everything Bagel Stuffed Mushrooms! Start by warming your air fryer to 350°F (175°C). Next, grab your large cremini or button mushrooms. Gently clean each mushroom by wiping it with a damp cloth. This step is key to keeping them fresh. After cleaning, remove the stems from the caps. Finely chop these stems and set them aside for later. This will add great flavor to your filling. In a mixing bowl, combine the chopped mushroom stems, softened cream cheese, shredded mozzarella cheese, and finely chopped green onions. Add in the plain breadcrumbs and two tablespoons of everything bagel seasoning. Don’t forget a pinch of salt and pepper to taste. Mix everything well until it forms a smooth filling. This mixture is what makes your stuffed mushrooms so tasty. Now, it’s time to fill the mushrooms. Use a spoon to generously fill each mushroom cap with your creamy mixture. Once filled, drizzle the stuffed mushrooms with olive oil. Sprinkle the remaining everything bagel seasoning on top for extra flavor. Place the stuffed mushrooms in a single layer in the air fryer basket. Make sure they don’t touch each other. Cook them for 10 to 12 minutes. They should turn golden brown and the filling should be bubbly. After cooking, carefully take them out and let them cool for a few minutes. Enjoy these delicious snacks warm! To make sure your stuffed mushrooms cook evenly, follow these steps: - Preheat your air fryer to 350°F (175°C). - Clean mushrooms gently to avoid bruising. - Arrange mushrooms in a single layer. Do not stack them. - Leave space around each mushroom for air to flow. This helps them cook properly and get that nice golden color. Flavor is key in any dish. Here’s how to boost it in your stuffed mushrooms: - Use fresh ingredients. Fresh mushrooms and green onions add more taste. - Mix your filling well. This ensures every bite is full of flavor. - Don’t skip the everything bagel seasoning. It adds a unique taste that makes these special. - Drizzle a bit of olive oil on top before cooking. It helps with browning and flavor. Each of these tips will help create a delicious bite. These stuffed mushrooms shine as an appetizer or snack. Here are some ideas to serve them: - Plate them on a rustic wooden board for a nice look. - Garnish with extra green onions for color and freshness. - Serve warm with dipping sauces like ranch or marinara. - Pair them with a light salad for a full meal. These ideas will make your stuffed mushrooms even more enjoyable! {{image_2}} You can easily make these stuffed mushrooms vegetarian. Instead of cream cheese, try using a plant-based cream cheese. It adds the same creamy texture and taste without the dairy. You can also replace the mozzarella with vegan cheese. Look for options that melt well. This way, you keep the dish rich and tasty while making it plant-friendly. For those who are gluten-free, swap out the plain breadcrumbs. Use gluten-free breadcrumbs or almond flour instead. Both options will give you a nice crunch. Just make sure to check that your everything bagel seasoning is gluten-free too. This keeps the recipe safe for everyone while still being delicious. Experimenting with cheese can bring new flavors to your stuffed mushrooms. You can use goat cheese for a tangy kick. Feta cheese also works well, giving a salty and creamy bite. If you love a stronger flavor, try blue cheese. Each cheese choice offers a unique taste, so feel free to mix it up! After enjoying your Air Fryer Everything Bagel Stuffed Mushrooms, let them cool. Place any leftovers in an airtight container. Store them in the fridge for up to three days. This keeps them fresh and tasty for your next snack. If you want to save some for later, freezing works well. First, let the stuffed mushrooms cool completely. Then, arrange them in a single layer on a baking sheet. Freeze them for about two hours until firm. Once frozen, transfer them to a freezer-safe bag or container. You can keep them in the freezer for up to three months. To enjoy your stuffed mushrooms again, you have a few options. For the best results, reheat them in the air fryer. Set it to 350°F (175°C) and cook for about 5-7 minutes. This method keeps them crispy. You can also use a microwave, but they may lose some texture. Heat them for about 30-60 seconds, checking often so they don’t get too hot. Enjoy your delicious mushrooms! Yes, you can use other mushrooms. Try portobello, shiitake, or oyster mushrooms. Each type adds its own flavor. Portobello has a meaty taste, while shiitake offers a woodsy note. Oyster mushrooms have a soft texture and mild flavor. Just make sure the mushrooms are large enough to hold the filling. To cook these in the oven, preheat it to 375°F (190°C). Prepare the mushrooms as you would for the air fryer. Fill them with the cream cheese mix. Place them on a baking sheet lined with parchment. Bake for about 15-20 minutes until golden and bubbly. Keep an eye on them to avoid burning. Great dipping sauces include ranch, garlic aioli, or marinara. Ranch adds a cool, creamy touch. Garlic aioli gives a strong flavor punch. Marinara brings a nice, tangy contrast. You can also try a spicy sriracha mayo for a kick. Feel free to experiment with your favorite sauces! In this post, we explored the ingredients, preparation, and cooking methods for stuffed mushrooms. We learned how to choose fresh mushrooms and customize your filling. Tips for even cooking and flavor helped elevate your dish. We also discussed variations for dietary needs and proper storage for leftovers. Stuffed mushrooms can impress at any meal. With these easy steps, you can make your version shine. Enjoy experimenting with flavors and sharing with friends!

Air Fryer Everything Bagel Stuffed Mushrooms Delight

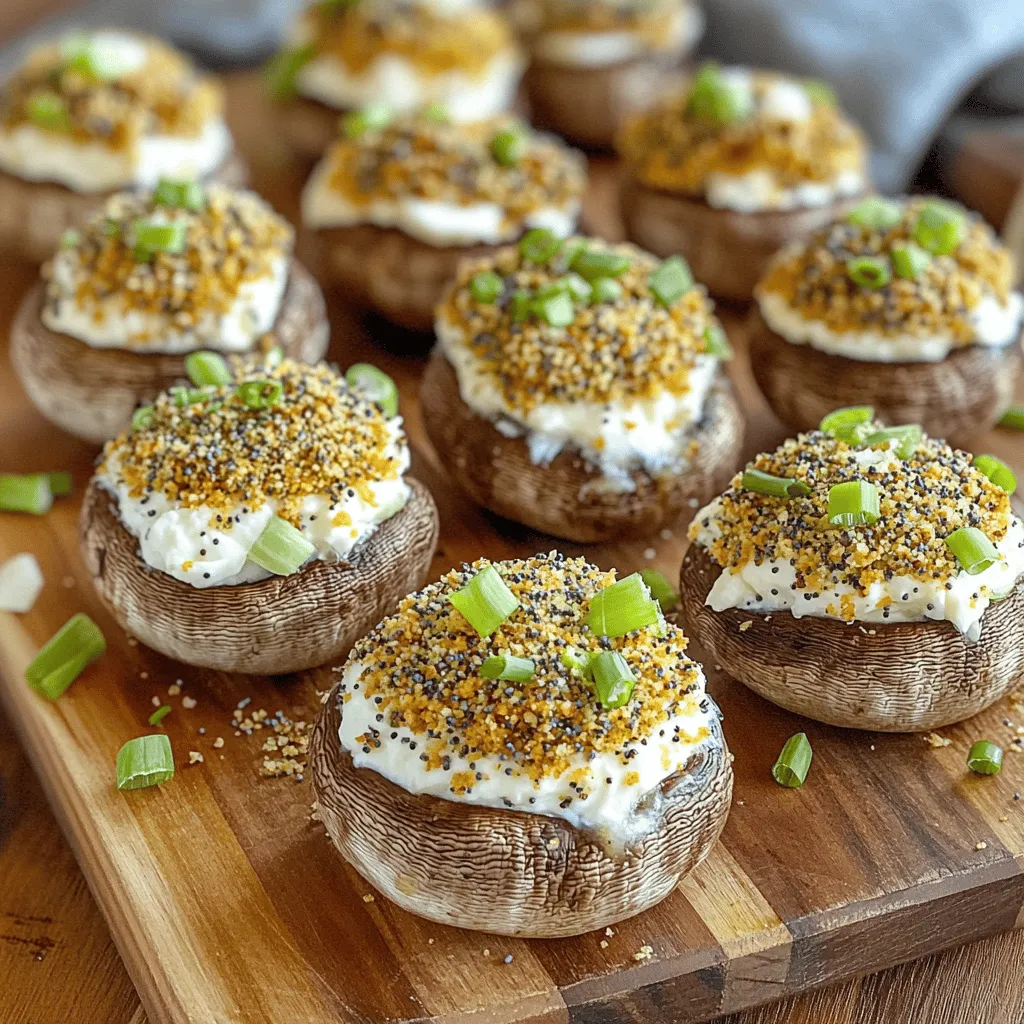
Looking for an easy and tasty snack? You’ll love these Air Fryer Everything Bagel Stuffed Mushrooms! They combine all the

- Chicken and Wild Rice - 1 lb boneless, skinless chicken breasts - 1 cup wild rice, rinsed - Vegetables - 1 medium onion, diced - 3 cloves garlic, minced - 3 carrots, sliced - 2 celery stalks, diced - Seasonings and Broth - 6 cups low-sodium chicken broth - 1 teaspoon dried thyme - 1 teaspoon dried rosemary - 1 bay leaf - Salt and pepper to taste - Cream and Garnish - 1 cup heavy cream (or coconut milk for a dairy-free option) - Fresh parsley, chopped (for garnish) Gather these ingredients to create a warm and hearty dish. The chicken and wild rice form a great base. The vegetables add texture and flavor. The seasonings and broth bring everything together. Finally, the cream gives a rich finish. Using fresh parsley as a garnish adds color and freshness. This combination makes the soup comforting and delicious. Preparing the Chicken Start by taking 1 pound of boneless, skinless chicken breasts. Place them at the bottom of your slow cooker. This forms a tasty base for your soup. Rinsing the Wild Rice Next, grab 1 cup of wild rice. Rinse it under cold water to remove any dust or extra starch. This step helps the rice cook better and keeps the soup from being too thick. Chopping the Vegetables Now, let's chop up some veggies. Dice 1 medium onion, slice 3 carrots, and dice 2 celery stalks. Also, mince 3 cloves of garlic. These ingredients add great flavor and nutrition to your soup. Layering Ingredients in the Slow Cooker With your chicken and veggies ready, it's time to layer them in the slow cooker. Put the rinsed wild rice on top of the chicken. Then, add the diced onion, minced garlic, sliced carrots, and diced celery. This order helps the flavors blend well. Cooking Times for Low and High Settings Pour in 6 cups of low-sodium chicken broth. Add 1 teaspoon of dried thyme, 1 teaspoon of dried rosemary, and 1 bay leaf. Stir gently to mix everything. Cover the slow cooker. Cook on low for 6-7 hours or on high for 3-4 hours. The chicken should be tender, and the rice fully cooked. Shredding the Chicken Once the cooking time is up, take out the chicken breasts. Use two forks to shred them into bite-sized pieces. Return the shredded chicken back to the soup, mixing it in well. Adding Cream or Coconut Milk Now, it's time to add some creaminess. Stir in 1 cup of heavy cream or coconut milk for a dairy-free option. Let the soup warm through for about 10 minutes. This step adds richness and smoothness to the soup. Adjusting Seasonings Before serving, taste the soup. Adjust the salt and pepper based on your preference. This final touch makes the soup just right for you. For this soup, wild rice is best. It adds a nutty flavor and chewy texture. Rinse the wild rice before use. This step removes any grit. Wild rice expands and softens during cooking. Avoid white rice, as it cooks too fast. To keep your soup creamy, add heavy cream or coconut milk. Stir in the cream at the end of cooking. This keeps the soup rich without curdling. For a lighter touch, add more broth or use less cream. Adjust this to fit your taste. Fresh herbs uplift this dish. Consider adding parsley or thyme just before serving. This adds brightness. You can also try dill for a different flavor. Fresh herbs make your soup lively and fresh. Spices can change your soup's flavor profile. Try adding a pinch of paprika for warmth. A touch of cayenne can add heat. Don't forget to taste as you go. Adjust spices based on your preference. Serve this soup with crusty bread. A nice, warm baguette complements it well. You can also pair it with a simple salad. A light side salad balances the richness of the soup. I recommend a Caesar salad or a mixed green salad. These add crunch and freshness. If you enjoy bread, garlic bread is a tasty choice. It soaks up the soup and adds flavor. {{image_2}} You can easily make this soup dairy-free by using coconut milk instead of heavy cream. Coconut milk adds a creamy texture and a hint of sweetness. It pairs perfectly with the savory flavors of chicken and wild rice. Just swap the heavy cream for one cup of coconut milk during the final steps. This change does not affect cooking times. It keeps the soup rich and comforting. If you want to use turkey or rotisserie chicken, you can. Rotisserie chicken saves time and adds flavor. Just add the shredded chicken during the last 10 minutes of cooking. If you prefer turkey, use one pound of cooked turkey instead of chicken. This option works well for holiday leftovers, making the soup a great way to enjoy festive flavors. For a vegetarian version, try chickpeas or lentils instead of chicken. These proteins add heartiness while keeping the soup filling. Just cook the soup as usual but omit the chicken. You may also want to add extra spices or herbs for flavor. Adding more vegetables boosts nutrition and flavor. Think about seasonal ingredients like squash or zucchini. These veggies add texture and taste. You can also toss in peas or corn for sweetness. Leafy greens like spinach or kale are great for extra nutrition. Add them in the last 15 minutes of cooking. They will wilt and blend into the soup, making it colorful. This way, you increase the health benefits while keeping the soup delicious. How Long Does It Last? This soup stays fresh in the fridge for up to four days. After cooking, let it cool down before storing. Proper Storage Containers Use airtight containers to keep your soup. Glass or BPA-free plastic works best. Make sure to leave some space at the top for expansion. Best Practices for Freezing Soup You can freeze this soup for up to three months. Let it cool completely before putting it in freezer-safe containers. Consider freezing in single servings for easy meals later. Thawing and Reheating Tips To thaw, place the container in the fridge overnight. You can also use the microwave for quick thawing. When reheating, heat on low to avoid burning. Stir often to keep it smooth and creamy. To make this soup gluten-free, use gluten-free broth. Check the label on your chicken broth. Ensure your wild rice is pure and does not mix with other grains. Avoid using any sauces or seasonings with gluten. Yes, you can use brown rice. Brown rice will take longer to cook. You may need to adjust the cooking time. Start checking for doneness after four hours on high or six hours on low. The chicken is done when it reaches 165°F. You can check this with a meat thermometer. If you do not have one, shred the chicken. It should pull apart easily and look white inside. You can use coconut milk for a dairy-free option. It adds a creamy texture and a hint of sweetness. Other options include cashew cream or almond milk. Just remember, these may change the flavor slightly. Yes, you can make this soup on the stovetop. Start by sautéing the veggies in a pot. Then, add the chicken and broth. Bring it to a boil, then reduce the heat. Simmer for about 30 minutes. Check the chicken for doneness, shred, and add the cream. This blog post covered how to make a delicious chicken and wild rice soup. We discussed the key ingredients, step-by-step cooking instructions, and helpful tips. You can enhance flavors with herbs and try variations for different diets. Storing and serving suggestions help extend enjoyment of this dish. In conclusion, this soup is easy, flexible, and perfect for any meal. With the right ingredients and a slow cooker, you can enjoy a warm bowl any day.

Slow Cooker Chicken and Wild Rice Soup Comfort Dish

Warm up your kitchen with my Slow Cooker Chicken and Wild Rice Soup. This cozy dish combines tender chicken, nutty

- 1 pound large shrimp, peeled and deveined - 4 tablespoons unsalted butter - 4 cloves garlic, minced - 1 tablespoon olive oil - 1 teaspoon red pepper flakes (adjust to taste) - Zest of 1 lemon - Juice of 1 lemon - Salt and pepper to taste These main ingredients create a rich, buttery sauce. The shrimp gives the dish protein. Garlic adds a punch of flavor, while lemon adds brightness. The red pepper flakes bring a little heat, which you can adjust. - 8 ounces linguine or spaghetti (for serving) - Fresh parsley, chopped (for garnish) - Grated Parmesan cheese (for serving, optional) You can serve the scampi over pasta for a filling meal. Fresh parsley adds color and freshness. Grated Parmesan cheese offers a creamy touch that enhances the dish. - Large pot (for boiling pasta, if using) - Large skillet (for sautéing shrimp) - Wooden spoon or spatula (for mixing) - Colander (for draining pasta) These tools help you cook efficiently. The pot boils water quickly, while the skillet helps you sauté shrimp evenly. A colander keeps your pasta from being watery. Having the right tools makes cooking easier and more fun! If you choose to serve pasta, start by boiling water. Use a large pot and add salt. Bring the water to a rolling boil. Add 8 ounces of linguine or spaghetti. Cook it according to the package instructions until it is al dente. This usually takes about 8 to 10 minutes. Once cooked, drain the pasta but save ½ cup of the pasta water. Set the pasta aside for later. Next, grab a large skillet and place it on medium heat. Add 1 tablespoon of olive oil and 2 tablespoons of unsalted butter. Once the butter melts, toss in 4 cloves of minced garlic and 1 teaspoon of red pepper flakes. Sauté this mixture for about 1 minute until it smells amazing. Then, add 1 pound of peeled and deveined shrimp to the skillet. Season it all with salt and pepper. Cook the shrimp for 2 to 3 minutes on each side. They should turn pink and opaque when done. After the shrimp is ready, it’s time to add some flavor. Stir in the zest and juice of 1 lemon. Add the remaining 2 tablespoons of butter to the skillet. If you cooked pasta, now add it to the pan. Pour in a bit of the reserved pasta water to help create a light sauce. Toss everything together to coat well. This will make sure the shrimp and pasta absorb all that delicious garlic butter flavor. To cook shrimp well, start with fresh, large shrimp. If you use frozen shrimp, thaw them first. Heat your skillet over medium heat. Add olive oil and butter. Wait for the butter to melt before adding garlic. Sauté the garlic until it smells great. Then, add the shrimp. Cook them for about 2-3 minutes on each side. They should turn pink and opaque. This means they are done. Overcooking will make shrimp tough, so watch them closely. Want to spice things up? You can easily adjust the heat. The red pepper flakes add a nice kick. If you like it mild, use less. If you love heat, add more. Red pepper flakes mix well with garlic. You can also try adding fresh chili for more flavor. Just slice it thin and toss it in with the shrimp. This way, you control the spice to fit your taste. Herbs and cheese can boost the flavor of your dish. Fresh parsley adds color and a fresh taste. Chop it finely and sprinkle on top just before serving. For an extra layer of flavor, consider using basil or thyme. Grated Parmesan cheese can also add a creamy richness. Just a sprinkle on top makes it feel special. Mixing these ingredients creates a dish that is not just tasty but looks great too. {{image_2}} You can easily make this dish gluten-free. Instead of pasta, use gluten-free pasta or zucchini noodles. Both options taste great and keep the meal light. You can also enjoy the shrimp with rice or quinoa. They soak up the garlic butter sauce well. Want to add some veggies? You can toss in spinach, cherry tomatoes, or asparagus. Add them to the skillet when you sauté the shrimp. This gives the dish color and extra nutrients. Broccoli or bell peppers also work well. They add a nice crunch and flavor. If you prefer different seafood, try scallops or crab. They both cook quickly and pair well with garlic butter. You can also mix shrimp with these seafood options. Just adjust the cooking time to make sure everything is cooked perfectly. This keeps the dish exciting and fresh. Store any leftover garlic butter shrimp scampi in an airtight container. This keeps flavors fresh. Place the container in the fridge. You can keep it for up to 2 days. If you used pasta, it may get mushy over time. For best taste, eat it soon. To reheat, use a skillet on low heat. Add a splash of water or broth. This helps prevent sticking. Stir gently until heated through. You can also use the microwave. Heat in short bursts, checking often to avoid overcooking the shrimp. You can freeze garlic butter shrimp scampi, but the texture may change. First, cool it completely. Place it in a freezer-safe container. Seal tightly and label it with the date. It will last up to 3 months. To thaw, move it to the fridge overnight before reheating. Yes, you can make Garlic Butter Shrimp Scampi without pasta. Just skip the pasta step. Serve the shrimp over rice, quinoa, or a salad. This keeps it light and fresh. You can enjoy all the tasty flavors without the carbs. You will know the shrimp are done when they turn pink and opaque. This usually takes about 2-3 minutes per side. Watch carefully; overcooking makes shrimp tough. Perfectly cooked shrimp should be firm but not rubbery. You can serve Garlic Butter Shrimp Scampi with several sides. Here are some great options: - Crusty bread for dipping in the garlic butter sauce - A fresh green salad with lemon vinaigrette - Steamed vegetables like asparagus or broccoli - Rice or quinoa for a filling meal These sides complement the dish and enhance its flavors. You learned how to make Garlic Butter Shrimp Scampi today. We covered the main ingredients, cooking steps, and tips for perfect shrimp. We also explored fun variations and how to store leftovers. This dish is easy and delicious, and you can adapt it to your taste. With these details, you can impress others or enjoy a meal yourself. Now, go cook and share your scampi adventure!

Garlic Butter Shrimp Scampi Quick and Easy Meal

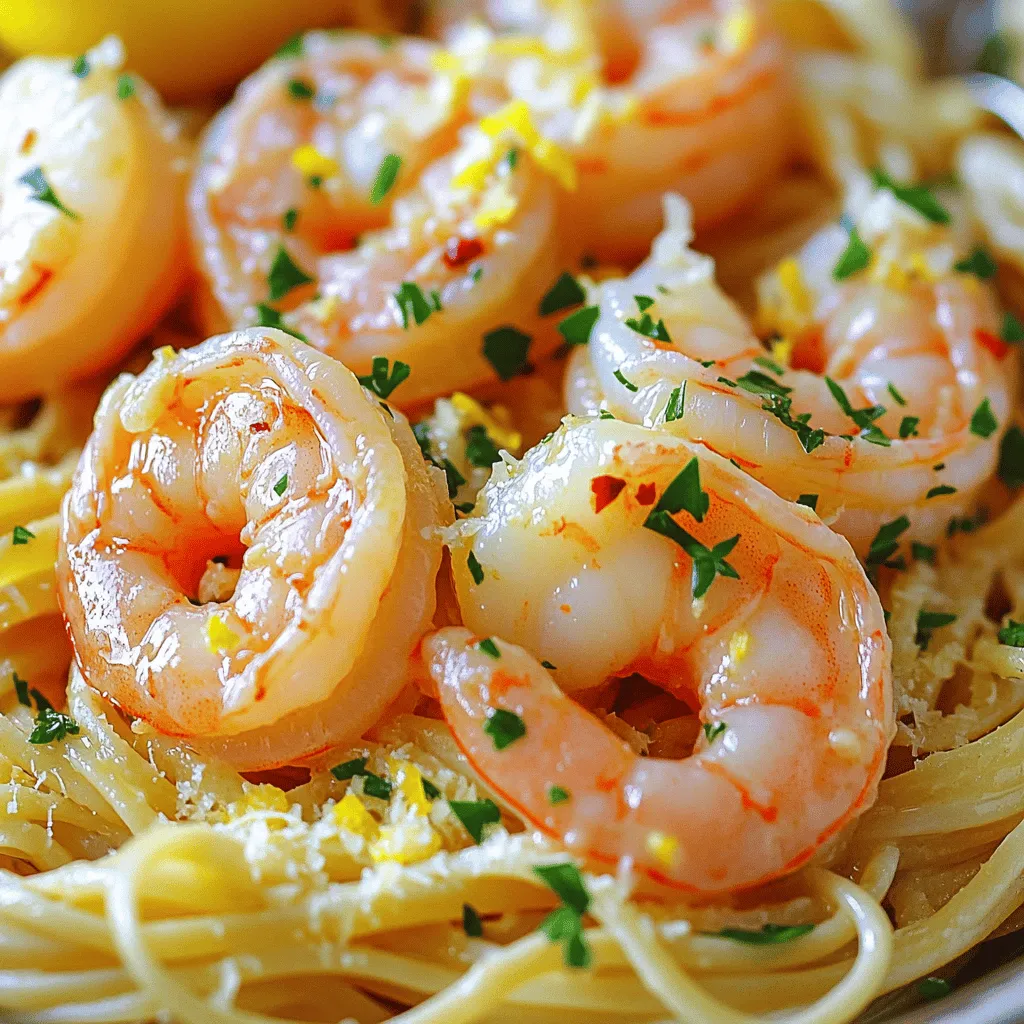
Craving a quick and tasty meal? Let’s whip up Garlic Butter Shrimp Scampi in just 15 minutes! This dish is

- 1 sheet of puff pastry, thawed - 8 oz cream cheese, softened - 1/2 cup pumpkin puree The main ingredients are key to this recipe's rich flavor. Puff pastry gives a light and flaky texture. Cream cheese adds a creamy, tangy element. Pumpkin puree brings the warm, inviting taste of fall. - 1/4 cup granulated sugar - 1 teaspoon vanilla extract - 1 teaspoon pumpkin pie spice Sweetening and flavoring ingredients enhance the overall taste. Granulated sugar adds the right amount of sweetness. Vanilla extract brings a lovely aroma. Pumpkin pie spice adds warmth with its blend of cinnamon, nutmeg, and ginger. - 1 egg (for egg wash) - 2 tablespoons pumpkin seeds (for topping) - Powdered sugar (for dusting) Topping and finishing ingredients make the dish shine. The egg wash helps the pastry turn golden and shiny. Pumpkin seeds add a nice crunch on top. Dusting with powdered sugar gives it a sweet, beautiful finish. - Preheat Oven and Prepare Baking Sheet Start by setting your oven to 400°F (200°C). This will help the pastry puff up nicely. While the oven heats, line a baking sheet with parchment paper to prevent sticking. - Roll Out the Puff Pastry Take the thawed puff pastry and place it on a lightly floured surface. Roll it out into a rectangle, aiming for about 12x16 inches. Make sure it’s even so it cooks well. - Combine Ingredients in a Bowl In a medium bowl, mix together 8 oz of softened cream cheese, 1/2 cup of pumpkin puree, 1/4 cup of granulated sugar, 1 teaspoon of vanilla extract, and 1 teaspoon of pumpkin pie spice. Stir until the mixture is smooth and well blended. - Spread Mixture on Puff Pastry Once the cream cheese mixture is ready, spread it down the center of the rolled-out pastry. Leave about 2 inches of space on each side. This will give you room to fold the pastry over later. - Cut Diagonal Strips in Pastry Make diagonal cuts on each side of the pastry. Each cut should be about 1 inch apart, starting from the edge of the filling to the outer edge of the pastry. This will allow you to create nice braid sections. - Fold Strips to Create Braid Start folding the cut pastry strips over the filling. Alternate sides as you fold to form a braid pattern. Pinch the ends to seal it all together. This step is key for a beautiful braid. - Apply Egg Wash and Sprinkle Toppings In a small bowl, whisk the egg. Use a brush to apply the egg wash over the braid. This will give it a golden color when baked. Next, sprinkle 2 tablespoons of pumpkin seeds on top for added crunch. - Bake and Cool Place the braid in your preheated oven and bake for 20-25 minutes. Look for a golden brown and puffed appearance. After baking, let it cool slightly. Dust with powdered sugar before serving. Enjoy each delicious bite! Thawing and Rolling Tips To start, always thaw puff pastry in the fridge overnight. This keeps it cold and easy to work with. When you're ready, sprinkle flour on your surface. Roll it out to about 12x16 inches. This size gives you enough space for the filling and braiding. Achieving Golden Brown Finish For a golden finish, brush the pastry with egg wash before baking. This step adds color and shine. Bake at 400°F for 20-25 minutes. Keep an eye on it. You want it puffed and golden, not burnt. Substituting Pumpkin Pie Spice If you don't have pumpkin pie spice, use cinnamon and nutmeg. A mix of 1 teaspoon cinnamon and 1/2 teaspoon nutmeg works great. This swap keeps the warmth and flavor you want. Cream Cheese Variations You can change the cream cheese flavor too. Try adding maple syrup for sweetness or a bit of orange zest for brightness. Both options complement pumpkin well and add a twist. Pairing with Drinks Serve your Danish braid with warm apple cider or a spiced chai latte. Both drinks enhance the fall flavors of the braid. They are perfect for cozy mornings or gatherings. Garnishes to Consider Top your braid with a dusting of powdered sugar or even a drizzle of icing. This adds a sweet finish and makes it look fancy. For crunch, sprinkle on more pumpkin seeds after baking. {{image_2}} You can boost the flavor of your Pumpkin Spice Cream Cheese Danish Braid in fun ways. One option is to add chocolate or maple syrup. Imagine the rich taste of chocolate melting into the cream cheese. You can mix in some chocolate chips or drizzle maple syrup over the top. Both options will make your braid even more delightful. Another idea is to use unique fruit fillings. You could add apples, cranberries, or even pears. These fruits pair well with pumpkin spice and give a fresh taste. You can mix the fruit with the cream cheese or layer it on top before braiding. This adds a vibrant twist to the classic recipe. If you need to make dietary changes, there are great options. For gluten-free diets, look for gluten-free puff pastry. Many brands offer this, and it works just as well. Follow the same steps as the original recipe. The taste and texture will still be yummy. For vegan options, you can swap cream cheese with vegan cream cheese. Many brands are available, and they taste great. You can also use a mixture of silken tofu and a bit of nutritional yeast for a creamy base. This way, everyone can enjoy your delicious Danish braid! After you enjoy your Pumpkin Spice Cream Cheese Danish Braid, store any leftovers properly. - Refrigeration Tips: Place the braid in an airtight container. You can also wrap it tightly in plastic wrap. This helps keep the pastry fresh. Store it in the fridge for up to three days. When you're ready, the cold fridge will keep it safe from spoilage. - Freezing the Danish Braid: If you have more leftovers, freezing is a great option. Wrap the braid tightly in plastic wrap. Then, put it in a freezer-safe bag. It can stay frozen for up to three months. When you want to enjoy it again, simply thaw it in the fridge overnight. When it's time to eat your Pumpkin Spice Cream Cheese Danish Braid, reheating is key. - Best Methods to Reheat: The oven is the best way to reheat. Preheat it to 350°F (175°C). Place the braid on a baking sheet. Heat it for about 10-15 minutes. This warms it up and keeps the pastry crispy. You can also use a toaster oven for smaller pieces. - Maintaining Texture and Flavor: To keep the texture nice, avoid using a microwave. Microwaving can make the pastry soggy. The oven helps maintain that flaky, delicious crust you love. Enjoy every bite! You can prepare the filling and pastry ahead of time. Make the cream cheese mixture a day in advance. Store it in the fridge. Thaw the puff pastry overnight in the fridge too. The next day, roll out the pastry, fill it, and braid it. Bake just before serving. This method saves time and keeps your pastry fresh. Yes, you can use homemade puff pastry. Here are the pros and cons. Pros: - Fresh taste and texture. - You can control the ingredients. - It can be healthier if you choose. Cons: - It requires more time to make. - It can be tricky to get right. - It may not puff as well if not done correctly. You can serve this Danish braid with various accompaniments. Here are some great ideas: - Hot coffee or tea pairs well. - A dollop of whipped cream brings extra creaminess. - Serve with a side of fresh fruit for balance. - A drizzle of caramel or chocolate sauce adds sweetness. These options enhance the flavors and make for a delightful experience. This blog post covered how to make a delicious Pumpkin Spice Cream Cheese Danish Braid. We discussed the main ingredients, tips for perfect pastry, and variations to try. Creating this treat is fun and rewarding. Remember to enjoy the process and share with friends. With the right techniques, you’ll impress everyone with your baking skills. Enjoy your tasty creations!

Pumpkin Spice Cream Cheese Danish Braid Delight

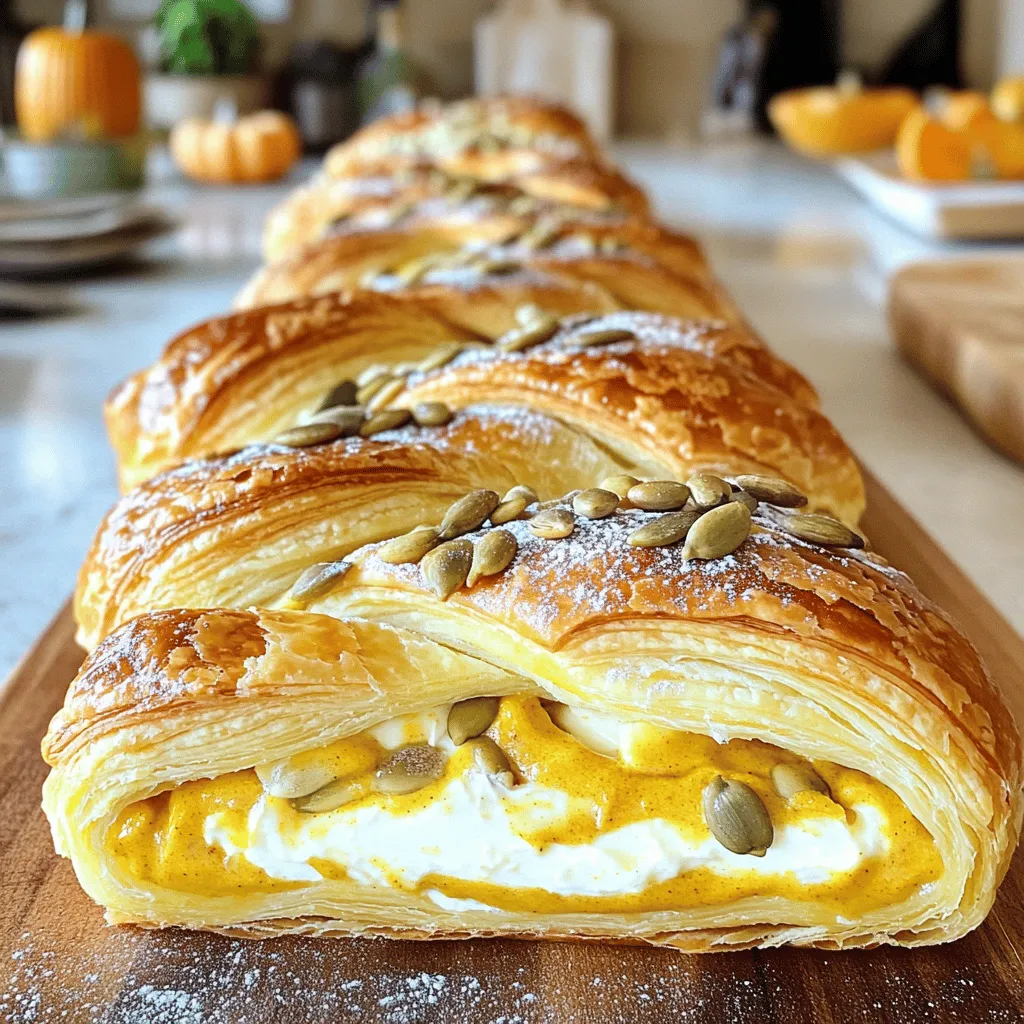
Get ready to indulge in a seasonal delight with my Pumpkin Spice Cream Cheese Danish Braid! This easy recipe combines

For these delightful cheesecake cups, you need: - 1 cup chocolate cookie crumbs - 4 tablespoons unsalted butter, melted - 8 oz cream cheese, softened - ½ cup creamy peanut butter - ½ cup powdered sugar - 1 teaspoon vanilla extract - 1 cup whipped cream (store-bought or homemade) Each ingredient plays a key role in creating rich flavors and a smooth texture. The chocolate cookie crumbs form a perfect crust. The cream cheese and peanut butter give the cups their creamy filling. You can add fun toppings to make your cheesecake cups even better: - ¼ cup chocolate chips - ¼ cup crushed peanuts These garnishes add crunch and extra sweetness. You can mix and match toppings based on your taste. If you need to change an ingredient, here are some ideas: - Use graham cracker crumbs for a different crust. - Swap cream cheese for vegan cream cheese if needed. - Use almond butter or cashew butter instead of peanut butter for different flavors. These swaps let you customize the recipe to fit your needs. To start, grab a medium bowl. You need to mix chocolate cookie crumbs and melted butter. Use 1 cup of cookie crumbs and 4 tablespoons of unsalted butter. Stir until all the crumbs get wet. This takes a minute or two. Next, take your serving cups. You can use 6 to 8 cups. Divide the crumb mix evenly among them. Press down firmly to make a solid crust. This step is key for the right texture. Set these cups aside as you move to the next step. Now, let’s make the filling! In a large mixing bowl, add 8 oz of softened cream cheese and ½ cup of creamy peanut butter. Beat them together until they blend well. This should be smooth and creamy. Once mixed, add in ½ cup of powdered sugar and 1 teaspoon of vanilla extract. Mix until everything is combined and sweet. The filling should feel light and fluffy. To achieve this, gently fold in 1 cup of whipped cream. This makes your filling airy and delicious. Now, it’s time to fill the cups! Take a spoon and scoop the cheesecake filling. Spoon it over the chocolate crust in each cup. Fill them all the way to the top. Once filled, place the cups in the fridge. Chill them for at least 2 hours. This helps the cheesecake set perfectly. When you’re ready to serve, sprinkle chocolate chips and crushed peanuts on top. This adds a nice crunch and looks great! Enjoy your tasty no-bake treats! To make your cheesecake filling creamy, start with softened cream cheese. Cold cream cheese will stay lumpy. Use a hand mixer or stand mixer to beat it well. Mix the peanut butter in next. This adds flavor and creaminess. When you add powdered sugar and vanilla, do it slowly. This helps keep the mixture smooth. Finally, gently fold in whipped cream. This keeps the filling light and fluffy. A good crust starts with the right cookie crumbs. I use chocolate cookies for a rich flavor. Mix the crumbs with melted butter until they are fully moistened. When you press the mixture into the cups, use your fingers or the back of a spoon. Make it firm, but not too hard. This gives you a strong base that holds up well. If your filling is too thick, try adding a bit more whipped cream. This will lighten it up. If the crust falls apart, it may need more butter. Just mix in a bit more until it holds together. Sometimes, the filling may not set well. If this happens, chill the cups longer. They need at least two hours to firm up. Always keep an eye on the texture while mixing and assembling. {{image_2}} You can switch up the crust for your cheesecake cups. Instead of chocolate cookie crumbs, try graham cracker crumbs. They give a nice flavor and crunch. You can also use crushed pretzels for a salty twist. This adds a fun contrast to the sweet filling. Just mix them with melted butter the same way. Feel free to play with the filling flavors. You can swap creamy peanut butter for almond butter. This will give a new taste while keeping it nutty. You can also add a bit of melted chocolate for a richer chocolate flavor. If you want a fruity taste, try adding some mashed bananas or pureed strawberries. Just mix them in with the cream cheese for a fun twist. Want a lighter version? You can use low-fat cream cheese instead of regular. This keeps the taste while cutting some calories. For the crust, opt for sugar-free cookies or use whole grain options. You can also replace powdered sugar with a sugar substitute. This way, you can enjoy these treats without the guilt. To store your leftover cheesecake cups, cover them well. Use plastic wrap or place them in an airtight container. Keep them in the fridge. This helps maintain their creamy texture and flavor. They will stay fresh for a few days. You can freeze these cheesecake cups if you want to keep them longer. First, let them chill in the fridge for at least two hours. Then, remove the toppings like chocolate chips and peanuts. Place the cups in a freezer-safe container. They can last up to three months in the freezer. When ready to eat, move them to the fridge to thaw overnight. The cheesecake cups taste best when fresh, but they last well in the fridge. If stored properly, they can last up to five days. Always check for any signs of spoilage before eating. For the best taste and texture, enjoy them within three days. Yes, you can make these cheesecake cups ahead of time. I often prepare them a day before. This way, they have time to chill and set properly. Just store them in the fridge, covered with plastic wrap. They stay fresh for up to three days. This makes them perfect for parties or gatherings! Serving these cheesecake cups is fun! You can keep it simple or get creative. Here are some ideas: - Top with extra chocolate chips for a sweet touch. - Drizzle with chocolate or caramel sauce for more flavor. - Add fresh fruit like strawberries or bananas for a fresh twist. - Serve alongside a scoop of vanilla ice cream for extra creaminess. Each option adds a new layer to the dessert experience. Absolutely! You can use non-dairy options for this recipe. For the cream cheese, look for a plant-based version. There are many good brands available now. Use coconut cream or a non-dairy whipped topping instead of regular whipped cream. These swaps keep the dessert tasty while meeting dietary needs. You learned how to make cheesecake cups with easy steps, tips, and variations. Using the right ingredients, you can create a tasty treat. Remember to chill them well and store leftovers properly. Feel free to try different flavors and crusts. With practice, you’ll make perfect cheesecake cups every time. These are quick and fun to share. Enjoy your delicious creation!

No-Bake Chocolate Peanut Butter Cheesecake Cups Delight

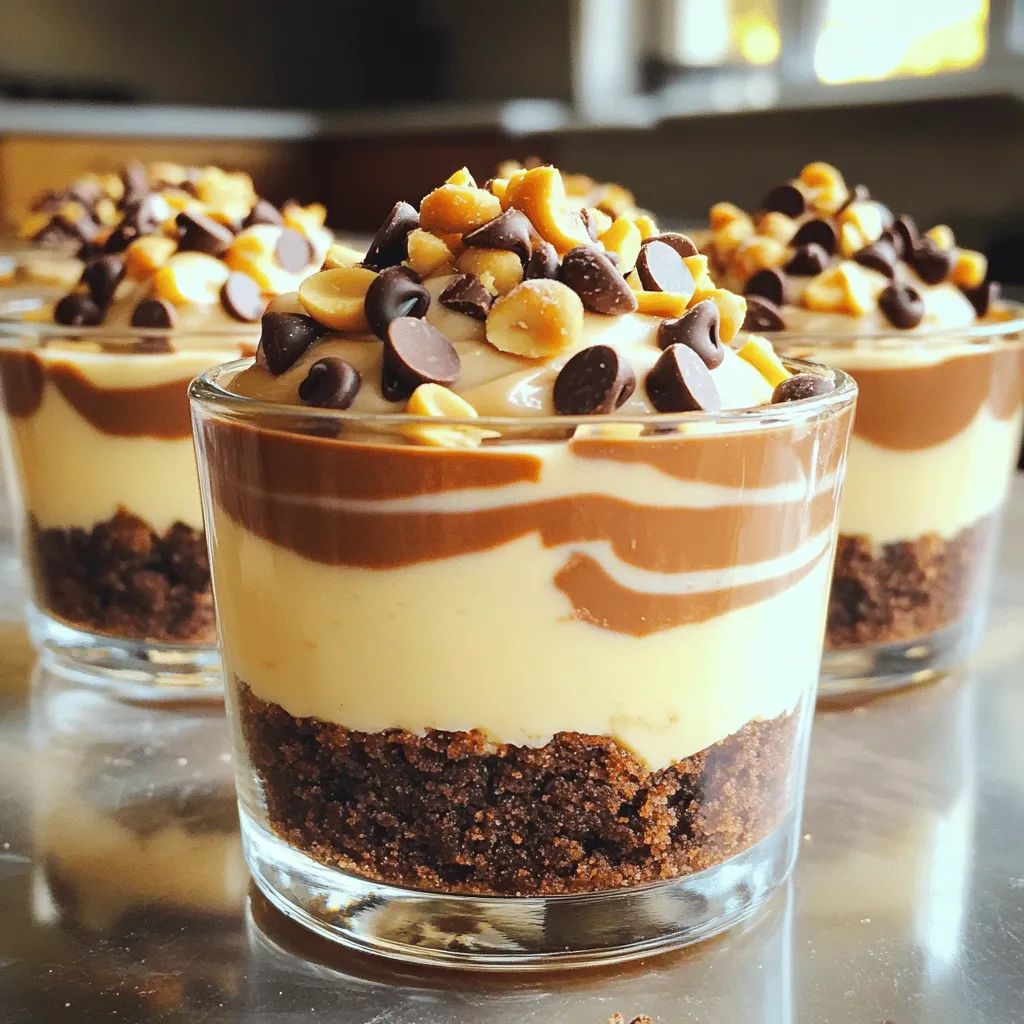
Get ready to indulge in a sweet treat that’s quick and easy! Today, I’m sharing my No-Bake Chocolate Peanut Butter

Older posts
Newer posts
← Previous Page1 … Page25 Page26 Page27 … Page84 Next →

dsad

© 2026 Foodish Talk • Built with GeneratePress

Our Policies

  • Copyright Policy
  • Cookie Policy
  • GDPR Policy
  • Privacy Policy
  • Disclaimer
  • Terms Of Use

More Information

  • Home
  • About
  • Contact
  • Appetizers
  • Dessert
  • Dinner
  • Drinks
©2026, Foodish Talk About Back To Top