Skip to content
DisclaimerTerms Of UseGDPR PolicyCookie Policy

Foodish Talk

  • Home
  • Drinks
  • Appetizers
  • Dinner
  • Dessert
  • About
  • Contact
  • Privacy Policy
DisclaimerTerms Of UseGDPR PolicyCookie Policy

NO-ING-IMG

For this dish, you need a few key items to make the chicken tasty and tender. Here’s what you will gather: - 4 chicken thighs, bone-in and skin-on - 2 tablespoons smoky BBQ sauce (store-bought or homemade) - 1 teaspoon smoked paprika - 1 teaspoon garlic powder - 1 teaspoon onion powder - Salt and pepper to taste The chicken thighs are juicy and full of flavor. The skin adds crispiness. The smoky BBQ sauce gives that sweet and tangy taste. Smoked paprika, garlic powder, and onion powder add depth and warmth. Next, we will add some colorful veggies that bring fun and health to your meal. Here is the list: - 1 red bell pepper, sliced - 1 zucchini, sliced - 1 cup cherry tomatoes, halved - 1 small red onion, cut into wedges - 2 tablespoons olive oil - Salt and pepper to taste These veggies not only add color but also texture. The red bell pepper is sweet, while the zucchini brings a nice crunch. Cherry tomatoes burst with flavor, and the red onion adds a savory touch. Tossing them in olive oil and seasoning helps them roast well. To finish your dish, you can add some garnishes. They make the meal look pretty and add a fresh taste. Here’s what you can use: - Fresh parsley, chopped Chop the fresh parsley and sprinkle it on top before serving. This small step brightens the whole dish. It adds a fresh flavor that pairs well with the smoky chicken and veggies. First, preheat your oven to 400°F (200°C). This step ensures even cooking. In a large bowl, add the chicken thighs. Pour in the smoky BBQ sauce, smoked paprika, garlic powder, onion powder, salt, and pepper. Mix everything well. Make sure the chicken is coated in the sauce and spices. This will give your chicken a great flavor. Now, grab another bowl for the veggies. Add the sliced red bell pepper, zucchini, halved cherry tomatoes, and onion wedges. Drizzle with olive oil, then sprinkle with salt and pepper. Toss the veggies until they are evenly coated. This step brings out their natural taste. Once done, set them aside for the next step. Take a large sheet pan and arrange the marinated chicken in the center. Spread the seasoned veggies around the chicken in a single layer. This helps them cook evenly. Place the sheet pan in the preheated oven. Roast everything for 30 to 35 minutes. The chicken should reach an internal temperature of 165°F (75°C). The veggies should be tender and slightly charred. Once cooked, remove the pan from the oven. Let it rest for a few minutes. Finally, garnish with fresh parsley. This adds a pop of color and extra flavor to your meal. To get that perfect BBQ taste, use smoky BBQ sauce. I prefer a brand I trust, but homemade is great too. Mix the sauce with smoked paprika, garlic powder, and onion powder. This blend adds depth. Coat the chicken well. Let it marinate for at least 30 minutes. This allows the flavors to soak in. If you can, marinate overnight for even better taste. For even cooking, cut veggies into similar sizes. I like to slice bell peppers, zucchini, and onions thin. This helps them cook at the same rate as the chicken. Spread the veggies in a single layer on the sheet pan. Avoid crowding them too much. This prevents steaming and helps with that nice char. Check the chicken's internal temperature. It should reach 165°F (75°C) before serving. You don’t need fancy tools to make this dish. Here’s what I recommend: - Large mixing bowl: To mix the chicken and marinade. - Sheet pan: A sturdy one is best for even roasting. - Knife and cutting board: For chopping veggies. - Meat thermometer: To check chicken doneness. - Tongs: Handy for flipping and serving. These tools make the process simple and fun! {{image_2}} You can swap chicken thighs for other proteins. Try using chicken breasts for a leaner option. Turkey thighs also work well, adding a nice flavor. If you want something different, use pork chops. They soak up the BBQ sauce nicely. For a meatless option, consider firm tofu. Just press it to remove moisture before marinating. Feel free to mix up the veggies! Broccoli florets add a nice crunch and color. Carrots can bring a sweet touch, especially when roasted. Sweet potatoes add heartiness and a hint of sweetness. You can even try mushrooms for an earthy flavor. Just remember to cut the vegetables into similar sizes for even cooking. Making your own BBQ sauce is easy and fun! Combine 1 cup of ketchup, 1/4 cup of apple cider vinegar, and 1/4 cup of brown sugar. Add 1 tablespoon of Worcestershire sauce and 1 teaspoon of smoked paprika. Stir well and let it simmer for 10 minutes. This sauce gives your chicken a great smoky flavor. Adjust the ingredients to suit your taste. After enjoying your smoky BBQ chicken and veggies, store leftovers in an airtight container. Let the dish cool down first. Place it in the fridge within two hours to keep it fresh. It will keep well for up to three days. This way, you can enjoy the flavors again without any hassle. To reheat, use the oven for best results. Preheat your oven to 350°F (175°C). Spread the chicken and veggies in a single layer on a baking sheet. Heat for about 15-20 minutes or until warmed through. You can also use a microwave. Just cover the dish with a microwave-safe lid and heat for 2-3 minutes. Make sure the chicken is hot all the way through before serving. If you want to save some for later, freezing is a great option. Place the cooled leftovers in a freezer-safe container. It’s best to divide into portions for easy meals later. Label the container with the date. Your dish can last in the freezer for up to three months. When ready to eat, thaw in the fridge overnight and reheat as described above. Enjoy your meal anytime! Yes, you can use boneless chicken thighs. Boneless thighs cook faster. Just make sure to adjust the cooking time. I recommend roasting them for about 25 to 30 minutes. Check that the chicken reaches 165°F (75°C) to be safe. If you need a substitute for smoky BBQ sauce, try using teriyaki sauce. You can also mix ketchup with a bit of liquid smoke. Another option is to use a blend of honey and soy sauce. This gives a sweet and savory flavor. To check if the chicken is fully cooked, use a meat thermometer. Insert it into the thickest part of the thigh. The temperature should read 165°F (75°C). If you don’t have a thermometer, cut into the chicken. The meat should be white with no pink inside. This blog post covered all you need for a great BBQ dish. We looked at ingredients, from chicken and marinade to veggies and optional garnishes. I shared step-by-step instructions for prepping everything and roasting the dish. Tips helped ensure perfect flavor and even cooking. We explored variations with different proteins and veggies, plus a BBQ sauce recipe. Lastly, I explained how to store your leftovers. With these insights, you can create tasty BBQ meals. Dive in and enjoy cooking!

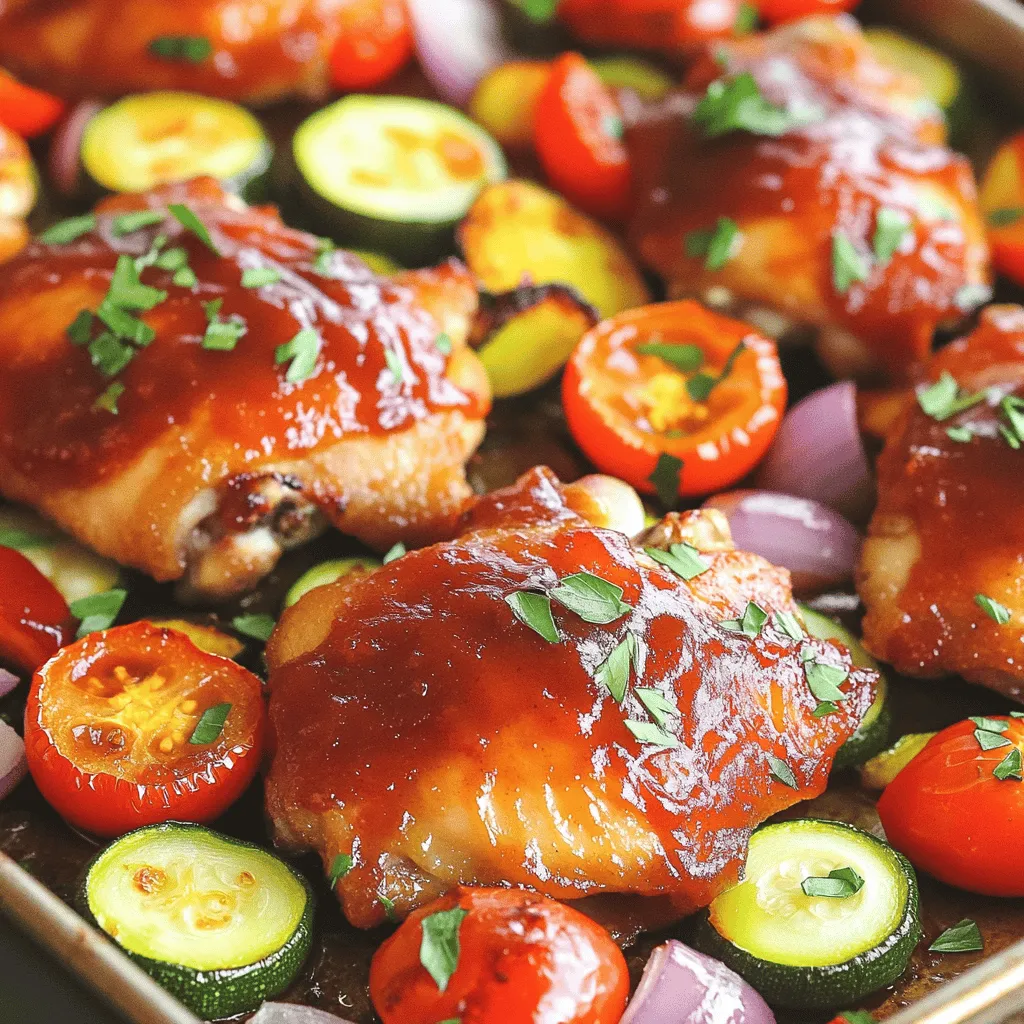
Sheet Pan Smoky BBQ Chicken Veggies Flavorful Meal

Looking for a tasty dinner idea that’s easy to make? Try my Sheet Pan Smoky BBQ Chicken Veggies! This flavorful

To make Apple Pie Overnight Chia Pudding, you will need: - 1 cup unsweetened almond milk - 1/2 cup chia seeds - 1 medium apple, peeled and diced - 1 tablespoon maple syrup - 1 teaspoon cinnamon - 1/2 teaspoon nutmeg - 1/4 teaspoon vanilla extract - Pinch of salt You can add extra flavor and crunch with these toppings: - 1/4 cup granola - Extra apple slices - A sprinkle of cinnamon This dish is not just tasty; it also has great health perks: - Chia seeds are high in fiber and omega-3s. They help keep you full. - Almond milk is low in calories and rich in vitamins. It is a good choice for many. - Apples provide fiber and vitamin C, boosting your immune system. - Maple syrup gives natural sweetness and has antioxidants. - Cinnamon can help lower blood sugar levels and is packed with antioxidants. - Nutmeg may aid digestion and improve sleep quality. Together, these ingredients create a healthy and delicious start to your day! Start by taking a medium bowl. Pour in 1 cup of unsweetened almond milk. Next, add 1/2 cup of chia seeds. These tiny seeds will help thicken the pudding. Then, mix in 1 tablespoon of maple syrup for sweetness. Add 1 teaspoon of cinnamon for that warm flavor. Don’t forget 1/2 teaspoon of nutmeg for extra spice. Also, include 1/4 teaspoon of vanilla extract for a nice aroma. Finally, add a pinch of salt to balance the flavors. Stir everything well until the chia seeds are evenly spread out. Now it’s time to bring in the apple. Peel and dice 1 medium apple into small pieces. Gently fold the diced apple into the mixture. Make sure the apple pieces get covered by the chia mix. This step adds freshness and texture to your pudding. Next, cover the bowl with plastic wrap. You can also use jars with lids for easy serving. Place the bowl or jars in the fridge. Let the mixture chill for at least 4 to 6 hours, or overnight if you can wait. During this time, the chia seeds will swell and create a pudding-like texture. In the morning, stir the pudding to break up any clumps. If it’s too thick, add a splash of almond milk. Now you’re ready to enjoy your delicious apple pie overnight chia pudding! To get a smooth and creamy chia pudding, use the right ratio of liquid to chia seeds. I recommend using 1 cup of almond milk for every 1/2 cup of chia seeds. This ratio helps the seeds absorb the milk and swell properly. After mixing, let the pudding sit for a few minutes before refrigerating. This allows the seeds to soak up some liquid first. If your pudding is too thick in the morning, add a splash of almond milk to loosen it up. Meal prepping this chia pudding is easy! You can prepare several jars at once. Just multiply the recipe by the number of servings you need. After mixing, divide the mixture into individual jars with lids. Store these jars in the fridge for up to five days. Grab one each morning for a quick breakfast. This method saves time and keeps you on track with healthy eating. Want to jazz up your chia pudding? Here are some tasty ideas: - Add nuts: Chopped walnuts or pecans give great crunch. - Use different spices: Try ginger or allspice for a twist. - Mix in yogurt: A dollop of yogurt adds creaminess. - Change the fruit: Swap apples for pears or berries for a fresh taste. These enhancements can make your chia pudding even more exciting and delicious! {{image_2}} You can change the fruit in your chia pudding for fun. Try using peaches, berries, or bananas. Each fruit brings its unique taste. For a tropical twist, use mango or pineapple. You can mix and match fruits based on what you like or have at home. If you want to switch from almond milk, go for oat milk or coconut milk. Both options are creamy and tasty. They add different flavors to your dish. You can even try soy milk or cashew milk. Each milk gives a new spin to your chia pudding. Maple syrup works great, but you can use honey or agave nectar. If you prefer to avoid sugar, try stevia or monk fruit sweetener. These options fit many diets. Make sure to adjust the amount based on how sweet you want it. This way, you can enjoy your dish without worry! Store leftover chia pudding in an airtight container. Glass jars work great for this. Make sure the lid is tight to keep it fresh. You can keep it in the fridge for easy access. It’s best to eat it within a few days for the best taste. Apple Pie Overnight Chia Pudding stays good for about 3 to 5 days in the fridge. After this time, the flavors may fade. The texture might change as well. Always check for any signs of spoilage before eating. If it smells off or looks strange, it’s better to toss it. You can enjoy this pudding cold or warm. If you prefer it warm, gently heat it in a pot over low heat. Stir often to avoid burning. Add a splash of almond milk to make it creamy again. Serve it in bowls with granola and extra apple slices on top. A sprinkle of cinnamon adds a nice touch. Enjoy your healthy treat! Chia seeds usually need 4 to 6 hours to soften. This time allows them to absorb the liquid and swell. If you leave them overnight, they yield a thicker pudding. The longer they sit, the creamier your pudding will become. Yes, you can use other types of milk. Options include coconut milk, oat milk, or regular milk. Each will add its own flavor and creaminess. Just keep in mind that non-dairy options are great for vegans or those with lactose issues. This recipe is perfect for meal prep! You can make it in advance and store it in the fridge. It stays fresh for about 3 to 5 days. Just add your toppings right before you eat to keep them crunchy and fresh. This article covered how to make Apple Pie Overnight Chia Pudding. We discussed the ingredient list, optional toppings, and health benefits. You learned step-by-step instructions, tips for consistency, and meal prep best practices. We explored tasty variations, storage methods, and frequently asked questions. Embrace this simple recipe for a healthy treat. Enjoy experimenting with flavors that suit your taste!

Apple Pie Overnight Chia Pudding Easy and Healthy Dish

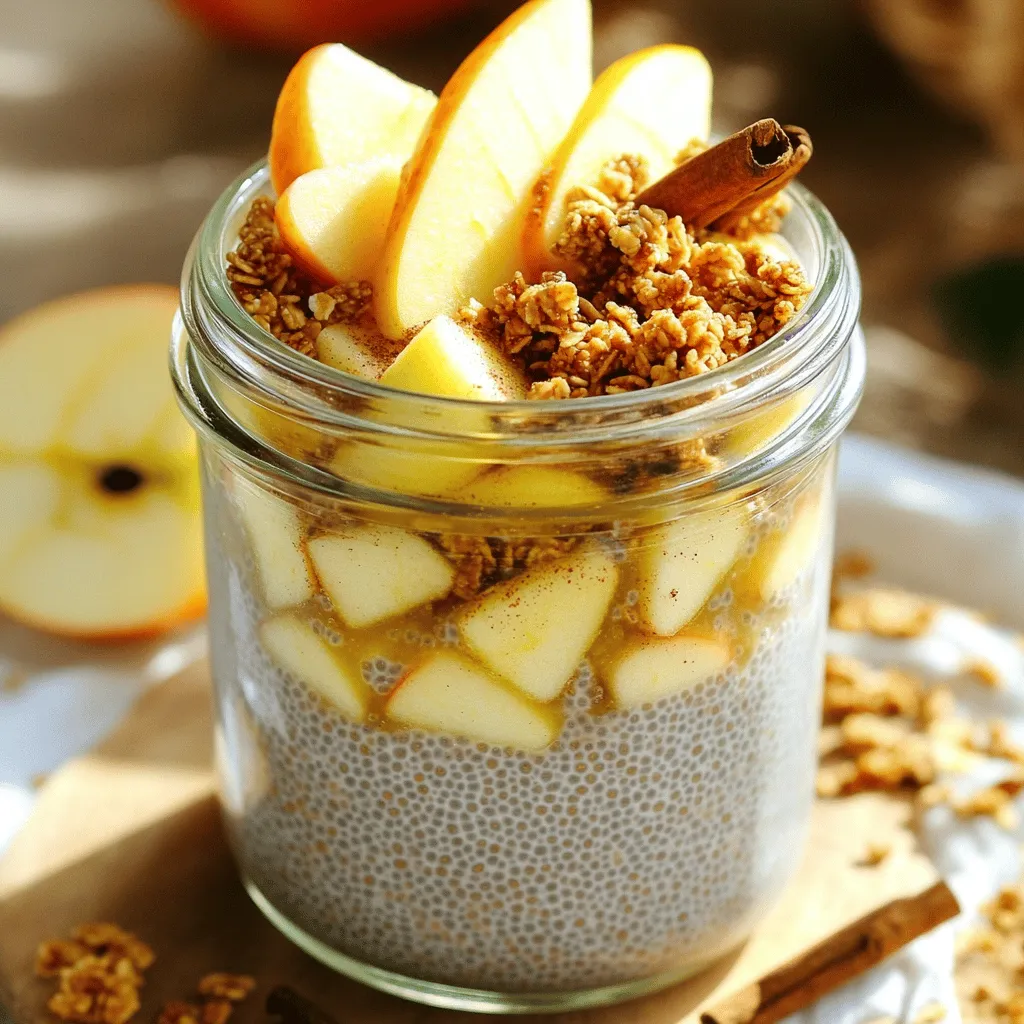
Imagine waking up to a creamy, sweet treat that tastes like dessert but is healthy! This Apple Pie Overnight Chia

- 1 pound Brussels sprouts, halved - 3 tablespoons olive oil - 2 tablespoons Dijon mustard - 2 tablespoons pure maple syrup - 1 teaspoon garlic powder - 1 teaspoon smoked paprika - Salt and pepper to taste - Fresh parsley, chopped (for garnish) Gathering the right ingredients is key for tasty Air Fryer Maple Dijon Brussels Sprouts. Start with fresh Brussels sprouts. They should be firm and bright green. Halving them helps them cook evenly and soak up flavor. Next, use olive oil, which adds richness and helps the sprouts crisp up nicely. Dijon mustard gives a tangy kick that pairs well with the sweetness of maple syrup. This combo makes the dish pop. For added depth, use garlic powder and smoked paprika. Garlic powder gives warmth, while smoked paprika adds a subtle smokiness. Don’t forget your salt and pepper! These basic seasonings enhance all the flavors. Finally, sprinkle fresh parsley on top for a bright finish. It adds color and a fresh taste. With these ingredients, you're set for a delicious side dish that everyone will love! - Rinse and trim Brussels sprouts. - Cut Brussels sprouts in half lengthwise. First, rinse the Brussels sprouts under cold water. This step cleans them well. Next, trim the ends to remove any tough bits. Now, cut each sprout in half from top to bottom. This helps them cook evenly and soak up the glaze. - Mix olive oil, Dijon mustard, maple syrup, garlic powder, smoked paprika, salt, and pepper. In a small bowl, combine three tablespoons of olive oil, two tablespoons of Dijon mustard, and two tablespoons of pure maple syrup. Add one teaspoon of garlic powder, one teaspoon of smoked paprika, and salt and pepper to taste. Whisk this mix until it’s smooth and well blended. This glaze adds a sweet and tangy flavor. - Coat the Brussels sprouts with the glaze. - Preheat the air fryer to 375°F (190°C). - Air fry for 12-15 minutes, shaking halfway through. In a large bowl, toss the halved Brussels sprouts with the glaze until they are fully coated. Make sure every piece is covered. Then, preheat your air fryer to 375°F (190°C) for about 3-5 minutes. Once ready, place the glazed Brussels sprouts in a single layer in the air fryer basket. Cook them for 12-15 minutes. Remember to shake the basket halfway through to ensure even cooking. The sprouts should be golden brown and tender when done. To make sure your Brussels sprouts cook evenly, shake the basket halfway through. This simple step helps them crisp up all around. Feel free to adjust the cooking time if you want your sprouts more or less crispy. If you like them soft, aim for 12 minutes. For a crunchier bite, go for 15 minutes. Serve your Brussels sprouts warm and sprinkle fresh parsley on top. This adds a nice touch and color. For extra sweetness, drizzle a bit more maple syrup before serving. This small step makes a big difference in flavor. Enjoy your tasty side dish! {{image_2}} You can change the taste of your Brussels sprouts easily. Adding balsamic glaze gives a sweet and tangy twist. Just drizzle it over the sprouts before serving. This makes each bite pop with flavor. Another fun idea is to add nuts like walnuts or pecans. They add a nice crunch and texture. Chop them up and toss them in with the Brussels sprouts. You’ll enjoy the extra crunch with each mouthful. If you follow a vegan diet, you can still enjoy this dish. Just make sure all your ingredients are plant-based. Use maple syrup and check that your Dijon mustard is vegan-friendly. This way, you have a tasty side dish that fits your diet. For those who need to avoid gluten, adjust your ingredients. Use gluten-free Dijon mustard and make sure your other items are gluten-free. This way, everyone can savor the dish without worry. To keep your Air Fryer Maple Dijon Brussels Sprouts fresh, use an airtight container. Place the cooled sprouts inside the container and seal it tightly. This will help them stay crisp longer. Store them in the fridge for up to three days. If you want to enjoy them later, make sure to check for any signs of spoilage before reheating. Reheating these sprouts is simple. I recommend using the air fryer for the best results. Preheat the air fryer to 350°F (175°C). Place the sprouts in the basket and heat them for about 5 minutes. This will bring back their crispiness. You can also use the oven. Spread them on a baking sheet and bake at 350°F (175°C) for around 10 minutes. Enjoy them warm and tasty! To get crispy Brussels sprouts, follow these tips: - Dry them well: After washing, pat them dry with a towel. - Don’t overcrowd: Place them in a single layer in the air fryer. - Use enough oil: Coat them lightly with olive oil for crispiness. - Shake the basket: Halfway through cooking, shake the basket. This helps them cook evenly. - Adjust cooking time: If you like them crispier, add a few extra minutes. These steps will help create that perfect crispy texture you want. Yes, you can use frozen Brussels sprouts. Here are some tips: - Do not thaw: Cook them straight from the freezer. - Increase cook time: Frozen sprouts may need 2-5 more minutes to cook. - Coat well: Make sure to coat them in the glaze thoroughly. - Check for doneness: They should be golden and tender when done. Using frozen Brussels sprouts is a great time-saver. Air Fryer Maple Dijon Brussels sprouts go well with many dishes. Here are a few ideas: - Grilled chicken: The flavors blend nicely. - Roasted salmon: A great match for a healthy meal. - Quinoa salad: Adds a nutritious side. - Pasta dishes: Complements creamy or tomato-based sauces. These pairings will enhance your meal and bring out the flavors of the sprouts. This blog post shared a delicious recipe for Air Fryer Maple Dijon Brussels Sprouts. You learned about the key ingredients like Brussels sprouts, olive oil, and Dijon mustard. The step-by-step guide made it easy to prepare, glaze, and cook them perfectly in the air fryer. Brussels sprouts can be crispy and tasty with some simple tips. Feel free to explore flavor and dietary variations to suit your needs. Enjoy your cooking and savor each bite!

Air Fryer Maple Dijon Brussels Sprouts Tasty Side Dish

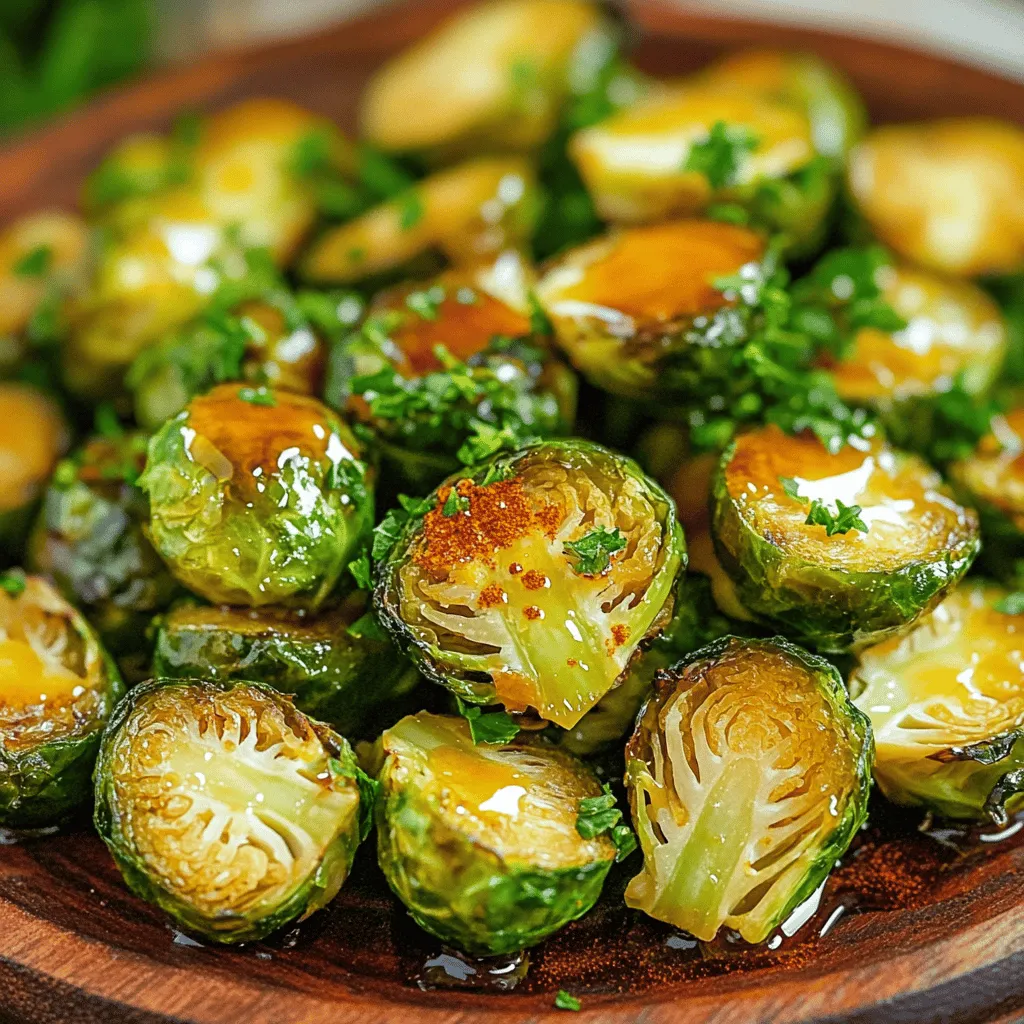
Looking for a delicious side dish that’s quick and easy? Try my Air Fryer Maple Dijon Brussels Sprouts! You’ll love

- 1 cup unsalted butter, softened - 1 cup brown sugar, packed - 1/2 cup granulated sugar - 2 large eggs - 2 teaspoons vanilla extract - 3 cups all-purpose flour - 1 teaspoon baking soda - 1/2 teaspoon salt - 1 cup chocolate chips (semi-sweet or dark) - 1 cup salted caramel sauce (store-bought or homemade) - Flaky sea salt for topping In this recipe, I use common ingredients. If you want to swap some, here are ideas: - Use coconut oil instead of butter. - For sugar, try coconut sugar for a different taste. - You can use egg replacers if you want a vegan option. - Use gluten-free flour if you need a gluten-free version. To make your own salted caramel, gather these items: - 1 cup granulated sugar - 6 tablespoons unsalted butter - 1/2 cup heavy cream - 1 teaspoon flaky sea salt To make the caramel: 1. In a pan, heat sugar on medium. 2. Stir until it melts and turns amber. 3. Add butter and stir until melted. 4. Slowly pour in heavy cream and mix well. 5. Add salt and let it cool. This caramel is sweet, rich, and adds the perfect touch to your bars! To start, preheat your oven to 350°F (175°C). This ensures even baking. Next, grab a 9x13-inch baking pan. Grease it lightly with butter. Then, line it with parchment paper. Leave some paper hanging over the edges. This makes it easy to lift the bars out later. In a large bowl, add 1 cup of softened butter. Then, add 1 cup of packed brown sugar and 1/2 cup of granulated sugar. Use an electric mixer to cream them together. Mix until fluffy, about 2-3 minutes. Next, add 2 large eggs one by one. Mix well after each egg. Finally, stir in 2 teaspoons of vanilla extract. In another bowl, whisk together 3 cups of all-purpose flour, 1 teaspoon of baking soda, and 1/2 teaspoon of salt. Gradually add this mix to the wet ingredients. Stir until just combined. Don’t overmix! Gently fold in 1 cup of chocolate chips, making sure they spread evenly through the dough. Take half of the dough and spread it into your prepared pan. Press it down evenly. Next, drizzle half of your salted caramel sauce over the dough. Spoon dollops of the remaining dough over the caramel layer. Use a spatula to spread it gently. It’s okay if some caramel shows through. Finally, drizzle the rest of the salted caramel on top and sprinkle with flaky sea salt. Place the pan in your preheated oven. Bake for 25-30 minutes. Look for golden brown edges. When done, a toothpick should come out with a few moist crumbs. Allow the bars to cool in the pan for about 15 minutes. Carefully lift them out using the parchment paper overhang. Place them on a wire rack to cool completely. Once cool, cut into squares and enjoy! To get soft and chewy bars, use room temperature butter. Cream the butter and sugars well. This helps make the bars light. Do not overmix the dough after adding the flour. Just mix until combined. The dough should stay thick and slightly sticky. Baking time matters, too. Keep an eye on the edges. They should look golden. The center may seem underbaked, but it firms up as it cools. If you have extra bars, store them in an airtight container. This keeps them fresh and soft. You can layer parchment paper between the bars to avoid sticking. Keep them at room temperature for up to three days. If you want to save them longer, place them in the fridge. They'll stay good for about a week. Just let them come to room temp before eating for the best taste. You can make the dough ahead of time. Just wrap it tightly in plastic wrap and freeze. When ready, thaw it overnight in the fridge. You can also bake the bars, then freeze them. Cut them into squares and place them in freezer bags. They can last for up to three months. To enjoy, thaw them in the fridge or at room temperature. Reheat them in the microwave for a few seconds if you like them warm. {{image_2}} You can easily adjust this recipe. If you need it dairy-free, swap the butter for a plant-based option. Use coconut oil or vegan butter. You can also use a dairy-free chocolate chip. For gluten-free bars, replace all-purpose flour with a gluten-free blend. Make sure it has xanthan gum for the right texture. If you're watching your sugar, try coconut sugar instead of brown and granulated sugar. Want to mix things up? Add nuts like walnuts or pecans for a nice crunch. You can also sprinkle in some cinnamon or espresso powder for a warm flavor boost. If you love fruit, try adding dried cherries or cranberries. Swap out the chocolate chips for white chocolate or butterscotch chips. Think about adding a hint of orange zest for a fresh twist. These bars are great on their own, but they shine with some extra touches. Serve them warm with a scoop of vanilla ice cream. Drizzle extra salted caramel sauce on top for a real treat. You can also pair these bars with a cup of coffee or tea. For a fun twist, serve them with a glass of cold milk. They make a great snack or dessert for any gathering. To keep your salted caramel chocolate chip bars fresh, store them in an airtight container. This keeps moisture in and prevents them from drying out. You can also place parchment paper between layers to avoid sticking. If you want extra protection, wrap the container in plastic wrap. These delicious bars can last up to one week at room temperature. For longer storage, place them in the fridge. They stay good for about two weeks when chilled. Frozen bars can last for about three months. Just make sure to wrap them tightly to avoid freezer burn. To enjoy these bars warm, preheat your oven to 350°F (175°C). Place the bars on a baking sheet and heat for about 5-7 minutes. You can also use a microwave. Heat them for about 10-15 seconds. If you want that gooey caramel to shine, cover them with a damp paper towel while microwaving. Enjoy the soft, warm treat! Yes, you can skip the chocolate chips. The bars will still taste great. You might add dried fruit or coconut instead. These swaps will keep the texture nice. You could also use white chocolate for a different flavor. Just remember, the bars may taste sweeter without dark chocolate. To make salted caramel, start with sugar. Heat 1 cup of sugar in a pot over medium heat. Stir until it melts and turns golden. Then add 1/2 cup of heavy cream slowly. Be careful, as it can bubble up. Stir in a pinch of sea salt after removing from heat. Let it cool before using. To cut the bars nicely, let them cool completely. Use a sharp knife for clean edges. If you want, you can lightly score the top before cutting. This helps guide your cuts. Also, wipe the knife with a damp cloth between slices. This keeps the cuts neat. Yes, you can use different nuts! Pecans or walnuts work well in these bars. Chop them coarsely and fold them into the dough. You can even skip the nuts if you prefer. Just keep in mind, the bars will be softer without them. This blog post covered how to make delicious homemade salted caramel bars. You learned about all the ingredients and how to mix, bake, and cut them. Our tips helped you achieve the best texture and store your treats. You also discovered fun variations to suit different tastes. Enjoying these bars is easy. You can share them with friends or keep them for yourself. With these steps, you can create a tasty treat that everyone will love. Happy baking!

Salted Caramel Chocolate Chip Bars Irresistible Treat

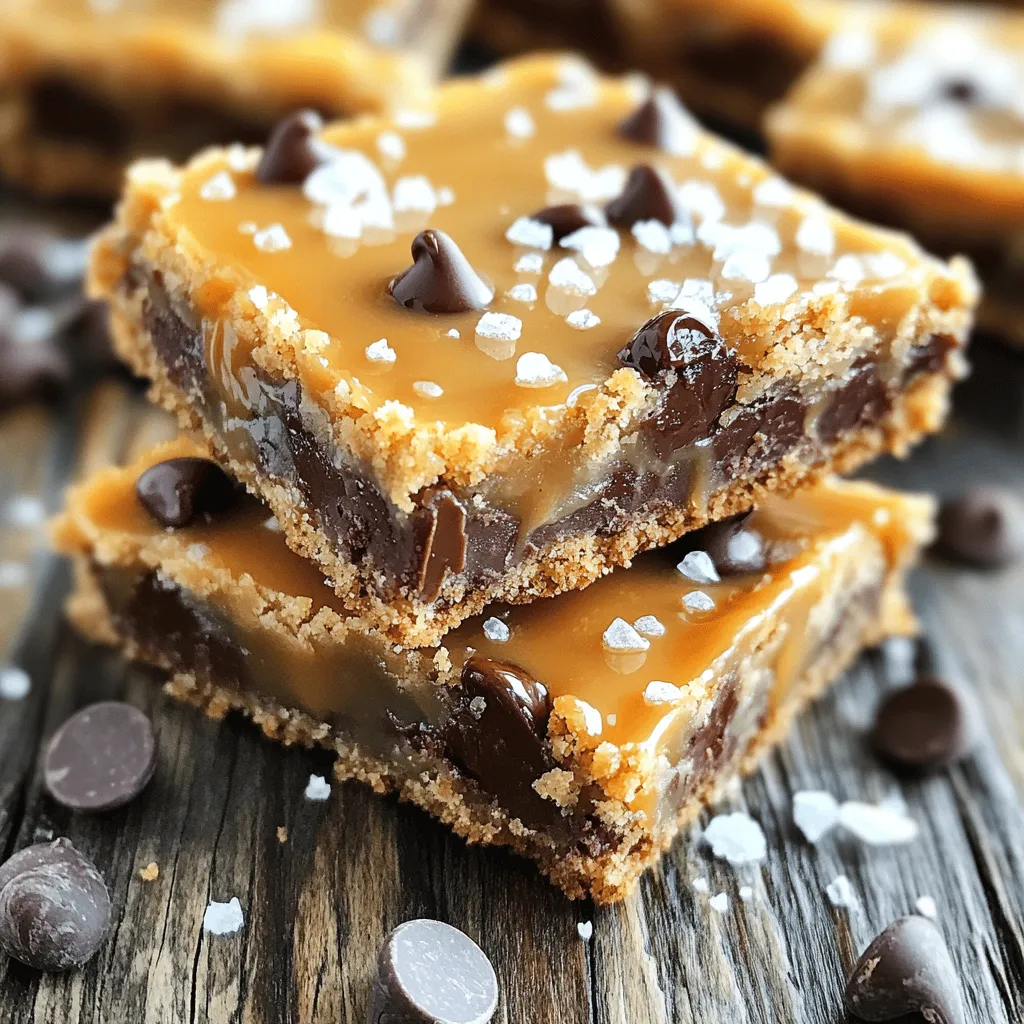
Ready to treat yourself to something amazing? These Salted Caramel Chocolate Chip Bars are a sweet dream come true. I’ll

- 1 cup orzo pasta - 2 cups vegetable broth - 1 cup fresh spinach, chopped - 1 tablespoon olive oil - 2 garlic cloves, minced - Zest of 1 lemon - Juice of 1 lemon - 1/2 cup cream cheese, softened - 1/2 teaspoon dried oregano - Salt and pepper to taste - 1/4 cup grated Parmesan cheese (optional) - Fresh parsley for garnish - 1/4 cup grated Parmesan cheese adds rich flavor. - Fresh parsley enhances the dish's look and taste. - You can swap orzo for quinoa or rice for a different texture. - Use chicken broth instead of vegetable broth for a meaty flavor. - For a lighter version, replace cream cheese with Greek yogurt. - Add cooked chicken, shrimp, or chickpeas for protein. - Try other greens like kale or arugula in place of spinach. When you gather these ingredients, you set the stage for a delightful meal. Each ingredient plays a role in creating that creamy, tangy, and bright flavor that makes this dish special. You can get creative with the ingredients based on what you have at home. The beauty of this recipe lies in its flexibility! Start by grabbing a large pot. Heat 1 tablespoon of olive oil over medium heat. Once the oil is hot, add 2 minced garlic cloves. Sauté them for about 1 minute until they smell great. This step makes a tasty base for your dish. Next, add 1 cup of orzo pasta. Stir it well and let it toast for 2-3 minutes. This toasting gives the orzo a nice flavor. Now, pour in 2 cups of vegetable broth. Bring the mixture to a boil. When it starts bubbling, reduce the heat to low and cover the pot. Let it simmer for about 8-10 minutes. You want the orzo to be al dente, meaning it should still have a little bite. Most of the liquid will get absorbed during this time. After the orzo is cooked, uncover the pot. Add 1 cup of chopped fresh spinach, the zest of 1 lemon, and the juice of 1 lemon. Mix in 1/2 cup of softened cream cheese. Stir until the cream cheese melts and the mixture becomes creamy. Taste your dish and season it with 1/2 teaspoon of dried oregano, salt, and pepper. If you like, add 1/4 cup of grated Parmesan cheese for extra creaminess. Cook for another 2-3 minutes, stirring well. The dish is now ready! Let it sit for a couple of minutes before serving. To make your orzo creamy, use softened cream cheese. This helps blend smoothly into the dish. Stir it in after cooking the orzo. The heat will melt it quickly. If you want extra creaminess, add grated Parmesan cheese. It gives a rich flavor and texture. Lemon zest adds brightness to the dish. Don't skip this step; it makes a huge difference. You can also add herbs like basil or thyme for more aroma. A pinch of red pepper flakes can give a nice kick if you enjoy heat. Fresh parsley on top not only looks nice but adds freshness. Cook orzo in vegetable broth instead of water. This boosts the flavor right from the start. Keep an eye on the pot to avoid overcooking. Stirring often helps prevent sticking. Aim for al dente texture, as it will continue to cook a bit after you remove it from heat. Test it a minute or two before the time is up to get it just right. {{image_2}} You can make this dish heartier by adding protein. Cooked chicken or shrimp works well. Simply stir in the protein after the orzo is cooked. If you want a meat-free option, try chickpeas or white beans. They add great texture and protein too. Feel free to swap out the spinach for other veggies. Broccoli or peas can add color and crunch. You could even try kale for a bolder flavor. Just chop them small so they cook quickly with the orzo. This keeps the dish fresh and fun. If you want a dairy-free meal, swap cream cheese with a vegan alternative. There are many good brands that melt well. You can also use coconut cream for a rich taste. Just be sure to check the labels for added sugars or preservatives. This way, you keep it healthy and tasty! After you make your one pot creamy lemon spinach orzo, let it cool. Once cooled, transfer it to an airtight container. It will stay fresh in the fridge for about 3 days. Keep it covered to prevent it from drying out. Before eating, check for any changes in smell or texture. If all looks good, you are ready to reheat! To reheat, simply place your orzo in a pot over low heat. Add a splash of vegetable broth or water. Stir well to help it warm up evenly. Heat until it’s hot throughout. You can also use a microwave. Place the orzo in a microwave-safe bowl. Cover it with a damp paper towel to keep moisture in. Heat in short bursts, stirring in between, until it's heated to your liking. If you want to save some for later, freezing works great! Allow the orzo to cool completely. Then, scoop it into freezer-safe bags or containers. Be sure to leave some space for expansion. It can stay frozen for up to 2 months. When ready to eat, thaw it in the fridge overnight. After thawing, follow the reheating instructions above. This way, your creamy orzo will still taste delicious! Orzo pasta looks like rice but is actually a small pasta. It cooks quickly and absorbs flavors well. You can find orzo in most grocery stores, often near other pasta types. It’s great in soups, salads, or dishes like our creamy lemon spinach orzo. Yes, you can make this recipe vegan. Replace cream cheese with a vegan alternative. Use a plant-based cheese for the topping. Ensure the vegetable broth is vegan too. This way, you keep all the creamy goodness without dairy. To adjust the serving size, simply change the amount of orzo. For more servings, double or triple the recipe. Keep the ratio of broth and other ingredients the same. This will keep the dish just as tasty, no matter how many you serve. This article covered the key ingredients needed for a great orzo dish. We discussed optional ingredients and substitutions to fit your taste. The step-by-step instructions showed how to prepare the base, cook the orzo, and combine everything. Tips ensured creaminess and flavor, while variations allowed for protein and veggie swaps. In the end, experimenting with orzo opens up many meal choices. You can make it your own with simple adjustments. Enjoy the process and savor the results!

One Pot Creamy Lemon Spinach Orzo Delightful Dish

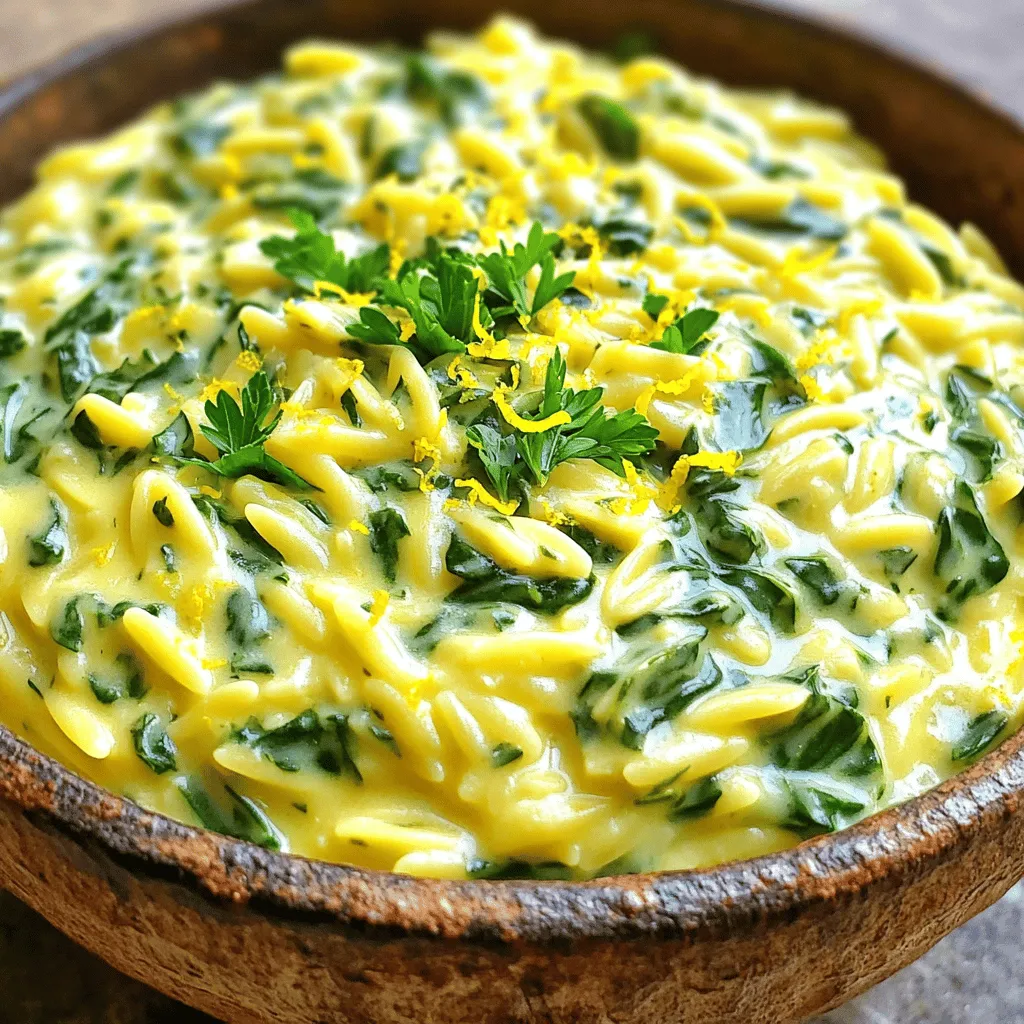
Craving a quick and creamy meal? You’re in for a treat with this One Pot Creamy Lemon Spinach Orzo! This

- 1 lb sirloin steak, cut into bite-sized cubes - 2 tablespoons olive oil - 4 tablespoons unsalted butter - 5 cloves garlic, minced - 1 teaspoon fresh thyme leaves (or ½ teaspoon dried thyme) - 1 teaspoon salt - ½ teaspoon black pepper - 2 cups broccoli florets - Zest of 1 lemon - Juice of 1 lemon - Pinch of red pepper flakes (optional) For this recipe, I recommend using sirloin steak. It has good flavor and cooks well. If you want, you can swap the steak for chicken or shrimp. Just adjust the cooking time as these proteins cook differently. Olive oil adds a nice touch, but you can use any oil you have on hand. Butter is key for flavor, so I suggest sticking with unsalted. For garlic, fresh is best, but jarred minced garlic works too. The thyme gives a great taste, but if you don’t have it, skip it or use Italian seasoning. Fresh broccoli is vibrant and crunchy. Frozen broccoli is okay, but it may not stay as crisp. If you like some heat, add red pepper flakes. Otherwise, leave them out for a milder dish. Make sure you have a lemon on hand for zest and juice. This brightens the dish and adds freshness. Enjoy your cooking! 1. Start by cutting the sirloin steak into bite-sized cubes. This makes it easy to cook and eat. 2. Season the steak cubes with salt, black pepper, and thyme. Mix well. 3. Let the steak marinate for about 15 minutes. This step adds flavor and tenderness. 4. Heat olive oil in a large skillet over medium-high heat. Wait until it shimmers. 5. Add the steak in a single layer. Cook in batches if needed to avoid crowding. 6. Sear the steak bites for 2-3 minutes on each side. They should be browned and cooked to your liking. 1. Remove the cooked steak and place it on a plate. Cover it to keep it warm. 2. In the same skillet, add unsalted butter and minced garlic. Sauté for 1 minute. 3. Add the broccoli florets to the skillet. Stir-fry for 3-5 minutes until bright and tender. 4. Return the steak bites to the skillet. Mix everything together gently. 1. Add the lemon zest and juice. Toss the mixture to coat well. 2. If you like some heat, sprinkle in red pepper flakes. This adds a nice kick. 3. Cook for an additional 1-2 minutes to heat everything through. 4. Taste and adjust seasoning if needed. 5. Serve the garlic butter steak bites and broccoli in shallow bowls. Garnish with fresh thyme and a squeeze of lemon for added brightness. The best way to cook steak bites is to aim for medium-rare. This keeps them juicy and tender. Sear the cubes for 2-3 minutes per side. Use a hot skillet to get nice browning. Always let the steak rest after cooking. This helps the juices stay inside. To keep broccoli vibrant, cook it quickly. Add it to the pan with garlic for about 3-5 minutes. Stir it often. You want bright green florets that are still crisp. A splash of lemon juice at the end will also help. For a great presentation, serve steak bites and broccoli in shallow bowls. Sprinkle fresh thyme leaves on top. Add a squeeze of lemon juice for a pop of flavor. The colors will look amazing together. Pair this dish with simple sides like rice or mashed potatoes. A light salad also works well. For beverages, try a glass of red wine. It complements the steak nicely. You can add more flavor with optional ingredients. A pinch of red pepper flakes gives a nice kick. If you like heat, try it! For garnishing, consider adding lemon zest or fresh herbs. They brighten the dish and make it more appealing. You could also drizzle some garlic butter over the top before serving. This adds richness and enhances the flavor. {{image_2}} You can change the protein in this dish. Try using chicken or shrimp instead of steak. Both options cook quickly and soak up flavors well. For a lighter touch, chicken pairs nicely with garlic butter. Shrimp adds a sweet taste that works great with the lemon juice. You can also switch up the vegetables. Asparagus or green beans are fantastic choices. Asparagus adds a nice crunch and a fresh taste. Green beans bring a mild flavor that complements the steak and garlic butter. Adjusting seasonings can elevate this dish. Try adding fresh herbs like parsley or rosemary for a different taste. You can also use spices like paprika or cumin for a warm flavor. These changes can make each meal unique. Adding sauces or marinades can enhance the flavors too. A splash of soy sauce adds a savory twist. You could also try teriyaki sauce for a sweet and tangy taste. These options can add a whole new layer to the dish. This recipe can easily fit different diets. To make it gluten-free, just check the sauces and use gluten-free options. For low-carb diets, skip any high-carb sides and keep it simple with more veggies. If you want a vegetarian or vegan version, replace the steak with mushrooms or tofu. Both options absorb flavors well and provide a good texture. Use vegan butter for a plant-based alternative, keeping the dish tasty and satisfying. To keep your Garlic Butter Steak Bites with Broccoli fresh, use airtight containers. Glass or plastic containers work well. Store leftovers in the fridge for up to three days. After that, the taste and texture may change. For the best taste, reheat on the stove over low heat. Add a splash of water or broth to keep the dish moist. Stir occasionally to avoid burning. If using a microwave, heat in short bursts. This method helps prevent overcooking the steak. To freeze, place the cooked steak bites and broccoli in freezer-safe bags. Remove as much air as possible. You can freeze for up to three months. For thawing, move the dish to the fridge overnight. This method helps maintain the texture and flavor. How do I make steak bites tender? To make steak bites tender, start with good quality meat. Sirloin works well. Cut it against the grain into small cubes. Marinate the meat with salt, pepper, and thyme for about 15 minutes. This helps to break down the fibers. Cook the steak quickly over high heat for a rich crust. This method keeps the inside juicy. Can I substitute the steak with another protein? Yes, you can use chicken or shrimp instead of steak. Cut chicken into bite-sized pieces. For shrimp, use large, raw shrimp. Adjust the cooking time as needed. Chicken takes a bit longer than steak, while shrimp cooks quickly. Both options will still taste great with the garlic butter. What is the best cooking time for medium-rare steak? For medium-rare steak, cook each side for 2-3 minutes. Your steak should reach an internal temperature of 130°F to 135°F. Use a meat thermometer for best results. Remove it from the heat and let it rest for a few minutes. This helps keep it juicy. How long will it take to cook the broccoli properly? Cook the broccoli for about 3-5 minutes in the skillet. You want it tender but still bright green. Stir-frying it with garlic adds great flavor. Avoid overcooking to keep the broccoli crisp and vibrant. Can I use frozen broccoli for this recipe? Yes, frozen broccoli can work well. Just make sure to thaw and drain it first. This prevents excess water from making the dish soggy. You can add it to the skillet for the last few minutes of cooking. What wine pairs well with Garlic Butter Steak Bites with Broccoli? A nice red wine pairs well with this dish. Try a Cabernet Sauvignon or a Merlot. These wines complement the rich flavors of the steak and butter. If you prefer white wine, a Chardonnay works too. It adds a nice balance to the meal. This article covered everything you need to know for making Garlic Butter Steak Bites with Broccoli. We explored key ingredients, step-by-step cooking instructions, plus tips for a great dish. You learned how to customize the recipe with variations and smart substitutions. Storing and reheating tips ensure your leftovers taste fresh. Cooking at home can be easy and fun. With these insights, you can impress your family and friends with delicious meals. Enjoy experimenting and sharing your variations!

Garlic Butter Steak Bites With Broccoli Delight

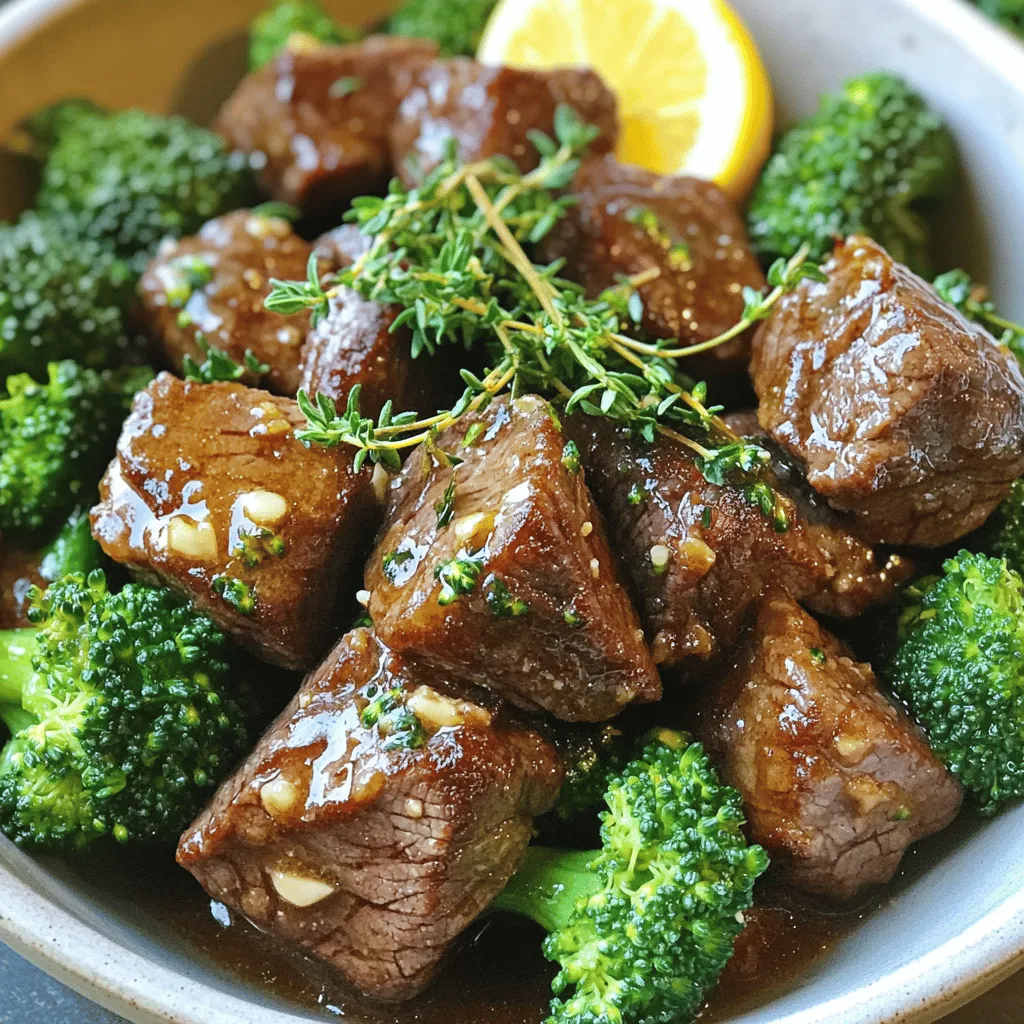
If you’re craving a quick meal that bursts with flavor, try my Garlic Butter Steak Bites with Broccoli! This dish

- 1 lb large shrimp, peeled and deveined - 1 bunch asparagus, trimmed - 4 cloves garlic, minced - 1 lemon, zested and juiced - 3 tablespoons olive oil - 1 teaspoon paprika - 1 teaspoon dried Italian herbs (oregano, basil, thyme) - Salt and pepper to taste - Fresh parsley, chopped (for garnish) - Lemon wedges (for serving) The key to this dish is the fresh, bright flavors. Start with large shrimp. They soak up the garlic and lemon well. You want them peeled and deveined for easy eating. Next, grab a bunch of fresh asparagus. Trim off the tough ends to keep it tender. Now, let’s talk about garlic. Use fresh cloves for the best taste. Mince them finely so they mix well with the shrimp. For the seasonings, the lemon is essential. Use both its zest and juice. The zest adds a punch of flavor, while the juice brightens everything up. Olive oil keeps the shrimp moist. It also helps the seasonings stick. Paprika adds a nice color and mild spice. For herbs, dried Italian herbs work great. They bring a mix of flavors to the dish. Don’t forget salt and pepper. They enhance all the tastes. Finally, garnish with fresh parsley. It adds a pop of color and freshness. Serve with lemon wedges for extra zest. Each bite will burst with flavor, making this dish a delight! - Preheat your oven to 400°F (200°C). - Start by peeling and deveining the shrimp. Rinse them in cold water. - Trim the asparagus by snapping off the tough ends. - In a large bowl, mix the shrimp, asparagus, minced garlic, lemon zest, and lemon juice. - Drizzle 3 tablespoons of olive oil over the mixture. Add 1 teaspoon of paprika, 1 teaspoon of dried Italian herbs, salt, and pepper. - Toss everything well to make sure all the ingredients are coated. - Line a sheet pan with parchment paper. This helps with easy cleanup. - Spread the shrimp and asparagus mixture evenly on the sheet pan in a single layer. - Bake in the preheated oven for 12-15 minutes. Keep an eye on it. The shrimp should turn pink and be opaque. The asparagus should be tender but crisp. - Once done, take it out of the oven and let it cool slightly. To cook shrimp just right, look for these signs: they should turn pink and opaque. If they curl tightly, that’s also a good sign. Be careful not to overcook them. Overcooked shrimp become rubbery and lose their nice texture. Since shrimp cook fast, keep an eye on them. Baking for 12-15 minutes usually does the trick. Want to elevate the flavor? Try adding a pinch of crushed red pepper for heat. You can also mix in fresh herbs like thyme or basil. Fresh herbs give a bright taste. If you love bold flavors, add a splash of white wine before baking. This adds depth and richness to the dish. Now, let’s talk about how to serve it. You can serve directly from the sheet pan for a cozy vibe. It’s easy and looks great! If you prefer a fancier touch, plate the shrimp and asparagus separately. Drizzle the juices from the pan over the top for extra flavor. For a pop of color, sprinkle fresh parsley and add lemon wedges on the side. These little touches make your dish stand out! {{image_2}} You can switch proteins in this dish easily. If you prefer chicken, use boneless, skinless chicken breasts. Cut them into bite-sized pieces. For a seafood twist, try scallops. They cook fast and add a sweet flavor. Feel free to change the vegetables too. Bell peppers add color and crunch. Broccoli works well for a different taste and good nutrition. Just remember to cut them into small pieces for even cooking. If you want to grill instead of roast, it’s simple. Preheat your grill to medium heat. Place the shrimp and asparagus on skewers. Grill for about 5-7 minutes. Turn them halfway through for even cooking. Just watch closely, so they don’t overcook. For a quicker option, try pan-searing. Heat a large skillet over medium-high heat. Add olive oil, then the shrimp and asparagus. Cook for about 5-6 minutes, stirring often. This method gives you a nice sear and keeps the flavors fresh. You can change the flavor with a Mediterranean twist. Add feta cheese or olives for a salty kick. This adds depth and pairs well with lemon. If you want an Asian-inspired version, use soy sauce or sesame oil. This will give the dish a rich umami flavor. You can also add some green onions or sesame seeds for extra crunch. Both options keep the dish exciting and fresh! To store cooked shrimp and asparagus, let them cool first. Place them in an airtight container. You can keep them in the fridge for up to three days. If you want to keep the flavor and texture, avoid stacking them too much. This keeps them from getting soggy. When reheating, I suggest using the oven or a skillet. Preheat your oven to 350°F (175°C). Place the shrimp and asparagus on a baking tray. Heat for about 10 minutes. If you use a skillet, add a small amount of olive oil. Heat on medium for 5-7 minutes. This method keeps them juicy and tasty. If you have leftovers, you can freeze them. Use a freezer-safe bag or container. Remove as much air as possible. Shrimp and asparagus can last up to two months in the freezer. To defrost, place them in the fridge overnight. Reheat them using the oven or skillet as mentioned. This way, you keep most of their flavor and texture. It takes about 12 to 15 minutes to bake shrimp and asparagus together. The shrimp should turn pink and opaque. The asparagus needs to be tender yet crisp. Tips for cooking times based on oven specifics: - Every oven is a bit different. - Check for doneness a minute or two early if unsure. - Use a meat thermometer; shrimp should reach 120°F (49°C). Yes, you can prepare the dish ahead of time. Combine the shrimp, asparagus, and seasonings. Storing options before baking: - Cover the bowl tightly with plastic wrap. - Store in the fridge for up to 24 hours. Reheating suggestions: - For best results, reheat in the oven at 350°F (175°C) for about 10 minutes. - You can also use a microwave, but it may not keep the best texture. You can serve many sides with this dish. Suggested side dishes: - A simple salad with mixed greens. - Garlic bread or crusty baguette. - Rice or quinoa for a filling option. Wine pairings for a complete meal: - A crisp white wine like Sauvignon Blanc works well. - If you prefer red, try a light Pinot Noir. In this post, we explored how to make a tasty lemon garlic shrimp and asparagus dish. We covered essential ingredients, step-by-step instructions, and helpful tips to ensure perfect cooking. Variations offer fun twists to keep things exciting. Remember, storing and reheating properly helps you enjoy leftovers without losing flavor. Whether you follow this recipe or add your unique spin, your meal will shine. Enjoy your cooking adventures with this simple yet flavorful dish!

Lemon Garlic Shrimp Asparagus Sheet Pan Delight

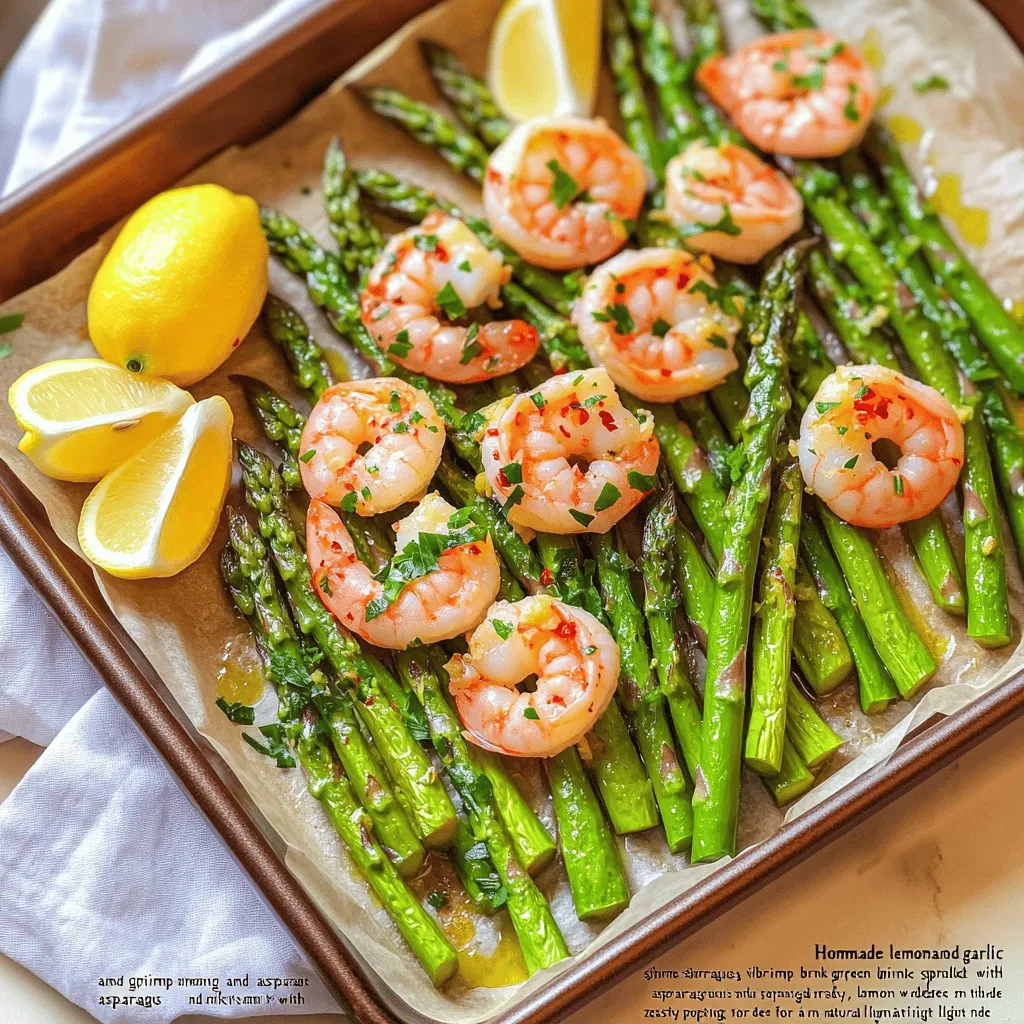
Looking for a quick, tasty dinner? Try my Lemon Garlic Shrimp Asparagus Sheet Pan Delight! This dish is simple and

To make these Peanut Butter Oat Energy Balls, you will need: - 1 cup rolled oats - 1/2 cup creamy peanut butter - 1/4 cup honey or maple syrup - 1/4 cup ground flaxseed - 1 teaspoon vanilla extract - A pinch of salt These main ingredients form a healthy base. Rolled oats provide fiber, while peanut butter adds protein and healthy fats. Honey or maple syrup gives sweetness. Ground flaxseed boosts nutrition with omega-3s. You can customize your energy balls with these add-ins: - 1/3 cup mini chocolate chips - 1/4 cup shredded coconut Adding mini chocolate chips gives a sweet touch. Shredded coconut adds a nice chew. Feel free to mix and match these options to suit your taste. These energy balls fit many diets. They are gluten-free if you choose certified oats. They are vegan if you use maple syrup instead of honey. The recipe is nut-friendly if you swap peanut butter for sunflower seed butter. Always check for allergies when sharing with others. Start by getting a big bowl. In it, mix the rolled oats, ground flaxseed, and a pinch of salt. Stir these dry ingredients well. This mix gives your energy balls a solid base. The oats add fiber, while flaxseed packs in healthy fats. Now, grab a spoon and add the creamy peanut butter to the dry mix. Pour in the honey or maple syrup next. Don't forget to add one teaspoon of vanilla extract. This sweetens the mix and adds flavor. Use your spoon or spatula to stir until everything blends into a sticky dough. It should feel thick and gooey. Once your mixture is ready, it’s time to chill. Put the bowl in the fridge for about 30 minutes. This step helps the dough firm up, making it easier to roll. After chilling, take the bowl out and scoop about one tablespoon of the mix. Roll it into a ball with your hands. Place each ball on a baking sheet lined with parchment paper. If you like, you can roll them in shredded coconut for extra flavor. Store your energy balls in an airtight container in the fridge. They’ll last up to one week, ready for a quick snack! Mixing your ingredients well is key to tasty energy balls. Start by combining the dry items first. This includes rolled oats, ground flaxseed, and salt. Stir them in a big bowl until mixed. Next, add the creamy peanut butter, honey, and vanilla extract. Use a spoon or spatula to mix everything. Aim for a sticky dough. If it feels too dry, add a bit more peanut butter. If too wet, add oats. Store your energy balls in an airtight container. This keeps them fresh. Place them in the fridge for up to one week. You can also freeze them for longer storage. Just make sure to wrap them tightly. When ready to eat, let them thaw for a bit. They taste great chilled or at room temp. When rolling the balls, keep your hands slightly damp. This helps prevent the mix from sticking. Scoop about one tablespoon of the mixture for each ball. Roll it gently between your palms until smooth. If you want, roll the balls in shredded coconut for extra flavor. This adds a fun texture too! Place the balls on a lined baking sheet after rolling. {{image_2}} You can change the taste of your peanut butter oat energy balls in many ways. Try adding spices like cinnamon or nutmeg for warmth. You can also use different nut butters, like almond or cashew. For a fruity twist, mix in dried fruits such as cranberries or raisins. You could even add cocoa powder for a rich chocolate flavor. Each change can give you a new treat to enjoy. Want to make these energy balls a bit healthier? You can swap out some ingredients. For example, use almond flour instead of some oats for added protein. You can also replace honey with unsweetened applesauce to cut down on sugar. If you want more fiber, add more ground flaxseed or chia seeds. These small changes can boost nutrition without losing flavor. If you don't want to use honey or maple syrup, there are other options. Try using agave syrup or coconut nectar for a different sweetness. Stevia is another great choice if you want a low-calorie sweetener. Just remember to adjust the amount since some sweeteners are stronger than others. Finding the right sweetener can help you enjoy these energy balls even more. One Peanut Butter Oat Energy Ball has about 100 calories. The total recipe makes about 14 to 16 balls. You can adjust based on the size you make. Each ball packs energy from oats and peanut butter. This makes them a great snack. - Rolled oats: They provide fiber and help keep you full. - Peanut butter: It's rich in protein and healthy fats. - Ground flaxseed: This adds omega-3 fatty acids and fiber. - Honey or maple syrup: Natural sweeteners that give quick energy. - Shredded coconut (optional): It adds healthy fats and a nice chew. - Mini chocolate chips (optional): They add a fun flavor boost. These ingredients work together to provide a mix of energy, protein, and healthy fats. I recommend one or two energy balls per snack. They are filling, so you don’t need many. If you make the balls smaller, you can enjoy more. Just remember to keep track of how many you eat. Enjoy them as a quick breakfast or a post-workout snack. Yes, you can freeze them! Just place the energy balls in an airtight container. Make sure to layer them with parchment paper to avoid sticking. They freeze well for up to three months. When you want one, let it thaw in the fridge or at room temperature. Homemade energy balls last about one week in the fridge. Store them in an airtight container. This keeps them fresh and tasty. If you want them to last longer, freeze them as mentioned above. You can use almond butter or sunflower seed butter instead of peanut butter. Both options offer great taste and texture. They also provide healthy fats and protein. Choose what suits your taste or allergy needs. Yes, these energy balls are great for kids! They are nutritious and easy to eat. Kids can enjoy them as a snack or during sports. Just keep an eye on any allergies to nuts or other ingredients. In this post, we explored making Peanut Butter Oat Energy Balls. We started with the main ingredients and optional add-ins. Next, I shared easy steps for preparation and mixing. I also provided tips on storage and rolling. Then, we looked at flavor variations and health benefits. These energy balls are tasty, healthy, and fun to make. Enjoy creating your perfect snack!

Peanut Butter Oat Energy Balls Simple and Nutritious

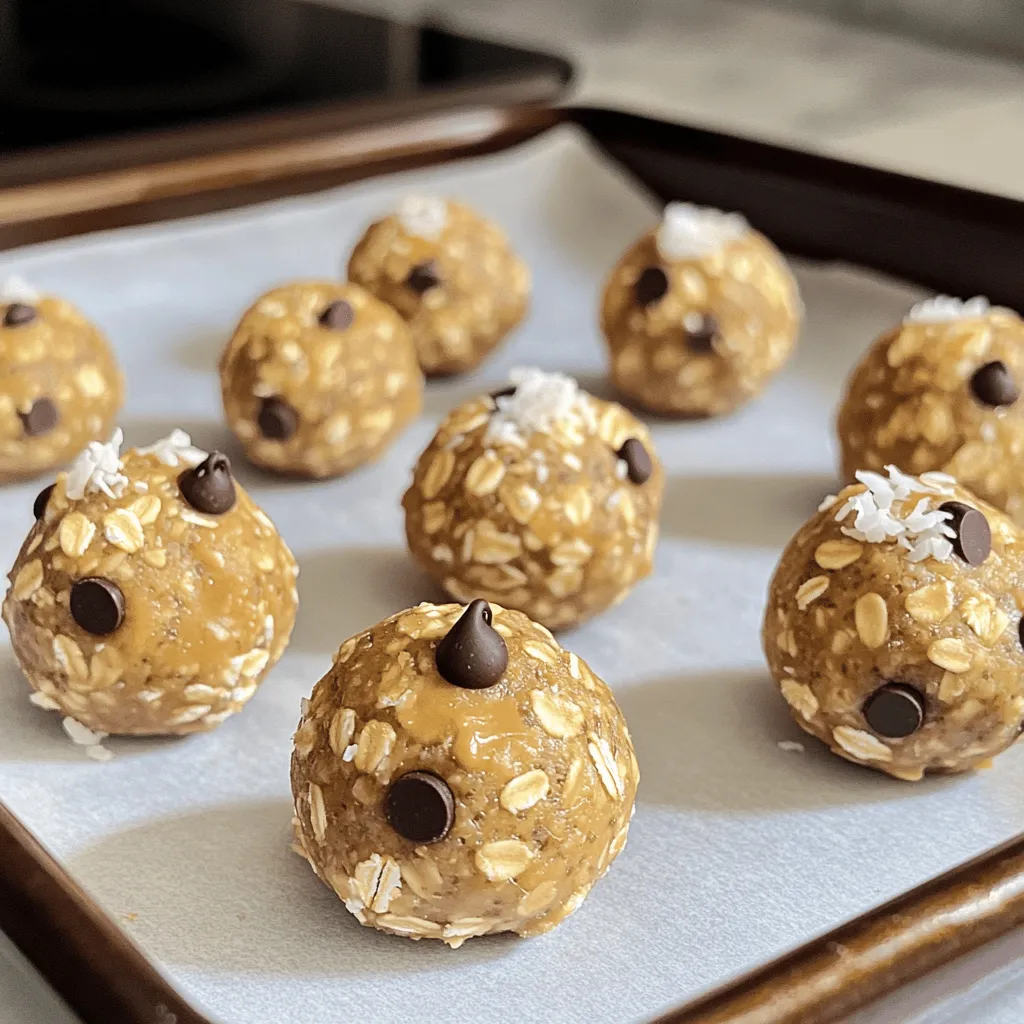
Looking for a quick, tasty snack? Peanut Butter Oat Energy Balls are your answer! These bite-sized treats are simple to

To make pumpkin chocolate chip pancakes, you will need: - 1 cup all-purpose flour - 1/2 cup pumpkin puree - 1/4 cup brown sugar - 2 tablespoons granulated sugar - 1 tablespoon baking powder - 1/2 teaspoon baking soda - 1/2 teaspoon cinnamon - 1/4 teaspoon nutmeg - 1/4 teaspoon salt - 1 cup milk (or a non-dairy alternative) - 1 large egg - 2 tablespoons unsalted butter, melted (plus extra for cooking) - 1/2 cup semi-sweet chocolate chips Each serving of these pancakes offers a delightful mix of nutrients. On average, one serving contains: - Calories: 250 - Protein: 6g - Carbohydrates: 35g - Dietary Fiber: 2g - Sugars: 10g - Fat: 10g The pumpkin adds fiber, while the chocolate chips provide a sweet touch. You can easily swap ingredients based on your needs: - Use whole wheat flour for a nuttier taste and added fiber. - Substitute pumpkin puree with mashed bananas for a different flavor. - Maple syrup can replace brown sugar for natural sweetness. - Almond milk works well as a non-dairy milk option. - Use a flaxseed egg instead of a large egg for a vegan version. Feel free to get creative with your ingredients! 1. Mix Dry Ingredients: In a large bowl, combine 1 cup of flour, 1/4 cup of brown sugar, 2 tablespoons of granulated sugar, 1 tablespoon of baking powder, 1/2 teaspoon of baking soda, 1/2 teaspoon of cinnamon, 1/4 teaspoon of nutmeg, and 1/4 teaspoon of salt. Whisk them well. 2. Mix Wet Ingredients: In another bowl, blend 1/2 cup of pumpkin puree, 1 cup of milk, 1 large egg, and 2 tablespoons of melted butter. Stir until it is smooth. 3. Combine Mixtures: Pour the wet mix into the dry mix. Gently fold the two together until just combined. It's okay if there are a few lumps. 4. Add Chocolate Chips: Fold in 1/2 cup of semi-sweet chocolate chips into the batter. Make sure they are spread evenly. - Preheat Your Pan: Heat a non-stick skillet over medium heat. Add a little butter to coat the bottom. - Perfect Pour: Use 1/4 cup of batter for each pancake. This size cooks evenly and looks great. - Watch for Bubbles: Cook each pancake until bubbles form on the surface, which takes about 2-3 minutes. This shows they’re ready to flip. - Golden Brown Finish: Flip the pancakes carefully. Cook for another 2-3 minutes until both sides are golden. - Batter Too Thick: If your batter is too thick, add a bit more milk to loosen it. This will help the pancakes to spread and cook evenly. - Pancakes Not Cooking: If pancakes are browning too fast, reduce the heat. Cooking at a lower temperature helps them cook through. - Sticking to the Pan: If pancakes are sticking, make sure to use enough butter on the skillet. A non-stick pan works best for easy flipping. These steps guide you to make pumpkin chocolate chip pancakes that are soft and delicious. Enjoy your cooking! To make fluffy pancakes, start with fresh ingredients. Use a light hand when mixing. Combine the wet and dry ingredients until they just blend. A few lumps are good; they help keep the pancakes airy. Let the batter rest for a few minutes. This allows the baking powder to activate, making your pancakes rise nicely. Serve these pancakes warm and stacked high. They taste great with a side of crispy bacon or fresh fruit. You can also add a dollop of yogurt for creaminess. If you like, serve them with maple syrup for sweetness. The best toppings include extra chocolate chips and whipped cream. You can also try a sprinkle of cinnamon or nutmeg. For a fun twist, add chopped nuts for crunch. If you want something sweet, drizzle honey or caramel sauce on top. These toppings make each bite special and delicious. {{image_2}} You can make these pancakes gluten-free. Simply swap regular flour with a gluten-free blend. Look for one that works cup-for-cup. This change keeps the texture nice. Just ensure it has xanthan gum, which helps bind the ingredients. To make these pancakes vegan, replace the egg with a flax egg. Mix one tablespoon of flaxseed meal with three tablespoons of water. Let it sit for five minutes. Use almond milk or soy milk instead of regular milk. For the butter, use coconut oil or a vegan butter. These swaps keep the pancakes tasty and fluffy. You can add more to your pancakes for fun flavors. Consider mixing in chopped nuts like walnuts or pecans. They add crunch and taste. You can also stir in a dash of ginger or cardamom for warmth. Try adding dried fruit like raisins or cranberries for a sweet twist. These small changes can make each pancake experience unique! After making pumpkin chocolate chip pancakes, you might have some left. Let the pancakes cool down first. Stack them in a single layer on a plate. Cover the pancakes with plastic wrap or foil. This keeps them fresh and prevents drying out. You can store them in the fridge for up to three days. If you want to keep them longer, freezing is a great option. Reheating pancakes is simple. You can use a microwave or a skillet. For the microwave, place pancakes on a plate. Heat them for 20 to 30 seconds. Check if they are warm enough; if not, add more time. For a skillet, heat it over low heat. Place the pancakes in the skillet and cook for about one minute on each side. This keeps them fluffy while warming them up. Freezing pancakes is an easy way to save them for later. First, let the pancakes cool completely. Then, stack them with parchment paper between each pancake. This stops them from sticking together. Place the stack in a freezer bag or airtight container. Seal it tightly, removing as much air as you can. You can freeze them for up to two months. When you're ready to eat, just reheat them as mentioned above. You can replace the egg with a mashed banana or applesauce. Use 1/4 cup of either. This keeps the pancakes moist. You can also use 1 tablespoon of ground flaxseed mixed with 3 tablespoons of water. Let this sit for five minutes before adding it to the batter. Both options work well and keep your pancakes tasty. Yes, you can use fresh pumpkin! First, roast or steam your pumpkin until soft. Then, blend it until smooth. Measure out 1/2 cup for your recipe. Fresh pumpkin may add a slightly different taste, but it will still taste amazing. Plus, it gives a nice, fresh flavor to your pancakes. To keep pancakes warm, preheat your oven to 200°F (93°C). Place a baking sheet inside. As you cook each pancake, stack them on the baking sheet. This will keep them warm without drying them out. You can also cover them with foil to maintain warmth and moisture. We explored ingredients for pumpkin chocolate chip pancakes and shared cooking steps. I provided tips for fluffy pancakes and serving ideas. You can try different variations, like gluten-free or vegan. For storage, I shared how to keep leftovers fresh. Remember, pancakes can be fun and easy. Don’t hesitate to experiment with flavors and toppings. Enjoy making those pancakes, and share your tasty results!

Pumpkin Chocolate Chip Pancakes Tasty and Simple Treat

Are you ready to enjoy a delicious breakfast treat? Pumpkin Chocolate Chip Pancakes are your answer! They’re tasty, easy to

- 2 cans (12.4 oz each) refrigerated cinnamon rolls - 1/2 cup packed brown sugar - 1/4 cup granulated sugar - 1 tablespoon ground cinnamon - 1/2 cup unsalted butter, melted - Optional add-ins: walnuts or pecans, raisins or dried cranberries - 1/2 cup cream cheese frosting Gather these simple ingredients to make your Slow Cooker Cinnamon Roll Monkey Bread. You will need two cans of cinnamon rolls for the base. The brown sugar adds a rich flavor, while the granulated sugar gives sweetness. The ground cinnamon is what makes this dish so warm and inviting. Melt your butter to coat the dough. You can make it crunchy by adding walnuts or pecans. If you want some chewiness, toss in raisins or dried cranberries. Finally, don't forget the cream cheese frosting. It adds a sweet finish and ties everything together. With these ingredients, you can create a delightful dish that everyone will love. Now, let’s get cooking! First, open the cans of cinnamon rolls. You will find the icing cups inside. Set those aside for later. Then, cut each cinnamon roll into quarters. Place the pieces in a large mixing bowl. Next, grab a small bowl. Combine the brown sugar, granulated sugar, and ground cinnamon. Stir until the mixture is well blended. This step adds a sweet and spicy flavor. Now, drizzle the melted butter over the quartered cinnamon rolls. Toss the pieces gently to coat them evenly. This helps the sugars stick well. Sprinkle the sugar and cinnamon mixture over the dough. Toss again to make sure all pieces are well coated. If you want to add some crunch or chew, this is the time! You can add chopped walnuts or pecans. You can also include raisins or dried cranberries. Mix these optional ingredients until they are well distributed throughout the dough. Lightly grease the inside of a slow cooker. This step helps prevent sticking. Next, transfer the cinnamon roll mixture into the slow cooker. Spread the pieces evenly to ensure they cook well. Cover the slow cooker and set it to low. Cook for 2 to 2.5 hours. The center should be cooked through, and the top will turn golden brown. Avoid lifting the lid too often. This keeps the heat in and helps with even cooking. Once cooked, turn off the slow cooker. Drizzle the reserved cream cheese frosting over the top while it’s still warm. This will make it melt slightly, creating a delicious topping. Use a spoon to scoop out servings. Enjoy your warm monkey bread! To get that perfect slow cooker cinnamon roll monkey bread, you need to ensure even cooking. Place the dough pieces in a single layer. This helps them cook uniformly. If they overlap, some parts might be doughy while others are done. Check doneness indicators by inserting a toothpick into the center. If it comes out clean, the bread is ready. You can also gently press the top to see if it springs back. If it does, you’re good to go! When serving, consider how you want it to look. You can keep the monkey bread in the slow cooker for a cozy vibe. Or, transfer it to a decorative platter for a nice touch. Garnish with extra chopped nuts or a light dusting of powdered sugar. This makes it look even more inviting. Pair this sweet treat with coffee or a warm cup of tea. The flavors blend well and make for a nice afternoon snack or dessert. One common mistake is overcrowding the slow cooker. If you add too many dough pieces, they won’t cook right. It’s best to stick to the recommended amount. Another mistake is not allowing the frosting to melt properly. Drizzling it on too soon can make it clump up. Wait until the monkey bread is warm to let it melt beautifully over the top. This adds a creamy finish that everyone will love! {{image_2}} You can change the taste of your monkey bread easily. Use different flavored cinnamon rolls. Try maple or pumpkin spice rolls for a fun twist. You can also mix in nuts and dried fruits. Walnuts or pecans give a nice crunch. Raisins or dried cranberries add a sweet touch. This way, you can create your own fun flavor combinations. If you need to make dietary changes, there are great options. For gluten-free needs, use gluten-free cinnamon rolls. Many brands offer good choices that taste great. If you want a vegan version, choose plant-based butter and dairy-free icing. You can also find vegan cinnamon rolls. These swaps let everyone enjoy this treat. Want smaller portions? You can make mini monkey breads! Use a muffin tin to create single servings. Just cut the cinnamon rolls into smaller pieces. Then, layer them in the muffin cups. Cook as usual but check for doneness sooner. These mini versions are fun for parties or brunch gatherings. To keep your Slow Cooker Cinnamon Roll Monkey Bread fresh, store it in an airtight container. Use a glass or plastic container with a tight lid. This keeps the moisture in and helps prevent drying out. You can also wrap it tightly in plastic wrap if you don’t have a container. When you want to enjoy leftovers, reheat them gently. The best way is to use the microwave. Place a small piece on a plate and cover it with a damp paper towel. Heat it in short bursts of 15 to 20 seconds. This keeps it soft and moist. You can also use the oven. Preheat it to 350°F. Place the monkey bread in a baking dish, cover it with foil, and heat for about 10 minutes. You can freeze this monkey bread before or after cooking. If you freeze it before, prepare the dough and place it in a freezer-safe container. Seal it well and freeze. To cook, thaw it in the fridge overnight before using the slow cooker. If you want to freeze it after, let it cool completely. Place it in a container, and it can last up to three months. For the best results when thawing, leave it in the fridge overnight. This helps maintain its texture and flavor. It takes about 15 minutes to prep. After that, the monkey bread cooks for 2 to 2.5 hours. The total time is around 2 hours and 45 minutes. This includes both prep and cooking. Yes, you can use frozen cinnamon rolls. Just let them thaw for about 30 minutes. Cut them into quarters like fresh rolls. They will cook well in the slow cooker. You can add nuts or dried fruits for extra flavor. Chopped walnuts or pecans work great. Raisins or dried cranberries add a nice touch too. You could also sprinkle some vanilla extract or a dash of nutmeg for a twist. Check for a golden brown top. You can also stick a toothpick in the center. If it comes out clean, it’s done. The center should be cooked through, not gooey. This blog post shared a simple, fun recipe for Slow Cooker Cinnamon Roll Monkey Bread. You learned about the key ingredients and followed clear steps to prepare it. We discussed tips to perfect the recipe and suggested variations to fit different tastes. You now know how to store leftovers and reheat them properly. Enjoy making this treat for your family or friends. It's easy, tasty, and sure to impress! Happy cooking!

Slow Cooker Cinnamon Roll Monkey Bread Delight

Are you ready to indulge in an easy, warm treat? This Slow Cooker Cinnamon Roll Monkey Bread combines gooey goodness

Older posts
Newer posts
← Previous Page1 … Page21 Page22 Page23 … Page84 Next →

dsad

© 2026 Foodish Talk • Built with GeneratePress

Our Policies

  • Copyright Policy
  • Cookie Policy
  • GDPR Policy
  • Privacy Policy
  • Disclaimer
  • Terms Of Use

More Information

  • Home
  • About
  • Contact
  • Appetizers
  • Dessert
  • Dinner
  • Drinks
©2026, Foodish Talk About Back To Top