Craving a dessert that combines creamy coconut and rich chocolate? You’re in the right place! This Coconut Chocolate Dome recipe is a joyous treat that’s easy to make and hard to resist. Whether you’re planning a special occasion or just want a sweet bite, this guide gives you all the details. Get ready to impress yourself and your guests with these delightful domes that are as fun to create as they are to eat!
Ingredients
List of Essential Ingredients
To make the Coconut Chocolate Dome, gather these key items:
– 1 cup coconut cream
– 1/2 cup granulated sugar
– 1/2 cup unsweetened cocoa powder
– 1/2 cup dark chocolate, chopped
– 1/4 cup shredded coconut
– 1 teaspoon vanilla extract
– Pinch of salt
– 1 tablespoon coconut oil
– 1/4 cup milk chocolate for coating
– Fresh mint leaves for garnish (optional)
These ingredients create a rich and creamy dessert that shines with coconut flavor.
Substitutes for Ingredients
If you can’t find coconut cream, try using heavy cream or a dairy-free option like almond milk. For vegan or gluten-free needs, use plant-based milk and non-dairy chocolate. These swaps keep the dessert tasty without losing charm.
Quantities for Different Servings
Want to make more or fewer domes? Simply adjust the amounts. For 12 domes, double all ingredients. For just two, cut them in half. It’s easy to scale, ensuring everyone gets a bite of this treat.
Step-by-Step Instructions
Preparation Steps
To make the coconut chocolate mixture, start by gathering your ingredients. You need coconut cream, sugar, cocoa powder, and a pinch of salt.
1. In a medium saucepan, mix the coconut cream, sugar, cocoa powder, and salt.
2. Heat this mix on medium. Stir it constantly. You want the sugar and cocoa to dissolve completely.
3. Once smooth, remove the pan from the heat. Add chopped dark chocolate, shredded coconut, and vanilla extract.
4. Stir until the chocolate melts and everything combines well.
5. Let this mixture cool a bit. Then, carefully pour it into dome-shaped silicone molds. Fill them just below the rim.
Setting the Domes
Now it’s time to set the domes.
1. Place the molds in the freezer.
2. Let them freeze for about 4 to 5 hours. Check if they are firm.
3. When ready, gently remove the chocolate domes from the molds.
4. If they stick, warm the mold’s edges with your hands. This helps loosen them.
Coating the Domes
Next, we’ll coat the domes with chocolate.
1. In a small microwave-safe bowl, combine milk chocolate and coconut oil.
2. Microwave this mix in 30-second bursts. Stir after each burst until it’s smooth.
3. Dip the top of each dome into the melted chocolate. Let the excess chocolate drip off.
4. Place the domes on a wire rack to set.
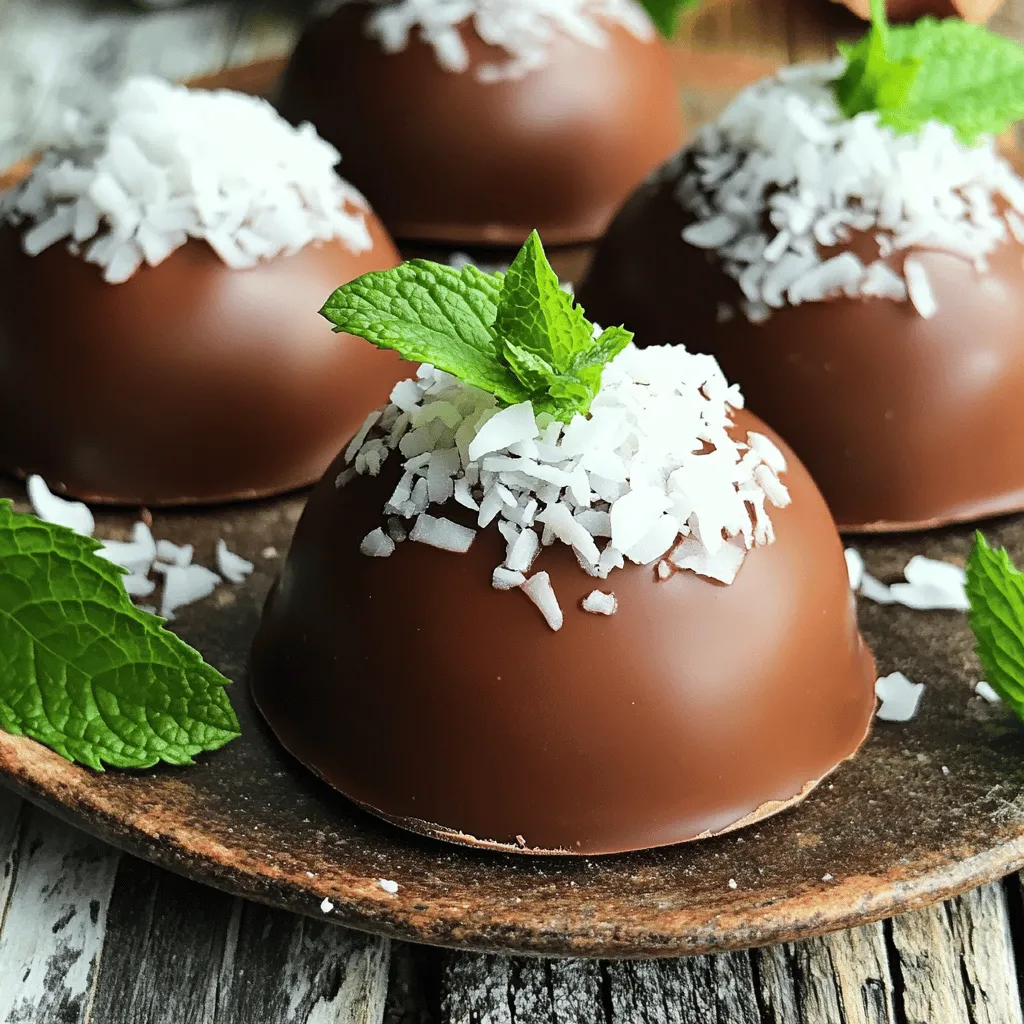
5. Once the coating is firm, you can serve the coconut chocolate domes. You can sprinkle some shredded coconut on top for extra flair.
Follow this guide and you will create a stunning coconut chocolate dome that will wow your friends and family!
Tips & Tricks
Perfecting Texture and Flavor
To get the right texture in your coconut chocolate mixture, stir it well. You want it smooth and creamy. If you find it too thick, add a bit more coconut cream. This will help. For added flavor, consider mixing in a dash of espresso or a few drops of almond extract. These flavors pair nicely with chocolate and coconut.
Presentation Tips
Garnishing your coconut chocolate domes can really impress your guests. Try sprinkling additional shredded coconut on top. It adds texture and looks lovely. Fresh mint leaves make a great garnish too. They give a nice pop of color and freshness. When plating, use a clean white dish. It makes the dessert stand out more.
Common Mistakes to Avoid
One common issue is uneven setting of the domes. To avoid this, make sure the mixture is evenly distributed in the molds. If the domes do not come out cleanly, try warming the mold slightly. This helps loosen them. Also, ensure your chocolate coating is not too thick. A thin layer will look smooth and shiny.

Variations
Vegan Coconut Chocolate Dome
To make a fully plant-based version, use coconut cream. Replace milk chocolate with vegan chocolate. This simple swap keeps the taste rich and creamy. You can use agave or maple syrup instead of granulated sugar. These options make the dessert sweet without animal products.
Gluten-Free Options
For a gluten-free recipe, ensure all ingredients are labeled gluten-free. Use certified gluten-free cocoa powder and chocolate. This way, everyone can enjoy this delightful treat without worry. You can also replace granulated sugar with coconut sugar for a unique flavor twist.
Flavor Variations
To add different flavors, think outside the box! Mint and orange zest work great. You can mix in a few drops of peppermint oil for minty goodness. For orange flavor, add zest to the chocolate mixture. You can even swirl in fruit purees like raspberry or passion fruit for a fruity touch. Each of these ideas adds a fun twist to your coconut chocolate dome.
Storage Info
Best Practices for Storing
To keep your coconut chocolate domes fresh, store them properly. If the domes are uncoated, wrap them in plastic wrap. Place them in an airtight container. This method keeps them safe from freezer burn. For coated domes, let the chocolate set first. Then place them in a single layer in an airtight container. Add parchment paper between layers to prevent sticking.
Shelf Life
Coconut chocolate domes last about five days in the refrigerator. Make sure to keep them in an airtight container. If you want to save them longer, freeze them. Frozen domes can last up to three months. Just remember to wrap them well to avoid freezer burn.
Reheating or Refreshing
Before serving, let the domes sit at room temperature for a few minutes. This helps bring back their soft texture. If the chocolate looks dull, you can warm them slightly in your hands. Avoid using a microwave, as it may melt the chocolate too much. Enjoy the fresh taste and texture of your coconut chocolate domes!
FAQs
How do I avoid the chocolate from cracking when coating?
To avoid cracks, make sure your chocolate is not too hot. Melt the chocolate gently. Stir it often to keep the heat even. Once melted, let it cool slightly before dipping. This helps create a smooth coating over the dome. You can also try dipping the domes quickly. This keeps the chocolate from setting too fast.
Can I make these domes ahead of time?
Yes, you can make these domes ahead of time. Prepare them and freeze them for up to two weeks. When you are ready to serve, take them out and let them thaw in the fridge. This keeps their shape and taste fresh. If you coat them, do it right before serving for the best results.
What can I serve with coconut chocolate domes?
You can serve coconut chocolate domes with many delicious things. Fresh fruit like strawberries or raspberries adds a nice touch. A scoop of vanilla ice cream pairs well too. For drinks, serve with coffee, hot chocolate, or a fruity cocktail. These options complement the rich flavors of the domes perfectly.
You now have all the tools to create delicious coconut chocolate domes. You learned about essential ingredients and substitutes, making adjustments for dietary needs. The step-by-step guide helps you prepare, set, and coat your domes perfectly. I shared tips to perfect flavors and avoid common mistakes. Feel free to experiment with variations that suit your taste. By following these guidelines, you’ll create tasty treats that impress everyone. Enjoy making and sharing your coconut chocolate domes!


