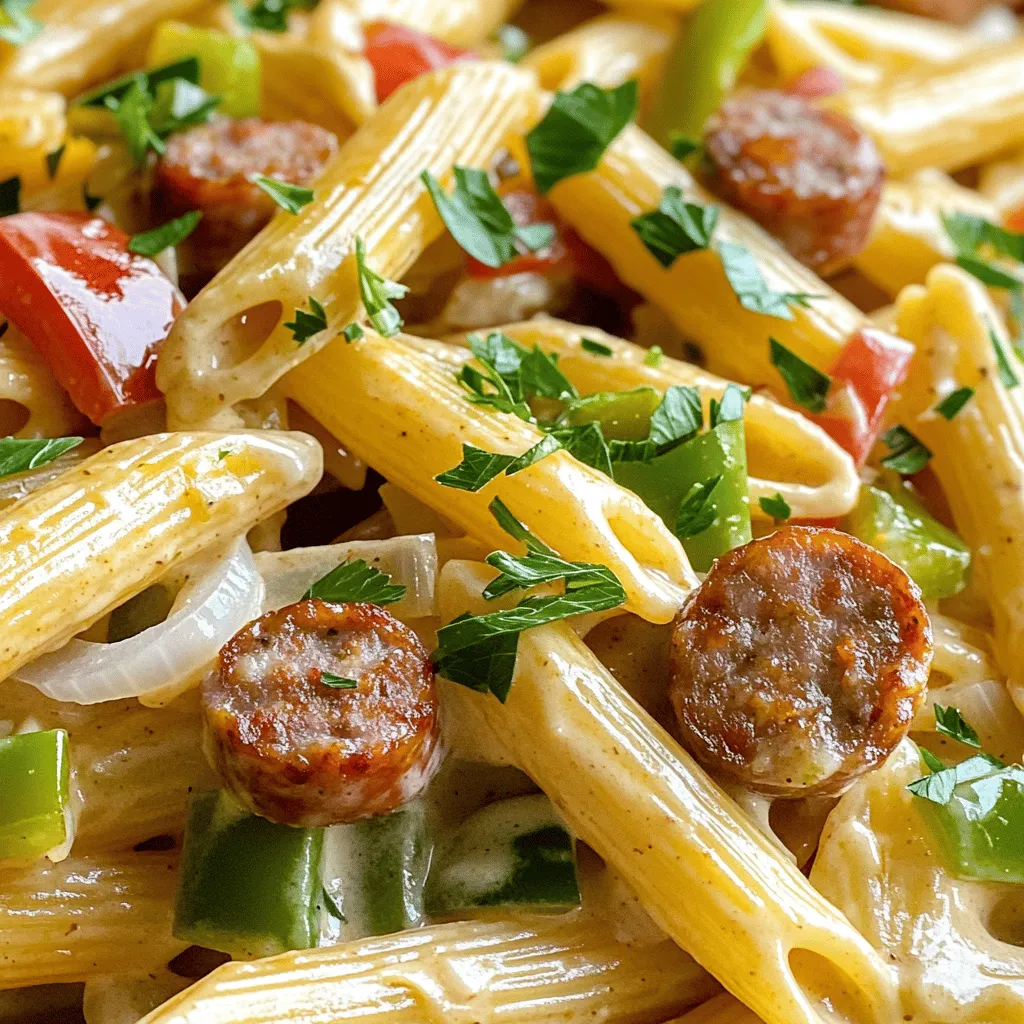
Creamy Cajun Sausage Pasta Quick and Tasty Dish
Are you ready for a dish that packs flavor and comfort? Creamy Cajun Sausage Pasta is quick to make and
Are you ready for a dish that packs flavor and comfort? Creamy Cajun Sausage Pasta is quick to make and
![- Baby spinach: Use 4 cups of fresh baby spinach. This leafy green is vibrant and nutritious. It adds a fresh crunch and rich color to your salad. - Strawberries: Grab 1 cup of strawberries. Make sure to hull and slice them. Their sweetness balances the salad and brings a burst of flavor. - Red onion: You need 1/4 cup of thinly sliced red onion. It gives a nice zing and a beautiful contrast in color. - Feta cheese: Use 1/2 cup of crumbled feta cheese. Its salty and creamy taste pairs well with the strawberries. - Walnuts: Add 1/4 cup of toasted walnuts. They add a rich, nutty flavor and a satisfying crunch to the mix. - Balsamic vinaigrette: You will need 1/3 cup of balsamic vinaigrette. This dressing adds a tangy sweetness that ties everything together. - Honey: Just 1 tablespoon of honey brings extra sweetness. It balances the tang of the dressing. - Salt and pepper: Season to taste. A pinch of salt and a dash of pepper enhance all the flavors in your salad. For the Full Recipe, follow the easy steps to bring everything together. Enjoy creating this delightful Strawberry Spinach Salad! First, let's wash and dry the spinach. Rinse 4 cups of fresh baby spinach under cold water. Then, use a salad spinner or clean towel to dry it well. Next, we need to hull and slice the strawberries. Take 1 cup of strawberries. Remove the green tops with a knife. Then, slice the strawberries into thin pieces. This will help them mix well in the salad. Now, it's time to combine the spinach and strawberries. In a large salad bowl, add the dried spinach and sliced strawberries. Toss them gently so they mix well. Next, we’ll add feta and walnuts. Crumble 1/2 cup of feta cheese and sprinkle it over the salad. Then, add 1/4 cup of toasted walnuts, roughly chopped. This adds a nice crunch to our dish. For the dressing, whisk together balsamic vinaigrette and honey. In a small bowl, pour in 1/3 cup of balsamic vinaigrette. Add 1 tablespoon of honey. Use a whisk to blend them until smooth and well combined. Now, let’s drizzle the dressing over the salad. Pour it evenly across the salad. Then, toss everything gently to coat the ingredients well. Finally, season the salad with salt and pepper to taste. This will enhance all the fresh flavors. Enjoy your delicious Strawberry Spinach Salad! For the full recipe, check the details above. Serve the salad on a large platter. This makes it look inviting. Use whole strawberries and walnut halves to garnish. This adds color and makes it more appealing. You can add herbs for extra flavor, like basil or mint. These herbs brighten the dish. If you want spice, add a pinch of red pepper flakes. This gives a nice kick without being too hot. Serve the salad right after you prepare it. This keeps the spinach fresh and crisp. If you wait too long, the spinach wilts and loses its crunch. Aim to serve within 15 minutes of making it for the best taste. {{image_2}} For this strawberry spinach salad, you can swap different nuts and cheeses. Instead of walnuts, try pecans or almonds. They add a nice crunch and flavor. For cheese, goat cheese works well too. It gives a creamy texture that pairs nicely with strawberries. You can also add seasonal fruits. In summer, peaches or blueberries shine in this salad. In fall, consider apples or pears. Each fruit brings a new taste, keeping the salad fresh and exciting. If you want to mix it up, try making your own dressing. A simple lemon vinaigrette is quick and bright. Just whisk lemon juice, olive oil, salt, and pepper together. It tastes great on the salad and is very light. For a vegan option, use a tahini dressing. Blend tahini, water, lemon juice, and garlic for a creamy taste. This dressing adds a rich flavor while keeping it plant-based. You can serve this salad as a main course. Just add grilled chicken or shrimp on top. It makes the meal more filling and satisfying. For side dishes, pair this salad with grilled steak or fish. The fresh flavors of the salad balance well with hearty proteins. You can enjoy this dish in many ways, making it versatile for any dining occasion. For the complete recipe, check out the [Full Recipe]. To keep your Strawberry Spinach Salad fresh, store it in the fridge. Use an airtight container. This helps to keep moisture in and air out. If you have leftovers, try to eat them within two days. The spinach can wilt if stored too long. Keep the dressing separate until you are ready to enjoy the salad. This way, the salad stays crisp and fresh. Freezing this salad is not recommended. The spinach and strawberries will lose texture and flavor. If you want to save some ingredients, you can freeze the walnuts. Just place them in a freezer bag. They can last for up to six months in the freezer. When ready to use, just thaw them at room temperature. You don't need to heat the salad. It’s best served cold. If you want to refresh it, just add a little more dressing. Toss the salad gently to mix. You can also add fresh strawberries or nuts to boost the flavor. This will make it taste just like when you first made it. Enjoy your Strawberry Spinach Salad! For the details on how to make it, check the Full Recipe. You can try goat cheese or ricotta. Both have a creamy taste. Goat cheese adds a tangy flavor, while ricotta is mild and sweet. If you want a dairy-free option, try tofu. Crumbled tofu can mimic feta’s texture. Just season it with salt and lemon juice for more flavor. To make this salad vegan, swap feta for vegan cheese. Look for brands that offer a feta-like flavor. You can also skip cheese altogether and add more nuts for crunch. Instead of honey, use maple syrup or agave nectar. This keeps the sweetness and makes it vegan-friendly. Yes, you can prepare this salad in advance. Wash and dry the spinach, then store it in a sealed container. Slice the strawberries and keep them separate to avoid sogginess. You can mix the salad up to an hour before serving. Just add the dressing right before you eat. This salad is very healthy! Spinach is high in iron and vitamins A and C. Strawberries are rich in antioxidants and fiber, which help digestion. Walnuts provide healthy fats and protein. Feta cheese can add calcium, but watch portions if you're mindful of fat. This salad gives you a tasty boost of nutrients! For the full recipe, check the Strawberry Spinach Bliss Salad! This blog post covered a delightful strawberry spinach salad. You learned about fresh ingredients, like baby spinach and strawberries, as well as nuts and cheeses. We walked through step-by-step instructions for making the salad and dressing. You also discovered tips for presentation and flavor. Plus, I shared variations and storage tips to keep your salad fresh. Remember, this salad is simple and full of flavor. Enjoy making it your own!](https://foodishtalk.com/wp-content/uploads/2025/06/6d598bfa-df10-4422-a0ce-68733d2f7b50.webp)
Craving a fresh and tasty dish? You’ll love this Strawberry Spinach Salad! Bursting with flavors from sweet strawberries and crunchy
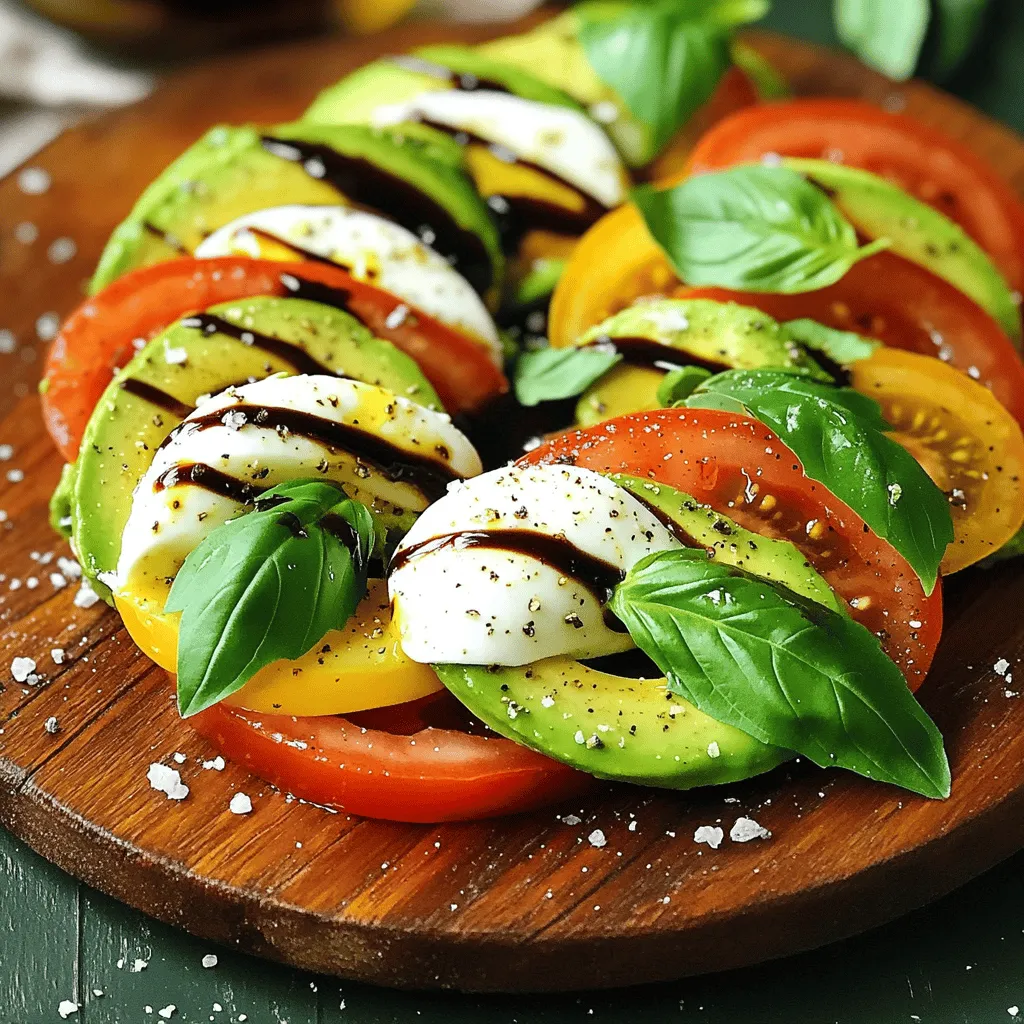
Looking for a fresh and flavorful dish? The Avocado Caprese Salad is the perfect choice! This simple salad features creamy
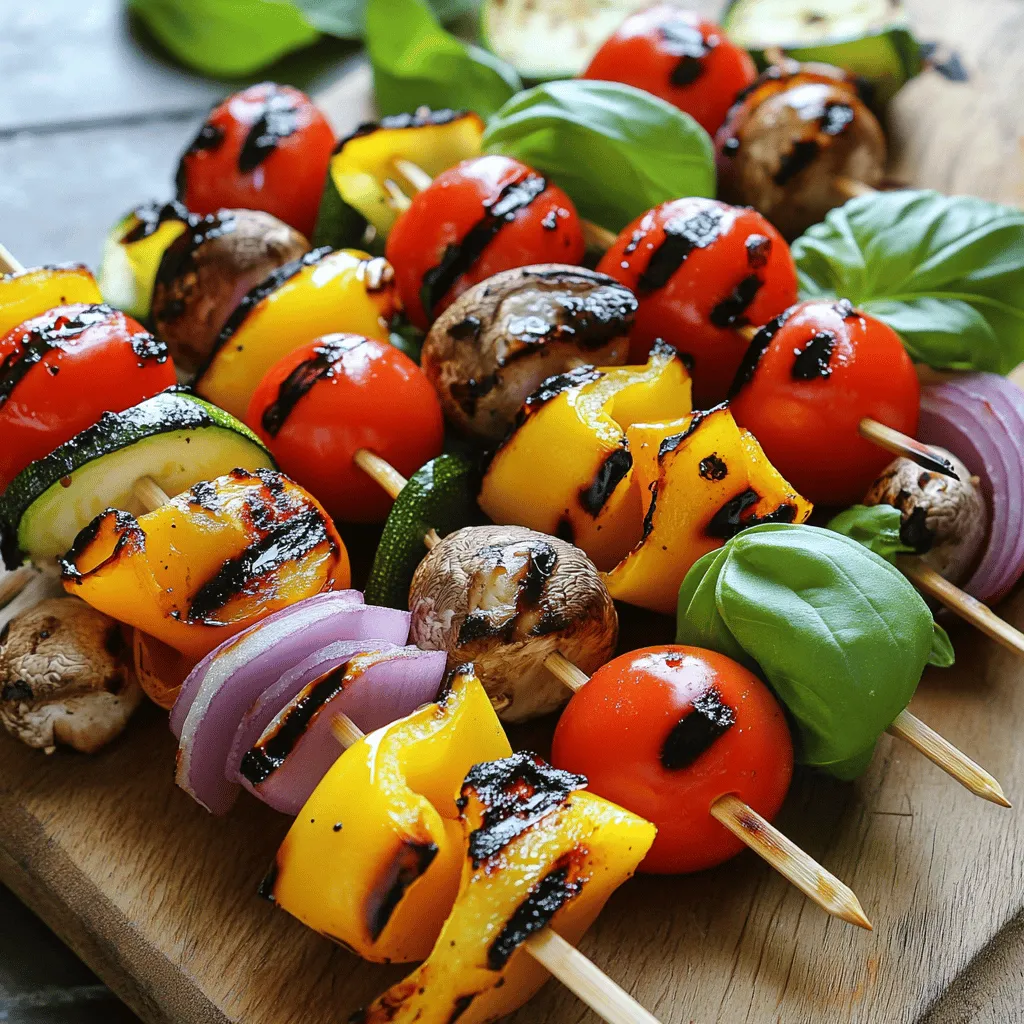
Grilled vegetable skewers are a colorful and tasty dish that anyone can enjoy. I love how easy they are to

If you love coffee and dessert, you’re in for a treat! Tiramisu Brownies combine rich chocolate with creamy mascarpone and

Looking for a quick and tasty dessert? This Easy Cherry Pie will make your taste buds sing! With just a
![Let’s gather the fresh ingredients for our refreshing mango salad. Each one adds a unique flavor and texture. - 2 ripe mangoes, diced - 1 cucumber, diced - 1 red bell pepper, diced - 1/2 red onion, finely chopped - 1/4 cup fresh cilantro, chopped - 1 jalapeño, seeded and minced (optional for spice) - Juice of 2 limes - 2 tablespoons honey (or agave syrup for a vegan option) - 2 tablespoons olive oil - Salt and pepper to taste Choosing ripe mangoes is key. Look for ones that feel slightly soft and smell fragrant. The cucumber adds crunch, while the bell pepper brings sweetness. The red onion gives a nice bite. If you like heat, the jalapeño is a great touch. I love using fresh lime juice. It brightens the salad and pairs perfectly with mango. Honey or agave syrup balances the tanginess. Olive oil rounds out the dressing, making it rich and smooth. This combination of ingredients creates a colorful and vibrant salad. You can find the full recipe at the end. Enjoy putting these ingredients together to create something delicious! How to dice mangoes and cucumbers To dice mangoes, start with ripe fruit. Cut off the sides of the mango. Stand it up and slice down to remove the pit. Make crosshatch cuts in the flesh. Then, scoop out the cubes with a spoon. For cucumbers, wash them well. Cut off both ends, then slice them in half. Lay each half flat and cut into small pieces. Chopping red peppers and onions For red peppers, remove the stem and seeds. Cut the pepper in half, then slice it into thin strips. Next, chop the strips into small pieces. For onions, peel off the outer skin. Cut the onion in half, then slice it thinly. Aim for small, even pieces for a consistent taste. Handling jalapeños safely Jalapeños can add spice. First, wash your hands. Cut off the stem and slice them in half. Carefully remove the seeds with a spoon. Use gloves if you have sensitive skin. Chop the jalapeño into tiny pieces. Remember, less is more if you want mild heat. Combining lime juice, honey, and olive oil In a small bowl, squeeze the juice from two limes. Add two tablespoons of honey for sweetness and two tablespoons of olive oil for richness. Whisk these together until well combined. This simple dressing balances tart and sweet flavors. Tips for achieving the perfect balance of flavors Taste your dressing after mixing. If it's too tart, add a bit more honey. If it’s too sweet, add a splash more lime juice. Season with a pinch of salt and pepper. The right balance makes your salad shine. Mixing the salad and dressing thoroughly In a large bowl, combine diced mangoes, cucumbers, red peppers, red onions, and jalapeños (if using). Pour the lime dressing over the salad. Gently toss everything together until all pieces are coated. Do this carefully to keep the mango pieces intact. Recommended marination time for flavor enhancement Let the salad sit for about ten minutes. This time allows the flavors to meld together. It also enhances the juiciness of the mangoes. Serve right after marinating for the best taste. Check out the Full Recipe for more details! Letting the salad sit is key. After mixing, let it rest for about 10 minutes. This time allows the flavors to blend nicely. You’ll notice the mangoes become juicier and tastier. The lime dressing soaks in, enhancing each bite. The balance of sweetness and acidity in the dressing matters too. Use ripe mangoes for natural sweetness. The lime juice brightens the dish. If you find the dressing too tart, add a bit more honey. Adjusting these flavors can make all the difference. This salad pairs well with grilled chicken or shrimp. You can also serve it as a side dish for tacos. It adds a fresh touch to any meal. For a beautiful presentation, serve the salad in a shallow bowl. Sprinkle fresh cilantro on top. Add lime wedges on the side for a pop of color. This simple touch makes your dish look even more inviting. For the complete recipe, check out the [Full Recipe]. {{image_2}} You can easily boost this mango salad with protein. Grilled chicken or shrimp works well. These options add heartiness and flavor. For a vegetarian twist, try adding chickpeas or quinoa. Both choices provide good protein and texture. Chickpeas add a nutty flavor, while quinoa brings a nice crunch. To make your salad even more exciting, add nuts or seeds. Sliced almonds or toasted pumpkin seeds offer a great crunch. They also add healthy fats and nutrients. You can also mix in other fruits. Avocado adds creaminess, while pineapple gives a sweet and tangy twist. These fruits complement the mango and lime dressing beautifully. For the full recipe, check out the [Full Recipe]. To keep your mango salad fresh, store it in an airtight container. Place it in the fridge right after serving. This helps keep the flavors bright and the texture crisp. Always use clean utensils to avoid contamination. Look for signs of spoilage, like an off smell or slimy texture. If you spot these signs, it’s best to toss the salad. Fresh mango salad lasts about two days in the fridge. Can you freeze mango salad? Freezing is not ideal for this salad. The texture of mangoes and cucumbers changes when frozen. If you do choose to freeze it, make sure to discard any dressing. Store the salad without dressing in a freezer-safe container. When you're ready to eat, thaw it overnight in the fridge. After thawing, add fresh lime dressing to restore flavor. Enjoy your delightful dish! For the full recipe, check out the details above. Yes, you can use frozen mangoes. They work well in a salad. Frozen mangoes are often picked at their peak ripeness. This means they can taste just as sweet as fresh ones. Just let them thaw before you use them. You may also want to pat them dry to avoid extra moisture in your salad. If you don't have lime, try lemon or orange juice. Both add a nice citrus flavor. Lemon gives a sharper taste, while orange offers a sweeter twist. You can also mix citrus juices for a unique flavor. This way, you can keep the dressing fresh and tasty. The salad can last about three days in the fridge. However, it’s best to eat it fresh. After a day, the ingredients may lose their crunch. The dressing can make the salad soggy over time. If you store the dressing separately, it helps keep the salad fresh longer. This blog post detailed a fresh mango salad recipe. You learned about the key ingredients, simple steps, and tips for best flavor. Remember, resting the salad enhances taste. Add proteins or fruits for more variety. Proper storage keeps leftovers fresh. With these insights, you'll create a vibrant dish that impresses. Enjoy making this salad again and again!](https://foodishtalk.com/wp-content/uploads/2025/06/491e2c03-880b-4b3e-8bcc-bdb6a7d8a06e.webp)
Are you ready to beat the heat with a delicious and easy dish? This Refreshing Mango Salad with Lime Dressing
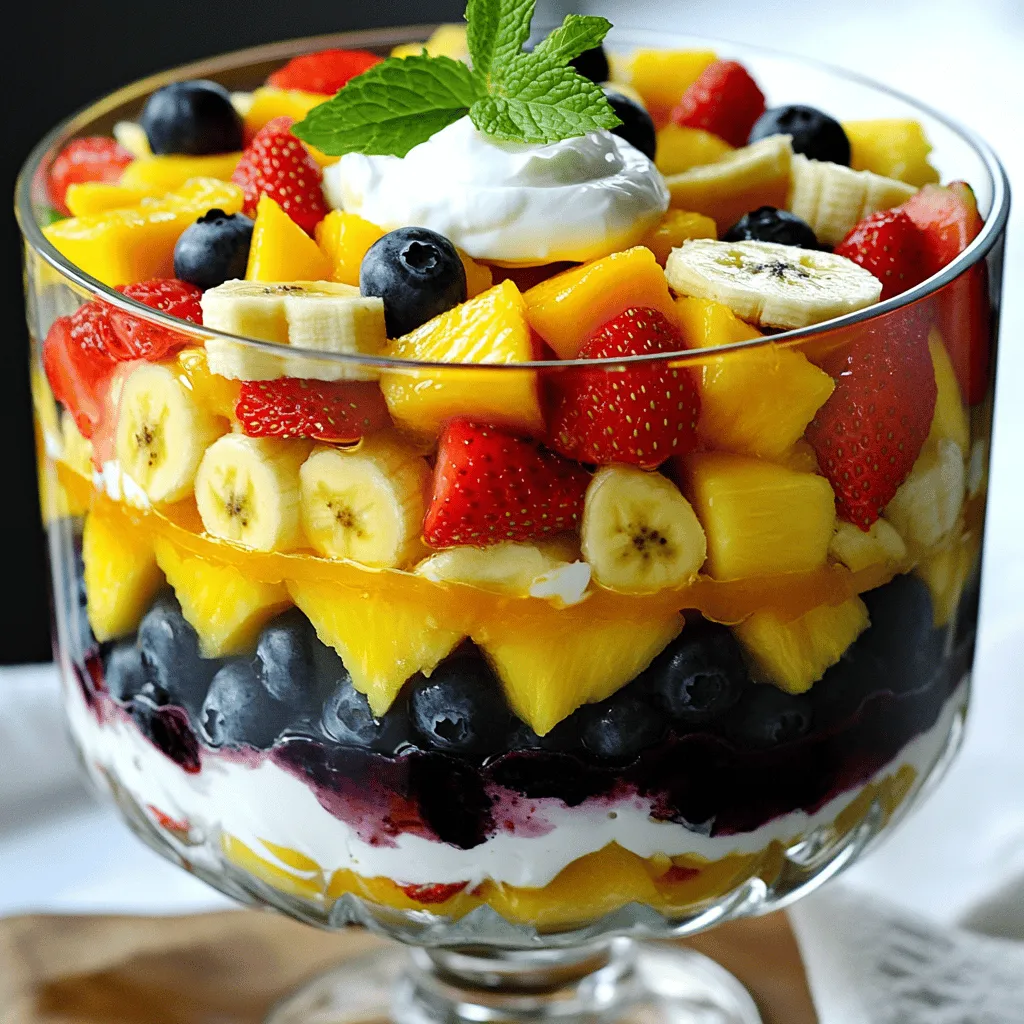
Are you ready to impress your taste buds? My Layered Fruit Salad with Citrus Dressing combines fresh, vibrant fruits to
![To make a delicious Mango Chickpea Salad, you need fresh and simple ingredients. Here is your list: - 1 ripe mango, diced - 1 can (15 oz) chickpeas, drained and rinsed - 1 red bell pepper, diced - ½ red onion, finely chopped - 1 cup cherry tomatoes, halved - 1 avocado, diced - ¼ cup fresh cilantro, chopped - 2 tablespoons olive oil - 1 tablespoon lime juice - 1 teaspoon ground cumin - Salt and pepper to taste Each ingredient adds flavor and texture. The mango gives sweetness, while chickpeas add protein. The red bell pepper and cherry tomatoes bring crunch and color. Avocado adds creaminess, making every bite delightful. You can customize your salad with extra ingredients. Here are some tasty options: - Cucumber for a refreshing crunch - Corn for sweetness and color - Feta cheese for a salty kick - Jalapeños for heat if you like spice Feel free to mix and match these add-ins. They can give your salad a unique twist and keep things exciting. This Mango Chickpea Salad is not only tasty but also healthy. Here’s what you get per serving: - Calories: Around 250 - Protein: About 10g - Fiber: 8g - Healthy fats from avocado and olive oil This salad provides a good balance of nutrients. It helps you feel full while being light and refreshing. It’s great for lunches or as a side dish at dinner. You can find the full recipe [here]. To start, gather all your ingredients. You will need a ripe mango, chickpeas, red bell pepper, cherry tomatoes, avocado, red onion, and cilantro. Dice the mango, avocado, and red bell pepper into small pieces. Place these in a large salad bowl. Next, drain and rinse the chickpeas. Add them to the bowl along with halved cherry tomatoes and finely chopped red onion. This mix gives the salad a fresh look and taste. Once your ingredients are prepared, it's time to combine them. Gently toss the mango, chickpeas, bell pepper, cherry tomatoes, avocado, red onion, and cilantro together in the bowl. Make sure everything is evenly mixed. The colors of the salad will pop, making it look inviting and delicious. This salad is not only tasty but also packed with nutrients. Now, let’s make the dressing. In a small bowl, whisk together olive oil, lime juice, ground cumin, salt, and pepper. This dressing adds a zesty flavor. Once mixed, drizzle it over the salad ingredients. Gently toss everything again to coat all the components well. Taste the salad and adjust the seasoning if needed. If you like a stronger flavor, add more salt, pepper, or lime juice. Chill the salad in the refrigerator for about 15 minutes. This waiting time helps the flavors blend beautifully. For the full recipe, check the details above. Chopping your ingredients well makes your salad look good. Here are some tips: - Use a sharp knife for clean cuts. - Cut the mango and avocado last to avoid browning. - Dice the red onion small so it blends well with other flavors. - Keep your cuts even for a nice look and feel. To make your salad pop, try these dressings: - Mix lime juice with honey for a sweet touch. - Add a dash of chili powder for heat. - Consider a splash of balsamic vinegar for richness. - Experiment with fresh herbs like basil or mint for a twist. Store your salad properly to keep it fresh: - Use an airtight container to lock in moisture. - Add the dressing just before serving to avoid sogginess. - Keep ingredients separate if you plan to store leftovers. - Refrigerate for up to two days for the best taste. For more details, check the Full Recipe for Mango Chickpea Delight. {{image_2}} You can keep this salad vegan easily. Swap the olive oil with avocado oil for a new taste. You can also use lemon juice instead of lime juice. If you like a creamy texture, add dairy-free yogurt. Try using hemp seeds for extra protein. They give a nice crunch, too. To make the salad more filling, add grains. Quinoa or brown rice works well. They add good texture and fiber. Cook the grains first, then mix them in. This will make the dish hearty and satisfying. You can serve it as a main meal or a side. If you love heat, add jalapeños. Dice them finely and mix them in with the other veggies. Start with a small amount, then taste it. You can always add more if you want. This will give the salad a spicy kick. It pairs well with the sweet mango, creating a balanced flavor. The mango chickpea salad stays fresh for about 3 days when stored properly. After that, the ingredients may lose their crunch and flavor. Keep an eye on the avocado, as it can brown quickly. If you notice browning, just scoop it out before serving. Use an airtight container to store the salad. Glass or plastic containers work well. If you have multiple servings, store them in smaller containers for easy access. This way, you can take a quick lunch or snack without mess. This salad is best enjoyed cold, so reheating isn’t necessary. However, if you prefer warmth, warm the chickpeas separately. Then, mix them back into the salad. Avoid heating the mango and avocado, as they can become mushy. For the best taste, enjoy the salad chilled! For the full recipe, check out the section above! Yes, you can make this salad ahead of time. I often prepare it a few hours before serving. The flavors mix well when they marinate. However, keep in mind that the avocado may brown. To prevent this, add it just before serving. This way, your salad stays fresh and bright. This salad pairs well with many dishes. You can serve it with grilled chicken or fish for protein. It also goes great with tacos or as a side for a barbecue. For a light meal, enjoy it with pita bread or tortilla chips. You can always add more veggies or grains to make it heartier. Yes, this recipe is gluten-free. All the ingredients, like chickpeas and mango, are naturally gluten-free. This makes it a safe choice for those with gluten sensitivities. Always check labels for any packaged ingredients to ensure they meet your dietary needs. Enjoy this fresh dish without worry! Mango Chickpea Salad is a simple and tasty dish full of nutrients. We covered key ingredients and optional add-ins, making it easy to customize. You learned step-by-step instructions for perfect prep and mixing. I shared tips for chopping and storing, so your salad stays fresh. Plus, we explored fun variations, including vegan and spicy options. This dish is versatile and enjoyable. Try it today for a healthy meal!](https://foodishtalk.com/wp-content/uploads/2025/06/73160f2a-299c-43b2-ad25-6c23d6de50a9.webp)
Are you ready to brighten your meal with a Mango Chickpea Salad? This fresh and colorful dish is packed with

Looking for a refreshing drink that’s easy to make? Lemon Iced Tea is the perfect choice! In this guide, I’ll
