Skip to content
DisclaimerTerms Of UseGDPR PolicyCookie Policy

Foodish Talk

  • Home
  • Drinks
  • Appetizers
  • Dinner
  • Dessert
  • About
  • Contact
  • Privacy Policy
DisclaimerTerms Of UseGDPR PolicyCookie Policy

Ava

- Shrimp: You need 1 pound of shrimp. Peel and devein them for best results. - Avocado: Choose 2 ripe avocados. They should feel slightly soft when gently squeezed. - Other Fresh Ingredients: Use 1 cup of halved cherry tomatoes, 1/4 cup of finely chopped red onion, and 1/4 cup of fresh cilantro. - Olive oil: Use high-quality extra virgin olive oil for flavor and health benefits. - Lime juice: Fresh lime juice is best. It adds brightness and a fresh taste. Bottled juice lacks this quality. - Seasoning: You will need 1 teaspoon of garlic powder, salt, and pepper to taste. Start by seasoning the shrimp. In a medium bowl, toss the cleaned shrimp with garlic powder, salt, and pepper. This adds great flavor. Next, heat a skillet over medium heat. Add 1 tablespoon of olive oil once the skillet is hot. Cook the shrimp for about 2-3 minutes on each side. They should turn pink and opaque. Once done, take them off the heat and let them cool. In a large mixing bowl, combine diced avocados, halved cherry tomatoes, finely chopped red onion, and fresh cilantro. These ingredients bring freshness and color. After the shrimp cools down, add them to the avocado mix. Make sure the shrimp is evenly distributed so everyone gets a taste. To make the dressing, whisk together the remaining olive oil and lime juice in a small bowl. Add a pinch of salt and pepper for extra flavor. Drizzle this dressing over the salad. Use a gentle hand to toss everything together. Be careful not to mash the avocado. Adjust the seasoning if needed by adding more salt, pepper, or lime juice. Enjoy your vibrant and tasty salad! To make your salad shine, start with fresh shrimp and avocados. When choosing shrimp, look for a firm texture and a mild ocean scent. Avoid shrimp that smell strong or have a dull color. For avocados, pick ones that are slightly soft but not mushy. A dark, bumpy skin often indicates ripeness. If you have leftover shrimp or avocados, store them separately in an airtight container. Shrimp can last one or two days in the fridge, while avocados should be consumed within a day or two after cutting. Cooking shrimp requires a little attention. Overcooking makes shrimp tough and rubbery. Cook shrimp for about 2-3 minutes on each side until they turn pink and opaque. You can tell they are done when they curl into a C shape. Remove them from heat right away to keep them tender. Presentation matters! Serve your salad in a chilled bowl for a fresh look. Garnish with cilantro sprigs and a lime wedge for color and flair. For great pairings, consider serving with tortilla chips or a light vinaigrette. You can also enjoy it with a side of grilled corn for extra texture. For the full recipe, check out Shrimp & Avocado Delight. {{image_2}} You can switch shrimp for chicken or tofu. Chicken gives a hearty bite that pairs well with avocado. Cook the chicken in the same skillet, using the same spices. Tofu is a great choice for a vegetarian dish. Just press it to remove extra liquid, then cube and sauté until golden. For seafood lovers, try scallops or crab. They both add a nice twist to the salad. Want to spice it up? Add jalapeños for heat, corn for sweetness, or black beans for texture. They all blend well with shrimp and avocado. Cheese can enhance the dish, too. Feta adds a salty kick, while queso fresco brings creaminess. Feel free to mix and match based on your taste. These add-ins make your salad more fun and flavorful. For a change, use balsamic vinaigrette or a yogurt-based dressing. Both offer a different taste profile. If you like tang, balsamic is great. Yogurt adds creaminess and a bit of zing. Adjust spices to match your mood. Try adding cumin or chili powder for a bold flavor. With these options, you can keep your salad exciting every time you make it. For the full recipe, click here. To keep your shrimp and avocado salad fresh, use airtight containers. Glass or plastic containers work well. Try to store the salad in smaller portions. This way, you can grab what you need without exposing the rest to air. You can keep leftovers in your fridge for up to two days. It’s best to eat the shrimp and avocado salad cold. If you prefer to reheat it, do so gently. Place it in a skillet over low heat. Heat it just until warm, not hot. This keeps the shrimp tender. If you want, you can also enjoy the salad as is, straight from the fridge. It makes for a quick, refreshing meal! You can prepare this salad a few hours before serving. Start by cooking the shrimp and letting them cool. Chop the avocados and mix them with other fresh ingredients. Keep the shrimp and avocado mix separate. Dress the salad just before serving. This keeps the avocado from browning. For best taste, serve within a few hours. Yes, this salad is quite healthy. Shrimp is low in calories, high in protein, and packed with vitamins. Avocados provide healthy fats and fiber. A serving has around 300 calories, depending on the dressing. You get nutrients like vitamin E and potassium from the avocados. Overall, this dish is a tasty, nutritious choice. Freezing this salad is not recommended. Avocados will turn mushy when thawed. However, you can freeze cooked shrimp. Place them in an airtight container. When ready to use, thaw shrimp overnight in the fridge. Combine with fresh ingredients and dress just before serving. This keeps flavors fresh and textures right. Shrimp and avocado salad combines fresh ingredients and bold flavors. You learned how to pick the best shrimp and avocados, prepare them right, and create a tasty dressing. Tips on variations help you customize the dish to your taste. Storing leftovers properly keeps your meal fresh. Now, you have everything you need to make this salad shine. Enjoy each bite and impress your guests with this delicious and healthy dish!

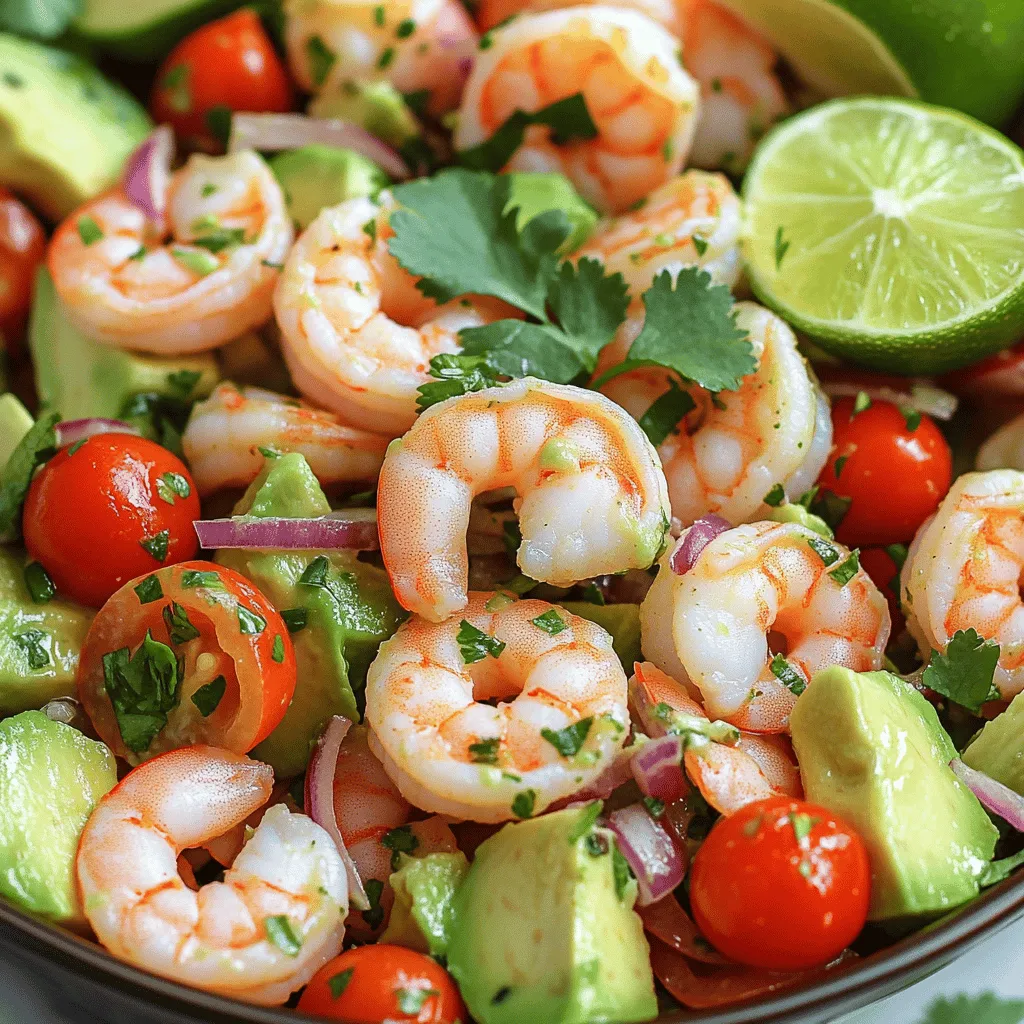
Savory Shrimp and Avocado Salad Quick and Easy Recipe

If you’re craving a light, delicious meal, you’ve found the right spot! This Savory Shrimp and Avocado Salad is the

To make Apple Cinnamon Overnight Oats, you will need the following simple ingredients: - 1 cup rolled oats - 1 cup almond milk (or milk of choice) - 1 medium apple, grated - 1 tablespoon chia seeds - 1 teaspoon cinnamon - 1 tablespoon maple syrup (or honey) - 1/2 teaspoon vanilla extract - A pinch of salt - 1/4 cup chopped walnuts (optional) - Fresh apple slices and cinnamon for topping Each ingredient plays a key role in your oats. The rolled oats provide a hearty base, while almond milk adds creaminess. Grated apple gives sweetness and moisture, and chia seeds boost fiber. Cinnamon adds warmth and flavor, making each bite cozy. Maple syrup or honey sweetens it just right. A pinch of salt enhances all the flavors. If you like, add walnuts for crunch. Top with fresh apple slices and a sprinkle of cinnamon for a beautiful finish. For the full recipe, check out the detailed steps to create this delightful dish. - Combine all ingredients in a bowl. - Mix the oats, milk, grated apple, chia seeds, cinnamon, maple syrup, vanilla, and salt well. - Divide the mixture into two jars. - Cover the jars tightly and refrigerate overnight. - Stir the oats well before serving. - If too thick, add a splash of almond milk. - Top with fresh apple slices and a sprinkle of cinnamon. - You can also add chopped walnuts for extra crunch. - Choose a sweet apple, like Honeycrisp or Fuji, for a tasty flavor. - If you like it sweeter, add more maple syrup or honey. - For a fun twist, try mixing in some dried fruit or nuts. - Remember, the longer the oats soak, the softer they get. These steps will help you create a delicious breakfast that is easy and ready to go. For the full recipe, you can check the detailed instructions above. - Correct oat-to-liquid ratio: Use a 1:1 ratio of oats to liquid. This keeps the oats from being too dry or too mushy. - Refrigeration tips: Always store your oats in a sealed container. This keeps them fresh and prevents odors from other foods. - Pairing with yogurt or nuts: Add a scoop of yogurt for creaminess. A sprinkle of nuts adds a nice crunch. - Make it a meal prep staple: Prepare several jars at once. This saves time on busy mornings. - Breakfast or snack option: These oats are great for breakfast or a quick snack. They fuel your day with energy. - Meal prep advantage: They last well in the fridge. Enjoy them all week long for easy meals. {{image_2}} You can easily change up the taste of your Apple Cinnamon Overnight Oats. Try adding different fruits like berries or bananas. They add color and flavor. You can also switch out nuts and seeds. Almonds, pecans, or sunflower seeds work great. This keeps the recipe fresh and fun. If you need dairy-free options, use almond milk or coconut milk. These will still keep your oats creamy. For gluten-free oats, make sure to use certified gluten-free rolled oats. This way, everyone can enjoy this tasty dish. Toppings can make your oats even better. Try different sweeteners like honey, agave, or stevia. You can also play with spices. Add a pinch of nutmeg or ginger for a new twist. These simple changes will keep your breakfast exciting and delicious. For the full recipe, check out the Apple Cinnamon Overnight Oats 🥣. To keep your apple cinnamon overnight oats fresh, choose glass jars or airtight containers. These types of containers work well because they prevent air from getting in. Always make sure the lids fit tightly. For best results, store the jars in the fridge right after preparing them. This keeps the oats cold and ready to eat. In the fridge, your oats can last for about three to five days. They make a great meal prep option. If you want to keep them longer, you can freeze them. Just remember to use freezer-safe containers. When freezing, leave some space at the top. This allows the oats to expand. If you have leftovers, you can reheat them in the microwave. Heat them for about 30 seconds to a minute. Stir halfway through to ensure even warming. If the oats feel too thick, add a splash of almond milk. This helps keep the texture smooth and creamy. Enjoy them warm or cold, based on your preference! Yes, you can make Apple Cinnamon Overnight Oats ahead of time. I often prepare them the night before. This allows the oats to soak and become soft. You can store them in the fridge for up to five days. Just remember to keep the toppings separate until you're ready to eat. Use rolled oats for this recipe. They absorb the liquid well and give a nice texture. Quick oats will become too mushy, and steel-cut oats need more time to soften. Stick with rolled oats for the best results. Soaking overnight is key for great taste and texture. It allows the oats to absorb the almond milk and flavors. If you're short on time, soak them for at least four hours, but overnight is best. Absolutely! You can use any milk you prefer. Options include cow's milk, oat milk, or soy milk. Each type will give a different flavor. Feel free to experiment to find your favorite! For the full recipe, check out the detailed steps. This blog post covered how to make delicious Apple Cinnamon Overnight Oats. We discussed ingredients, preparation steps, tips, and variations for different diets. This recipe is tasty and easy. You can enjoy it for breakfast or a snack. Remember, using the right apple and adjusting sweetness makes a big difference. Store your oats correctly to keep them fresh. With these tips, you will create a healthy meal prep staple. Now, it’s your turn to experiment and enjoy!

Apple Cinnamon Overnight Oats Quick and Tasty Recipe

Looking for a quick and tasty breakfast? Try my Apple Cinnamon Overnight Oats! This simple recipe combines hearty oats with

- 4 boneless, skinless chicken breasts - 2 tablespoons fresh ginger, grated - 2 limes (zested and juiced) - 3 tablespoons honey - 3 tablespoons soy sauce - 2 garlic cloves, minced - 1 tablespoon sesame oil - Salt and pepper to taste In this recipe, chicken is the star. You want four boneless, skinless breasts for the best results. The marinade makes this dish shine! We use fresh ginger for a zesty kick. Lime juice and zest add brightness. Honey gives a touch of sweetness, while soy sauce adds depth. Garlic brings in a savory note, and sesame oil rounds it all out. Make sure to season with salt and pepper for a well-balanced flavor. - Fresh cilantro, chopped - Additional lime wedges Garnishes make your dish look pretty and add flavor. Fresh cilantro brings a nice herb taste. Lime wedges offer an extra burst of tang. They make your Ginger Lime Grilled Chicken even more appealing. Don't skip these fun touches! For the full recipe, check the section above. Enjoy cooking! To start, gather your ingredients. You need fresh ginger, lime zest, lime juice, honey, soy sauce, minced garlic, and sesame oil. In a medium bowl, whisk them all together. Mix until everything combines well. This marinade adds a punch of flavor to the chicken. Next, take your chicken breasts. Place them in a resealable bag or a shallow dish. Pour the marinade over the chicken. Make sure each piece is well-coated. Seal the bag or cover the dish. Let it sit in the fridge for at least 30 minutes. For deeper flavor, aim for 4 hours. This step helps the chicken absorb all those tasty flavors. Now, preheat your grill to medium-high heat, around 400°F (200°C). After marinating, take the chicken out. Let any extra marinade drip off. Discard the leftover marinade. Place the chicken on the grill and cook for about 6-7 minutes per side. You want the inside to reach 165°F (75°C). Look for nice grill marks. Once cooked, take it off and let it rest for 5 minutes. This helps keep it juicy. Slice and serve it on a platter. Enjoy the vibrant flavors! For the full recipe, check out the link. To grill chicken perfectly, start by keeping the grill temperature steady. Aim for medium-high heat, around 400°F (200°C). This heat cooks the chicken evenly and gives it nice grill marks. When you place the chicken on the grill, avoid moving it too much. Let it sit for about 6-7 minutes on each side. To check for doneness, use a meat thermometer. The chicken should reach an internal temperature of 165°F (75°C). This ensures it is safe to eat and juicy. Marination is key to flavor. For the best taste, let the chicken soak in the ginger-lime mix for at least 30 minutes. This short time helps the chicken absorb some flavor. If you have time, marinate it for up to 4 hours. This longer period lets the flavors deepen, making each bite even better. For a complete meal, pair your Ginger Lime Grilled Chicken with fresh sides. Consider serving it with a light salad or grilled vegetables. Rice or quinoa also works well to soak up the chicken’s flavors. To drink, a cold lemonade or iced tea complements the dish nicely. These drinks balance the zesty notes of lime and ginger. Enjoy your meal with a touch of freshness! For the full recipe details, check out the [Full Recipe]. {{image_2}} Want to add some heat? You can include chili or red pepper flakes in your marinade. A little heat balances the sweet and sour flavors of the ginger and lime. Start with just a pinch, then taste. You can always add more if you like it spicy! Not a fan of chicken? You can swap it for shrimp or tofu. Both options work great with the ginger lime flavor. Grill shrimp until pink and firm. For tofu, press it to remove extra water, then marinate and grill until golden brown. Herbs can make this dish even better! Try adding fresh basil or mint to your marinade. These herbs add unique flavors that complement ginger and lime. Mix in a tablespoon of chopped herbs before marinating. You’ll be surprised at how fresh and vibrant the dish becomes. For the full recipe, check the [Full Recipe]. To store leftover grilled chicken, let it cool first. Place it in an airtight container. This keeps it fresh. You can also wrap it tightly with plastic wrap. Store it in the fridge. It will last up to four days. Reheat it gently to keep it moist. To freeze grilled chicken, wrap it well. Use plastic wrap or aluminum foil. Then, place it in a freezer bag. This keeps out air and prevents freezer burn. The chicken can stay in the freezer for up to three months. When ready to eat, thaw it overnight in the fridge. Reheat it in the oven or on the grill for best results. For best taste and safety, it’s key to know when to use the chicken. If stored in the fridge, use it within four days. If frozen, use it within three months. After these times, the chicken may lose its flavor and texture. Always check for signs of spoilage before eating. Grilling chicken takes about 40 minutes in total. Here’s a quick breakdown: - Prep time: 10 minutes to mix the marinade. - Marination time: At least 30 minutes, but you can marinate for up to 4 hours for deeper flavor. - Cooking time: Grill the chicken for about 6-7 minutes on each side. This makes it easy to fit into your busy day. Yes, you can bake the ginger lime chicken! Here’s how: 1. Preheat your oven to 400°F (200°C). 2. Place the marinated chicken breasts on a baking sheet. 3. Bake for about 20-25 minutes, or until the chicken reaches an internal temperature of 165°F (75°C). Baking keeps the chicken juicy, and you will still enjoy that great ginger-lime flavor. Pair the ginger lime chicken with tasty sides! Here are some ideas: - Rice: Serve it over jasmine or brown rice for a filling meal. - Salad: A fresh green salad with cucumber and avocado adds crunch. - Vegetables: Grilled or steamed veggies like zucchini and bell peppers complement the dish well. These sides will enhance your meal and keep it balanced. To ensure your chicken is cooked perfectly, follow these tips: - Use a meat thermometer: Check that the internal temperature is 165°F (75°C). - Check the juices: When you cut into the chicken, the juices should run clear, not pink. - Look for firmness: Cooked chicken feels firm to the touch, not squishy. These methods help you serve safe and juicy chicken every time. You can find the full recipe for Ginger Lime Grilled Chicken to enjoy this delicious dish! In this blog post, we explored how to make Ginger Lime Grilled Chicken. We covered the main ingredients, steps for marinating and grilling, and tips for success. You learned about variations, storage tips, and FAQs related to the dish. Cooking can be simple and enjoyable. Keep experimenting with flavors and techniques. With this guide, you’ll impress your friends and family at your next meal. Enjoy your cooking journey!

Ginger Lime Grilled Chicken Flavorful and Easy Recipe

If you crave a dish that bursts with flavor yet is simple to make, try my Ginger Lime Grilled Chicken.

To make a tasty Zucchini Noodle Stir Fry, you need fresh veggies and simple sauces. This dish is quick and fun to prepare. Here are the main items you will need: - 2 medium zucchinis, spiralized into noodles - 1 red bell pepper, sliced - 1 yellow bell pepper, sliced - 1 cup broccoli florets - 1 cup snap peas - 2 cloves garlic, minced - 1 tablespoon ginger, grated - 3 tablespoons soy sauce (or tamari for gluten-free) - 1 tablespoon sesame oil - 1 tablespoon olive oil - 1 tablespoon rice vinegar - 1 teaspoon honey (or maple syrup) - Sesame seeds for garnish - Fresh cilantro for garnish You can add these ingredients to change the flavor: - Sliced green onions for a fresh taste - Chopped peanuts for crunch - Red pepper flakes for heat - Cooked chicken or shrimp for protein These ingredients make your stir fry bright and delicious. Use the Full Recipe for clear steps on how to cook this fast and flavorful meal! To make this dish quick, spiralize the zucchini first. You can use a spiralizer or a vegetable peeler. Prepare all your veggies before you start cooking. This saves time and keeps things organized. 1. Heat olive oil in a large skillet or wok over medium-high heat. 2. Add minced garlic and grated ginger. Sauté for about 30 seconds until it smells good. 3. Toss in sliced red and yellow bell peppers, broccoli florets, and snap peas. Stir-fry for 5-7 minutes until the veggies are tender but still crisp. 4. Add the spiralized zucchini noodles and stir-fry for another 2-3 minutes. This softens the noodles a bit. 5. In a small bowl, mix soy sauce, sesame oil, rice vinegar, and honey. Pour this over the stir-fried veggies and noodles. Toss well to coat everything. 6. Remove the skillet from heat and transfer the mix to a serving platter. 7. Garnish with sesame seeds and fresh cilantro before serving. Serve this dish warm. You can plate it up family-style or in individual bowls. It looks great with colorful veggies on top. Pair it with a protein like grilled chicken or tofu for a full meal. If you want, drizzle extra soy sauce on top for more flavor. Enjoy your zesty zucchini noodle stir fry! For the complete recipe, check out the Full Recipe section. When making zucchini noodle stir fry, you want the best results. Here are some common mistakes: - Overcooking the zucchini: This can make them mushy. Stir-fry them last for 2-3 minutes only. - Using too much sauce: It can drown out flavors. Start with less and add more if needed. - Not prepping ingredients first: It slows down cooking. Have all your veggies ready to go. - Skipping fresh herbs: Fresh cilantro adds a burst of flavor. Don’t skip the garnish! You can make this dish your own with simple changes. Here are some ideas: - Add protein: Try chicken, shrimp, or tofu for extra nutrition. - Change the veggies: Use carrots, mushrooms, or baby corn for variety. - Spice it up: Add red pepper flakes or sriracha for heat. - Switch the sauce: Try teriyaki or peanut sauce for a new flavor. To make your stir fry pop, consider these tips: - Use fresh garlic and ginger: They add a strong, fresh taste. - Toast sesame seeds: This brings out their nutty flavor. - Experiment with acids: A squeeze of lime juice can brighten the dish. - Finish with fresh herbs: They add layers of flavor and freshness. For the full recipe, check out the details above. Happy cooking! {{image_2}} You can easily add protein to your zucchini noodle stir fry. Chicken, shrimp, or tofu work great. For chicken, use thin strips. Cook them first, then set aside. Add them back when you mix in the sauce. For shrimp, toss them in with the veggies until they turn pink. If you prefer tofu, cube it and sauté until golden. This adds texture and makes your dish more filling. For a tasty vegetarian option, use eggs or tempeh. Scramble eggs in the pan before adding veggies. You can also use tempeh for a hearty and nutty flavor. Just slice it thin and sauté it until golden. Both options keep the dish exciting and satisfying. If you're vegan, simply skip the eggs and use tofu or tempeh. To make your stir fry gluten-free, use tamari instead of soy sauce. Tamari tastes similar but is made without wheat. You can also try coconut aminos, which adds a slight sweetness. If you want to avoid sauces, use fresh lemon or lime juice for a bright flavor. These small swaps keep your dish safe and delicious for everyone. For the full recipe, check out the Zesty Zucchini Noodle Stir Fry. To keep your zucchini noodle stir fry fresh, place leftovers in an airtight container. Store it in the fridge. It stays good for up to three days. Make sure to let it cool down before sealing the container. This helps avoid condensation, which can make the dish soggy. When you’re ready to enjoy your leftovers, reheat them in a skillet. Use medium heat to warm it up gently. Stir often to heat evenly. You can also use a microwave. Place the stir fry in a microwave-safe dish and cover it. Heat for 1-2 minutes, stirring halfway through. This keeps the noodles from getting too soft. If you want to freeze your stir fry, it’s best to do so before adding the zucchini noodles. Cook and cool the other veggies and sauce, then freeze in a container. When you’re ready to eat, thaw in the fridge overnight. Sauté the mix with fresh zucchini noodles for the best taste. You can find the full recipe to guide you through this tasty meal. Yes, you can make this dish ahead of time. Cook the stir fry and store it in a container. Keep it in the fridge for up to three days. When you are ready to eat, reheat it in a pan until hot. The flavors will still taste great, but the zucchini might be softer. If you don’t have zucchini noodles, you can use other veggies. Try using spiralized carrots or sweet potatoes. You can also use regular pasta if you prefer. Each option will give a different flavor and texture, so choose what you like best. Yes, zucchini noodles are very healthy. They are low in calories and high in vitamins. They also have a lot of water, which helps keep you hydrated. Plus, they are a great way to eat more veggies without feeling heavy. Enjoying zucchini noodles can help you feel full and satisfied. In summary, this blog covered a complete recipe, including key ingredients and step-by-step instructions. We discussed how to avoid common mistakes and ways to customize your dish. You learned about different variations, suitable storage methods, and answered common questions. Cooking is fun and trying new ideas makes it even better. Enjoy your meal, and feel free to experiment. You can create something truly special!

Zucchini Noodle Stir Fry Fast and Flavorful Meal

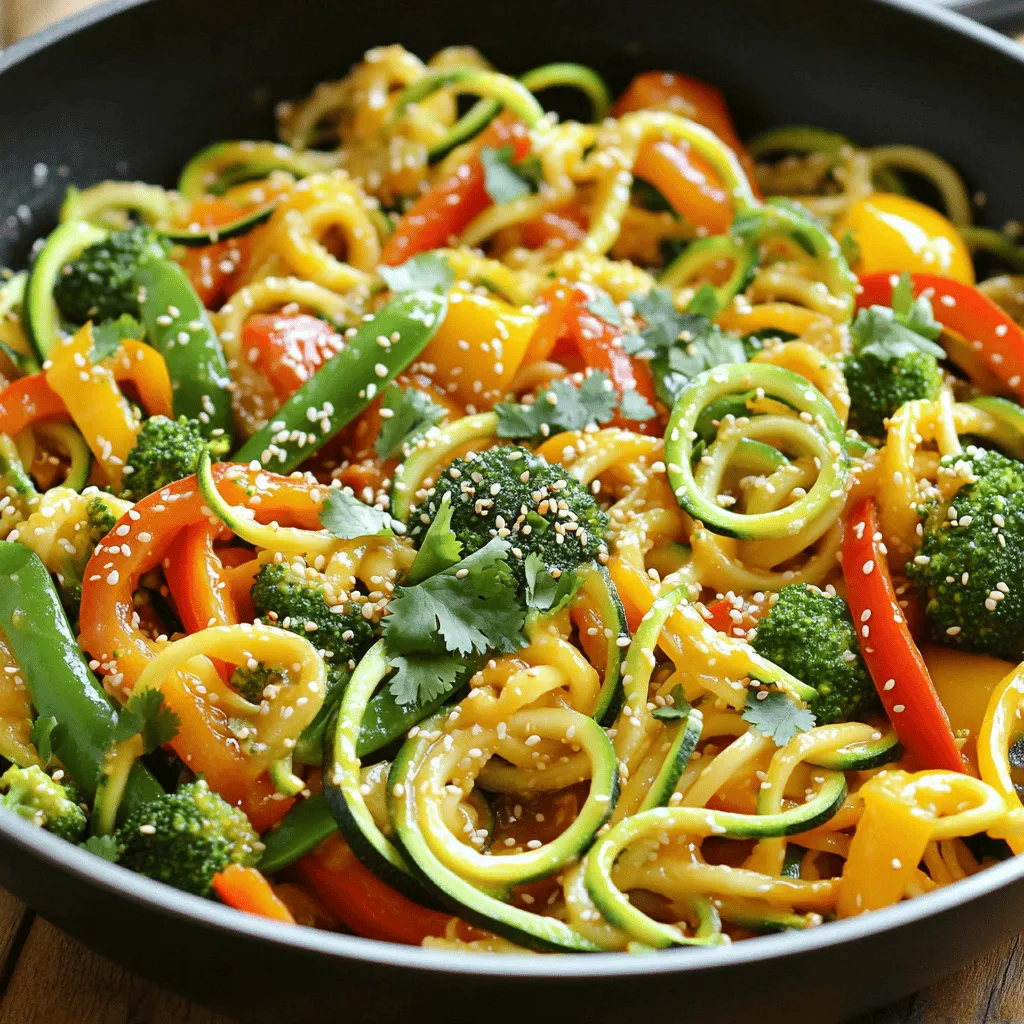
Looking for a quick, tasty meal? My Zucchini Noodle Stir Fry is just what you need! This dish is simple

- 1 ½ cups Arborio rice - 5 cups vegetable broth - 1 cup heavy cream - 1 cup fresh mushrooms (e.g., cremini, shiitake), sliced - ½ cup onion, finely diced - 2 cloves garlic, minced - ½ cup grated Parmesan cheese For creamy mushroom risotto, you need a few key ingredients. First, Arborio rice makes the dish creamy. This rice has a lot of starch, which gives risotto its special texture. Next, vegetable broth adds flavor. Use a good broth for the best taste. Heavy cream brings richness, making it extra smooth. Fresh mushrooms like cremini or shiitake add a lovely earthy taste. Onions and garlic give a nice base flavor. Lastly, Parmesan cheese adds a salty kick and enhances the creaminess. - Fresh herbs like thyme - Seasoning tips - Garnishing suggestions You can also add fresh herbs like thyme for a burst of flavor. A little salt and pepper can help bring out the dish's taste. For garnish, sprinkle some chopped parsley on top. It adds color and freshness to your plate. You can find the full recipe at the end of the article. Enjoy your cooking! First, pour the vegetable broth into a saucepan. Heat it over low heat. You want to keep the broth warm while you cook. This helps the rice absorb the liquid better. Warm broth makes for smoother risotto. Next, grab a large skillet or a heavy pot. Pour in the olive oil and warm it over medium heat. Add the finely diced onion. Sauté it for about three minutes until it softens. Then, stir in the minced garlic. Cook it for one more minute until it smells great. After that, add the sliced mushrooms to the skillet. Cook them for about five to seven minutes. You want them to turn golden brown and release their moisture. This step adds rich flavor to your risotto. Now it's time to toast the Arborio rice. Add it to the skillet and stir well. Coat the rice with the oil, onion, and mushrooms. Let it toast for one to two minutes. This step enhances the rice's flavor. Then, take about half a cup of the warm vegetable broth. Gradually add it to the rice while stirring. Keep stirring until most of the liquid disappears. Repeat this step, adding broth half a cup at a time. Stir often and let each addition absorb before adding more. This takes about 18 to 20 minutes. You want the rice to be creamy and a bit firm, called al dente. Once the rice is cooked just right, stir in the heavy cream, grated Parmesan cheese, and fresh thyme. Add salt and pepper to taste. Adjust the texture by mixing in more broth if you prefer. Let your risotto sit for a minute before serving. Enjoy this simple yet delicious dish. For the full recipe, check out the details above. To make creamy mushroom risotto, focus on a few key techniques. First, use Arborio rice. This short-grain rice has a high starch content, which helps create that creamy texture. Next, stir constantly while cooking. This action helps release the starch and keeps the rice from sticking. Watch out for common mistakes. One big error is adding all the broth at once. This can make the rice gummy. Instead, add the broth slowly, one ladle at a time. Let each addition absorb before adding more. This slow process takes about 18-20 minutes. Another mistake is not using warm broth. Cold broth can shock the rice and slow down cooking. Always keep your vegetable broth warm on the stove while you cook. Timing and temperature are crucial for perfect risotto. You want all your ingredients to be at the right temperature. Keep your broth warm, but do not let it boil. If your stovetop heat is too high, the rice may cook unevenly. If it's too low, the risotto will take longer than needed. Adjust cook times based on your stove. If it seems too slow, raise the heat slightly. If it cooks too fast, reduce it. Following these tips will help you create a beautiful and creamy mushroom risotto every time. For a detailed guide, check out the Full Recipe. {{image_2}} You can mix up your creamy mushroom risotto with different flavors. - Adding different mushrooms: Try using shiitake, portobello, or oyster mushrooms. Each one brings a unique taste. For a deeper flavor, sauté the mushrooms longer. This step can make your dish even more savory. - Incorporating vegetables like peas or spinach: Adding peas gives a nice pop of color and sweetness. Spinach adds nutrition and a mild taste. Stir in these veggies during the last few minutes of cooking. They will keep their bright color and fresh taste. You can easily adjust this recipe to fit dietary needs. - Dairy-free alternatives: Substitute heavy cream with coconut milk or a nut-based cream. This keeps the dish rich while being dairy-free. Use nutritional yeast instead of Parmesan for a cheesy flavor. - Gluten-free options: Arborio rice is naturally gluten-free, so you’re already set. Just ensure your broth is also gluten-free. Always check labels to be safe. These variations can help you create a dish that suits your taste and needs. For the complete recipe, check out the Full Recipe section. To keep your creamy mushroom risotto fresh, place it in an airtight container. This helps lock in flavor and moisture. Make sure to cool the risotto to room temperature before sealing it. Store it in the fridge for up to three days. If you want to keep it longer, freeze it. It lasts in the freezer for about one month. Just remember to label your container with the date. When it's time to enjoy your leftovers, reheating properly is key. The best way to reheat risotto is on the stove. Add a splash of broth or water to help regain its creamy texture. Heat it gently over low heat, stirring often. If you microwave it, cover the dish to keep moisture in. Stir it halfway through to ensure even heating. If the risotto seems dry, add a bit more liquid and mix well. The best rice for risotto is Arborio rice. This type has a high starch content. This starch gives risotto its creamy texture. Other options include Carnaroli and Vialone Nano. These rices also work well for creamy dishes. You can make risotto in advance, but it may lose its creaminess. When cooled, it becomes thick and sticky. To keep it fresh, store it in an airtight container. Reheat with a splash of broth or cream to restore texture. To make risotto less creamy, reduce the amount of heavy cream. You can also use less broth. Stirring less often will keep it drier. Add more vegetables or herbs for extra flavor without added creaminess. Traditional risotto has a firmer texture and less cream. It focuses on the rice's natural starches. Creamy risotto includes heavy cream for richness. This makes it softer and smoother on the palate. Each version has its own unique charm. For a detailed recipe, check the Full Recipe. In this article, we explored how to make a rich, creamy mushroom risotto. You learned about essential and optional ingredients, how to prepare the broth, and step-by-step cooking instructions. I shared tips for perfecting your risotto and suggested delicious variations. Remember, proper timing and technique make a big difference. Storing and reheating are simple when done right. Enjoy creating your risotto masterpiece, and remember, practice makes perfect. Happy cooking!

Creamy Mushroom Risotto Comforting and Simple Dish

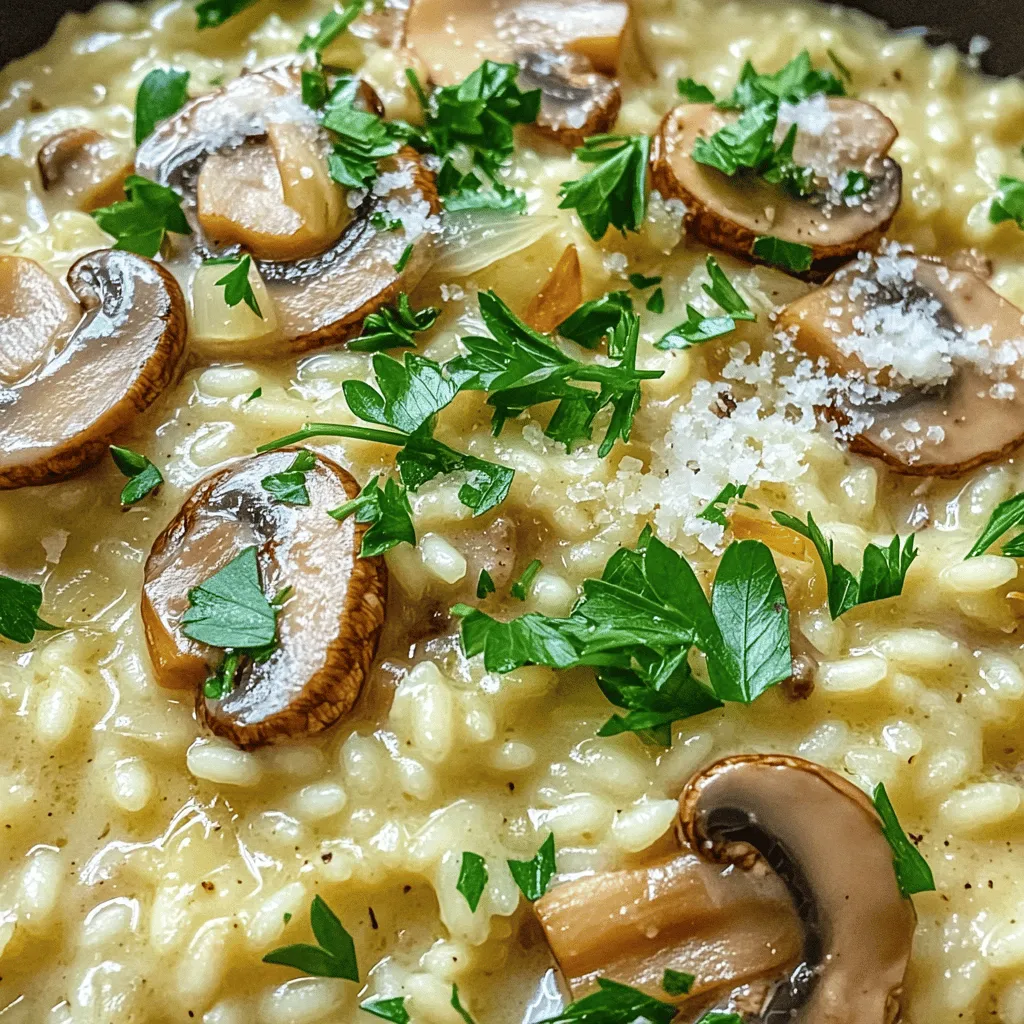
If you’re craving a warm, cozy dish that’s easy to make, creamy mushroom risotto is for you! This simple yet

- Shrimp: 1 pound, peeled and deveined - Honey: 3 tablespoons - Soy Sauce: 2 tablespoons - Garlic: 3 cloves, minced - Lime Juice: 1 tablespoon - Fresh Ginger: 1 teaspoon, grated - Olive Oil: 1 tablespoon - Tortillas: 8 small corn or flour - Shredded Cabbage: 1 cup - Diced Tomatoes: ½ cup - Fresh Cilantro: ¼ cup, chopped - Lime Wedges: for serving - Salt and Pepper: to taste Gather these ingredients to make your honey garlic shrimp tacos. The shrimp will provide a sweet and savory base. Honey and soy sauce create a rich sauce that coats the shrimp perfectly. The garlic adds a nice kick, while lime juice and ginger brighten the dish. The tortillas hold all the flavors together. Corn tortillas give a classic taste, but flour tortillas work well too. Toppings like shredded cabbage and diced tomatoes add crunch and freshness. Cilantro enhances the flavor, and lime wedges give a zesty finish. This recipe is easy and fun to make. You can find the full recipe above to guide you through each step. Enjoy cooking! - Whisk together honey, soy sauce, minced garlic, lime juice, and grated ginger. - Set the prepared sauce aside for later use. To make this sauce, start with a small bowl. I love using a whisk; it mixes well. The honey adds sweetness, while soy sauce brings a salty touch. Minced garlic gives it a strong flavor, and lime juice adds brightness. Grated ginger rounds out the taste. Once mixed, set it aside; we will use it soon. - Heat olive oil in a skillet over medium-high heat. - Season shrimp with salt and pepper; cook until pink, about 2-3 minutes. - Add the honey garlic sauce and cook until the shrimp are fully coated and done. For the shrimp, grab a skillet and heat olive oil. Keep the heat at medium-high. While the oil heats, season your shrimp with salt and pepper. Once the oil is hot, add the shrimp. Cook them for 2-3 minutes. You will see them turn pink, a sign they are cooking well. Now, pour the honey garlic sauce over the shrimp. Stir to coat them well. Cook for another 2-3 minutes until they are fully cooked and shiny. - Warm tortillas in a pan or microwave. - Place cooked shrimp on each tortilla and add toppings. - Serve immediately with lime wedges. To build the tacos, start by warming the tortillas. You can do this in a pan or the microwave for about 15 seconds. Once warm, place a good amount of cooked shrimp on each tortilla. Add your favorite toppings like shredded cabbage, diced tomatoes, and fresh cilantro. Finish with lime wedges on the side. These tacos taste best when served right away. For the full recipe, check the details above! - Avoid overcooking shrimp; cook just until pink and opaque. - Marinate shrimp in the sauce for additional flavor before cooking. To get the best shrimp, I recommend cooking them quickly. Shrimp should only take 2-3 minutes. Watch them closely, or they will get tough. Marinating adds depth to the flavor. I often let shrimp sit in the honey garlic sauce for 15 minutes. This extra time makes a big difference in taste. - Adjust honey for sweetness or soy sauce for saltiness. - Add a pinch of red pepper flakes for a spicy kick. Feel free to play with the sauce! If you like it sweet, add more honey. If you want it saltier, increase the soy sauce. For those who enjoy heat, a pinch of red pepper flakes will elevate the dish. This simple tweak makes the tacos pop. - Serve with salsa or guacamole for added flavor. - Pair with a refreshing salad or rice for a complete meal. These tacos shine with sides. Add a scoop of salsa or guacamole for a fresh touch. A light salad or fluffy rice complements the meal well. Enjoying these tacos with friends makes them even better! For the full recipe, check out the complete guide to making honey garlic shrimp tacos. {{image_2}} You can make these tacos your own with simple swaps. - Substitute shrimp with chicken or tofu for different proteins. - Use flour tortillas instead of corn for a gluten-free version. Add fun flavors to your tacos. - Toss in sliced jalapeños for heat. - Incorporate mango or pineapple for sweetness and tang. You can adjust the recipe to fit your diet. - Make it paleo by skipping the soy sauce or using coconut aminos. - Veganize the recipe by using plant-based shrimp alternatives. These variations keep the dish fresh and exciting. Feel free to mix and match! For full details, check the Full Recipe. Store leftovers in an airtight container in the fridge for up to 2 days. This keeps the shrimp fresh and safe to eat later. When you take them out, the flavors still hold up quite well. For the best texture, freeze cooked shrimp separately from the tortillas. This helps keep everything from getting soggy. You can enjoy your frozen shrimp tacos within 1 month for the best taste. Just make sure to label your container with the date. To reheat, use a skillet over medium heat. This helps keep the shrimp tender. You can also use the microwave with a damp paper towel to keep moisture in. This way, your tacos taste fresh and delicious when you enjoy them again. Yes, just ensure they are fully thawed and dried before cooking. Using frozen shrimp can save time. When thawing, place them in the fridge overnight or run cold water over them. This keeps the shrimp fresh and ready for your tacos. Add spices like cayenne pepper or top with a spicy salsa. You can also mix in sliced jalapeños while cooking. This adds heat and flavor. Experiment with different hot sauces to find your favorite kick. Consider serving with cilantro-lime rice or a fresh corn salad. Both sides balance the sweet and savory of the tacos. You could also try a simple avocado salad for a creamy touch. Enjoying these sides enhances the meal's overall taste. To sum up, this blog post walks you through the tasty honey garlic shrimp tacos. You learned about the fresh ingredients, simple steps, and useful tips to make this dish shine. Remember to customize flavors and swap ingredients to fit your taste. You can enjoy these tacos any day of the week. So gather your ingredients and get cooking—delicious shrimp tacos await you!

Honey Garlic Shrimp Tacos Flavorful and Easy Dish

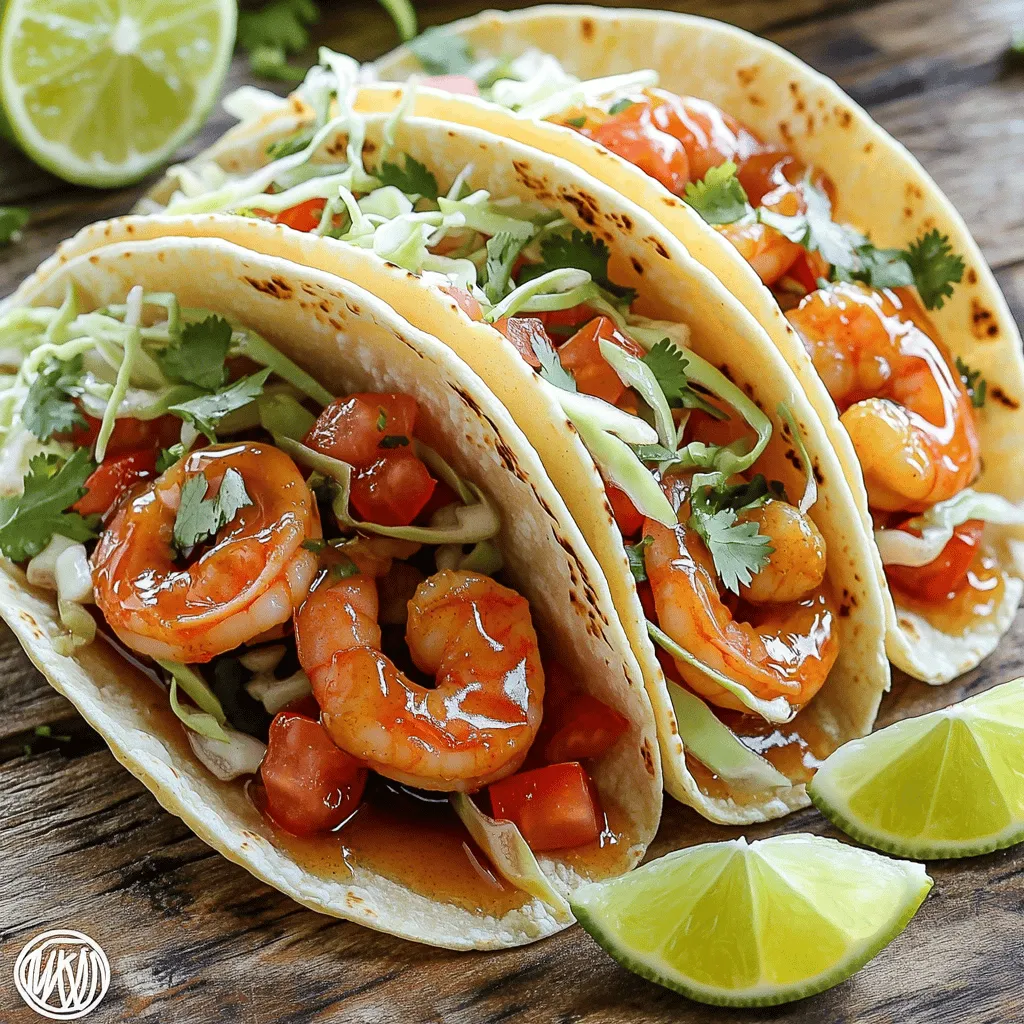
Are you ready to tantalize your taste buds? Honey Garlic Shrimp Tacos bring sweet and savory flavors together in every

- 3 medium beets, scrubbed and tops trimmed - 4 cups mixed salad greens (arugula, spinach, and rucola work great) - 1/2 cup goat cheese, crumbled - 1/4 cup walnuts, chopped and toasted - 1/4 cup balsamic vinegar - 2 tablespoons honey - 3 tablespoons olive oil - Salt and pepper to taste - Fresh herbs (parsley or basil) for garnish This salad shines with the bold flavors of roasted beets and creamy goat cheese. The beets bring sweetness and earthiness, while the goat cheese adds a tangy contrast. Using mixed salad greens gives a nice crunch and freshness. Don't forget the walnuts! They add a lovely crunch and nutty taste. The balsamic vinegar and honey blend perfectly for a sweet and tangy dressing. A touch of salt and pepper enhances all the flavors. Fresh herbs brighten the dish and add a pop of color. For the full recipe, check out the vibrant roasted beet and goat cheese salad section. Enjoy the delightful mix of flavors in this beautiful dish! Roasting Method To start, preheat your oven to 400°F (200°C). Take each beet, scrub it clean, and trim the tops. Wrap each one in aluminum foil. Drizzle a bit of olive oil and sprinkle some salt on top. Place them on a baking sheet. Roast the beets for 45 to 60 minutes. They are done when a fork goes in easily. Cooling and Slicing Once roasted, let the beets cool. This makes peeling easy. When cool, peel the skin off. Slice the beets into wedges for the salad. Their vibrant color adds a beautiful touch! Combining Ingredients In a small bowl, whisk together balsamic vinegar, honey, and olive oil. This mix will bring a sweet and tangy flavor to the salad. Adjusting Flavors Taste the dressing and add salt and pepper. If you want it sweeter, add more honey. If you want it tangier, add more vinegar. Make it just how you like it! Ideal Toasting Technique Take a dry skillet and heat it over medium heat. Add the chopped walnuts and toast them for 3 to 4 minutes. Stir often. You want them fragrant but not burned. This step adds a nice crunch to your salad. Layering and Mixing Tips Grab a large salad bowl. Start with a base of mixed salad greens. Then, add the roasted beet wedges, crumbled goat cheese, and toasted walnuts. Use your hands or a spoon to gently mix everything. This helps distribute the flavors evenly. Presentation Ideas Serve the salad on individual plates for a fancy look. Arrange the beets and cheese in a circle. This shows off their colors. Drizzle extra dressing around the plate for a nice touch. Portioning Options This recipe serves four. You can easily adjust the amounts for more or fewer servings. Just remember to keep the flavors balanced. For a meal, add a protein like grilled chicken or chickpeas. You can find the Full Recipe in the previous section for detailed steps! How to Check Doneness To check if your beets are done, insert a fork into one. If it goes in easily, the beets are ready. This means they are soft and tender, perfect for slicing. If you meet resistance, roast them for a little longer. Peeling Techniques Once your beets are done, let them cool a bit. This makes peeling easier. You can use your fingers to rub off the skin, or you can use a paper towel for grip. Both methods work well. Just be careful with the juice; it stains! Variations on Flavor You can switch up the dressing to suit your taste. Try adding a squeeze of lemon for zing. If you like heat, a pinch of red pepper flakes adds a nice kick. Or, blend in some Dijon mustard for a little extra depth. Best Practices for Enjoyment Serve this salad slightly chilled or at room temperature. Cold beets can dull the flavor. If you like, let the salad sit for about 10 minutes after dressing. This allows the flavors to meld. Enjoy the fresh taste! For more details on making this salad, check out the Full Recipe. {{image_2}} You can change the cheese in this salad. Feta or blue cheese works well. Both add a unique taste. If you want a creamier salad, try ricotta. For a nutty flavor, try fresh mozzarella. You can also swap the nuts. Instead of walnuts, try pecans or almonds. Both add crunch and flavor. Toast them lightly for the best taste. Want to boost protein? Add grilled chicken or quinoa. Both make the salad heartier. Chicken adds a savory taste, while quinoa adds a nice chew. Seasonal fruits like apples or pears add sweetness. They pair well with the beets. Try adding slices or small cubes for texture and flavor. You can change the dressing if you like. A lemon vinaigrette brightens the salad. Mix lemon juice, olive oil, and a pinch of salt for a fresh taste. For a creamy dressing, try yogurt or a sour cream base. These add richness. Mix in herbs or spices to create your own flavor. For the full recipe, check the Vibrant Roasted Beet and Goat Cheese Salad section above. Enjoy exploring these fun variations! How long can you keep the salad? You can store your roasted beet and goat cheese salad in the fridge for up to three days. The beets will stay tasty, while the greens will wilt faster. To keep the greens fresh, store them separately from the beets and dressing. What are the best practices for beets and greens? If you have leftover beets, place them in an airtight container. Keep them in the fridge for about a week. For the greens, wash and dry them thoroughly before storing. Use a paper towel to absorb excess moisture, which helps the greens stay crisp. How do you refresh the salad? I recommend enjoying this salad cold. If you want to warm the beets, slice them and place them in a pan over low heat for a few minutes. Avoid reheating the goat cheese, as it can lose its creamy texture. For the best taste, serve the salad fresh! Check out the Full Recipe for more details on preparation. To roast beets, follow these steps: 1. Preheat the oven to 400°F (200°C). 2. Wrap each beet in aluminum foil. 3. Drizzle with olive oil and sprinkle with salt. 4. Place beets on a baking sheet. 5. Roast for 45-60 minutes or until tender. 6. Check doneness by inserting a fork. 7. Cool beets before peeling and slicing. Roasting beets brings out their natural sweetness. You can enjoy them warm or cool. Yes, you can prep this salad ahead of time! - Roast beets and store them in the fridge. - Make the dressing and keep it separate. - Assemble the salad just before serving. This way, your salad stays fresh and tasty. This salad pairs well with many dishes! - Grilled chicken adds protein and flavor. - Quinoa offers a healthy grain option. - Crusty bread complements the meal nicely. These additions make a complete and satisfying dinner. Absolutely! This salad is perfect for meal prep. - Store beets in containers for easy access. - Keep greens separate to prevent wilting. - Portion out servings of dressing. This way, you can enjoy a fresh salad all week! For the complete recipe, check out the Full Recipe section. This blog covered how to make a delicious roasted beet and goat cheese salad. We discussed key ingredients like beets, goat cheese, and mixed greens. I shared step-by-step instructions for preparing beets, making dressing, toasting walnuts, and assembling the salad. Additionally, there are tips for flavor, storage, and variations to suit your taste. In conclusion, this salad is simple to make and full of flavor. Enjoy experimenting with different ingredients to make it your own!

Roasted Beet and Goat Cheese Salad Fresh Flavor Burst

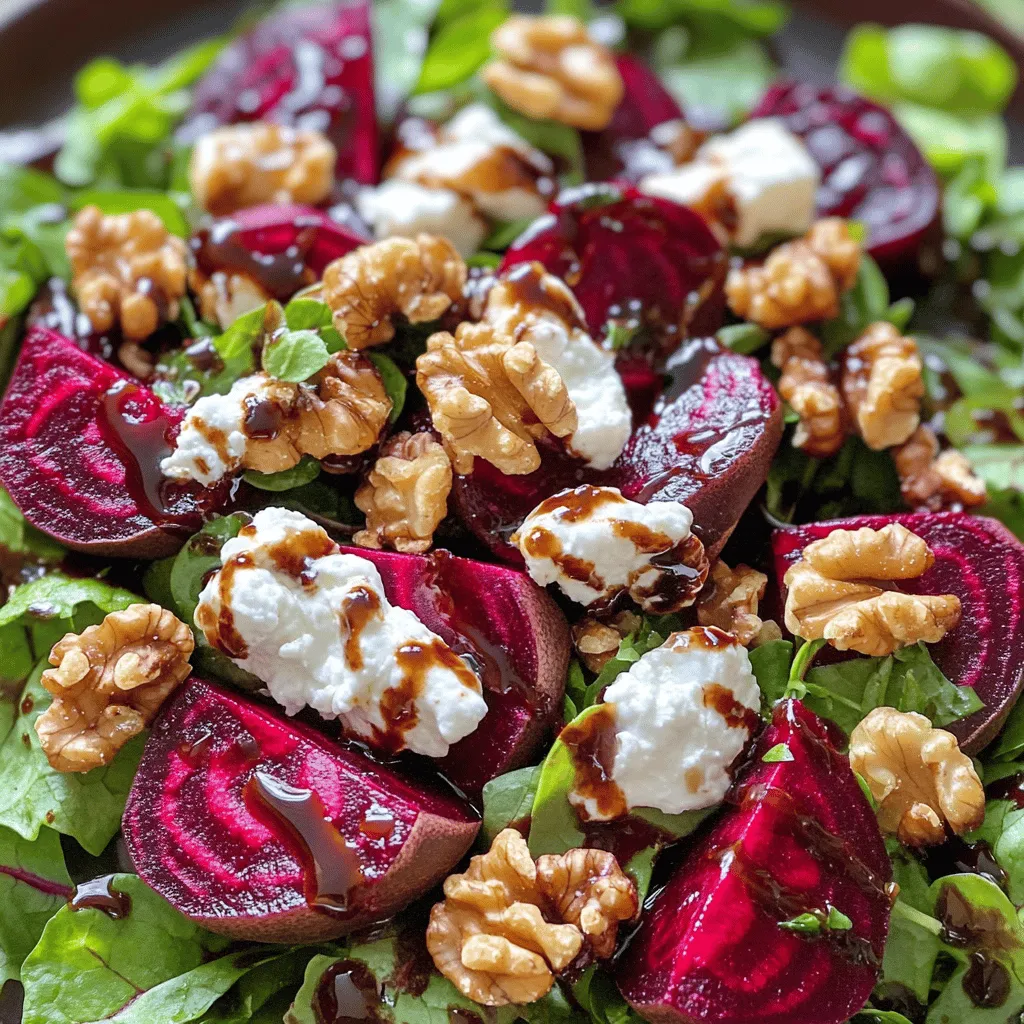
Looking for a fresh and vibrant addition to your meal? This Roasted Beet and Goat Cheese Salad is bursting with

- 1 cup red lentils, rinsed - 1 can (14 oz) coconut milk - 1 cup vegetable broth - 1 medium onion, diced You need red lentils for a rich base. They cook quickly and soak up flavors. Coconut milk adds creaminess and a hint of sweetness. The vegetable broth enhances the taste and keeps it light. Diced onion gives a great aroma and taste to start your soup. - 1 tablespoon ginger, grated - 1 tablespoon curry powder - 1 teaspoon turmeric - Salt and pepper to taste Ginger brings warmth and a nice zing. Curry powder adds a burst of flavor with a mix of spices. Turmeric gives the soup a golden color and health benefits. Salt and pepper are key to balance all the flavors. - 1 medium carrot, diced - 1 red bell pepper, diced - 1 cup spinach, roughly chopped - Fresh cilantro, for garnish - Juice of 1 lime Diced carrot adds natural sweetness and a pop of color. Red bell pepper contributes crunch and freshness. Spinach gives a green boost and extra nutrients. Cilantro brightens the dish while lime juice adds a refreshing tang. This soup is not just filling; it’s a joy to eat. You can find the complete recipe in the Full Recipe section. - Heat olive oil in a pot over medium heat. - Sauté onion until translucent, about 5 minutes. Starting with a strong base is key. I like to use a large pot to get an even cook. Olive oil adds a nice flavor. Let the onion sweat gently until it becomes soft. This step is important to build the soup's depth. - Stir in garlic and ginger; cook for 1 more minute. - Add curry powder and turmeric; toast for a minute. Once the onion is ready, I add garlic and ginger. This mix smells amazing! Next, I toss in curry powder and turmeric. Toasting these spices helps release their oils, boosting the flavor. - Add carrot and red bell pepper; sauté for about 5 minutes. - Pour in lentils, coconut milk, and broth; bring to a boil. - Simmer for 20-25 minutes until lentils are tender. I then add diced carrot and red bell pepper. They add sweetness and color. After a bit of sautéing, in go the rinsed lentils, coconut milk, and vegetable broth. I give it a good stir and bring it to a boil. Red lentils cook quickly, so I watch it and lower the heat after boiling. I let it simmer until the lentils are soft and creamy. - Stir in spinach and lime juice. - Season with salt and pepper; simmer for an additional 5 minutes. At the end, I mix in chopped spinach and a splash of lime juice. This adds freshness and brightness. I finish with salt and pepper to taste. I let it simmer for a few more minutes. This last step warms the spinach and blends all the flavors perfectly. For the full recipe, check out the details above. Enjoy this warm, hearty soup! To make your coconut curry lentil soup even better, try adding new spices. Cumin and chili powder can add warmth and depth. You can also use homemade vegetable broth. It gives the soup a richer taste than store-bought broth. You might want your soup thicker or thinner. If you want a thicker soup, reduce the amount of broth you use. On the other hand, if you like a thinner texture, just add more vegetable broth or water. Adjusting these amounts helps you control the soup's richness. Storing leftovers is easy. Keep them in an airtight container in the fridge. This soup stays good for about five days. When you’re ready to eat, reheat it on the stovetop or in the microwave. Stir it well to ensure even heating. Enjoy your warm bowl of soup any time! For the complete recipe, check out the Full Recipe link. {{image_2}} You can easily add protein to this soup. Chickpeas work well for a plant-based boost. Shredded chicken also adds a nice texture and flavor. If you want to change the lentils, try green or brown lentils. Each type brings a unique taste and texture to the dish. Toppings can make your soup even better. Sliced avocado adds creaminess. Lime wedges give a fresh zing. Toasted nuts add crunch and flavor. Don't stop there—add other veggies too! Zucchini or kale can blend well with the soup. If you like spice, you can adjust the heat. Use more curry powder for a bolder flavor. For extra heat, add fresh chilies or red pepper flakes. This way, you can customize the soup to fit your taste. Enjoy experimenting with these variations to find your perfect bowl of Coconut Curry Lentil Soup! Keep your coconut curry lentil soup in the refrigerator for up to 5 days. Make sure your container is tightly sealed. This helps keep the soup fresh and prevents any odors from the fridge from mixing in. When you're ready to enjoy it again, just open the container and dive in! You can freeze this soup in airtight containers for up to 3 months. This is great if you want to save some for later. To use it, thaw the soup in the fridge overnight before reheating. This slow thawing keeps the texture nice. When you want to eat your soup, reheat it on the stove over medium heat. Stir it until it gets warm all the way through. If you prefer the microwave, use it in intervals. Stir between each interval to heat it evenly. Enjoy warm and comforting soup anytime! Yes, but cooking times may vary for different lentils. Red lentils cook faster than green or brown ones. If you choose green lentils, add about 10 extra minutes to your cooking time. Brown lentils also take longer, roughly 30 minutes. Always check for doneness to get that perfect texture in your soup. Yes, this recipe is completely plant-based and vegan-friendly. You can enjoy this soup without worry about animal products. The coconut milk adds creaminess, while the lentils pack in protein. It’s a great choice for anyone looking for vegan comfort food. Increase the amount of curry powder or add fresh peppers. For a mild kick, try adding a chopped jalapeño. If you love heat, use serrano or Thai chilies. You can always taste as you go to find the right spice level for you. Serve with rice, naan, or a fresh salad for a complete meal. Rice absorbs the soup nicely, while naan adds a wonderful texture. A fresh salad adds a nice crunch and balances the warm flavors of the soup. Yes, this soup can be made and stored for future meals. It keeps well in the fridge for up to five days. You can also freeze it for up to three months. Just thaw and reheat when you’re ready to enjoy a warm bowl of goodness. This blog post provided a simple guide to making Coconut Curry Lentil Soup. You learned about essential ingredients, spices, and vegetables. I shared step-by-step instructions and tips to perfect the flavor and adjust the consistency. Variations can give you more protein or spice. Remember, this soup is easy to store and reheat. Whether you're busy or just want a tasty meal, this soup offers comfort and nutrition in each bowl. Enjoy making it your own, and savor every spoonful!

Coconut Curry Lentil Soup Hearty and Nourishing Dish

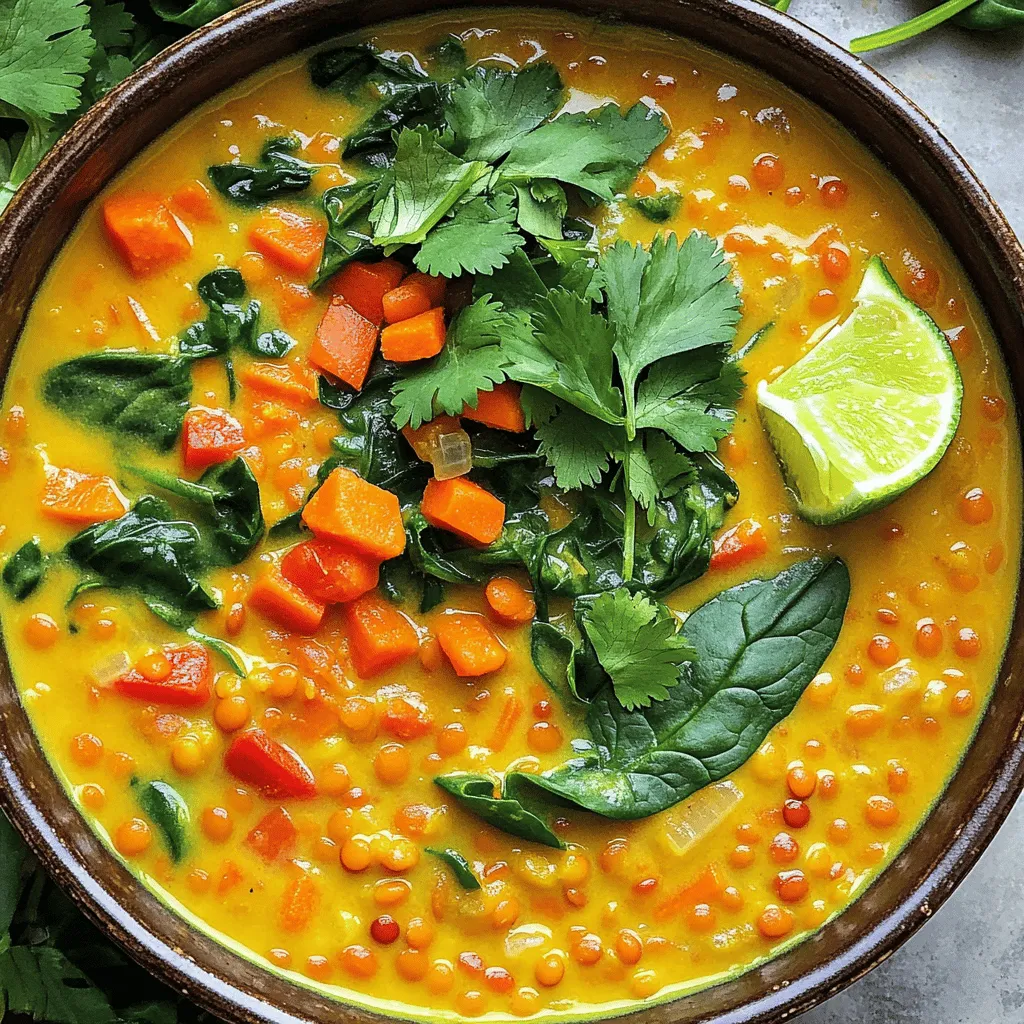
Looking for a warm, hearty dish that delights your taste buds and nourishes your body? Say hello to Coconut Curry

Pasta and Vegetables Needed - 8 ounces of penne pasta - 1 zucchini, sliced - 1 bell pepper (any color), sliced - 1 red onion, cut into wedges - 1 cup cherry tomatoes, halved In this salad, the pasta acts as a base. I love using penne since its shape holds the dressing well. The veggies add color, taste, and nutrients. Grilled zucchini, bell pepper, red onion, and juicy cherry tomatoes are my favorites. Seasoning and Dressing Essentials - 2 tablespoons olive oil - 1 teaspoon dried Italian herbs (oregano, basil, thyme blend) - Salt and pepper to taste The olive oil adds richness. The dried herbs give the salad a nice Italian flavor. Salt and pepper bring out all the tastes. Optional Ingredients for Enhanced Flavor - 1/4 cup feta cheese, crumbled (optional) - Fresh basil leaves for garnish Feta cheese adds a creamy texture and tangy taste. Fresh basil gives a lovely aroma and brightness, making the dish even better. For the full recipe, check out [Full Recipe]. Boiling the Penne Pasta Start by bringing a large pot of salted water to a rolling boil. Add your penne pasta and cook it according to the package instructions. Usually, this takes about 10-12 minutes. Tips for Achieving Perfect Al Dente To get that perfect al dente texture, taste the pasta a minute or two before the time is up. It should be firm yet tender. Once you hit that sweet spot, drain the pasta right away. Cooling the Pasta for Salad After draining, spread the pasta on a baking sheet to cool quickly. This helps avoid clumping. Let it sit while you prepare the veggies. Prepping the Vegetables for Grilling While the pasta cooks, get your veggies ready. Slice the zucchini and bell peppers. Cut the red onion into wedges. Halve the cherry tomatoes. Seasoning Tips for Flavor In a bowl, toss the veggies with olive oil, dried Italian herbs, salt, and pepper. This mix adds a burst of flavor. Grilling Technique and Timing Preheat your grill or grill pan over medium heat. Place the seasoned vegetables on the grill. Grill for about 4-5 minutes on each side. You want nice grill marks and tender veggies. Combining Cooked Pasta and Grilled Vegetables In a large mixing bowl, combine the cooled pasta and chopped grilled vegetables. Toss gently to mix them well. Adding Optional Ingredients like Feta If you like, sprinkle crumbled feta cheese over the top. This adds a creamy texture and a salty kick. Toss again to incorporate. Allowing the Salad to Chill Let the salad chill in the fridge for at least 30 minutes. This helps all the flavors blend together. Serve cold or at room temperature. Enjoy this colorful delight! For the complete recipe, check [Full Recipe]. - Choosing the Right Grill Temperature: Aim for medium heat. This allows vegetables to cook evenly. Too hot and they burn; too cool and they won't char. - Signs of Perfectly Grilled Vegetables: Look for nice grill marks. The veggies should be tender but not mushy. They should also have a smoky aroma that signals great flavor. - Avoiding Common Grilling Mistakes: Don't overcrowd the grill. This can trap steam and prevent charring. Always use fresh vegetables for the best taste. - Enhancing Flavor with Dressings: A simple vinaigrette works wonders. Use olive oil, vinegar, and herbs to boost flavor. You can also try lemon juice for a fresh kick. - Tips for Serving Cold or at Room Temperature: Chill the salad for at least 30 minutes before serving. This helps the flavors blend nicely. If serving at room temp, let it sit out for a bit. - Adjusting Portions and Ingredients for Large Gatherings: Double or triple the recipe as needed. Just keep the same ratios for ingredients. This way, everyone enjoys the same great taste. For more detailed steps, check out the Full Recipe. {{image_2}} You can switch up the vegetables in your grilled vegetable pasta salad. Try seasonal veggies for new flavors. Asparagus, eggplant, and mushrooms can add great taste. You can also use fresh greens like spinach or arugula for a twist. Adding protein makes this dish heartier. Grilled chicken or tofu works well. Simply marinate them before grilling. This adds depth to your flavors and makes the salad more filling. Don't forget about pasta shapes! Penne is great, but you can use fusilli or farfalle too. Different shapes hold the dressing better and add fun to your meal. When it comes to dressings, you have options. You can make your own or use store-bought. Homemade dressings let you control the flavors. Try a simple vinaigrette with olive oil and vinegar for a fresh taste. Creamy options like ranch or yogurt dressings can add richness. These pair well with grilled veggies and pasta. Experiment with herbs like dill or cilantro for unique flavors. Different dressings can change the whole vibe of your salad. A zesty lemon vinaigrette gives a bright taste. On the other hand, a balsamic glaze offers sweetness. Play around with flavors to find what you love most. For the full recipe, check out the detailed instructions above. To keep your grilled vegetable pasta salad fresh, use airtight containers. Glass or BPA-free plastic containers work best. Make sure the salad is cool before sealing it up. Store the salad in the fridge for up to three days. After that, the veggies may lose their crunch and flavor. If you want to keep it longer, freezing is an option. However, the texture of the pasta and veggies may change. To freeze, place the salad in a freezer-safe container. Leave some space at the top because it will expand. You can freeze it for one to two months. When you're ready to eat, thaw it in the fridge overnight. Reheating pasta salad can be tricky. You want to keep the flavors bright. For best results, gently heat it in a skillet over low heat. This way, it warms up without cooking the pasta again. After reheating, taste the salad. You might need to add more salt or pepper. Sometimes the flavors fade a bit during storage. If you want to serve it cold, take it out of the fridge and let it sit for a few minutes. It tastes great at room temperature too. You can also add fresh herbs or a drizzle of olive oil just before serving for extra flavor. Grilled vegetable pasta salad stays fresh for about 3 to 5 days. Store it in an airtight container. Make sure to cool it down first. If you see any mold or bad smell, it’s time to toss it. Yes, you can make this salad a day in advance. This gives the flavors more time to blend. Just keep it in the fridge until you are ready to serve. Feel free to use any veggies you love. Good options include carrots, asparagus, or eggplant. For harder vegetables, cut them smaller. This helps them cook evenly on the grill. Yes, but you need to change a few ingredients. Simply leave out the feta cheese. You can use tofu or avocado for creaminess instead. This keeps your salad tasty and vegan-friendly. For more details, check out the Full Recipe. This blog post covered how to make a delicious grilled vegetable pasta salad. We looked at key ingredients, cooking methods, and tips for grilling. Understanding storage options and variations can enhance your meal. You can mix in different veggies, proteins, and dressings for more flavors. Remember, this salad is great for any occasion, and you can prep it ahead for better taste. Enjoy making your dish, and have fun experimenting with new ingredients!

Grilled Vegetable Pasta Salad Flavorful and Satisfying

Are you ready to elevate your pasta salad game? This Grilled Vegetable Pasta Salad is not just a side dish;

To make these easy no-bake chocolate oatmeal cookies, you need simple, tasty ingredients. Here’s what you’ll need: - 1 cup rolled oats - 1/2 cup creamy peanut butter - 1/2 cup honey or maple syrup - 1/4 cup unsweetened cocoa powder - 1/4 cup coconut oil, melted - 1 teaspoon vanilla extract - 1/4 cup mini chocolate chips (optional) - Pinch of salt Each ingredient plays a key role. Rolled oats give your cookies structure and chew. Creamy peanut butter adds rich flavor and binds everything together. Honey or maple syrup sweetens your cookies while keeping them moist. Unsweetened cocoa powder gives that deep chocolate taste. Coconut oil adds healthy fat and helps the cookies set. Vanilla extract boosts the flavor, making each bite delightful. If you want a little extra sweetness, mini chocolate chips are a great choice. Lastly, a pinch of salt balances the sweetness and enhances the flavors. For the complete recipe, don’t forget to check the Full Recipe section! Each step builds on the last, making these cookies a fun treat you can whip up quickly. To start, gather your ingredients. You need coconut oil, honey or maple syrup, cocoa powder, and peanut butter. In a medium saucepan, mix the coconut oil, honey (or maple syrup), cocoa powder, and peanut butter. Heat this mixture on low. Stir it often until everything melts and blends well. You want it smooth and creamy. Once it’s ready, take it off the heat. Add in the vanilla extract and a pinch of salt. Mix it well. Next, grab a large mixing bowl. Add 1 cup of rolled oats to the bowl. Pour the chocolate mixture over the oats. Stir it all together until every oat is coated with chocolate. If you like, you can fold in 1/4 cup of mini chocolate chips now. This adds extra sweetness and fun! Now, it’s time to shape the cookies. Use a tablespoon or cookie scoop to drop spoonfuls of the mixture onto a parchment-lined baking sheet. Make sure to flatten them slightly. This helps them look like cookies. After shaping, place the baking sheet in the refrigerator. Let the cookies set for at least 30 minutes. When they are firm, they are ready to enjoy! Store any leftovers in an airtight container in the fridge. For the complete recipe, check the section above. Make sure to measure all your ingredients before you start. This will help you mix them easily. Use a non-stick pot to prevent anything from sticking. Keep the heat low while melting your ingredients. This way, you avoid burning the mixture. When dropping the cookies, use a cookie scoop for even sizes. This makes your cookies look nice and neat. To get that perfect texture, mix the oats well into the chocolate mixture. If the mixture feels too wet, add a few more oats. If it’s too dry, add a bit of melted coconut oil. Let the cookies flatten slightly when you scoop them. This helps them set better in the fridge. Refrigerate them for at least 30 minutes to firm up nicely. If you need a nut-free option, try using sunbutter instead of peanut butter. For a vegan treat, use maple syrup and ensure your chocolate chips are dairy-free. You can also swap honey for agave syrup. If you want to reduce sugar, use a sugar substitute that works for baking. These changes will keep the taste delicious while fitting your needs. For the full recipe, check out the [Full Recipe]. {{image_2}} You can easily add nuts or seeds to your cookies. Chopped walnuts, almonds, or sunflower seeds work well. Just mix them in with the oats. This adds a nice crunch and extra nutrients. I enjoy the texture change it brings. You can use about 1/2 cup of your favorite nuts or seeds. Each bite becomes more satisfying and delicious. If you want a healthier choice, try different sweeteners. Instead of honey, use agave syrup or stevia. These options can cut down on sugar. They still provide sweetness without the extra calories. I often use maple syrup for a unique flavor. You can adjust the amount based on your taste preferences. Spices can take your cookies to the next level. Cinnamon adds warmth and a lovely aroma. Nutmeg or ginger can give a spicy kick. Simply add 1/2 teaspoon of your chosen spice to the chocolate mix. This small change makes a big difference. I love experimenting with different spice combos to keep things exciting. To keep your no-bake chocolate oatmeal cookies fresh, store them in an airtight container. This will help maintain their chewy texture and rich flavor. Place parchment paper between layers if you stack them. You can keep them in the fridge for up to one week. If you want to save some for later, freezing is a great option. Just place the cookies in a single layer on a baking sheet. Freeze them for about an hour until firm. Then, transfer them to a freezer-safe bag. They can last up to three months in the freezer. When you're ready to enjoy, let them thaw in the fridge overnight. These cookies stay tasty for about a week when refrigerated. If you freeze them, they keep their flavor and texture for a longer time. Always check for any signs of spoilage, like an off smell or changes in texture. Enjoy them fresh for the best taste! For the full recipe, refer to the earlier sections. No-bake chocolate oatmeal cookies need to set for at least 30 minutes. This time allows them to firm up and hold their shape. If you want them firmer, you can let them sit for longer. Just pop them in the fridge. They will be ready to enjoy after that wait! Yes, you can use quick oats instead of rolled oats. Quick oats will make the cookies softer and less chewy. If you prefer a chewier texture, stick with rolled oats. Both types will still taste great in the cookies. Choose what you like best for your treat! To make these cookies vegan, swap honey for maple syrup. Use a vegan chocolate option if you want to add chocolate chips. The other ingredients, like oats and peanut butter, are already vegan-friendly. This way, you can enjoy a delicious treat without any animal products! No-bake chocolate oatmeal cookies are easy and fun to make. You learned about key ingredients like oats, peanut butter, and cocoa powder. I shared step-by-step instructions to help you create perfect cookies. You also discovered useful tips on texture and substitutions. Finally, I covered storage tips and answered common questions. Try different flavors and enjoy the process! These cookies are a tasty treat that fits many diets.

No-Bake Chocolate Oatmeal Cookies Easy Delightful Treat

Looking for a quick and tasty treat? No-bake chocolate oatmeal cookies are the answer! You need just a few simple

Older posts
Newer posts
← Previous Page1 … Page44 Page45 Page46 … Page64 Next →

dsad

© 2025 Foodish Talk • Built with GeneratePress

Our Policies

  • Copyright Policy
  • Cookie Policy
  • GDPR Policy
  • Privacy Policy
  • Disclaimer
  • Terms Of Use

More Information

  • Home
  • About
  • Contact
  • Appetizers
  • Dessert
  • Dinner
  • Drinks
©2025, Foodish Talk About Back To Top