Skip to content
DisclaimerTerms Of UseGDPR PolicyCookie Policy

Foodish Talk

  • Home
  • Drinks
  • Appetizers
  • Dinner
  • Dessert
  • About
  • Contact
  • Privacy Policy
DisclaimerTerms Of UseGDPR PolicyCookie Policy

Ava

To make Coconut Curry Lentils, you need some key items. Here’s what you'll need: - 1 cup red lentils, rinsed - 1 can (14 oz) coconut milk - 2 cups vegetable broth - 1 medium onion, finely chopped - 2 cloves garlic, minced - 1 inch ginger, grated - 2 tablespoons curry powder - 1 teaspoon turmeric - 1 teaspoon cumin - 1 tablespoon olive oil - Salt and pepper to taste - 1 cup spinach (fresh or frozen) - Juice of 1 lime - Fresh cilantro for garnish These ingredients work together to create a rich and creamy dish. The lentils provide protein and fiber, while coconut milk adds a lovely creaminess. You can boost the flavor of your Coconut Curry Lentils with these extras: - 1 teaspoon chili powder for heat - 1 tablespoon soy sauce for umami - 1 bell pepper, diced for sweetness - A splash of vinegar for brightness These additions can change the taste of the dish. They let you customize your lentils based on what you like. To cook Coconut Curry Lentils, you'll need some simple tools: - A large pot for cooking - A cutting board and knife for prep - A measuring cup for accuracy - A wooden spoon for stirring Having the right tools makes cooking easy. This way, you can focus on making a tasty meal. For the full recipe, check out the detailed steps provided. Start by gathering your ingredients. You will need: - 1 cup red lentils, rinsed - 1 can (14 oz) coconut milk - 2 cups vegetable broth - 1 medium onion, finely chopped - 2 cloves garlic, minced - 1 inch ginger, grated - 2 tablespoons curry powder - 1 teaspoon turmeric - 1 teaspoon cumin - 1 tablespoon olive oil - Salt and pepper to taste - 1 cup spinach (fresh or frozen) - Juice of 1 lime - Fresh cilantro for garnish Chop the onion and mince the garlic. Grate the ginger next. Rinse the lentils under cold water until the water runs clear. In a large pot, heat the olive oil over medium heat. Add the chopped onion. Sauté the onion until it turns translucent, about five minutes. Stir in the minced garlic and grated ginger. Cook for one more minute until fragrant. Next, add the curry powder, turmeric, and cumin. Stir to coat the onions in the spices. Cook for one to two minutes, letting the spices bloom. Pour in the vegetable broth and coconut milk. Stir well to mix everything. Add the rinsed lentils to the pot. Bring the mixture to a gentle boil. Reduce the heat to low and cover the pot. Let it simmer for 20 to 25 minutes or until the lentils are tender. If you use frozen spinach, add it during the last five minutes of cooking. If you use fresh spinach, stir it in just before serving. Season the lentil curry with salt and pepper. Add lime juice to add brightness. Serve your coconut curry lentils hot. Garnish with fresh cilantro for a pop of color. You can also serve it with rice or warm naan for a complete meal. For a fun twist, add some chopped nuts or a squeeze of lime on top. Enjoy your flavorful dish! For the complete recipe, check out the Full Recipe. One common mistake is cooking lentils too long. They can turn mushy if overcooked. Always check them around the 20-minute mark. Another error is skipping the spices. They add depth to the dish. Use fresh spices for the best flavor. Lastly, don’t forget to taste as you cook. Adjust salt and pepper to your liking. To boost flavors, add a squeeze of lime juice at the end. This adds brightness. You can also use fresh herbs like cilantro for a fresh touch. A pinch of red pepper flakes adds heat if you want extra spice. Try to let it sit for a few minutes after cooking. This helps the flavors blend together. To make it kid-friendly, reduce the spice. Use less curry powder to start. You can also add sweet veggies like carrots or bell peppers. These add sweetness and color. Another tip is to serve it with rice or naan. Kids love dipping! Adjust the texture by blending it for younger kids. This makes it smooth and easy to eat. For the full recipe, check out the detailed instructions above! {{image_2}} You can try different lentils for this dish. Red lentils cook fast and become soft. Green or brown lentils stay firm and add texture. Black lentils bring a unique look and flavor. Each type makes a tasty curry, so feel free to mix and match. Just remember to adjust cooking times based on the lentil type. Want to boost protein? Chickpeas and tofu are great options. Chickpeas add a nutty taste and extra fiber. You can use canned chickpeas for ease. Tofu absorbs the curry flavors well. For tofu, press it first to remove water. Then cut it into cubes and cook it with the onions for added flavor. Do you like your curry spicy? You can add chili powder or fresh peppers. Start with a small amount, then taste and adjust. If you prefer mild flavors, skip the heat. The curry powder already adds warmth. You can create a dish that suits your taste perfectly. Explore your spice cabinet to find the right balance for you. For the full recipe, check out the Coconut Curry Lentils section above. To store leftover coconut curry lentils, let them cool first. Use an airtight container. This keeps them fresh and prevents spills. You can keep them in the fridge for up to four days. If you want to save them longer, freezing is a great option. To freeze your lentils, pour them into a freezer-safe container. Leave some space at the top, as they may expand. Label the container with the date. You can freeze them for up to three months. When ready to eat, thaw them overnight in the fridge. Reheat on the stove or in the microwave until hot. After storing, serving your lentils with fresh rice is great. You can also pair them with warm naan bread. Adding a squeeze of lime on top brings out the flavors. Garnish with fresh cilantro for a nice touch. These options make your meal feel fresh and new. Check out the Full Recipe for more ideas! Lentils are small but mighty. They pack a punch of nutrition. They are rich in protein and fiber. This helps keep you full and satisfied. Lentils also contain iron, which is great for your blood. They have many vitamins, like B vitamins, that boost energy. Eating lentils can support heart health and help manage weight. Yes, you can easily make Coconut Curry Lentils vegan. The main ingredients are already plant-based. Just ensure that your vegetable broth is vegan. If you want, add more veggies for flavor. You can also swap olive oil for coconut oil. This keeps the dish rich and creamy. If you need more servings, just double the recipe. Use two cups of lentils instead of one. Increase the coconut milk and broth as well. Keep the spices the same for flavor. Cooking time may change slightly, so check the lentils. They should be soft and tender. Yes, Coconut Curry Lentils are gluten-free! All the ingredients are naturally free from gluten. Use certified gluten-free vegetable broth if needed. This makes the dish safe for those with gluten allergies. Enjoy your meal without worry! For the full recipe, check out the Coconut Curry Lentils section. This blog post covered how to make Coconut Curry Lentils. You learned about essential and optional ingredients. I shared tips to avoid mistakes and enhance flavors. We explored variations with lentils, protein, and spice levels. Lastly, I provided helpful storage and reheating methods. With this guide, you can create a tasty, healthy dish. Enjoy experimenting with your own flavors and ingredients. Happy cooking!

Coconut Curry Lentils Flavorful and Easy Recipe

Let’s dive into a deliciously simple dish: Coconut Curry Lentils! This recipe is packed with flavor and is perfect for

To make roasted red pepper hummus, gather these simple ingredients: - 1 can (15 oz) chickpeas, drained and rinsed - 1 large roasted red pepper (jarred or homemade) - 2 tablespoons tahini - 2 tablespoons olive oil - 1 clove garlic, minced - 1 tablespoon lemon juice - 1/2 teaspoon ground cumin - 1/2 teaspoon smoked paprika - Salt to taste - Water as needed for consistency - Fresh parsley, for garnish - Pita chips or vegetable sticks, for serving You can use fresh or jarred roasted red peppers. Fresh peppers offer a bright flavor. Roast them yourself for a smoky taste. This takes time, but it’s worth it. Jarred peppers are easy and quick. They are already cooked and ready to use. Look for jars packed in water or oil. Avoid those with added preservatives. Chickpeas are the star of this hummus. When choosing canned chickpeas, check the label. Go for those with no added salt or preservatives. For a fresher option, try dried chickpeas. Soak them overnight and cook them until soft. This gives you a great texture and flavor in your hummus. Remember to rinse the chickpeas well. This helps remove extra salt and improves taste. You can find the full recipe for more details on making this delicious hummus. Making roasted red pepper hummus is fun and easy. You will blend simple ingredients in a food processor. In just ten minutes, you will have a tasty dip ready to serve. 1. Combine Ingredients: Start by adding the drained chickpeas to your food processor. Next, add the roasted red pepper, tahini, olive oil, minced garlic, lemon juice, ground cumin, smoked paprika, and salt. 2. Blend Until Smooth: Turn on the food processor. Blend the mixture until it is creamy and smooth. If it feels too thick, don’t worry. You can add water one tablespoon at a time. 3. Taste and Adjust: Once blended, taste your hummus. If it needs more flavor, add extra salt or lemon juice. Blend again to mix well. 4. Serve: Transfer the hummus to a bowl. Drizzle a little olive oil on top, and sprinkle fresh parsley as a garnish. 5. Enjoy with Dippers: Serve your delicious hummus with pita chips or fresh vegetable sticks. To get the right texture, always start with less water. You can add more as needed. If your hummus is too thin, blend in more chickpeas or tahini. For an extra smooth finish, blend longer to break down any lumps. For the full recipe, check out the details provided above. Enjoy creating your hummus! To make your roasted red pepper hummus even better, try adding spices. Ground coriander adds a nice zest. You can also mix in a pinch of cayenne pepper for heat. If you love herbs, fresh basil or cilantro can brighten the taste. Experiment with these spices to find your favorite blend. To keep your hummus fresh, store it in an airtight container. This helps prevent it from drying out. You can also drizzle a little olive oil on top before sealing. This keeps the top moist and adds flavor. Fill the container as much as possible to limit air exposure. Making hummus ahead of time is easy. You can prepare it a day before your event. Just keep it in the fridge in an airtight container. When you are ready to serve, give it a quick stir. If the texture seems thick, add a bit of water to loosen it up. This method saves time and ensures your dish is ready to impress. For the full recipe, check the details above. {{image_2}} Herbs can make your hummus shine. Fresh herbs add taste and color. You can try parsley, basil, or cilantro. Just chop them finely and mix them in. I love adding a handful of fresh parsley. It brightens the dish and adds a nice crunch. If you like heat, this is for you! To make your hummus spicy, add jalapeños or red pepper flakes. Start with a small amount and taste as you go. This way, you control the heat. I often add one chopped jalapeño to the mix. It brings a lively kick that wakes up the flavors. You can adapt this recipe to fit your needs. If you want a nut-free version, skip the tahini. Instead, use sunflower seed butter for creaminess. For a low-sodium option, rinse the chickpeas well. You can also use low-sodium broth instead of water. This way, you keep the flavor while lowering salt. For a vegan option, this recipe is already perfect! You can serve it with veggies or whole grain crackers. Explore these variations to make the hummus your own. For the full recipe, check out the details above. To keep your roasted red pepper hummus fresh, store it in an airtight container. This helps prevent air from drying it out. Make sure to use a clean spoon every time you scoop out some hummus. That way, you avoid introducing bacteria. Always refrigerate your hummus right after serving to keep it cool. When stored properly in the fridge, roasted red pepper hummus lasts about 4 to 7 days. If you notice any off smells or changes in texture, it's best to throw it away. Always check for signs of spoilage before enjoying. Yes, you can freeze roasted red pepper hummus! Place it in a freezer-safe container, leaving some space at the top. Hummus expands when it freezes. It stays good for about 3 months. When ready to eat, thaw it in the fridge overnight. Stir well before serving. You might need to add a touch of olive oil or water for creaminess. For the full recipe and more tips, check out the [Full Recipe]. Hummus is not just tasty; it is also healthy. It is high in protein, which helps build muscles. Chickpeas, the main ingredient, are rich in fiber. Fiber aids digestion and keeps you full longer. Hummus also contains healthy fats from olive oil and tahini. These fats support heart health. Plus, hummus is low in calories, making it a smart snack choice. Eating hummus can help you control your weight. You can dip veggies or whole-grain pita chips for extra nutrition. Yes, you can use dried chickpeas instead of canned ones. However, you need to soak and cook them first. Soaking helps soften the chickpeas and reduce cooking time. After soaking overnight, boil them until tender. This may take 1 to 2 hours. Once cooked, drain and rinse them. Then, you can use them just like canned chickpeas in the recipe. Using dried chickpeas may give a fresher taste. It also allows you to control the salt content. You can buy quality roasted red pepper hummus at many grocery stores. Look for it in the deli or refrigerated section. Some stores have fresh-made options that are very good. You can also find it at health food stores or specialty markets. Many brands sell hummus online as well. Always check the ingredients. Choose brands with natural ingredients and no preservatives. Making your own is also easy and fun. You can find the full recipe above! Roasted red pepper hummus is easy to make with fresh or jarred peppers and quality chickpeas. We discussed the step-by-step method and tips for the right texture. Adding spices boosts flavor, and storing it well keeps it fresh. Explore variations, like spicy options or using different ingredients for diets. Hummus is healthy and simple, making it a delightful snack or meal. With these tips, you can confidently create delicious hummus at home. Enjoy your cooking journey!

Roasted Red Pepper Hummus Flavorful and Simple Recipe

Looking for a dip that’s both tasty and easy to make? Look no further! This Roasted Red Pepper Hummus recipe

To make a cheesy cauliflower bake, you need the following main ingredients: - 1 large head of cauliflower, cut into florets - 2 cups shredded cheddar cheese - 1 cup cream cheese, softened - 1/2 cup sour cream - 1/2 cup milk These ingredients create a rich and creamy base. The cauliflower gives it a great texture while soaking up all that cheesy goodness. Adding the right seasonings makes your dish pop. Here’s what you need: - 1 teaspoon garlic powder - 1/2 teaspoon onion powder - 1/2 teaspoon paprika - Salt and pepper to taste - Optional toppings: 1/2 cup breadcrumbs and 2 tablespoons chopped fresh parsley The garlic and onion powders enhance the flavor. Paprika adds a slight smokiness. If you like a crunchy top, sprinkle breadcrumbs before baking. Fresh parsley adds a nice touch when serving. For the full recipe, you can refer to the detailed instructions that guide you step-by-step through the process. Enjoy your cheesy creation! First, fill a large pot with salted water and bring it to a boil. Add the cauliflower florets to the boiling water. Cook them for about five minutes until they become tender but still firm. After cooking, drain the florets well and set them aside. This step is key to getting a nice texture in your bake. In a big mixing bowl, add the softened cream cheese, sour cream, and milk. Use a spatula or mixer to blend them until smooth and creamy. This mixture will make your dish rich and delightful. Next, sprinkle in the garlic powder, onion powder, paprika, salt, and pepper. Stir everything together until the seasonings are evenly mixed. This adds flavor that complements the cauliflower. Now it’s time to combine everything! Gently fold the cooked cauliflower florets into the creamy mixture. Make sure every floret is well coated. Transfer this mix into a greased baking dish, spreading it out evenly. For the final touch, sprinkle shredded cheddar cheese on top. If you like a bit of crunch, add breadcrumbs as well. Bake this in a preheated oven at 375°F (190°C) for 25 to 30 minutes. You want the cheese to be bubbly and golden brown. Once it’s done, let it cool for a few minutes, then add chopped parsley for a fresh look before serving. For the complete details, refer to the Full Recipe. To check if your cauliflower is done, pierce a floret with a fork. It should be tender but not mushy. This keeps it firm in the bake. For a crisp topping, use dry breadcrumbs. Mix them with a little olive oil or melted butter. This helps them brown nicely. Spread them evenly on top before baking. Spices can change the game. Try adding cumin or Italian herbs like oregano. Fresh herbs like thyme or rosemary also add great taste. If you want to swap cheese, consider mozzarella or gouda. They melt well and bring a unique flavor. Pair your cheesy cauliflower bake with a fresh salad or roasted veggies. These sides balance the richness of the dish. For a fun twist, serve in individual ramekins. This adds style to your table. You can also sprinkle extra parsley on top for a pop of color. For the full recipe, check out the main article. {{image_2}} You can easily adjust this cheesy cauliflower bake for different diets. If you need a gluten-free option, skip the breadcrumbs or use gluten-free bread crumbs. This change keeps the dish tasty and safe for those avoiding gluten. For a vegan version, swap out the cream cheese and cheddar cheese for plant-based ones. You can use cashew cream or coconut cream. These options give you the same creamy texture. Nutritional yeast can add a cheesy flavor without dairy. Feel free to add other vegetables to the mix. Broccoli, spinach, or even bell peppers work great. These add color and nutrition. You can also toss in some cooked protein. Grilled chicken or crispy bacon add a nice touch. This makes the dish heartier and more filling. If you want to try a different cooking method, a slow cooker is a great choice. Just combine everything in the slow cooker. Cook on low for about 4 hours or until the cauliflower is tender. An air fryer is another fun option. Cook the cauliflower for about 15-20 minutes at 375°F (190°C). This method gives you a nice crispy top and keeps the inside creamy. For the full recipe, check out the Cooking section. To keep your cheesy cauliflower bake fresh, store it in the fridge. Use an airtight container to avoid moisture loss. It will stay good for about three to four days. For long-term storage, you can freeze it. Wrap the dish tightly in plastic wrap, then foil. Label it with the date. Frozen cheesy cauliflower bake can last for up to three months. When you're ready to enjoy your leftovers, reheating carefully is key. The best method is to bake it again. Preheat your oven to 350°F (175°C). Place the dish in the oven for about 20 minutes. This brings back the creamy texture and warm flavor. You can also microwave individual portions. Heat them in short bursts, about one minute at a time. Stir in between to ensure even heating. Enjoy every cheesy bite! The cooking time for Cheesy Cauliflower Bake is about 25 to 30 minutes. The prep time takes around 15 minutes. In total, you will spend about 45 minutes from start to finish. This includes boiling the cauliflower and baking the dish until it is bubbly and golden brown. Yes, you can make Cheesy Cauliflower Bake ahead of time! Just prepare the dish as instructed but skip baking. Cover it and keep it in the fridge for up to two days. When you're ready to eat, just pop it in the oven. Bake at 375°F (190°C) for 30 to 35 minutes. This way, you enjoy a hot, creamy meal without the extra work on busy days. Cheesy Cauliflower Bake can be a healthy choice! Cauliflower is low in calories and high in fiber. It also contains vitamins C and K. The cheese adds protein and calcium, but it can be high in fat. If you want a lighter version, use less cheese or low-fat options. Enjoy this dish as a tasty side or a light main meal. Yes, you can use frozen cauliflower! Just make sure to thaw and drain it before use. This helps avoid extra water in your dish. Frozen cauliflower works well and saves time. You will still get that great cheesy flavor and creamy texture in your bake. In this blog post, we explored how to make a delicious Cheesy Cauliflower Bake. We covered the key ingredients, prep steps, and baking tips to create a creamy and flavorful dish. You learned about variations for different diets and ways to store leftovers. Whether you want a tasty side or a main dish, this recipe fits well. Enjoy experimenting with flavors and variations. Cooking can be fun and rewarding when you make this dish!

Cheesy Cauliflower Bake Deliciously Creamy Treat

Do you love comfort food that’s easy and tasty? My Cheesy Cauliflower Bake is the answer! This dish is creamy,

To make Lemon Herb Grilled Chicken, you need fresh and simple ingredients. Here’s what you’ll need: - Chicken Breasts: 4 boneless, skinless chicken breasts - Marinade Components: - 1/4 cup olive oil - 2 lemons (zested and juiced) - 4 cloves garlic, minced - 2 tablespoons fresh rosemary, finely chopped - 2 tablespoons fresh thyme, finely chopped - 1 teaspoon salt - 1/2 teaspoon black pepper - Optional Additions: - 1 teaspoon honey (for a touch of sweetness) - Fresh parsley (for garnish) Each ingredient adds a layer of flavor. The chicken serves as a great canvas for the bright lemon and fresh herbs. Olive oil keeps the chicken juicy while garlic adds depth. You can adjust the herbs to your taste, making this dish versatile. If you want a hint of sweetness, add honey to the marinade. For a nice finish, sprinkle fresh parsley on top before serving. This Lemon Herb Grilled Chicken is not only flavorful but also simple to prepare. For the full recipe and instructions, check out the Full Recipe. To start, we need to make the marinade. In a large mixing bowl, combine these ingredients: - 1/4 cup olive oil - Zest and juice from 2 lemons - 4 cloves of minced garlic - 2 tablespoons of finely chopped rosemary - 2 tablespoons of finely chopped thyme - 1 teaspoon salt - 1/2 teaspoon black pepper Whisk everything together until it looks smooth. This mix adds zest and depth to the chicken. Next, it's time to marinate the chicken. You can use a large zip-top bag or a shallow dish for this. Place the chicken breasts inside and pour the marinade over them. Make sure each piece is well coated. Seal the bag or cover the dish, then put it in the fridge. Let it marinate for at least 30 minutes, or up to 4 hours for more flavor. Now, let’s fire up the grill. Preheat it to medium-high heat. This step is important because it ensures the chicken cooks evenly and gets those nice grill marks. After the grill is hot, take the chicken out of the marinade. Let any extra marinade drip off; this helps avoid flare-ups. If your grill is small, cook the chicken in batches. Place the chicken on the grill and let it cook for about 6-7 minutes on one side. Don’t move it around! This helps create those beautiful grill marks. After that, flip the chicken and grill for another 6-7 minutes. You want the internal temperature to reach 165°F (75°C) for safe eating. Once the chicken is done, remove it from the grill. Let it rest for about 5 minutes. This resting period helps the juices settle, making the chicken more tender. For a lovely finish, garnish your chicken with fresh parsley. This adds a pop of color and a nice flavor boost. For the full recipe, check out the previous sections. Enjoy your zesty lemon herb grilled chicken! Duration for Best Flavor: For great taste, marinate chicken for at least 30 minutes. However, you can leave it for up to 4 hours. Longer marinating allows the flavors to soak in better. Tips for Even Coating: To ensure every part of the chicken gets flavor, massage the marinade into the meat. This step helps the marinade cover all surfaces. Avoiding Overcrowding: Cook your chicken in batches. If you put too much on the grill, it won’t cook evenly. This can lead to undercooked chicken, which is not safe to eat. Achieving Perfect Grill Marks: Keep the chicken in place while it cooks. Moving it too soon can prevent those nice grill marks from forming. Let it sizzle and create that beautiful char. For a complete guide on making this dish, check the Full Recipe. {{image_2}} You can make lemon herb grilled chicken even better with a few tweaks. First, consider adding spices like chili flakes or paprika. These will give a nice kick to the dish. Just a pinch can really enhance the flavor without overpowering it. You can also switch up the herbs. Instead of rosemary and thyme, try using fresh basil or dill. These herbs bring a different taste and freshness. Experimenting with herbs can make the dish unique each time you cook it. If you want to bake instead of grill, it’s easy. Preheat your oven to 400°F (200°C). Place the marinated chicken on a baking sheet lined with parchment paper. Bake for 20-25 minutes, or until the internal temperature reaches 165°F (75°C). This method keeps the chicken juicy and tender. Another fun option is to make skewers. Cut the chicken into chunks and marinate as usual. Thread the chicken pieces onto skewers, adding bell peppers or onions for color. Grill the skewers over medium heat for about 10-12 minutes, flipping them halfway through. Skewers are great for parties and are fun to eat. For the full recipe, check out the complete guide that includes all the steps and tips. After grilling, it's best to cool your chicken quickly. Let it sit at room temperature for no more than two hours. This helps prevent bacteria growth. If you have leftovers, place them in an airtight container. In the fridge, Lemon Herb Grilled Chicken lasts about three to four days. Make sure to keep it sealed tight. This way, it stays fresh and tasty. You can freeze grilled chicken for longer storage. First, let the chicken cool completely. Wrap each piece tightly in plastic wrap. Then place them in a freezer bag. This helps avoid freezer burn. To thaw, move the chicken to the fridge for a few hours or overnight. You can also use the microwave on the defrost setting. Just be careful to not cook it while defrosting. For a quick meal, having grilled chicken ready in the freezer is a smart idea. You can enjoy it anytime by adding it to salads or wraps. You can marinate chicken for 30 minutes to 4 hours. For the best flavor, I recommend marinating it for about 2 hours. This allows the chicken to soak up the lemon and herb flavors. If you marinate it too long, the acid can make the meat mushy. Yes, you can use bone-in chicken. It will take longer to cook than boneless chicken. Bone-in pieces usually need about 10 extra minutes on the grill. Use a meat thermometer to check that the inside reaches 165°F (75°C). Great sides for this dish include: - Fresh salads - Roasted vegetables - Quinoa or couscous - Garlic bread These options enhance the zesty flavors of the chicken and make your meal complete. You can find the full recipe in the article for more details. In this article, we explored how to make lemon herb grilled chicken. We covered the key ingredients like chicken breasts, marinade components, and optional additions. You learned step-by-step instructions, marinating tips, grilling techniques, and variations. Remember to let the chicken rest after grilling for the best flavor and tenderness. With these tips, you can enjoy a delicious meal anytime. So, fire up the grill and savor every bite!

Lemon Herb Grilled Chicken Flavorful and Simple Dish

If you’re craving a simple yet tasty meal, Lemon Herb Grilled Chicken is the answer. With fresh flavors and easy

To make creamy polenta with mushroom ragu, gather these key ingredients: - 1 cup polenta - 4 cups vegetable broth - 1 cup heavy cream - 2 tablespoons unsalted butter - 1 tablespoon olive oil - 1 onion, finely chopped - 2 garlic cloves, minced - 3 cups mixed mushrooms (e.g., cremini, shiitake, and button), sliced - 1 teaspoon dried thyme - 1 tablespoon fresh parsley, chopped - Salt and pepper to taste These ingredients create a hearty and flavorful dish. Polenta serves as the base, bringing a creamy texture. The vegetable broth adds depth and warmth. Heavy cream and butter enrich the polenta, making it luxurious. Next, the mushrooms shine in the ragu. They offer umami and a meaty bite. Onions and garlic add sweetness and aroma. Dried thyme gives a nice herbal note. Fresh parsley brightens the dish with color and flavor. You can find the full recipe within this article. With these ingredients, you can create a delicious meal that pleases everyone at the table. Enjoy each bite of this comforting dish! Start by boiling the vegetable broth. Pour 4 cups into a large saucepan and bring it to a rolling boil. This step is crucial for smooth polenta. Next, gradually whisk in 1 cup of polenta. Stir constantly to avoid lumps. The polenta will start to thicken quickly. Cook the polenta on low heat for about 20-25 minutes. Stir it often to keep it creamy. It should become thick and smooth. If it gets too thick, you can add more broth or water. Season with salt and pepper to taste before mixing in the cream and butter. While the polenta cooks, heat 1 tablespoon of olive oil in a large skillet over medium heat. Add a finely chopped onion and sauté for about 3-4 minutes until it becomes soft and translucent. Next, add 2 minced garlic cloves and 3 cups of sliced mixed mushrooms. Cook this mixture for another 5-7 minutes until the mushrooms are browned and tender. This creates a rich flavor base for your ragu. Then, stir in 1 teaspoon of dried thyme and season with salt and pepper. Let it cook for an additional 2 minutes. This allows the flavors to blend well. Finally, remove it from heat and mix in 1 tablespoon of chopped fresh parsley for a fresh touch. Now it's time to combine everything. Take your creamy polenta and mix in 1 cup of heavy cream and 2 tablespoons of unsalted butter. This will make it extra rich and smooth. To serve, spoon a generous portion of polenta onto each plate. Top it with the warm mushroom ragu and finish with a sprinkle of grated Parmesan cheese. For a rustic feel, use shallow bowls and add some fresh parsley and a drizzle of olive oil on top for extra flavor. For further guidance, check out the Full Recipe to ensure every step is followed perfectly. To make smooth polenta, avoid lumps by whisking. Start with boiling broth before adding polenta. Slowly sprinkle in the polenta while whisking. This helps it blend without clumping. If your polenta gets too thick, you can fix it. Add more broth or water until it reaches the right creaminess. The texture should be soft and velvety, not dry. For a richer ragu, think about seasoning. Use salt and pepper to boost the taste. Fresh herbs, like thyme, add depth. If you want a kick, try adding a pinch of red pepper flakes. You can also add more vegetables. Carrots, bell peppers, or spinach blend well with mushrooms. They add color and nutrients to the dish. For serving, choose shallow bowls. They give a rustic feel to the meal. Spoon the polenta in the center and top it with ragu. Garnish your dish for extra flair. A sprinkle of parsley adds freshness. A drizzle of olive oil gives shine and flavor. For a finishing touch, try grated Parmesan cheese. It melts beautifully over the warm polenta. This meal is not just tasty but also a feast for the eyes. Enjoying it is part of the experience. For the full recipe, check out the recipe section. {{image_2}} You can switch up the mushrooms to mix flavors. Try using: - Portobello for a meaty bite - Oyster mushrooms for a delicate taste - Enoki for a crunchy texture If you want a dairy-free option, use coconut cream instead of heavy cream. It adds a nice sweetness. Also, choose vegan butter or olive oil to keep it plant-based. To add depth to your ragu, experiment with spices. A pinch of smoked paprika can give a warm kick. You could also add a little chili for heat. Fresh herbs like basil or rosemary can brighten the dish. If you want more protein, add cooked lentils or chickpeas to the ragu. They mix well with mushrooms and add heartiness. You can also toss in cooked sausage or chicken for a meatier version. Check out the Full Recipe for more details on creating this delicious meal! Store your creamy polenta and mushroom ragu in airtight containers. Glass or plastic containers work well. Keep them in the fridge for up to three days. If you want to store them longer, freeze the leftovers. Use freezer-safe bags or containers. Make sure to label them with the date to track freshness. To reheat creamy polenta, add a splash of broth or water. Heat it gently on the stove, stirring often. This keeps the texture smooth. For the mushroom ragu, warm it in a skillet over low heat. Stir occasionally until heated through. Avoid high heat, as it can change the flavor and texture. Enjoy your meal just as tasty as the first time! To make polenta creamy, add heavy cream. Start with one cup of heavy cream while cooking. This thickens the polenta and gives it a rich taste. You can also add butter for extra creaminess. If the polenta is too thick, mix in more broth or water. Stir often to keep it smooth. Yes, you can use dried mushrooms. They add deep flavor to your dish. To use them, first soak the mushrooms in warm water for about 20-30 minutes. This helps them rehydrate. After soaking, chop them and add them to your ragu. The soaking water can also add flavor if you use it in your sauce. Creamy polenta pairs well with many side dishes. Consider serving it with roasted vegetables or a fresh salad. Grilled meats, like chicken or steak, work nicely too. You can even add a fried egg on top for a hearty breakfast option. Creamy polenta lasts about 3-5 days in the fridge. Store it in an airtight container for best results. When reheating, add a splash of water or broth. This helps restore its creamy texture. If you freeze it, it can last up to three months. Just remember that freezing may change the texture slightly. This article covered how to create a delicious creamy polenta with mushroom ragu. You learned about the key ingredients and step-by-step cooking instructions. I shared tips for perfecting the polenta and enhancing the ragu’s flavor. We also explored variations and storage tips. In closing, making this dish allows you to experiment and enjoy. Keep it simple, taste often, and have fun in the kitchen!

Creamy Polenta with Mushroom Ragu Hearty and Flavorful

Are you ready to dive into a dish that is both hearty and flavorful? Creamy polenta with mushroom ragu is

To make your spiced apple cider, gather these key items: - 8 cups apple juice or apple cider - 1 cup water - 3 whole cinnamon sticks - 5 whole cloves - 3 star anise - 1 orange, sliced - 1 tablespoon freshly grated ginger - 1/4 cup brown sugar (adjust to taste) - 1 teaspoon vanilla extract These ingredients create a warm and cozy drink. The apple juice or cider forms the base, while the spices add depth and warmth. You can also add a pinch of nutmeg for extra spice. If you like a sweeter cider, consider using more brown sugar. A splash of lemon juice can brighten the drink. Each addition can change the flavor for your taste. If you don’t have apple juice, use apple cider instead. Honey or maple syrup can replace brown sugar. If you want a caffeine kick, try adding chai tea bags during cooking. Adjust the spices to match your preferences. Each change can lead to a new flavor experience. For the complete recipe, check out the [Full Recipe]. To start, gather your ingredients. You need apple juice or cider, water, spices, and an orange. It takes just a few minutes to prep. Pour the apple juice and water into the Instant Pot. Adding the water helps balance the flavor. Next, add your spices: the cinnamon sticks, cloves, and star anise. These spices bring warmth and depth to your cider. Slice the orange and toss it in, along with the ginger and brown sugar. If you like nutmeg, a pinch will add a nice touch. Stir everything gently to mix well. Now, secure the lid on the Instant Pot. Make sure the valve is set to sealing. Select the Manual or Pressure Cook setting. Set the timer for 10 minutes. The Instant Pot will build pressure and cook your cider. Once the time is up, let it sit for a bit. Allow the pressure to release naturally for about 10 minutes. After that, do a quick release to let out any extra steam. Carefully open the lid and stir the cider to mix the spices. Strain the cider using a fine-mesh sieve into a large pitcher or bowl. This step removes all the solids, leaving you with a smooth drink. Taste your cider. You can add more sugar or spices if you want a richer flavor. Serve the cider warm. You can garnish it with extra cinnamon sticks or orange slices for a pretty look. This drink is perfect for cozy nights or festive gatherings. For the full recipe, check the complete guide. Enjoy every sip of your spiced apple cider! To make your cider shine, focus on the spice balance. Use whole spices like cinnamon sticks and cloves for better taste. Fresh ginger adds a bright kick. Adjust the brown sugar to match your sweet tooth. If you like a little heat, consider adding a pinch of nutmeg. Experiment with the orange slices. They bring a fresh, zesty note that brightens the drink. A splash of vanilla extract deepens the flavor. Always taste your cider before serving. Adjust the sweetness or spices as needed. One common mistake is rushing the cooking time. Ten minutes is usually perfect, but letting the spices steep longer after cooking makes a big difference. Avoid using pre-ground spices; they can lose flavor quickly. Skipping the straining step can leave your cider gritty. Lastly, don’t forget to taste! Each batch can vary in sweetness, so adjust it to your liking. When using the Instant Pot, always ensure the lid seals well. This keeps the flavors inside. Add liquids first to prevent burning. Stir the mixture gently to mix the spices, but don’t overdo it. Once cooking is done, allow some natural pressure release. This helps meld the flavors together. Use a fine-mesh sieve to strain your cider well. Enjoy serving your warm spiced apple cider in mugs or festive cups. For the full recipe, check the Spiced Apple Cider Magic section. {{image_2}} You can change the spices in your spiced apple cider for new flavors. Try adding allspice for a warm, sweet touch. Cardamom brings a nice, aromatic twist. If you like heat, a dash of cayenne can add a kick. Play around with your favorite spices to find what you love best. Brown sugar works well, but you can switch it up. Honey or maple syrup offers a nice flavor. Use agave nectar for a lighter sweetness. Experiment with stevia for a sugar-free option. Each sweetener will change the taste a bit, so find your favorite. Seasonal fruits can enhance your cider. In fall, add slices of pears for a fresh twist. In winter, cranberries add a pop of color and tartness. Spring brings the chance to add fresh herbs like mint for a refreshing taste. Explore different fruits and herbs to make your cider special. Store your leftover spiced apple cider in an airtight container. Glass jars work well. Make sure to let it cool down before sealing. You can keep it in the fridge for up to a week. If you want to enjoy it later, freezing is a great option. To freeze cider, pour it into freezer-safe bags or containers. Leave some space at the top for expansion. When ready to enjoy, thaw it in the fridge overnight. Heat it in a pot or microwave until warm. Just stir it well before serving. Homemade spiced apple cider lasts about a week in the fridge. If it smells sour or has an off taste, it's time to toss it. Look for changes in color or texture as signs of spoilage. Always trust your senses. Keeping your cider fresh ensures you enjoy every delightful sip. You can store homemade spiced apple cider in the fridge for about one week. Keep it in a sealed container to maintain its flavor. If you want to enjoy it later, freeze it for up to three months. Just make sure to leave some space in the container, as liquids expand when frozen. Yes, you can definitely make spiced apple cider without an Instant Pot. You can use a slow cooker or a large pot on the stove. If you use a slow cooker, combine the ingredients and cook on low for 4-6 hours. For the stovetop, bring the mixture to a boil, then reduce heat and simmer for 30-45 minutes. This method will give you a lovely aroma in your kitchen, too! To adjust the recipe, you can simply change the amounts of each ingredient. If you want to make half the recipe, use 4 cups of apple juice and half the spices. If you're making more, double everything. It’s easy to tweak the flavors to fit your taste. Just keep in mind that cooking times may vary with the volume, especially if you use a larger pot. You learned about making spiced apple cider in an Instant Pot. We covered key ingredients, cooking steps, and ways to improve flavor. Remember to try various spices and sweeteners to find your favorite mix. Storing leftover cider is easy, and you can freeze it too. This drink is versatile, fun, and perfect for any season. Enjoy experimenting with different flavors and serving styles. Your cozy drink awaits!

Spiced Apple Cider Instant Pot Flavorful Delight

Are you ready to warm your soul with a delicious cup of spiced apple cider? This Instant Pot recipe brings

To make nut-free granola bars, start with these key ingredients: - 2 cups rolled oats - 1/2 cup sunflower seeds - 1/2 cup pumpkin seeds - 1/2 cup unsweetened shredded coconut - 1/2 cup honey or maple syrup - 1/4 cup coconut oil, melted - 1 teaspoon vanilla extract - 1/2 teaspoon cinnamon - 1/4 teaspoon salt These ingredients create a tasty base for your granola bars. Rolled oats give structure, while seeds add crunch. Shredded coconut brings a sweet flavor that pairs well with the honey or maple syrup. You can customize your granola bars with optional add-ins like: - 1/2 cup dried fruits (e.g., cranberries, apricots, or raisins) - Optional: 1/2 cup chocolate chips or carob chips Adding dried fruit keeps your bars chewy and adds natural sweetness. Chocolate or carob chips provide a delightful treat for chocolate lovers. Feel free to mix and match to suit your taste! If you want to switch things up, here are some ingredient substitutions: - Honey vs. maple syrup: Both work well as sweeteners. Choose maple syrup for a vegan option. - Coconut oil alternatives: You can use butter or even vegetable oil if you prefer. - Gluten-free options: Oats can be gluten-free. Just check the label to be sure. These substitutions help you tailor the recipe to fit your needs. They also keep the recipe fun and flexible! For the full recipe, check out Nut-Free Granola Bars. First, preheat your oven to 350°F (175°C). This helps your bars bake evenly. Next, line an 8x8 inch baking dish with parchment paper. Leave some paper hanging over the edges. This makes it easy to lift the bars out later. Now, mix the dry ingredients in a large bowl. Combine 2 cups of rolled oats, 1/2 cup of sunflower seeds, 1/2 cup of pumpkin seeds, and 1/2 cup of shredded coconut. Add 1/2 teaspoon of cinnamon and 1/4 teaspoon of salt to enhance the flavor. Stir everything well so that the seeds and oats are evenly mixed. In a separate bowl, whisk together the wet ingredients. Use 1/4 cup of melted coconut oil, 1/2 cup of honey or maple syrup, and 1 teaspoon of vanilla extract. Mix until everything is smooth. Pour the wet mixture into the dry ingredients. Stir until all the oats and seeds are coated. This step is key for good flavor. Next, fold in 1/2 cup of dried fruits like cranberries or raisins. If you love chocolate, add 1/2 cup of chocolate chips too. This gives a nice sweet touch. Transfer the mixture to your prepared baking dish. Press it down firmly. This helps the bars hold their shape. Bake for about 20 to 25 minutes. Check for a golden brown color on the edges. That’s how you know they are done. After baking, let the granola cool in the pan for at least 15 minutes. Use the parchment paper to lift it out. Place it on a cutting board. Once it cools completely, cut it into bars or squares. Enjoy your tasty nut-free granola bars! For the full recipe, check the provided details above. To get the best texture, press the mixture down firmly in your baking dish. This helps the bars hold together well. If you skip this step, your bars may crumble. After pressing, bake until the edges turn a nice golden brown. This color means they are done and will taste great. For short-term storage, keep your granola bars in an airtight container at room temperature. They will stay fresh for about a week. For long-term storage, freeze the bars after cutting them. Wrap each bar in plastic wrap and store them in a freezer bag. They can last for up to three months. Just take them out a few hours before you want to eat them. You can easily change the recipe based on your needs. For a fruity twist, try adding dried mango or apricots. If you want a spicy flavor, mix in some cinnamon or nutmeg. You can also swap honey for maple syrup to make them vegan. These simple changes help you create a bar that fits your taste and diet. For more inspiration, check out the Full Recipe for additional ideas! {{image_2}} You can have fun with flavors in your nut-free granola bars. Here are two tasty ideas: - Tropical coconut and mango: Add dried mango pieces and extra coconut. This mix gives a fresh, sunny taste. It's like a vacation in a bar! - Spicy cinnamon and apple: Mix in dried apples and a bit more cinnamon. This combo creates a warm, cozy flavor. Perfect for fall! You might have different needs, so here are some options: - Vegan nut-free granola bars: Use maple syrup instead of honey. This swap makes the bars vegan-friendly. Check that your chocolate chips are also dairy-free. - Low-sugar or sugar-free options: Try using mashed bananas or applesauce as a sweetener. These options cut down on sugar and add natural sweetness. Granola bars come in different formats to suit your taste: - Granola bites vs. traditional bars: You can shape the mixture into small balls instead of pressing it into a pan. These bites are fun and easy to grab! - No-bake granola bar recipes: You can skip the oven too! Just mix the ingredients and chill them in the fridge until firm. This method saves time and energy. Try these variations to find your favorite nut-free granola bar! For a complete guide, check the Full Recipe. To keep your nut-free granola bars fresh at room temperature, wrap them tightly in plastic wrap. You can also store them in an airtight container. Place them in a cool, dry spot. Avoid direct sunlight and heat to maintain their taste and texture. It's best to let the bars cool completely before storing them. This helps prevent moisture buildup, which can make them soggy. If you want to save some bars for later, freezing is a great option. Wrap each bar in plastic wrap, then put them in a freezer-safe bag. This keeps them fresh for up to three months. When you're ready to eat, take out a bar and let it thaw at room temperature for about 30 minutes. You can also warm it in the microwave for 10 to 15 seconds if you prefer a softer texture. In your pantry, nut-free granola bars will last about one week. The freezer can extend their life to three months. Always check for spoilage signs before eating. Look for any off smells or changes in color. If the bars feel hard or crumbly, it might be time to toss them. Proper storage helps keep your nut-free granola bars tasty and safe to eat. Can I make nut-free granola bars without oats? Yes, you can make nut-free granola bars without oats. Instead, use puffed rice or quinoa flakes. These will give your bars a nice texture. Just mix them with seeds and dried fruits for flavor. What is a good binder for nut-free granola bars? A good binder is honey or maple syrup. They help hold all ingredients together. You can also use brown rice syrup for a vegan option. This will keep your bars chewy and tasty. How do nut-free granola bars compare nutritionally to regular ones? Nut-free granola bars can be just as healthy as regular bars. They often have lower fat since they lack nuts. However, they still offer fiber from oats and seeds. Check the labels for added sugars to ensure you pick a healthy option. Caloric intake and serving tips Each bar usually has about 150-200 calories. For a balanced snack, pair one with fruit or yogurt. This adds vitamins and protein to your meal. Recommended stores and brands for nut-free granola bars You can find nut-free granola bars at most grocery stores. Look for brands like Nature Valley or MadeGood. They offer tasty options without nuts. Online resources for purchasing ingredients You can buy ingredients for nut-free granola bars online. Websites like Amazon or Thrive Market have everything you need. You can also find organic options for a healthier choice. For the full recipe, check out your favorite food blogs or recipe sites. Making nut-free granola bars is easy and fun. We covered key ingredients, optional add-ins, and ways to customize your recipe. You can make bars that fit your taste and diet. With simple steps, you can bake not just tasty snacks, but healthy ones too. Remember to store them correctly for the best flavor. This recipe can suit everyone, even those with nut allergies. Enjoy your homemade bars as a perfect snack or treat. Your journey to making great nut-free granola bars starts now!

Nut-Free Granola Bars Simple and Tasty Recipe

Are you craving a tasty snack that’s safe for nut allergy sufferers? Look no further! In this post, I’ll share

To make Baked Feta Pasta, gather these key items: - 200g (7 oz) pasta of your choice (penne or fusilli recommended) - 200g (7 oz) block of feta cheese - 250g (9 oz) cherry tomatoes, halved - 3 cloves garlic, minced The pasta plays a big role in the dish's texture. I often choose penne or fusilli for their ability to hold the creamy sauce well. Feta cheese brings a salty, tangy flavor that blends beautifully with the baked tomatoes. Cherry tomatoes add sweetness and freshness, while garlic adds depth. Don't forget these flavorful touches: - 1 teaspoon red pepper flakes (adjust to taste) - 3 tablespoons olive oil - 1 teaspoon dried oregano - Salt and black pepper to taste - Fresh basil leaves for garnish - Grated Parmesan cheese for serving (optional) Red pepper flakes give a gentle kick. The olive oil helps everything bake together nicely. Dried oregano adds an aromatic note. Fresh basil and Parmesan on top make it all look and taste even better. - Use a kitchen scale or measuring cups for accurate amounts. - Halve the cherry tomatoes for even cooking. - Mince the garlic finely to blend well with other flavors. Proper measurements ensure balance in taste. Preparing the tomatoes and cheese correctly helps them soften and meld during baking. This makes the sauce rich and smooth. When you mix everything, you’ll create a dish that feels homemade and gourmet. For the complete recipe, check [Full Recipe]. Preheat your oven to 200°C (400°F). This temperature helps the feta and tomatoes bake evenly. Grab a large baking dish and set it aside. This dish will hold all your tasty ingredients. In the baking dish, mix the halved cherry tomatoes, minced garlic, red pepper flakes, and olive oil together. Add salt and black pepper to taste. Stir well so everything is coated. Next, place the block of feta cheese in the center of this mixture. Drizzle a bit of extra olive oil over the feta and sprinkle dried oregano on top. While the feta and tomatoes bake, cook your pasta according to the package instructions until it's al dente. This usually takes about 8-10 minutes. Before draining, reserve 1 cup of pasta water. This water helps create a smooth sauce later. Once the feta and tomatoes are done baking, remove the dish from the oven. Use a fork to mash the soft feta and mix it with the tomatoes. This creates a creamy sauce. Add the cooked pasta to the baking dish, mixing everything well. If the pasta seems dry, add some reserved pasta water until it reaches your desired consistency. Taste and adjust the seasoning as needed. Serve right away, garnished with fresh basil and grated Parmesan cheese if you like. For the full recipe, check out the details provided earlier. To get the best sauce texture, start with a good feta cheese. Use a high-quality block of feta instead of crumbled. This allows the feta to melt evenly, creating a rich sauce. As the feta bakes, it becomes soft and creamy. When you mash it with the tomatoes, it blends well. Adjusting spice levels is easy. If you love heat, add more red pepper flakes. For a milder sauce, use less. Taste the sauce before mixing it with pasta. This way, you can find the right balance for your taste buds. Timing is key for fresh pasta. Cook the pasta just as the feta and tomatoes are baking. This keeps the pasta hot when you mix it in. Follow the timing on the pasta package. You want it al dente, so it holds up well in the sauce. Always reserve some pasta water before draining. This water helps create a smooth sauce. If the dish seems dry after mixing, add a splash of the reserved water. This also helps bring all the flavors together. Great sides can elevate your meal. A simple green salad pairs well with baked feta pasta. The fresh greens balance the creamy sauce. Garlic bread is another tasty option. It adds crunch and is perfect for scooping up extra sauce. You can also add toppings for more flavor. Fresh basil adds a nice touch, both in taste and color. Grated Parmesan cheese is a classic choice. It adds a salty kick that complements the dish. Enjoy this delightful meal with friends and family! {{image_2}} You can swap feta with other cheeses. Try goat cheese for a tangy twist. Cream cheese works well too, making it super creamy. For vegetables, bell peppers or zucchini can add color and crunch. If you want a low-carb option, use spiralized zucchini or cauliflower rice instead of pasta. This keeps the dish light but still tasty. To boost the flavor, add fresh herbs like thyme or rosemary. They pair well with the creamy feta. You might want to sprinkle some lemon zest for brightness. For added protein, toss in cooked chicken, shrimp, or chickpeas. This makes the dish more filling and nutritious. Use seasonal veggies for a fresher taste. In spring, add asparagus or peas. In fall, roasted butternut squash adds sweetness. Adjust your ingredients based on what’s fresh and available. This keeps the dish exciting and unique each time you make it. To store leftovers safely, place your baked feta pasta in an airtight container. Make sure the dish cools down before sealing it. This helps prevent condensation, which can make the pasta soggy. Store it in the fridge for up to three days. Label the container with the date, so you know when to eat it. The best way to reheat baked feta pasta is in the oven. Preheat your oven to 180°C (350°F). Place the pasta in a baking dish and cover it with foil. Heat it for about 15-20 minutes. This keeps the sauce creamy and the pasta from drying out. You can also reheat it in the microwave, but use a lower power setting. Stir the pasta halfway through to heat it evenly. Yes, you can freeze baked feta pasta. To freeze it, let it cool completely. Then, portion it into freezer-safe containers. Leave some space at the top, as it will expand when frozen. Seal tightly and store in the freezer for up to three months. To thaw, move it to the fridge overnight. You can reheat it directly from frozen too. Just add a little extra sauce or pasta water while reheating to keep it moist. Enjoy your baked feta pasta anytime! For the full recipe, refer back to the beginning of this article. Baked Feta Pasta is a creamy dish made with pasta, feta cheese, and tomatoes. This dish became popular on social media, and for good reason. It’s easy to make and tastes amazing. You start by baking feta with cherry tomatoes and garlic, which creates a rich sauce. You then mix this with pasta. The result is a warm, cheesy delight that everyone loves. Yes, you can! To make Baked Feta Pasta vegan, simply swap the feta cheese for a plant-based option. Look for a vegan feta made from nuts or tofu. Use the same amount as the original cheese. You can also add nutritional yeast for a cheesy flavor. This keeps the dish creamy while staying plant-based. To make the dish spicy, add more red pepper flakes. If you like it mild, reduce the amount. You can also add a pinch of cayenne pepper for a different heat. Taste as you go to find the perfect balance that suits your palate. Baked Feta Pasta pairs well with a fresh salad or crusty bread. A simple green salad with olive oil and lemon works great. For drinks, a light white wine or sparkling water complements the flavors. You can also serve it with grilled vegetables for a colorful plate. For those eager to try this dish, find the Full Recipe above! Baked Feta Pasta is a simple yet tasty dish that combines pasta, feta, and fresh veggies. We explored key ingredients, from pasta shapes to seasoning. I shared tips on preparing and cooking, plus ways to perfect your sauce. You can also customize this recipe with different flavors and ingredients based on your preferences. With these insights, you now have all you need to create a delicious meal. Enjoy your cooking, and embrace the flavors of Baked Feta Pasta!

Baked Feta Pasta Delightfully Simple and Creamy Dish

Are you ready to make a dish that’s creamy, easy, and delicious? Baked Feta Pasta fits all those wishes! This

To make a tasty vegetable stir-fry, you need a mix of fresh veggies. Here’s what you’ll need: - 1 cup broccoli florets - 1 bell pepper (any color), sliced - 1 medium carrot, julienned - 1 zucchini, sliced into half-moons - 1 cup snap peas - 3 cloves garlic, minced - 1 tablespoon fresh ginger, grated - 2 tablespoons soy sauce (low sodium) - 1 tablespoon sesame oil - 1 tablespoon olive oil - 1 teaspoon chili flakes (optional) - Salt and pepper to taste - Sesame seeds for garnish - Chopped green onions for garnish When picking vegetables, look for bright colors and firm textures. Fresh veggies taste better and have more nutrients. Avoid any that seem limp or have dark spots. Feel free to swap out veggies based on what you like or have on hand. For example, you can use green beans instead of snap peas or add mushrooms for extra flavor. If you want a vegan option, just ensure your soy sauce is plant-based. This simple blend creates a stir-fry that’s not only quick but also full of flavor. For the Full Recipe, follow the steps outlined to create your vibrant veggie delight. Start by preparing your vegetables. Wash each one under cold water to remove dirt. This helps keep your veggies fresh and clean. Cut all your vegetables into similar sizes. This is key for even cooking. When pieces are the same size, they cook at the same rate. If you cut them too big or too small, some may cook faster, while others stay raw. Now, let's get cooking! Heat a large non-stick skillet or wok over medium-high heat. Add olive oil and let it warm up. First, add minced garlic and grated ginger. Stir for about 30 seconds until you smell their wonderful aroma. Next, toss in the broccoli, bell pepper, and carrot. Stir-fry these for about 3 to 4 minutes. You want them to start softening but still be a bit crunchy. Now, it's time for the zucchini and snap peas. Add them to the pan and stir continuously for 2 to 3 more minutes. Your goal is tender-crisp vegetables. Drizzle soy sauce and sesame oil over the mix. If you like a little heat, sprinkle chili flakes in too. Stir everything well to coat the veggies. Season with salt and pepper to taste. Finally, cook for another minute. This ensures everything is heated through and well mixed. Serving your stir-fry can be fun! Place it over a bed of steamed rice or noodles. This adds texture and makes it filling. For a pretty touch, sprinkle sesame seeds and chopped green onions on top. This not only looks great but adds flavor too. Enjoy your vibrant veggie delight! For a full recipe, check out the [Full Recipe]. Common mistakes to avoid When making stir-fry, avoid overcrowding the pan. If you add too many veggies at once, they will steam instead of fry. This makes them soggy. It’s best to work in batches if you have a lot of vegetables. Another mistake is cooking on low heat. Stir-frying needs high heat to give that nice char. Also, don’t forget to prep all your ingredients first. Stir-frying cooks quickly, and you need to be ready. Adjusting cooking times for various vegetables Different veggies have different cooking times. Start with the ones that take longer, like broccoli and carrots. Stir-fry these for about 3-4 minutes. Then add quicker-cooking vegetables like zucchini and snap peas. They usually need only 2-3 minutes. This way, all your veggies will be tender but still crisp. Additional sauces and seasonings to try Soy sauce is a classic, but you can mix it up. Try adding oyster sauce for a richer taste. You can also use teriyaki sauce for a sweet touch. A splash of rice vinegar adds brightness. If you want some heat, chili paste or sriracha gives a nice kick. Experiment with different sauces to find your favorite blend. Tips for balancing flavors in your stir-fry Balancing flavors is key. Aim for salty, sweet, and sour. If your stir-fry seems too salty, add a bit of sugar or honey. If it’s too sweet, a splash of vinegar can help. Taste as you cook. This way, you can adjust flavors to your liking. Remember, each ingredient adds its own unique taste. Play around with them for the best result! For the recipe, check out the Full Recipe. {{image_2}} You can mix and match vegetables based on what’s in season. In spring, use fresh asparagus and peas. Summer is great for bell peppers and zucchini. Fall brings hearty veggies like carrots and squash. Winter favorites include broccoli and Brussels sprouts. To make your stir-fry even more exciting, try adding protein. Tofu is a great option for vegans. Chicken or shrimp adds a nice touch for meat lovers. Slice them thinly to help them cook quickly. If you need a gluten-free stir-fry, use tamari instead of soy sauce. This swap keeps the flavor while making it safe for gluten-free diets. For a vegan version, stick with just vegetables and tofu. Each vegetable you choose brings unique health benefits. Broccoli is high in vitamins C and K. Bell peppers are rich in antioxidants. Carrots offer beta-carotene for eye health. Zucchini is low in calories and high in water content, which helps keep you hydrated. For more ideas and tips, check out the Full Recipe for vibrant flavor and nutrition! After enjoying your vibrant veggie delight stir-fry, store any leftovers in an airtight container. This keeps the flavors fresh and prevents spoilage. Make sure to let the stir-fry cool down before sealing it. The best way to reheat your stir-fry is in a skillet over medium heat. This method helps keep the veggies crisp. Stir frequently to avoid burning. If you prefer using a microwave, heat it in short bursts. Stir in between to ensure even warming. Yes, you can freeze stir-fry! Freezing is a great way to save any extra servings. Start by letting the stir-fry cool completely. Then, pack it into freezer-safe bags or containers. Remove as much air as possible to prevent freezer burn. Label the bags with the date. When you want to enjoy it again, thaw the stir-fry in the fridge overnight. For reheating, use a skillet or microwave. This keeps the vegetables from getting mushy. Enjoy your easy vegetable stir-fry anytime with these simple storage tips! How do I make my stir-fry more flavorful? To boost flavor, use fresh herbs and spices. Try adding fresh basil, cilantro, or parsley. A splash of lime juice or rice vinegar can add brightness. A dash of soy sauce, hoisin, or oyster sauce also enhances taste. Experiment with different sauces to find your favorite mix. Can I use frozen vegetables for stir-fry? Yes, you can use frozen vegetables! They are convenient and save time. Just make sure to thaw them before cooking. This helps avoid excess water in your stir-fry. Cooking time may be a bit longer since frozen veggies are colder. What type of oil is best for stir-frying? The best oils for stir-frying are ones with a high smoke point. Use oils like peanut, canola, or sunflower oil. These oils handle high heat well and add flavor. You can also mix oils, like olive oil with sesame oil, for depth. How do I know when my stir-fry is done cooking? Your stir-fry is ready when vegetables are tender-crisp. They should be vibrant and colorful. Taste a piece to check the texture. Also, check if the sauce coats the vegetables evenly. If all looks good, it’s time to serve! In this blog post, I shared a complete guide to making a delicious vegetable stir-fry. We covered essential ingredients, detailed preparation steps, and cooking tips to keep your veggies crisp. I shared ideas for serving and creative variations based on your dietary needs. Finally, I highlighted how to store leftovers and answered common questions. Stir-frying is fun and flexible. You can experiment with flavors and ingredients. Enjoy your cooking journey and create tasty meals your whole family will love.

Easy Vegetable Stir-Fry Quick and Flavorful Recipe

Looking for a quick and tasty dinner? My Easy Vegetable Stir-Fry recipe packs flavor and nutrition in every bite. With

To make Garlic Butter Shrimp Pasta, gather these items: - 8 oz linguine or spaghetti - 1 lb large shrimp, peeled and deveined - 4 tablespoons unsalted butter - 4 cloves garlic, minced - 1 teaspoon red pepper flakes (adjust to taste) - Zest and juice of 1 lemon - 1/4 cup chicken or vegetable broth - 1/4 cup freshly grated Parmesan cheese - 2 tablespoons fresh parsley, chopped - Salt and pepper to taste You will need these tools for easy cooking: - Large pot for boiling pasta - Large skillet for sautéing - Measuring cups and spoons - Cutting board and knife - Tongs or a pasta fork - Colander for draining pasta This dish serves four. Each serving has: - Calories: 400 - Protein: 30g - Carbohydrates: 40g - Fat: 15g - Fiber: 2g - Sodium: 600mg This meal is packed with flavor and good nutrients. You get protein from shrimp and healthy fats from butter. Enjoy this balanced dish while savoring every bite of garlic goodness! For the full recipe, visit the link provided. Start by boiling a large pot of salted water. Once it boils, add 8 oz of linguine or spaghetti. Cook it until al dente, following the package's time. Drain the pasta, but save about 1/2 cup of the pasta water for later. In a large skillet, heat 2 tablespoons of butter over medium heat. Add 1 lb of large shrimp, making sure they are in a single layer. Season them with salt and pepper. Cook for 2-3 minutes on each side. The shrimp should turn pink and opaque. Remove them from the skillet and set aside. In the same skillet, add the remaining 2 tablespoons of butter. Once it melts, toss in 4 cloves of minced garlic and 1 teaspoon of red pepper flakes. Sauté for about 1 minute. You want it fragrant, but not browned. Pour in 1/4 cup of chicken or vegetable broth, along with the zest and juice of 1 lemon. Bring the mixture to a simmer. Add the cooked pasta and shrimp back to the skillet. Toss everything well to combine. If the sauce seems too thick, stir in some reserved pasta water. Mix in 1/4 cup of freshly grated Parmesan cheese and half of the 2 tablespoons of chopped parsley. Taste your dish and add more salt, pepper, or red pepper flakes if needed. Divide the pasta into bowls. Garnish with the remaining parsley and extra Parmesan cheese. Enjoy your Garlic Butter Shrimp Pasta! For the full recipe, check out the section above. To get the best garlic butter flavor, use fresh garlic. Fresh garlic has a bright taste. Mince the garlic finely to release more oils. You can let it sit for a minute after mincing. This helps it become even more fragrant. Use unsalted butter for better control over salt. Feel free to add herbs like thyme or basil for a fresh touch. You can also adjust the red pepper flakes to suit your spice level. Overcooked shrimp can become rubbery. To keep them juicy, cook them just until they turn pink. This usually takes about 2-3 minutes on each side. Remove them from heat as soon as they are opaque. If you are unsure, test one shrimp first. It should bend easily but not fall apart. You can always add them back to the pan later if needed. Leftover pasta water is a great cooking secret. It has starch, which helps thicken your sauce. Save about 1/2 cup before draining the pasta. When mixing ingredients, add a little pasta water if the sauce seems dry. This will help the sauce cling to the pasta better. Plus, it adds extra flavor. You won't believe how much it improves your dish! For a full recipe, check out the detailed steps provided above. {{image_2}} You can make this dish even better by adding vegetables. Spinach, cherry tomatoes, and bell peppers work well. Cook them in the skillet after you sauté the shrimp. This adds color and nutrition. You can also use zucchini or asparagus for a fresh twist. Just slice them thinly so they cook quickly. Adding veggies makes the dish more filling and fun. If shrimp isn’t your favorite, you can use other proteins. Chicken or scallops are great choices. For chicken, cut it into small pieces and cook it the same way as shrimp. If you want to try scallops, sear them for about 2-3 minutes per side. Both options work well with the garlic butter sauce. You can even use tofu for a vegetarian option, making this dish suitable for everyone. For a gluten-free meal, swap the pasta for zucchini noodles or gluten-free pasta. Zucchini noodles are light and soak up the sauce nicely. Simply spiralize the zucchini and sauté it for a few minutes before mixing in the sauce. Gluten-free pasta cooks like regular pasta, and you can follow the same steps in the recipe. This way, everyone can enjoy a tasty meal without worry. For the full recipe, be sure to check the details above. To keep your garlic butter shrimp pasta fresh, place it in an airtight container. Make sure it cools down first. You can store it in the fridge for up to three days. For best flavor, consume it within this time. When you’re ready to enjoy your leftovers, reheat them gently. Use a skillet over low heat. Add a splash of broth or water to keep it moist. Stir often until heated through. You can also microwave it, but cover the dish to avoid drying out. If you want to freeze garlic butter shrimp pasta, do this before adding the cheese. Place the cooled pasta in a freezer-safe bag. Remove as much air as possible. It can last up to three months in the freezer. To enjoy it later, thaw in the fridge overnight and reheat as mentioned above. For the best taste, add fresh cheese after reheating. Yes, you can use frozen shrimp. Just make sure to thaw them first. Place the shrimp in cold water for about 15 minutes. This helps them defrost quickly and evenly. After that, pat them dry with a paper towel. This step prevents excess water from ruining your dish. If you don’t have Parmesan cheese, you can use Pecorino Romano. It has a similar taste but is a bit saltier. Another option is nutritional yeast, which is great for a dairy-free choice. It adds a nice cheesy flavor without the dairy. To spice things up, add more red pepper flakes. Start with an extra half teaspoon and taste as you go. You can also chop fresh jalapeños or add a dash of hot sauce. These choices will add heat without changing the dish too much. Yes, this dish is great for meal prep. Cook it, then store it in airtight containers. It keeps well in the fridge for up to three days. To reheat, just warm it in a skillet. Add a splash of broth or water to keep it moist. For the full recipe, check out the detailed instructions above. This blog post covered all you need for garlic butter shrimp pasta. We explored the right ingredients, kitchen tools, and nutritional facts. I shared step-by-step instructions so you can cook with ease. You learned tips to improve flavor and prevent overcooking. We also discussed variations, storage methods, and answered common questions. Now, you have the tools to make a tasty meal. Enjoy cooking and experimenting with your own twists!

Garlic Butter Shrimp Pasta Simple and Savory Delight

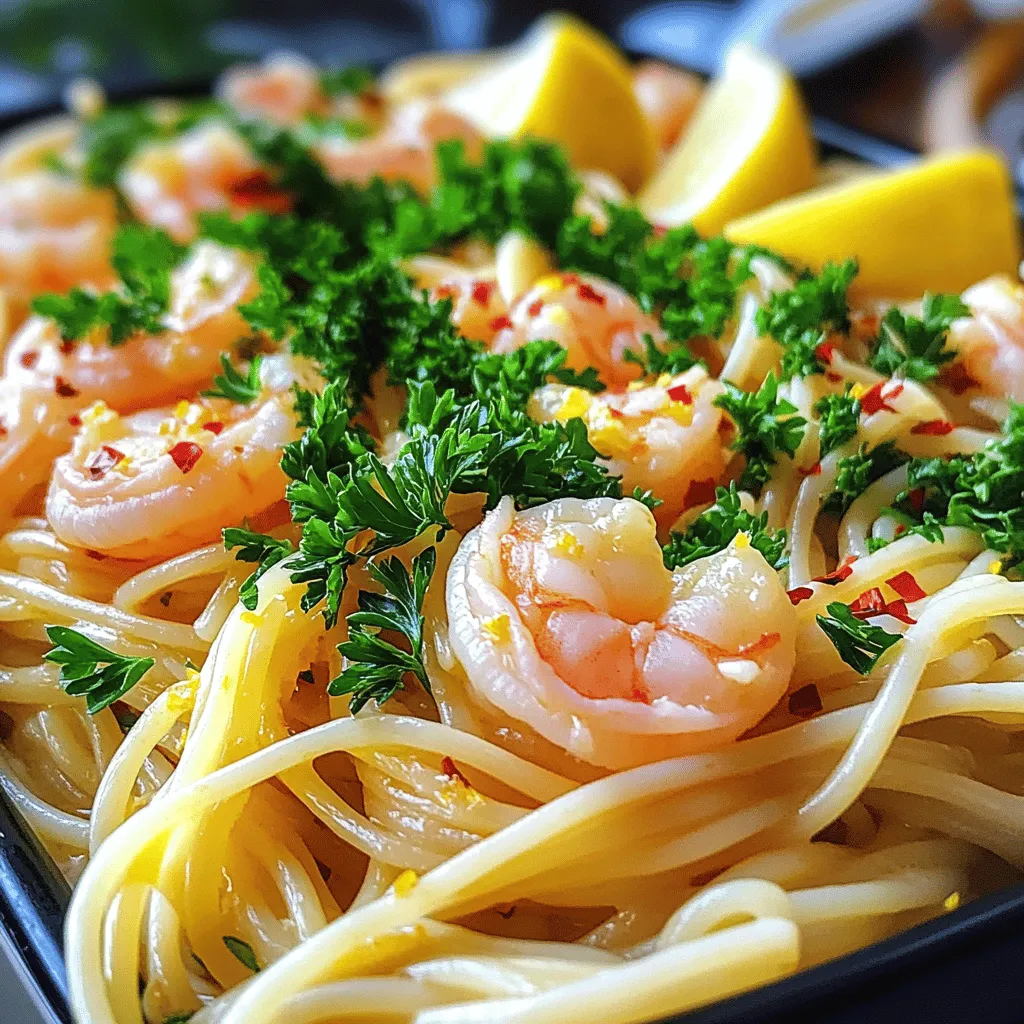
Are you ready for a dish that bursts with flavor and is quick to make? My Garlic Butter Shrimp Pasta

Older posts
Newer posts
← Previous Page1 … Page43 Page44 Page45 … Page64 Next →

dsad

© 2025 Foodish Talk • Built with GeneratePress

Our Policies

  • Copyright Policy
  • Cookie Policy
  • GDPR Policy
  • Privacy Policy
  • Disclaimer
  • Terms Of Use

More Information

  • Home
  • About
  • Contact
  • Appetizers
  • Dessert
  • Dinner
  • Drinks
©2025, Foodish Talk About Back To Top