Skip to content
DisclaimerTerms Of UseGDPR PolicyCookie Policy

Foodish Talk

  • Home
  • Drinks
  • Appetizers
  • Dinner
  • Dessert
  • About
  • Contact
  • Privacy Policy
DisclaimerTerms Of UseGDPR PolicyCookie Policy

Ava

- 1 pound Italian chicken sausage, sliced - 2 medium zucchinis, sliced - 1 bell pepper (any color), chopped - 1 red onion, sliced - 1 cup cherry tomatoes, halved - 3 tablespoons olive oil - 1 teaspoon garlic powder - 1 teaspoon smoked paprika - 1 teaspoon dried oregano - Salt and pepper to taste - Fresh parsley, for garnish I love this recipe because it brings together bright veggies and tasty sausage. The main ingredients are simple but flavorful. You can choose any color of bell pepper to match your taste. The cherry tomatoes add a nice sweetness when they roast. Next, let’s talk about the seasonings. Olive oil is key for flavor and helps everything cook evenly. Garlic powder gives a nice kick. Smoked paprika adds depth, making the dish more exciting. Dried oregano brings an aromatic touch. You can adjust salt and pepper to your liking. Lastly, the fresh parsley adds a pop of color and freshness. It’s a simple touch that makes a big difference. When you combine all these ingredients, you get a colorful and hearty meal. For the complete details, check the Full Recipe. 1. Preheat your oven to 400°F (200°C). This helps cook everything evenly. 2. Line a large sheet pan with parchment paper. This makes cleanup easy. 3. In a large bowl, combine the sliced sausage, zucchinis, bell pepper, red onion, and cherry tomatoes. Mix them well. 1. Drizzle the olive oil over the mixture. 2. Add garlic powder, smoked paprika, dried oregano, salt, and pepper. Toss everything together until coated. 3. Spread the mixture in a single layer on the prepared sheet pan. Avoid overcrowding for even roasting. 4. Roast in the oven for 25-30 minutes. Check that the sausage is browned and the veggies are tender. Toss halfway through for even browning. 1. Once done, remove the sheet pan from the oven. Let it cool for a few minutes. 2. Garnish with freshly chopped parsley before serving. Enjoy your meal! To make your dish shine, adjust the seasonings to your taste. You can add more garlic powder for extra flavor. If you like heat, try adding red pepper flakes. For a fresh touch, squeeze lemon juice over the dish just before serving. To ensure even cooking, cut your veggies into similar sizes. Smaller pieces cook faster, while larger chunks may stay firm. This simple trick helps everything cook at the same rate. Avoid overcrowding the pan. Give each piece space to brown. When you pile everything together, they steam instead of roast. If needed, use two pans for better results. Toss the ingredients halfway through cooking. This step allows all sides to get crispy and browned. You want each bite to be full of flavor. It also helps the veggies soften nicely while keeping the sausage juicy. For the full recipe, check out the Sizzling Sheet Pan Sausage & Veggies. {{image_2}} If you want to change the sausage, there are great options. Turkey sausage works well and has less fat. If you prefer plant-based options, try tofu or tempeh. Both absorb flavors nicely and add protein. You can also use vegan sausage for a meatless meal. Each option brings its own taste and texture. You can swap veggies based on what you have. Broccoli and carrots roast nicely. They add crunch and color. Seasonal veggies are also a great choice. In the fall, use squash or Brussels sprouts. In the summer, bell peppers and eggplant shine. Mix and match to keep things exciting. To boost flavors, try different herbs and spices. Rosemary, thyme, and basil can add depth. A dash of red pepper flakes brings heat. You can also add sauces or marinades for a twist. Teriyaki or BBQ sauce can change the whole dish. Don’t hesitate to experiment and find your favorite combo. For the full recipe, check the Sizzling Sheet Pan Sausage & Veggies section. To store your leftovers, let the dish cool first. Place the sausage and veggies in an airtight container. This keeps them fresh and tasty. You can store them in the fridge for up to three days. After that, the veggies might lose their crunch. For the best texture, heat your leftovers in the oven. Preheat the oven to 350°F (175°C). Spread the sausage and veggies on a baking sheet. Heat them for about 10-15 minutes. This method keeps them crispy. You can also use the microwave. Place the food in a microwave-safe bowl. Cover it with a damp paper towel. Heat it for 1-2 minutes, checking often. The food warms quickly, but it may lose some crispness. For more details, check the Full Recipe. I recommend using Italian chicken sausage for this dish. It brings great flavor without being too heavy. You can also try turkey sausage or pork sausage if you prefer. Each type adds its own unique taste, so feel free to experiment. Yes, you can prepare the ingredients the night before. Just chop the veggies and slice the sausage. Store them in the fridge in an airtight container. When you're ready to eat, just toss everything together and roast it. To make this dish gluten-free, ensure your sausage is gluten-free. For a vegetarian option, use plant-based sausage or tofu. You can also swap out the veggies to include your favorites, like carrots or broccoli, based on your needs. Absolutely! You can freeze the cooked sausage and veggies. Allow them to cool, then store in freezer-safe bags. They will keep well for up to three months. Just thaw overnight in the fridge before reheating. This dish pairs well with a simple side salad or crusty bread. You can also serve it over rice or quinoa for added texture. Drizzle with a bit of balsamic glaze or your favorite sauce for a flavor boost. For the full recipe, check out the details above! This blog post covered a simple sheet pan sausage and veggie recipe. We explored key ingredients like Italian sausage, zucchinis, and cherry tomatoes. I shared step-by-step cooking instructions to ensure great flavor and texture. Tips helped you perfect the dish, with variations for dietary needs. Remember, you can customize this meal however you like. Trust your taste buds and have fun cooking. Enjoy your tasty creation!

Satisfying Sheet Pan Sausage and Veggies Recipe

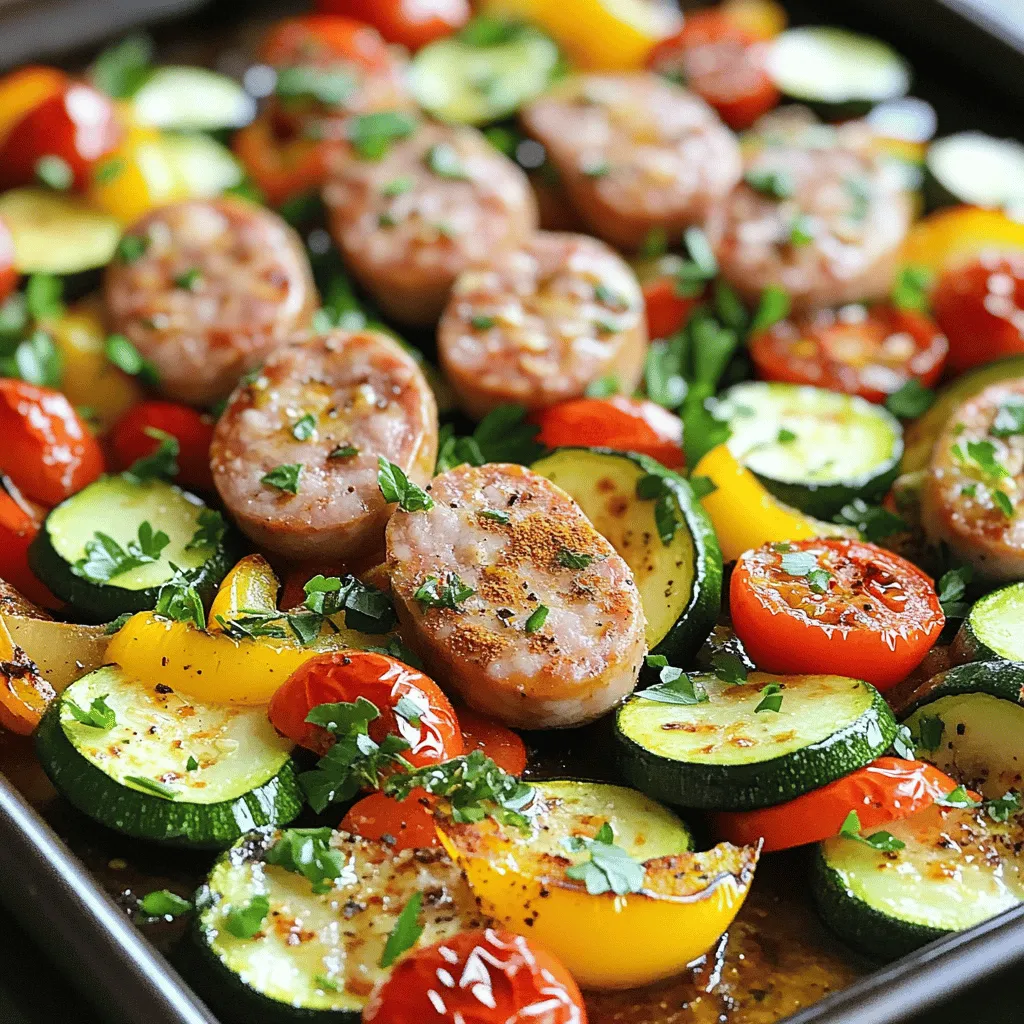
Are you looking for a quick and tasty dinner idea? Try my Satisfying Sheet Pan Sausage and Veggies recipe! This

To make S'mores Dip, gather these key items: - 1 cup semi-sweet chocolate chips - 1 cup mini marshmallows - 1 tablespoon butter - 1 teaspoon vanilla extract - 1/2 teaspoon sea salt - Graham crackers for dipping - Optional: fresh strawberries or banana slices These ingredients create a rich, gooey treat that everyone loves. The measurements are simple and easy to remember. You need equal parts of chocolate chips and marshmallows, which makes it balanced. The butter adds creaminess, while vanilla and sea salt enhance the flavor. You can get creative with add-ins! Try adding crushed nuts for a crunchy bite. Some people enjoy a sprinkle of cinnamon or a dash of chili powder for a twist. Fresh fruit slices, like strawberries or bananas, are great for dipping too. For the full recipe, check out S'mores Dip Delight . Start by preheating your oven to 450°F (232°C). This heat is perfect to make the marshmallows toast nicely. While the oven heats up, grab an 8-inch baking dish. Lightly grease it with butter or cooking spray. This helps the dip come out easily later. Next, take a medium saucepan. Place it on low heat and add 1 tablespoon of butter. Let it melt slowly. Once melted, add 1 cup of semi-sweet chocolate chips. Stir continuously. Keep stirring until the mix is smooth and fully melted. Remove the pan from heat. Add 1 teaspoon of vanilla extract and 1/2 teaspoon of sea salt. Mix well to combine all the flavors. Pour the chocolate mixture into your greased baking dish. Spread it out evenly. Then, take 1 cup of mini marshmallows and sprinkle them on top of the chocolate layer. Place the dish in the oven. Bake for about 5-7 minutes. Watch closely until the marshmallows turn golden brown and slightly toasted. This step makes the dip look and taste amazing. Once the dip is out of the oven, let it cool for a minute. Serve it warm with graham crackers for dipping. You can also add fresh strawberries or banana slices on the side. These fruits add a tasty twist and pair well with the sweet dip. Remember, for the full recipe, check out the details above! To get those marshmallows perfectly toasted, keep an eye on them. They can go from golden to burnt very fast. Bake them at 450°F (232°C) for about 5-7 minutes. Watch closely as they puff up and turn golden brown. For extra flavor, try using a kitchen torch if you have one. This gives you control and a nice, even toast. Avoid using too many marshmallows. While they are tasty, too many can overpower the chocolate. Make sure the chocolate layer is smooth and even. If it’s lumpy, it won’t melt well. Also, don’t bake it for too long. If you let it sit too long, the marshmallows can burn. Lastly, remember to let the dip cool for a minute before serving. This helps prevent burns. You’ll need a few basic tools for this recipe. A medium saucepan is great for melting chocolate. I recommend a baking dish about 8 inches wide for even cooking. Use a spatula to spread the chocolate smoothly. A kitchen torch can help with toasting marshmallows if you want that perfect finish. Lastly, have some sturdy graham crackers on hand for dipping. You can also use fresh strawberries or banana slices for a fruity twist. Enjoy your S'mores Dip Delight with these tips for the best experience. For the complete recipe, check [Full Recipe]. {{image_2}} You can mix up your s'mores dip with fun flavors. Try adding a nutty twist by using peanut butter chips along with the chocolate. You can also add a touch of spice. A sprinkle of cinnamon or cayenne pepper can give it a warm kick. You can even use flavored chocolate, like mint or orange, for a unique taste. Each of these options adds a new layer of delight. While graham crackers are classic, you can explore other dippers. Cookies like Oreos or vanilla wafers work great. Fruit adds freshness too. Try strawberries, bananas, or apple slices. Each dipper gives a different taste. You can even use pretzels for a salty crunch. Get creative and find your favorite combination! You can easily make s'mores dip fit your diet. To make it gluten-free, choose gluten-free graham crackers or use fruit slices. If you're vegan, substitute chocolate chips with dairy-free options. Use coconut cream instead of butter for a rich flavor. These changes keep the fun alive for everyone at your table. With these variations, you can enjoy s'mores dip in many ways! For the full recipe, check out S'mores Dip Delight. To store leftover s'mores dip, let it cool first. Then, cover the dish tightly with plastic wrap or foil. You can also transfer it to an airtight container. This keeps the dip fresh and prevents it from drying out. When you’re ready to enjoy the dip again, preheat your oven to 350°F (175°C). Place the dip in the oven for about 10 minutes. This will warm it up and slightly revive the marshmallows. You can also use a microwave. Heat it in short bursts of 15 seconds, stirring in between. This method works well if you're in a hurry. Leftover s'mores dip lasts about 3 days in the fridge. Make sure it stays sealed to keep it fresh. I recommend checking for any signs of spoilage before using it. If you see any changes in color or smell, toss it out. To enjoy the dip at its best, eat it within a day or two. For full enjoyment, try to finish it while it's still soft and warm. Yes, you can prepare S'mores Dip ahead. Make the dip and store it in the fridge. Cover it tightly to keep it fresh. When ready to serve, heat it again in the oven or microwave until warm. This keeps the chocolate and marshmallows soft and gooey. If you lack chocolate chips, don’t worry! You can use chopped chocolate bars or cocoa powder mixed with a bit of cream. Both options work well. Just make sure the chocolate melts smoothly for the best dip. To make S'mores Dip in the microwave, start by melting the butter and chocolate in a bowl. Heat in short bursts, stirring after each. Once melted, mix in the vanilla and salt. Top with marshmallows and microwave for 30 seconds. Keep an eye on it to avoid burning. Yes, you can make S'mores Dip on the stovetop. Melt the butter and chocolate in a pan, stirring well. Once smooth, pour the mix into a heat-safe bowl. Top with marshmallows and cover. Place the bowl on low heat until the marshmallows puff up. Enjoy warm with graham crackers and fresh fruit! For the complete recipe, check out the Full Recipe section above. S'mores dip is a fun twist on the classic treat. We covered how to prepare this tasty dessert with simple ingredients, clear steps, and useful tips. You now know how to experiment with flavors and dippers too. Enjoy the sweet combination of chocolate and marshmallows whenever you want. Store any leftovers properly to keep the taste fresh. With these ideas, you can impress friends and family with your s'mores dip skills! Get ready to indulge in this delicious treat again and again.

S’mores Dip Irresistible and Easy Dessert Treat

If you’re looking for a quick and tasty dessert, S’mores Dip is the answer! This easy treat combines gooey chocolate,

- 1 ½ cups chocolate wafer cookie crumbs - ½ cup unsalted butter, melted - 2 cups cream cheese, softened - 1 cup powdered sugar - 1 teaspoon vanilla extract - 1 cup heavy cream - 8 oz dark chocolate, melted and slightly cooled - ½ cup sour cream - ½ teaspoon instant coffee granules (optional) - Pinch of salt Gathering the right ingredients is key for a great no-bake chocolate cheesecake. First, you need chocolate wafer cookie crumbs. These crumbs form a delicious crust. You mix them with melted butter for a rich base. Next, you will need cream cheese. Make sure it's softened to get a smooth filling. Powdered sugar adds sweetness, while vanilla extract gives flavor. Heavy cream is crucial for that wonderful, creamy texture. It helps to whip up into peaks, making your cheesecake light. Dark chocolate is the star here. Melt it, and let it cool slightly before mixing. It adds richness and depth to the flavor. Sour cream adds tanginess, balancing the sweetness. If you want, you can include instant coffee granules. They boost the chocolate taste without making it too coffee-like. A pinch of salt enhances all the flavors. - 9-inch springform pan - Mixing bowls - Electric mixer or whisk - Spatula - Plastic wrap You will need a 9-inch springform pan to hold everything together. Mixing bowls are key for combining your ingredients. An electric mixer or whisk helps whip the cream and mix the filling. A spatula is perfect for smoothing the cheesecake top. Lastly, plastic wrap keeps the cheesecake fresh while it chills. Using the right tools helps ensure your no-bake chocolate cheesecake turns out perfect. Follow the Full Recipe to make this creamy dessert delight! To start, gather your ingredients. In a medium bowl, combine 1 ½ cups of chocolate wafer cookie crumbs and ½ cup of melted unsalted butter. Mix until the crumbs are fully coated. Now, take a 9-inch springform pan. Press the crumb mixture firmly into the bottom of the pan. Make sure it is even. Chill this crust in the refrigerator for at least 15 minutes. This step helps it hold together better. Next, we will make the cheesecake filling. In a large mixing bowl, beat 2 cups of softened cream cheese with an electric mixer. Add 1 cup of powdered sugar and 1 teaspoon of vanilla extract. Mix until the mixture is smooth and creamy. In another bowl, whip 1 cup of heavy cream until stiff peaks form. Gently fold this whipped cream into the cream cheese mixture. This gives the cheesecake its light, fluffy texture. Now, it's time to bring it all together. Pour in 8 ounces of melted dark chocolate and mix until well combined. If you want to enhance the flavor, dissolve ½ teaspoon of instant coffee granules in a tablespoon of warm water. Mix that in too. Add ½ cup of sour cream and a pinch of salt. Fold gently until smooth. Now, pour this delicious filling over the prepared crust. Smooth the top with a spatula. Cover the pan with plastic wrap and refrigerate for at least 4 hours, or overnight for the best texture. Once set, carefully remove the sides of the springform pan. For the complete recipe, check the Full Recipe section. To get a smooth and creamy cheesecake, use room temperature cream cheese. Cold cream cheese will create lumps in your mix. Set it out for 30 minutes before you start. When whipping the heavy cream, make sure your bowl and beaters are cold. This helps the cream whip faster and get nice peaks. You can add extra flavor to your cheesecake. A few drops of mint extract can give a fresh taste. If you want a different twist, try Greek yogurt instead of sour cream. It adds a nice tang without losing the creaminess. Toppings make your cheesecake shine. Use chocolate shavings for a rich look. Fresh berries add color and a burst of flavor. A drizzle of chocolate ganache can make it look fancy. Serve it on a nice plate to make it pop. For the best effect, slice and serve right after adding your toppings. For the full recipe, check out the details above. {{image_2}} You can tweak your cheesecake flavors to make it even more fun. - Mocha Chocolate Cheesecake: Add coffee to your mix. This gives a nice coffee taste. Just mix in a bit of instant coffee granules when you blend the chocolate. - Pure Chocolate: For a richer taste, use only dark chocolate. It gives a deep, bold flavor that chocolate lovers will adore. Making this dessert fit your diet is easy! - Gluten-Free: Use gluten-free cookie crumbs for the crust. This way, everyone can enjoy it without worry. - Vegan Option: Swap cream cheese and heavy cream for vegan alternatives. Look for vegan cream cheese and coconut cream. They work well and still taste great. Serving this cheesecake can be as fun as making it! - Pair it with fresh fruits like strawberries or raspberries. A fruit sauce adds a nice touch too. - Think about special occasions. This cheesecake is perfect for birthdays or holidays. You can even top it with whipped cream for a festive look. Explore more ways to enjoy this dessert by checking the Full Recipe! After you make your No-Bake Chocolate Cheesecake, you should store any leftovers in the fridge. Place the cheesecake in an airtight container. If you don’t have one, cover it tightly with plastic wrap. This keeps it fresh and prevents it from absorbing any odors. You can freeze the cheesecake for longer storage. First, let it chill in the fridge until it sets. Then, wrap the cheesecake tightly in plastic wrap, and follow with aluminum foil. This double layer helps protect it from freezer burn. When you’re ready to enjoy it, take it out and let it thaw in the fridge overnight. Avoid thawing it at room temperature to keep the texture smooth. The cheesecake stays fresh in the fridge for about 5 to 7 days. If you freeze it, it can last for up to 3 months. Just make sure to check for any signs of freezer burn before serving. For best taste, eat it within a month. Yes, you can make this cheesecake a day in advance. It tastes even better after chilling overnight. Just cover it well with plastic wrap. This keeps it fresh and ready for serving. Make sure to allow at least four hours of chill time. If you want a dairy-free option, use vegan cream cheese. You can also try mascarpone cheese for a rich taste. Greek yogurt is another choice for a lighter twist. Each will give a different flavor, so choose what you like best. The cheesecake needs to chill for at least four hours. However, if you can wait overnight, it will set better. This extra time helps the flavors meld together and gives a firmer texture. Yes, you can make this cheesecake gluten-free. Use gluten-free chocolate wafer cookie crumbs for the crust. Check the labels of your other ingredients to ensure they are gluten-free. This way, everyone can enjoy this delicious treat. This blog post detailed a simple and tasty no-bake chocolate cheesecake recipe. We covered each ingredient, from chocolate wafer crumbs to dark chocolate. You learned how to prepare the crust and make a smooth filling. I shared tips on texture, flavor, and presentation. Variations and storage options allow you to adapt the recipe to your needs. Enjoy this dessert at any gathering, or treat yourself. Your delicious cheesecake awaits!

No-Bake Chocolate Cheesecake Creamy Dessert Delight

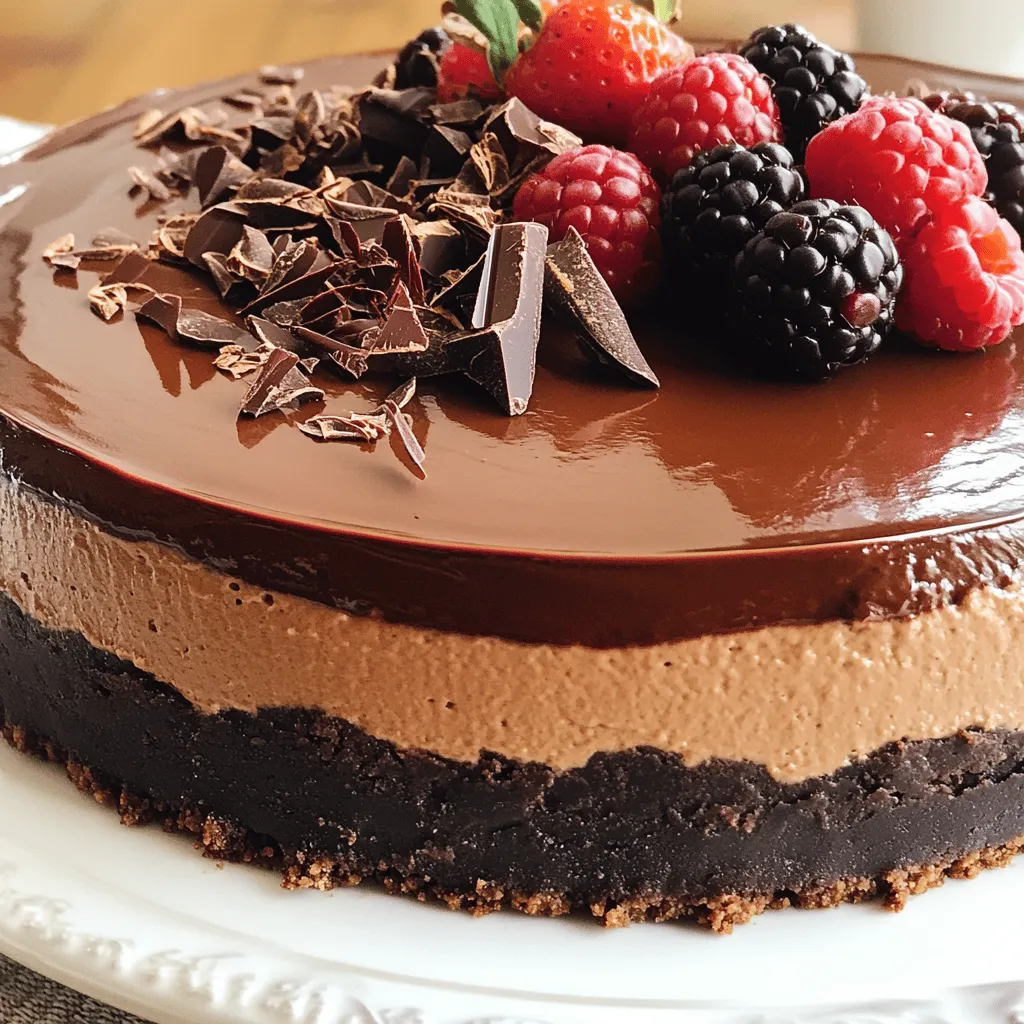
Indulge in a creamy paradise with my No-Bake Chocolate Cheesecake! This delightful dessert is perfect for any occasion and requires

- 2 cans (16 oz each) refrigerated biscuit dough - 1 cup shredded mozzarella cheese - 1 cup shredded cheddar cheese - ½ cup unsalted butter, melted - 5 cloves garlic, minced - 2 tablespoons fresh parsley, chopped - 1 teaspoon Italian seasoning - Salt and pepper to taste - Extra melted butter for greasing The main stars of this dish are the biscuit dough and cheese. The dough gives it a soft base, while mozzarella and cheddar add a rich flavor. Garlic and herbs bring a fresh taste that makes it special. - Fresh herbs - Additional spices You can add fresh herbs like thyme or rosemary for extra flavor. A pinch of red pepper flakes can bring some heat, too. Feel free to mix up the spices to make the bread your own. - Bundt pan or oven-safe dish - Mixing bowls and spatula You need a bundt pan or a deep oven-safe dish to bake this bread. Mixing bowls and a spatula help you combine the ingredients easily. The right tools make the process smooth and fun. First, preheat your oven to 375°F (190°C). This step is crucial. A hot oven helps the bread rise and get golden. Next, prepare your bundt pan. Grease it well with melted butter. This will prevent sticking later. Now, let’s make the garlic butter mixture. In a small bowl, combine melted butter, minced garlic, chopped parsley, Italian seasoning, salt, and pepper. Stir everything well until it blends nicely. Open the refrigerated biscuit dough. Separate each biscuit and cut them into quarters. This makes it easy to toss. In a large mixing bowl, toss the biscuit pieces with half of the garlic butter mixture. Make sure every piece gets coated. Start layering in the pan. Place half of the coated biscuit pieces in the prepared bundt pan. Then, sprinkle half of the mozzarella and cheddar cheese on top. Pour half of the remaining garlic butter mixture over this cheese layer. Next, add the rest of the biscuit pieces. Then, top with the remaining cheese and garlic butter mixture. Use a spatula to press down gently. This helps everything stick together. Bake in your preheated oven for 25-30 minutes. Look for a golden brown color. When done, remove the pan and let it cool for 5 minutes. Then, invert it onto a serving platter. Enjoy warm and pull apart the cheesy goodness! For details on ingredients, check the Full Recipe. To make your cheesy garlic monkey bread perfect, focus on two key areas: even baking and room temperature ingredients. - Ensuring even baking: Place your bundt pan in the center of the oven. This spot helps heat circulate well. Rotate your pan halfway through baking. This way, all sides get that nice golden brown color. - Using room temperature ingredients: Before you start, let your butter and cheese sit out for about 30 minutes. This helps them mix better. Room temperature cheese melts nicely, making your bread even cheesier. Cheesy garlic monkey bread is perfect for sharing. Here are some fun ways to serve it: - Pairing with dips: Think about adding marinara or ranch dressing on the side. These dips add flavor and fun. You can also try garlic aioli for an extra kick. - Presentation ideas: Serve your bread on a wooden board. This gives it a rustic look. You can also sprinkle some chopped parsley on top for color. It makes your dish more inviting. Even the best cooks can make mistakes. Here are two you should watch out for: - Overbaking or underbaking: Keep an eye on the time. If your bread is too dark, it may taste burnt. If it's too light, it might be doughy inside. Aim for a nice golden brown. - Not using enough butter: Butter adds flavor and moisture. If you skimp on it, your bread may turn out dry. Make sure to use the right amount for a tasty result. For more details, check the Full Recipe. {{image_2}} You can switch up the cheese in your Cheesy Garlic Monkey Bread. Try using provolone or gouda for a new flavor twist. They melt well and add depth to the dish. You can also mix in cream cheese. Cream cheese makes the bread extra creamy and rich. Just cut it into small cubes and toss it with the biscuit pieces. Want to make it even better? Add some veggies or meats! Chopped spinach, bell peppers, or cooked sausage work great. They bring in extra flavor and nutrition. Herbs can also change the taste. Try using fresh thyme or rosemary instead of parsley. This small change can elevate the dish to a new level. For a healthier version, use sweet potato or whole wheat dough. These options add fiber and nutrients. Adjust your cooking time if you use sweet potato dough. It may need a bit longer to bake. Keep an eye on it to ensure it cooks all the way through. You’ll still get that warm, cheesy goodness! For the full recipe, check out the [Full Recipe]. After enjoying your cheesy garlic monkey bread, you may have leftovers. First, let the bread cool down. Cooling it for about 30 minutes helps keep the texture nice. Once cool, place the bread in an airtight container. You can also wrap it tightly in plastic wrap. This keeps it fresh and prevents it from drying out. When reheating, you have two options: the oven or the microwave. The oven is best for keeping the bread crispy. Preheat your oven to 350°F (175°C). Place the leftover bread on a baking sheet and cover it with foil. Heat it for about 10-15 minutes. If you're in a hurry, use the microwave. Place a piece of the bread on a microwave-safe plate. Heat it for 20-30 seconds. Keep in mind that the microwave may make it a bit soggy. If you want to save some for later, freezing is a great choice. First, let the monkey bread cool completely. Then, wrap it in plastic wrap. You can also place it in a freezer bag. Remove as much air as possible to prevent freezer burn. To thaw, take it out of the freezer and place it in the fridge overnight. When ready to eat, reheat it in the oven as mentioned earlier. This way, it tastes fresh and delicious! For the complete recipe, check the Full Recipe above. To make Cheesy Garlic Monkey Bread from scratch, you can use a few simple swaps. If you can't find refrigerated biscuit dough, you can use homemade dough. Just mix flour, baking powder, salt, and milk to create a soft dough. Ingredient substitutions: - Use whole wheat flour for a healthier twist. - Swap mozzarella with gouda for a unique flavor. Dough alternatives: - Try using pizza dough for a different texture. - You can also use dough from a bread machine for ease. Yes, you can prepare Cheesy Garlic Monkey Bread ahead of time. Just follow the recipe until the baking step. Then, cover the pan and refrigerate it overnight. Tips on pre-preparation: - Allow the dough to sit at room temperature for about 30 minutes before baking. - This lets the dough rise a bit and improves the texture. Pairing dipping sauces with Cheesy Garlic Monkey Bread makes it even better. Here are some great options to try: - Marinara sauce for a classic taste. - Garlic butter for extra richness. - Ranch dressing for a cool contrast. - Spinach dip for a fresh flavor. Absolutely! You can make Cheesy Garlic Monkey Bread a bit lighter. Health-conscious ingredient swaps: - Use low-fat cheese instead of regular cheese. - Replace butter with olive oil for a healthier fat option. - Add more veggies like spinach or bell peppers to boost nutrition. In this post, we covered how to make Cheesy Garlic Monkey Bread. We discussed the main and optional ingredients, the equipment needed, and gave step-by-step instructions for preparation and baking. Tips for perfecting the recipe and common mistakes to avoid were included, along with fun variations and storage information. This recipe is flexible and easy to adapt. You can impress your friends and family with this warm, cheesy treat. Enjoy your baking adventure!

Cheesy Garlic Monkey Bread Irresistible and Easy Recipe

Are you ready to make a dreamy dish that’s gooey, savory, and oh-so-easy? This Cheesy Garlic Monkey Bread recipe combines

Pumpkin Spice Energy Bites are a simple and tasty treat that you can make at home. They are great for a quick snack or breakfast. You only need a few ingredients to whip them up. - 1 cup rolled oats - 1/2 cup pumpkin puree - 1/4 cup almond butter - 1/4 cup honey or maple syrup - 1 teaspoon vanilla extract - 1 teaspoon pumpkin spice - 1/4 teaspoon salt - Optional: 1/2 cup mini chocolate chips - Optional: 1/4 cup chopped nuts Each ingredient plays a key role. The rolled oats give a hearty base. Pumpkin puree adds moisture and flavor. Almond butter binds the mixture and adds healthy fats. Honey or maple syrup sweetens the bites. Vanilla extract enhances the taste, while pumpkin spice brings warmth. A pinch of salt balances the flavors. You can add mini chocolate chips or chopped nuts for extra fun. These bites are perfect for any time of day. Plus, you can easily make them in just 15 minutes! To make pumpkin spice energy bites, you need just 15 minutes. This quick recipe is fun to prepare. Gather your ingredients first. Measure everything out for a smooth workflow. You can enjoy these bites right away or chill them for later. Start by taking a large mixing bowl. In it, combine the rolled oats, pumpkin puree, almond butter, honey, and vanilla extract. Use a spatula to mix until everything blends well. The mixture should be thick and sticky. Next, add the pumpkin spice and salt. Stir again until fully combined. If you want, fold in mini chocolate chips and chopped nuts for extra flavor. This adds a nice crunch, too! Now comes the fun part! Take a small amount of the mixture and roll it into a ball. Aim for about 1 inch in diameter. Place each ball on a baking sheet lined with parchment paper. Once you finish rolling, put the baking sheet in the fridge. Let the bites chill for about 30 minutes. This helps them firm up. After chilling, transfer your energy bites to an airtight container. They can stay fresh in the fridge for up to a week. Enjoy these tasty treats anytime! For the complete recipe, check out the Full Recipe. To get the best texture, measure all ingredients carefully. Use a sturdy mixing bowl, so nothing spills. Combine the rolled oats, pumpkin puree, and almond butter first. This helps blend them smoothly. Then, add the honey or maple syrup and vanilla extract. Make sure to mix well. The mixture should be thick but not dry. If it feels too crumbly, add a splash of water. If it’s too wet, sprinkle in more oats. This balance is key for tasty energy bites. When it’s time to roll the bites, wet your hands with water. This prevents the mixture from sticking. Take a small amount, about a tablespoon, and roll it into a ball. Aim for a size of about 1 inch. If you want larger bites, adjust the amount accordingly. Place each rolled bite on a parchment-lined baking sheet. Keep space between them to avoid sticking. If they are uneven, gently reshape them to make them smooth. These energy bites shine on their own but pair well with many snacks. Serve them with a cup of warm tea or coffee for a cozy treat. You can also enjoy them with fresh fruit like apple slices or bananas. For a fun twist, try them with yogurt or a sprinkle of granola. They make a great grab-and-go snack for busy days. You can also pack them as a quick breakfast option when you are in a rush. Try out these ideas and enjoy your Pumpkin Spice Energy Bites! For the full recipe, check the earlier section. {{image_2}} You can change the flavor of your energy bites easily. Instead of pumpkin spice, try using vanilla or cocoa powder. For a fruitier taste, add mashed banana or dried fruit. If you love a nutty flavor, mix in some almond extract or peanut butter. The key is to keep it fun and tasty! If you want to swap ingredients, here are some great ideas. Use sunflower seed butter instead of almond butter for a nut-free option. Maple syrup can be replaced with agave nectar if you prefer. For a gluten-free option, make sure to use certified gluten-free oats. Each swap can give your bites a new twist! You can easily adjust this recipe to fit your diet. To make it nut-free, use sunbutter or soy nut butter. For a vegan version, ensure you use maple syrup instead of honey. You can also skip the chocolate chips or use dairy-free ones. These small changes let everyone enjoy the energy bites! For the full recipe, check out the details above. Store your pumpkin spice energy bites in an airtight container. This keeps them fresh and tasty. Place the container in your fridge. The cool air helps maintain their texture and flavor. These energy bites stay good for about a week in the fridge. If they are kept well, they can last up to seven days. Enjoy them as a quick snack or a breakfast boost! You can freeze these bites for longer storage. Place them in a freezer-safe bag or container. They will stay good for about three months in the freezer. When you want to eat them, just take out what you need. Let them thaw in the fridge. This way, you can enjoy pumpkin spice energy bites anytime! For the full recipe, check the section above. Pumpkin spice energy bites are small snacks packed with flavor and nutrients. They combine oats, pumpkin puree, and nut butter. The pumpkin spice adds warmth and aroma, making them perfect for fall. These bites are easy to make and great for on-the-go snacking. Yes! You can switch almond butter for any nut butter you like. Peanut butter, cashew butter, or sunflower seed butter all work well. Each nut butter brings a unique flavor and texture. Experiment to find your favorite mix! Yes, they are healthy! These bites include oats, which provide fiber and energy. Pumpkin puree is low in calories but high in vitamins. Nut butter adds protein and healthy fats. Honey or maple syrup gives natural sweetness. If you choose to skip the chocolate chips, they can be even healthier. For the full recipe, check out the detailed instructions above. We explored a simple and tasty way to make pumpkin spice energy bites. You learned about the easy ingredients and the step-by-step process. I shared tips on perfecting your mix and variations to try. Remember, these bites are flexible and can fit different diets. Store them well, and they will last longer! Making energy bites is fun, healthy, and delicious, so get started and enjoy your treats!

Pumpkin Spice Energy Bites Simple and Tasty Treat

Are you ready to enjoy a sweet and healthy snack? These Pumpkin Spice Energy Bites are simple to make and

- 1 medium spaghetti squash - 2 tablespoons olive oil - 1 red bell pepper, diced - 1 yellow bell pepper, diced - 1 zucchini, sliced into half-moons - 1 cup cherry tomatoes, halved - 1 cup broccoli florets - 3 cloves garlic, minced The star of this dish is the spaghetti squash. It has a unique texture that mimics pasta. When cooked, its flesh turns into long, noodle-like strands that soak up flavors well. I love using fresh vegetables for this recipe. They add color and nutrients to the dish. You can choose any mix of your favorites. - ¼ cup grated Parmesan cheese - Fresh basil leaves for garnish Adding grated Parmesan cheese gives the dish a rich taste. Fresh basil adds a burst of flavor and a lovely aroma. You can skip these if you prefer a lighter dish. - 1 teaspoon Italian seasoning - Salt and pepper to taste Italian seasoning brings warmth and depth to the dish. It blends herbs like oregano, basil, and thyme. Salt and pepper enhance all the flavors and balance the dish. For the full recipe, please refer to the [Full Recipe]. Cutting and Prepping First, grab a medium spaghetti squash. Cut it in half lengthwise. Use a spoon to remove the seeds. Drizzle one tablespoon of olive oil on the cut sides. Add a pinch of salt and pepper to taste. This step adds flavor from the start. Roasting Instructions Place the squash cut-side down on a baking sheet lined with parchment paper. Preheat your oven to 400°F (200°C). Roast the squash for 30 to 40 minutes. Check if it’s tender by poking it with a fork. The flesh should shred easily into noodles. Cooking Method While the squash roasts, heat the remaining tablespoon of olive oil in a large skillet. Set the heat to medium. Add the diced red and yellow bell peppers, sliced zucchini, and broccoli. Stir them for about 5 to 7 minutes. The veggies should soften but still have some crunch. Timing and Tips Next, add the halved cherry tomatoes and minced garlic to the skillet. Cook for another 3 to 4 minutes. Watch for the tomatoes to soften and give off their juices. Always taste as you go. Adjust salt and pepper if needed. Mixing Everything Together Once the spaghetti squash is cool, scrape out the flesh with a fork. It should look like noodles. Transfer the spaghetti squash noodles to a large bowl. Mix in the sautéed vegetables until well combined. This is where the magic happens! Serving Suggestions If you like, sprinkle grated Parmesan cheese over the top for extra flavor. Garnish with fresh basil leaves for color and flavor. Serve this dish warm and enjoy the vibrant colors and tastes. You can find the full recipe [here](Full Recipe). Understanding Cooking Times Roasting spaghetti squash takes about 30 to 40 minutes at 400°F (200°C). Check it at 30 minutes. If a fork pierces the flesh easily, it’s ready. If not, give it a few more minutes. Overcooking can make it mushy, so keep an eye on it. Texture Tips To get the best texture, roast the squash cut-side down. This traps steam and helps it cook evenly. After roasting, let it sit for a few minutes. This makes it easier to scrape out those delicious noodles. Vegetable Variations Feel free to mix different veggies in your sauté. You can use bell peppers, zucchini, cherry tomatoes, and broccoli. Other great choices include carrots, snap peas, or spinach. Seasonal veggies can add a fresh twist to your dish. Additional Flavor Boosts To enhance flavor, add herbs or spices while cooking. A pinch of red pepper flakes gives heat. For a zesty kick, try lemon juice or zest. A splash of balsamic vinegar can add depth, too. Garnishing Techniques Garnish your dish with fresh basil leaves. They add color and a burst of flavor. You can also sprinkle grated Parmesan cheese on top. This adds richness and pairs well with the veggies. Serving Suggestions Serve spaghetti squash primavera in a large bowl for sharing. You can also plate individual servings for a nice touch. Pair it with a simple green salad for a complete meal. The bright colors will make your dish pop on the table. For the full recipe, check the section above. Enjoy! {{image_2}} You can change up the veggies in spaghetti squash primavera. Use what you like or what’s fresh. - Seasonal Choices: In summer, add bell peppers or fresh corn. In fall, try roasted pumpkin or kale. Seasonal veggies taste great and add color. - Adding Protein: For extra protein, toss in cooked chicken, shrimp, or beans. This makes the dish more filling and hearty. This dish can fit many diets. You can easily adapt it to your needs. - Vegan Adaptations: Skip the cheese to make it vegan. Use nutritional yeast for a cheesy flavor without dairy. This keeps it tasty and plant-based. - Gluten-Free Swaps: Spaghetti squash is naturally gluten-free. If you want more texture, consider gluten-free pasta made from rice or chickpeas. Spaghetti squash primavera can have many flavors. Use spices and cheeses to mix things up. - Different Spice Mixes: Try adding red pepper flakes for heat or smoked paprika for depth. Use fresh herbs like thyme or oregano for bright flavors. - Unique Cheese Options: Instead of Parmesan, use feta or goat cheese. They add a tangy twist that pairs well with the veggies. For the full recipe, check out the details above. Enjoy making your dish your own! To keep your spaghetti squash primavera fresh, follow these tips. - Refrigeration Tips: Store any leftovers in an airtight container. You can keep it in the fridge for up to three days. Make sure to cool it to room temperature before sealing. This helps prevent sogginess. - Freezing Guidelines: If you want to save it longer, you can freeze it. Place the dish in a freezer-safe container. It will last up to three months. When ready to eat, let it thaw in the fridge overnight. Reheating your spaghetti squash primavera well is key to keeping its flavors. - Best Practices for Microwave: Use a microwave-safe dish. Cover it with a damp paper towel. Heat in short bursts of one minute. Stir in between to heat evenly. - Oven Reheating Tips: Preheat your oven to 350°F (175°C). Place the primavera in an oven-safe dish. Cover with foil to lock in moisture. Heat for about 15-20 minutes or until hot. Knowing how long your dish lasts is important. - How Long It Lasts: If stored correctly, spaghetti squash primavera stays fresh for about three days in the fridge. In the freezer, it can last for up to three months. - Signs of Spoilage: Look for off smells or changes in color. If the texture seems mushy or slimy, it’s best to toss it. Always trust your senses when it comes to food safety. For the full recipe, check out the complete guide. To cut spaghetti squash safely, place it on a cutting board. Use a sharp knife to slice it in half lengthwise. Be firm but careful. This will help avoid slips and cuts. After cutting, scoop out the seeds with a spoon. Tools Needed: - Sharp chef's knife - Cutting board - Spoon for scooping Yes, you can make spaghetti squash primavera ahead of time. It’s perfect for meal prep. Cook the squash and veggies, then store them separately. This keeps flavors fresh. Meal Prep Tips: - Roast the squash and veggies in advance. - Store them in airtight containers. - You can keep them in the fridge for up to 3 days. Storage Advice: When ready to eat, just reheat. You can warm it in the microwave or a skillet. Add a splash of water if it seems dry. Spaghetti squash primavera is great on its own, but you can add sides. A light salad pairs well. You might also enjoy crusty bread or garlic bread for a nice touch. Side Dish Suggestions: - Mixed greens salad with vinaigrette - Roasted or steamed vegetables - Garlic bread Additional Pairings: You can serve it with grilled chicken or shrimp for protein. They add flavor and make the meal more filling. If you want the complete recipe, you can find it in the [Full Recipe]. This blog post explored how to make delicious spaghetti squash primavera. We discussed the main ingredients, like spaghetti squash and fresh veggies. I shared tips for preparation, sautéing, and combining everything for a tasty dish. You learned about variations, dietary swaps, and proper storage. Remember, you can adjust flavors and ingredients to suit your taste. Enjoy trying out these steps in your kitchen. This dish offers flexibility and health benefits for everyone!

Spaghetti Squash Primavera Flavorful Healthy Dish

Are you ready to enjoy a dish that’s both delicious and healthy? Spaghetti Squash Primavera is a perfect choice. With

To make fried green tomatoes, you need a few simple items. Here’s what you will need: - 4 medium green tomatoes, sliced into 1/2-inch thick rounds - 1 cup all-purpose flour - 1 teaspoon paprika - 1 teaspoon garlic powder - 1/2 teaspoon cayenne pepper (adjust for spice preference) - 1 teaspoon salt - 1/2 teaspoon black pepper - 2 large eggs - 1 cup cornmeal - Vegetable oil for frying These ingredients create a crunchy and tasty treat. The green tomatoes give a fresh taste. The spices add warmth and flavor. This sauce makes your fried green tomatoes pop! For the zesty remoulade, gather: - 1/2 cup mayonnaise - 2 tablespoons Dijon mustard - 1 tablespoon capers, minced - 1 tablespoon pickles, minced - 1 teaspoon lemon juice - 1/2 teaspoon garlic powder - Salt and pepper to taste This sauce is creamy with a tangy kick. It pairs perfectly with the crispy tomatoes. You can tweak the recipe to fit what you have at home. Here are some ideas: - Use rice flour instead of all-purpose flour for a gluten-free option. - Swap cornmeal for crushed crackers for a different crunch. - Add herbs like dill or parsley to the remoulade for extra flavor. - Use hot sauce in the batter for a spicy twist. These changes keep the dish fun and new. Personalize it to your taste! For the full recipe, check the earlier instructions. Start by washing your green tomatoes well. Use a clean towel to dry them. Slice each tomato into 1/2-inch thick rounds. This thickness helps them fry evenly. Pat them dry with a paper towel. This step removes excess moisture. It keeps them crispy when frying. You need three bowls for this part. In one bowl, mix flour, paprika, garlic powder, cayenne pepper, salt, and black pepper. This mix adds flavor to the tomatoes. In the second bowl, beat two large eggs until smooth. In the third bowl, pour in the cornmeal. This will create a crunchy coating. Heat about 1/4 inch of vegetable oil in a large skillet over medium-high heat. You want the oil to shimmer, not smoke. Take each tomato slice. First, dredge it in the seasoned flour. Shake off any extra flour. Next, dip it in the egg, letting any excess drip off. Finally, coat it in cornmeal. Press lightly to make sure it sticks well. Add the breaded slices to the hot oil in batches. Do not crowd the skillet. Fry for about 3 to 4 minutes on each side. Look for a golden brown color and a crispy texture. When done, transfer the fried tomatoes to a plate lined with paper towels. This step helps drain off excess oil. Enjoy your crispy fried green tomatoes with zesty remoulade for dipping. For the full recipe, check out the complete guide above. To get that perfect crunch, follow these steps closely: - Dry the Tomatoes: Always pat the tomato slices dry. This helps the coating stick well. - Use Cold Eggs: Cold eggs help create a better bond when you dip the tomatoes. This makes them extra crispy. - Hot Oil is Key: Heat the oil until it shimmers. This ensures a quick fry, locking in moisture. If your fried green tomatoes don’t turn out right, here’s what to check: - Soggy Tomatoes: If they are soggy, they might have too much moisture. Always dry them well. - Coating Falling Off: If the coating comes off, make sure you press the cornmeal firmly onto the tomatoes. - Burnt Outside, Raw Inside: If this happens, the oil may be too hot. Lower the heat to cook them evenly. To make your fried green tomatoes pop with flavor, consider these tips: - Season the Flour: Add extra spices to your flour mix. Try onion powder or dried herbs for more taste. - Experiment with Cornmeal: You can use flavored cornmeal, like buttermilk or spicy varieties, to add depth. - Zesty Remoulade: Don't skip the sauce! It adds a fresh kick that balances the fried taste. Check the Full Recipe for the zesty remoulade ingredients. Try these tricks to make your fried green tomatoes crispy and full of flavor. Enjoy creating your delicious dish! {{image_2}} You can easily make fried green tomatoes vegan. Instead of eggs, use a flaxseed meal. Mix one tablespoon of flaxseed meal with three tablespoons of water. Let it sit for five minutes. This mixture will bind the coating as eggs do. You can also use plant-based milk, like almond or soy, instead of eggs. If you need a gluten-free option, swap the all-purpose flour with a gluten-free blend. Use cornmeal as your main coating. It gives a nice crunch and flavor. Make sure your cornmeal is labeled gluten-free. This way, everyone can enjoy the crispy delight. Fried green tomatoes have many regional twists. In the South, we often serve them with a spicy remoulade. In some areas, people like to add pimento cheese on top. You can also try serving them alongside collard greens or grits. For a fun twist, stack them with a slice of avocado or a dollop of salsa. These ideas give a unique spin to a classic dish. To explore more, check out the full recipe for a deeper dive into flavors. To keep your fried green tomatoes fresh, let them cool first. Place them in an airtight container. Line the bottom of the container with paper towels. This helps absorb any extra moisture. Store them in the fridge for up to three days. For the best taste and texture, reheat fried green tomatoes in an oven. Preheat your oven to 375°F (190°C). Place the tomatoes on a baking sheet. Bake them for about 10-15 minutes. This will make them crispy again. You can also use an air fryer. Set it to 350°F (175°C) and cook for 5-7 minutes. You can freeze fried green tomatoes, but they may lose some crispness. First, let them cool completely. Then, lay them flat on a baking sheet. Freeze them for about an hour until solid. After that, transfer them to a freezer bag. Remove as much air as possible. They can last up to three months in the freezer. When ready to eat, thaw them in the fridge overnight before reheating. Check out the full recipe for more tips and tricks! Fried green tomatoes are slices of unripe tomatoes. You coat them in flour and cornmeal. Then, you fry them until they are golden and crispy. They have a tangy taste and a crunchy texture. This dish is popular in the South. People enjoy it as a snack or side dish. You can serve them with a zesty remoulade for extra flavor. To make fried green tomatoes healthier, try these tips: - Bake instead of fry: Place the breaded tomatoes on a baking sheet and spray with oil. Bake at 400°F (200°C) for about 20 minutes. - Use whole wheat flour: This adds fiber and nutrients. - Reduce oil: Use less oil when frying or baking. - Add more spices: Enhance flavor without extra fat by using spices like paprika or herbs. You can use ripe tomatoes, but the taste will change. Ripe tomatoes are sweeter and softer. They may not hold their shape as well when fried. For the best results, stick with green tomatoes. They offer the perfect balance of tartness and firmness. If you still want to use ripe ones, prepare for a different texture and flavor. Fried green tomatoes are a tasty dish with rich flavor and crispy texture. This guide covered key ingredients, preparation steps, and tips for great results. You learned about variations and how to store leftovers for future meals. In closing, enjoy making your fried green tomatoes unique. With practice, you’ll impress friends and family.

Fried Green Tomatoes Crispy and Flavorful Delight

Are you ready to dive into the crispy, tangy delight of Fried Green Tomatoes? This classic dish combines the perfect

- 1 cup semi-sweet chocolate chips - 1 cup mini marshmallows - 4 tablespoons heavy cream - 1 teaspoon vanilla extract - 1/2 cup crushed graham crackers - Pinch of sea salt The heart of this dish is the chocolate. I love using semi-sweet chocolate chips. They melt well and give a rich taste. The mini marshmallows add that classic s'mores touch. They become soft and golden when baked. Heavy cream keeps the chocolate smooth and creamy. A hint of vanilla extract adds depth to the flavors. The crushed graham crackers give a nice crunch on top. Finally, a pinch of sea salt balances the sweet taste. - Fresh strawberries - Banana slices When it comes to dipping, I suggest fresh strawberries. Their juicy sweetness pairs well with the dip. Banana slices are another great choice. They add a creamy texture and a lovely flavor. You can mix and match these options to find your favorite combination. Remember, the dip is best when shared, so get ready to enjoy this treat with friends! For the full recipe, see above. - Preheat oven to 350°F (175°C). - In a medium oven-safe skillet, combine 1 cup of semi-sweet chocolate chips and 4 tablespoons of heavy cream. - Place the skillet in the oven for about 5 minutes. Watch as the chocolate starts to melt. - Remove the skillet and stir until the chocolate is smooth. Add 1 teaspoon of vanilla extract and a pinch of sea salt, then mix well. - Evenly layer 1 cup of mini marshmallows over the melted chocolate. - Return the skillet to the oven and bake for 5-7 minutes. Look for golden-brown marshmallows. - After baking, sprinkle 1/2 cup of crushed graham crackers evenly on top. - Allow the dip to cool for a few minutes before serving. Enjoy with fresh strawberries and banana slices for dipping. This S'mores Dip is a fun treat that brings everyone together. You can find the full recipe above. To make the best S'mores Dip, start with quality chocolate chips. Good chocolate melts better and tastes richer. When baking, watch the marshmallows closely. They can go from golden brown to burnt in seconds. I love serving S'mores Dip straight from the skillet. It looks great and keeps the dip warm. Arrange fresh fruit like strawberries and bananas around the dip. This adds color and gives a tasty option for dipping. Don't overbake your marshmallows. They should be golden, not dark brown. Also, mix the chocolate and cream thoroughly before baking. A well-blended mixture ensures a smooth dip. For the full recipe, check out the details above. {{image_2}} You can easily change up S'mores Dip to keep it fun. One way is to add flavored extracts. A drop of almond extract gives a nutty twist. You can also mix in peanut butter or Nutella for a creamy, rich flavor. These small changes can make a big difference in taste. Don't limit yourself to just fruit! Use pretzels for a salty crunch. Graham cracker sticks also work great for dipping. You can even try apple slices for a fresh, sweet take. Another fun option is marshmallow fluff. It adds extra sweetness and a nice texture to your S'mores experience. For the full recipe, check back in the main section, and get ready for a treat! After you enjoy your S'mores Dip, store any leftovers in an airtight container. This keeps the dip fresh. Place the container in the fridge to prevent spoilage. It’s best to consume the dip within a few days for the best taste. To enjoy your dip again, warm it gently in the microwave. Heat in short bursts of 15-20 seconds. Stir between heating to ensure even warmth. Avoid overcooking, as this can change the texture and flavor of the chocolate and marshmallows. The dip tastes best when eaten within 2-3 days. After this time, the flavors may fade. The marshmallows may also lose their fluffy texture. Enjoy your S'mores Dip soon after making it for the best experience! To make S'mores Dip dairy-free, you can use dairy-free chocolate chips. Brands like Enjoy Life or Hu make great options. For the cream, try coconut cream or almond milk. These substitutes will keep your dip delicious and creamy without dairy. Yes! You can use dark chocolate, white chocolate, or even milk chocolate. Each type gives a unique taste. Dark chocolate adds richness, while white chocolate brings sweetness. Mix and match to find your favorite flavor! You can prep the dip in advance. Mix the chocolate and cream, then store it in the fridge. When you're ready, just bake it and add the marshmallows. This keeps your cooking time short and fun. For the full recipe, check out the previous section. You learned how to make a delicious S'mores Dip. We covered ingredients, steps to prepare, and tips for success. Don’t forget to get creative with flavors and dipping options. Storing leftovers is easy, and you can even make it ahead. Enjoy sharing this sweet treat with family and friends. This dip is fun, tasty, and perfect for any gathering. Now, go ahead and delight everyone with your S'mores Dip!

S’mores Dip Irresistible Chocolatey Treat to Share

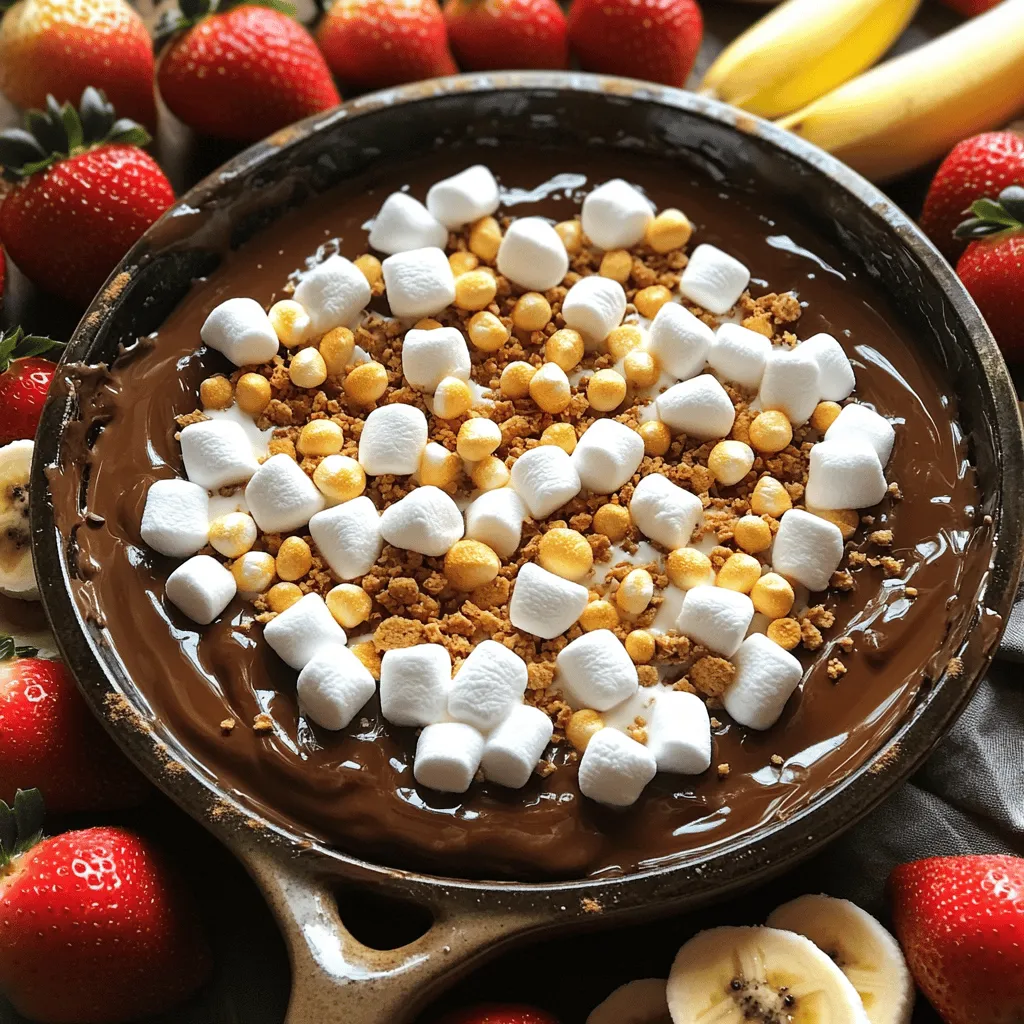
Are you ready to dive into a gooey, chocolatey delight? This S’mores Dip is the perfect treat to share with

To make the Mediterranean quinoa salad, you need: - 1 cup quinoa, rinsed - 2 cups vegetable broth (or water) - 1 cup cherry tomatoes, halved - 1 cucumber, diced - ½ red onion, finely chopped - 1 bell pepper (red or yellow), diced - 1 cup canned chickpeas, drained and rinsed - ½ cup black olives, pitted and sliced - ¼ cup fresh parsley, chopped - ¼ cup feta cheese, crumbled (optional) - 3 tablespoons olive oil - 2 tablespoons lemon juice - 1 teaspoon dried oregano - Salt and pepper to taste You can add these for more flavor: - Avocado, diced - Artichoke hearts, chopped - Spinach or arugula, for greens - Roasted red peppers, diced This salad is not only tasty but also healthy. Here are some details: - Serving Size: 1 cup - Calories: Approximately 250 - Protein: 10 grams - Carbohydrates: 35 grams - Fat: 10 grams - Fiber: 7 grams The combination of quinoa, chickpeas, and veggies makes this salad filling. It offers a great mix of protein, fiber, and healthy fats. The fresh herbs and lemon juice add bright flavors. You can find the full recipe to enjoy this simple and nutritious meal! To cook the quinoa, start by rinsing 1 cup of quinoa under cold water. This helps remove any bitterness. In a medium saucepan, add the rinsed quinoa and 2 cups of vegetable broth or water. Bring this mixture to a boil. Once boiling, reduce the heat to low. Cover the pot and let it simmer for about 15 minutes. The quinoa will become fluffy and absorb all the liquid. After it cooks, take it off the heat and let it cool. While the quinoa cools, you can prepare the vegetables. In a large mixing bowl, add the following fresh ingredients: - 1 cup cherry tomatoes, halved - 1 cucumber, diced - ½ red onion, finely chopped - 1 bell pepper (red or yellow), diced - 1 cup canned chickpeas, drained and rinsed - ½ cup black olives, pitted and sliced - ¼ cup fresh parsley, chopped Mix these veggies well. They add color and crunch to your salad. Now, let’s make the dressing. In a small bowl, whisk together: - 3 tablespoons olive oil - 2 tablespoons lemon juice - 1 teaspoon dried oregano - Salt and pepper to taste Taste the dressing and adjust the seasoning if needed. This dressing will brighten your salad. Once the quinoa has cooled, it’s time to combine everything. Add the cooled quinoa to the bowl with the prepared vegetables and chickpeas. Drizzle the dressing over the top and toss gently. Make sure all the ingredients mix well. If you want creaminess, sprinkle ¼ cup of crumbled feta cheese on top. Serve the salad chilled or at room temperature. Letting it sit for about 30 minutes helps the flavors blend. Enjoy your fresh Mediterranean Quinoa Salad! For the full recipe, check the details above. To cook quinoa, rinse it first. This removes bitter flavor. Use two cups of vegetable broth for each cup of quinoa. Bring the broth to a boil. Then, reduce heat, cover, and simmer for 15 minutes. After that, let it cool. Fluff it with a fork for a light texture. For a tasty kick, try garlic powder, cumin, or smoked paprika. Mix these with olive oil, lemon juice, salt, and pepper. Fresh herbs like parsley or mint really boost flavor, too. You can also add a dash of chili flakes for heat. Experiment until you find your favorite mix. Serve this salad chilled or at room temperature. Place it in a large bowl for sharing. You can also present it in individual plates. For an extra touch, garnish with lemon wedges and parsley sprigs. This adds color and makes the dish pop. Enjoy it as a main dish or a side. You can pair it with grilled chicken or fish for a full meal. Check the Full Recipe for more details! {{image_2}} You can add protein to your Mediterranean quinoa salad to make it a full meal. Grilled chicken or shrimp works great. If you want a plant-based option, try adding more chickpeas or black beans. Tofu is another good choice. You can also use nuts or seeds for extra crunch and protein. While the basic dressing is simple, you can change it up. Try adding balsamic vinegar for a sweeter taste. You can also use tahini for a creamier texture. A splash of red wine vinegar adds a nice zing. Mix and match to find your favorite flavor. Feel free to swap ingredients based on what you have. If you don't like olives, skip them. You can replace cucumbers with radishes or celery for a different crunch. Use spinach instead of parsley for a fresh twist. The fun part of this salad is making it yours. For the full recipe, check the main section. Store your Mediterranean quinoa salad in the fridge. Use an airtight container to keep it fresh. Make sure to cool the salad first before sealing it. Leftovers can last for about 3 to 5 days. Glass containers work best for storing your salad. They do not stain, and they seal tightly. If you prefer plastic, choose BPA-free containers. Look for ones that are microwave safe if you plan to reheat. You can enjoy this salad cold or at room temperature. If you prefer it warm, heat it gently. Use the microwave and heat in short bursts. Stir after each burst to ensure even warming. Avoid overheating to keep the veggies crisp. If the salad seems dry, add a splash of olive oil or lemon juice before serving. For the full recipe, check out the linked details. Mediterranean Quinoa Salad lasts about 3 to 5 days in the fridge. Store it in an airtight container. The flavors get better over time, but the veggies may soften. Yes, you can make this salad gluten-free. Quinoa is naturally gluten-free. Just ensure all other ingredients, like broth, are also gluten-free. You can use goat cheese or vegan cheese as a substitute for feta cheese. If you want a dairy-free option, try using avocado or nutritional yeast for a creamy texture. Yes, Mediterranean Quinoa Salad is a healthy choice. It is packed with protein, fiber, and vitamins. Quinoa adds protein, while veggies offer nutrients. This salad supports a balanced diet. For the full recipe, check out the section above. This blog post covered how to make a tasty Mediterranean Quinoa Salad. We reviewed key ingredients and step-by-step cooking tips. You learned how to improve flavor and keep it fresh. Plus, we shared ways to personalize your salad with protein and dressings. In closing, both the flavor and health benefits make this salad great. Enjoy making it your own and share it with family and friends.

Mediterranean Quinoa Salad Simple and Nutritious Meal

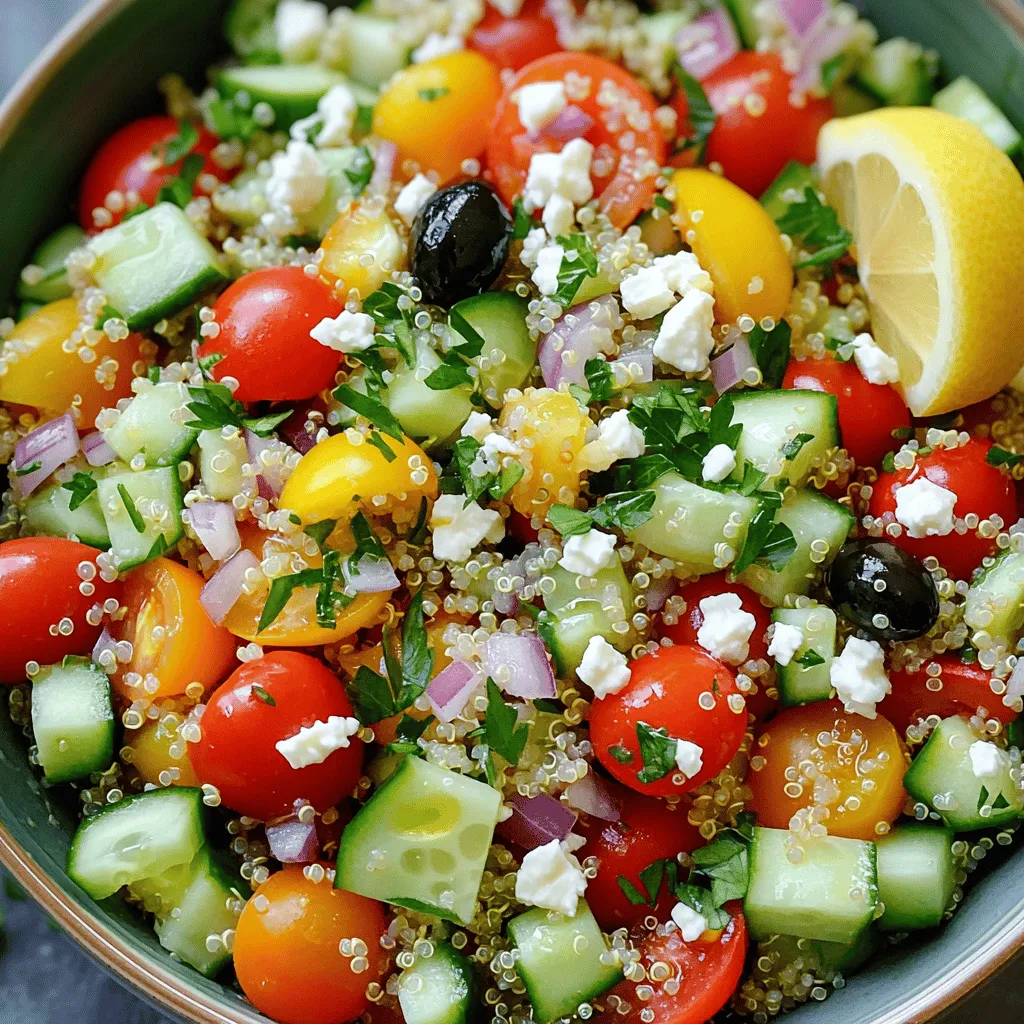
If you’re looking for a fresh, tasty meal, try my Mediterranean Quinoa Salad. This dish is simple, healthy, and full

To make chickpea flour pancakes, you need a few key items. Here’s what you’ll need: - 1 cup chickpea flour (besan) - 1 cup water - 1 teaspoon turmeric powder - 1 teaspoon cumin powder - 1/2 teaspoon baking soda - 1/2 teaspoon salt - 1 small onion, finely chopped - 1 green chili, finely chopped (optional) - 1/4 cup fresh cilantro, chopped - Olive oil or ghee for cooking Chickpea flour is the star here. It gives the pancakes a nutty taste and a nice texture. Turmeric and cumin add warmth and flavor, while the onion and cilantro bring freshness. You can mix in more flavors if you like. Here are some suggestions: - Finely chopped bell peppers - Spinach or kale - Garlic powder - Black pepper - Other herbs like parsley or dill Feel free to get creative! These add-ins can change the taste and make your pancakes unique. When it comes to serving, toppings can elevate your dish. Here are some ideas: - Plain yogurt or Greek yogurt - Chutney like mint or tamarind - Avocado slices - Sliced tomatoes - Fresh herbs for garnish These toppings add creaminess and brightness. They also make your pancakes more filling and tasty. Enjoy your meal with these simple yet delicious choices! For the complete cooking steps, check out the Full Recipe. To start, gather your ingredients. You will need chickpea flour, turmeric, cumin, baking soda, salt, water, onion, green chili, and cilantro. In a mixing bowl, combine the chickpea flour, turmeric, cumin, baking soda, and salt. Mix these dry ingredients well. This helps them blend evenly. Next, slowly add the water to the dry mix. Whisk it continuously. This step is key to avoiding lumps. You want your batter smooth and thick, like pancake batter. After that, stir in the chopped onion, green chili, and cilantro. Make sure they mix well into the batter. Now, heat a non-stick skillet over medium heat. Add a small amount of olive oil or ghee to the pan. Once hot, pour a ladleful of batter onto the skillet. Spread it gently to form a round shape, about 1/4 inch thick. Cook each pancake for about 2-3 minutes. You will see the edges lift and turn golden brown. Carefully flip the pancake using a spatula. Cook for another 2-3 minutes until both sides are golden. Transfer the pancake to a plate. Repeat with the rest of the batter, adding oil as needed. For the best texture, make sure your batter is not too thick or too thin. It should flow easily but hold its shape. If it seems too thick, add a little more water. Also, keeping the heat at medium helps to cook the pancakes evenly. If they cook too fast, they may burn on the outside and stay raw inside. When serving, try pairing your pancakes with yogurt or chutney. These toppings add flavor and texture. For more tips, check out the [Full Recipe]. You can add many flavors to your chickpea flour pancakes. Try mixing in spices, such as garlic powder or paprika. Fresh herbs like parsley or dill can add a nice touch. If you enjoy a kick, toss in some red pepper flakes or extra green chili. You can also add veggies, like grated carrots or chopped spinach, for more nutrients. These add-ins make each pancake unique and tasty. Many people make a few common mistakes. First, ensure your batter is not too thick. If it is, add a bit more water to reach the right consistency. Second, don’t skip the resting time after mixing. Letting the batter sit for a few minutes helps it thicken and improves texture. Lastly, don’t rush cooking. Cooking on medium heat allows the pancakes to cook evenly without burning. Use a non-stick skillet for the best cooking experience. Heat it well before adding oil or ghee. This step ensures a golden crust. Pour the batter into the center and spread it gently. Keep the pancakes about ¼ inch thick for even cooking. Flip them only when the edges lift easily. This method gives you fluffy pancakes with a crispy edge. For full details, check the Full Recipe section. {{image_2}} Chickpea flour is naturally gluten-free. This makes these pancakes a great choice for anyone with gluten issues. You don’t need to change much in the recipe. Just use chickpea flour as your base. You can always add other gluten-free flours if you like. Almond flour or rice flour can add more texture. These pancakes are already vegan-friendly! The chickpea flour and water mix well. If you want a richer flavor, try adding mashed banana or flaxseed meal. This gives the pancakes a nice taste without adding eggs or dairy. You can also substitute cooking oil with coconut oil for a different flavor twist. You can change spices to explore different tastes. For an Indian flair, add garam masala or coriander. If you want a spicy kick, include red chili powder or smoked paprika. For a Mediterranean touch, try oregano or thyme. Each spice adds its unique flavor, making the pancakes fun and exciting. For the full recipe, check out the detailed instructions above. After making your chickpea flour pancakes, let them cool. Place them in an airtight container. You can stack them with parchment paper in between to keep them from sticking. Store them in the fridge for up to three days. To reheat your pancakes, use a skillet. Heat it over low to medium heat. Add a little olive oil or ghee for flavor. Place the pancake in the skillet. Cook for about one minute on each side. This keeps the pancakes soft and tasty. For long-term storage, freeze the pancakes. Cool them completely first. Then, place them in a single layer on a baking sheet. Freeze for about two hours. Once frozen, transfer them to a freezer bag. They can stay fresh for up to three months. When ready to eat, thaw overnight in the fridge and reheat as mentioned above. Chickpea flour, also known as besan, comes from ground chickpeas. It is high in protein and fiber. This flour is popular in many cuisines. You can use it for pancakes, fritters, or even sauces. I love how it adds a nutty taste to dishes. It is gluten-free, making it a great choice for many diets. Yes, you can make these pancakes ahead of time. Cook them as directed and let them cool. Store them in an airtight container in the fridge. They stay fresh for about 3 days. When you're ready to eat, just reheat them in a skillet or microwave. This makes breakfast quick and easy! Chickpea flour pancakes are indeed healthy. They are rich in protein, fiber, and essential vitamins. This flour helps keep you full for longer. The added spices like turmeric and cumin boost flavor and health benefits. Overall, these pancakes are a wholesome meal choice. To serve more people, simply double or triple the recipe. Use 2 cups of chickpea flour and 2 cups of water for a double batch. Make sure to adjust all the other ingredients as well. This way, everyone can enjoy a tasty meal without fuss. You can find the Full Recipe for more detailed steps. Chickpea flour pancakes are a fun and healthy meal. They are easy to make and packed with flavor. Here’s how to whip them up. Ingredients: - 1 cup chickpea flour (besan) - 1 cup water - 1 teaspoon turmeric powder - 1 teaspoon cumin powder - 1/2 teaspoon baking soda - 1/2 teaspoon salt - 1 small onion, finely chopped - 1 green chili, finely chopped (optional) - 1/4 cup fresh cilantro, chopped - Olive oil or ghee for cooking Instructions: 1. In a bowl, mix chickpea flour, turmeric, cumin, baking soda, and salt. 2. Slowly add water while whisking. The batter should be thick and smooth. 3. Add chopped onion, green chili, and cilantro to the batter. Stir well. 4. Heat a non-stick skillet on medium. Add a bit of olive oil or ghee. 5. Pour a ladle of batter onto the skillet. Spread it gently into a circle. 6. Cook for 2-3 minutes until the edges lift and the bottom turns golden. 7. Flip the pancake with a spatula and cook for another 2-3 minutes. 8. Move the pancake to a plate. Repeat with remaining batter, adding oil as needed. 9. Serve warm with yogurt or your favorite chutney. Prep Time: 10 min | Total Time: 20 min | Servings: 4 This simple recipe makes a delightful dish. You can enjoy it any time of day. Try it with different toppings to make it your own! Chickpea flour pancakes are simple to make and full of flavor. We covered essential ingredients, cooking steps, and tips for perfect texture. You can customize your pancakes with spices, toppings, and even go gluten-free or vegan. Store leftovers properly for a tasty meal later. Remember, these pancakes are not just healthy; they are easy to modify for your taste. Embrace your creativity in the kitchen and enjoy delicious chickpea flour pancakes today!

Chickpea Flour Pancakes Easy and Wholesome Meal

Looking for a quick and healthy meal? Chickpea flour pancakes are your answer! These simple pancakes are packed with nutrition

Older posts
Newer posts
← Previous Page1 … Page42 Page43 Page44 … Page64 Next →

dsad

© 2025 Foodish Talk • Built with GeneratePress

Our Policies

  • Copyright Policy
  • Cookie Policy
  • GDPR Policy
  • Privacy Policy
  • Disclaimer
  • Terms Of Use

More Information

  • Home
  • About
  • Contact
  • Appetizers
  • Dessert
  • Dinner
  • Drinks
©2025, Foodish Talk About Back To Top