![- Beef Sirloin: This is the star of your dish. Use one pound of beef sirloin, thinly sliced for tender bites. - Mushrooms and Onions: You need eight ounces of sliced mushrooms and one medium onion, diced. They add so much flavor and texture. - Sour Cream and Broth: One cup of sour cream gives creaminess. One cup of beef broth adds depth to the sauce. - Fresh Herbs: Adding fresh parsley brightens the dish. It looks pretty and enhances taste. - Extra Seasoning Options: Consider using extra Worcestershire sauce or a dash of paprika. These can really elevate the flavor. - Alternative Protein Options: If you prefer, swap beef for chicken or pork. These work well and taste great. - Gluten-Free Noodle Choices: Use gluten-free pasta if needed. It complements the sauce without losing flavor. For the full recipe, check the [Full Recipe]. To start, slice the beef sirloin into thin strips. This helps the meat cook quickly and evenly. Heat two tablespoons of olive oil in a large skillet over medium-high heat. Add the beef in small batches. Brown it on all sides, which takes about 3-4 minutes. Once browned, remove the beef from the skillet and set it aside. Remember, do not crowd the pan. This step is key for a nice sear. Next, it’s time to cook the vegetables. In the same skillet, add the diced onion. Sauté it for about 3-4 minutes until it becomes translucent. Then, add two cloves of minced garlic and the sliced mushrooms. Cook until the mushrooms are tender, around 5-7 minutes. Be careful not to overcook the vegetables. They should be soft but still hold their shape. Overcooked veggies can turn mushy and lose their flavor. Now, let’s bring it all together. Return the cooked beef to the skillet. Pour in one cup of beef broth, one tablespoon of Worcestershire sauce, and one teaspoon of Dijon mustard. Stir well and bring it to a simmer. Let it cook for about five minutes. This helps thicken the sauce. After that, reduce the heat to low. Stir in one cup of sour cream until smooth. Warm it gently but avoid boiling. This keeps the sauce creamy and rich. To complete your dish, serve the beef stroganoff over cooked egg noodles. Garnish with chopped parsley for a fresh touch. For the full recipe, check out the details above! To get great flavor in your beef stroganoff, start with the right seasoning. I recommend using salt and pepper to highlight the beef's natural taste. Adding a splash of Worcestershire sauce gives it a rich depth. Don’t forget the Dijon mustard; it adds a nice tang. The quality of your beef matters a lot. I prefer using beef sirloin because it’s tender and flavorful. Fresh cuts make a big difference. Always choose grass-fed beef if you can. It tastes better and is healthier. Cooking the egg noodles is key to getting the right texture. Follow the package directions, but aim for al dente. They should have a slight bite. This helps them hold up under the creamy sauce. When it comes to the sauce, balance is crucial. Stir in the sour cream gently. You want it creamy but not too thick. If it feels too thick, add a splash of beef broth to loosen it up. One big mistake is overcooking the beef. Cook it until it’s just browned, then take it out. If you cook it too long, it gets tough. Another mistake is skipping the simmering step. This allows the flavors to blend. Letting it simmer for a few minutes helps thicken the sauce too. Trust me, it’s worth the wait! For the full recipe, check out the details above. Enjoy making your beef stroganoff! {{image_2}} You can switch things up in beef stroganoff by using chicken or pork. Chicken breast works well. Just cut it into thin strips and cook it like you would the beef. Pork tenderloin is another tasty option. It gives a nice flavor and texture. For a vegetarian version, use mushrooms as the main ingredient. You can also use tempeh or tofu for protein. These options keep the dish creamy and delicious while being meat-free. When serving beef stroganoff, you have choices. You can serve it over rice or noodles. Egg noodles are classic, but any noodle works. Rice gives a different texture and flavor. You can also add creative toppings. Try crispy onions, fresh herbs, or even a sprinkle of cheese. A side of steamed veggies or a salad also pairs well with this dish. Beef stroganoff has roots in Eastern Europe. You can add paprika for a smoky flavor. This nod to tradition brings warmth to the dish. For an Asian twist, use soy sauce instead of beef broth. Add ginger and sesame oil for extra taste. These changes create a fun fusion dish that still feels like home. For more details on making this dish, check out the Full Recipe. To keep your beef stroganoff fresh, store it in the fridge. Use an airtight container. This way, it stays tasty for about three to four days. Make sure the dish cools down before sealing it. This helps prevent moisture build-up. You can freeze beef stroganoff for later meals. To do this, let it cool completely first. Then, place it in a freezer-safe container. When you are ready to eat it, thaw it in the fridge overnight. Reheat gently in a pot. This keeps the flavors and texture nice. When you want to enjoy your leftovers, reheat them on low heat. Stir often to avoid hot spots. You can also use the microwave on a low setting. Just be careful not to overcook it. This will keep your beef tender and the sauce creamy. To make Classic Beef Stroganoff from scratch, follow these steps: 1. Slice the Beef: Cut 1 lb of beef sirloin into thin strips. 2. Brown the Beef: Heat 2 tablespoons of olive oil in a skillet. Cook the beef in batches until browned, then set aside. 3. Sauté the Onion and Mushrooms: In the same skillet, add 1 diced medium onion and cook until soft. Add 8 oz of sliced mushrooms and 2 cloves of minced garlic. Cook until mushrooms are tender. 4. Make the Sauce: Return the beef to the skillet. Pour in 1 cup of beef broth, 1 tablespoon of Worcestershire sauce, and 1 teaspoon of Dijon mustard. Stir and simmer for 5 minutes. 5. Add Creaminess: Reduce heat and mix in 1 cup of sour cream. Stir until smooth and warm gently. 6. Cook the Noodles: Boil 8 oz of egg noodles as per the package instructions. Drain and set aside. 7. Serve: Place the beef mixture over the noodles and add chopped parsley for garnish. You can find the full recipe above for more details. The best way to serve Beef Stroganoff is over egg noodles. You can also try these ideas: - Garnish: Add fresh parsley for color and flavor. - Sides: Serve with a side of steamed green beans or a crisp salad. - Bread: Pair with crusty bread to soak up the sauce. These options enhance the dish and make your meal more complete. Yes, you can use Greek yogurt as a substitute for sour cream. Here’s how it affects the taste: - Flavor: Greek yogurt adds a tangy taste, which can brighten the dish. - Texture: It provides creaminess but may be slightly thicker than sour cream. - Healthier Option: Greek yogurt has more protein and less fat. Using Greek yogurt is a great way to keep your dish healthy while still delicious! In this post, we explored classic beef stroganoff, from key ingredients to cooking steps. You learned how to prepare the beef, sauté vegetables, and combine everything for rich flavor. We also discussed mistakes to avoid and different variations like chicken or vegetarian options. Remember, quality ingredients and proper cooking times are crucial. With practice, you can create a dish that delights every time. Enjoy your cooking journey and don't be afraid to experiment!](https://foodishtalk.com/wp-content/uploads/2025/05/9e71d9c7-d39b-4b76-b1f5-f97f5e101e36.webp)
Classic Beef Stroganoff Rich and Creamy Comfort Dish
Welcome to the world of rich and creamy comfort! Classic Beef Stroganoff blends tender beef, savory mushrooms, and luscious sour
Welcome to the world of rich and creamy comfort! Classic Beef Stroganoff blends tender beef, savory mushrooms, and luscious sour

Craving a warm, comforting dish that bursts with flavor? You’re in the right place! In this blog post, I’ll share
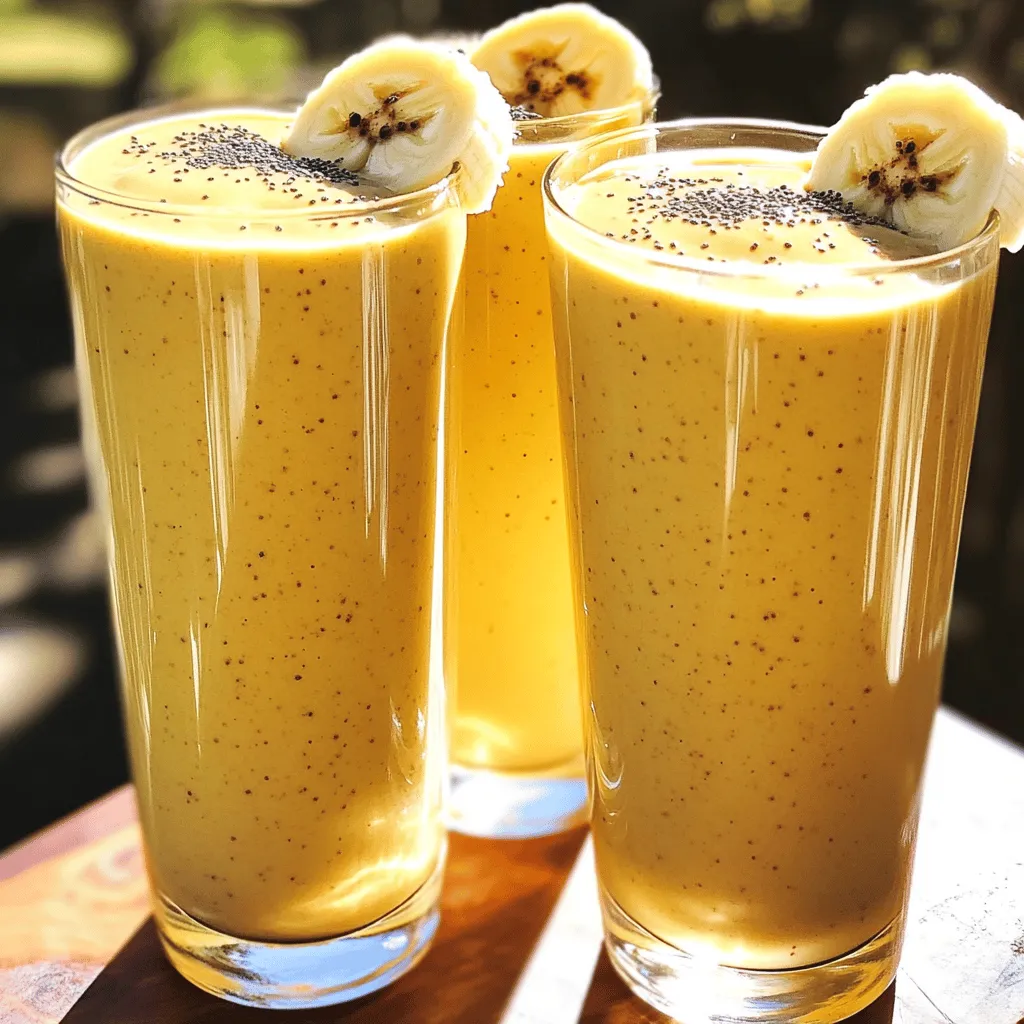
If you’re looking for a delicious and healthy drink, you’ve found it! This Peanut Butter Banana Smoothie is creamy, tasty,
![- 1 cup shredded cabbage - 1 cup shredded carrots - 1 bell pepper, thinly sliced (any color) - 1 cup bean sprouts - 2 green onions, finely chopped - 2 cloves garlic, minced - 1 tablespoon fresh ginger, grated - 1 teaspoon soy sauce (or tamari for gluten-free) - 1 tablespoon sesame oil - 12 rice paper wrappers - Cooking spray or olive oil for brushing - Salt and pepper to taste These ingredients make the spring rolls full of flavor and crunch. The cabbage and carrots give a nice bite. Bell peppers add a sweet touch, while bean sprouts bring crispness. Garlic and ginger add warmth and zest. Soy sauce or tamari provides depth, and sesame oil adds a nutty flavor. Using rice paper wrappers makes these rolls light and fun to eat. When baked, they turn golden brown and crispy. You can find all these ingredients at your local store. If you want to explore more, check out the Full Recipe for step-by-step instructions. 1. Preheat your oven to 400°F (200°C). Line a baking sheet with parchment paper. This helps the spring rolls not stick. 2. In a large skillet, heat 1 tablespoon of sesame oil over medium heat. Add 2 cloves of minced garlic and 1 tablespoon of grated ginger. Sauté for 1 minute. Enjoy the wonderful aroma! 3. Stir in 1 cup of shredded cabbage, 1 cup of shredded carrots, 1 bell pepper (thinly sliced), and 1 cup of bean sprouts. Cook for 3-4 minutes. The veggies should be slightly soft but still crunchy. 1. Fill a shallow dish with warm water. This is for softening the rice paper wrappers. 2. Dip one rice paper wrapper in the water for about 10 seconds. It should feel soft and pliable. 3. Place the softened wrapper on a clean surface. Spoon 2 tablespoons of the veggie filling onto the lower third of the wrapper. 4. Fold the sides in, then roll from the bottom upwards tightly. Repeat with the rest of the wrappers and filling. 1. Place the rolled spring rolls on the prepared baking sheet, seam side down. Lightly spray or brush them with cooking spray or olive oil. 2. Bake in the preheated oven for 15-20 minutes. Flip halfway through. Look for a golden brown color for that perfect crispy texture. Now, enjoy your crispy and flavorful baked veggie spring rolls! For the complete recipe, check [Full Recipe]. To get that crispy texture, follow these tips. First, make sure to bake them on a parchment-lined sheet. This keeps them from sticking and helps with even cooking. Second, brush the spring rolls lightly with olive oil or spray them with cooking spray. This adds a nice crunch. When it comes to seasoning, feel free to adjust it based on your taste. If you like heat, add some chili flakes to the veggie mix. Or, if you prefer a sweeter touch, try adding a dash of sugar to the soy sauce. These small tweaks can elevate your spring rolls! One common mistake is overfilling the wrappers. It might seem tempting to load them up, but too much filling makes rolling hard. Aim for about 2 tablespoons of the veggie mix per roll. Another mistake is not sealing the rolls properly. Make sure to fold the sides in and roll tightly. This prevents the filling from leaking out during baking. If they aren’t sealed well, you’ll end up with a mess instead of a beautiful spring roll. {{image_2}} You can easily adapt baked veggie spring rolls to fit your diet. For a gluten-free option, use rice paper wrappers instead of regular ones. Rice paper is light and crispy, perfect for these rolls. Swap soy sauce for tamari to keep things gluten-free. For those who follow a vegan diet, this recipe is already vegan-friendly, as it contains no animal products. Just ensure your soy sauce or tamari is vegan as well. To boost the flavor of your spring rolls, consider adding spices or fresh herbs. A pinch of crushed red pepper can add a nice kick. Fresh cilantro or basil can bring a bright taste, too. You can also try adding sesame seeds for extra crunch. When it comes to dipping sauces, the sky's the limit! Sweet chili sauce pairs well with the veggie filling. You could also try spicy sriracha for a bold flavor. If you prefer something creamy, a simple peanut sauce works great. Choose what excites your taste buds! For the Full Recipe, check out the detailed instructions above. To keep your leftover spring rolls fresh, follow these best practices: - Refrigeration: Place the rolls in an airtight container. They last for about 3 days in the fridge. If you want to keep them crispy, avoid stacking the rolls. Use parchment paper between layers to keep them from sticking together. - Freezing options: You can also freeze the spring rolls. Wrap each roll in plastic wrap and place them in a freezer-safe bag. They stay good for up to 2 months. When you’re ready to eat, thaw them in the fridge overnight before reheating. Reheating baked spring rolls while keeping them crispy is easy. Here are some methods: - Oven: Preheat your oven to 375°F (190°C). Place the rolls on a baking sheet and bake for about 10 minutes. This method helps revive the crunch. - Air fryer: If you have an air fryer, this is a great option. Set it to 350°F (175°C) and heat the rolls for about 5-7 minutes. They turn out nice and crispy. - Skillet: Heat a non-stick skillet over medium heat. Add a small amount of oil. Place the rolls in the skillet and cook for about 2-3 minutes on each side. This method adds extra crispiness. By storing and reheating your baked veggie spring rolls properly, you'll enjoy them just as much as when they were fresh. For the full recipe, check out the link provided. Baked spring rolls use hot air to cook. They have less oil than fried ones. This makes baked rolls healthier. You get fewer calories and less fat. Baking also keeps the veggies crisp and colorful. Fried rolls can become greasy and heavy. Overall, baking is a lighter choice. Yes, you can use various vegetables! Fresh veggies let you be creative. Try mushrooms, zucchini, or spinach. Seasonal vegetables add unique flavors. For spring, use asparagus or peas. In fall, root veggies like sweet potatoes work well. Just chop them small so they cook evenly. You can store baked veggie spring rolls in the fridge for about three days. Make sure to keep them in an airtight container. They stay fresh and tasty this way. For longer storage, freeze them. They can last up to three months in the freezer. Dips add great flavors to spring rolls. Try sweet chili sauce or soy sauce for a classic taste. Spicy sriracha gives a nice kick. Pair them with fresh salads or noodles for a complete meal. You can also serve mango salsa for a fruity twist. For the full recipe, check out the section above! In this blog post, we explored how to make delicious baked veggie spring rolls. We looked at the key ingredients, simple preparation steps, and tips to get that perfect crunch. You learned about variations for different diets and how to store leftovers properly. As you experiment with flavors and ingredients, remember that these rolls are versatile and healthy. Enjoy creating your own unique spring rolls and sharing them with others! Your kitchen adventures just got more exciting!](https://foodishtalk.com/wp-content/uploads/2025/05/f33f0178-6f36-4877-9da8-229289566f15.webp)
Do you crave a snack that’s both crispy and packed with flavor? Try these Baked Veggie Spring Rolls! With fresh
. Ginger Sesame Noodles are easy to make with simple steps. First, boil the noodles and mix a tasty sauce. Then, sauté the veggies and combine everything for a quick meal. You can even swap ingredients based on your tastes or diet. Store leftovers well for more delicious meals later. If you’re looking for a healthy, flavorful dish, this one is a winner! Enjoy making it your own and share it with family and friends.](https://foodishtalk.com/wp-content/uploads/2025/05/2493c3e3-b980-4d20-bf39-497cb990eb74.webp)
If you’re craving a dish that’s both flavorful and easy to make, Ginger Sesame Noodles is the answer. This bright
![The right ingredients make all the difference in this zesty lime chicken marinade. Each one adds a unique touch to the dish. - Fresh lime juice (1/2 cup): This is the star of the show! It adds a bright, tangy flavor. You will need about four medium limes to get this amount. Fresh juice makes your dish vibrant and lively. - Olive oil (1/4 cup): This ingredient adds richness and a smooth texture. It helps the marinade stick to the chicken. Olive oil also brings a healthy fat that balances the acidity of the lime juice. - Garlic (3 cloves, minced): Garlic adds depth and a savory kick. It enhances the overall flavor profile of the marinade. - Honey (1 tablespoon): Honey brings a touch of sweetness. This balances the tartness of the lime juice, creating a beautiful harmony of flavors. - Ground cumin (1 teaspoon): This spice introduces an earthy warmth. It adds a subtle complexity that enhances the overall taste. - Paprika (1 teaspoon): Paprika provides a mild smokiness. It also gives the marinade a lovely red hue. - Chili powder (1/2 teaspoon): This spice adds a hint of heat. It gives the dish some zest without making it too spicy. - Black pepper (1/2 teaspoon): This adds a slight bite. Black pepper rounds out the flavors nicely. - Salt (to taste): Salt brings out all the other flavors. It’s key for balancing the marinade. - Chicken breasts (4 boneless, skinless): These are the canvas for your marinade. They soak up all the zesty goodness. Using these ingredients together makes for a flavorful and easy chicken dish that shines! You can find the complete recipe details in the Full Recipe section. To make the marinade, start by whisking the ingredients together. You need: - 1/2 cup fresh lime juice - 1/4 cup olive oil - 3 cloves garlic, minced - 1 tablespoon honey - 1 teaspoon ground cumin - 1 teaspoon paprika - 1/2 teaspoon chili powder - 1/2 teaspoon black pepper - Salt to taste Whisk these ingredients in a medium bowl until they blend well. This step is key. It ensures the flavors mix evenly. A balanced marinade adds depth to your chicken. Marinating time matters too. I recommend marinating for at least 30 minutes. For the best taste, aim for 2 to 4 hours. This allows the chicken to soak up all the zesty lime flavor. When you choose chicken for this recipe, boneless, skinless chicken breasts work best. They absorb the marinade well and cook evenly. After preparing the marinade, place the chicken in a resealable bag or shallow dish. Pour the marinade over the chicken and seal the bag or cover the dish. For marinating duration, stick with the same 30 minutes to 4 hours. Longer marinating gives you more flavor, but don’t exceed 24 hours. The chicken may get too salty. Before cooking, preheat your grill over medium-high heat. This step is important. A hot grill sears the chicken, locking in the juices. For cooking times, grill the chicken for 6 to 7 minutes per side. Always check the internal temperature. It should reach 165°F or 75°C to ensure it’s safe to eat. After grilling, let the chicken rest for 5 minutes before slicing. This helps keep the juices inside, giving you tender and flavorful chicken. To get the best flavor from your Zesty Lime Chicken Marinade, you want to marinate the chicken well. Here’s how: - Use a resealable plastic bag. This helps spread the marinade evenly. - Try to remove all air from the bag. This helps the marinade hug the chicken. - Marinate for at least 30 minutes. But for more flavor, aim for 2 to 4 hours. I find that using glass or ceramic dishes works well too. Avoid metal containers. Acidic ingredients like lime juice can react with metal and change the taste. Grilling can be tricky, but these tips will help: - Before grilling, oil the grates. This keeps the chicken from sticking and makes flipping easy. - Make sure your grill is hot. Preheat it for about 10 minutes on medium-high heat. - Cook the chicken for about 6 to 7 minutes on each side. This gives even cooking. Always check the chicken’s internal temperature. It should reach 165°F (75°C) to be safe. This way, you ensure a juicy, flavorful meal. {{image_2}} You can easily change the taste of your Zesty Lime Chicken. Adding herbs or spices can create new flavors. For instance, try fresh cilantro or parsley for a bright touch. If you want a spicy kick, add a pinch of cayenne pepper. You can also experiment with different sweeteners. Instead of honey, use maple syrup or agave nectar. These alternatives can add a unique twist to the marinade. You have several options for cooking your Zesty Lime Chicken. Baking in the oven gives you juicy chicken, while grilling adds a smoky flavor. If you grill, preheat your grill and cook each side for 6-7 minutes. This method creates nice grill marks and enhances the taste. If you prefer a quicker method, try an air fryer. It cooks the chicken fast and leaves it tender. Set your air fryer to 375°F (190°C) and cook for about 12-15 minutes. Always check the internal temperature to ensure it reaches 165°F (75°C). These methods can change your meals and keep things exciting. Don't hesitate to explore these variations for your Zesty Lime Chicken. For the complete Zesty Lime Chicken Marinade recipe, check out the Full Recipe. For short-term storage, keep your marinated chicken in the fridge. Use a clean, airtight container or a resealable plastic bag. This helps to lock in the flavors and keep your chicken safe. The marinated chicken lasts about 2 to 3 days in the fridge. If you plan to eat it later, make sure to label the container with the date. For long-term storage, you can freeze the marinade and chicken together. This way, you keep the flavor intact. Place the chicken and marinade in a freezer bag. Squeeze out as much air as possible before sealing. The chicken can stay good in the freezer for about 3 months. When you are ready to cook, safely defrost the chicken. The best way is to move it from the freezer to the fridge. Let it thaw overnight. If you need it fast, you can use cold water. Just keep it in a sealed bag and change the water every 30 minutes. Avoid defrosting in the microwave, as it can cook the chicken unevenly. For the full recipe, check out the complete guide to Zesty Lime Chicken Marinade. The best chicken for this marinade is boneless, skinless chicken breasts. They soak up the zesty flavors well. You can also use chicken thighs for more juiciness. Thighs have a richer taste and stay tender when cooked. Choose cuts based on your flavor preference. Yes, you can use bottled lime juice. However, fresh lime juice offers a brighter taste. Bottled juice may taste more muted. If you want the best flavor, use fresh limes. This small switch makes a big difference in your dish. You should marinate the chicken for at least 30 minutes. For the best flavor, aim for 2 to 4 hours. The longer you marinate, the more tender the chicken gets. Just avoid going over 24 hours, as it can get mushy. Yes, you can double the marinade recipe. Just keep the same ratios for each ingredient. This is great for larger gatherings or meal prep. Ensure you have enough chicken to soak up the flavors. You can serve Zesty Lime Chicken with many sides. Consider a fresh salad, rice, or grilled veggies. Corn on the cob and avocado slices also pair nicely. These options balance the zesty chicken and make a full meal. For the complete Zesty Lime Chicken Marinade recipe details, check out the [Full Recipe]. Using fresh lime juice, olive oil, garlic, and spices creates a zesty marinade. Marinate the chicken well for rich flavor and juicy texture. Remember to preheat your grill for even cooking. You can try variations with herbs or sweeteners for new tastes. Store leftovers properly for later enjoyment. Zesty Lime Chicken is fun to make and share. You will impress your family and friends with this dish! Follow these tips to make your chicken shine every time. Enjoy great meals at home with ease and confidence!](https://foodishtalk.com/wp-content/uploads/2025/05/f9cc23c2-1e76-4784-8acc-8e9d3266f583.webp)
If you’re craving a burst of flavor in your chicken, this Zesty Lime Chicken Marinade is the answer! With just

Looking for a tasty snack that won’t ruin your diet? This Healthy Spinach Artichoke Dip is your answer! With fresh
![- 1 cup glutinous rice - 1 ½ cups coconut milk - ¾ cup sugar - ½ teaspoon salt - 2 ripe mangoes, peeled and sliced - 1 tablespoon toasted sesame seeds - 2 tablespoons cooked mung beans - Fresh mint leaves for garnish Mango sticky rice uses a few key ingredients. First, glutinous rice is the heart of this dish. Its unique texture makes it sticky and chewy. Coconut milk adds a rich creaminess that enhances the flavor. The sugar balances the dish, giving it a sweet note. A pinch of salt rounds out the taste. You can also add optional ingredients. Ripe mangoes bring a fresh, fruity taste. Toasted sesame seeds add a nice crunch. Cooked mung beans provide a unique texture and flavor. Fresh mint leaves make a lovely garnish, adding color and freshness. For the full recipe, check out the details on how to bring these ingredients together. - Rinsing the glutinous rice: Start by rinsing 1 cup of glutinous rice. Use cold water and rinse until the water is clear. This step removes excess starch. - Soaking time required: After rinsing, soak the rice in water for at least 4 hours. If you can, soak it overnight. This makes the rice soft and tender. - Steaming method: Drain the soaked rice. Place it in a steamer lined with cheesecloth or a clean kitchen towel. Steam over boiling water for 30 to 40 minutes. The rice should look translucent and feel tender when done. - Combining ingredients: In a saucepan, mix 1 ½ cups of coconut milk, ¾ cup of sugar, and ½ teaspoon of salt. - Heating instructions: Heat the mixture over medium heat. Stir it until the sugar dissolves. It’s key not to let it boil. - Importance of temperature control: Keeping the heat moderate helps maintain a smooth sauce. A high heat could cause the coconut milk to separate. - Mixing rice with coconut sauce: Once the rice is steamed, put it in a large bowl. Pour about 1 cup of the coconut sauce over the hot rice. Mix it well and let it sit for 15 to 20 minutes. This allows the rice to soak up the flavor. - Portioning and serving tips: Use a scoop or your hands to mold the rice into small portions. Place each portion on a plate. - Adding garnishes: Top the rice with slices of ripe mango. Drizzle more coconut sauce on top. Sprinkle with toasted sesame seeds and mung beans for added crunch. Finish with fresh mint leaves for a lovely touch. This mango sticky rice dessert will surely delight your taste buds! If you want to dive deeper into the recipe, check the Full Recipe for more details. To make the best mango sticky rice, you must soak the rice. Soaking helps the rice absorb water, making it soft. I usually soak it for at least four hours or even overnight. This step is key. Next, steaming makes the rice tender. Place the soaked rice in a steamer lined with cheesecloth. Steam it for 30 to 40 minutes. The rice should look translucent and feel soft when done. The coconut sauce needs a good balance of sweetness. I mix sugar into the coconut milk until it dissolves. Be careful not to boil it; just heat it gently. If you want a richer flavor, add a pinch of salt. For garnishes, think about texture and color. Toasted sesame seeds add a nice crunch. You can also sprinkle cooked mung beans on top for extra flavor. Fresh mint leaves brighten the dish and make it look pretty. Presentation matters! Mold the sticky rice into small portions. Use a scoop or your hands to shape it. Place each portion on a serving plate. Top the rice with slices of ripe mango. Drizzle more coconut sauce on top for extra creaminess. This dessert pairs well with fresh fruit or a cup of green tea. For the full recipe, check out the [Full Recipe]. Enjoy your delightful mango sticky rice dessert! {{image_2}} You can switch up the mango in this dessert. Try using ripe bananas, sweet strawberries, or juicy pineapples. Each fruit brings its own twist. When mangoes are out of season, these fruits can work well. During summer, fresh peaches shine. In fall, apples or pears can add a cozy touch. Mango sticky rice can fit many diets. If you need a gluten-free option, you're in luck! The main ingredients are naturally gluten-free. Just make sure to check your coconut milk. Some brands add gluten. For a vegan treat, this dessert is perfect. All the ingredients are plant-based, so enjoy guilt-free! Want to get creative? Mix flavors from different cuisines. Add a hint of lime zest for a citrus kick. You can also sprinkle some chili flakes for a spicy touch. Another fun idea is to layer the sticky rice with matcha powder or black sesame. These flavors can create a unique dessert experience. You can find the Full Recipe to start your journey! To store leftover sticky rice, place it in an airtight container. Make sure it cools down first. This keeps the rice fresh and moist. You can keep it in the fridge for about 3 days. After that, the rice may dry out or lose its taste. The best way to reheat sticky rice is to steam it again. This method keeps the rice soft and fluffy. You can also use a microwave. Place the rice in a bowl, add a splash of water, and cover it. Heat in short bursts, stirring in between. This helps keep the texture and flavor intact. Yes, you can freeze mango sticky rice! First, let the rice cool completely. Then, place it in a freezer-safe bag. Make sure to remove as much air as possible. For best results, eat it within 1-2 months. Thaw the rice in the fridge before reheating. This way, you maintain its taste and texture. Mango sticky rice is a sweet Thai dessert. It consists of glutinous rice, coconut milk, and ripe mango. This dish is popular in Thailand and across Southeast Asia. It celebrates the joy of mango season. The creamy coconut sauce pairs well with the sweet mango. This dessert is often enjoyed during festivals or special occasions. Yes, you can prepare this dessert ahead of time. First, cook the glutinous rice and make the coconut sauce. Store them separately in the fridge. You can assemble the dessert just before serving. This way, the rice stays fresh and the mango retains its flavor. Just remember to slice the mango right before serving to keep it vibrant. You can find mango sticky rice at many Thai restaurants. Look for places that offer authentic Thai desserts. Local Asian markets often sell ready-made versions. Some grocery stores may also stock this treat. If you want to try making it yourself, you can purchase the key ingredients online. Websites like Amazon or specialty food stores carry glutinous rice and coconut milk. Mango sticky rice pairs well with several dishes and drinks. Try serving it with a strong Thai iced tea. The tea's sweetness complements the dessert's flavors. You can also enjoy it alongside fresh fruit salad. If you want a savory option, serve it with grilled chicken or shrimp. This balance of sweet and savory will enhance your meal. In this blog post, we explored how to make the delightful mango sticky rice dessert. We covered the key ingredients, step-by-step instructions, and variations to enhance your dish. You learned tips to achieve the perfect texture and how to store any leftovers. Mango sticky rice is not just a treat; it holds cultural significance and offers endless possibilities. Enjoy experimenting with flavors and textures. This dessert is sure to impress your family and friends. Happy cooking!](https://foodishtalk.com/wp-content/uploads/2025/05/cab4aae7-0fae-4445-a4d4-dae9169f0e53.webp)
Mango Sticky Rice is a dessert that bursts with flavor and nostalgia. This sweet treat combines glutinous rice, creamy coconut
![- 1 block (14 oz) firm tofu, pressed and cubed - 2 tablespoons cornstarch - 2 tablespoons vegetable oil - 1 red bell pepper, sliced - 1 yellow bell pepper, sliced - 1 cup broccoli florets - 1 cup snap peas - 2 carrots, thinly sliced - 3 green onions, chopped - 3 cloves garlic, minced - 1 tablespoon fresh ginger, grated - 3 tablespoons soy sauce (low sodium) - 1 tablespoon sesame oil - 1 tablespoon rice vinegar The main ingredients are key to a great stir fry. I always use firm tofu for the best texture. It holds up well when stir-fried. First, you need to press the tofu to remove moisture. This step helps in achieving a crispy exterior. I like to include colorful vegetables in my stir fry. The red and yellow bell peppers add sweetness and crunch. Broccoli and snap peas provide freshness. Carrots give a nice color and a bit of sweetness too. - Sesame seeds - Additional herbs After cooking, I often sprinkle sesame seeds on top. They add a nice crunch and flavor. You can also use fresh herbs, like cilantro or basil, for a pop of color and taste. - Wok or large pan - Knife and cutting board - Measuring cups and spoons A wok is my favorite tool for stir frying. It heats evenly and cooks food fast. If you don’t have one, a large pan works too. Always have a good knife and cutting board ready. They make prep easy. I recommend using measuring cups and spoons for accuracy. Follow the [Full Recipe], and you will have a tasty meal! To start, you need to press the tofu. This removes excess moisture. Place the tofu block on a plate. Put a heavy object on top for about 15 minutes. After pressing, cut the tofu into 1-inch cubes. Next, toss the cubes in cornstarch. This helps create a crispy outer layer. Now, heat 1 tablespoon of vegetable oil in a large pan or wok. Use medium-high heat for best results. Once the oil is hot, carefully add the tofu cubes. Cook them until they turn golden brown, about 8 to 10 minutes. Make sure to turn them to cook all sides evenly. Once done, remove the tofu from the pan and set it aside. In the same pan, add the remaining tablespoon of oil. When the oil is hot, add minced garlic and grated ginger. Stir quickly to avoid burning. Then, add sliced bell peppers, broccoli florets, snap peas, and carrot slices. Stir-fry these vegetables for about 5 to 7 minutes. They should be tender but still crisp. Now, it’s time to bring everything together. Return the cooked tofu to the pan. Pour in the soy sauce, sesame oil, and rice vinegar. Toss everything gently to coat the ingredients well. Cook for an additional 2 to 3 minutes. Finally, add the chopped green onions and stir-fry for one more minute. Serve your dish hot, garnished with sesame seeds. For the full recipe, check out the Veggie Delight Tofu Stir Fry 🥦. To get the best tofu, start by pressing it. Place the block of tofu between two plates. Add a weight on top, like a can. Let it sit for about 15 minutes. This method removes extra water. After that, cut the tofu into 1-inch cubes. Coat these cubes in cornstarch. This helps them get crispy. For added flavor, marinate the tofu in soy sauce for 10 minutes before cooking. This gives it a tasty kick. For a great stir-fry, pick fresh vegetables. Bell peppers, broccoli, and snap peas work well. Carrots add crunch and color. You can also use seasonal veggies. In spring, try asparagus. In summer, add zucchini. Choose what looks fresh at the market. The more colors you have, the better your dish will look and taste. High heat is key when stir-frying. It lets the food cook fast and keeps it crisp. Heat your pan or wok before adding oil. Once hot, add the tofu or veggies. Stir often to cook evenly. If things stick, don't worry. Just keep stirring, and they'll release. This method helps keep all the flavors locked in. {{image_2}} You can switch up the protein in your stir fry. If you want a plant-based option, try tempeh or seitan. Both give a hearty texture. Tempeh has a nutty flavor, while seitan is chewy and absorbs sauces well. If you prefer tofu, you can use different types. Extra-firm tofu offers a denser bite, while silken tofu gives a soft texture. Each type changes the dish's feel and taste. The sauce can make or break your stir fry. You can add spicy elements like chili sauce for heat. A little goes a long way, so start small and taste as you go. You can also experiment with different soy sauce types. For example, tamari is gluten-free and adds depth. You might even try sweet soy sauce for a twist. Each change can create a new flavor experience. Feel free to get creative with vegetables. You can mix different combinations based on what you have. Try adding bok choy, zucchini, or mushrooms. Each vegetable adds its unique flavor and texture. For a refreshing twist, use citrus. A squeeze of lime or lemon brightens the dish. It balances the savory sauce and adds a zesty touch. These variations keep your vegetable stir fry fun and exciting! To keep your vegetable stir fry with tofu fresh, store leftovers in the fridge. Place the stir fry in an airtight container. This helps prevent moisture loss and keeps the flavors intact. You can use glass or plastic containers. Make sure they seal well. When reheating, I recommend using a pan over medium heat. This method helps maintain texture. Stir occasionally to heat evenly. You can also use the microwave. Heat on medium power for about 2-3 minutes. Stir halfway through to ensure it warms evenly. Yes, you can freeze stir fry. To do this, let it cool completely before packing. Use freezer-safe bags or containers. Squeeze out any air to avoid freezer burn. To thaw, place it in the fridge overnight. You can also use the microwave on low power for quick defrosting. For stir fry, firm or extra-firm tofu works best. These types hold their shape well. Silken tofu is too soft and will break apart. Firm tofu has a nice texture. Extra-firm tofu gives a crunchier bite. Both options are great for soaking up flavor. Yes, you can add other proteins. Chicken, shrimp, or beef mix well with the veggies. Cook them first, then add the vegetables. You can also use tempeh or seitan for a plant-based option. These choices provide extra protein and flavor. This recipe is already vegan if you use plant-based sauces. Check the soy sauce and rice vinegar labels to ensure they are vegan. You can also add more veggies or nuts for added nutrition. The mix of flavors will still be delicious and fulfilling. You can serve this stir fry with rice or quinoa. Both options soak up the sauce well. You can also pair it with a fresh salad or spring rolls. For a heartier meal, try it with steamed dumplings. These sides will balance out the flavors and make a complete meal. This blog post gave you a clear guide to making vegetable stir fry with tofu. We covered key ingredients, including firm tofu and fresh vegetables. You learned handy tips for cooking and storage. Variations allow you to customize this dish with different proteins and sauces. Remember, stir-frying is an art that thrives on high heat and quick movements. With practice, you will create tasty meals that everyone loves. Enjoy experimenting with flavors and enjoy your cooking!](https://foodishtalk.com/wp-content/uploads/2025/05/678c071b-34d4-4281-ab83-ccf3a9950f44.webp)
Looking for a quick, tasty, and healthy meal? This Vegetable Stir Fry with Tofu is your answer! Packed with fresh

Are you ready to dive into a delicious and healthy dish? Stuffed zucchini boats are not only easy to make
