Skip to content
DisclaimerTerms Of UseGDPR PolicyCookie Policy

Foodish Talk

  • Home
  • Drinks
  • Appetizers
  • Dinner
  • Dessert
  • About
  • Contact
  • Privacy Policy
DisclaimerTerms Of UseGDPR PolicyCookie Policy

Ava

Peach Cobbler Overnight Oats is a tasty and simple dish. You can make it quickly. This recipe gives you a creamy, sweet, and crunchy breakfast. You can prepare it the night before. Just let it chill in the fridge. - 1 cup rolled oats - 1 cup almond milk (or any milk of choice) - 1 ripe peach, diced - 1 tablespoon honey or maple syrup (adjust for sweetness) - 1/2 teaspoon vanilla extract - 1/2 teaspoon ground cinnamon - 1/4 teaspoon nutmeg (optional) - 1/4 cup Greek yogurt (for creaminess) - 2 tablespoons chopped pecans (for crunch) - Fresh mint leaves (for garnish) If you want to change things up, here are some ideas: - Use coconut milk instead of almond milk. - Swap the peach for fresh berries or bananas. - Try agave nectar instead of honey. - Use dairy yogurt if you prefer. - For a nut-free option, skip the pecans. These swaps can help you make the recipe fit your taste! To start, gather all your ingredients. You will need rolled oats, almond milk, a ripe peach, and a few more items. In a medium bowl, mix the rolled oats with almond milk. Then, add the diced peach, honey, vanilla extract, ground cinnamon, and nutmeg. Stir well until everything combines. This mix is the base for your peach cobbler overnight oats. Next, it's time to add some creaminess. Take your Greek yogurt and fold it into the oat mixture gently. This step adds richness and makes the texture smooth. Make sure you don't stir too hard; you want to keep it fluffy. Once combined, divide the mixture into two jars or containers. Leave some space on top for toppings. After chilling overnight, your oats will be ready to enjoy. In the morning, stir the oats well. Taste them and adjust the sweetness if you like. For a lovely finish, add more diced peach on top and sprinkle with chopped pecans. Don't forget a few fresh mint leaves for a nice touch. You can find the full recipe above for more details. Enjoy your delicious peach cobbler overnight oats! To make your peach cobbler overnight oats pop, use ripe peaches. They bring natural sweetness. You can also add a pinch of salt. This small trick helps balance the flavors. Consider adding a splash of almond extract for a unique twist. For more flavor, mix in some chia seeds. They add texture and boost nutrition. Store your oats in airtight containers. This keeps them fresh and tasty. Use jars for easy grab-and-go meals. You can make them up to three days in advance. Just remember to add fresh toppings right before eating. This keeps your oats from getting soggy. One common mistake is not using enough liquid. Oats need enough milk to soften. Another error is skipping the chill time. Giving oats time to soak makes them creamy. Lastly, don’t forget to taste before serving. You might want to adjust the sweetness. {{image_2}} You can swap the peach for other fruits. Try berries, apples, or bananas. Each fruit brings a unique taste. In summer, fresh strawberries work well. In fall, diced apples with cinnamon taste great. Choose fruits that you love for the best results. You can mix fruits, too! This keeps your breakfast exciting. To make this recipe vegan, use plant-based yogurt. Almond milk is already dairy-free, so you’re set there! For gluten-free oats, check the label. Some oats may have gluten. The rest of the ingredients are naturally gluten-free. You can also skip the honey and use maple syrup instead. This keeps it sweet and vegan-friendly! Want a protein boost? Add a scoop of protein powder to the oats. Chia seeds or flaxseeds also add nutrition. They’re small but pack a punch! You can sprinkle them in before mixing. Want some crunch? Toss in some nuts or seeds for texture. These add flavor and healthy fats too. For more sweetness, a bit of brown sugar works well. Feel free to explore and make this recipe your own! For the full recipe, check out the earlier section. Storing leftovers is simple. Place any extra Peach Cobbler Overnight Oats in a clean jar. Make sure the jar has a tight lid to keep out air. You can store it for up to three days. If you want to keep it longer, freeze the oats instead. Just remember to thaw it in the fridge before you eat it. I love using glass jars for storage. They keep the oats fresh and let you see the layers. You can also use BPA-free plastic containers. Just make sure they are airtight. This will help keep the oats tasty and safe. Keep your overnight oats in the fridge at all times. The cold will help the oats soak up flavors and stay fresh. If you see any water on top, just stir it back in. That means the oats are doing their job. Always check for any signs of spoilage before eating. If it smells off or looks strange, it's best to toss it out. For the best taste, enjoy your oats within three days. If you want to make a big batch, just follow the full recipe, and you’ll have delicious breakfast ready for days! Yes, you can use many other fruits in this recipe. Try berries, bananas, or apples. Each fruit adds its own flavor and sweetness. If you want a twist, mix different fruits. Just keep the same amount of oats and milk for best results. Overnight oats can last up to five days in the fridge. Store them in airtight containers. This way, they stay fresh and tasty. If you notice any changes in smell or texture, it’s best to toss them. The best way to reheat overnight oats is in the microwave. Place the oats in a microwave-safe bowl. Add a splash of milk to keep them creamy. Heat for about 30 seconds. Stir and heat longer if needed. You can also enjoy them cold if you prefer. For more details, check the Full Recipe. This blog post covered the essential parts of overnight oats. We reviewed the ingredients, their substitutes, and step-by-step instructions. You learned tips to enhance flavor and store leftovers properly. We discussed variations for different diets and fruits. Lastly, I answered common questions to help you make the best oats. Remember, overnight oats are flexible and easy. Enjoy making your own unique version and share it with friends!

Peach Cobbler Overnight Oats Tasty and Simple Recipe

Looking for a quick, tasty breakfast? Let me introduce you to Peach Cobbler Overnight Oats! This simple recipe combines fresh

- 1 cup quinoa, rinsed - 2 cups vegetable broth (or water) - 1 cup cherry tomatoes, halved - 1 cucumber, diced - 1 bell pepper (red or yellow), diced - 1/2 red onion, finely chopped - 1/2 cup Kalamata olives, pitted and sliced - 1/2 cup feta cheese, crumbled - 1/4 cup fresh parsley, chopped Quinoa serves as the base for this salad. It gives a nice, nutty flavor and a great texture. I love how it absorbs the flavors around it. The fresh vegetables add crunch and color. Cherry tomatoes burst with sweetness, while cucumber cools the dish. The bell pepper brings a crisp bite, and the red onion adds a sharp taste. Kalamata olives and feta cheese provide saltiness and creaminess. Fresh parsley finishes the dish with a bright touch. - 1/4 cup olive oil - 2 tablespoons lemon juice - 1 teaspoon dried oregano - Salt and pepper to taste The dressing is simple yet full of flavor. Olive oil gives richness, while lemon juice adds bright acidity. Dried oregano brings an earthy touch, which is perfect for a Mediterranean dish. Don’t forget to season with salt and pepper to balance everything. - Alternative grains - Vegan cheese options - Low-sodium dressing alternatives If you want to change things up, try using other grains like farro or barley instead of quinoa. For a vegan option, swap feta cheese with a plant-based alternative. You can also make a low-sodium dressing by using less salt and opting for fresh herbs instead of dried ones. For the full recipe, check out the details above. First, you need to rinse the quinoa. This step removes any bitterness. Next, combine the rinsed quinoa with vegetable broth or water in a medium saucepan. Use two cups of liquid for every cup of quinoa. Bring the mixture to a boil over medium heat. Once it boils, reduce the heat to low. Cover the pan and let it simmer for about 15 minutes. The quinoa is ready when it’s fluffy and the liquid is gone. Remove it from heat and let it cool for a few minutes. While the quinoa cools, grab a large mixing bowl. Chop the fresh vegetables: cherry tomatoes, cucumber, bell pepper, red onion, and olives. Dice them into bite-sized pieces. This makes it easy to eat. Mix the chopped veggies in the bowl. Add crumbled feta cheese and chopped parsley for flavor. Focus on the texture; you want a mix of crunchy and soft. This balance makes the salad interesting and fun to eat. Now it’s time to mix everything together. Fluff the cooled quinoa with a fork to separate the grains. Add the quinoa to the bowl of veggies. In a separate small bowl, whisk together olive oil, lemon juice, dried oregano, salt, and pepper. This dressing brings all the flavors together. Pour it over the quinoa and vegetables. Gently toss everything until well combined. Taste the salad and adjust seasoning if needed. For extra zest, add more lemon juice or salt. Let the salad sit for at least 15-30 minutes. This waiting time helps the flavors meld beautifully. Enjoy your fresh and flavorful Mediterranean Quinoa Salad! For a detailed guide, check out the Full Recipe. To boost the taste of your Mediterranean quinoa salad, try marinating some of your main ingredients. For example: - Let the olives soak in olive oil and herbs. - Marinate the diced cucumbers in lemon juice and a pinch of salt. These simple steps add depth to your dish. When seasoning, use a light hand. Start with a little salt and pepper. After tossing, taste and adjust. You can always add, but it’s hard to take away. How you serve your salad makes a difference. For a bright look, use a big bowl. It’s great for sharing. You can also serve individual portions. This makes it feel special for each guest. Garnish your salad with extra parsley and a lemon slice. This adds color and freshness. You can also sprinkle some extra feta on top for a creamy finish. You can prep many ingredients ahead of time. Chop your veggies and store them in airtight containers. This keeps them fresh. Cook your quinoa the day before and chill it. This saves time on the day of serving. When storing prepped components, keep them separate. This helps maintain their texture. Store your dressing in a jar. Just shake it up when you are ready to use it. {{image_2}} You can easily boost the nutrition of your Mediterranean quinoa salad by adding protein. Here are some options: - Chicken: Grilled or roasted chicken works well. Cut it into bite-sized pieces and mix it in. - Shrimp: Cook shrimp in garlic and olive oil for a tasty twist. Toss them in once they cool. - Beans: Chickpeas or black beans add a hearty texture. They are also great for plant-based diets. If you want vegan protein sources, consider adding: - Lentils: Cooked lentils blend nicely with the salad. They add fiber and protein. - Tofu: Marinated and cubed tofu gives a nice flavor punch. It soaks up the dressing well. Using seasonal ingredients can make your salad even better. Here’s how you can switch it up: - Substituting Vegetables: In summer, add ripe zucchini or fresh corn. In fall, try roasted butternut squash or sweet potatoes. - Tailoring Flavors: Seasonal herbs like basil in summer or sage in fall can enhance the taste. Just chop them finely and mix them in. Making dietary adjustments is simple with this salad. Here are a few ideas: - Gluten-Free: Quinoa is naturally gluten-free, but check any added products like dressing or cheese. - Low-Fat Options: Use less olive oil or swap feta for a lighter cheese. You can also skip the cheese altogether for fewer calories. These variations let you personalize your salad. Enjoy experimenting and finding your favorite mix! For the full recipe, check out the Mediterranean Quinoa Salad. To store your Mediterranean quinoa salad, place leftovers in an airtight container. This helps keep the salad fresh. Glass or BPA-free plastic containers work best. They seal tightly and keep flavors intact. Store the salad in the fridge and use it within three days for the best taste. If you want to save the salad for later, consider freezing it. You can freeze the whole salad or just the quinoa. Place it in a freezer-safe bag, removing as much air as possible. For best flavor, freeze without the dressing. This way, the veggies stay fresh. When you thaw it, mix in fresh dressing for that zesty kick. The Mediterranean quinoa salad stays fresh for about three days in the fridge. Check for any signs of spoilage. If the salad has a strange smell or changes color, it’s time to toss it out. Always trust your senses; they guide you well in the kitchen. Yes, you can make this salad ahead of time. I recommend preparing it the day before. It lets the flavors mix well. Store it in an airtight container in the fridge. This keeps the salad fresh and tasty. The best time to eat it is within two to three days for the best taste. If you want to replace quinoa, try other grains. Brown rice and farro are great choices. You can cook them in the same way as quinoa. Just follow the package instructions for water ratios and cooking times. For example, brown rice usually takes about 45 minutes to cook. This salad usually lasts about three to five days in the fridge. Make sure to keep it in a sealed container. If you notice any changes in smell or texture, it’s best to toss it out. Freshness is key for the best flavors. Absolutely! For gluten-free diets, quinoa is a great option. For vegan needs, skip the feta cheese or use a vegan cheese. If you want a low-carb version, you can use cauliflower rice instead of quinoa. Just make sure to adjust the cooking time accordingly. This blog post covered how to make a Mediterranean Quinoa Salad. We explored essential ingredients, from quinoa to fresh herbs, plus tips for the best dressing. You learned easy cooking steps, flavor-enhancing tricks, and how to store your salad. Customization for dietary needs is simple, meaning everyone can enjoy it. In conclusion, this salad is healthy, tasty, and versatile. Enjoy creating your version with seasonal ingredients. Happy cooking!

Mediterranean Quinoa Salad Fresh and Flavorful Dish

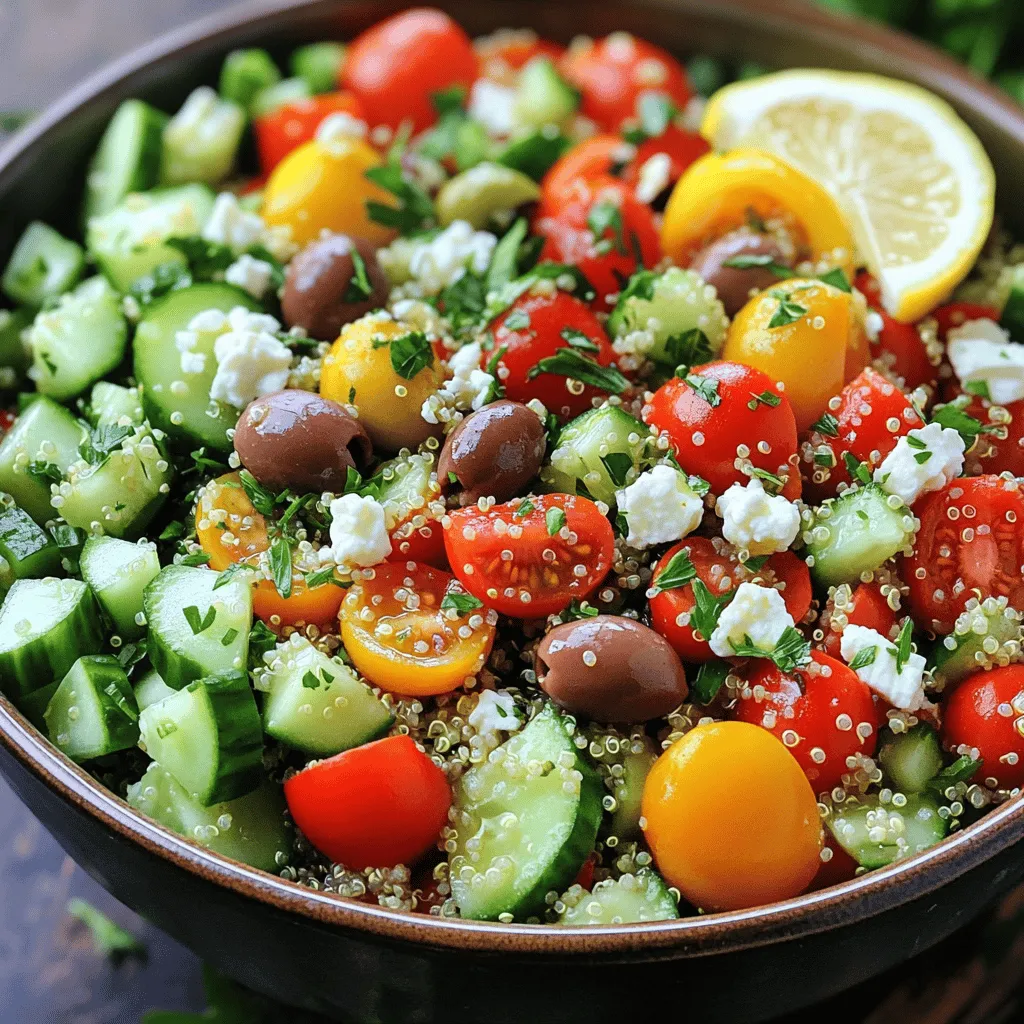
Looking for a bright and tasty dish that’s packed with nutrients? Try my Mediterranean Quinoa Salad! With fresh veggies, feta

Here is a simple list of what you need to make chocolate chip cookie dough dip: - 1 cup all-purpose flour (heat-treated for safety) - ½ cup brown sugar, packed - ½ cup granulated sugar - ½ cup unsalted butter, softened - 2 teaspoons vanilla extract - 1 (8 oz) package cream cheese, softened - ½ cup mini chocolate chips - ¼ teaspoon salt - Optional: graham crackers, apple slices, or pretzels for dipping Each ingredient plays a key role in the flavor and texture of the dip. Using heat-treated flour is vital, as it keeps you safe from any raw flour risks. Mixing the sugars with softened butter creates a light and fluffy base. Cream cheese adds a rich and creamy texture, while vanilla extract gives it a warm, sweet aroma. Mini chocolate chips add that classic cookie flavor, making it truly special. Optional dippers like graham crackers, apple slices, or pretzels offer fun ways to enjoy the dip. You can choose whatever suits your taste best. This chocolate chip cookie dough dip is not just tasty; it’s also easy to prepare. For the complete instructions, check the Full Recipe. 1. Mixing the butter and sugars Start by placing softened butter, brown sugar, and granulated sugar into a mixing bowl. Use a hand mixer to beat them together. Mix until the blend is light and fluffy, which should take about 2 to 3 minutes. 2. Adding cream cheese and vanilla Next, add the softened cream cheese and vanilla extract to the bowl. Beat this mixture until it turns smooth and creamy. This step gives the dip its rich flavor. 3. Combining flour and salt Gradually add the heat-treated all-purpose flour and salt to the creamy mixture. Mix until everything is well combined. This will give the dip its doughy texture. 4. Folding in chocolate chips Now it’s time for the best part! Gently fold in the mini chocolate chips using a spatula. Make sure they are evenly spread throughout the dip. This ensures every bite is filled with chocolatey goodness. 5. Chilling the dip Transfer your dip into a serving bowl and smooth the top with your spatula. Cover it with plastic wrap and chill it in the refrigerator for at least 30 minutes. Chilling helps the flavors blend and enhances the taste. This simple process results in a delightful treat that you and your friends will love! For the full recipe, be sure to check the earlier section. To make the best chocolate chip cookie dough dip, start with softened butter and cream cheese. This helps the dip mix nicely and taste creamy. If you forget to soften them, cut them into small pieces. Let them sit at room temperature for a bit. Next, heat-treat the flour. Raw flour can have germs. To make it safe, spread flour on a baking sheet. Bake it at 350°F (175°C) for five minutes. Let it cool before using it in your dip. The texture of your dip matters too. You want it to be smooth and creamy. If it feels too thick, add a splash of milk. If it’s too runny, mix in a little more flour. Now let’s talk about what to dip in this tasty treat! Graham crackers are a classic choice. They give a nice crunch. Apple slices add a fresh, sweet taste. Pretzels bring a salty twist that balances the sweetness. For parties, get creative! Use mini cones to scoop the dip. You can also serve it in a fun bowl with colorful sprinkles on top. This dip is sure to make everyone smile! For the complete recipe, check out the Full Recipe. {{image_2}} You can make this dip even better with fun flavor changes. Start by swapping out your chocolate chips. Try using: - Dark chocolate chips for a richer taste - White chocolate chips for a sweeter bite - Milk chocolate chips for a classic flavor You can also add nuts or sprinkles to give it extra crunch and color. Chopped walnuts or pecans work well. Rainbow sprinkles can make the dip more festive. Just fold them in after mixing the base for a fun twist. If you need to adjust the dip for special diets, it’s easy! For gluten-free options, use gluten-free flour. Make sure you heat-treat it for safety. This keeps the dip safe without losing flavor. For vegan alternatives, swap the cream cheese with a plant-based option. Use coconut cream or cashew cream for a creamy texture. Replace the butter with coconut oil or vegan butter. You’ll still get a rich and tasty dip without any animal products. These variations keep your chocolate chip cookie dough dip fresh and fun! To keep your Chocolate Chip Cookie Dough Dip fresh, store it in an airtight container. Place it in the fridge right after serving. This helps to keep it cool and tasty. If you want to enjoy it later, you can freeze it. Just make sure to use a freezer-safe container. The dip can stay good in the freezer for up to three months. In the fridge, this dip lasts about five days. If you notice any changes in color or smell, it might be time to toss it. Look for signs of spoilage like a sour smell or unusual texture. If you see any mold, definitely discard it. Enjoy your dip while it's fresh for the best taste! Is raw flour safe to eat? Raw flour can hold germs like E. coli. To be safe, always heat-treat your flour before using it in dips. You can do this by baking it at 350°F for about 5 minutes. This step helps kill any harmful bacteria. Can I make this dip ahead of time? Yes, you can. This dip tastes better after chilling. Make it a day before your event. Just store it in the fridge until you're ready to serve. What can I substitute for cream cheese? If you want a lighter option, use Greek yogurt. It gives a nice tang and creamy texture. You can also try mascarpone for a richer taste. How to reheat if served warm? If you want to serve the dip warm, gently warm it in the microwave. Heat in short bursts of 15 seconds, stirring in between. Be careful not to overheat, as it can become too soft. Can I use other sweeteners? Yes! You can replace the sugars with honey or maple syrup. Keep in mind that this may change the dip's texture slightly. Adjust the amounts based on your taste. What are the best fruits for dipping? For dipping, I love using apple slices and bananas. Their sweetness pairs well with the chocolate chip cookie dough flavors. Strawberries and pears also work great! This chocolate chip cookie dough dip is easy and fun to make. You will need simple ingredients like flour, butter, and cream cheese. The blend of sweet and chocolatey flavors is a crowd-pleaser. Here’s a quick overview of how to whip it up. Ingredients: - 1 cup all-purpose flour (heat-treated for safety) - ½ cup brown sugar, packed - ½ cup granulated sugar - ½ cup unsalted butter, softened - 2 teaspoons vanilla extract - 1 (8 oz) package cream cheese, softened - ½ cup mini chocolate chips - ¼ teaspoon salt - Optional: graham crackers, apple slices, or pretzels for dipping Instructions: 1. Beat the softened butter with the sugars until fluffy. 2. Add the cream cheese and vanilla, mixing until smooth. 3. Gradually mix in the heat-treated flour and salt. 4. Fold in the mini chocolate chips. 5. Transfer to a bowl and chill for 30 minutes. Prep Time: 10 minutes Total Time: 40 minutes Servings: 8 This dip is perfect for parties or family fun. Enjoy with your favorite dippers like graham crackers or apple slices! For the full recipe, check out the details. This blog post covered how to make a delicious dip using simple ingredients. We explored each step, from mixing butter and sugars to chilling the dip for the best taste. You learned tips for achieving the perfect texture and some fun serving ideas. I also shared variations and storage tips to help you enjoy this treat longer. Experiment with flavors and enjoy this dish with friends and family. Try making it your own and have fun with the process!

Chocolate Chip Cookie Dough Dip Tasty and Simple Treat

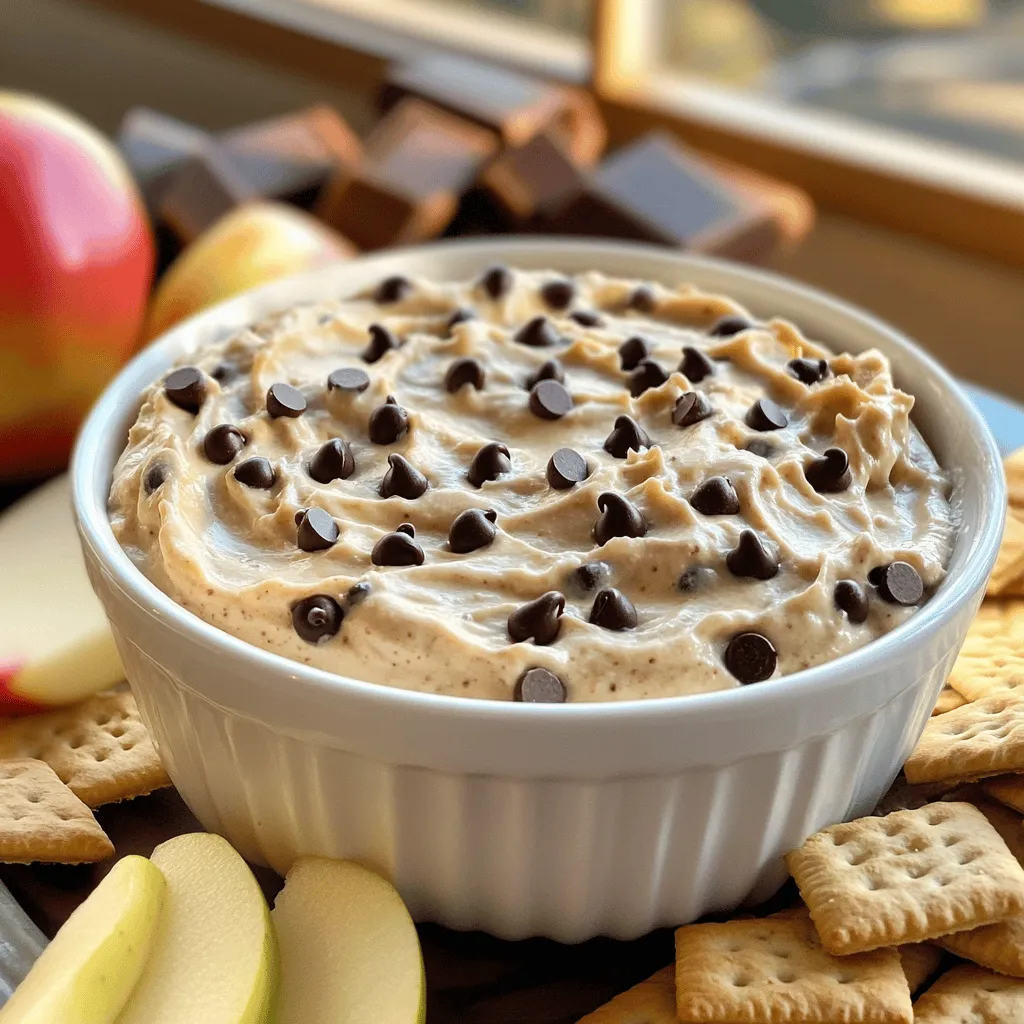
If you love the taste of raw cookie dough, I have the perfect treat for you! Chocolate Chip Cookie Dough

For your spicy veggie stir fry, gather the following items: - 1 cup broccoli florets - 1 red bell pepper, sliced - 1 yellow bell pepper, sliced - 1 carrot, julienned - 1 zucchini, sliced - 1 cup snap peas - 3 cloves garlic, minced - 1 tablespoon fresh ginger, grated - 2 tablespoons soy sauce - 1 tablespoon sriracha (adjust to taste) - 1 tablespoon sesame oil - 1 tablespoon olive oil - 1 tablespoon sesame seeds (for garnish) - Salt and pepper to taste I often prefer fresh vegetables for stir fry. They taste better and add crunch. Fresh veggies also pack more nutrients. However, frozen vegetables work great too. They save time and are easy to store. When using frozen, thaw them first. This helps avoid excess water in your stir fry. Want more heat? Add extra sriracha or try red pepper flakes. For less spice, skip the sriracha or use half the amount. You control the heat in your dish. Experiment to find what you like best. This dish is all about your taste! For more details and a full recipe, check out the included link. Start by washing all your veggies well. Cut them into uniform pieces. This helps them cook evenly. I like to cut the broccoli into small florets. Slice the red and yellow bell peppers thinly. Julienning the carrot gives it a nice look. For the zucchini, simple slices work best. Finally, snap the peas by removing the ends. Keep all the veggies ready before cooking. This makes your stir fry fast and fun! Heat a large skillet or wok over medium-high heat. Add olive oil and let it warm up. Next, toss in minced garlic and grated ginger. Sauté for about 30 seconds until you smell the lovely aroma. Now add the broccoli and julienned carrots. Cook them for about three minutes. They should start to soften but still be crunchy. Then, add the bell peppers, zucchini, and snap peas. Stir everything well. In a small bowl, mix soy sauce, sriracha, and sesame oil. Pour this sauce over the veggies. Toss to coat them evenly, making every bite flavorful. Cook for another 4 to 5 minutes. The vegetables should turn vibrant and tender-crisp. Once cooked, season with salt and pepper. Remove from heat and serve hot. Sprinkle sesame seeds on top for a lovely finish. This dish is colorful and packed with flavors. For the full recipe, check back for the complete guide to a perfect Spicy Veggie Stir Fry! To get your veggies just right, cut them evenly. This helps them cook at the same time. I like to use fresh veggies, but frozen ones work too! If you want a nice crunch, stir-fry them for a shorter time. Aim for bright colors; they mean your veggies are cooked but still crisp. Seasoning is key to a tasty stir fry. Use soy sauce for depth. Sriracha gives it a kick, so adjust it based on your spice level. I love adding ginger and garlic for a fresh flavor. Just a minute in the hot oil brings out their best taste. You can also sprinkle sesame seeds at the end for extra crunch and flavor. To save time, prep all your veggies first. Wash and cut them before you start cooking. This way, you can focus on stir-frying. Use a wok or a large skillet to get that high heat you need. It helps the veggies cook fast and evenly. If you’re in a hurry, you can also use pre-cut veggies from the store. For the [Full Recipe], check the previous section. Enjoy your cooking! {{image_2}} Adding protein to your spicy veggie stir fry makes it heartier. Tofu is a great option. It soaks up flavors well. Choose firm tofu for a nice texture. Cut it into cubes and sauté it in the skillet before adding veggies. Tempeh is another fantastic choice. It has a nutty flavor and works well with the spices. Cook it the same way as tofu. You can also try edamame or chickpeas for a protein boost. The sauce you use can change the taste of your stir fry. Beyond soy sauce and sriracha, consider using teriyaki sauce. It adds sweetness and depth. You can also try hoisin sauce for a thicker, rich flavor. For a tangy kick, use a splash of rice vinegar. If you like it spicy, add more sriracha or a dash of chili paste. Mix and match sauces to find your favorite flavor. Using seasonal veggies keeps your stir fry fresh and exciting. In spring, add asparagus or snap peas for crunch. Summer calls for fresh corn or bell peppers. In fall, use squash or carrots for warmth. Winter is perfect for hearty greens like kale or Brussels sprouts. This keeps your dish colorful and packed with nutrients. The best part? You can change it up each time you make this recipe! You can store your spicy veggie stir fry in an airtight container. Let it cool first. Place it in the fridge. It will stay fresh for about three days. If you want to keep it longer, freezing is a great option. To reheat, use a skillet over medium heat. Add a splash of water or oil to keep it moist. Stir for about five minutes until hot. You can also use a microwave. Heat it in 30-second bursts, stirring in between. This keeps your veggies crisp. If you want to freeze your stir fry, let it cool completely first. Pack it in freezer-safe bags or containers. It can last up to three months in the freezer. When ready to eat, thaw it overnight in the fridge. Reheat as mentioned above. For best flavor and texture, don’t freeze it with sauce. Make the sauce fresh when reheating. You can find the full recipe in the earlier section. You can use chili paste, hot sauce, or even red pepper flakes. Each option brings its own heat level. Adjust the amount to fit your taste. If you like a milder dish, use less. Yes, you can prep the veggies and sauce ahead of time. Just store them in the fridge. When you're ready to eat, cook them quickly in a hot skillet. This keeps everything fresh and tasty. Some great side dishes include jasmine rice, quinoa, or cauliflower rice. You can also serve it with spring rolls or a light salad. These options balance the spice and add more texture to your meal. This post covered all you need for a great veggie stir fry. We explored ingredients, cooking steps, and tips for the best taste. You learned how to keep your veggies bright and how to save time in the kitchen. Don’t forget, you can mix in proteins or try new sauces for fun flavors. Finally, store your leftovers right to enjoy later. Cooking can be simple and tasty. Dive in and enjoy making this dish your own!

Spicy Veggie Stir Fry Quick and Tasty Meal Idea

Looking for a quick and tasty meal? You’ll love this Spicy Veggie Stir Fry! Packed with vibrant flavors and easy

- 4 chicken thighs, bone-in and skin-on - 2 tablespoons olive oil - 3 cloves garlic, minced - Zest and juice of 1 large lemon - 1 teaspoon dried thyme - 1 teaspoon dried oregano - Salt and pepper to taste - 1 cup chicken broth - 2 cups baby spinach - 1 cup cherry tomatoes, halved - Fresh parsley, chopped (for garnish) For this dish, I use 4 chicken thighs. The skin adds flavor and helps keep the meat juicy. I need 2 tablespoons of olive oil for cooking. Three cloves of minced garlic give a nice kick. I zest and juice one large lemon for freshness. The dried thyme and oregano both need one teaspoon each. I add salt and pepper to taste. For moisture and flavor, I pour in 1 cup of chicken broth. To add color and nutrition, I use 2 cups of baby spinach and 1 cup of halved cherry tomatoes. Finally, I garnish with fresh parsley to brighten the dish. When selecting chicken, look for thighs with shiny skin. The meat should feel firm but slightly springy. For garlic, choose bulbs that feel heavy and have tight skin. Fresh lemons should be bright yellow and firm. For herbs, dried ones should be aromatic and not clumpy. Always check the expiration date. Fresh spinach should be crisp and vibrant green. Pick tomatoes that are plump and smooth. Using quality ingredients makes a big difference in flavor. First, preheat your oven to 400°F (200°C). This helps cook your chicken evenly. While the oven heats, gather your ingredients. You will need chicken thighs, olive oil, garlic, lemon, herbs, and seasoning. Make sure to wash the spinach and halve the cherry tomatoes. Now, heat the olive oil in a large oven-safe skillet over medium-high heat. Season the chicken thighs with salt, pepper, thyme, and oregano. Once the oil is hot, add the chicken thighs skin-side down. Sear them for about 5-7 minutes until the skin is golden brown. Flip the chicken over and cook for another 3 minutes. Next, add the minced garlic to the pan. Sauté it for about 30 seconds until it smells great. Pour in the chicken broth, then add the lemon zest and juice. Stir it all together. Now, gently add the baby spinach and cherry tomatoes around the chicken. Transfer the skillet to your preheated oven. Bake the chicken for 25-30 minutes, or until it reaches an internal temperature of 165°F (75°C). Once your chicken is done, take the skillet out of the oven. Let it rest for a few minutes. This helps keep the chicken juicy. Before serving, garnish with fresh parsley for a pop of color. You can serve directly from the skillet for a rustic look. Enjoy your One-Pan Lemon Garlic Chicken! Check out the Full Recipe for more details on this dish. To get crispy skin and juicy meat, start with a hot skillet. Heat olive oil until it shimmers. Place the chicken thighs skin-side down. Sear them for 5-7 minutes without moving them. This helps the skin crisp up. After flipping, cook for 3 more minutes. Make sure the internal temperature hits 165°F. You can add more flavor with herbs and spices. Fresh rosemary or basil pairs well with lemon. Consider adding crushed red pepper for heat. Try mixing in some capers for a briny touch. You can also add a splash of white wine for depth. If your chicken is overcooked, try using a meat thermometer next time. It helps you avoid dry meat. For too much acidity, add a pinch of sugar to balance the flavors. You can also add more chicken broth to mellow the taste. {{image_2}} If you want to change things up, consider using different proteins. You can swap chicken thighs for chicken breasts. Breasts will cook faster, so watch the time. You can also try turkey thighs or even plant-based options like tofu. For a veggie twist, use hearty vegetables like zucchini or bell peppers. They soak up the lemon garlic flavor well. While this recipe shines in the oven, you can grill or slow cook it too. For grilling, marinate the chicken in lemon and garlic. Grill it over medium heat until it’s cooked through. This method adds a smoky flavor. If you prefer slow cooking, place the ingredients in a slow cooker. Cook on low for 6-8 hours or high for 3-4 hours. The chicken will become tender and juicy. Don’t hesitate to play with flavors! Instead of lemon, try lime or orange for a different zest. Fresh herbs like rosemary or basil can also give a new taste. You can even add a pinch of red pepper flakes for heat. Adjusting flavors keeps the dish fresh and exciting every time you make it. To store leftovers, let the chicken cool down first. Place the chicken and veggies in an airtight container. This keeps the flavors fresh. Store it in the fridge for up to 3 days. Before eating, reheat it in the oven or microwave until hot. If you want to freeze the chicken, follow these steps. First, let it cool completely. Then, wrap it tightly in plastic wrap and place it in a freezer-safe bag. Remove as much air as you can. You can freeze it for up to 3 months. To reheat, thaw it in the fridge overnight. Then, warm it in the oven for best results. For the best taste and quality, enjoy your One-Pan Lemon Garlic Chicken within 3 days if kept in the fridge. If you freeze it, use it within 3 months for the best flavor. After these timeframes, the chicken may lose flavor and texture. Always check for signs of spoilage before eating. How long does it take to cook? This dish takes about 50 minutes from start to finish. You’ll spend 10 minutes prepping and 40 minutes cooking. The chicken needs to bake until it reaches 165°F. Can I use boneless chicken thighs? Yes, boneless chicken thighs work well too. They will cook faster than bone-in thighs. Check for doneness after about 20-25 minutes in the oven. What can I serve with this dish? You can serve this chicken with rice, quinoa, or a fresh salad. Roasted veggies also pair nicely. Try garlic bread for a tasty side! For the complete recipe, check the Full Recipe section. In this blog post, we explored how to make a delicious one-pan lemon garlic chicken. We covered essential ingredients and their measurements for the best flavor. I shared tips for cooking perfectly juicy meat with crispy skin, and how to switch things up with variations. Proper storage will keep your leftovers fresh for longer. As you cook, remember that simple tweaks can enhance your dish. Enjoy experimenting and sharing this meal with loved ones!

One-Pan Lemon Garlic Chicken Easy and Flavorful Meal

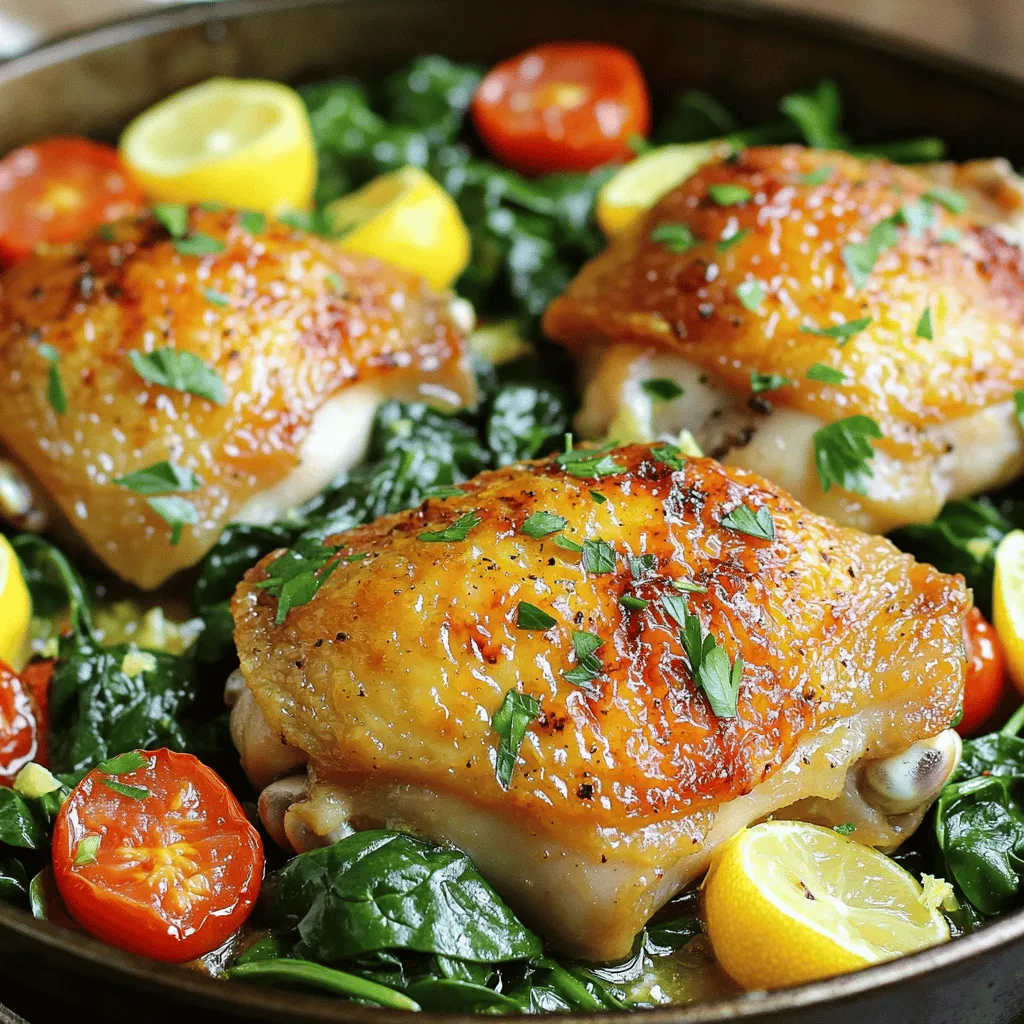
Craving a tasty meal without the fuss? You’ll love this One-Pan Lemon Garlic Chicken! It’s simple to make and full

- 1 cup rolled oats - 1 ½ cups almond milk (or milk of choice) - 1 tablespoon chia seeds - 1 tablespoon maple syrup (optional) - 1 cup mixed berries (strawberries, blueberries, raspberries) - ½ teaspoon vanilla extract - A pinch of salt - Optional toppings: sliced almonds, coconut flakes, additional berries To make overnight oats with berries, gather these simple ingredients. Rolled oats form the base. They soak up the liquid and become soft by morning. Use almond milk or any milk you like. This adds a creamy texture. Chia seeds help thicken the oats and add fiber. Maple syrup is optional for sweetness. You can adjust it to your taste. Mixed berries bring color and flavor. Strawberries, blueberries, and raspberries create a fruity mix. A touch of vanilla extract enhances the taste. Finally, a pinch of salt balances all the flavors. You can add toppings like sliced almonds or coconut flakes for crunch. This makes your breakfast even more enjoyable. For the full recipe, check out the Berry Bliss Overnight Oats. - In a large bowl, combine 1 cup of rolled oats, 1 tablespoon of chia seeds, and a pinch of salt. Stir to mix well. - In another bowl, whisk together 1 ½ cups of almond milk, 1 tablespoon of maple syrup, and ½ teaspoon of vanilla extract until fully combined. - Pour the wet ingredients into the dry ingredients. Stir until everything is well mixed. - Gently fold in 1 cup of mixed berries. You can reserve some for topping later if you like. - Divide the mixture into jars or containers. This makes for an easy grab-and-go breakfast. - Seal the containers and refrigerate overnight. This helps the oats soak up all the tasty flavors. In the morning, stir the oats and taste for sweetness. Add more maple syrup if you want. Top with extra berries or other toppings you enjoy. You can find the full recipe above. To get the best texture in your overnight oats, soak them long enough. I recommend soaking for at least 6 hours. This allows the oats to absorb the liquid. If you prefer a thicker mix, use less milk. For a creamier texture, add more almond milk. Adjust it to match what you like best. Choosing the right milk can change the taste. I suggest almond milk for a light flavor. If you want something richer, try coconut milk or whole milk. Sweeteners can also enhance the taste. Maple syrup is a great choice, but honey or agave syrup works too. You can skip sweeteners if you use ripe berries. Serving in clear jars makes your dish look appealing. You can see the layers of oats and berries. For extra flair, try adding toppings. Sliced almonds or coconut flakes add crunch. A few extra berries on top make it pop. These small touches make your breakfast feel special. {{image_2}} You can change the taste of your overnight oats by using different types of berries. Strawberries, blueberries, and raspberries are great, but you can also try blackberries, cranberries, or even cherries. Each berry adds its unique flavor and nutrients. Mix and match to find your favorite combo. Adding nut butter or yogurt can give your oats a creamier texture. Almond butter or peanut butter adds a rich taste. Greek yogurt can make it more filling and add protein. Try experimenting with these additions to make your meal special. If you need a gluten-free option, use certified gluten-free oats. These oats are safe for people with gluten intolerance. Just check the package to ensure they meet the standards. For those who follow a vegan diet, stick to plant-based milk. Almond milk, oat milk, or coconut milk work well. You can also skip the honey and use maple syrup instead for sweetness. Incorporate seasonal fruits to keep it fresh and exciting. In summer, use peaches or plums. In autumn, add apples or pears. Using what’s in season not only boosts flavor but also supports local farmers. You can adapt your recipe based on what you find at the store. If you see ripe mangoes or juicy citrus fruits, toss them in. This way, your oats stay interesting all year long. For the full recipe, check out the Berry Bliss Overnight Oats. To keep your overnight oats fresh, store them in airtight containers. Glass jars work great for this. Place them in the fridge right after making. This helps the oats soak up the liquid and flavors. You can enjoy them cold in the morning. Prepared overnight oats last about 3 to 5 days in the fridge. If you notice any off smells or colors, it’s best to toss them. Yes, you can freeze overnight oats! Freezing is a good option if you want to save some for later. Use freezer-safe containers to prevent freezer burn. When you’re ready to eat them, move the oats to the fridge. Let them thaw overnight. You can also thaw them in the microwave. Just heat for a minute or two, stirring every 30 seconds. Overnight oats can be enjoyed cold or warm. If you like them warm, transfer to a bowl. Heat them in the microwave for about 30 seconds. Stir and check the temperature. You can add a splash of milk to make them creamier. If you prefer cold oats, just dig in straight from the fridge. They taste great either way! You can keep overnight oats in the fridge for up to five days. For the best taste, eat them within three days. The oats stay fresh and tasty when stored in a sealed container. Just make sure to check for any changes in smell or texture before you eat them. Yes, you can use frozen berries! They add a nice chill and burst of flavor. Frozen berries are often picked at peak ripeness, so they can be just as good as fresh ones. Just remember, they may release more juice, which can change the texture of your oats a bit. If you want less liquid, you might want to add them in the morning instead. No, overnight oats do not need cooking. They soak in liquid overnight, which softens them. Just mix your oats with milk or yogurt and let them sit. They become creamy and ready to eat by morning. This no-cook method makes them quick and easy to prepare. Yes, overnight oats are very healthy! Oats are high in fiber and can help with digestion. They provide long-lasting energy, which makes them a great breakfast choice. Berries offer vitamins and antioxidants. Together, they make a nutritious meal packed with flavor. You can enjoy them knowing you’re fueling your body well. For a full recipe, check out the Berry Bliss Overnight Oats. In this post, we explored how to make delicious overnight oats. We covered the main ingredients, mixing steps, and ways to store them. Remember, you can mix flavors and customize your oats. Try different toppings to make them look good. These easy recipes fit many diets and tastes. Enjoy your nutritious breakfast or snack! With little prep, you can have tasty oats ready anytime. Make this fun and part of your daily routine. You’ll love how easy it is to make healthy choices.

Overnight Oats with Berries Easy and Nutritious Meal

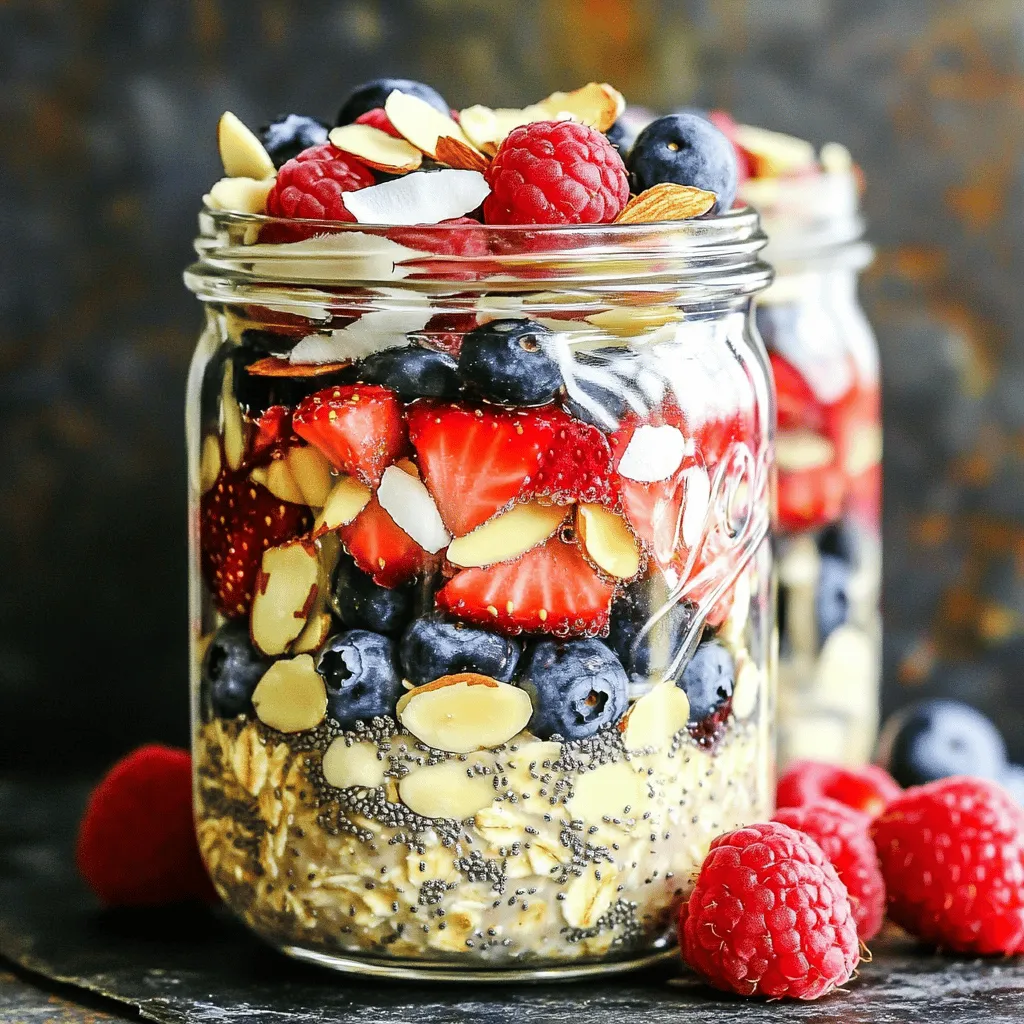
Looking for a quick, tasty breakfast that’s also packed with nutrients? Overnight oats with berries are the perfect solution! In

- 4 medium zucchinis, spiralized into noodles - 1 cup fresh basil leaves - 1/4 cup pine nuts (lightly toasted) - 1/2 cup grated Parmesan cheese (or nutritional yeast for a vegan option) - 2 garlic cloves - 1/2 cup extra virgin olive oil - Salt and pepper to taste - Cherry tomatoes, halved (for garnish) - 1 tablespoon lemon juice - Crushed red pepper flakes (optional) Zucchini noodles are a great way to enjoy a fresh dish. They are light and full of flavor. You start with four medium zucchinis. Spiralize them to get those fun noodle shapes. This makes the dish more appealing and fun to eat. Next, you need fresh basil leaves. About one cup will do. Basil adds a sweet and slightly peppery taste. It pairs well with the other flavors in the dish. Pine nuts are next on the list. Use about a quarter cup, lightly toasted. They bring a nutty flavor and a bit of crunch. For a cheesy taste, use half a cup of grated Parmesan cheese. If you want a vegan option, use nutritional yeast instead. Two garlic cloves add a strong, savory punch. Don't skip this step; garlic enhances the overall taste. Extra virgin olive oil is essential. Half a cup will help bring all the ingredients together. You will also need salt and pepper to taste. These common seasonings help balance flavors. To add color and freshness, include halved cherry tomatoes for garnish. They make the dish look lovely on the plate. Finally, add a tablespoon of lemon juice. This brightens up the flavors and adds a nice zing. If you enjoy spice, sprinkle in some crushed red pepper flakes. These ingredients combine to create a light and vibrant meal. For the full recipe, check out the detailed instructions. - Combine 1 cup of fresh basil leaves, 1/4 cup of lightly toasted pine nuts, 1/2 cup of grated Parmesan cheese, and 2 garlic cloves in a food processor. - Pulse the mixture until it is finely chopped. This step brings out the fresh, herbal notes of the basil. - While the processor runs, slowly add 1/2 cup of extra virgin olive oil. This creates a smooth, creamy sauce. - Season the pesto with 1 tablespoon of lemon juice, salt, and pepper to taste. Blend again until combined. Adjust seasoning if you want more zing. - Heat a teaspoon of olive oil in a large skillet over medium heat. - Add the spiralized zucchini noodles to the skillet and sauté for 2-3 minutes. Cook them just until tender, but keep that nice crunch. Avoid overcooking to keep the texture right. - Once the noodles are cooked, remove the skillet from heat. - Toss the zucchini noodles with the pesto until they are well-coated. - Plate the dish and garnish with halved cherry tomatoes and a sprinkle of crushed red pepper flakes for a kick. Enjoy your flavorful and fresh Zucchini Noodles with Pesto! For the complete recipe, check out the Full Recipe section. Select firm, medium-sized zucchinis for the best texture. Look for ones that feel heavy for their size. They should have smooth skin with no blemishes. Fresh zucchini gives your dish a nice crunch. You can make your pesto unique by adding nuts or using different herbs. Swap pine nuts for walnuts or almonds for a twist. Try using parsley or cilantro instead of basil for a fresh taste. These small changes can add big flavor to your dish. Sauté the noodles instead of boiling them. This keeps the zucchini noodles crunchy and tasty. Cook them in a hot skillet for just 2-3 minutes. Overcooking will make them mushy. Keep an eye on them to maintain the perfect bite. {{image_2}} You can make this dish vegan by using nutritional yeast instead of Parmesan cheese. Nutritional yeast adds a cheesy flavor without any dairy. It is also rich in vitamins and minerals. This swap makes the dish light and still tasty. To turn zucchini noodles with pesto into a full meal, add protein. Grilled chicken or shrimp works well. Chickpeas are a great plant-based option. These additions boost flavor and make the dish more filling. Adding seasonal veggies can elevate your dish. Try bell peppers for a sweet crunch or fresh spinach for extra nutrition. These veggies blend well with the pesto and add color to your plate. They enhance the dish’s flavor and health benefits. For the full recipe, check out the Zucchini Noodles with Basil Pesto. Store your leftover zucchini noodles in an airtight container. They stay fresh in the fridge for up to 3 days. If you plan to eat them later, try to keep them separate from the pesto. This way, the noodles will not get soggy. When you want to enjoy your dish again, gently reheat the zucchini noodles on the stove. Use low heat to keep them from overcooking. This helps maintain their nice crunch. Stir them often for even heating. To freeze, store the pesto separately in a freezer-safe container. When you’re ready to eat, cook fresh zucchini noodles and mix them with the thawed pesto. This keeps the flavors fresh and bright. Enjoy your meal even after storing! For the full recipe, refer to the recipe details above. Yes, store-bought pesto can be used for a quicker meal. It saves time and still tastes great. Just grab a jar from the store. Look for one with simple ingredients for the best flavor. Yes, zucchini noodles are a low-carb alternative to traditional pasta. This makes them a popular choice for those on low-carb diets. They provide a light and fresh base for your dish. Enjoy the same flavors without the heavy carbs. Try walnuts, cashews, or sunflower seeds if you're allergic. These nuts give a nice crunch and flavor to your pesto. Each option brings a unique taste, so feel free to experiment. Use what you have on hand. Yes, carrots, sweet potatoes, and cucumbers work well too. Each vegetable adds its own flavor and texture. Experimenting with different veggies can keep your meals exciting. You can create colorful dishes that are fun to eat. This recipe highlights fresh ingredients and easy steps for a tasty dish. You learned how to make creamy pesto sauce and cook zucchini noodles for a healthy meal. Remember, variations can add personal flavors, and leftovers store well for later. Enjoy this fun cooking experience and experiment with different ingredients. Your kitchen can create delicious meals that fit your tastes!

Zucchini Noodles with Pesto Flavorful and Fresh Dish

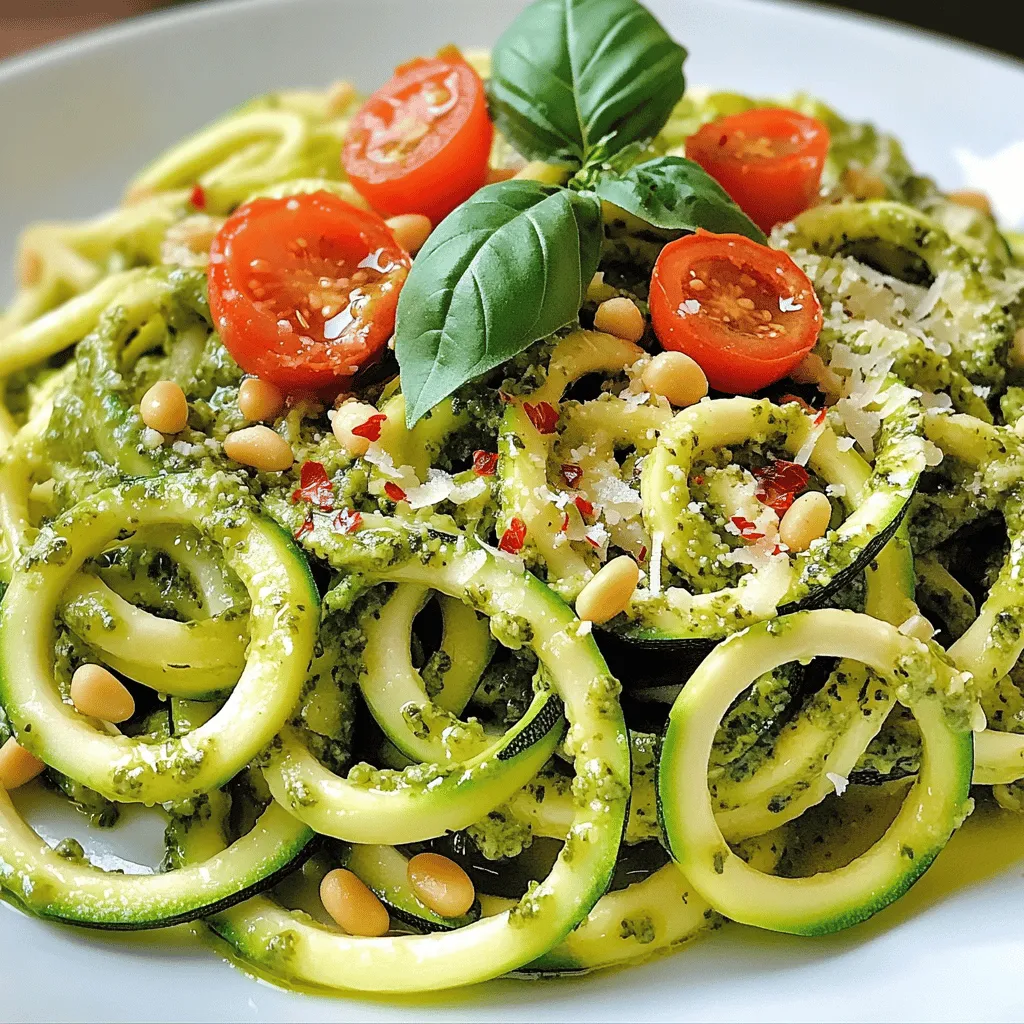
Looking for a tasty, healthy meal that’s easy to make? Zucchini noodles with pesto might be the dish for you!

Creating a creamy mushroom risotto starts with the right ingredients. Each one plays a key role in building flavor and texture. Here’s what you’ll need: - 1 cup Arborio rice - 4 cups vegetable broth - 1 cup mushrooms (cremini or shiitake), sliced - 1 small onion, finely chopped - 3 cloves garlic, minced - 1/2 cup heavy cream - 2 tablespoons truffle oil - 1/2 cup Parmesan cheese, grated - 2 tablespoons olive oil - Salt and pepper to taste - Fresh parsley, chopped (for garnish) Arborio rice is special. It absorbs liquid well, creating a creamy texture. The vegetable broth adds depth. I love using cremini or shiitake mushrooms. They bring an earthy flavor that complements the dish. Onion and garlic form the base. They add sweetness and aroma. Heavy cream makes the risotto rich and smooth. A drizzle of truffle oil enhances the dish, making it luxurious. Parmesan cheese brings saltiness and umami. I like to finish with fresh parsley. It adds color and a hint of freshness. Each ingredient works together, creating layers of flavor in every bite. For the full recipe, check out the details above. To start, heat your vegetable broth in a medium saucepan. Keep it over low heat so it stays warm. This step is key as it helps the rice cook evenly. Next, grab a large skillet and heat olive oil over medium heat. Add your finely chopped onion. Cook it for about 3-4 minutes until it’s soft. Then, stir in minced garlic and sliced mushrooms. Cook these for another 5-7 minutes. You want the mushrooms to turn golden brown and fragrant. Now, it’s time to toast the rice. Add the Arborio rice to the skillet and let it toast for about 1-2 minutes. This adds a nice nutty flavor. Start adding the warm vegetable broth one ladle at a time. Stir the rice often. Wait until the rice absorbs the liquid before adding more broth. Keep this up until the rice is creamy and al dente, which takes about 15-20 minutes. Once your risotto is ready, stir in the heavy cream, Parmesan cheese, and truffle oil. Mix it well to get that creamy texture. Season with salt and pepper to taste. Let the risotto sit for a minute before serving. You can find the full recipe above for more details. To achieve a creamy risotto, stirring is key. You should stir constantly while adding broth. This helps the starches in the rice release. The result? A smooth, silky texture. Timing is also important for adding broth. Wait until the rice absorbs the liquid before adding more. This method ensures the rice cooks evenly and stays creamy. Aim to add broth one ladle at a time. Mushrooms are the star of this dish. I love using cremini or shiitake mushrooms. They add rich, earthy flavors. You can mix different types for a unique taste. Try adding a bit of porcini for a deeper umami. For seasoning, keep it simple. A pinch of salt and pepper is essential. You might also consider adding fresh herbs like thyme. This adds brightness to the earthy flavors. When it comes to presentation, serve risotto in shallow bowls. This allows the dish to shine. Drizzle with extra truffle oil for added flair. The oil enhances the flavor and adds a nice sheen. Garnish with fresh parsley for a pop of color. It also gives a fresh taste that balances the richness. A sprinkle of grated Parmesan on top adds a nice finishing touch. You can find the full recipe for this delicious risotto in the previous sections. {{image_2}} You can easily adapt creamy mushroom risotto to fit different diets. For a vegan option, replace the heavy cream with coconut milk or cashew cream. These substitutes give you that creamy texture without dairy. For cheese, use nutritional yeast or a vegan cheese alternative. Both options add a nice flavor without animal products. If you're gluten-free, ensure your vegetable broth is certified gluten-free. Arborio rice is naturally gluten-free, so you don’t need to worry about that. To elevate the flavors, try adding fresh herbs like thyme or rosemary. These herbs enhance the taste and add freshness. Mix them in while the risotto cooks. You can also incorporate other vegetables. Think peas, spinach, or roasted bell peppers. These veggies not only add color but also boost nutrition. Adding them at the end keeps their texture and flavor vibrant. If you want to switch up the mushrooms, consider using wild mushrooms. They have a deep, earthy flavor that enhances your risotto. You can mix different types, like portobello, shiitake, or oyster mushrooms. This blend creates a rich taste and adds different textures. Don't be afraid to experiment and find your favorite mix! Check out the Full Recipe for more tips on making your risotto unforgettable. To store leftover risotto, place it in an airtight container. This helps keep it fresh. Risotto can last in the fridge for about 3 days. Make sure to cool it down first before sealing. The best way to reheat risotto is on the stove. Use a small pot over low heat. Add a splash of broth or water to help it stay creamy. Stir often to keep the texture smooth. You can also use a microwave, but this may dry it out. You can freeze risotto, but it may change in texture. If you freeze it, use a freezer-safe container. It can last up to 2 months. When ready to eat, thaw it in the fridge overnight. Reheat it gently on the stove with some broth or water to restore creaminess. Making creamy mushroom risotto takes about 35 minutes. Here is a breakdown of the time: - Prep time: 10 minutes - Cooking time: 25 minutes This includes time for sautéing, stirring, and letting the flavors blend. It’s a quick dish with big flavors. You can use regular rice, but it won’t be the same. Arborio rice has a high starch content. This gives risotto its creamy texture. Regular rice cooks faster and lacks the same bite. You might need to adjust the cooking time if you use regular rice. Creamy mushroom risotto pairs well with: - Grilled chicken - Roasted vegetables - A fresh salad - Garlic bread These sides complement the rich flavors of the risotto and create a balanced meal. Yes, you can prepare risotto ahead of time. Here are some tips: - Cook the risotto but stop before it’s fully creamy. - Cool it quickly and store it in the fridge. - When ready to serve, reheat it gently, adding broth to reach the right texture. This way, you save time on busy days! For the full recipe, check out Creamy Truffle Mushroom Risotto. This blog covers making creamy mushroom risotto, from ingredients to cooking tips. You learned about the key ingredients and how to prepare the broth and sauté the base. We explored cooking techniques that give you that creamy texture. Variations showed ways to adjust for diets and flavor. In the end, risotto is versatile and easy to personalize. Enjoy making your own delicious version!

Creamy Mushroom Risotto Flavors in Every Bite

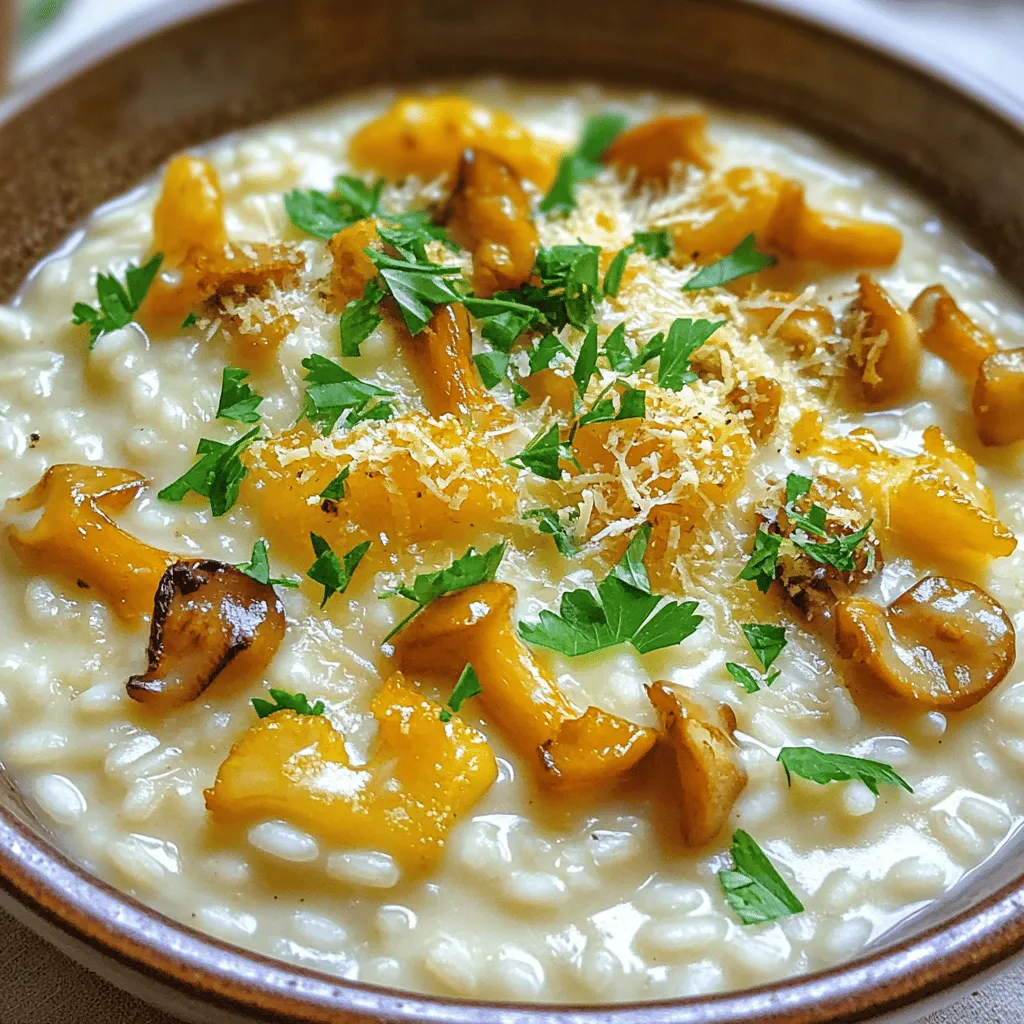
Are you ready to savor every bite of a creamy mushroom risotto? This dish combines simple, fresh ingredients to create

To make savory stuffed peppers, gather these main ingredients: - 4 large bell peppers (any color) - 1 cup quinoa, rinsed - 2 cups vegetable broth - 1 can (15 oz) black beans, drained and rinsed - 1 cup corn, fresh or frozen - 1 cup cherry tomatoes, halved - 1 teaspoon cumin - 1 teaspoon smoked paprika - ½ teaspoon garlic powder - ½ teaspoon onion powder - Salt and pepper to taste - 1 cup shredded cheese (cheddar or a blend) - Fresh cilantro for garnish You can enhance the flavor with these optional ingredients: - Chopped onion - Minced garlic - Fresh herbs like parsley or basil - Squeeze of lime juice - Hot sauce for a kick If you have dietary needs, consider these substitutions: - Use brown rice instead of quinoa for a different texture. - Swap black beans for lentils or chickpeas for variety. - Try dairy-free cheese if you want a vegan option. - Use vegetable or chicken broth based on your preference. This recipe for savory stuffed peppers is flexible. You can adjust it to suit your tastes or dietary restrictions. Check out the Full Recipe for more details! Start by preheating your oven to 375°F (190°C). Next, take your bell peppers and cut off the tops. Remove the seeds and membranes from inside. This step helps the peppers cook evenly. Place them cut-side up in a baking dish. Now, let’s prepare the quinoa. In a medium saucepan, combine 1 cup of rinsed quinoa and 2 cups of vegetable broth. Bring this mixture to a boil. Once it boils, reduce the heat to low, cover it, and let it cook for about 15 minutes. You want the liquid to be fully absorbed. After cooking, fluff the quinoa with a fork. In a large mixing bowl, combine the cooked quinoa, 1 can of black beans (drained and rinsed), 1 cup of corn (fresh or frozen), and 1 cup of halved cherry tomatoes. Add 1 teaspoon of cumin, 1 teaspoon of smoked paprika, ½ teaspoon of garlic powder, and ½ teaspoon of onion powder. Season with salt and pepper to taste. Mix all these ingredients until they blend well. Now, it's time to stuff the peppers! Take each pepper and fill it tightly with the quinoa mixture. Make sure to pack it in well. Once filled, sprinkle 1 cup of shredded cheese over the top of each stuffed pepper. Cover your baking dish with aluminum foil. Bake in the preheated oven for 25 minutes. After that, remove the foil. Bake for an additional 10 to 15 minutes. You want the cheese to melt and bubble. When they look golden and delicious, take them out of the oven. Let them cool for a few minutes. Before serving, you can garnish with fresh cilantro for added flavor. For the complete recipe, check the [Full Recipe]. To make quinoa perfect, rinse it well before cooking. This removes a bitter coating called saponin. Use two cups of vegetable broth for one cup of quinoa. This gives it a nice flavor. Bring the broth to a boil, then lower the heat. Cover it and let it cook for about 15 minutes. Check that all the liquid is absorbed. Fluff it gently with a fork. This helps keep it light and prevents sogginess. When serving stuffed peppers, use a colorful plate. Place the peppers upright for a fun look. You can drizzle some olive oil or a sauce around them. This adds color and flavor. Fresh cilantro on top gives a nice touch. You can also sprinkle more cheese for a cheesy look. If you want, add a wedge of lime on the side. It adds a zesty twist. Avoid overcooking the quinoa. This can make it mushy and ruin your dish. Don’t pack the peppers too tight. Leave some room for the filling to expand. If you add too much salt, it can overpower the meal. Taste as you go to find the right balance. Lastly, don’t skip the cheese topping. It adds a delicious creamy layer that makes the dish special. For the full recipe, check the earlier section. {{image_2}} To make this recipe plant-based, use the following tips: - Replace cheese with vegan cheese or nutritional yeast. - Use vegetable broth for cooking quinoa, as listed in the recipe. - For added protein, include lentils or chickpeas in the filling. - You can also add diced zucchini or mushrooms for extra veggies. You can easily add different proteins to the filling. Here are some ideas: - Ground turkey or chicken works well for a lean option. - Use cooked beef or pork for a heartier flavor. - For a seafood twist, try adding crab or shrimp. - You can also mix in some cooked sausage for a spicy kick. To spice up your stuffed peppers, consider these options: - Add a pinch of cayenne pepper for heat. - Mix in fresh herbs like basil or oregano for freshness. - Drizzle some hot sauce or salsa on top before serving. - Try adding some olives or capers for a briny taste. These variations help you personalize your meal while keeping it delicious. For the full recipe, check out the detailed instructions above. To keep your stuffed peppers fresh, store them in an airtight container. Place them in the fridge. They can last up to three days. Make sure to let them cool before storing. This helps prevent moisture build-up. You can also wrap them in plastic wrap or aluminum foil. This keeps them safe from odors in the fridge. If you want to save stuffed peppers for later, freezing is a great option. First, allow them to cool completely. Then, wrap each pepper tightly in plastic wrap. You can also use a freezer-safe bag. Label the bags with the date. Stuffed peppers can last up to three months in the freezer. When you're ready to eat, just thaw them in the fridge overnight before reheating. To reheat stuffed peppers, use the oven for the best results. Preheat your oven to 350°F (175°C). Place the peppers in a baking dish and cover with foil. Bake for about 20 minutes. If you want, remove the foil for the last five minutes to crisp the cheese. You can also use the microwave if you're in a hurry. Heat on medium power for about 3-5 minutes. Just make sure they heat evenly to keep their texture. Stuffed peppers can last in your fridge for about three to four days. Make sure to store them in an airtight container. This keeps them fresh and safe to eat. If you see any signs of spoilage, like bad smells or mold, toss them out. Yes, you can prep stuffed peppers ahead of time. First, prepare the filling and stuff the peppers. Then, cover them tightly and store them in the fridge. Bake them within a day or two for best results. This saves you time on busy days. Stuffed peppers pair well with many sides. Try a simple green salad for freshness. Rice or quinoa on the side also works great. You can even serve them with a dollop of sour cream or guacamole for added creaminess. Yes, pre-cooking the quinoa is key for this recipe. It helps the quinoa soak up the vegetable broth flavor. Cook it until it’s fluffy, about 15 minutes, before mixing it with the other ingredients. This step adds depth to your dish. You can use various peppers for this recipe. Bell peppers are classic, but you can try poblano or Anaheim peppers for a twist. Each type offers a different flavor and heat level. Choose peppers that are firm and bright for the best taste. You learned how to make stuffed peppers from our detailed guide. We covered ingredients, both main and optional, for fantastic flavor. You now know steps for preparation, stuffing, and baking to ensure great results. Tips helped you avoid mistakes and gave you serving ideas. Variations allow for customizing to your taste and dietary needs. Finally, storage info keeps your leftovers fresh. With these insights, you can cook with confidence and enjoy every bite.

Savory Stuffed Peppers Flavorful and Healthy Meal

Are you ready to enjoy a meal that’s both tasty and good for you? Savory stuffed peppers combine fresh veggies

- 4 boneless, skinless chicken breasts - 3 tablespoons olive oil - Zest and juice of 2 large lemons - 3 cloves garlic, minced - 1 tablespoon fresh rosemary, chopped - 1 tablespoon fresh thyme, chopped - Salt and pepper to taste - Lemon slices for garnish - Fresh herbs to garnish (parsley or additional thyme) To cook Lemon Herb Grilled Chicken, you need fresh ingredients. Boneless chicken breasts are the star. They cook evenly and stay juicy. Olive oil adds richness and helps the herbs stick. Fresh herbs like rosemary and thyme bring bright flavors. - 1 teaspoon Dijon mustard - Lemon slices for garnish Dijon mustard gives a nice tang. It adds depth to the marinade. You can also use garlic for more flavor. Lemon slices make a pretty garnish. They add a touch of brightness when serving. - Mixing bowl - Resealable plastic bag or glass dish - Grill or grill pan Use a mixing bowl to whisk your marinade. A resealable plastic bag or glass dish helps marinate the chicken well. A grill or grill pan is key for that smoky flavor. These tools make the process smooth and fun. Want to dive deeper? Check out the [Full Recipe]. To make the marinade, you need to mix a few simple ingredients. First, take a mixing bowl. Add 3 tablespoons of olive oil. Then, zest and juice 2 large lemons and pour them in. Next, add 3 minced garlic cloves. Now, toss in 1 tablespoon each of chopped rosemary and thyme. Finally, stir in 1 teaspoon of Dijon mustard and season with salt and pepper. Mix everything well until it blends into a nice sauce. For the best flavor, marinate the chicken for at least 1 hour. You can leave it in the marinade for up to 4 hours. This gives the chicken time to soak up the flavors. To store the chicken, place it in a large resealable plastic bag or a glass dish. Pour the marinade over the chicken. Seal the bag or cover the dish with a lid. Place it in the fridge while it marinates. Preheat your grill to medium-high heat. This step helps the chicken cook evenly. After marinating, take the chicken out of the fridge. Remove excess marinade by shaking off the liquid. Place the chicken on the grill. Cook each side for about 6-7 minutes. Make sure the chicken reaches an internal temperature of 165°F (75°C). Once cooked, remove the chicken from the grill and let it rest for 5 minutes. This step helps keep your chicken juicy. Serve the grilled chicken warm, garnished with lemon slices and fresh herbs. For the full recipe, check the earlier section! Marinating chicken is key to great flavor. I always aim for at least one hour of marinating time. This lets the chicken soak in all those tasty juices. If you have more time, try marinating for four hours. This gives the herbs and lemon a chance to work their magic. To get maximum flavor infusion, use a resealable bag. This helps the marinade cover the chicken evenly. Make sure to press out all the air before sealing. This keeps the chicken snug in the marinade. When you’re ready to cook, shake off the extra marinade. This helps create a nice grill mark. Grilling chicken can be simple if you follow a few tips. Preheat your grill to medium-high heat, around 425°F. This helps cook the chicken quickly and evenly. Place the chicken on the grill and don’t flip it too early. Let it cook for about 6-7 minutes on one side before checking. To check doneness, use a meat thermometer. The internal temperature should reach 165°F. If you don’t have a thermometer, cut into the chicken. It should be white, not pink. This ensures it’s safe to eat and juicy. Presentation makes a meal more appealing. I like to serve the chicken on a wooden cutting board. Add lemon slices around the chicken for color. A sprinkle of fresh herbs adds a nice touch too. You can use parsley or extra thyme. For side dishes, grilled vegetables or a fresh salad work well. They add color and crunch. If you want something heartier, try rice or quinoa. These sides round out the meal and make it more satisfying. For the full recipe, check out the complete guide. {{image_2}} You can change the taste of your lemon herb grilled chicken easily. Try using different herbs. Instead of rosemary and thyme, you might like basil or oregano. Each herb gives a new flavor. You can also mix in spices. A pinch of paprika adds a nice kick. Cumin brings a warm taste. Experiment with what you like best. If you don't have a grill, you can still make tasty lemon herb chicken. One option is to bake it. Preheat your oven to 400°F (200°C). Place the marinated chicken on a baking sheet. Bake for about 20-25 minutes or until cooked through. The chicken will still be juicy and flavorful. Another method is stovetop cooking. Heat a skillet over medium heat. Add a bit of olive oil and place the chicken in the pan. Cook each side for about 6-7 minutes. Use a meat thermometer to check the inside temperature. It should reach 165°F (75°C). You can make this dish fit your diet easily. For a gluten-free option, use gluten-free mustard. Most mustards are gluten-free, but check the label. For low-carb needs, skip the mustard and use more herbs. This keeps the flavor bright without the carbs. You can also pair this meal with low-carb sides like grilled vegetables or salads. This way, you enjoy a delicious meal while staying within your dietary needs. I hope you enjoy exploring these variations! For the full recipe, check out the details above. To store your Lemon Herb Grilled Chicken, follow these easy steps: - Refrigeration tips: Place the chicken in an airtight container. It will stay fresh for up to four days in the fridge. Make sure it cools down first before sealing. This helps maintain its flavor and texture. - Freezing instructions: If you want to keep it longer, freeze the chicken. Wrap each piece in plastic wrap, then place it in a freezer bag. This keeps it fresh for up to three months. Label the bag with the date for easy tracking. When you're ready to enjoy leftovers, reheating is key to keeping the chicken moist: - Best methods for keeping chicken moist: The oven works well. Preheat it to 350°F (175°C). Place the chicken in a baking dish and cover it with foil. Heat for about 15-20 minutes. This helps keep the chicken juicy. - Reheating tips for quick meals: If you're in a hurry, use the microwave. Place the chicken on a microwave-safe plate. Add a splash of water, cover it with a damp paper towel, and heat for 1-2 minutes. Check it often to avoid overcooking. Knowing how long your chicken stays fresh helps prevent waste: - How long does it stay fresh? Marinated chicken can last up to two days in the fridge. Cooked chicken is safe for four days. If frozen, it stays good for three months. - Signs of spoilage: Always check for changes. If the chicken smells sour or looks discolored, it's best to throw it out. Trust your senses to keep your meals safe and tasty. For the full recipe, refer to the earlier sections. You should marinate the chicken for at least 1 hour. This gives the chicken time to soak up the flavors. For the best taste, I recommend marinating for up to 4 hours. The longer it sits, the more lemon and herb flavor it gets. Just don’t go over 4 hours, or the chicken may become too mushy. Yes, you can use chicken thighs. They have a richer flavor compared to breasts. Chicken thighs also stay moist when cooked. Keep in mind, thighs take a bit longer to cook. Aim for about 8-10 minutes per side on the grill. Always check that the internal temperature reaches 165°F (75°C) for safety. Many sides pair well with this dish. Here are some ideas: - Grilled vegetables like zucchini and bell peppers - A fresh garden salad with lemon vinaigrette - Roasted potatoes or rice pilaf - A light white wine, like Sauvignon Blanc, complements the meal well These sides add color and flavor to your plate. They also balance the bright lemon notes in the chicken. Enjoy your meal! For the full recipe, check out the [Full Recipe]. Lemon herb grilled chicken is simple yet full of flavor. You can use basic ingredients like chicken breasts, olive oil, and fresh herbs. This dish shines through careful marinating and grilling. Remember, letting the chicken soak in the flavors makes a big difference. You can always tweak the recipe with different herbs or cooking methods. Store leftovers wisely for tasty meals later. Now, enjoy making this easy recipe and impress your family and friends!

Lemon Herb Grilled Chicken Tasty and Simple Recipe

If you’re craving something light and zesty, Lemon Herb Grilled Chicken is a perfect choice. This simple recipe combines juicy

Older posts
Newer posts
← Previous Page1 … Page32 Page33 Page34 … Page67 Next →

dsad

© 2025 Foodish Talk • Built with GeneratePress

Our Policies

  • Copyright Policy
  • Cookie Policy
  • GDPR Policy
  • Privacy Policy
  • Disclaimer
  • Terms Of Use

More Information

  • Home
  • About
  • Contact
  • Appetizers
  • Dessert
  • Dinner
  • Drinks
©2025, Foodish Talk About Back To Top