![To make Dill Pickle Deviled Eggs, you need a few simple items: - 6 large eggs - 3 tablespoons mayonnaise - 2 tablespoons dill pickle relish - 1 teaspoon Dijon mustard - 1 teaspoon apple cider vinegar - 1/4 teaspoon garlic powder - Salt and black pepper to taste These ingredients work together to create a creamy, tangy filling that really shines. You can add a few fun toppings to make your eggs prettier: - Fresh dill - Paprika These garnishes not only add color but also give a nice flavor boost. If you don’t have some items, don’t worry! Here are some swaps: - Use Greek yogurt instead of mayonnaise for a lighter taste. - Swap Dijon mustard with yellow mustard if that's what you have. - You can use white vinegar in place of apple cider vinegar. These changes will still keep your deviled eggs delicious and fun to eat! For the complete recipe, check out the [Full Recipe]. Start by placing the six large eggs in a pot. Cover them with cold water. Turn the heat to medium-high and bring the water to a boil. When it starts boiling, cover the pot with a lid and take it off the heat. Let the eggs sit for 10 to 12 minutes. This simple method works well for perfect hard-boiled eggs. After the time is up, carefully move the eggs to an ice bath. This will cool them down quickly. Leave them in the ice bath for about five minutes. Once cooled, gently tap each egg to crack the shell. Peel the eggs under running water for easier shell removal. Now, it’s time to make the filling. Slice each peeled egg in half lengthwise. Carefully scoop out the yolks and place them in a mixing bowl. Add the following ingredients to the yolks: - 3 tablespoons mayonnaise - 2 tablespoons dill pickle relish - 1 teaspoon Dijon mustard - 1 teaspoon apple cider vinegar - 1/4 teaspoon garlic powder - Salt and black pepper to taste Mash the yolks and ingredients together with a fork until creamy and smooth. Taste your mixture and adjust the seasoning as needed. This filling is what gives the deviled eggs their unique flavor. Next, we will fill the egg whites with the yolk mixture. You can use a piping bag for a fancy look or a spoon for simplicity. Fill each egg white half until it’s heaping. For a lovely finish, sprinkle some paprika on top. You can also add fresh dill for a touch of color. The deviled eggs are now ready to serve. Enjoy your Dill Pickle Deviled Eggs as a tasty and easy appetizer! For the Full Recipe, be sure to check the details above. To make the best hard-boiled eggs, start with fresh eggs. Place them in a pot and cover them with cold water. Bring the water to a boil over medium-high heat. Once it boils, cover the pot and remove it from the heat. Let the eggs sit for 10 to 12 minutes. This method helps you avoid overcooking and makes for tender yolks. After that, cool the eggs in an ice bath for five minutes. This step makes peeling easy. Remember, peeling under running water helps to remove any stubborn bits of shell. Dill Pickle Deviled Eggs are tasty, but you can spice them up! Try adding different ingredients. A bit of hot sauce can give a nice kick. For a creamier filling, swap half of the mayonnaise with Greek yogurt. If you love herbs, add fresh chives or cilantro. You can also mix in crumbled bacon for a savory twist. Experimenting with flavors makes the dish fun and personal. How you serve these eggs matters. A simple way is to use a nice platter. Arrange the filled eggs in a circle for a pretty look. You can sprinkle paprika on top for color. Fresh dill adds a nice touch too. For a creative twist, try using mini mason jars. Layer the egg filling with some greens for a rustic vibe. This makes your dish stand out at parties. Remember, we eat with our eyes first! {{image_2}} Want to spice things up? Add some heat to your deviled eggs! Mix in chopped jalapeños or a dash of hot sauce. You can also try adding cayenne pepper to the yolk mix. This twist brings a fiery kick to the creamy filling. Your guests will love the extra flavor! If you enjoy avocados, this version is for you. Simply replace half of the mayonnaise with ripe avocado. This swap gives the filling a creamy texture and a fresh taste. The dill pickle relish still shines through, making it a perfect blend. You’ll create a tasty, healthy treat that everyone will enjoy! Who doesn’t love bacon? For this variation, add crispy bacon bits to the yolk mixture. Chop the bacon finely and fold it in before filling the egg whites. The salty, smoky flavor pairs well with dill pickles. This version is sure to impress bacon lovers at your next gathering! For the full recipe, check out the details above! You can store leftover Dill Pickle Deviled Eggs in an airtight container. Place them in the fridge right away. They will stay fresh for up to three days. Make sure to cover them well. This keeps them from drying out. To keep your deviled eggs tasting great, do not add any toppings until serving. Toppings like paprika or fresh dill can get soggy. If you want to keep the filling smooth, cover it with plastic wrap before sealing the container. This helps keep the air out. I do not recommend freezing deviled eggs. The texture changes when they freeze, and they may become watery. If you want to make a big batch, just prepare the filling. Store the filling in the fridge. You can assemble the eggs when you are ready to serve. This keeps them fresh and tasty. For the full recipe, check the earlier section. Dill Pickle Deviled Eggs can last up to three days in the fridge. Make sure to store them in an airtight container. This keeps them fresh and tasty. Always check for changes in smell or texture before serving. If they look or smell off, it’s best to toss them. Yes, you can make Dill Pickle Deviled Eggs in advance. Prepare them a day before your event for convenience. Just store them in the fridge until serving time. This makes your party prep easier. The flavors will also develop more over time, enhancing the taste. Dill Pickle Deviled Eggs are great on a platter at parties. You can also serve them with fresh veggies. They pair well with crackers for a crunchy bite. For a fun twist, try serving them with a side of spicy mustard. You can find the full recipe for these delightful bites above, allowing you to explore more serving options! You now have all you need to make delicious Dill Pickle Deviled Eggs. We covered the ingredients, step-by-step instructions, and tips to boost flavor and presentation. Remember, you can customize these eggs with spicy or bacon flavors. Store leftovers properly to keep them fresh. Deviled eggs are great for any gathering. Use these ideas to impress your friends and family. Enjoy your tasty creation!](https://foodishtalk.com/wp-content/uploads/2025/07/0cf9bf26-3171-4091-ae40-16b95a8b1bdc-768x768.webp)
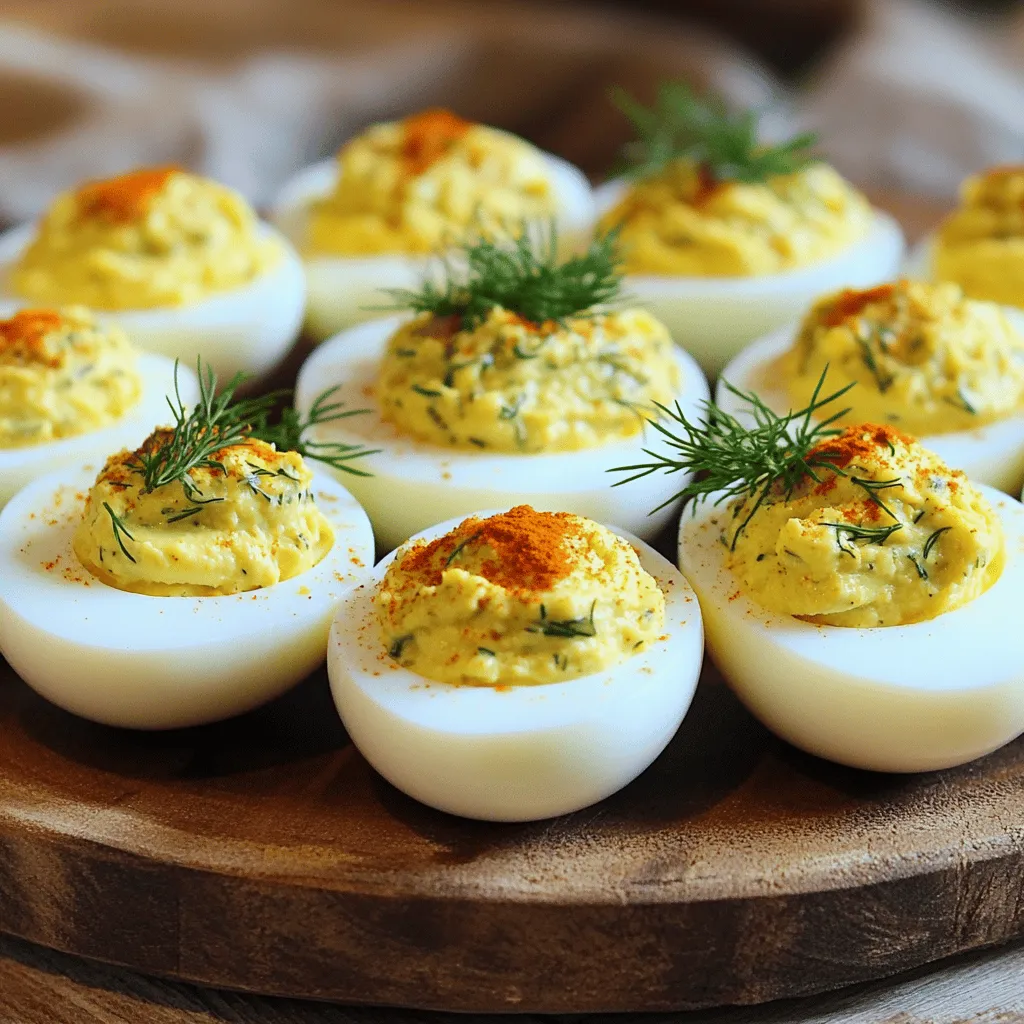
Looking for a snack that’s both simple and full of flavor? You’ve landed at the right place! Dill Pickle Deviled Eggs are the perfect blend of creamy and tangy, making them a hit for any gathering. In this article, I’ll walk you through easy steps, must-have ingredients, and fun variations to make your dish stand out. Get ready to whip up a tasty appetizer that everyone will love!
Ingredients
List of Required Ingredients
To make Dill Pickle Deviled Eggs, you need a few simple items:
– 6 large eggs
– 3 tablespoons mayonnaise
– 2 tablespoons dill pickle relish
– 1 teaspoon Dijon mustard
– 1 teaspoon apple cider vinegar
– 1/4 teaspoon garlic powder
– Salt and black pepper to taste
These ingredients work together to create a creamy, tangy filling that really shines.
Optional Garnishes
You can add a few fun toppings to make your eggs prettier:
– Fresh dill
– Paprika
These garnishes not only add color but also give a nice flavor boost.
Ingredient Substitutions
If you don’t have some items, don’t worry! Here are some swaps:
– Use Greek yogurt instead of mayonnaise for a lighter taste.
– Swap Dijon mustard with yellow mustard if that’s what you have.
– You can use white vinegar in place of apple cider vinegar.
These changes will still keep your deviled eggs delicious and fun to eat!
Step-by-Step Instructions
Preparation of Hard-Boiled Eggs
Start by placing the six large eggs in a pot. Cover them with cold water. Turn the heat to medium-high and bring the water to a boil. When it starts boiling, cover the pot with a lid and take it off the heat. Let the eggs sit for 10 to 12 minutes. This simple method works well for perfect hard-boiled eggs. After the time is up, carefully move the eggs to an ice bath. This will cool them down quickly. Leave them in the ice bath for about five minutes. Once cooled, gently tap each egg to crack the shell. Peel the eggs under running water for easier shell removal.
Making the Filling
Now, it’s time to make the filling. Slice each peeled egg in half lengthwise. Carefully scoop out the yolks and place them in a mixing bowl. Add the following ingredients to the yolks:
– 3 tablespoons mayonnaise
– 2 tablespoons dill pickle relish
– 1 teaspoon Dijon mustard
– 1 teaspoon apple cider vinegar
– 1/4 teaspoon garlic powder
– Salt and black pepper to taste
Mash the yolks and ingredients together with a fork until creamy and smooth. Taste your mixture and adjust the seasoning as needed. This filling is what gives the deviled eggs their unique flavor.
Assembling the Deviled Eggs
Next, we will fill the egg whites with the yolk mixture. You can use a piping bag for a fancy look or a spoon for simplicity. Fill each egg white half until it’s heaping. For a lovely finish, sprinkle some paprika on top. You can also add fresh dill for a touch of color. The deviled eggs are now ready to serve. Enjoy your Dill Pickle Deviled Eggs as a tasty and easy appetizer!
Tips & Tricks
Perfecting the Hard-Boiling Process
To make the best hard-boiled eggs, start with fresh eggs. Place them in a pot and cover them with cold water. Bring the water to a boil over medium-high heat. Once it boils, cover the pot and remove it from the heat. Let the eggs sit for 10 to 12 minutes. This method helps you avoid overcooking and makes for tender yolks. After that, cool the eggs in an ice bath for five minutes. This step makes peeling easy. Remember, peeling under running water helps to remove any stubborn bits of shell.
Enhancing Flavor Variations
Dill Pickle Deviled Eggs are tasty, but you can spice them up! Try adding different ingredients. A bit of hot sauce can give a nice kick. For a creamier filling, swap half of the mayonnaise with Greek yogurt. If you love herbs, add fresh chives or cilantro. You can also mix in crumbled bacon for a savory twist. Experimenting with flavors makes the dish fun and personal.
Presentation Ideas for Serving
How you serve these eggs matters. A simple way is to use a nice platter. Arrange the filled eggs in a circle for a pretty look. You can sprinkle paprika on top for color. Fresh dill adds a nice touch too. For a creative twist, try using mini mason jars. Layer the egg filling with some greens for a rustic vibe. This makes your dish stand out at parties. Remember, we eat with our eyes first!
Variations
Spicy Dill Pickle Deviled Eggs
Want to spice things up? Add some heat to your deviled eggs! Mix in chopped jalapeños or a dash of hot sauce. You can also try adding cayenne pepper to the yolk mix. This twist brings a fiery kick to the creamy filling. Your guests will love the extra flavor!
Avocado Dill Pickle Deviled Eggs
If you enjoy avocados, this version is for you. Simply replace half of the mayonnaise with ripe avocado. This swap gives the filling a creamy texture and a fresh taste. The dill pickle relish still shines through, making it a perfect blend. You’ll create a tasty, healthy treat that everyone will enjoy!
Bacon-Infused Dill Pickle Deviled Eggs
Who doesn’t love bacon? For this variation, add crispy bacon bits to the yolk mixture. Chop the bacon finely and fold it in before filling the egg whites. The salty, smoky flavor pairs well with dill pickles. This version is sure to impress bacon lovers at your next gathering!
Storage Info
How to Store Leftovers
You can store leftover Dill Pickle Deviled Eggs in an airtight container. Place them in the fridge right away. They will stay fresh for up to three days. Make sure to cover them well. This keeps them from drying out.
Best Practices for Freshness
To keep your deviled eggs tasting great, do not add any toppings until serving. Toppings like paprika or fresh dill can get soggy. If you want to keep the filling smooth, cover it with plastic wrap before sealing the container. This helps keep the air out.
Freezing Options
I do not recommend freezing deviled eggs. The texture changes when they freeze, and they may become watery. If you want to make a big batch, just prepare the filling. Store the filling in the fridge. You can assemble the eggs when you are ready to serve. This keeps them fresh and tasty.
FAQs
How long do Dill Pickle Deviled Eggs last in the fridge?
Dill Pickle Deviled Eggs can last up to three days in the fridge. Make sure to store them in an airtight container. This keeps them fresh and tasty. Always check for changes in smell or texture before serving. If they look or smell off, it’s best to toss them.
Can I make Dill Pickle Deviled Eggs in advance?
Yes, you can make Dill Pickle Deviled Eggs in advance. Prepare them a day before your event for convenience. Just store them in the fridge until serving time. This makes your party prep easier. The flavors will also develop more over time, enhancing the taste.
What are some serving suggestions for Dill Pickle Deviled Eggs?
Dill Pickle Deviled Eggs are great on a platter at parties. You can also serve them with fresh veggies. They pair well with crackers for a crunchy bite. For a fun twist, try serving them with a side of spicy mustard.
You now have all you need to make delicious Dill Pickle Deviled Eggs. We covered the ingredients, step-by-step instructions, and tips to boost flavor and presentation. Remember, you can customize these eggs with spicy or bacon flavors. Store leftovers properly to keep them fresh.
Deviled eggs are great for any gathering. Use these ideas to impress your friends and family. Enjoy your tasty creation!
![To make Dill Pickle Deviled Eggs, you need a few simple items: - 6 large eggs - 3 tablespoons mayonnaise - 2 tablespoons dill pickle relish - 1 teaspoon Dijon mustard - 1 teaspoon apple cider vinegar - 1/4 teaspoon garlic powder - Salt and black pepper to taste These ingredients work together to create a creamy, tangy filling that really shines. You can add a few fun toppings to make your eggs prettier: - Fresh dill - Paprika These garnishes not only add color but also give a nice flavor boost. If you don’t have some items, don’t worry! Here are some swaps: - Use Greek yogurt instead of mayonnaise for a lighter taste. - Swap Dijon mustard with yellow mustard if that's what you have. - You can use white vinegar in place of apple cider vinegar. These changes will still keep your deviled eggs delicious and fun to eat! For the complete recipe, check out the [Full Recipe]. Start by placing the six large eggs in a pot. Cover them with cold water. Turn the heat to medium-high and bring the water to a boil. When it starts boiling, cover the pot with a lid and take it off the heat. Let the eggs sit for 10 to 12 minutes. This simple method works well for perfect hard-boiled eggs. After the time is up, carefully move the eggs to an ice bath. This will cool them down quickly. Leave them in the ice bath for about five minutes. Once cooled, gently tap each egg to crack the shell. Peel the eggs under running water for easier shell removal. Now, it’s time to make the filling. Slice each peeled egg in half lengthwise. Carefully scoop out the yolks and place them in a mixing bowl. Add the following ingredients to the yolks: - 3 tablespoons mayonnaise - 2 tablespoons dill pickle relish - 1 teaspoon Dijon mustard - 1 teaspoon apple cider vinegar - 1/4 teaspoon garlic powder - Salt and black pepper to taste Mash the yolks and ingredients together with a fork until creamy and smooth. Taste your mixture and adjust the seasoning as needed. This filling is what gives the deviled eggs their unique flavor. Next, we will fill the egg whites with the yolk mixture. You can use a piping bag for a fancy look or a spoon for simplicity. Fill each egg white half until it’s heaping. For a lovely finish, sprinkle some paprika on top. You can also add fresh dill for a touch of color. The deviled eggs are now ready to serve. Enjoy your Dill Pickle Deviled Eggs as a tasty and easy appetizer! For the Full Recipe, be sure to check the details above. To make the best hard-boiled eggs, start with fresh eggs. Place them in a pot and cover them with cold water. Bring the water to a boil over medium-high heat. Once it boils, cover the pot and remove it from the heat. Let the eggs sit for 10 to 12 minutes. This method helps you avoid overcooking and makes for tender yolks. After that, cool the eggs in an ice bath for five minutes. This step makes peeling easy. Remember, peeling under running water helps to remove any stubborn bits of shell. Dill Pickle Deviled Eggs are tasty, but you can spice them up! Try adding different ingredients. A bit of hot sauce can give a nice kick. For a creamier filling, swap half of the mayonnaise with Greek yogurt. If you love herbs, add fresh chives or cilantro. You can also mix in crumbled bacon for a savory twist. Experimenting with flavors makes the dish fun and personal. How you serve these eggs matters. A simple way is to use a nice platter. Arrange the filled eggs in a circle for a pretty look. You can sprinkle paprika on top for color. Fresh dill adds a nice touch too. For a creative twist, try using mini mason jars. Layer the egg filling with some greens for a rustic vibe. This makes your dish stand out at parties. Remember, we eat with our eyes first! {{image_2}} Want to spice things up? Add some heat to your deviled eggs! Mix in chopped jalapeños or a dash of hot sauce. You can also try adding cayenne pepper to the yolk mix. This twist brings a fiery kick to the creamy filling. Your guests will love the extra flavor! If you enjoy avocados, this version is for you. Simply replace half of the mayonnaise with ripe avocado. This swap gives the filling a creamy texture and a fresh taste. The dill pickle relish still shines through, making it a perfect blend. You’ll create a tasty, healthy treat that everyone will enjoy! Who doesn’t love bacon? For this variation, add crispy bacon bits to the yolk mixture. Chop the bacon finely and fold it in before filling the egg whites. The salty, smoky flavor pairs well with dill pickles. This version is sure to impress bacon lovers at your next gathering! For the full recipe, check out the details above! You can store leftover Dill Pickle Deviled Eggs in an airtight container. Place them in the fridge right away. They will stay fresh for up to three days. Make sure to cover them well. This keeps them from drying out. To keep your deviled eggs tasting great, do not add any toppings until serving. Toppings like paprika or fresh dill can get soggy. If you want to keep the filling smooth, cover it with plastic wrap before sealing the container. This helps keep the air out. I do not recommend freezing deviled eggs. The texture changes when they freeze, and they may become watery. If you want to make a big batch, just prepare the filling. Store the filling in the fridge. You can assemble the eggs when you are ready to serve. This keeps them fresh and tasty. For the full recipe, check the earlier section. Dill Pickle Deviled Eggs can last up to three days in the fridge. Make sure to store them in an airtight container. This keeps them fresh and tasty. Always check for changes in smell or texture before serving. If they look or smell off, it’s best to toss them. Yes, you can make Dill Pickle Deviled Eggs in advance. Prepare them a day before your event for convenience. Just store them in the fridge until serving time. This makes your party prep easier. The flavors will also develop more over time, enhancing the taste. Dill Pickle Deviled Eggs are great on a platter at parties. You can also serve them with fresh veggies. They pair well with crackers for a crunchy bite. For a fun twist, try serving them with a side of spicy mustard. You can find the full recipe for these delightful bites above, allowing you to explore more serving options! You now have all you need to make delicious Dill Pickle Deviled Eggs. We covered the ingredients, step-by-step instructions, and tips to boost flavor and presentation. Remember, you can customize these eggs with spicy or bacon flavors. Store leftovers properly to keep them fresh. Deviled eggs are great for any gathering. Use these ideas to impress your friends and family. Enjoy your tasty creation!](https://foodishtalk.com/wp-content/uploads/2025/07/0cf9bf26-3171-4091-ae40-16b95a8b1bdc-250x250.webp)
